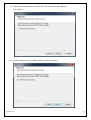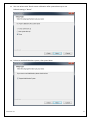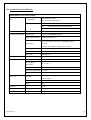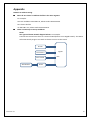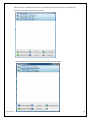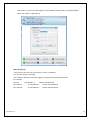
1
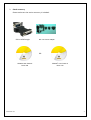
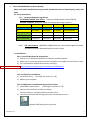
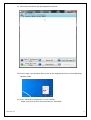
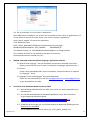
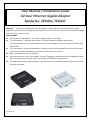
User Manual / Installation Guide AV Over Ethernet Gigabit Adaptor Model No. ZE6000/ ZE6000+ Warning! It will cause malfunction if the AV Adaptor is operating with unspecified power supply adaptor or incorrect power voltage. Do not expose this unit in the rain or moisture environment to reduce the risk of fire or electric shock. PRECAUTIONS Do not use the “AV adaptor” and “Power supply Adaptor” near water. The “AV adaptor” is featured with 75mm x 75mm and 100mm x 100mm VESA mount. For easy and safe use, it is recommended to mount ”AV adaptor” on the rear cover of monitor with VESA mount. The “AV Adaptor” should be operated by an Ethernet cable with standard RJ-45 connector on both ends. One end to the “AV adaptor”, the other end to host PC or server. Never spill liquids on the “AV Adaptor”. Do not attempts to service ”AV adaptor” yourself; opening or removing covers can degrade product EMC and performance. Please refer all servicing to qualified service personnel. For Wall mount “Power supply adaptor”, wall socket shall be installed near the equipment and shall be easily accessible. 20141229 V2 1 Index: I. Introduction --------------------------------------------------------------------------------------------------- 3~4 Features--------------------------------------------------------------------------------------------------------- 3 Unpack the Adaptor------------------------------------------------------------------------------------------- 3 Check Accessories--------------------------------------------------------------------------------------------- 4 II. Recommended network application and setting ---------------------------------------------------- 5~10 Basic Extended Mode (or Mirror Mode)----------------------------------------------------------------- 7~10 ZE6000+ extended mode with Phistek eSignage+ application software --------------------------10 Zero Client with WMS2012 Multipoint ------------------------------------------------------------------ 10 III. Drivers Installation : Install drivers for extended mode --------------------------------------------12~19 eSignage+ need to open Microsoft Framework----------------------------------------------------------12 Install Elite USB Server--------------------------------------------------------------------------------------- 13~14 Install SMSC Driver-------------------------------------------------------------------------------------------- 15~16 Install EETI Touch Driver ------------------------------------------------------------------------------------- 17~20 IV. Mechanical Dimension and Input/ Output ports description ----------------------------------- 21 V. Output signals installation --------------------------------------------------------------------------------- 21 VI. Adaptor installation -------------------------------------------------------------------------------------------22~23 VII. FCC Warning Statement ------------------------------------------------------------------------------------ 24 VIII. Product General Specification ---------------------------------------------------------------------------- 25 Appendix: Network IP address setting -------------------------------------------------------------------------------26~29 20141229 V2 2 I. Introduction ZE6000/ ZE6000+ are a Zero Client Audio/Video over Ethernet Adaptor, designed as an endpoint of a PC sharing solution such as Windows MultiPoint Server 2012. With Windows MultiPoint Server 2012, it can work as a standalone workstation. The solution enables a host PC(Server) to communicate with multiple and independent stations. Each station is consisted of one Adaptor (zero client) with a keyboard, mouse, and monitor connected, allowing multiple users to share the resources/computing of one single server. By simple Ethernet connection, the server provides each station user with a familiar and independent Windows® experience. ZE6000+ is a ZE6000 add with embedded access code, provides additional Phistek special software application, such as eSignage+. - Features Simple Ethernet connection ZE6000/ ZE6000+ connect to Host server through Ethernet cable connection, this type of connection can exceed the length limit of other signal connection such as VGA, USB. This also gives the flexibility of system layout. - Simple plug and play Just attach a keyboard, mouse, and monitor to your ZE6000/ ZE6000+, and connect it to the host server. A station is set up easily and ready for use right away - Easy and convenient installation Designed with VESA standard mounting on the adaptor box; 75mm x 75mm and 100mm x 100mm Provides three types of video signals for end user to select DVI (through a DVI to DVI cable) VGA (by an attached DVI to VGA dongle) - - HDMI (through a DVI to HDMI cable) Reset: To reset IP address Audio Line out - Headphone out Microphone in/out - Unpack the Adaptor Put the AV Adaptor on a clean surface; make sure the box in upright position. Remove packing materials from inside of box. 20141229 V2 3 Check accessory Please make sure the entire accessory is included: DVI to VGA Dongle DC 12V Power Adaptor OR 20141229 V2 + ZE6000 User Guide & ZE6000 User Guide & Driver CD Driver CD 4 II. Recommended network application and setting: The Phistek ZE6000/ ZE6000+ can be configured to the following modes diagram: Basic Extended mode, Multiple extended displays block diagram : LAN cable Gigabit LAN switch Host PC LAN cable Audio - LAN cable LAN cable LAN cable ZE6000 ZE6000 ZE6000 ZE6000 #1 #2 #3 #4 VGA/ DVI-D/ Audio HDMI VGA/ DVI-D/ Audio HDMI VGA/ DVI-D/ Audio HDMI Monitor Monitor Monitor Monitor Display 1 Display 2 Display 3 Display 4 VGA/ DVI-D/ HDMI Zero Client With WMS2012 Multipoint Ethernet( LAN) network connection 20141229 V2 5 - ZE6000+ apply with Phistek eSignage+ 20141229 V2 6 1. Basic Extended Mode (or Mirror Mode): Please note that Extended mode only provide extended function of video display, audio, USB ports. 1.1 Set Up Procedures: 1.1.1 Required Hardware Ingredients The ZE6000/ ZE6000+ Zero-Client: typically available directly from PHISTEK. The host computer: should be scaled according to the usage scenarios CPU Intel i7 Intel i5 Intel i3 Inel Atom D525 DRAM 8G 8G 4G 2G OS Win7 64bit Win7 64bit POS Ready7 POS Ready2009 Video 1080p 8 sets(max) 6 sets(max) 0 set 0 sets Video 720p 8 sets(max) 8 sets(max) 1 sets(max) 0 sets Photo 1920x1080 8 sets(max) 8 sets(max) 4 sets(max) 4 sets(max) 1.1.2 The LAN network: 10/100M or 1000M Ethernet, recommend Gigabit-Switched, and ideally having a dedicated switch per each cluster. 1.2 Installation: Part 1: Host PC Windows OS Preparations 1) Host PC to run Windows-Update and install all available updates. 2) Make sure to install the latest driver for the graphic card (applies to on-board as well). 3) Turn off Windows-Update device driver searching http://technet.microsoft.com/en-us/library/cc753091.aspx 4) Set Host PC TCP/IPV4 to DHCP Part 2: Elite Driver installation: 1) Install Elite Driver: (See Page 13, Section III, 2.0) 2) Reboot your computer Part 3: SMSC Driver Installation & prepare Zero-Client 1) Install SMSC display driver: (See Page 15 Section III, 3.0) 2) Connect all Zero-Clients to Ethernet Switch. Connect monitors, and sound devices to each client. 3) Launch the Network USB Setting Utility from its desktop shortcut. Network USB Setting Utility shortcut 20141229 V2 7 4) This program will search for ZE6000/ZE6000+ Zero-Clients: 5) Click “Configuration”, tick “DHCP” 6) Per each cluster, per each client terminal: Click “Assign to this PC”: 7) Windows will identify and install USB sound driver. 8) A dialog may pop up – search for Zero Client software – click cancel. 20141229 V2 8 9) Each client connection will be completed as below: 10) At this stage, you should be able to see all the assigned monitors in active Windows Desktop mode. 11) Start “ViewSpan Configuration” in the Task-Bar. Make sure to set all zero client monitors as “Extended” 20141229 V2 9 12). Set up maximum no. zero clients in application After SMSC driver installation, the system will set number of zero clients in application at”4” If user wants to connect for more clients, user need to execute “regedit.exe” Simply input “regedit “to search this application. Then follow the route: HKEY_LOCAL_MACHINE/SYSTEM/CurrentControlSet/services/sgfxk : MAxNumberOfUsbAdapters REG_DWORD 0x00000004 (4) The default number is 4, click MAxNumberOfUsbAdapters to change number The numbers of clients to use depend on the Host PC resources, Recommend maximum number set <10 2. ZE6000+ extended mode with Phistek eSignage+ application software 2.1 With Phistek eSignage+, user can broadcast and monitor extended zero clients display on the Host PC control center ( see details in eSignage+ application Doc.) 2.2 Drivers: Follow “Basic extended mode” drivers installation, except Elite Driver is replaced by “eSignage+” driver 2.3 eSignage+ driver and eSignage+ user guide download, Please use the CD attached, or mail to: [email protected] or [email protected] to get download access code. 3. Zero Client with Windows MultiPoint Server 2012 3.1 With Windows MultiPoint Server 2012, zero clients can work independently as standalone PC 3.2 Pls visit Microsoft Website for Windows MultiPoint Server 2012 Evaluation. to get image and installation guide. http://www.microsoft.com/en-us/download/details.aspx?id=35821 3.3 In addition to the image, pls visit Phistek website to download following drivers Elite Driver for wms2012: GenericWMSZeroClientService_Setup_13_1217_S0122_G1042_Cert 20141229 V2 10 SMSC driver for wms2012: SetupSgfxWmsFbr-5_3_60_8411 Patch file: WMS-KB2791647-ENU-x64 Please mail to: [email protected] or [email protected] to get download access code. 3.4 The recommended PC System equipment: Minimum base PC system running RDSH (formerly “Terminal Services”) desktops (supporting up to 4 lightly loaded stations): Dual Core Processor and 1 core or thread for each two stations 2 GB Memory and 0.5 GB of memory per station 20 GB disk space 20141229 V2 11 III. Drivers Installation: Install drivers for extended mode The attached CD includes three drivers for installation: Elite USB Server (for extended mode) for ZE6000, or eSignage+ driver for ZE6000+ SMSC Driver (for extended mode) EETI Touch Driver (For Touch workstation only) 1.0 eSignage+ need to open Microsoft Framework: If you are using eSignage+ driver, you need to open Microsoft NET. Framework before Drivers installation Click Control Panel to enter Programs. In Programs, Please check “ Turn Windows Features on or off” Find and turn on Microsoft. NET Framework (it shall be later than 3.5.1 version) Please see the Fig. below. 20141229 V2 12 2.0 2.1 Install Elite Driver: USB Server: ZE6000: Elite USB Server ZE6000+ :eSignage+ Driver Installation is automatically run as below: 20141229 V2 13 2.2 After installation, screen will display as below, please press “Finish” 2.3 Screen will then display as below, please choose to restart your computer. 20141229 V2 14 3.0 Install SMSC Driver: ZE6000 3.1 ZE6000+ Please press “I Accept” 20141229 V2 15 Please select and confirm the “Language” 3.2 Installation start as below, installation run automatically and completed with no additional message, please restart your computer to complete it. 20141229 V2 16 4.0 Install EETI Touch Driver (For Touch workstation only) ZE6000 4.1 ZE6000+ Screen display as below, please click Next. 20141229 V2 17 4.2 Select the set up type, don’t tick the box if PS2 interface is not required, Click “Next> . 4.3 RS232 interface driver installed is default, please click Next> 20141229 V2 18 4.4 You can select to do Touch screen calibration after system boot up or not Default setting is” None” 4.5 Select to use Multi-Monitor system, then press Next> 20141229 V2 19 4.6 Choose destination location, default folder location shown as below. Press Next> 4.7 As Figure shown below, please press Next> to complete installation 20141229 V2 20 IV. Mechanical Dimension and Input/ Output ports description: switch ① ② ③ ⑨ 1. 2. Microphone Headphone 3. LED indicators Power LED (Yellow) Network connect LED (Blue) 4. 5. 6. Identification LED (Green) USB A type downstream port x 4 Line out RJ-45 Ethernet connector 7. 8. 9. DVI – I connector DC 12 V in Reset (reset IP address) V. ④ ⑤ ⑥ ⑦ ⑧ Output signals installation: 20141229 V2 21 VI. Adaptor installation: 1. Type1: 2. Type2: 3. Type3: 20141229 V2 22 4. Type 4: 20141229 V2 23 VII. FCC Warning Statement: FCC Class A Warning This equipment has been tested and found to comply with the limits for a Class A digital device, pursuant to Part 15 of the FCC Rules. These limits are designed to provide reasonable protection against harmful interference when the equipment is operated in a commercial environment. This equipment generates, uses, and can radiate radio frequency energy and, if not installed and used in accordance with the instruction manual, may cause harmful interference to radio communications. Operation of this equipment in a residential area is likely to cause harmful interference in which case the user will be required to correct the interference at his own expense. 20141229 V2 24 VIII. Product General Specification: + ZE6000/ ZE6000 AV over Ethernet Adaptor Power AC –DC adaptor LED indicators AC100V~240V, 50~60Hz DC power output: 12Vdc @1.5A Yellow: to indicate power Adaptor attached Blue: Green: to indicate device connected to Host PC to indicate device identified Reset Reset IP address Input/output connectors Ethernet input x1 RJ-45, 10/100/1000Mb Ethernet USB downstream ports x4 USB A type (USB 2.0) x1 DVI-I connector for VGA, DVI or HDMI Digital signal Video output connection x1 DVI-I to VGA Dongle for VGA signal connection Audio output 1 x1 Line out Audio output 2 x1 headphone Audio input x1 Microphone Max. Video resolution Environmental 2048 x1152 Operating temperature 0º C ~ 35º C Non-operating temperature Operating Humidity -30º C ~ 60º C 10% ~ 90% (non-condensing) Non-operating Humidity 5 % ~ 95% Cooling Mechanical Mounting at 75mm centers 115mm x 115mm x 17.8mm Weight 326g FCC, CE Compliance 20141229 V2 4 VESA holes; 2 spaced at 100mm centers and 2 spaced Dimensions W x D x H Regulatory Option Fan-less WEEE, RoHS ZE6000 + Phistek SW access code embedded 25 Appendix Network IP address setting: Note: All zero clients’ IP address shall be in the same segment For example: Host PC: IP address=192.168.1.10, Subnet mask=255:255:255:0 Zero clients shall be IP=192.168.1.xxx, Subnet mask=255:255:255:0 There are two ways to set up IP address: DHCP: See a general home network diagram below as an example: Connect Host PC and zero clients to a network switch(better to use Gigabit switch). The Router will automatically assign IP via switch to devices connect to this switch Host PC Zero Client A Zero Client B ADSL Modem 20141229 V2 Gigabit LAN Router 26 Check if zero clients are at DHCP status: Click configuration, a set up table will appear, DHCP shall be ticked. Set Host PC to DHCP: see below properties of IPV4 : tick “Obtain an IP address automatically 20141229 V2 27 After all devices’ IP address has been set up to DHCP, the router will assign IP automatically, the USB server utility will look like as below: Click Assignment to this PC for each client, connection will be made: 20141229 V2 28 If the client IP is not in the same segment, the IP address shown is RED, see example below: Please tick “DHCP” to get DHCP IP. Manual assign IP: If the system is for local use( not connect to router to website), you may also assign IP manually, The IP address shall be in the same segment, and Subnet mask shall be the same. For example: Host PC: IP=192.168.1.1, subnet: 255:255:255:0 Zero Client A IP=192.168.1.11, subnet: 255:255:255:0 Zero Client B IP=192.168.1.12, subnet: 255:255:255:0. 20141229 V2 29