1
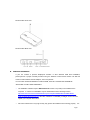
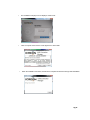
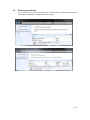
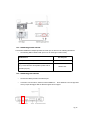
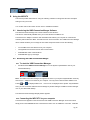
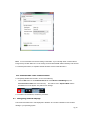
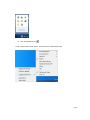
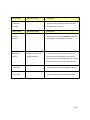
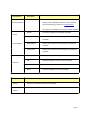
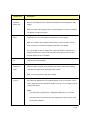
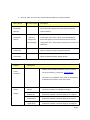
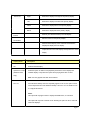
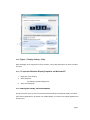
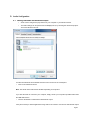
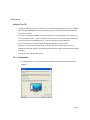
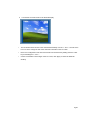
UWB Based Wireless PC to TV WPC2TV Installation & Troubleshooting Guide P/N: HS5790 Rev A 1. INTRODUCTION .......................................................................................................................................................7 2. FEATURES ..................................................................................................................................................................7 3. SYSTEM REQUIREMENTS........................................................................................................................................7 4. SPECIFICATIONS.......................................................................................................................................................8 4.1 RECEIVER BASE .........................................................................................................................................................................................8 4.2 PC ADAPTER ............................................................................................................................................................................................8 4.3 STANDARDS ..............................................................................................................................................................................................8 4.4 GENERAL ...................................................................................................................................................................................................8 5. PACKAGE CONTENTS ..............................................................................................................................................8 6. SOFTWARE INSTALLATION. ...................................................................................................................................9 7. 8. 6.1 INSTALLATION STEPS ............................................................................................................................................................................ 10 6.2 REMOVING THE SOFTWARE ................................................................................................................................................................ 13 SETTING UP THE ADAPTER................................................................................................................................. 14 7.1 CONNECT THE WIRELESS USB PC ADAPTER .................................................................................................................................. 14 7.2 CONNECT THE RECEIVER BASE ........................................................................................................................................................... 14 7.2.1 Connect the Power Adapter............................................................................................................................................. 14 7.2.2 Connecting a TV, Monitor or Projector ...................................................................................................................... 14 7.2.3 Connecting Audio devices ................................................................................................................................................ 15 7.2.4 Connecting USB devices .................................................................................................................................................... 15 USING THE STREAMHD™ ................................................................................................................................... 16 8.1 INTRODUCING THE UWB CONNECTION MANGER SOFTWARE .................................................................................................... 16 8.2 ACCESSING THE UWB CONNECTION MANGER ..............................................................................................................................16 Pg 2 8.2.1 To start the UWB Connection Manager: .................................................................................................................... 16 8.2.2 Connecting the WPC2TV to your computer..................................................................................................... 16 8.2.3 Disconnecting the WPC2TV from your computer ......................................................................................... 18 8.2.4 Radio Communications....................................................................................................................................................... 18 8.2.5 Disable/Enable radio communications ........................................................................................................................ 19 8.3 CONFIGURING EXTERNAL DISPLAYS .................................................................................................................................................. 19 8.4 DEVICE/MONITOR DETECTION ........................................................................................................................................................... 20 8.5 RESOLUTION SUPPORT ........................................................................................................................................................................ 20 8.6 WINDOWS 8 AND WINDOWS 7 - CONTROLLING THE DISPLAY .................................................................................................. 20 8.6.1 8.7 To use the DisplayLink Manager Menu....................................................................................................................... 20 WINDOWS VISTA AND WINDOWS XP – CONTROLLING THE DISPLAY ....................................................................................... 25 8.7.1 To use the DisplayLink Manager Menu....................................................................................................................... 25 8.7.2 To set the display into Extend Mode ........................................................................................................................... 28 8.7.3 Setting the Display into Mirror Mode.......................................................................................................................... 28 To set the display into Mirror mode ............................................................................................................................................... 28 8.8 WINDOWS VISTA AND XP – WINDOWS DISPLAY PROPERTIES .................................................................................................... 28 8.8.1 To open the Windows Display Properties on Windows Vista........................................................................... 28 8.8.2 Figure 1: Display Setting - Vista...................................................................................................................................... 29 8.8.3 To open the Windows Display Properties on Windows XP ............................................................................... 29 8.8.4 Setting the Display into Extend Mode......................................................................................................................... 29 To set the display to Extend Mode using Windows Display properties ......................................................................... 30 To set the display to Extend Mode using the DisplayLink menu ...................................................................................... 30 8.8.5 Setting the External Display to Mirror the Primary Screen................................................................................. 30 To set the display to Mirror Mode using Windows Display properties .......................................................................... 30 To set the display to Mirror mode using the DisplayLink menu........................................................................................ 30 Pg 3 9. 8.8.6 Setting the External Display as the Primary Display.............................................................................................. 31 8.8.7 To make the External Display the Primary Display using the DisplayLink menu ..................................... 31 8.8.8 Setting the Laptop Lid to “Do Nothing” (Upon Close)......................................................................................... 31 8.8.9 To set a laptop to do nothing......................................................................................................................................... 31 AUDIO CONFIGURATION .................................................................................................................................... 32 9.1 SETTING USB AUDIO AS THE DEFAULT OUTPUT..............................................................................................................................32 9.2 CONFIGURING USB AUDIO ON WINDOWS XP .............................................................................................................................. 33 9.2.1 Setting USB audio as the default output ................................................................................................................... 33 9.2.2 Configuring the audio output.......................................................................................................................................... 34 10. FIT TO TV ............................................................................................................................................................ 35 WHAT IS FIT TO TV? .........................................................................................................................................................................................35 10.1 11. CONFIGURATION ................................................................................................................................................................................... 35 ADDITIONAL INFORMATION .......................................................................................................................... 37 11.1 GAME SUPPORT .................................................................................................................................................................................... 37 11.2 MONITOR CALIBRATION ...................................................................................................................................................................... 37 11.3 STANDBY AND HIBERNATE, SHUT DOWN AND RESTART .............................................................................................................. 37 11.4 DISCONNECTING THE WARPIA PC ADAPTER .................................................................................................................................. 37 11.5 INFERRED MODES ................................................................................................................................................................................. 38 11.6 ERROR MESSAGES ................................................................................................................................................................................ 39 12. TROUBLESHOOTING......................................................................................................................................... 40 12.1 DISPLAY/VIDEO ..................................................................................................................................................................................... 40 12.2 NO IMAGE DISPLAYS ON THE EXTERNAL MONITOR CONNECTED TO THE WPC2TV 12.3 DISPLAY ERROR ..................................................................................................................................................................................... 41 . ............. .... .. ....................................... 40 Pg 4 12.4 CANNOT PLAY VIDEOS ON AN EXTERNAL MONITOR CONNECTED TO THE WPC2TV. ............... ...... ........................................ 41 12.5 THE SCREEN RESOLUTION WINDOW IN THE CONTROL PANEL DOES NOT LIST ALL OF THE RESOLUTION MODES MY MONITOR IS CAPABLE OF DISPLAYING. ............................................................................................................................................................ 42 12.6 THE EXTERNAL MONITOR CONNECTED TO THE W PC2TV IS INCORRECTLY IDENTIFIED AS A "NON-PNP MONITOR" IN THE WINDOWS® DEVICE MANAGER. ........................................................................................................................................................ 42 12.7 THE COMPUTER'S BUILT-IN DISPLAY DOES NOT TURN OFF WHEN THE EXTERNAL MONITOR CONNECTED TO THE WPC2TV IS SET AS THE PRIMARY MONITOR. .................................................................................................... ........................................... 42 12.8 MIRROR MODE IS NOT AVAILABLE (GRAYED OUT). ......................................................................................................................... 42 12.9 SCALABLE LINK INTERFACE (SLI) MODE IS NOT AVAILABLE........................................................................................................... 42 12.10 IN WINDOWS DISPLAY PROPERTIES, I CANNOT MOVE THE EXTERNAL MONITOR ICON WHERE I WANT RELATIVE TO THE ICON OF THE COMPUTER'S BUILT-IN DISPLAY ................................................................................................................................................ 42 12.11 I CANNOT DRAG WINDOWS FROM MY PRIMARY DISPLAY TO THE EXTERNAL MONITOR CONNECTED TO THE W PC2TV 42 12.12 I CANNOT RUN A 3D PROGRAM OR A PROGRAM USING DIRECTDRAW COMMANDS ON THE EXTERNAL MONITOR CONNECTED TO THE WPC2TV 12.13 ................................................................................................................................................................ 43 AUDIO/SOUND................................................................................................................................................................................. 43 12.13.1 There is no sound coming from the external audio device connected to WPC2TV. ............................ 43 12.13.2 There is no sound coming from the computer’s internal speakers, or from the headphones/headset connected directly to the docked computer. ............................................................................... 43 12.13.3 12.14 Sound is distorted or delayed when playing some multimedia files. ..................................................... 44 CONNECTION/DOCKING ................................................................................................................................................................. 44 12.14.1 My computer does not automatically detect the PC adaptor. ................................................................... 44 12.14.2 The connection to the WPC2TV has been lost. ................................. ................................................................. 44 12.15 USB.................................................................................................................................................................................................... 44 12.15.1 USB device does not work. .......................................................................................................................................... 44 Pg 5 12.15.2 My real-time device (for example, a Web camera, microphone, or speakers) does not operate properly when connected to the W PC2TV . ......................................................................................................................... 45 13. 13.1 SUPPORT ........................................................................................................................................................... 45 CONTACTING US ......................................................................................................................................................................... 45 Pg 6 1. Introduction The WPC2TV Wireless PC to TV Display Adapter with HDMI, VGA & Stereo Audio Outputs allows users to watch and share any notebook or PC content (such as pictures, movies and presentations) and any Internet content on their HDTV, projector, or monitor without cable limitations and in up to stunning 1080p HD. The PC Adapter connects to a USB 2.0 or USB 3.0 port available in the notebook/ PC, and the Receiver Base connects to either an HDMI port available in flat screen TVs or a VGA connection in monitors & projectors. Stereo audio is supported via the HDMI port (along with the video) or via a separate 3.5mm audio jack. Use the S/PDIF output for connection to home audio components for a stunning wireless audio/video experience. The WPC2TV Wireless Display Adapter set provides full single-room coverage, is easy to set up and use, and is an ideal solution for both home and office use. It delivers the best combination of performance and cost in a variety of living room, conference room and classroom environments. 2. Features Wireless connectivity from notebook or PC to any HDTV, Monitor or Projector HDMI with audio & video support, as well as VGA video output Additional audio support through a 3.5mm stereo jack or S/PDIF optical output Same room coverage, up to 30ft direct line of site between PC adapter & base unit Graphics resolution up to 2048 x1152 1080p Streaming Video 6-9GHz Ultrawide Band Wireless technology – Free from Wi-Fi interference QuickLink™ association between Host Transmitter and Receiver ® ® ® ® ® Windows 8/ Windows 7/ Windows Vista SP2/ Windows XP 32bit SP3 3. System Requirements CPU: Core Core2Duo or equivalent, 2.2 GHZ Graphics Chipsets Supported: Intel, AMD, and NVIDIA. 2GB memory One Host USB 2.0 port 30MB of available disk space Windows® XP SP2 or SP3, Windows Vista® SP1 or SP2 (32-bit or 64-bit), and Windows® 7 (32-bit or 64-bit), and Windows® 8 Note. The minimum system requirements described above support 1080p streaming video. Lower resolution video and static graphic screens are supported with lower system specifications. Pg 7 4. Specifications 4.1 Receiver Base Video Out: HDMI Connector, VGA Connector Audio Output: S/PDIF optical, 3.5mm Stereo Jack 32-bit True Color support with display resolution of up to 2048 x1152 (SXGA+) Streaming video up to 1080p resolution Supports both Mirror Mode and Extended Mode (as provided for within Windows® ) 44.1 kHz, 16-bit Stereo via audio jack, S/PIF, or HDMI connector Whip Antenna 5VDC Power Adapter LED power and Tri-color signal strength indicators 4.2 PC Adapter USB type-A male Internal transmission antenna 4.3 Standards Wireless USB 1.0, UWB certified Certified WiMedia PHY and MAC 4.4 General Same room, direct line of site range, up to 30ft 128-bit AES security Regulation compliant to US, Japan, Europe, Korea Software drivers: Windows® 8/ Windows® 7/ Windows® Vista SP2/ Windows® XP® 32bit SP3 Input voltage: 100-240V, 50/60Hz Operating temperature range: 0-40 C 5. Package Contents PC Adapter Receiver Base Power Supply Unit Quick Start Guide CD with software drivers and user information Pg 8 Receiver Base Front View Receiver Base Back View 6. Software Installation. If your PC contains a previous DisplayLink software or other Wireless USB driver installation, please perform a proper uninstall procedure using the Windows Control Panel. Please note that this doesn’t include wireless network adapters, mice or keyboards. IF YOU HAVE THIS SOFTWARE IN YOUR SYSTEM, THIS WILL CAUSE THE STREAMHD SOFTWARE TO NOT WORK PROPERLY The installation software requires .NET Framework version 2.0 (or later) to be installed on the computer. In case it is not installed it may be downloaded from the following location: http://www.microsoft.com/downloads/details.aspx?FamilyID=0856EACB-4362-4B0D-8EDDAAB15C5E04F5&displaylang=en If the .NET software is not installed you will get an error and can update your computer at that time. Anti-Virus software set to very high security may prevent the installer from functioning properly. It is Pg 9 recommended that you temporarily disable the Anti-virus software during the installation. The installation checks the PC capabilities and compares them to the minimum system requirements of the system. For Windows Vista or above it is recommended to run WEI (Windows experience index) calculation prior to installation to ensure you have a current value. 6.1 Installation Steps x Ensure that the PC Adapter is unplugged from the PC. If your PC contains a previous , DisplayLink software or other Wireless USB driver installation, please perform a proper uninstall procedure using the Windows Control Panel. Please note that this doesn’t include wireless network adapters, mice or keyboards. IF YOU HAVE THIS SOFTWARE IN YOUR SYSTEM, THIS WILL CAUSE THE STREAMHD SOFTWARE TO NOT WORK PROPERLY Prior to installing the WPC2TV software go to Control Panel>Uninstall a Program and look through your programs to ensure you do not see any of the following programs: WPC2TV DisplayLink Core Software, DisplayLink Graphics, Wireless USB WinDrivers Pg 10 Next, Insert the installation CD in the CD-ROM drive The installation CD Autoplay menu is displayed The installation Autoplay menu is displayed. Click Install. Click I accept the terms of this License Agreement. Click Install. When the installation is finished, click Finish to complete the wireless manager S/W installation. Pg 12 11 6.2 Removing the Software In the event you need to remove the software, go to Control Panel – Programs and Features and Select SMSC & ViewSpan & DisplayLink items to uninstall. Pg 13 7. Setting up the Adapter 7.1 Connect the Wireless USB PC Adapter Connect the Wireless USB PC Adapter to a high speed PC USB port. The system will automatically detect and install the drivers. 7.2 Connect the Receiver Base 7.2.1 Connect the Power Adapter Plug the AC Adapter cord into the DC-IN on the back of the Receiver Base Connect the power plug to a live electrical outlet. The power light on the front panel glows red when the Receiver Base is powered on. 7.2.2 Connecting a TV, Monitor or Projector You can connect a digital (HDMI) or analog (VGA) monitor to the Receiver Base. Only one monitor can be connected to the HD Adapter at a time. Connect an HDMI or VGA Cable to the HDMI or VGA port on the Receiver Base Connect the other end of the cable to the TV, Projector or external monitor. Pg 14 7.2.3 Connecting Audio devices The Wireless USB Device Adapter provides two audio port, as shown in the following illustrations The following table indicates which port to use for each type of audio activity Audio Device Headphones/headsets/speakers Use this port 3.5mm Jack Digital audio equipment: (e.g.: Sound receivers and speaker system with an S/PDIF Jack optical input port) 7.2.4 Connecting USB devices The Receiver Base provides one USB 2.0 port Connection can be made to, Printers, External HDD’s etc. Some Webcam’s are not supported as they require throughput that the wireless signal cannot support. Pg 15 8. Using the WPC2TV This section provides information on using the following software to manage the WPC2TV and adjust settings to suit your needs: You can also refer to this section to learn how to uninstall the software. 8.1 Introducing the UWB Connection Manger Software The UWB Connection Manager is the driver software for the WPC2TV. This driver is automatically installed when you run the WPC2TV Installation CD. The WPC2TV PC Adapter contains a radio transmitter that enables your computer to communicate wirelessly with the Receiver Base. This radio is known as the host radio. The UWB Connection Manager driver software enables you to manage the host radio and perform tasks such as the following: Connect/Disconnect the WPC2TV from your computer Change/Select the channel used for radio communication Disable/Enable radio communications Disable/Enable pop-up messages 8.2 Accessing the UWB Connection Manger 8.2.1 To start the UWB Connection Manager: Double-click the UWB Connection Manager icon in the System tray/Notification Area of your Windows® desktop. Note : The UWB Connection Manager icon appears as Green in your System tray/Notification Area only when the PC adaptor is connected to your computer. You may need to click the Show Hidden Icons button [ ] or [ ], to display hidden icons. If the icon is not displayed in the System Tray Notification Area, you can access the UWB Connection Manager by double clicking the UWB Connection Manager icon on your Windows® desktop. The UWB Connection Manager Display window appears 8.2.2 Connecting the WPC2TV to your computer The WPC2TV first appears on the Devices tab of the UWB Connection Manager as Not Connected. Simply click on the Connect tab next to the WPC2TV Device Icon to establish a connection. It will take Pg 16 a few minutes for the Drivers to load upon first connection. When the wireless connection has been made, a yellow star will automatically appear next to the WPC2TV Device Icon, making it the default device for future connections. Pg 17 8.2.3 Disconnecting the WPC2TV from your computer Your computer can only be connected with one WPC2TV at a time. If you have more than WPC2TVwithin range of your computer, you may want to temporarily prevent your computer from connecting wirelessly to a particular WPC2TV. On the Devices tab of the UWB Connection Manager, right - click on the connected WPC2TV Device and unselect “Set as default”. Once the device is no longer the default device you can then either double click on the device or right-click and then select “Disconnect”. The device will now move back to a Not Connected status Note. You can change the name of the each WPC2TV listed on the Devices tab of the Wireless USB Manager. This is especially useful if you have multiple WPC2TV units and want to differentiate between them. To rename a WPC2TV, right-click on the default name, select Rename from the shortcut menu and then enter a custom name. 8.2.4 Radio Communications Change/Select the channel used for radio communication The Communications tab of the Wireless USB Manager enables you to view and change radio settings. The default channel setting is Automatic, which enables the host radio to automatically locate an available channel for communications. The UWB specification transmits at a higher power output as the channel number decreases. If you find you aren’t getting a strong signal on the channel automatically assigned you can manually set the device to a lower channel to improve signal quality. Pg 18 Note. It is recommended to leave this setting on Automatic. If you manually select a channel that is being used by another WPC2TV™ in the vicinity, the channel bandwidth will be shared by both devices. To maximize performance, a separate channel should be used for each WPC2TV™ 8.2.5 Disable/Enable radio communications To temporarily disable the host radio, do one of the following: Click the Off button on the Communications tab of the Wireless USB Manager (in the Communication status area of the window). The radio is now in Airplane Mode and the StreamHD Icon in the System Tray will now turn Orange: To re-enable communications, reverse the procedure. 8.3 Configuring External Displays This section describes how to use DisplayLink’s Software. The section is divided into sub-sections relating to your operating system. Pg 19 Note: The terminology for "mirror mode" can vary between operating systems and the DisplayLink GUI. The terms “Clone”, “Mirror” and “Duplicate” are interchangeable and provide the same function of making the contents of the 2 selected displays identical. 8.4 Device/Monitor Detection The DisplayLink System tray GUI, covered below, will only be available when a WPC2TV DisplayLink-based device is detected on the USB bus. 8.5 Resolution Support When a monitor is connected to a Warpia device, the DisplayLink host software reads the supported modes from the display. These are the only supported modes offered by the DisplayLink software, through the DisplayLink UI or Windows Display Properties. The DisplayLink software will use the monitor’s preferred mode by default. If the monitor does not report any supported modes, DisplayLink will offer a list of default modes. Note: This communication standard is called EDID and stands for Electronic Device ID. While connecting your External display directly to your Windows-based computer may allow you to use other resolutions than what we provide, we strictly adhere to the EDID protocol. This is the only way to ensure that a resolution or refresh rate that could cause damage to the External display is never used. 8.6 Windows 8 and Windows 7 - Controlling the Display When devices are attached, an icon appears in the taskbar. This gives you access to the DisplayLink manager menu. 8.6.1 1. To use the DisplayLink Manager Menu From the taskbar, click the Show hidden icons arrow to show all available icons. Pg 20 2. Click the DisplayLink icon . A menu appears with several options. These are shown and described below. Pg 21 Menu Option Sub-menu Option Description DisplayLink This is the UI title. Clicking on this item will open Manager Windows screen resolution. Menu Option Sub-menu Option Description Check for DisplayLink software should NEVER be updated Updates automatically, via the DisplayLink website DisplayLink Options to configure this In this section of the menu, a list of connected devices DisplayLink device DisplayLink devices will appear. Each of these devices has its own sub-configuration menu. These Submenu options are covered in the table below. Audio Setup Opens the Windows Audio Configuration Window. Video Setup Opens the Windows Screen Resolution window. Pg 22 Display Menu Description Screen Resolution Displays a list of available resolutions. Some resolutions may be enclosed by [ ]. Please see, Inferred Modes. This option is not available in mirror mode, as the resolution Normal No rotation is applied to the DisplayLink display Rotated Left Rotates the extended or mirrored display by 270 degrees Screen clockwise. Screen Rotation Rotated Right Rotates the extended or mirrored display by 90 degrees clockwise. Upside-Down Rotates the extended or mirrored display by 180 degrees clockwise. Right Extends the display to the right of the main display. Left Extends the display to the left of the main display. Above Extends the display above of the main display. Below Extends the display below the main display. Extend To Display Menu Description Extend Extends your Windows desktop onto this display. Set as Main Sets this screen as the main display. Monitor Pg 23 Display Menu Description Notebook Switches off the display of the notebook and makes the External display the main Monitor Off display. Note: This option will only appear when 1 External display is connected. It will also only appear on Laptop computers. Mirror Copies what is on the main display and reproduces it on this display. Note: The resolution of this display and the primary must be the same in mirror mode. This may be lower than the preferred resolution of the display. It is only possible to mirror 2 displays due to Microsoft Windows restrictions. If a display is already set to mirror mode, this option will be greyed out for the other External displays and is not available. Off Switches off the laptop display. Optimize for Select this option for better movie playback performance on the External display. Video Only select this option when playing back video content. Note: Text may appear less clear when enabled. Fit to TV If the Windows desktop does not completely appear on the TV, this option can be used to adjust the size of the Windows desktop. See “Fit to TV” for details on how to configure this feature. Notes: This option will only appear when 1 DisplayLink USB screen, is connected This option will only work in extend mode. Selecting the option in mirror mode will extend the displays. Pg 24 8.7 Windows Vista and Windows XP – Controlling the Display When devices are attached, an icon appears in the taskbar. This gives you access to the DisplayLink manager menu. 8.7.1 1. To use the DisplayLink Manager Menu Click the DisplayLink icon on the taskbar. The menu appears as shown below. Pg 25 2. Select an option from the menu, using the following table for the options available. Menu Option Sub-menu Option Description DisplayLink This is the UI title. Clicking on this item will open Windows Manager screen resolution. DisplayLink devices Options to configure this External display In this section of the menu, a list of connected DisplayLink devices will appear. Each of these devices has its own subconfiguration menu. These Submenu options are covered in the table below. Audio Setup Opens the Windows Audio Configuration Window. Video Setup Opens the Windows Display Settings window. Display Description Displays a list of available resolutions. Some resolutions Screen may be enclosed by [ ]. Please see, Inferred Modes. Resolution This option is not available in mirror mode, as the resolution is defined as the resolution of the main monitor. Screen Normal No rotation is applied to the DisplayLink display Rotation Rotated Left Rotates the extended or mirrored display by 270 degrees. Rotated Right Rotates the extended or mirrored display by 90 degrees. Upside-Down Rotates the extended or mirrored display by 180 degrees. Pg 26 Extend To: Right Extends the display to the right of the primary display. Left Extends the display to the left of the primary display. Above Extends the display above of the primary display. Below Extends the display below the primary display. Extends your Windows desktop onto this display. Extend Sets this screen as the primary display. Set as Main Switches off the display of the notebook and makes the DisplayLink display the main display. Copies what is on the main display and reproduces it on this display. Display Menu Description Off Switches off this display. Optimize for Video Select this option for better movie playback performance on the DisplayLink (Windows Vista enabled displays. Only select this option when playing back video content. Only) Note: Text may appear less clear when enabled. Fit to TV If the Windows desktop does not completely appear on the TV, this option can be used to adjust the size of the Windows desktop. See “Fit to TV” for details on how to configure this feature. Notes: This option will only appear when 1 DisplayLink USB screen, is connected This option will only work in extend mode. Selecting the option in mirror mode will extend the displays. Pg 27 Setting the Display into Extend Mode In extend mode, the monitor attached to the WPC2TV device forms part of the extended Windows desktop. The extra desktop area is a great productivity aid, allowing more applications or documents to be visible at a time. 8.7.2 To set the display into Extend Mode Click on the DisplayLink icon . Select Extend. The device is now extended in the direction it was the last time the display was in this mode. For more control, use the Extend To submenu and select one of the options. This puts the device into extend mode, and places it to the Left/Right/Above/Below the main (primary) monitor. 8.7.3 Setting the Display into Mirror Mode In mirror mode, the monitor attached to the Warpia device duplicates what is on the primary display. To set the display into Mirror mode Click on the DisplayLink icon . Select Mirror. The resolution, color depth and refresh rate of the primary screen are replicated on the monitor connected to the WPC2TV device. If the monitor connected to the WPC2TV device supports a lower resolution than the primary display, then the primary graphics device will have its resolution changed automatically to ensure the whole picture fits on the external screen. Where the monitor connected to the WPC2TV device is of a larger size than the primary screen the image will be letter-boxed to keep the aspect ratio correct. 8.8 Windows Vista and XP – Windows Display Properties You can also configure the WPC2TV device from the Windows Display Properties dialog box. 8.8.1 To open the Windows Display Properties on Windows Vista 1. Right-click on the Desktop. 2. Click Personalize. 3. Click Display Settings. The Display Settings window opens. Pg 28 8.8.2 Figure 1: Display Setting - Vista Select the display to be configured. Its mode, resolution, color quality and position can all be controlled from here. 8.8.3 To open the Windows Display Properties on Windows XP 1. Right-click on the Desktop. 2. Select Properties. The Display Properties dialog opens. 3. 8.8.4 Select the Settings tab. Setting the Display into Extend Mode Use this procedure when you want to extend the Windows desktop to the External display. This allows many different applications to be spread over multiple displays, to be able to see multiple applications at the same time. Pg 29 To set the display to Extend Mode using Windows Display properties Select Extend the desktop onto this monitor checkbox (1 in Figure 1 above). Arrange the screen resolution using the Resolution slide bar. (2) Select the color quality from the Colors drop-down list. (3). Arrange its position with respect to the other monitors on the extended desktop in using the drag area (4). Click OK to save your changes. For more detailed mode setting, including the refresh rate, click Advanced Settings button, then the Adapter tab then on the List all modes button. All valid combinations of resolution, color quality and refresh rate are listed. For CRT monitors, it is best to use a high refresh rate so as to avoid discomfort due to flicker. Flat panel monitors do not flicker and a low refresh rate is adequate. To set the display to Extend Mode using the DisplayLink menu From the taskbar, click on the DisplayLink icon . Select Extend. 8.8.5 Setting the External Display to Mirror the Primary Screen Mirror mode copies what is on the main display and reproduces it on the secondary display. To set the display to Mirror Mode using Windows Display properties Uncheck the Extend the desktop onto this monitor checkbox (1 in Figure 1). Click Apply. To set the display to Mirror mode using the DisplayLink menu From the taskbar, click on the DisplayLink icon . Select Mirror Note: The display resolution of the primary display and the External display may be changed to a lower resolution. In mirror mode, both screens must output the same resolution, which may not be the maximum resolution of the display. This mode is NOT recommended if using the External display as the primary laptop display, as it is unlikely to provide the optimum resolution for the External display. Please see, Setting the External Display as the Primary Display. Pg 30 8.8.6 Setting the External Display as the Primary Display Select the This is my main monitor checkbox (1 in Figure 1 above). Click Apply. Note: On some PCs and laptops it is necessary to disable the main display (clear the Extend the desktop onto this monitor checkbox for the main display) as part of the same settings change. The reason for this is that many primary graphics card drivers tend to make the laptop screen primary if it is enabled. The only workaround for this is to disable the laptop screen to allow another screen to be primary. To do this: Select the This is my main monitor checkbox (1 in Figure 1) of the External display. Select the primary display (Display 1). Uncheck the Extend the desktop onto this monitor checkbox (1 in Figure 1). Click Apply. The External display stays primary if the PC enters hibernate or suspend mode or is rebooted. If the External display is detached from the computer while it was set as the main monitor, the computer's display will become the main monitor again.. 8.8.7 To make the External Display the Primary Display using the DisplayLink menu From the taskbar, click on the DisplayLink icon . Select Set as Main Monitor. 8.8.8 Setting the Laptop Lid to “Do Nothing” (Upon Close) It is possible to use a laptop with a WPC2TV device and conveniently have the laptop closed on the side by setting its action when closing the lid to ‘do nothing’ , and then making the External screen primary while disabling the main screen. The laptop lid can then be closed and the laptop used with only the External display and with and external keyboard and mouse. 8.8.9 To set a laptop to do nothing Select Start menu > Control Panel > Power Options. Select Choose what closing the lid does. From When I close the lid, select Do nothing from the On battery and Plugged in drop down list. Pg 31 9. Audio Configuration 9.1 Setting USB audio as the default output Audio can be configured to play either from your computer or your WPC2TV device. The audio settings can be opened from the DisplayLink UI, by choosing the Audio Setup option. The Sound window is shown: To make the USB audio device default and have sound come from the TV/Projector: Click on the USB audio device Note: The actual name of this device will differ depending on the product. If you want the audio to come from your computer, simply choose your computer’s speakers rather than the USB Audio device. Choose Set Default to make this the default audio output It may be necessary to restart applications using audio to force them to use the new default audio output. Pg 32 9.2 Configuring USB audio on Windows XP 9.2.1 Setting USB audio as the default output The audio settings can be opened from the DisplayLink UI, by choosing the Audio Setup option. The Sound and Audio Devices Properties window is shown 1. Click on the Audio tab 2. Under Sound Playback, select the USB Audio Device. This changes the default sound output to the WPC2TV audio device 3. Under Sound Recording, select the USB Audio Device. This changes the default recording input to the WPC2TV audio device. 4. Click OK to apply the changes and close the window. It may be necessary to restart applications using audio to force them to use the new default audio output. Pg 33 9.2.2 Configuring the audio output To configure the audio output to match your speaker setup 1. Open the Audio setup from the DisplayLink UI 2. Click on the Audio tab 3. Under Sound Playback, select the USB Audio Device. This changes the default sound output to the WPC2TV audio device 4. Click Advanced 5. Under the Speaker Setup, select stereo from the dropdown 6. Click OK Pg 34 10. Fit to TV What is Fit to TV? If using your WPC2TV product to connect to a TV, all of the Windows desktop may not be available. Many TVs will automatically 'overscan' the image they get by cutting off the borders and filling the screen with the image. On some TVs it may be possible to turn this 'overscan' off in your TVs settings menu, consult your TVs User Manual to see if this is an option for you. If you can do so, then you will not need to use the Fit to TV function of the DisplayLink UI. This is the best way to correct this issue. Fit to TV can be used to reduce the size of the Windows desktop on the TV screen. Notes: Fit to TV only works in extend mode. If choosing the option while in mirror mode, the DisplayLink screen will change to extend and be placed above the laptop screen in Windows Display Properties. Fit to TV does not support rotated modes. 10.1 Configuration 1. To configure Fit to TV, choose the option from the DisplayLink GUI. The following interface appears: Pg 35 2. You will also see a red border on the External display The red border shows the size of the new Windows desktop. Use the “+” and “-” controls on the Fit to TV GUI to change the size of the red border until it fits on the TV screen. Note: Finer configuration of the size of the border can be achieved by holding down the CTRL key and clicking the “+” and “-”. Once the red border is at the edges of the TV screen, click “Apply” to resize the Windows desktop. Pg 36 11. Additional Information The following section provides additional information on the use of the DisplayLink software. 11.1 Game support This software does not support 3D rendering. Games that are 3D-based will not function. 11.2 Monitor Calibration Monitors can be calibrated with applications that use the Display Data Channel Command Interface (DDC/CI). Both the monitor and application must support DDC/CI for this to work. An example of an application that is now supported is ScreenWhite. 11.3 Standby and Hibernate, Shut down and Restart If the PC that the External display is connected to is placed into standby or hibernate mode, the display goes blank. When the PC is again powered up (and unlocked if necessary) the connected monitor returns to the same mode as it was before stand by or hibernation. If the PC is shut down, restarted and logged in, again the connected display returns to the same mode as it was before shutdown. However, this function is controlled by the laptop manufacturer. If they have not configured the laptop properly to recover from sleep or hibernate you will need to restart the laptop to restore the External display. 11.4 Disconnecting the WPC2TV PC Adapter If the USB port is powered off or the USB cable is removed from the computer, the display blanks. All windows and icons move to the primary screen as a function of Microsoft Windows. On reconnection or powering up of the WPC2TV PC adapter, the display returns to the same mode as it was before disconnection. However, windows and icons that were previously on the screen will not be moved back as this is a function of Microsoft Windows. It is not necessary to use the USB interface to disconnect the USB adapter before unplugging it. Pg 37 11.5 Inferred Modes Some modes in the DisplayLink GUI are shown with [ ] around them. This occurs when connecting a monitor with a preferred mode higher than the maximum supported resolution of the W device In this case, the preferred resolution of the monitor cannot be supported. However we add lower resolutions of the same aspect ratio to be tried with the monitor. Modes in square brackets [ ] imply that these are modes not reported by the monitor, but have been made available by the DisplayLink software for you to try. As these are inferred modes from the preferred mode of the monitor, they are not guaranteed to work with the display. Pg 38 11.6 Error Messages The DisplayLink software occasionally displays user messages in a bubble in the notification area. The table below lists the user messages and their description. Message Description Insufficient system This can occur when entering extend mode with low system resources. resources exist to complete The PC does not have enough memory to start an extend display. the requested service Close down any unused applications. The situation may also be improved by rebooting the PC. The requested allocation This can occur if trying to mirror a primary display with a resolution above size was too large 2300x1700 (4:3) or 2600x1500 (16:9). This message will appear if the primary graphics card drivers installed are not WDDM compatible. Windows 7 is not designed to operate without Incompatible Display Driver WDDM drivers. Download and install the latest Windows 7 (WDDM) drivers for your primary graphics card. The system cannot write to This warning may be displayed in Windows XP after changing the display the specified device mode several times (e.g. Extend/Dock mode) from the DisplayLink GUI. If this happens, detach and reattach the device to restore normal operation. Pg 39 12. Troubleshooting This section provides answers for problems you may encounter when using your WPC2TV. If you need to contact HanshinITa, you will find information regarding Warpia’s support services at the end of this section. Before you contact HanshinIT, please read the troubleshooting advice in this manual, in your computer’s user’s guide and/or in any manuals that came with your optional peripheral devices. 12.1 Display/Video Note For additional information on troubleshooting WPC2TV video issues, please visit the HanshinIT Technical Support Website at support.icreon.kr External monitor does not turn on (the monitor’s power light does not turn on). Make sure that the external monitor’s power switch is on. Confirm that the external monitor’s power cable is plugged into a live electrical outlet. Make sure that the external monitor is securely connected to the WPC2TV Check the external monitor settings. Refer also to the computer user’s manual and to the external monitor’s documentation. 12.2 No image displays on the external monitor connected to the WPC2TV If you connect through an HDMI or VGA Cable, check to ensure your cable is connected properly on both sides. Make sure you have the correct video input selected on the TV or Projector Try adjusting the resolution, contrast and or brightness controls on the external monitor. Check to make sure that the wireless connection is established between the PC and the WPC2TV (the WPC2TV icon in the System Tray is green, and when you double click on it, your TV or Monitor shows connected). Make sure your Windows® operating system is updated with the latest available Service Pack from Microsoft® . Your computer BIOS (Basic Input/Output System) may also need to be updated. Refer to your computer manufacturer's Web site for more information. Restart your computer after updating the operating system and/or the BIOS, and try using the WPC2TV again. Pg 40 12.3 Display error Check that the cable connecting the external monitor to the WPC2TV is firmly attached to both the Receiver Base and the TV/Monitor. The external monitor connected to the WPC2TV shows only the wallpaper background of my Windows® desktop. The default configuration for the external monitor connected to the WPC2TV is Extend mode (an extension of the image on the computer to a second screen). This mode allows you to display different information on each monitor connected to your computer. Drag a window off of the right side of your primary display to have it appear on the external monitor. To switch to Mirror mode, so that an exact duplicate of the image on your primary monitor displays on the external monitor, please see “Adjusting video settings” beginning on page 14. Video or game playback is slow or choppy on the external monitor connected to the WPC2TV. Confirm that the PC meets the minimum system requirements to run the WPC2TV You can find the requirements on the packaging, or online in the product pages at www.icreon.kr Ensure the PC is within 30ft of the TV/Monitor and the PC Adapter has direct line of site to the Receiver Base. Double click on the WPC2TV icon in the system tray and note the signal strength meter next to the device icon in the Window. Signal strength must be 4-5 bars to play high definition video. The WPC2TV uses an advanced video graphics controller to display video images, however it does not support 3D Gaming. My Windows Vista® system runs more slowly when an external monitor is connected to the computer via the WPC2TV. This may occur if the external monitor is set to Mirror mode and the display resolution is higher than 1280 x 800. You can take one or more of the following actions to resolve the problem: Disable the Aero color scheme. (Click Start, Control Panel, Appearance and Personalization, Personalization, and then Window Color and Appearance. The Appearance Settings window opens. Select a different color scheme other than "Windows Aero." Lower the display resolution. Switch to Extend mode. 12.4 Cannot play videos on an external monitor connected to the WPC2TV Try a different media player. VLC Media Player is recommended, though the Pg 41 WPC2TV supports many different players. 12.5 The Screen Resolution window in the Control Panel does not list all of the resolution modes my monitor is capable of displaying. The WPC2TV video card requires Extended Display Identification Data (EDID) to be supplied by a connected monitor. This information includes resolution settings supported by the monitor. Some monitors do not supply this information, and in such cases the resolution settings available in the Screen Resolution Window will be limited, to avoid damage to the monitor. 12.6 The external monitor connected to the WPC2TV is incorrectly identified as a "Non-PNP monitor" in the Windows® Device Manager. The monitor name displayed in the Windows® Device Manager is controlled by Windows. This designation will not affect the functionality of the device. 12.7 The computer's built-in display does not turn off when the external monitor connected to the WPC2TV is set as the primary monitor. On some systems, the WPC2TV video adapter cannot control the internal display. 12.8 Mirror mode is not available (grayed out). Mirror mode is not available if the external monitor connected to the WPC2TV is set as the primary display. To enable Mirror mode, set the computer's built-in display as the primary display in the Windows Display Properties dialog box. 12.9 Scalable Link Interface (SLI) mode is not available This product does not support SLI mode when more than two graphics cards are installed in the connected computer. In such cases, SLI mode is disabled 12.10 In Windows Display Properties, I cannot move the external monitor icon where I want relative to the icon of the computer's built-in display Try dragging the computer's built-in display icon instead, relative to the external monitor icon. 12.11 I cannot drag windows from my primary display to the external monitor connected to the WPC2TV Follow these steps to fix the problem: Open the Windows® Display Properties dialog box and position the monitor icons on Pg 42 the Settings tab to match the physical arrangement of your monitors. Make sure the "Extend to" setting matches the physical arrangement of your monitors. For example, if the external monitor is to the right of the computer display, select "Extend to right." Drag the window you want to move in the direction that matches the extension setting. For example, if the desktop space is extended to the right, drag the window off of the right edge of the primary display and it will appear on the extended desktop. 12.12 I cannot run a 3D program or a program using DirectDraw commands on the external monitor connected to the WPC2TV This product does not support 3D programs. Running applications that use certain DirectDraw commands (such as some 2D gaming applications) is also not supported. If you want to play these games in full-screen mode, disconnect the WPC2TV and use your computer's display. 12.13 Audio/Sound 12.13.1 There is no sound coming from the external audio device connected to the WPC2TV Check and adjust the volume settings. Make sure the cable connecting the audio device to the WPC2TV’s audio output is secure. Check that the Mute all/Mute checkboxes in Microsoft® Windows® are not selected or that the volume is not set too low. To locate these settings, double-click the speaker icon in your Windows® System tray/Notification Area. Close your media player application, if it is running. Wait approximately 10-15 seconds for the operating system to recognize the audio device connected to the WPC2TV and then restart your media player application. The audio port on the WPC2TV may be disabled. To enable the port, follow the instructions in Section 9. 12.13.2 There is no sound coming from the computer’s internal speakers, or from the headphones/headset connected directly to the docked computer. By default, the internal speakers and audio ports on the computer are disabled when the computer is connected to the WPC2TV. To enable the speakers or audio ports on the computer, follow the instructions in Section 9 Check that the Mute all/Mute checkboxes in Windows® are not selected. To locate these settings double-click the speaker icon in your Windows® System Tray Pg 43 Notification Area. Close the media player application, if it is running. Wait approximately 10-15 seconds for the operating system to recognize the audio device and then restart the media player application. 12.13.3 Sound is distorted or delayed when playing some multimedia files. Disconnect the WPC2TV from your computer, reconnect and play the file again. Close the Media Player being used and restart the player. 12.14 Connection/Docking 12.14.1 My computer does not automatically detect the PC adaptor. Make sure you have properly connected the PC adaptor to your computer’s USB port. Unplug, then re-plug in the adaptor. Reboot the PC The computer's USB port may be damaged. Check to see if other devices can be successfully connected to the port. 12.14.2 The connection to the WPC2TV has been lost. The computer may be out of wireless communication range. Bring the computer within close range of the WPC2TV to automatically reconnect. The computer may be in standby/sleep/hibernation mode. The computer will reconnect when it resumes from standby/sleep/hibernation. The USB adaptor may have been disconnected. Re-connect the USB adaptor to the computer. 12.15 USB 12.15.1 USB device does not work. Make sure the WPC2TV is connected to your computer and the computer is docked (indicator light on WPC2TV is green). Check that the cable connection between the USB port on the WPC2TV and the USB device is secure. Make sure that the WPC2TV drivers are properly installed. Refer to the operating system documentation for more information. Make sure that the AC adaptor (if applicable) is connected securely to the Receiver Base and a live electrical outlet. Pg 44 12.15.2 My real-time device (for example, a Web camera, microphone, or speakers) does not operate properly when connected to the WPC2TV Due to USB bandwidth limitations and USB packet priority requirements, real-time devices (for example, Web cameras, microphones, and speakers) may not operate correctly and cannot be supported. 13. Support If you require additional help or are still having problems operating the WPC2TV, you may contact HanshinIT for additional technical assistance. Before you call 1. Review the user’s manual and/or troubleshooting sections in the documentation supplied with your WPC2TV 2. Ensure you have the latest Windows software updates for your computer. 3. If a problem occurs when you are running particular software applications, consult the software documentation for troubleshooting suggestions. Contact the software company’s technical support department for assistance. 4. Consult the HanshinIT technical support website at http://support.icreon.kr This is an excellent resource for current information and support. 13.1 Contacting HanshinIT HanshinIT’s technical support Web site is http://support.icreon.kr To stay current on the most recent software and hardware updates for your WPC2TV and for other product information, be sure to regularly check the HansinIT Web site at http://www.icreon.kr/support/drivers Contacting HanshinIT technical support Before contacting HanshinIT make sure you have your WPC2TV model number and revision. You can find that information on the bottom of the base unit. For example, HS5750 or etc Information about what you were doing when the problem occurred. Exact error messages and when they occurred. For technical support, email the HanshinIT Customer Support Center at [email protected] Pg 45