1
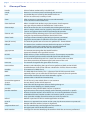
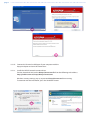
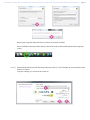
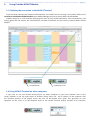
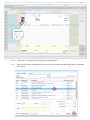
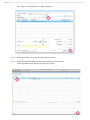
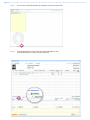
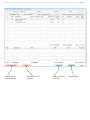
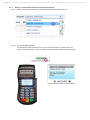
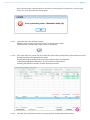
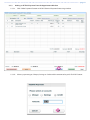
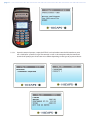
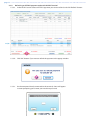
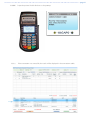
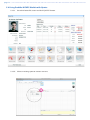
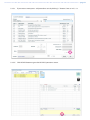
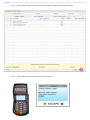
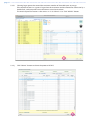
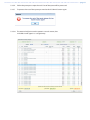
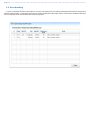
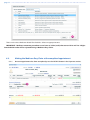
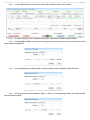
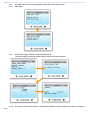
page 1 Praktika HICAPS module User Guide page 3 Table of Contents 1. Praktika 5 2. HICAPS 5 3. Glossary of Terms 6 4. Installation of Praktika HICAPS Module. 7 4.1. 4.1.1. 4.2. System Requirements: 7 To install and run HICAPS terminal you need: 7 Installation: 4.2.1. To install the HICAPS terminal perform the following actions in the given order: 5. Using Praktika HICAPS Module 7 7 11 5.1. Checking the connection to the HICAPS Terminal 11 5.2. Using HICAPS Terminal on other computers 11 5.3. Making Payments and Claims through HICAPS Terminal with Praktika 12 5.3.1. Working with HICAPS from the Appointment screen. 12 5.3.2. Making a Claim Benefit from the Appointment Window 18 5.3.3. Making an EFTPOS Payment from the Appointment Window 21 5.3.4. Cancellation of a HICAPS Claimed Benefit 24 5.3.5. Refunding an EFTPOS payment made with HICAPS Terminal 26 5.4. Using Praktika HICAPS Module with Quotes 28 5.5. Error Handling 34 6. Making Medicare Easy Claims through HICAPS Terminal with Praktika 35 6.1. Setting up the patient file for Medicare processing 35 6.2. Appointment creation and completion stage 35 6.3. Making the Medicare Easy Claim at the completed appointment 36 6.4. Medicare Claim Error Handling 38 page 4 Praktika support: Telephone: 03 9005 5432 Facsimile: 03 9802 8371 Email : [email protected] Web: praktika.com.au page 5 The current User Manual covers the issues concerning the installation, running and troubleshooting of the Praktika HICAPS Module that enables Praktika to work with the HICAPS terminal. 1. Praktika Praktika is a Dental Practice Management System software package developed specifically for the Australian dental industry. It follows the SaaS (Software as a Service) Model where both the application and data are supplied over the Internet. Praktika is a cross platform browser based application, that does not require any specific setup or installation on a client’s computer. All it needs to run is a web browser and a broadband Internet connection. Now Praktika is capable to work with the HICAPS terminal. If several computers running Praktika are joined in a local area network (LAN), then they all can share a single HICAPS terminal. To start using Praktika with the HICAPS a special software module needs to be installed. For the installation instructions, please refer to the Installation chapter of the current User Manual. 2. HICAPS Health Industry Claims And Payments Service. The company responsible for the switching of transactions to health funds from the terminal. HICAPS is Australia’s leading electronic claiming service, providing members of participating health fund the convenience of electronic claims (health fund and Medicare Easyclaim) processing and payments at the point of service. HICAPS comes with a terminal, which can be operated through the build-in interface or through an external interface provided by a Practice Management System. In our case, such interface is provided by Praktika. For all the questions regarding the operations of the HICAPS terminal, software and services, please refer to the HICAPS Terminal User Guide, provided by HICAPS. page 6 3. Glossary of Terms benefit cancel card claim claim declined claim receipt claim to sale clinical code date (of service) fallback gap payment HICAPS issue date item cost item number member MMF patient Practice Management System Praktika provider provider numbers refund reversal RRN swipe member card tooth number Value of rebate authorised by a Health Fund. Reverses a transaction processed through the terminal. A membership card issued by the Health Fund or an EFTPOS or credit card, issued by a bank. After treatment is provided, details are sent electronically via the terminal to the Health Fund. When a Health Fund declines to pay the request a brief response message will print with each declined item and/or claim. Either the terminal or the associated Practice Management System prints a receipt, which must be signed by the patient to acknowledge services and approve the transfer of payment to the provider. The terminal facility allowing you to start an EFTPOS transaction using the Gap amount returned from the HICAPS Claim. Two digit numeric identifying the body part/primary condition/ diagnostic intervention on which the service was performed. The date the specific item of service was performed – format ddmm. The terminal was unable to contact the bank to process an EFTPOS transaction, but the transaction has been approved/declined and will be sent to the bank with the next transaction. The amount remaining after the Health Fund has approved a benefit or the specified services. Health Industry Claims And Payments Service. The company responsible for the switching of transactions to health funds from the terminal. The date the membership card was issued. Those cards with issue dates have them printed on the bottom right-hand corner of the card. The amount charged for the given item of service. Numeric code identifying the type of service performed. Refer to the HICAPS Quick Reference Guide or the relevant schedule for a full list of item numbers. A customer of a Health Fund. The Multi-Merchant Facility. This is a feature of the HICAPS terminal which optionally allows you to settle the EFTPOS funds separately for each provider. iDA member listed on the card which identifies a given patient within a Health Fund membership. The PC-based system which allows a transaction to be sent directly to the HICAPS terminal. Dental Practice Management Software Package design to automate record keeping at a dental practice Practitioners who provide Health Services to patients. eight characters that uniquely identify each individual provider for a specific location. Provider numbers that HICAPS use are issued by Medicare Australia or Medibank Private. Provider numbers are location specifi, so you must have a provider number for each location you wish to practice at. Refunds a previous EFTPOS or credit approved transaction. Reverses an approved transaction on the same day the transaction was processed. Receipt reference number (unique 2 digit field) Pass the membership card through the card reader on the right-hand side of the HICAPS terminal. Two digit FDI numeric identifying the tooth on which the service was performed. page 7 4. Installation of Praktika HICAPS Module. 4.1. System Requirements: Praktika can run on any modern operating system, including Microsoft Windows, Mac OS X, Linux and UNIX. However, to be able to connect to a HICAPS terminal you have to use a personal computer with a Microsoft Windows operating system. You can share the terminal with other computers running various operating systems (including Mac OS X) on a local area network. 4.1.1. To install and run HICAPS terminal you need: - a personal computer with Microsoft Windows operating system (XP, Vista, 7, Windows Server 2003 and 2008) - at least 2GB of RAM - a serial port on your computer. If a serial port is unavailable (most of modern PCs come without a serial port), then you need a Keyspan High Serial USB Serial Adaptor (USA-19HS) to connect the HICAPS Terminal to an USB port of your computer.. Note: you can run Microsoft Windows operating system on an Apple’s iMacs by installing Parallels software. 4.2. Installation: 4.2.1. To install the HICAPS terminal perform the following actions in the given order: 4.2.1.a. Install the Keyspan High Serial USB Serial Adaptor drivers from the supplied disc Follow the driver installation screen instructions. page 8 4.2.1.b. Connect the Terminal to USB port of your computer with the Keyspan adaptor and turn the Terminal on. 4.2.1.c. Install the HICAPS network connect driver. For that, download and run the HicapsConnect.exe file from the following web address: http://praktika.com.au/hicaps/HicapsConnect.exe Windows security settings may try to prevent HicapsConnect.exe from running. To continue with the installation, press the “Unblock“ button. page 9 Restart your computer after the driver has been successfully installed. Once installed the HicapsConnect displays the HICAPS icon in the bottom panel of the computer screen 4.2.1.d. Select the Default Terminal In the HicapsConnect screen (1). The id number of your terminal can be found on its body. Save your settings (2) and close the screen (3). 1 2 3 page 10 4.2.1.e. Install the Praktika HICAPS Module. For that, download and run setup.exe file from the following web address: http://praktika.com.au/hicaps 4.2.1.f. Start Praktika HICAPS Module For that, click on Start button (left bottom of Windows screen) Then go to Programs - Lizards Software Pty Ltd - Praktika Hicaps Interface 4.2.1.g. Test the connectivity with the terminal. If test show OK, the installation is complete. page 11 5. Using Praktika HICAPS Module 5.1.Checking the connection to the HICAPS Terminal Once the HicapsConnect and Praktika HICAPS Modules are installed and are running, start Praktika. Refer to the Installation of Praktika HICAPS Module items 4.2.f and 4.2.g to see how to start Praktika HICAPS Module. Praktika screen has a visual indicator displaying the status of your HICAPS connection. If the red indicator is not turning green after 30 seconds, the connection has not been established and you need to restart Praktika HICAPS Module no connection connection is OK 5.2.Using HICAPS Terminal on other computers If you want to use your HICAPS terminal from any other computer on your local network, click on the Hicaps indicator in the top right corner of Praktika screen, enter and the IP address of the computer with the attached terminal in the popup screen and wait till the button turns green. The operation on such computer are the same as on the computer that has the HICAPS Terminal directly attached to its USB port. page 12 5.3.Making Payments and Claims through HICAPS Terminal with Praktika You can send transactions from Praktika to HICAPS, receive and display the results of claims and payments. You can do it from the Appointment screen or from the Quote screen. 5.3.1. Working with HICAPS from the Appointment screen. 5.3.1.a. Click on an Appointment in the Scheduler screen to add procedures. page 13 5.3.1.b. Click on the “+“ button to add procedures to appointment. 5.3.1.c. Select a required Fee Schedule from the Current Fee Schedule drop down box. Select a procedure from the list page 14 or by type in an ADA code in the Context input box, . 5.3.1.d. Added procedures turn up in the Treatment Plan screen 5.3.1.e. Make sure that check boxes next to the procedures you want to add to the Appointment are selected and click “OK“ button. page 15 5.3.1.f. Click on the “Complete“ button to complete the appointment. 5.3.1.g. Confirm the completion of the Appointment 5.3.1.h. If Patient Recall has not yet been set, either set it or cancel (click “Close“) to do it later. page 16 5.3.1.i. You can also add Clinical Notes or cancel the screen and do it later. 5.3.1.j. In the Appointment screen, click on “HICAPS” button to start transaction processes using a HICAPS Terminal page 17 Cancellation of claimed benefit Refund of EFTPOS payment Make an EFTPOS payment Claim benefit page 18 5.3.2. Making a Claim Benefit from the Appointment Window 5.3.2.a. Make sure the correct provider is selected in the Provider drop down box. 5.3.2.b. C lick Claim Benefit button. The HICAPS Terminal should prompt you to swipe the patient’s Health Fund card. There will also be a pop up screen on the computer directly attached to the terminal. page 19 Note: If the terminal is not able to process your claim, you may get the “Terminal busy“ error message. In this case, click “Claim Benefit“ button again. 5.3.2.c. Swipe the card in the HICAPS Terminal While the claim is being made. You will see a “waiting“ cursor, which will return to its normal state, once the claim is completed. 5.3.2.d. If the card swipe was successful, the result of the claim will be printed out by the terminal and it will also be displayed in the Appointment screen. The benefit amount, the gap amount and the response codes are displayed in the table (highlighted with green) as well as the transaction details including the reference numbers and the total claim amount. 5.3.2.e. Click the “Close“ button to close the screen to get back to the Appointment screen. page 20 page 21 5.3.3. Making an EFTPOS Payment from the Appointment Window 5.3.3.a. Click “Make Payment” button in HICAPS Terminal Payment Processing window. 5.3.3.b. Select a payment type: Cheque, Savings or Credit and the amount to be paid. Click “OK“ button. page 22 5.3.3.c. Upon the terminal prompt, swipe the EFTPOS card and either enter the PIN number or print out a docket for a patient to sign. The terminal as well as the computer with the connected terminal will prompt you what action must follow depending on the type of payment chosen. page 23 5.3.3.d. The Praktika screen will reflect the transaction details once it is successfully processed. Note: EFTPOS payments normally attract a surcharge, which is also reflected in the transactions table as a separate entry. page 24 5.3.4. Cancellation of a HICAPS Claimed Benefit 5.3.4.a. To cancel a HICAPS claimed benefit click “Cancel Claimed Benefit “ in the Praktika Terminal Processing Window. 5.3.4.b. Click “OK“ if ypu want to cancel the benefit claim. page 25 5.3.4.c. Swipe the patient’s health fund cars at the prompt. 5.3.4.d. After the successful transaction the cancelled claim will be displayed in the transaction table as HICAPS Reversal page 26 5.3.5. Refunding an EFTPOS payment made with HICAPS Terminal 5.3.5.a. In the HICAPS screen select an EFTPOS payment you want to refund. and click “Refund “ button. 5.3.5.b. Click “OK“ button if you want to refund the payment in the popup window. 5.3.5.c. On the computer directly connected to the terminal, there will appear a screen prompting you to enter your merchant password. page 27 5.3.5.d. Swipe the patient’s health fund cars at the prompt. 5.3.5.e. If the transaction was successful, the results will be displayed in the transactions table. page 28 5.4.Using Praktika HICAPS Module with Quotes 5.4.5.a. Go to the Patient File screen and click “QUOTES“ button. 5.4.5.b. Select an existing quote or create a new one. page 29 5.4.5.c. If you create a new quote - add procedures to it by clicking “+“ button. Same as in 5.3.1.c 5.4.5.d. Click HICAPS button to go to the HICAPS Quotations screen. page 30 5.4.5.e. Click “Submit“ button in the Quote Claim window to submit the quote to HICAPS. 5.4.5.f. Follow the prompt to swipe the card in the terminal. page 31 5.4.5.g. Once the transaction is complete, the results of the claim are displayed in the Quote Claim screen 5.4.5.h. To print the quote out, click “Print“ button. page 32 5.4.5.i. Claiming large quotes that exceed the maximum number of claimable items in one go. If the number of items in a quote is larger than the maximum number allowed for submission by a health fund, such quote will have to be done in several transactions. The initial sequence of actions is the same as in 5.4.5.d thru 5.4.5.e. Click “HICAPS“ button. 5.4.5.j. Click “Submit “ button to submit the quote to HICAPS. page 33 5.4.5.k. Follow the prompt to swipe the card. Part of the quote will be processed. 5.4.5.l. To process the rest of the quote you need to click “Submit“ button again. 5.4.5.m. The terminal will print out the quote in several screens, but in Praktika it will appear as a single entity. page 34 5.5. Error Handling In case a particular HICAPS transaction or a set was not processed, you will be prompted with the Error processing HICAPS claim window. A possible cause of error will be displayed in the Note section. Correct the condition that may have caused the error and resubmit the claim or payment. page 35 6. Making Medicare Easy Claims through HICAPS Terminal with Praktika 6.1. 6.1.1. Setting up the patient file for Medicare processing Go to the Patient’s Personal Information screen and make sure the following data are entered: - Medicare Number - Doctor’s Name - Provider No. - Referral No. - Referral Date. 6.2. Appointment creation and completion stage Follow steps from 5.3 through 5.3.1.j (pp 12-16) of the current manual to see how to create appointments, add treatment, complete the appointments and enter payment via the HICAPS terminal. It is exactly the same as in making the Health Funds claims. When adding the treatment it is advisable to use a Medicare Fee Schedule as it contains the precedure code applicable to the Medicare Claims. If you have not got a Medicare Fee Schedule - create one by clicking on the New Fee Schedule button in the Management Section and choose one of the Medicare types. page 36 There are 6 various Medicare related fee schedules. Select an appropriate one. IMPORTANT: Medicare treatment procedures must have an index (code) that starts with 8 and has 5 digits. Standard ADA codes will be rejected during a Medicare Easy Claim. 6.3. 6.3.1. Making the Medicare Easy Claim at the completed appointment Once an appointment has been completed, press the HICAPS button in the Payment section. page 37 6.3.2. In the HICAPS Payment and Claims screen click on Medicare Easy Claim button. 6.3.3. A screen will popup with a choice of claim types: Fully Paid, Part Paid, Unpaid, Bulk Bill. 6.3.4. If NO OTHER PAYMENT was entered in the appointment payment section, only two choices will be active: Unpaid and Bulk Bill 6.3.5. If the appointment was FULLY PAID, the only available choice displayed will be: Fully Paid 6.3.6. If the appointment was PARTIALLY PAID, i.e. there is an outstanding balance, the only available choice will be: Part Paid page 38 6.3.7. 6.3.8. 6.3.9. mail. Press OK. You will then be prompted to swipe the card at the terminal. If Bulk Bill: If Fully Paid. Swipe Patient’s Credit or EFTPOS card: The funds will be transferred to the Patient’s account linked to the card. 6.3.10. If Unpaid or Part Paid the data is submitted to Medicare and the paitient will receive a cheque in page 39 6.3.11. For Bulk Bill claims where the fee is higher than the Medicare rebate, a special adjustment will be entered automatically to balance up the Appointment total. 6.4. Medicare Claim Error Handling For explanations and instructions reguarding the Medicare Easyclain error codes returned by the HICAPS terminal, please follow the instructions in the “Medicare Easyclaim Return Codes” brochure that can be found at the following link: http://www.medicareaustralia.gov.au/provider/medicare/claiming/easyclaim/files/medicare-easyclaim-returncode-list.pdf or download the brochure from the Praktika Website - Essential Downloads page. page 40