1
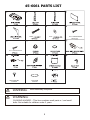
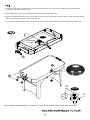
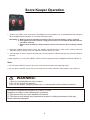
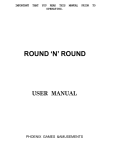
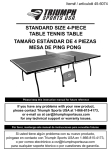
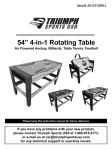
Item# 45-6061
60” Air Powered Hockey
Please keep this instruction manual for future reference
If you have any problems with your new product,
please contact Triumph Sports USA at 1-866-815-4173,
or e-mail us at [email protected]
for any technical support or warranty issues.
90-Day Triumph Sports USA, Inc. (TSU) Game Warranty
All TSU games have a 90-day from date of purchase warranty. This warrants the retail
purchaser for any TSU game purchased to be free from any defect in materials and
construction for 90 days from the date of purchase. Normal play wear and usage is not
covered under the warranty, nor is wear or damage due to improper use of the TSU
game. This will void any and all TSU warranties.
A PURCHASE RECEIPT (or other proof of purchase date) will be required before
any warranty service is initiated. All requests for warranty service can be submitted
by email, in writing or by contacting our Customer Service Department at:
1-866-815-4173 or email us at [email protected].
IMPORTANT NOTICE! Please contact us before returning the product to the store.
Warnings
WARNING:Choking Hazard--Toy contains small balls and/or small parts.
Not for children under 3 years of age.
Triumph Sports USA
Milwaukee, WI 53227
www.triumphsportsusa.com
© 2012 Triumph Sports USA. All Rights Reserved.
IMPORTANT SAFETY INSTRUCTIONS
Read all instructions
1. Read all instructions-All the safety and operating instructions should be read carefully before this hockey game is
played.
2. Caution-This is not a toy and is intended for use by or under the supervision of adults. Adults should review safety
guidelines with children to avoid possible risk of electric shock or other injuries.
3. Power sources-This hockey game should be operated only from 110-120V A.C., 60 cycle current as indicated on
the identification label. If you are not sure of the type of power supply to your home, consult your appliance dealer
or local power company.
4. Power cord protection-Power cord should be routed so that it is not likely to be walked on or pinched by items
placed upon or against it. Pay particular attention to cords at plugs, convenience receptacles, and the point of
exit from the game.
5. Overloading-Do not overload wall outlets and extension cords as this can result in a risk of fire or electric shock.
6. Object and liquid entry-Never push objects of any kind into this game through openings as they may touch
dangerous voltage points or short-out parts which could result in a fire or electric shock. Never spill liquid of any
kind on the game.
7. Ventilation-Openings in the game are provided for the exhaust air to create a cushion effect. The openings on the
air blower are for the intake air. Keep clear of the air blower when it is on. Do not put hand or other objects near
the intake openings. To ensure reliable operation of the game and protect it from overheating these openings must
not be blocked or covered.
8. Damage requiring service-Unplug the game from the wall outlet.
Do not attempt to service the blower yourself as opening or removing covers may expose you to dangerous
voltage or other hazards. Refer servicing to qualified service personnel under the following conditions.
A. When the power supply cord or plug is damaged.
B. If liquid has spilled, or objects have fallen into the blower.
C. When the air blower exhibits a distinct change in performance e.g. abnormal noise, this indicates a need for
service.
9. Grounding or Polarization-This game is equipped with a polarized alternating current line plug (a plug having one
blade wider than the other). This plug will fit into the power outlet only one way. This is a safety feature. If you are
unable to insert the plug fully into the outlet, try reversing the plug. If the plug should still fail to fit, contact your
electrician to replace your obsolete outlet. Do not defeat the safety purpose of the polarized plug.
10. CAUTION-ELECTRICALLY OPERATED PRODUCT-Not recommended for children under 8 years of age. As with
all electrical products, precautions should be observed during handling and use to reduce the risk of electric
shock.
11. We recommend that the game be periodically examined for conditions that may result in the risk of fire, electrical
shock, or injury to persons. In the event such conditions exist, the game should not be used until properly
repaired.
12. RISK OF FIRE, ELECTRIC SHOCK, OR INJURY TO PERSONS
WARNING-When using electric appliances, basic precautions should always be followed, including the following:
A) Read all the instructions before using the appliances.
B) To reduce the risk of injury, close supervision is necessary when an appliance is used near children.
C) Do not contact moving parts.
D) Only use attachment recommended or sold by the manufacturer.
E) Do not use outdoors.
F) For a cord-connected appliance, the following shall be included:
-To disconnect, turn all controls to the off position, then remove plug from outlet.
-Do not unplug by pulling on cord. To unplug, grasp the plug, not the cord.
-Unplug from outlet when not in use and before servicing or cleaning.
-Do not operate any appliance with a damaged cord or plug, or after the appliance malfunctions or is dropped or
damaged in any manner. Return appliance to the nearest authorized service facility for examination, repair, or
electrical or mechanical adjustment.
13. To reduce the risk of electric shock, this appliance has a polarized plug (one blade is wider than the other).This
plug will fit in a polarized outlet only one way. If the plug does not fit fully in the outlet, reverse the plug. If it still
does not fit, contact a qualified electrician to install the proper outlet. Do not change the plug in any way.
SAVE THESE INSTRUCTIONS
WARNING: To Reduce The Risk Of Fire Or Electric Shock, Do Not Use This Fan With Any Solid-State Speed
Control Device.
For Household use only.
45-6061 PARTS LIST
8mm
8mm
3.5 x 12mm Screw
24
3.5 x 16mm Screw
#17
#19
#18
LEG LEVELER
4 Pieces
!
WARNING:
!
WARNING:
FELT PAD
2 Pieces
16
Adult Assembly Required.
CHOKING HAZARD -- This item contains small parts or / and small
balls. Not suitable for children under 3 years.
Assembly Instructions
1. Find a clean, level place to begin the assembly of your Air Hockey Table. The table will be assembled upside down
and then turned over on its legs once the assembly completed. This game table is heavy, and turning it over will
require at least two adults.
2. Remove all the parts from the box and verify that you have all of the listed parts as shown on the parts list page.
Carefully cut or tear the four corners of the box so that the bottom of the box can be used as your work surface.
FIG.1
3. Place the Main Frame (#1) face down on a clean and flat surface. Attach the Left Leg (#2) and Right Leg (#3) to the
Main Frame using three Leg Bolts (#6) and three Leg Washers (#7) per Leg. See FIG.1.
4. Screw the Leg Levelers (#17) into the bottom of each leg.
5. Attach the Leg End Panels (#4) to the Legs using four Screws (#8) per Leg End Panel.
6. Attach the Leg Side Panel (#5) to the Leg (#2 or #3) and side apron of the Main Frame (#1) using two Screws (#8) per
Leg Side Panel.
19
19
CAUTION: Two strong adults are recommended to turn the table over as shown.
1. Lift the table off the ground.
2. Turn the table over.
3. Place it on all four feet at the same time on the ground.
HOLD TABLE
CABINET
DO NOT
HOLD THE
LEGS
DO NOT LEAN THE
TABLE ON ITS LEGS!
8. Thread the wire from Goal Box (#12) through the openings of the end aprons and support of the playfield to the
opening of side apron. See FIG.2A.
9. Attach the Goals (#12) to each End Apron using four Screws (#8). See FIG.2.
10. Attach the Electronic Scorer (#14) to the side apron in the pre-drilled holes using two Screws (#9). Insert the Sensor
Wire into the Electronic Scorer (#14). See FIG.2B.
11. Tear off the backside paper of the Felt Pad (#18) and stick them at the bottom of the Pushers (#10). See FIG.2C.
FIG. 2A
Underside
the table
12
FIG. 2B
18
FIG.2C
10
THE HOCKEY GAME ASSEMBLY IS COMPLETE. PLUG IN THE POWER CORD. TURN ON THE MOTOR.
Score Keeper Operation
1. Remove the battery cover and insert 2 AAA Batteries into the battery box. (2 AAA Batteries Not Included.)
When HOME/VISITOR indicates “0”, therewith starting the game.
Reminding: a. Batteries must be installed according to the correct polarization (+ and -) required.
b. If the game will not be used for a long period of time, we recommend that the batteries
should be removed.
c. Please clean the battery contacts and also those of the devices prior to battery installation.
2. When the “HOME” player scores a point, the “HOME” indicator will show 1 point. On the contrary, when the
“VISITOR” player scores a point, the “VISITOR” indicator will show 1 point.
3. The first player to reach 10 points wins the game, and the winner’s indicator will stay at 9 points and flash for
seconds.
4. After the game, you can press “RESET” button to start a new game and the HOME/VISITOR will indicate “0”.
Note:
1. You can press “RESET” button at any time, to set the scorer back to the beginning status.
2. You can press “ON/OFF” at any time to turn off the scorer. Press “ON/OFF” button again to turn it back on.
!
WARNING:
1) Require 2 pcs AAA Batteries (Not included).
2) Do not mix old and new batteries.
3) Do not mix alkaline, standard (carbon zinc), or rechangeable (nickel-cadmium) batteries.
This device complies with the part 15 of the FCC rules.
Operation is subject to the following two conditions :
(1) This device may not cause harmful interference.
(2) This device must accept any interference received, including interference that may
cause undesired operation.
4