1
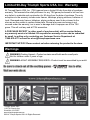
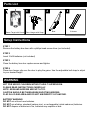
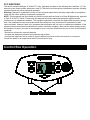
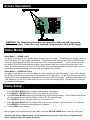
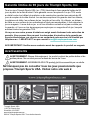
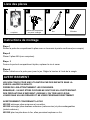
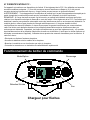
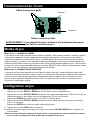
Item# 21-2018
Please keep this instruction manual for future reference
If you have any problems with your new product,
please contact Triumph Sports USA at 1-866-815-4173,
or e-mail us at [email protected]
for any technical support or warranty issues.
Limited 90-Day Triumph Sports USA, Inc. Warranty
All Triumph Sports USA, Inc. (TSU) games have a limited 90-day from date of purchase
warranty. This warrants the retail purchaser for any TSU game purchased to be free from
any defect in materials and construction for 90 days from the date of purchase. The only
exceptions to the warranty include main frames, tabletops, playing surfaces, batteries or
tools. Damaged main frames, tabletops, playing surfaces need to be returned to the
store as we are unable to replace these parts. Normal play wear and usage is not
covered under the warranty, nor is wear or damage due to improper use of the TSU
game. This will void any and all TSU warranties.
A PURCHASE RECEIPT (or other proof of purchase date) will be required before
any warranty service is initiated. All requests for warranty service can be submitted
by email, in writing or by contacting our Customer Service Department at:
1-866-815-4173 or email us at [email protected].
IMPORTANT NOTICE! Please contact us before returning the product to the store.
Warnings
WARNING:Choking Hazard—Product contains small balls and/or small parts.
Not for children under 3 years of age.
WARNING: ADULT ASSEMBLY REQUIRED—Product must be assembled by an adult.
Triumph Sports USA
11327 W Lincoln Ave.
West Allis, WI 53227
www.triumphsportsusa.com
©2014 Triumph Sports USA. All Rights Reserved.
Parts List
Game Target with Scorer
Door Hanger with Strap
Bow
3 Arrows
Setup Instructions
STEP 1
Remove the battery box door with a phillips head screw driver (not included)
STEP 2
Insert 3 AAA batteries (not included)
STEP 3
Close the battery box door replace screw and tighten
STEP 4
Place door hanger clip over the door to play the game. Use the adjustable belt strap to adjust
to your desired height
WARNING
NOT FOR USE BY CHILDREN WITHOUT ADULT SUPERVISION.
PLEASE READ INSTRUCTIONS CAREFULLY.
NOTE: BOW AND ARROWS ARE NOT A TOY.
CAUTION SHOULD BE TAKEN WHEN SHOOTING ARROWS.
PLAY IN A CLEAR AREA AND DO NOT AIM DIRECTLY AT ANYONE.
BATTERY WARNING
DO NOT mix old and new batteries.
DO NOT mix alkaline, standard (carbon-zinc), or rechargeable (nickel-cadmium) batteries.
DO NOT dispose of batteries in fire, batteries may explode or leak.
FCC IDENTIFIER :
This device complies with part 15 of the FCC rules. Operation is subject to the following two conditions: (1) This
device may not cause harmful interference, and (2) This device must accept any interference received, including
interference that may cause undesired operation.
Warning! Changes or modifications to this unit not expressly approved by the party responsible for compliance
could void the user’s authority to operate the equipment.
NOTE: This equipment has been tested and found to comply with the limits for a Class B digital device, pursuant
to Part 15 of the FCC Rules. These limits are designed to provide reasonable protection against harmful
interference in a residential installation. This equipment generates, uses and can radiate radio frequency energy
and, if not installed and used in accordance with the instructions, may cause harmful interference to radio
communications. However, there is no guarantee that interference will not occur in a particular installation. If this
equipment does cause harmful interference to radio or television reception, which can be determined by turning
the equipment o and on, the user is encouraged to try to correct the interference by one or more of the following
measures:
• Reorient or relocate the receiving antenna.
• Increase the separation between the equipment and receiver.
• Connect the equipment into an outlet on a circuit different from that to which the receiver is connected.
Consult the dealer or an experienced radio/TV technician for help.
Control Box Operation
Screen Operations
WARNING: You must first remove the clear protective film from the target area
before game play. If the film is not removed, arrows will not stick to the target.
Game Modes
Game Mode 1 – ZOMBIE HUNT
The object of this game is to be the first player to take down the Zombie! To take down the zombie, you must
be the first player to hit the winning hit point total. The default hit point total you must reach is 50 total points.
(There are game options that allow you to play up to 100 or 150 hit point totals) To get to the hit point total,
you must hit POSITIVE point numbered targets on the zombie to add up to the winning hit point total of the
game. Be careful with your aim, because every NEGATIVE numbered target that you hit will reduce your hit
point total by that amount taking you further away from defeating the zombie.
Game Mode 2 – THREE SHOT KILL
The object of this game is to be the first player to hit the zombie in all 3 specific targets in order. The computer
will randomly choose the 3 target areas on the zombie to hit for each game. You will need to follow the scoring
display and hit the corresponding blinking target first to move onto the next target. After the blinking target is hit,
it will disappear from the LCD screen and you move on to the next blinking target. The first player to eliminate
all 3 targets wins the game.
Game Setup
1. Press OPTION / MODE button to toggle between game 1 and game 2
Press SELECT / ENTER button to choose the game you wish to play
2. Press OPTION / MODE button to toggle between any game options available. For the Zombie Hunt Game,
you can choose between winning hit point totals of 50, 100, and 150 points.
Press ENTER to choose the game option you would like to use.
3. Press OPTION / MODE button to toggle between the amount of players you wish to play (1 or 2 players)
Press ENTER to choose the confirmed amount of players
4. Press START button to begin.
After the game is over and you wish to play again, press the OPTION / MODE button to set up a new game.
*Practice your skills using the player 1 mode options and gear up for some fierce competition with
Player 2 options with your friends and family
Game Play Instructions
Before you start the game, you must choose how many arrows each player will shoot at the target before the
next player takes their turn. To keep the game moving along smoothly, it’s best to allow each player either 3
arrows or 6 arrows per turn before you switch.
Removing the Arrows from the Game Target
After a player has completed shooting and wishes to retrieve their arrows from the game board, they must press
the START button to deactivate the sensors so the arrows can be removed without affecting the score. Once
the START button is pressed, you will hear the voice command to “START HUNTING, REMOVE ARROWS”.
At this time, arrows can be safely removed from the game target. To begin play again, press the START button
and you will hear a beep sound which indicates you can start shooting again. The beep confirms that the
sensors are active again for game play scoring. Repeat this process during game play.
Taking Turns for 2 Player Games
To change scoring over to the next player, you must press the MODE / OPTION button during game play to
change over to the other players score.
(NOTE: You cannot change over to the next player if the sensors
are deactivated during the arrow removal process.) You must first press the START button to re-activate the
sensors first before you change players.
The LCD display shows which player is actively computing score. There will be 3 moving dots
. . . next to the player 1 or player 2 indicator to confirm which player is actively scoring.
SOUND button - The SOUND button can be pressed at any time during active game play to turn on and off the
background sounds
Game Target Height and Shooting Distance
Players must choose and agree to the height of the target and shooting distance for game play. It is
recommended to not shoot arrows standing too close to the target to avoid potential deflections and injury. The
game target height can be changed by using the adjustable belt strap on top of the game target.
Adjusting the Bow Strength (ADULT SUPERVISION NEEDED)
The shooting strength of the bow can be adjusted and increased. Pull and remove the end cap from the top or
bottom of the bow. To make the bow string tighter, simply wrap the string around the bow body a few times to
make the shooting string tighter. Place the end cap back on making sure the slot of the end cap lines up with
the string. This will increase the speed of the arrows significantly. It is highly recommended to stand further
away from the target when using the bow after the strings have been tightened. Always make sure there are no
people or pets around the target or in the shooting path during game play.
Article N° 21-2018
Chasse à l’arcau zombie
Veuillez conserver ce mode d’emploi pour consultation ultérieure
Si ce produit récemment acquis présente un défaut,
veuillez contacter Triumph Sports USA par téléphone au
1-866-815-4173, ou par courrier électronique à
[email protected] pour obtenir une aide
technique ou l’exécution de la garantie.
Garantie limitée de 90 jours de Triumph Sports, Inc.
Tous les jeux Triumph Sports USA, Inc. (TSU) bénéficient d’une garantie limitée de 90
jours à partir de la date d’achat. Cette garantie couvre l’acquéreur d’un jeu TSU vendu
au détail contre tout défaut de matériau ou de construction pendant une période de 90
jours à compter de la date d’achat. Les seules exceptions à la garantie sont les châssis,
les plateaux de table, les surfaces de jeu, les piles et les outils. Un châssis, un plateau
de table ou une surface de jeu endommagé n'étant pas remplaçables, il faut rapporter le
jeu au magasin. L’usure due au jeu ou à une utilisation normale n’est pas couverte par
la garantie, ni l’usure ou les dommages provoqués par un usage abusif du jeu, lesquels
annulent toutes les garanties TSÚ.
Un reçu ou une autre preuve d’achat sera exigé avant d’entamer toute exécution de
garantie. Vous pouvez faire parvenir les demandes d’exécution de la garantie par
courrier électronique, par courrier ou en contactant notre service à la clientèle par
téléphone au : 1-866-815-4173 ou par courriel à [email protected].
AVIS IMPORTANT! Veuillez nous contacter avant de rapporter le produit au magasin
Avertissements
AVERTISSEMENT: Risque d'étranglement. Le produit contient de petites balles et de
petites pièces. Ne convient pas aux enfants de moins de 3 ans.
AVERTISSEMENT: ASSEMBLEE ADULTE-produit doit être assemblé par un adulte.
Ne manquez pas de consulter tous les jeux passionnants que
propose Triumph Sports USA. Visitez notre site web à:
BILLARDS
FLÉCHETTES
TABLES DE JEUX
Triumph Sports USA
11327 W Lincoln Ave.
West Allis, WI 53227
www.triumphsportsusa.com
©2014 Triumph Sports USA. Tous droits réservés.
CASINO
JEUX D’EXTÉRIEUR
CIBLES DE
FLÉCHETTES
Liste des pièces
Cible de jeu avec
compteur
Système de suspension
sur porte à sangle
Arc
3 flèches
Instructions de montage
Étape 1
Retirer la porte du compartiment à piles avec un tournevis à pointe cruciforme(non compris)
Étape 2
Placer 3 piles AAA (non comprises)
Étape 3
Fermer la porte du compartiment à piles, replacer la vis et serrer
Étape 4
Placer l’attache sur la porte pour jouer le jeu. Régler la hauteur à l’aide de la sangle
AVERTISSEMENT
JEU NON CONÇU POUR UNE UTILISATION PAR DES ENFANTS SANS LA
SURVEILLANCED’UN ADULTE.
PRIÈRE DE LIRE ATTENTIVEMENT LES CONSIGNES.
REMARQUE : UN ARC ETDES FLÈCHES NE SONT PAS UN JOUETD’ENFANT.
DES PRÉCAUTIONS S’IMPOSENT LORSQUE L’ON TIRE UNE FLÈCHE.
JOUER DANS UN LIEU DÉGAGÉ ET NE VISER PERSONNE DIRECTEMENT.
AVERTISSEMENT CONCERNANT LA PILE
NE PAS mélanger piles anciennes et nouvelles.
NE PAS mélanger piles alcalines ordinaires (carbone-zinc) et piles rechargeables
(nickel-cadmium).
NE PAS jeter les piles dans le feu, elles pourraient exploser ou fuir.
N° D’IDENTIFICATION FCC :
Cet appareil est conforme aux dispositions de l’article 15 du règlement de la FCC. Son utilisation est soumise
aux deux conditions suivantes : (1) Il ne doit provoquer aucune interférence néfaste et (2), il doit pouvoir
accepter toutes les interférences reçues, y compris celles pouvant causer un dysfonctionnement.
AVERTISSEMENT : Tout changement ou modification de matériel qui n’a pas été expressément accepté par la
partie chargée de la conformité pourrait annuler l’autorisation de l’utilisateur de le faire fonctionner.
REMARQUE : À l’issue des tests auxquels il a été soumis, ce matériel a été déclaré conforme aux limites
relatives à un dispositif numérique de classe B en vertu de l’article 15 du règlement de la FCC. Ces limites sont
destinées à assurer une protection raisonnable contre les interférences dans un environnement résidentiel. Ce
matériel génère, utilise et peut émettre de l'énergie radiofréquence et, s'il n'est pas installé et utilisé
conformément au manuel d'utilisation, il risque de provoquer de graves interférences aux communications
radio.Ces limites sont destinées à assurer une protection raisonnable contre les interférences dans un
environnement résidentiel. Cependant, tout risque d'interférences ne peut être totalement exclu : s'il constate
des interférences lors de la réception d'émissions de radio ou de télévision (il suffit pour le vérifier d'allumer et
d'éteindre successivement l'appareil), l'utilisateur devra prendre les mesures nécessaires pour les éliminer. À
cette fin il devra :
• Réorienter ou déplacer l'antenne réceptrice.
• Accroître la distance entre le matériel et le récepteur.
• Brancher le matériel sur un circuit autre que celui du récepteur.
• Consulter le revendeur ou un technicien de radio/télévision expérimenté.
Fonctionnement du boîtier de commande
Démarrage
Mode/Option
Sélection/ Entrée
Marche
Arrêt
Son
Chargeur pour flèches
Fonctionnement de l’écran
Cibles à numéros négatifs
Joueur 1
Joueur 2
Cibles à nombres positifs
AVERTISSEMENT : Il est impératif de retirer d’abord le film protecteur transparent
de la cible, sans quoi les flèches n’adhéreront pas.
Modes de jeu
Mode de jeu 1 – CHASSE AU ZOMBIE
L’objet de ce jeu est d’être le premier joueur à abattre le Zombie ! Pour abattre le zombie, il faut être le premier
ou la première à atteindre le total correspondant au total de points gagnant. Le total de points par défaut à
atteindre pour abattre le zombie est de 50 points. (Certaines options du jeu permettent de jouer jusqu’à total
gagnant de 100 ou 150 points). Pour atteindre le total de points gagnant, il faut frapper des cibles portant des
nombres POSITIFSsur le zombie qui s’ajouteront pour arriver au total de points gagnant du jeu. Il est important
de viser avec soin car toute cible atteinte portant un nombre NÉGATIF réduit votre total de points de ce nombre
de points, ce qui vous éloigne de votre objectif de vaincre le zombie.
Mode de jeu 2 – ÉLIMINATION EN TROIS TIRS
L’objet de ce jeu est d’être le premier joueur à frapper le zombie dans les 3 cibles spécifiques, dans l’ordre.
L’ordinateur choisit au hasard les 3 zones à cibler sur le zombie pour chaque partie. Il faudra suivre l’indicateur
de score et viser d’abord la cible clignotante correspondante avant de passer à la cible suivante. Une fois
atteinte, la cible clignotante disparaît de l’écran LCD et l’on passe à la cible suivante. Le premier joueur à
éliminer les 3 cibles gagne la partie.
Configuration du jeu
1. Appuyer sur le bouton OPTION / MODE pour passer du jeu 1 à 2 et inversement.
Appuyer sur le bouton SELECT / ENTER pour choisir le jeu auquel on souhaite jouer.
2. Appuyer sur le bouton OPTION / MODE pour passer d’une option disponible du jeu à l’autre. Pour le jeu de
chasse au zombie, on peut choisir entre un total gagnant de 50, 100, ou 150 points.
Appuyer sur ENTER pour choisir l’option du jeu que l’on souhaite utiliser.
3. Appuyer sur le bouton OPTION / MODE pour alterner entre le nombre de joueurs avec qui l’on souhaite
jouer (1 ou 2 joueurs)
Appuyer sur ENTER pour choisir le nombre confirmé de joueurs.
4. Appuyer sur le bouton START pour commencer.
Une fois le jeu terminé, appuyer pour jouer à nouveau, sur le bouton OPTION / MODEafin de configurer une
nouvelle partie.
*Exercez-vous en utilisant les options du mode joueur 1 et préparez-vous à une compétition acharnée
avec vos amis et membres de votre famille avec les options de joueur 2.
Instructions concernant le jeu
Avant de débuter le jeu, il faut choisir le nombre de flèches que chaque joueur tirera sur la cible avant que le
joueur suivant prenne son tour. Pour permettre un déroulement du jeu sans heurt, le mieux est de laisser
chaque joueur tirer 3 ou 5 flèches par tour avant de changer.
Retrait des flèches de la cible
Une fois qu’un joueur a terminé son tour et souhaite retirer ses flèches de la cible, il doit appuyer sur le bouton
START pour désactiver les capteurs afin de retirer les flèches sans que cela n’ait d’incidence sur le score.
Lorsqu’on appuie sur le bouton START, on entendl’ordre vocal de « COMMENCER LA CHASSE, RETIRER
LES FLÈCHES ». On peut alors retirer les flèches de la cible en toute sécurité. Pour débuter la partie ellemême, appuyer sur le bouton START et une tonalité d’avertissement indique que l’on peut recommencer à tirer.
La tonalité confirme que les capteurs sont à nouveau actifs pour marquer les points du jeu. Procéder de même
pendant le jeu.
Tours dans une partie à 2 joueurs
Pour pouvoir enregistrer le score du joueur suivant, comme des autres après lui, il faut appuyer sur le bouton
MODE / OPTION pendant le jeu. (REMARQUE : On ne peut pas passer au joueur suivant si les capteurs sont
désactivés pendant le retrait des flèches). Il faut d’abord appuyer sur le bouton START pour réactiver les
capteurs d’abord avant de changer de joueurs.
L’affichage LCD indique le joueur dont il est en train de calculer le score. 3 points mobiles à côté de joueur 1 ou
joueur 2 confirment le joueur dont le score est en cours d’enregistrement.
Le bouton SOUND(Son) - On peut appuyer sur le bouton SOUND à n’importe quel moment pendant un jeu
actif pour faire entendre ou arrêter les bruits de fond.
Hauteur de la cible de jeu et distance de tir
Les joueurs doivent choisir la hauteur de la cible et la distance de tir et s’accorder sur ces dernières. Il est
conseillé de ne pas tirer de flèches trop près de la cible pour éviter des ricochets et blessures possibles. On peut
modifier la hauteur de la cible en utilisant la sangle réglable qui se trouve à la partie supérieure de la cible.
Réglage de la puissance de l’arc (SURVEILLANCE PAR UN ADULTE NÉCESSAIRE)
On peut régler et augmenter la puissance de l’arc. Tirer et retirer le capuchon d’extrémité de la partie supérieure
ou inférieure de l’arc. Pour tendre davantage la corde, il suffit de l’enrouler de quelques tours autour du corps de
l’arc. Replacer le capuchon d’extrémité en veillant à ce que la rainure du capuchon d’extrémité soit alignée avec
la corde, ce qui augmentera beaucoup la vitesse des flèches. Il est vivement conseillé de s’éloigner de la cible
lorsque l’on utilise l’arc après avoir retendu les cordes. Toujours veiller à ce qu’il ne se trouve personne ni aucun
animal autour de la cible ou sur la trajectoire du tir pendant le jeu.