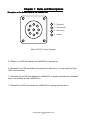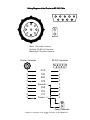
1
Table of Contents
Foreword ............................................................................................................................. v
Declaration Of Conformity ........................................................................................... vi
Declaration Of Conformity ......................................................................................... viii
WARNING! ....................................................................................................................... ix
Notices.............................................................................................................................. x
LIMITED WARRANTY: ....................................................................................................... xi
Chapter 1: Rules and Descriptions ................................................................................. 12
Description of the Bottom Panel of the LAWNII Plus ................................................ 12
Description of the Top Panel of the LAWNII Plus ....................................................... 13
Description of the Interface Connectors of the LAWNII-Plus OEM Board ............. 14
Installation of LAWNII Plus OEM ................................................................................... 15
Description of the Front Panel of the LAWNII ............................................................ 16
Description of the Rear Panel of the LAWNII ............................................................ 17
Installing the OEM board ............................................................................................ 18
FCC Rules for Customers Using LAWN II Plus OEM Board ........................................ 19
Chapter 2: Programming the LAWN II ............................................................................ 20
Using a Terminal or MS-DOS Terminal Simulator ....................................................... 20
Using the Terminal Simulation Program from Windows 3.1 ..................................... 21
Using the Terminal Simulation Program from Windows 95 ..................................... 22
Using LAWNII Configuration Program 3.0 with Terminal Emulator................................ 22
Installing the LAWNII 3.0 Configuration Program ...................................................... 23
Getting Started with the LAWNII Configuration Program 3.0 ................................. 23
Changing the LAWNII Serial Settings .......................................................................... 23
Checking LAWNII Settings ........................................................................................... 23
Using the Terminal Emulator ........................................................................................ 24
Using the Loop back Test ............................................................................................ 24
Using the LAWN Wizard ................................................................................................ 25
Chapter 3: Overview........................................................................................................ 26
Chapter 4: Operation Modes .......................................................................................... 27
Command mode ......................................................................................................... 27
Transparent mode........................................................................................................ 28
Return to command mode from transparent mode .............................................. 28
Peripheral device mode ............................................................................................. 28
Default Connect operation ........................................................................................ 29
Datagram mode .......................................................................................................... 29
Chapter 5: Operation requirements ............................................................................... 30
Name ............................................................................................................................. 30
System number ............................................................................................................. 30
Via .................................................................................................................................. 30
Radio channel .............................................................................................................. 31
Hardware reset ............................................................................................................. 31
RS-232 Interface ........................................................................................................... 31
Chapter 6: Commands the User Can Modify ................................................................ 32
ABAUD n ....................................................... 32
AUTOLF ON/OFF ................................................. 32
AWLEN 7/8 ..................................................... 32
BEACON EVERY N / BEACON AFTER N ............................... 32
BREAK ......................................................... 33
BREAKLN n ..................................................... 33
CHAN 1/2/3/4 .................................................. 33
CMDTIME n ..................................................... 33
CONNECT name .................................................. 33
CONOK ON/OFF .................................................. 34
DFC ON/OFF .................................................... 34
DFCNAME name .................................................. 34
DIGIPEAT ON/OFF ............................................... 34
DISCONNECT .................................................... 34
DISPLAY option ................................................ 34
ECHO ON/OFF ................................................... 35
FCC ........................................................... 35
HF ON/OFF .................................................... 35
MHEARD ........................................................ 35
MHCLEAR ....................................................... 35
MYCALL name ................................................... 35
PACLEN n ...................................................... 36
PACTIME AFTER N and PACTIME EVERY N ........................... 36
PARITY n ...................................................... 36
RESENDS n ..................................................... 37
RESET ......................................................... 37
RESTART ....................................................... 37
RETRY n ...................................................... 37
SAVE .......................................................... 37
STATUS ........................................................ 37
SYSNUM n ...................................................... 38
TIMEOUT n ..................................................... 38
TRANSPARENT ................................................... 38
TRFLOW ON/OFF ................................................. 38
TRIES ......................................................... 38
TXFLOW ON/OFF ................................................. 38
XFLOW ON/OFF .................................................. 38
Chapter 7: Datagram Commands ................................................................................. 39
LAWNGRAM ON/OFF ............................................... 39
LCALLS nl,n2,.. ............................................... 39
TRANSGRA ON/OFF .............................................. 39
UNPROTO name ................................................. 39
Chapter 8: 485 Option Command .................................................................................. 39
ASYNCPH n ..................................................... 39
Chapter 9: Messages from the LAWNII ........................................................................... 40
Command mode messages ...................................................................................... 40
Command mode error messages ............................................................................. 40
Link status messages .................................................................................................... 41
Other messages ........................................................................................................... 42
Chapter 10: Examples ..................................................................................................... 43
Send data sequence .................................................................................................. 43
Receive data sequence ............................................................................................. 43
Loopback test .............................................................................................................. 43
Master-slave network .................................................................................................. 44
RS-232 cable replacing (one-to-one)........................................................................ 46
Chapter 11: Application Notes: ...................................................................................... 47
Radio propagation investigation ............................................................................... 47
Using repeater-set to extend coverage range in the broadcast mode. ............. 47
Flow control .................................................................................................................. 47
Packet formation ......................................................................................................... 48
Timing ............................................................................................................................. 48
Conok off busy message ............................................................................................ 48
^C^C^C ........................................................................................................................ 48
Datagram and beaconing ......................................................................................... 48
Latency time ................................................................................................................. 48
Chapter 12: LAWNII Error Counters ................................................................................. 49
Chapter 13: Tips to Using the LAWNII for Indoor Applications ..................................... 50
Chapter 14: Options ......................................................................................................... 51
Internal Battery Option for LAWNII-BAT ...................................................................... 51
Antenna ........................................................................................................................ 51
Chapter 15: Description of the Circular Connector on the LAWNII-Plus ..................... 52
Wiring Diagram of the Circular-to-RS-232 Cable ..................................................... 53
Chapter 16: LAWNII-Plus Specifications ......................................................................... 54
Chapter 17: Installation of the LAWNII Plus .................................................................... 55
Introduction to LAWN II Plus installation ..................................................................... 55
Antenna Height Requirement for long range applications (more than 5 miles) . 55
Installation ..................................................................................................................... 57
Site Selection ................................................................................................................ 57
Chapter 18: Support selection ........................................................................................ 60
Roof mounting .............................................................................................................. 60
Telescoping Mast ......................................................................................................... 60
Side of House Mount ................................................................................................... 61
Water tank guard rail mount ...................................................................................... 61
Tower Mount ................................................................................................................. 63
Chimney Mount ........................................................................................................... 63
Chapter 19: Polarization selection ................................................................................. 64
Correct Polarizations: ................................................................................................... 65
Chapter 20: Lightning protection .................................................................................... 66
Chapter 21: The Mast Selection ...................................................................................... 67
Chapter 22: Installing the LAWNII Plus system ............................................................... 68
Bench functional check .............................................................................................. 68
Installation ..................................................................................................................... 68
Installing the aluminum raincoat for LAWNII+ ........................................................... 68
Installing the Cold Shrink Tape .................................................................................... 69
Installation Tips and Warnings:.................................................................................... 70
Chapter 23: System Check and Functional Test ........................................................... 72
LED status check .......................................................................................................... 72
Connect test ................................................................................................................. 73
Data test ........................................................................................................................ 73
More on the antenna alignment ............................................................................... 73
Loopback Test .............................................................................................................. 74
One-to-one network .................................................................................................... 74
Multidrop network ........................................................................................................ 75
Chapter 24: Making RS-232 Cables for LAWNII-Plus ..................................................... 76
Connect a LAWNII-Plus to a PC or printer (DTE) ....................................................... 76
Connect a LAWNII-Plus to a modem (DCE) ............................................................. 76
Connect a LAWNII-Plus to a terminal ........................................................................ 77
Chapter 25: 485 Option ................................................................................................... 78
LAWNII Plus with 485 option. ........................................................................................ 78
485 Option for the regular LAWNII .............................................................................. 78
LAWNII Plus OEM board with the 485 option ............................................................ 79
422 option ..................................................................................................................... 80
Termination and Bias ................................................................................................... 80
Chapter 26: Using Repeaters for the Broadcast Mode ................................................. 82
Serial repeater set ........................................................................................................ 82
Parallel repeater set..................................................................................................... 83
Performance Improvement by Parallel Repeating ................................................. 86
This eequipment
quipment has b
e en teste
d and found to comply with the limits for a Class B digit
al
be
tested
digital
device, pursuant to P
art 1
5 of the FFC
C C rules. T
hese limits are designe
d to provide reasonable
Part
15
These
designed
prote
ction against harmful interference when the eequipment
quipment is operate
d in a residential
protection
operated
inst
allation. T
his eequipment
quipment generates, uses, and ccan
an radiate radio fre
quency energy and if
installation.
This
frequency
not inst
alle
d and use
d in accordance with the instruction manual may ccause
ause harmful interalled
used
installe
ference to radio communic
ations. However, there is no guarante
e that harmful interference
communications.
guarantee
ause harmful interference to
will not occur in a particular inst
allation. If this eequipment
quipment does ccause
installation.
radio or television re
ception, which ccan
an b
e determine
d by turning the eequipment
quipment on off and
reception,
be
determined
on, the user is encourage
d to try to corre
ct the interference by one or more of the following
encouraged
correct
measures,
•
•
•
•
Re
orient or reloc
ate the re
ceiving antenna.
Reorient
relocate
receiving
Increase the separation b
etwe
en the eequipment
quipment and the re
ceiver
betwe
etween
receiver
ceiver..
Conne
ct the eequipment
quipment into an outlet on a circuit different from that to which the
Connect
re
ceiver is conne
cte
d.
receiver
connecte
cted.
Consult the dealer or an experience
d radio T
V te
chnician for help.
experienced
TV
technician
De
claration Of Conformity
Declaration
In accordance with FFC
C C Rules and Re
gulations
Regulations
Code of FFe
e deral Re
gulations 4
7, part 1
5
Regulations
47,
15
Teste
dT
o Comply
ested
To
andards
With FFC
C C St
Standards
F C C Rule P
art 1
5 for Digit
al Devices
Part
15
Digital
Manufacturer's Name:
Omnispread Communications, Inc.
809 N. Bethlehem Pike #C6
P.O. Box 248
Spring House, PA 19477
Type of Equipment:
Wireless RS-232 Radio Modem
Model Number:
LAWNII Plus, model: 210
Year of Manufacture:
1997
October 30, 1997
I, the undersigned, hereby declare that the equipment specified above conforms
to the above standard.
Wen T. Lin
President
Omnispread Communications, Inc.
Test Facility:
Washington Laboratories, Ltd.
7560 Lindbergh Dr.
Gaithersburg, MD 20879
NVLAP: 200066-0
This eequipment
quipment has b
e en teste
d and found to comply with the limits for a Class B digit
al
be
tested
digital
device, pursuant to P
art 1
5 of the FFC
C C rules. T
hese limits are designe
d to provide reasonable
Part
15
These
designed
prote
ction against harmful interference when the eequipment
quipment is operate
d in a residential
protection
operated
inst
allation. T
his eequipment
quipment generates, uses, and ccan
an radiate radio fre
quency energy and if
installation.
This
frequency
not inst
alle
d and use
d in accordance with the instruction manual may ccause
ause harmful interalled
used
installe
ference to radio communic
ations. However, there is no guarante
e that harmful interference
communications.
guarantee
ause harmful interference to
will not occur in a particular inst
allation. If this eequipment
quipment does ccause
installation.
radio or television re
ception, which ccan
an b
e determine
d by turning the eequipment
quipment on off and
reception,
be
determined
on, the user is encourage
d to try to corre
ct the interference by one or more of the following
encouraged
correct
measures,
•
•
•
•
Re
orient or reloc
ate the re
ceiving antenna.
Reorient
relocate
receiving
Increase the separation b
etwe
en the eequipment
quipment and the re
ceiver
betwe
etween
receiver
ceiver..
Conne
ct the eequipment
quipment into an outlet on a circuit different from that to which the
Connect
re
ceiver is conne
cte
d.
receiver
connecte
cted.
Consult the dealer or an experience
d radio T
V te
chnician for help.
experienced
TV
technician
De
claration Of Conformity
Declaration
In accordance with FFC
C C Rules and Re
gulations
Regulations
Code of FFe
e deral Re
gulations 4
7, part 1
5
Regulations
47,
15
Teste
dT
o Comply
ested
To
andards
With FFC
C C St
Standards
F C C Rule P
art 1
5 for Digit
al Devices
Part
15
Digital
Manufacturer's Name:
Omnispread Communications, Inc.
809 N. Bethlehem Pike #C6
P.O. Box 248
Spring House, PA 19477
Type of Equipment:
Wireless RS-232 Radio Modem
Model Number:
LAWNII Plus OEM, model 211
Year of Manufacture:
September 10, 1998
I, the undersigned, hereby declare that the equipment specified above conforms
to the above standard.
Wen T. Lin
President
Omnispread Communications, Inc.
Test Facility:
Washington Laboratories, Ltd.
7560 Lindbergh Dr.
Gaithersburg, MD 20879
NVLAP: 200066-0
- Omnispread Communications, Inc. - viii -
For Model Name: LAWNII Plus, LAWNII Plus OEM, and LAWNII.
FCC ID: LT4LAWNII, LT4LAWNIIP, LT4LAWNIIPO
This device complies with Part 15 of the FCC Rules. Operation is
subject to the following two conditions: (1) this device may not cause
harmful interference, and (2) this device must accept any interference
received, including interference that may cause undesired operation.
WAR
N I N G!
ARN
It is the responsibility of the inst
aller to ensure that this device is properly
installer
inst
alle
d to comply with the FFC
C C adopte
d Radio fre
quency exposure
installe
alled
adopted
frequency
limits. T
he 1
2 and 1
3 db Y
agi antennas should b
e mounte
d with minimal
The
12
13
Yagi
be
mounted
separation dist
ance of 7
.5 cm from all persons in order to avoid R
distance
7.5
RFF exposures that may exce
e d the allowe
d limits. All Y
agi antennas should b
e
excee
allowed
Yagi
be
mounte
d with their main b
eam away from any persons.
mounted
beam
- Foreword - ix -
Notices
Omnispread Communications, Inc. (OCI) has written this manual for use by OCI customers. The
information contained in this manual and associated software shall not be reproduced in whole or
in part without prior written approval of OCI.
OCI reserves the right to make changes in specifications and other information contained in this
manual without prior notice. The reader shall, in all cases, consult OCI to determine whether any
such changes have been made.
LAWNII TM User’s Manual
rev D, 08/2003
Copyright (c) 2003 Omnispread Communications, Inc.
Omnispread Communications, Inc.
809 N. Bethlehem Pike #C6
P.O. Box 248
Spring House, PA 19477
All rights reserved.
Trademark Information
LAWN® is a registered trademark of Omnispread Communications, Inc.
The LAWN logo, OCI, and the OCI logo are trademarks of Omnispread Communications, Inc.
Other Information
The LAWNII-Plus system hardware is proprietary to Omnispread Communications, Inc. Patented
in the United States of America and other countries.
LAWNII-Plus User Software Copyright (c) 1997 Omnispread Communications, Inc.
All rights reserved.
- Omnispread Communications, Inc. -x-
LIMITED WARRANTY:
Omnispread Communications, Inc. (“OCI”) warrants to the original purchaser that the LAWNII
will operate substantially in accordance with the description provided in the accompanying documentation (the “Documentation”). OCI also warrants the hardware will be free from defects in
materials and workmanship under normal use. This warranty does not cover the Datagram
LAWNII with Ni-Cd battery pack option, which will require replacements under normal use during
the life of the hardware. This warranty shall extend for a period of three years (for Datagram
LAWNII only) or one year (for LAWNII Plus) from the date of purchase by you. If you discover
that the LAWNII is defective at any time during the warranty period, (1) call OCI at 800-OCILAWN and request a Return Material Authorization Number (RMA Number) and (2) return the
defective item to OCI at 809 N Bethlehem Pike, #C6 Spring House, PA 19477, shipping and
insurance charges prepaid, together with your name, address, telephone number, RMA Number,
a description of the problem, and a copy of your receipt showing the date of purchase and the
price paid. OCI will, at OCI’s option, either (1) repair or replace the LAWNII that does not meet
OCI’s Limited Warranty, or (2) refund the price paid. These are your sole and exclusive remedies
of any claim relating to the performance of the LAWNII. This warranty does not apply if the
LAWNII has been damaged by accident, abuse, misuse, or misapplication or if the LAWNII has
been modified or opened.
EXCEPT AS SPECIFICALLY PROVIDED ABOVE, OCI MAKES NO OTHER WARRANTY OR
REPRESENTATION OF ANY KIND, EITHER EXPRESSED OR IMPLIED, WITH RESPECT TO THE
SOFTWARE, HARDWARE, DISKETTE OR DOCUMENTATION (THE “PRODUCTS”) INCLUDING THEIR QUALITY, PERFORMANCE, MERCHANTABILITY OR FITNESS FOR A PARTICULAR PURPOSE. THE ENTIRE RISK AS TO THE SELECTION, QUALITY, RESULTS AND PERFORMANCE OF THE PRODUCTS ARE ASSUMED BY YOU. IF THE PRODUCTS ARE DEFECTIVE (OTHER THAN AS SPECIFICALLY WARRANTED ABOVE), YOU (AND NOT OCI OR ITS
DEALERS, DISTRIBUTORS, AGENTS, OR EMPLOYEES) ASSUME ALL LIABILITY AND EXPENSE INCURRED AS A RESULT THEREOF.
IN NO EVENT WILL OCI OR ANYONE ELSE INVOLVED IN THE CREATION, PRODUCTION,
OR DELIVERY OF THE PRODUCTS BE LIABLE FOR ANY DIRECT, INDIRECT, SPECIAL, INCIDENTAL OR CONSEQUENTIAL DAMAGES (INCLUDING, BUT NOT LIMITED TO, DAMAGES
FOR LOSS OF PROFITS, INTERRUPTION OF USE, LOSS OF DATA) ARISING OUT OF THE
USE OR INABILITY TO USE THE PRODUCTS, EVEN IF ADVISED OF THE POSSIBILITY OF
SUCH DAMAGES.
Some states don’t allow the exclusion or limitation of implied warranties or limitation of liability for
incidental or consequential damages, so the above limitation or exclusion may not apply to you.
- Foreword - xi -
Chapter 1: Rules and Descriptions
Description of the Bottom P
anel of the LLA
AW N I I Plus
Panel
T - (Transmit)
C - (Connected)
R - (Received)
P - (Power)
Above: RS-232 Circular Connector
P—(Power) A red LED that indicates the LAWNII-Plus is powered up.
R—(Received) A red LED that indicates the presence of radio carriers. It is also called the Traffic
LED in some occasions.
C—(Connected) A red LED that indicates the LAWNII-Plus is virtually connected to its destination
and it is not available to other LAWNII-Plus’s.
T—(Transmit) A red LED that indicates the LAWNII-Plus is sending signals to the air.
- Omnispread Communications, Inc. - 12 -
Description of the T
op P
anel of the LLA
AW N I I Plus
Top
Panel
Above: The LAWNII Plus antenna connector.
- Chapter 1: Rules and Descriptions - 13 -
Description of the Interface Conne
ctors of the LLA
AW N I I-Plus O
E M Board
Connectors
OE
Left: The LAWNII-Plus OEM
board interfaces (front)
1. (Left to Right)
•
Power
•
Traffic
•
Connect
•
Transmit
2. DB9 female connector
3. Power Jack 2.1 mm center
positive.
Left: The LAWNII-Plus OEM
board interfaces (back)
1. SMA Connector
- Omnispread Communications, Inc. - 14 -
Inst
allation of LLA
AW N I I Plus O
EM
Installation
OE
3.177"
Right: Location of the mounting
holes on the LAWNII Plus OEM
board. The holes are .1” in diameter.
3.365"
3.000"
2.675"
1.000"
.355"
.710"
1.000"
Left: Antenna connector
mounting hole locations.
Below: Antenna connector
cable.
.110" Dia
.710"
.375" Dia
8.00"
SMA Plug
Reverse N Female
- Chapter 1: Rules and Descriptions - 15 -
Description of the FFront
ront P
anel of the LLA
AW N I I
Panel
Above: The front panel of the LAWNII
Power—A red LED that indicates the LAWNII is powered up.
Traffic—A green LED that indicates the presence of radio carriers.
Connected—A green LED that indicates the LAWNII is virtually connected to its destination and it
is not available to other LAWNIIs.
Transmit—A green LED that indicates the LAWNII is sending signals to the air.
- Omnispread Communications, Inc. - 16 -
Description of the Rear P
anel of the LLA
AW N I I
Panel
Above: The rear panel of the LAWNII.
1. Reset—A momentary push button that causes the LAWNII to return to the power up
reset condition.
2. RS-232 Data—A female 25 pin RS-232 connector.
3. Power—Accepting AC 10V or DC 12V input (Depends upon the models).
- Chapter 1: Rules and Descriptions - 17 -
Inst
alling the O
EM b
oard
Installing
OE
board
The OEM board can be mounted in two ways, either with the radio board on top or the processor
board on top. The advantage to mount the radio on top of the processor board is that it will
reduce the chance of damaging the component during assembly and it will also allow more room
when screwing the SMA connector of the cable to the board. However, it will be difficult to check
the status LEDs since they will be at the bottom. If the processor board is installed on top of the
radio board, there is a chance that the production operator might damage the components during
assembly especially when power tools are used. The components of the processor board are not
shielded and the components can be damaged by force if something hard, like a tool, hits the
components by accident. In contrast, the radio board is completely shielded and no components
are exposed. As a result, it is safer to handle the boards from this side during assembly.
You must also allow some room for the connectors. There are three connectors on the board, an
SMA connector for the antennas, a DB9 for the data and a power jack. The power jack and the
DB9 are right next to each other. Normally, the DB9 male plug can be longer than 1" so you
should allow room with 2" of clearance for the side with the DB9 connector. You also need to
allow 1" of clearance for the side with the SMA connector. Since the status LEDs are on the same
side as the SMA connector, you should always make this side easily visible.
Left: Radio on top
Right: Processor on top
- Omnispread Communications, Inc. - 18 -
F C C Rules for Customers Using LLA
AW N IIII Plus O
E M Board
OE
Since the LAWNII Plus OEM board is unlicensed, you, as the OEM user, are responsible for
complying with the FCC’s labeling and connector requirements.
1. Lab
eling re
quirement:
Labeling
requirement:
It is required by FCC that every part 15 radio product must have a warning label about interferences on the outside surface of the product. The warning label should also include the FCC ID of
the radio. To comply with this rule, OCI supplies a warning label with every LAWNII Plus OEM
board. You, as the OEM customer, must apply this label to the outside surface of your product so
that the end user can read the warning messages and the FCC officers can identify the radio
without opening the enclosure when they are investigating an interference problem.
The label provided by OCI contains the OCI logo and an 800 technical support phone number. If
you do not want your end user know about this information, you may print your own label that
contains the same information without the OCI logo and phone number. Your label must have the
same FCC ID number and warning message as the OCI’s label. However, you may use a different
model number and model name for the radio product if you wish to.
2. Conne
ctor re
quirement
Connector
requirement
The FCC requires that all unlicensed radios use a special connector for the antenna so that the
end user can not change the antenna to a more powerful antenna off the shelf. OCI satisfied this
requirement by providing a short RF cable to convert the SMA connector on the board to a
reverse N connector that is mounted on the outside case of the OEM final product. As the OEM
customer of the LAWNII Plus product, you must make sure that the reverse N connector is the
only connector that the end users have an access to by using some glue, such as Locktite 404, to
seal the SMA connector before shipping your product to the customer.
- Chapter 1: Rules and Descriptions - 19 -
Chapter 2: P
rogramming the LLA
AW N IIII
Programming
Using a T
erminal or M
S-D
OS T
erminal Simulator
Terminal
MS-D
S-DO
Terminal
1. Set the terminal to 9600,n,8,1. Select the Wyse-50 or a similar terminal. Set the terminal to HDX
and choose NO flow control for handshaking. If you do not have a terminal, you may use a PC
with a DOS based simulator program, such as PROCOMM, PCPLUS or Carbon Copy. If you are
using Windows, please refer to the sections titled “Using the Terminal Simulation Program from
Windows 3.1” or “Using the Terminal Simulation Program from Windows 95” for instructions.
2. If you are using LAWNII Plus, plug the cable with the circular connector supplied by OCI to the
LAWNII-Plus and plug the power cube to the wall outlet and the DB9 plug to the terminal.
If you are using LAWNII, plug the male DB25 plug that is labeled “LAWN” to the LAWNII and
plug the other end of the cable the is labeled as “COMPUTER” to the terminal. There are two
female plugs on this end, a DB9 and a DB25. Please use only one of the plug. Plug the power
cube to the wall and the power plug to the LAWNII.
3. The Power LED of the LAWNII should come ON immediately and the Connect and Transmit
LEDs should blink once. (Please refer to “Chapter One: Rules and Descriptions” for the locations of
these LEDs.) This indicates that the LAWNII has passed the initial power-up self-check successfully.
4. Type “<Ctrl> C” three times with one second of silence before and after the three “<Ctrl> C” to
switch the radio to command mode.
For example, wait one second without typing any key and then hold down the <Ctrl> key and
quickly hit “C” key three times and let go both keys and wait for one second. In the command
mode, LAWNII is not case sensitive. It will convert all character inputs to upper case.
5. Upon the receipt of three <Ctrl>C, the LAWNII should return a “cmd:” to the terminal. This
indicates that the LAWNII has switched to the command mode successfully and is ready to accept
more commands from you.
Once the LAWNII is in the command mode, you can start programming the LAWNII by following
the examples in “Chapter Ten: Examples”. Once the LAWNII is programmed as the examples (as
a peripheral device in the transparent mode or in DFC mode), it will be ready to send or receive
data for you whenever it is powered up again. You do not need to program it until you want to
change the programming again.
6. The command mode is the mode that you communicate with the LAWNII’s firmware. For
example, you can change the name of the LAWNII, the radio channel, the system number, the
baud rate, the parity, or the word length etc.. Or you can configure the radio into the right operating mode, for example, into the master-slave broadcast mode, one-to-one DeFault Connect (DFC)
or manual connect mode.
You can also perform some network functional tests, for example, to tell this LAWNII to establish a
- Omnispread Communications, Inc. - 20 -
virtual connection with the other radio directly or through repeaters or to disconnect an established virtual connection. If your radio is virtually connected to another radio, these two radios will
then work together like the two ends of a cable.
You can check the network status of the radio. For example, you can ask the radio how many retry
occurred since the last restart. If there are lots of retries, the link could be weak or the air-traffic
could be too congested. You can also ask the radio about the Health Indicators such as the number of packets received and the number of bad packets. From this information, you can calculate
the bit error rate.
In conclusion, the command mode is the operating mode that you use to communicate with the
microprocessor of the LAWNII. The command mode is used normally only during the initial
configuration and testing. Once it is configured correctly, the LAWNII should then be switched to
the transparent mode to send and receive data, either automatically or manually. If the LAWNII is
programmed as a peripheral device as in DFC mode, it will be automatically switched to the
transparent mode when it is powered up. Otherwise, the LAWNII will stay in the command mode
after the power up and you will need to issue a command to switch it to the transparent mode
manually.
Using the T
erminal Simulation P
rogram from W
indows 3.1
Terminal
Program
Windows
Since the <Ctrl>C is a special command (COPY) for Windows 3.1, the Windows 3.1 will not send it
out to the serial port when you type <Ctrl>C. The only way to send the <Ctrl>C to the serial port is
by using the special Function Key feature of the Windows 3.1 program.
To do this, first select the “Terminal Preference” option from the “Settings” command. The menu of
the terminal preference should show up. Make sure that the “CR -> CR/LF” option for both the
Inbound and Outbound are unchecked. Exit the “Terminal Preference” option.
Select the “Function Keys” option from the “Settings” command. First, enable the check box for
“Key visible” so that the function key will become visible at the bottom of the screen. Click at the
Key Name column of Fl and enter “cmd:” as the key name for Fl. Click the Command column of Fl
and enter “^C^C^C”. The ^ key is the [SHIFT] 6 key on the keyboard. Exit the Function keys.
Select the “Communications” option from the “Settings” command. Select the port to be used to
program the LAWNII and select the default serial port specifications to 9600,n,8,1.
Exit the “Communications” option and click the Fl key, which now should be shown with the name
“cmd:”.
Whenever you click the F1 key, the LAWNII should return the “cmd:” to the screen. You can start
to program the LAWNII now.
- Chapter 2: Programming the LAWNII - 21 -
Using the T
erminal Simulation P
rogram from W
indows 95
Terminal
Program
Windows
The terminal simulation program of the Windows 95 is much simpler than the Windows 3.1. Click
the Hyperterminal option from the accessaries of the main program manager.
Click the icon for “Hyperterminal” to create a new connection. When the connection screen come
up, enter a name for this connection, for example, “LAWNII”. Click the scroll bar for the “Connect using” option and choose the Direct Connect to COM1 or COM2 (depending upon which
port the LAWNII is attached to). At this moment, the phone number entry will be grayed out.
Click the “File” and the “Property” Option and click the “Settings”.
Click the “Terminal” for the “Function, arrow and Ctrl key act as “.
Click the “VT100” for the terminal type.
Click the “Configure” option to select the right serial port specs which is 9600 N 8 1 for a new
LAWNII from the factory.
Now the Windows 95 will work like a terminal.
After setting up the terminal, you should exit the hyperterminal and reboot the computer before
using the Hyperterminal to talk to LAWN II. Some computer will not change the serial port settings without doing so especially if the default serial setting of the computer is not 9600, N,8,1.
Using LLA
AW N I I Configuration P
rogram 3.0 with T
erminal Emulator
Program
Terminal
The LAWNII Configuration Program 3.0 is a Windows based configuration program designed for
Windows 95, 98, 98 SE, and 2000 Professional to help customers configure the LAWNII in a
familiar graphical user interface system. The program eases the configuration of the LAWNII by
handling most of the routine commands with an easy to use graphical interface. Version 3.0 is an
improved version of version 2.1 with a faster communications setting search, supporti for the new
LAWNII firmware, and a new loop back test function.
Version 3.0 retains many of the powerful features of version 2.1 such as the terminal emulator
which automatically switches the settings of the local communications port as the LAWNII’s communications port settings are changed. This eases the programming of the LAWNII by removing
the hassle of manually changing the communications port settings when using a program such as
Hyperterminal or other terminal emulators. The “Find Comm Port” function is also retained as well
as an improved version of “Find Comm Port Settings”.
There are four tabs in the main LAWN 3.0 program menu. They are: 1. Serial Port Settings, 2.
LAWN Settings, 3. Terminal, and 4. Loop back test.
The Serial Port Settings tab is used to find or change the serial settings of the LAWNII.
The LAWN Settings tab is used to find or change some of the basic LAWNII’s settings.
The Terminal tab is a terminal emulator that is designed specifically for the LAWNII.
The Loop back test tab is used to test the basic performance of the RF link.
- Omnispread Communications, Inc. - 22 -
Inst
alling the LLA
AW N I I 3.0 Configuration P
rogram
Installing
Program
1.
2.
3.
4.
Insert the CD-ROM titled “LAWNII Configuration Program and Users Manual” into your
CD-ROM drive.
If the setup program does not start automatically, click on “Start”-->“Run” and type
“D:\Setup\setup.exe” where the “D” corresponds to the letter of your CD-ROM drive.
Click OK
Follow the onscreen directions of the setup program.
Getting St
arte
d with the LLA
AW N I I Configuration P
rogram 3.0
Starte
arted
Program
Launch the program by selecting the icon under the “Omnispread Communications” folder from
the Start menu. When the LAWNII Configuration Program 3.0 loads up, it will attempt to communicate with the LAWNII at its last known configuration settings. If this is the first time it is run
then it will default to “Comm 1; 9600, n, 8, 1”. If the program fails to communicate with the
LAWNII, it will prompt you to go to the Serial Port Settings tab to find the correct communications
port and communications settings. This is recommended because until this is done the LAWNII
Configuration Program may not be able to communicate with the LAWNII.
After switching to the Serial Port Setting tab you should click on the “Find Port” button to find
which communications port the LAWNII is connected to. Follow the instructions as shown in the
message box to find the port. Be prepared to press the reset button or cycle the power supply to
the LAWNII during the search.
After finding the communications port, it is recommended that you then find the serial settings of
the LAWNII. To do so, press “Find Serial Port Settings” button, it is found below and to the right
of the “Find Port” button. By clicking the “Find Serial Port Settings” button, the LAWNII Configuration Program will begin to search the settings of the LAWNII. This process may take up to two
minutes but in most cases it will only take about one minute.
After finding the communications serial port and the serial settings you may now use the other
features of the LAWNII Configuration Program.
Changing the LLA
AW N I I Serial Settings
After finding the serial settings of the LAWNII, you can change the LAWNII serial port settings by
simply a click on the new desired serial setting. LAWNII Configuration Program will verify the
communications to the LAWNII, send the new settings to the LAWNII, change the local settings to
match with the new settings and issue the “SAVE” command to the LAWNII to store the new
settings, restart the LAWNII, and finally verify that the LAWNII is changed to the new settings
correctly.
Che
cking LLA
AW N I I Settings
Checking
The LAWN Settings tab is where you can view and edit some of the basic LAWNII settings, including Mycall, DFCN, system number, channel and packet format. To view the current settings in
the LAWNII, click “Find Lawn Settings” button in the lower right hand side of the window. This
- Chapter 2: Programming the LAWNII - 23 -
will initiate the process to determine the LAWNII’s setting. After receiving the current settings on
LAWNII, you can edit the settings to fit your application. To send the new settings to the LAWNII,
you simply press the “Send Settings” button located adjacent to the “Find Lawn Settings” button.
If you wish to save a set of commonly used settings to the disk, you can save them as an *.ini file
by clicking the “Save Settings to File” button. To retrieve these settings, press the “Load Settings
from File” button.
Using the T
erminal Emulator
Terminal
The terminal emulator is designed to ease the manual programming of the LAWNII with as little
interference to the user as possible. When you first enter the terminal tab, the LAWNII Configuration Program will try to get the LAWNII into command mode and turn echo and automatic
linefeed on for you so that it is ready to communicate with you. The other unique feature that
makes the LAWNII Configuration Program’s terminal emulator so useful is that it handles the
changes in the serial settings of the LAWNII automatically. For example, if the LAWNII is currently
set to “9600, n, 8, 1” and you issue “PARITY 1” (odd parity) to the LAWNII, the LAWN Configuration Program will send the new command to the LAWNII, take note of this new change and it will
change your local serial settings to the new settings after you issue the “SAVE” and “RESTART”
commands.
If you issue “AB 2400” to change the baud rate of the LAWNII, the program will send the new
baud rate command to the LAWNII and change the terminal’s baud rate to the new settings so
that you can continue to communicate with the LAWNII without any interruption.
Please remember to issue the “SAVE” command to store the new settings to the LAWNII. It is your
responsibility to do that. The program will not do that automatically for you during the terminal
mode.
Using the Loop b
ack T
est
back
Test
A new feature of the LAWNII Configuration Program is the Loop back test that allows you to test
the RF link between two LAWNII’s. During the loop back test, the unit being tested will connect
to itself via a remote unit so that any character sent to unit under test will be automatically echoed
back right away through the remote unit.
Before you can start the loop back test, you need to make sure that both units are programmed to
use the same channel and system number. You also need to know the name (MYCall) of the
remote unit. It is usually a good practice to write the name of each unit on a yellow self stick note
and affixe it on each unit so that you can easily identify the unit.
To start the loop back test, you need to enter the name of the remote unit that you wish to test
with. Please note that if you have a multidrop network, you must test each remote slave unit in
the network one unit at a time. All the other slaves that are not being tested must be turned off
completely.
- Omnispread Communications, Inc. - 24 -
After entering the mycall name of the remote unit, you can press the “Start” button and the
LAWNII configuration program will establish a connection to itself via the remote unit and the
“connected” LED of the unit under test will be ON. Then, the computer will continuously send
“The quick brown fox jumped over the lazy dogs back. ***” where *** represents the number of
times the message has been sent, to the unit under test. The messages sent will be shown in the
transmit box. If you have a good RF path between the two test units, you will see the same
message arriving to the receive box quickly.
The LAWN configuration program will also calculate the data throughput for you. Since this is a
loop back test, the data throughput will be twice faster if you send the data only one way.
Using the LLA
AW N W
izard
Wizard
The LAWN wizard is designed to ease the installation of the most common network designs for
the LAWNII system, the master-slave networks and one-to-one networks. To start the LAWN
Wizard, click “View”-->“LAWN Wizard” in the menu of the LAWNII Configuration Program. Then
you can follow the onscreen directions and the wizard will quickly finish the installation process for
you.
- Chapter 2: Programming the LAWNII - 25 -
Chapter 3: Overview
The LAWNII provides a method for two devices with RS-232 interfaces to communicate with each
other by using a connection oriented service. The LAWNII can also support an unconnected
broadcast network to replace the wired RS-485 multidrop network.
In the connection oriented service, the LAWNII operates by establishing a virtual connection
between one computer and another computer (or printer, etc.). The connection must be established before the data transfer begins. The connection can be established manually by sending a
command to the LAWNII or automatically by send any data to a LAWN II that is operated in the
DFC mode. After all the data has been sent to the destination LAWNII, the connection can be
terminated manually by sending another command to the LAWNII or automatically after the
connection time-out expired in the DFC mode. Each LAWNII may have only one active connection at a time.
In the broadcast service, the LAWNII operates in the unconnected operation. In this operation,
there are only two kinds of LAWNII in the system, the master and the slaves. In most cases, all the
slaves have exactly the same settings. There will be no virtual connection between the master and
the slaves. When the master broadcasts a message, all the slaves will receive the same message
while when a slave broadcasts a message, only the master will receive it. The slaves usually do not
communicate with each other.
In order for two LLA
AW N I Is to ttalk
alk to each other, they must have the ssame
ame radio
channel and the ssame
ame system numb
er and each LLA
AW N I I must have an unique
number
name unless it is use
d as a slave in the broadc
ast mode.
used
broadcast
Please also note that every LAWNII comes out of the factory set to have a default name ]PRNTR
and set at the default 9600, N, 8,1. You must assign a new name to every LAWNII before using it.
Never use a LAWNII with the default name which indicates that the LAWNII is un-programed and
is not ready to work for you.
- Omnispread Communications, Inc. - 26 -
Chapter 4: Operation Modes
By the nature of the input and output at the RS-232 port, the LAWNII is operated in two modes.
They are the command mode and the transparent mode. By the function of the LAWNII’s firmware, the LAWNII can be operated in a few modes, such as the peripheral mode, DFC mode and
Datagram mode.
In the command mode, the input and output at the RS-232 port are “commands” which are not
sent to the air. The user can change the settings and operation of the LAWNII by sending new
commands to it. Or the user can ask the status of firmware by issuing commands.
For example, the user can find out how many other LAWNII are active in the area by sending the
“MHeard” command. The LAWNII will return a list of the users that recently sent packets to the
air.
Or if the user would like to find out the robustness of a connected link, he can issue a “RESend 0”
command to clear the resend counter before sending the data. At the end of transmission, he can
issue a “RESend” command to see how many resends had occurred during the transmission. This
will indicate how robust the link is.
The command mode can be activated whenever the user needs to communicate with the firmware.
In the transparent mode, all the input and output of the serial port, either data to be sent to the air
or data received from the air, are data. This is the normal operating mode for data communications.
Command mode
The command mode is the normal mode for communication between the user and the LAWNII’s
firmware. The command mode is noted by the presence of the “cmd:” prompt from the LAWNII
after it receives a command.
The normal operation for the command mode is for the user to send a command to the LAWNII,
the LAWNII will return the prior state for that command, and then the LAWNII will execute the
command and return a new “cmd:” prompt to the user for the next command.
The LAWNII has separate queues for the input and output. Therefore, it is not necessary to wait
for the response from one command before issuing another command. Flow control on the serial
port will prevent overrunning the input buffer.
Normally, the LAWNII will be set to the transparent mode as a peripheral device so that it can
send or receive the data for you transparently. (That’s why you bought it.) Once the LAWNII is set
as a peripheral device in the transparent mode, it will always be powered up in the transparent
mode.
If you set the LAWNII to the command mode to change the settings and did not return to the
- Chapter 4: Operation Modes- 27 -
transparent mode before turning the power off, the LAWNII will be in the command mode when
it’s powered up again unless it is programed as either a peripheral device mode or the DFC mode,
as described below. In this case, you will need to send the Transparent command to the LAWNII
before it can send or receive data for you.
Transparent mode
The transparent mode is the normal mode for the communication between two LAWNII’s. In the
transparent mode, all the serial port input or output are treated as data. Transparent mode is
entered via the “Trans” command. In the transparent mode, all data passed to the LAWNII is
transmitted to another LAWNII. If no virtual connection is currently in effect and the LAWNII is
not in the broadcast mode, the data will be broadcasted and the sending LAWNII will be heard by
all other LAWNIIs. However, no LAWNII will be able to extract the data. The Traffic LED will
indicate that data was received.
While in the transparent mode, the data received by a LAWNII is sent to that LAWNII’s serial port.
There is no protocol between the LAWNII and the device that it is connected to. The data is sent
unsolicited from the LAWNII to your devices except when your device’s buffer is full and enables
the brake by asserting the flow control signal to the LAWNII.
Data may be received by a LAWNII that is in the command mode from another LAWNII that is in
the transparent mode. However, that data will be stored in the LAWNII until the LAWNII enters
the transparent mode. If the receiving LAWNII fills its buffer then the transmitting LAWNII will
hold off the sending computer through the handshake until the receiver has space for more data.
Return to command mode from transparent mode
The LAWNII will return to the command mode from the transparent mode if it receives a BREAK
on its async input. The LAWNII will also return to the command mode if it receives the following
wake-up sequence on the async port, one [second of no activity][^C][^C][^C][one second of no
activity].
If the LAWNII is in the peripheral mode as described below, then the asynchronous break does
not return the LAWNII to the command mode. (The power up or down cycle of many peripherals
looks like an async BREAK.)
Peripheral device mode
If the MYCALL name and the DFCNAME name are the same, then the LAWNII is assumed to be
driving a printer or something similar, and is in the peripheral mode. The peripheral mode makes
the LAWNII as transparent as possible to the equipment it is attached to.
While in the peripheral mode, the LAWNII does not return to the command mode after a disconnect. The LAWNII can only be brought to the command mode by the wake-up sequence. The
ASYNC break does not return the LAWNII to the command mode. This prevents unintentional
“break” conditions, such as the power-up or power-down of the attached equipment, from causing
the LAWNII’s to return from the peripheral mode to the command mode. While in the peripheral
- Omnispread Communications, Inc. - 28 -
mode, a LAWNII will not send any messages to the connected peripheral, such as the firmware’s
check sum, revision and OCI trademark informations during the power up self check.
Default Conne
ct operation
Connect
If the LAWNII is not in a state of virtual connection and has the default-connect-mode (DFC)
enabled, then the LAWNII will initiate a connection to the destination LAWNII, which is named by
the “DFCNAME” command, automatically when the data enters the serial port.
The data will then be sent after the virtual connection is established. The LAWNIIs will remain
connected until all the data are sent. The virtual connection will be dropped when the serial port
becomes quiet for some time longer than the user defined time-out. When new data arrives, the
whole process will repeat.
The DFC Mode is most useful for one-to-one communication that requires 100% data integrity.
The data will be re-sent automatically if the receiving unit does not send back a positive acknowledge to the sending unit. The data is guaranteed to be delivered with 100% accuracy. The user
can simply treat the LAWNII as a smart cable that guarantees the data delivery.
The LAWNII exerts flow control to handle any delay in establishing the connection. The LAWNII
remains in the transparent mode. If there is no activity on the RS-232 port for a user-defined timeout period (default = 45 seconds) then the LAWNII initiates a disconnection from the destination
LAWNII. The LAWN remains in the transparent mode afterward without sending any message to
the device it is connected to.
The LAWNII will enter the DFC mode when it receives the “DFC ON” command. This will cause
the LAWNII to go into the transparent mode immediately. Power up or reset also cause the
LAWNII to enter the transparent mode if the DFC is on.
Dat
agram mode
Datagram
The Datagram mode provides unconnected data communications between two or more
LAWNII’s. The data is sent as unconnected packets without protocol. The data between LAWNII’s
is checked for errors and only correct packets are sent to the RS-232 port. The Datagram mode
provides a method for a user to send a message to a specific user or to all users. No acknowledgment is required and no retry is attempted. The Datagram mode is only available for LAWNIIs
operated in the transparent mode. Only unconnected packets are monitored by a Datagram
LAWNII. This prevents the Datagram LAWNIIs from monitoring other LAWNII’s traffic.
The Datagram mode is enabled by the “UNPROTO”, “LCALLS”, “LAWNGRAM” and
“TRANSGRA” commands. The Datagram mode is designed to replace RS-485 multidrop network. The user must have a polling software with error detection and resend mechanism to ensure
the data integrity.
- Chapter 4: Operation Modes- 29 -
Chapter 5: Operation re
quirements
requirements
Name
The name, as defined by the “MYCALL” command, consists of up to 6 characters. Each LAWNII
needs to have an unique name, except when they are used in the Datagram mode. The name
may be extended with a -l to -9. Names may include all alphanumeric characters and other characters including, ], [, <, >. Examples of valid names are STEVE-3, JOHN, JOSEPH-9, MASTER,
SLAVE.
Each packet sent from one LAWNII to another has both the source name and the destination
name in it.
Please be advised not to use -1 suffix for your LAWNII. The -1 suffix is reserved for a LAWNII
used with a printer that is operated differently than a standard LAWNII.
System numb
er
number
A number between 0 to 32672 is included in the address of every packet. Both the system number and destination name must match for a LAWNII to accept the packet. The system number is
set by the “SYstem” command. The default of the SYSNUM is 0.
Via
LAWNIIs may route their messages through other LAWNIIs, that are used as the repeaters, before
reaching the final destination. This is accomplished by naming the repeater path in the connect
command as follows:
CONNECT JOHN VIA APRIL BOB CECIL DAVID
The LAWNII supports up to seven vias. Please be aware that each via adds more delay to the data
path. A LAWNII can connect to itself through vias. This feature allows the user perform a loopback
echo test easily.
For example:
CONNECT JOHN VIA JILL JACK JILL
This command will connect JOHN to itself through two other LAWNIIs assuming the LAWNII
initiating the connection is JOHN. After the connection is established, ever character the user send
to JOHN will be echoed back through the radio chain immediately.
This feature is great for the diagnostic and debugging purpose. It provides a round about way of
sending data to yourself through the same mechanism that data is sent to others.
- Omnispread Communications, Inc. - 30 -
Baud rate
The LAWNII supports baud rates from 300 to 38400 baud. The baud rates are software selectable. The baud rate is set by the “ABaud” command. The default is 9600 baud.
Radio channel
The LAWNII has 3 channels of operation. The three radio channels provide isolation for different
systems and also provide a way to prevent interference to and from other radio equipments that
are also using the 902-928 ISM band. The channel is set by the “CHA” command. For the channel
frequency, please see “Chapter Six: Commands the User Can Modify.”
Hardware reset
The hardware reset switch resets the processor. Action on hardware reset will force the LAWNII to
return to command mode (except if the LAWNII is in peripheral mode or if DFC is ON). The
software RESTART command provides a similar action. No parameters are changed by a hardware
reset.
R S-232 Interface
The LAWNII is a DCE device, just like a modem. The Data Set Ready (6) is asserted whenever the
LAWNII is powered on. The LAWNII can be operated with both the hardware and software flow
control.
The hardware flow control is operated according to the industrial standard. When a device sets
Data Terminal Ready (20) or Request To Send (4) false, transmission of data to that device from
the LAWNII over the RS-232 link will be halted.
The LAWNII uses Clear To Send (5) to tell the other device to stop sending data.
OCI connects the status of the “CONNECT” light at the front panel to the RS-232 Received Line
Signal Detector (carrier detect).
The hardware flow control and the software flow control can be turned on or off independently.
- Chapter 5: Operation Requirements- 31 -
Chapter 6: Commands the User Can Modify
The LAWNII firmware has many commands. Some of these commands are related to the radio or
protocol and have been locked to the user. These commands will be listed with the “DISPLAY”
command but are not available to the user. The LAWNII command processor requires only partial
commands to distinguish among its command set. The required letters are underlined in the
command description.
ABAUD n
Default: 9600
Sets the serial port baud rate. Valid baud rates are 38400, 19200, 9600, 4800, 2400, 1200, 600,
300. This command is an immediate command. Upon the receipt of this command, the LAWNII
will switch to the new baud rate immediately. The user will have to change the computer’s or
terminal’s baud rate immediately after issuing the new baud rate command if the user wants to
send more commands to the LAWNII.
Example: AB 38400 will set the LAWNII’s baud rate to 38400 immediately.
AUTOLF ON/OFF
Default: Off
If ON, a line feed is added after each carriage return is entered in the command mode. If OFF, all
characters are passed as received. This command is very useful when the user is communicating
with the LAWNII through a terminal. Without the auto-line-feed, all the conversations between the
LAWNII and user are displayed on one line.
Example: AU ON will turn on the auto-line-feed.
AWLEN 7/8
Default: 8
Defines the word length used by the serial port. The value can be either 7 or 8. The LAWNII will
not change to the new word length immediately. The new word length will be in effect after the
reset, either software or hardware or power on/off cycle occurs.
Example: AW 7
will set the word length to 7 bits at the next restart if the SAVE command is
issued after it.
BEACON EVERY N / BEACON AFTER N
Default: E 12
The purpose of beaconing is to let other LAWNII users know the presence of your LAWNII so that
- Omnispread Communications, Inc. - 32 -
your LAWNII’s name will show up in the other LAWNII’s user list. The “BEACON” command sets
the time interval to send a beacon in 3.3 sec increments. 0 turns off beaconing completely. The
EVERY parameter sets the beacon to occur at every Nx3.3 seconds. The AFTER parameter sets the
beacon to occur after Nx3.3 seconds of no packet activity. However, only one beacon is sent.
Example: BE E 99 will send out a beacon every 5 minutes and 26 seconds.
BREAK
Causes a break to be sent to the RS-232 port of the remotely connected LAWNII. This is intended
to support a remote modem where breaks may be required at the remote computer.
BREAKLN n
Default: 2
Length of break to be sent to async port of the remote connected LAWNII in 33.3 msec increments.
CHAN 1/2/3/4
Default: 2
Sets the LAWNIIs channel of operation. The frequencies for the channels are:
CHA 1
CHA 2
CHA 3
CHA 4
907.45 MHz
914.81 MHz
921.10 MHz
914.81 MHz
CMDTIME n
Default: 1
Sets the delay required before the “^C^C^C” sequence to get back to the command mode.
Measured in 1 second increments.
CONNECT name
If no name is specified, then this command returns the state of the current connection. If a name is
supplied, then a connection to that name is attempted.
For example,
C LASER will cause the LAWNII to connect to the printer LAWNII named LASER. Or C
will cause the LAWNII to report the current connection status for example, “CONNECTED
TO JIM” or “CONNECT IN PROGRESS”.
- Chapter 6: Commands the User Can Modify - 33 -
CONOK ON/OFF
Default: ON
If Conok is on, then other LAWNIIs are allowed to connect to this LAWNII. If conok is off, then
LAWNIIs attempting to connect to this LAWNII will get a busy message on a connect attempt.
DFC ON/OFF
Default: Off
“DFC ON” turns on default-connect mode and immediately enters the transparent mode.
DFCNAME name
Default: ]PRNTR
Sets the default-connect-to name.
DIGIPEAT ON/OFF
Default: ON
If Digipeat is set ON, it will allow the LAWNII to act as a VIA for other LAWNIIs.
DISCONNECT
Disconnects from the current connection if a connection exists. If all the data has not been sent,
then the remaining data will be lost.
DISPLAY option
Shows the current status of all commands, including those which the user cannot modify. Several
classes of display are possible:
Option
ASYNC
CHARACTE
ID
LINK
MONITOR
TIMING
HEALTH
Description
display async port parameters
display special characters
display ID parameters
display link parameters
display monitor parameters
display timing parameters
display health parameters
Please note that the DISPLAY command is not available to a LAWNII that is in the peripheral
mode.
- Omnispread Communications, Inc. - 34 -
ECHO ON/OFF
Default: ON
Sets LAWNII to echo data from the async port if in the command mode.
FCC
Sets the LAWNII to the FCC test mode. This command locks the LAWNII’s transmitter on and
transmits all ones. A <CR> turns the FCC test mode off. No communication on the selected channel is possible by other LAWNII if any LAWNII is in FCC mode.
This FCC mode is useful for setting up and aiming the antennas of LAWNII-Plus in outdoor
communications. The user can lock on the transmitting LAWNII-Plus and observe the traffic light
of the receiving LAWNII-Plus while aligning the receiver’s antenna. A solid traffic light indicates a
solid radio link.
HF
ON/OFF
Default: OFF
The command to turn on/off the hardware flow control.
MHEARD
Displays the name of users of this system. The LAWNII will store up to 18 names. LAWNIIs that
are heard through a via path have a * appended to their name.
Changing the channel or the system number does not affect the mheard list immediately. Therefore, the mheard list may have invalid data after either of these parameters is changed. To prevent
this problem, the MHEARD list should be cleared with a MHCLEAR command after changing the
channel and system number.
User may extend the length of the MHEARD list by polling the LAWNII every few seconds and
building a list in the computer. Each MHEARD command must be followed by a MHCLEAR command for this approach to function properly.
MHCLEAR
Clears the “MHEARD” list in the LAWNII.
MYCALL name
Default: ]PRNTR
Sets a new name for the attached LAWNII. The LAWNII will return its name if the “MYCALL”
- Chapter 6: Commands the User Can Modify - 35 -
command is entered without a name.
For example:
MY STEVE will set the LAWNII to a new name STEVE.
MY will ask the LAWNII to return its name, for example, the LAWNII will return MYCALL
IS STEVE.
PACLEN n
Default: 0
Sets the packet length used between LAWNII. n can vary between 1 and 256, which is also
represented by 0. Longer packets are more efficient in throughput for a busy network. Shorter
packets are more efficient in time and is more suitable for most real-time system. For example in a
terminal network application, an entry at the terminal usually requires immediate response from
the terminal server to download a lot of data to the terminal. So the LAWNII that is connected to
the terminal should have a minimum packet size of 1 and the LAWNII that is connected to the
terminal server should have a maximum packet size of 256.
Please note that a packet has approximately 20 bytes of overhead and a packet also requires 20
bytes of keyup time for the transmitter, as a result, small packet size is not efficient to send data.
PACTIME AFTER N and PACTIME EVERY N
Default: After 10
EVERY sets PACTIME to be a timed interval of every Nx3.3 milliseconds. AFTER sets the packets to be sent after Nx3.3 milliseconds of no activity on the async port. Packets are sent when
PACLEN data bytes have been received on the async port or the PACTIME has expired.
For example, the following two commands,
PACT A 1
P 0
will send the packet with packet size of 256 bytes after a continuous 256 bytes are received from
the serial port. If the 256 bytes coming from the serial port has a pause of 4 msec between the 1st
byte and 2nd byte, then the 256 bytes will be sent as two packets, one containing only one byte
and the other containing 255 bytes.
PARITY n
Default: 0
Sets the parity on the async port. Data is always sent on the RF link in 8 bit mode. If the data
length is set to 7 bits, then the parity bit or stop bit is sent to the destination LAWNII.
- Omnispread Communications, Inc. - 36 -
0
1
2
3
no parity
odd parity
no parity
even parity
RESENDS n
Returns the number of retransmissions of packets. Reset to 0 by using parameter 0. This command is useful to evaluate the robustness of the radio path. A robust link should not need to
resend any packet. For example, before you send the data, enter the RESEND 0 command to
clear the resend counter. After you finish the data transfer, enter the RESEND commend and the
radio will return the number of resend packets to you.
RESET
Resets LAWNII to the factory default values. The LAWNII will have the name of ]PRNTR and stay
in the peripheral mode.
RESTART
The RESTART command is the same as a power up or hardware reset.
RETRY
n
Default: 15
Sets the number of retries to use when a packet fails to be received correctly.
SAVE
This is a new command for the models that use EEPROM to keep the settings. Without the SAVE
command, the new settings will not be stored into the EEPROM and be lost upon the removal of
power, the RESTART command, or a hardware restart. This command is not needed for the
original LAWNII using battery as memory backup.
STATUS
Returns a message with the number of packets left to be transmitted. The zero value is the only
reliable number and tells the user that all packets have been sent. If no high level protocol is used
between computers, then a disconnect should not be issued until the status command returns 0
packets outstanding. Otherwise, data will be lost.
OCI’s experience indicates that if STATUS is continuously requested, packets remaining will not
be transmitted. Issue the STATUS command approximately every half second for proper operation.
- Chapter 6: Commands the User Can Modify - 37 -
SYSNUM n
Default: 0
Allows setting of system number which may be 0 through 65535. SYSNUM is preserved through
ame system must have the ssame
ame
RESTART, a hardware reset or power on. All units in the ssame
system numb
er
number
er..
TIMEOUT n
Default: 15
Sets the time-out for the default-connections. If there is no action on the RS-232 port for the
length of the time-out, the connection is disconnected. The unit of Time-out is 3.3 seconds. A
setting of 0 prevents time-out disconnect; only a hardware reset, power on/off cycle, or the DISCONNECT command can disconnect the link.
TRANSPARENT
Causes the LAWNII to switch from the command mode to the transparent mode. In the transparent mode, all data entering the LAWNII is sent over the air through the packetizing mechanism. If
no connection exists then the data is sent to CQ, a universal address. However, no LAWNIIs can
receive this data and send it out to the serial port. After switching to transparent mode, the user
should wait for at least 50 msec before sending characters to the LAWNII.
TRFLOW ON/OFF
Default: OFF
Enables software flow control XON/XOFF handshake on RX line.
TRIES
Returns the number of retries of the current packet if not yet acknowledged or the number of
retires required for the last packet if it has been acknowledged.
TXFLOW ON/OFF
Default: OFF
Enables software flow control XON/XOFF handshake on TX line.
XFLOW ON/OFF
Default: OFF
- Omnispread Communications, Inc. - 38 -
Master switch for XON/XOFF handshake. Overrides TRFLOW and TXFLOW commands.
Chapter 7: Dat
agram Commands
Datagram
LAWNGRAM ON/OFF
Default: OFF
If ON, the LAWNIIsuppresses the source and destination name and formatting of the monitored
packets. If OFF, the source and destination are displayed along with other screen formatting.
LCALLS nl,n2,..
Sets the list of destination names that will be monitored.
TRANSGRA
ON/OFF
Default: OFF
Set ON to receive Datagram in transparent mode.
UNPROTO
name
Default: CQ
Name of the destination LAWNII or LAWNIIs; default is CQ.
Chapter 8: 485 Option Command
ASYNCPH n
Default:76
Sets the hang-on time of the output data to the 485 bus. The unit is 16usec and the default is
about 1msec. Please avoid sending data to the bus before the hang-on time expires.
- Chapter 6: Commands the User Can Modify - 39 -
Chapter 9: Mess
ages from the LLA
AW N I I
Messages
Command mode mess
ages
messages
bbRAM loaded with defaults
This message appears along with the sign on message if the battery backup RAM
checksum verification fails at power up time. (This can indicate a hardware problem.)
cmd:
This is the command prompt. It appears in response to a carriage return if in command
mode or a break if in transparent mode.
was
The current state of a command is reported when a parameter is changed.
too many packets outstanding
This will appear if the outgoing packet buffer is full and you attempt to go from command mode
to transparent mode. It usually indicates a failure in the link between the sender and the receiver.
Command mode error mess
ages
messages
?bad
The command entered is correct but the rest of the command line is incorrect.
?call
The name entered for MYCALL or DFCNAME is invalid.
EH?
An invalid command has been issued.
?not enough
Not enough arguments were given for the command.
- Omnispread Communications, Inc. - 40 -
?not while connected
MYCALL can not be changed while the LAWNII is connected. Other parameters, such as
the channel and system number are also not changeable while connected.
?range
An argument is too large.
?too long
The command line entered is too long.
?too many
Too many arguments were given on the command line.
?VIA
More than one name was issued for the connect command without a via.
?valid baud rates are 38400 19200 9600 4800 2400 1200 600 300
This message appears if a valid baud rate is not used.
?valid channel numbers are 1 2 3 4
This message is used if a invalid channel is specified.
?cannot change
Many parameters in the LAWNII are ‘locked‘ in the firmware and cannot be adjusted by
the user. This message appears if one of those commands is issued with a value.
Link st
atus mess
ages
status
messages
Link status messages are returned by the connect command with no arguments.
Link state is: CONNECTED to NAME
This will occur if the LAWNII is connected to NAME.
- Chapter 9: Messages from the LAWNII - 41 -
Link state is: DISCONNECTED
This will occur if the LAWNII is not connected.
Link state is: CONNECT in progress
This will occur if the LAWNII is attempting to connect to another LAWNII.
Link state is: DISCONNECT in progress
This will occur if the LAWNII is attempting to disconnect from another LAWNII.
Link state is: FRMR in progress
This will occur if two or more LAWNIIs with the same name are used in a network and one
of them has had a packet error. Be careful about the use of LAWNIIs out of the box with the
name ]PRNTR.
?already connected
This message is received if you try to connect to LAWNII while another connection exists.
Other mess
ages
messages
*** retry count exceeded
This occurs if the destination LAWNII did not respond in RETRIES attempts. A disconnect
occurs.
*** <name> busy
This appears if the destination LAWNII is busy. This could be because it is connected to
another LAWNII or because its CONOK is OFF.
- Omnispread Communications, Inc. - 42 -
Chapter 1
0: Examples
10:
The following examples show you how to use the LAWNII to send and receive data for your
application. The first two examples are for sending and receiving data manually and the last two
examples are for most real world applications that using LAWNII to replace RS-232 and RS-485
cables.
Send dat
quence
dataa se
sequence
Screen
Comment
cmd: MYC TEST
-name the LAWNII
cmd: CONNECT STEVE
-connect to destination called STEVE
-go to transparent mode put data here,
can be binary. If STEVE is connected to a
terminal, the data should show up on the
terminal
^C^C^C
-get back to command mode
cmd: DISCONNECT
-disconnect from STEVE
Re
ceive dat
quence
Receive
dataa se
sequence
Screen
Comment
cmd: TRANSPARENT
-put the LAWNII in transparent mode
and wait for the connection to be
established by the other LAWNII.
-read the other LAWNII's sent data here
^C^C^C
-send CTRL-C to get back to command
mode
cmd:
-return to command mode after
disconnect
Loopb
ack test
Loopback
Screen
Comment
cmd: MYC TEST
-name the LAWNII
cmd: CO TEST VIA STEVE
-establish a loopback connection
-the connect light of STEVE should be off
-the connect light of TEST should be on
-type any key here and it should be
echoed right back through STEVE
- Chapter 10: Examples - 43 -
Master-slave network
An example of how to setup a master slave network to replace RS-485 or similar networks follows.
All of the data from the master will be sent to all slaves. The data from all slaves will be heard
only by the master. There is no limit for the number of slaves in a system.
The master-slave broadcast network can move data faster because the data is broadcasted and no
acknowledgment from the receiving unit is required. As a result, the latency time of a broadcast
network is only half of the latency time of a connection-oriented network. The broadcast network,
however, does not guarantee the delivery of data. If the data got lost, it is lost. The LAWNII will not
resend the bad packet. The user has to deal with the possibility of losing data in the user’s protocol.
The master-slave network is also called a multidrop network. This LAWNII master-slave network
can replace a typical RS-485 wired multidrop network easily. The LAWNII works transparently to
the users protocol. The only modification that might be required to the users polling software is
that the host computer must allow for a longer response time from the remote drops since the
LAWNII needs time to process the data packet. The latency time of the LAWNII can be from
25msec to 50msec one-way depending upon how the data packet is built.
Program the master as follows:
Command
Comment
AUTO ON
-so you can see the conversation easily
MYC MASTER
-name the master
DFCN MASTER
-put into peripheral mode
SYS 0
-use default system number
CHA 2
-pick a channel
PACTIME A 1
-send after 3 ms. of no characters
BE E 0
-turn off beacons
UNPROTO SLAVE
-send data to LAWN IIs with LCALLS
SLAVE
LAWNGRAM ON
-prevent addresses
TRANSGRA ON
-allow monitoring in transparent mode
LCALLS MASTER
-listen only for packets to master
SAVE
-save settings to LAWN
TRANS
-go to transparent mode
- Omnispread Communications, Inc. - 44 -
Program all the slaves as follows:
Command
Comment
AUTO ON
-so you can see the conversation easily
MYC SLAVE
-name the SLAVE
DFCN SLAVE
-put into peripheral mode
SYS 0
-use default system number
CHA 2
-use same channel as MASTER
PACTIME A 1
-send after 3 ms. of no characters
BE E 0
-turn off beacons
UNPROTO MASTER
-send data to LAWNIIs with LCALLS
MASTER
LAWNGRAM ON
-prevent addresses
TRANSGRAM ON
-allow monitoring in transparent mode
LCALLS SLAVE
-listen only for packets to slaves
TRANS
-go to transparent mode
The slaves may use independent names but must have a common broadcast name that is used for
LCALLS. For example, all the slaves can be named differently with the MYCALL command but
with the same broadcast name given by LCALLS command. The benefit of doing this way is that
it allows you to address each slave individually from the master by using the connect oriented
service during the debugging or system functional test while also allowing you to return to the
desired multidrop network immediately after the tests is done. If all the slaves are named identically by the MYCALL command, you will not be able to address each one individually to perform
a connect test or a loopback test to each one. The connect oriented service can only be done
when each radio has an unique name.
In the master-to-slave network, the user must provide the specific address for the equipment that
the slave is attached to, along with the data sending to that equipment. All slaves will receive the
same address code and data from the master and pass them on to the equipment. The equipment
will respond only when the address code in the data packet matches its own address. The user
needs to provide his own protocol for polling and resend to ensure the data integrity.
- Chapter 10: Examples - 45 -
R S-232 ccable
able replacing (one-to-one)
This is an example to use a pair of LAWNIIs to replace a single RS-232 cable by using the DFC
mode. In this mode, the virtual connection between the LAWNIIs will be established automatically
as soon as the data enters the serial port of either LAWNII. The connection may be kept on until
power-up reset occurs or after the disconnect time-out expired. Program the two LAWNIIs as
follows:
Commands for Host
Commands for Remote
AUTO ON
AUTO ON
MYC HOST
MYC REMOTE
DFCN REMOTE
DFCN HOST
DFC ON
DFC ON
^C^C^C
^C^C^C
SAVE
SAVE
The RS-232 port and packet specifications of the two ends need not be the same. For example, if
you are connecting a terminal to a computer by using LAWNII’s, the packet size of the LAWNII
that is connected to the terminal should be set to 1, and the packet size should be 256 for the
LAWNII that is connected to the computer. This is because that the input from terminal is keystroke and the computer should respond to it right away by quickly updating the terminal screen
whenever the user hits the keyboard of the terminal. By using packet size of 1, the keystroke will
be sent immediately whenever it occurs. This will minimize the latency time for the user. And the
computer will quickly send a lot of information back to the terminal by using a large packet size
for maximum data throughput.
The baud rate of the LAWNII attached to the terminal can be 300 baud while it can be 38400
baud for the LAWNII connected to the computer. All LAWNIIs use the same 76.8Kb data rate
over the air so that they are always matched over the air regardless the setting at its serial port.
You may use repeaters with the DFC mode by specifying the repeaters’ name with the DFCN
command. For example,
DFCN REMOTE VIA MARY JOHN NANCY
will use MARY, JOHN and NANCY as the repeaters to the REMOTE.
The sequence of the repeater must be exactly the same as their physically location in the repeater
path.
- Omnispread Communications, Inc. - 46 -
Chapter 1
1: Applic
ation Notes:
11:
Application
Radio propagation investigation
Before you install a LAWNII to a location permanently, you must make sure that it is located at a
radio friendly spot. This is especially true for long range outdoor communications that use Yagi
antennas. You must make sure that the antennas are aiming to each other properly. To find out
the path conditions of your radio link, you must send the “FCC” command to one of the LAWNII
to turn on the transmitter and observe the Received (Traffic) LED on the other side of the link.
For example, you will send the “FCC” command to the master LAWNII-Plus of a multidrop system
and then check the “Traffic” light of each slave LAWNII-Plus at the remote end. Each slave must
have a solid traffic light to ensure that the link is solid. Flicking “Traffic” light indicates the presence
of nulls or a weak signal. You may adjust the aiming of the antenna at the remote end to locate
the best signal.
Using repeater-set to extend coverage range in the broadc
ast mode.
broadcast
You may use up to 7 repeaters to extend the range in the connected mode by specifying the
repeaters’ name in the connect path. The repeater can be any other LAWNII that is located between you and your destination. You do not need to dedicate a LAWNII solely as a repeater.
In the broadcast mode, you will need to dedicate a repeater-set to extend your coverage. There
are two ways to use a repeater set in a broadcast network, either serially or parallel, please see
“Chapter Twenty Six: Using Repeater for the Broadcast Mode” at the end of the manual about the
repeater set in a broadcast network.
The repeater-set is the best way to extend your network. In a serial repeater set, you do not need
to modify your polling software except allowing more delay for responses from your slave.
Flow control
Normally, an RS-485 network is operated without flow control. So, if you use LAWNII in a
multidrop network, you will not need to enable the flow control at all until your data is moved too
fast for the LAWNII and it causes data overrun problem. You must then turn on the software flow
control to prevent this problem.
If you use the LAWNII as an one-to-one network, then you must enable the flow control, either
software or hardware flow control. Without the flow control, the data overrun can occur easily
when the radio needs to resend packets while new data keeps arriving. LAWNII has an internal 2K
buffer that is quite large for most serial communications.
Each of the flow control, inbound or outbound, software or hardware, can be programmed independently.
- Chapter 11: Application Notes - 47 -
Packet formation
The packet formation determines how fast and how quickly the data is sent over the LAWNIIs.
The packet formation, just like the baud rate, of the two ends of a link needs not be the same. The
user should find out the system’s requirement and uses the optimal packet size for the system.
For example, for a scale that is constantly sending out 20 bytes of data to the indicators, the packet
size should be exactly 20. Or for a data collector that sends 5 bytes of data to the computer and
receives 2 bytes of acknowledge from the computer should have 5 bytes as the packet size for the
LAWNII with the data collector and 2 bytes for the LAWNII with the computer.
Please note that the packet size must be 1 for the LAWNII-plus used with a terminal. The packet
size of 1 will ensure that the keystroke is sent to the computer as soon as the user hits the keyboard.
Timing
When switching from the command mode to the transparent mode, be aware that the switching
may take up to 50 msec. Since separate data queues are maintained for the command mode and
the transparent mode, the data could end up in the wrong queue if insufficient delay is inserted.
Conok off busy mess
age
message
When conok is off, no LAWNII can connect to your LAWNII, however, each connect attempt by
another LAWNII is accompanied by a message indicating that another LAWNII attempted to
connect to your LAWNII.
^C^C^C
This may return three cmd: or one cmd:, depending on the state of the LAWNII.
Dat
agram and b
eaconing
Datagram
beaconing
To prevent unwanted characters in the receive data stream, beaconing should be turned off for all
Datagram LAWNII’s in the system. Datagram LAWNII’s should not use UNPROTO CQ or use
CQ in LCALLS if regular LAWNII’s may be nearby. Beaconing normally sends a space character
in a Datagram packet.
Latency time
Assuming that a LAWNII-Plus is running at 9600 baud with the packet length of 256 bytes and
the fastest packet time out (PACTime A 1), the data will be sent in 8 msec to 20 msec after the last
data enters the RS-232 port. The LAWNII-Plus will take up to 25 msec to process the raw data
from the time that the radio receives the data to the time that the data shows up at the RS-232
port.
The total latency time of the system is under 50 msec which is from the time the data enters the
RS-232 port of the transmitter to the time that the data appears on the RS-232 port of the receiver.
- Omnispread Communications, Inc. - 48 -
Chapter 1
2: LLA
AW N I I Error Counters
12:
The LAWNII maintains several counters with statistics of the LAWNII performance. Each of the
counters increments when a specific event occurs. Several counters may be affected by one event.
The counters are reset to 0 by a RESTART. The counts are observed with the DISPLAY command.
Each count is listed with the event that causes it to increment.
ASYRXOVR
overruns from async port.
DIGISENT
frames digipeated.
HOVERR
receiver overruns in HDLC link.
HUNDERR
transmitter underruns in HDLC link.
RCVDFRMR
frame reject frames received.
RCVDIFRA
I frames received.
RCVDREJ
REJECT frames.
RCVDRNR
receive RNR packet.
RCVDSABM
SABM frames received.
RXABORT
received abort in data.
RXCCOUNT
frames received with good CRC.
RXERRORS
bad frames received.
RXLENERR
packets received that are too short.
RXRESYNC
receiver resync after error.
SENTFRMR
frame rejects sent.
SENTIFRA
I frames sent.
SENTREJ
REJECT frames sent.
SENTRNR
transmit RNR packet.
TXCOUNT
correctly transmitted frames.
TXQOVFLW
frame discarded if output queue is too small.
- Chapter 12: LAWNII Error Counters - 49 -
Chapter 1
3: T
ips to Using the LLA
AW N I I for Indoor Applic
ations
13:
Tips
Applications
Like every radio, LAWNII needs to have a good radio link to achieve its optimum performance. A
good radio link means an unobstructed path between the antennas of the receiver and transmitter.
Unfortunately, when a radio is used indoors, it is very difficult to arrange the radio’s position for an
unobstructed path due to the walls, fixtures, shelves, and furniture. On the contrary, we should
thank these metallic obstructions for making indoor radio communication possible. These metallic
obstructions reflect the radio waves in every direction and eventually, some part of the radio wave
will reach the destination. At any rate, an unobstructed path will improve the radio performance
but it is not a necessity.
LAWNII employs an internal antenna inside the plastic housing. Due to its physical limitation, the
internal antenna radiates most of its energy to the ceiling. As a result, LAWNII uses the ceiling or
light fixtures above it as the main reflector to communicate with the other LAWNIIs. To achieve
the optimum network performance, each LAWNII needs to have as much “free space” above it as
possible.
The internal antenna is an excellent antenna for indoor applications. The internal antenna is safe
and will not break. Each antenna is optimally tuned to match the input circuit and the antenna is
not affected by the outside environment that might otherwise severely de-tune the antenna in
some applications. As a result, the radio’s performance is very reliable and is always optimized.
The LAWNII is designed for indoor applications only. If you need to send data outside a building,
you should use the LAWNII Plus product instead. The LAWNII Plus is packaged in a NEMA 4X
enclosure and has an option to use all kinds of antenna. The Yagi antenna is normally used for
point-to-point application, it gives the user a great control over the signal path and also boost-up
both the transmitted and received signals. The “path control” and “signal gain” from the antenna
guarantees a great customer satisfaction for the years to come.
The do’s and don’ts of using LAWNII indoors are shown here. Please follow these guidelines for
the best results.
Do...
Don’t...
- Omnispread Communications, Inc. - 50 -
Chapter 1
4: Options
14:
Internal Battery Option for LLA
AW N I I-BA
T
I-BAT
The charging time of the battery is about 2 hours with a fast charger or 12 hours with the normal
charger. The operating time of a fully charge battery is about 7 hours.
The life of the battery is primarily determined by the cycles of charging and discharging. The
degree of charging and discharging also plays an important role. Please do not let the battery
drained out completely. Plug the LAWNII-BAT to its charger immediately when the low voltage
warning buzzer sounds. The buzzer sounds at least 5 minutes before the battery is running too
low so that you have plenty of time to prepare for the shutdown. The running time you have after
the buzzer sounds the first beep may vary from 5 to 30 minutes, depending upon the charging
conditions of the battery. Since the battery monitor will consume current regardless of the operating condition of the LAWNII-BAT, please keep the LAWNII-BAT plugged to its charger and with
the power switch in the OFF position when it is not in use. This will prevent the battery from
discharging.
But if you do not plan to use the LAWN-BAT for a while, please disconnect it from the charger to
prevent maintenance charging and extend the battery life.
You may operate the LAWNII-BAT while it is charging. It will only take a little bit longer to fully
charge the battery if you operate and charge it at the same time.
Never charge LAWNII-BAT with other chargers!! They might cause permanent damage to the
charging circuit and battery inside.
The battery of LAWNII-BAT should last for 300 charging/discharging cycles if the battery is operated according to the above guidelines with a normal charger.
Antenna
The LAWNII-Plus can be used with high gain (up to 13dbd) Yagi or omnidirectional antennas to
increase the coverage range. The Yagi antenna is normally used for fixed, line-of-sight applications
while the omnidirectional antenna is mainly used for mobile applications or the host computer of
the wireless network.
The mast of the antenna needs to be grounded properly to prevent the damage caused by lightning. The proper way of grounding is to connect the mast to the ground rod by using a twisted
pair of #10 copper. The ground rod should be buried deep enough to reach a stable ground
water level.
Please refer to the LAWNII-Plus installation guide for the antenna installation.
- Chapter 14: Options - 51 -
Chapter 1
5: Description of the Circular Conne
ctor on the
15:
Connector
L AW N I I-Plus
A weatherproofed circular connector instead of a standard DB9 connector is used for the
LAWNII Plus product so that it can be operated outdoors. OCI also supplies an interface cable
that convert the circular connector to a standard DB9 connector so that the user can connect the
LAWNII Plus to a terminal or PC directly. The pin arrangement of the circular connector is
almost the same as a normal DB9 connector except that the pin 9 is used as the power supply
input for the radio.
The pin assignments and functions of the circular connector are as follows,
Pin
Name
Dir
Description
1
DCD
Out
Indicates the LAWNII-Plus is connected.
2
TXD
Out
Transmit data from LAWNII-Plus
3
RXD
In
Receive data to LAWNII-Plus.
4
DTR
In
Hardware handshake to hold data from LAWNII-Plus.
5
GND
6
DSR
Out
Indicated that LAWNII-Plus is powered.
7
RTS
In
8
CTS
Out
Hardware handshake to hold data from computer.
9
PWR
In
Power supply to the LAWNII-Plus.
Hardware handshake to hold data from LAWNII-Plus.
Pin 4 or 7 may be used for flow control of data from LAWN II-Plus. The LAWN II-Plus includes
pull-up resistors on its flow control input lines. It can operate with only 3 wires, RXD, TXD, and
GND if flow control is not required or if software flow control (XON/XOFF) is used.
DCD indicates that LAWN II-Plus has a virtual connection between itself and another.
- Omnispread Communications, Inc. - 52 -
Wiring Diagram of the Circular-to-R
S-232 Cable
Circular-to-RS-232
5
4
3
9
8
2
7
1
2
3
4
5
7
+
6
-
8
9
Above: The circular connector.
Top Right: The RS-232 Connector
Bottom Right: The power connector
Circular Connector
RS-232 Connector
1
2
4
3
5
7
5
6
9
1
2
3
4
5
6
7
8
9
4
9
8
DCD
TXD
RXD
DTR
Ground ( - )
DSR
RTS
CTS
Power ( + )
3
8
2
7
1
6
1
2
3
4
5
6
7
8
9
+
-
Power Connector
- Chapter 15: Description of the Circular Connector on the LAWNII Plus - 53 -
1
6
Chapter 1
6: LLA
AW N I I-Plus Spe
cific
ations
16:
Specific
cifications
Interface: RS-232 Serial port
Flow Control: software & hardware
RF Channels: 3
Transmit Power: 13dbm, max.
Sensitivity: -97dbm, typ. -94dbm typ. for OEM model.
Frequency:
channel 1 —————907.45 MHz
channel 2 —————914.81 MHz
channel 3 —————921.10 MHz
Modulation: FSK, spread spectrum
Antenna: one, external
No. of chip per bit: 16
Bit rate (raw): 76.8 Kb/sec
Throughput: 38.4 Kb/sec
Protocol: AX.25
Contention: CSMA/CD
Range: 300 feet typical, indoors w/monopole antenna
For outdoor unobstructed, point-to-point applications and using
same antenna on both ends,
0.8 mile typical w/unity gain antenna
1.6 miles typical w/3 db gain antenna
3.2 miles typical w/6 db gain antenna
6.4 mile typical w/9 db gain antenna
12.8 mile typical w/12 db gain antenna
14 miles typical w/13 db gain antenna
Dimension: 4.5"x3.5"x2.5"” (LxWxH)
- Omnispread Communications, Inc. - 54 -
Chapter 1
7: Inst
allation of the LLA
AW N I I Plus
17:
Installation
Introduction to LLA
AW N IIII Plus inst
allation
installation
LAWN II Plus is operated in the 915Mhz band which requires a Line-Of-Sight (LOS) condition for
a reliable communications, just like radars. The LOS restriction means that there should be no tree,
no truck, no building or any other obstruction of any kind between the two antennas. The effective coverage range can be severely reduced if LOS is lost.
Normally, the LAWN II Plus is mounted together with the antenna on the mast so that the cable
loss is minimum. If the range is short and a moderate cable loss is acceptable, you may install the
LAWN II Plus inside a building and run a low loss cable, such as an RG-8 cable, to connect it to
able run is
the antenna. You may purchase the cable from OCI or build it yourself. Unless the ccable
short, please do not use R
G-58 ccable.
able.
RG-58
To build the cable, you will need to get a pair of N female and male connector and swap the
contact pin and socket. Please note that the reverse N connectors used by OCI are nonstandard.
Extra attention is required to make sure that your connector mate with the OCI’s connectors
without mechanical interference. Improper mating could damage the connectors permanently. It is
strongly recommended that the customer buys at least one cable from OCI as the reference
before making his own cable.
Antenna Height Re
quirement for long range applic
ations (more than 5 miles)
Requirement
applications
In order to maintain a LOS condition, the antenna should be always mounted at the possible
highest location., such as a tower, the roof of a tall building or mountain ridge. Since the earth is
round, the higher the antenna is mounted, the longer the LOS distance it can cover. The following
is a table showing the distance of horizon vs. the antenna height. Although the radio wave will
bend a little below the horizon, it is recommended that you operate the radio only within the
horizon for a real LOS condition.
Distance of horizon (miles)
Height Required (in feet)
5
16.5
6
24
7
32
8
42
9
53
10
66
11
80
12
95
13
111
14
130
- Chapter 17: Installation of the LAWNII-Plus - 55 -
As you can see, the height requirement increase much faster than the distance. The above table is
just for the calculation of the distance of horizon. In the real word, there probably will have some
obstructions like trees or houses on the way so that you need to add their height to the antenna
height requirement.
Additionally, the antenna needs to be mounted on a mast at least 10’ tall so that there is some
room against the multipath reflections from the ground. As a result, the antenna height requirement can be calculated as follows,
Total height of the antenna support = Antenna height at the distance of horizon + the height of
the trees and other obstructions between the path.
For example, if you are installing the radios at 10 miles apart, the height requirement for a 10 miles
horizon is 66'. If one end is installed on the roof of a three-story building and the roof is 40' tall
and the other end is installed on a tower and you need to find out the height requirement for the
tower. You also notice that there are some trees about 30’ tall between the two nodes.
You can find out the height requirement of the tower as follows,
Height of the tower + height of building = 66 + 30 , so that
Height of the tower = 66 +30 - 40 = 56
And each antenna is mounted on a 10’ mast so that the actual antenna height is 66’ at one end
and 50’ at the other.
If the trees between the two nodes are taller than the building, you will need to add that difference
to the antenna mast. For instance, in the above example, if the building is a two story and is only
20’ tall, you will need to add 10’ to the mast so that the roof is at least the same level as the obstruction. The height of the tower for this situation is,
Height of the tower = 66 + 30 -30 = 66
So that the tower should be 66’ tall and with a 10’ mast on the tower. At the other side, the mast
must be 20’ tall. So the actual antenna height is 76’ at one end and 40’ at the other.
- Omnispread Communications, Inc. - 56 -
Inst
allation
Installation
!
WA R N I N G
WAR
N I N G!
ARN
!
WA R N I N G
Inst
alling the antenna near power lines is dangerous.
Installing
To install the LAWN II Plus system, first, you need to find a place to install a mast for the antenna.
Each year hundreds of people are killed, mutilated or receive severe permanent injuries when
attempting to install an antenna. In many cases, the victim was aware of the danger of electrocution, but not take adequate steps to avoid the hazard.
OW the
For your own safety, and to help you achieve a good installation, please R EAD and F O LL
LLOW
Y SA
VE Y
O U R LI
THII S MA
MAY
SAVE
YO
LIFF E!
safety precautions below. TH
Site Sele
ction
Selection
Before attempting to install your mast, think where can you place your mast for safety and best
performance.
To determine a safe distance from wires, power lines and trees:
1. Measure the height of the mast.
2. Add this height to the height of your tower, if any, and then
3. Double this total for the minimum recommended safe distance.
DG
ET P
R O F E S S I O NAL H
E LP
If you are unable to maintain this safe distance, STO P AN
AND
GET
PR
HE
LP!
- Chapter 17: Installation of the LAWNII-Plus - 57 -
Suppose the power line is 50' from the mast, then the mast must be shorter than 25'. If the mast
is mounted on a chimney, you must deduct the height of chimney that is above the roof top. For
example, if the mast is mounted on a chimney that is 10' above the roof. The mast then must be
shorter than (25-10=15) 15' to maintain a safe distance from the power line.
Generally speaking, the higher the antenna, the better it performs. However, please bear in mind
the FCC limits your antenna height to 60 feet.
The following two diagrams show you how to choose a better antenna location when you install
the antenna on the roof.
The Yagi antenna is directional and the front-to-back ratio is usually greater than 10. In other
words, the antenna receives most of its signal from the front along the wave-guiding ribs than
from the back. So a good location for the antenna must
1.) have no metallic object near the front.
(The metallic objects at the back of antenna will not affect the antenna as much.)
2.) be located as high as possible.
You must always choose your antenna site following the above rules. For example, in the next
figure, the antenna location marked as “best”, without doubt, is the one on the top of the building
with a tall mast. If a tall mast is not available, the better location will be the one on the front of
the building because there is no metallic reflector in the front. The location on the roof top with a
short mast, although it is higher, is not the better location because there are more reflectors from
the roof and siding. The antenna location at the rear end of the house will have a range problem
because the siding reflects most of the signal away.
- Omnispread Communications, Inc. - 58 -
In the above figure, since all antennas are pointing away from the house and
roof, all these locations are acceptable and the one with a tall mast is the most
desirable location.
The omnidirectional antenna
should always be mounted at
the tallest point of the building
- Chapter 17: Installation of the LAWNII-Plus - 59 -
Chapter 1
8: Support sele
ction
18:
selection
After you have determined where to install the mast, now is the time to determine how to
support the mast and antenna. The following are a few common installation methods for
your reference.
Roof mounting
Using a tripod mounting bracket or a swivel universal roof mounting bracket to support the
mast on the roof. Guy wires are needed for the swivel universal mounting bracket. Place
three or four guy wires equally spaced around the mast and anchored to the roof. Apply
roofing compound around the base of bracket to seal the roof.
Telescoping Mast
Guy wires should be equally spaced in at least
three directions around the mast. Use at least
three guy wires for each ten feet section of
mast. For example, if the mast is 35', three sets
of guy wires (each set includes three guy wires)
that hold the mast at 10', 20' 30' above the
ground will be needed. So a total of 9 guy
wires are needed
- Omnispread Communications, Inc. - 60 -
Side of House Mount
The side of house is a very convenient place to mount the mast. Position two brackets over studs
that are at least two or three feet apart.
Water ttank
ank guard rail mount
The water tank is the best place to install the antenna since it is usually high above the surroundings and provides a great line-of-sight condition for the antenna. The guard rail around the water
tank is usually a good place to mount the antenna.
Since the antenna on the water tank is so high above the ground, it does not pick up much reflections from the earth. Nevertheless, the water tank itself can produce some undesired reflections to
the antenna. The user should follow the guidelines below to carefully select the best location for
the antenna.
The reflections from the water tank is usually determined by the shape of the water tank. Assuming that the remote end of the system is at a lower altitude than the water tank, for example, as
shown in the figures below on the left, the antenna on the top of the tank will pickup more reflection than the antenna at the bottom of the tank due to the descending slope of the tank and the
condition is reversed if the slope is ascending as shown in the figure on the right.
- Chapter 18: Support Selection - 61 -
The user can mount the antenna directly on the guard rail, however, an U bracket about
one foot wide is recommended. The U bracket will keep the most part of the antenna away
from the structure of the guard rail and reduce the effect of guard rail to the minimum.
It is not a good practice to install the antenna
under the shade of the water tank. If it is the only
place available, you will need a large U bracket to
keep the antenna out of the shade of the water
tank as shown in the figure at left.
The side of the water tank is the best place to
mount the antenna since the antenna can see the
most free space at this location. If you have to
mount the antenna on the top of the water tank,
you should use a tall mast so that the height of
the mast is taller than the distance between the
antenna and the edge of the water tank.
Water tower is also a very popular place to mount
the antenna for the cellular and pager system.
Since these systems are allowed to transmit a lot
more power than the LAWN II system, you
should mount the LAWN II's antenna away from
the other antenna as far as possible and also
install a notch filter with the LAWN II's antenna to
keep the pager and cellular's signal from affecting
the LAWN II system. Please call OCI to order the
notch filter.
- Omnispread Communications, Inc. - 62 -
You should also keep the LAWN II's antenna away from the parabolic dish antenna since it is a
perfect reflector with gain. The LAWN II's antenna should always be installed behind the parabolic
dish, not before, above or below. If you have to mount the LAWN II's antenna with a parabolic
antenna on the same mast, you will need to space the two antenna so that the reflections from the
dish will not reach the LAWN II's antenna as shown below.
Tower Mount
To survive the wind loading, a tower must be build upon a
solid foundation of concrete or a tower mounting plate. The
tower also must be properly secured by guy wires A professional help is strongly recommended
Chimney Mount
The chimney is usually a good place for the mast if it can
support the mast and antenna in high winds. Do not use a
chimney that has loose bricks or mortar. Secure the mast
with at least two heavy duty strap clamp brackets. Place the
two brackets away from each other as far as possible for a
maximum strength.
- Chapter 18: Support Selection - 63 -
Chapter 1
9: P
olarization sele
ction
19:
Polarization
selection
The Yagi antenna can be used in either vertical or horizontal polarization.
However, the horizontal polarization will accumulate more snow and ice during the winter and
lose more signals. Normally, a vertical polarization should be the first choice. In the vertical polarization, all the ribs of the antenna are pointing up and down while they are pointing left and right
in the horizontal polarization. You must operate all the antennas in the same way. Mixed polarization might reduce the range significantly. If you are using Yagi and omnidirectional antennas at the
same system, please remember that the omnidirectional antenna is vertically polarized and should
be installed at the highest point of the structure. Please see the following figures for your polarization selection. The polarization of antenna does not affect the range, however, the horizontal
polarization is found a better choice if there are foliages between the antenna or if there are more
reflections from the earth. This is because most foliages are in up-and-down position so that
horizontal wave has a better chance to pass through and the horizontal polarization also has a
narrow beamwidth that will pick up less reflection from the earth.
If you have to mount two Yagi antenna on the same mast, you will need to space them out so that
there is at least 10’ between the two antennas. Also you should use different polarization for them
to reduce the cross-coupling between the antennas.
Vertical Polarized
Yagi
Horizontal
Polar
Polarized
Yagi
Omnidirectional
ection
Anteenna
Horizontal
rizont
Polarized
ized Yagi
Y
Above: Examples of incorrect polarizations of
antennas.
- Omnispread Communications, Inc. - 64 -
Corre
ct P
olarizations:
Correct
Polarizations:
Vertical Polarized
Yagi
Vertical Polarized
Yagi
Horizontal
Polarized Yagi
Horizontal
Polarized Yagi
Omnidirectional
Antenna
Vertical Polarized
Yagi
- Chapter 19: Polarization Selection - 65 -
Chapter 20: Lightning prote
ction
protection
The mast of the antenna must be directly grounded to the earth so that it works as the lightning
rod for your system. A lightning rod is a sharp metallic object that diffuse the static charges accumulated on the building or structure into the air. As a result, the static charges on the building are
greatly reduced as are the chances of getting hit by lightning. Even if in the unfortunate event that
the lightning does hit, the energy released by the lightning hopefully will be channeled to the
earth directly and cause minimum damage to the building and radios.
The effectiveness of your lightning rod totally depends upon the grounding earth that the lightning rod is connected to and the quality of grounding earth completely depends upon the moisture contents in the earth. It is the conductive moisture in the earth that provides the real ground
for the system. The best thing you can do is to bury the earth rod into the earth as deep as you
can and hopefully it will reach a stable ground water level to protect your system. Or you can
connect the ground wire to the sewer or water line that usually will be in contact with the ground
water level at some point of the system.
The mast of the antenna should be connected to the earth rod via a twisted pair of #10 copper or
stainless steel ground wire. Please make sure that the connection of the wire to the earth rod or
the sewer or water line will be free from corrosion.
If you like to use the lightning arrestor for the antenna, you can order it from OCI, along with the
special cable to connect the arrestor to the antenna. The basic idea behind the lightning arrestor is
that when the lightning hit the antenna, the lightning energy will travel down the cable at different
speed between the shield and the center conductor of the cable. The difference of speed will
cause a big spike at the end of the cable. The use of lightning protector, which is installed in-line
with the cable, will bypass the spike energy to the ground and theoretically, save your equipment.
If you install LAWN II Plus on the mast with the antenna, then there is no such problem of speed
difference because the cable that comes down to your equipment is an un-shielded 9 conductor
RS-232 cable. Your best bet to survive a lightning strike is to prevent it in the first place. You can
do it by providing a good ground for the mast. It is hard to survive the lightning strike after you
get hit even if you install the best lightning protector. All the energy from the lightning strike must
go somewhere. Even if you install the best lightning protector in the world, you still have to make
sure that you have an effective ground system that will bypass the lightning to the earth. If you do
not have a good ground system, the energy from the lightning will still hurt you. A good ground is
the only thing that you can count on to prevent a lightning strike.
- Omnispread Communications, Inc. - 66 -
Chapter 2
1: T
he Mast Sele
ction
21:
The
Selection
Since the LAWNII Plus system is very light, a mast with 1" to 2" O.D.. will be sufficient to hold the
antenna and the radio. The height of the mast depends upon the location that it is mounted to. Do
not mount other antenna or anything that is metallic on the same mast with the LAWNII Plus. If
you have to mount the other antenna on the same mast, you must space them out and use
different polarity for the antenna to reduce cross-coupling.
The mast itself must be connected to the ground rod via a twisted pair of #10 copper wires so that
it becomes the lightning rod for your system. A proper grounding will protect the system from
lightning strikes. The ground rod itself must be buried into the earth for at least ten feet. Please
only use noncorrosive hardware for the grounding system. If you have difficulties to install the
ground rod, you may connect the ground wire to the sewer or water line instead. A ten feet
ground rod is usually sufficient for most area in this country to reach a stable ground water level
which provides the conductive ground for the electric system. The effectiveness of the ground rod
totally depends upon the moisture contents in the soil. A dry earth will greatly degrade the performance of the lightning rod. If this is the case, you will need to bury the ground rod deeper until it
reaches the ground water level or connect the ground system to the sewer or water line.
- Chapter 21: The Mast Selection- 67 -
Chapter 22: Inst
alling the LLA
AW N I I Plus system
Installing
Bench functional che
ck
check
Before you install the LAWNII Plus system, you need to first set them up and test them on the
bench. You do not need to connect the LAWN II Plus to the antenna for the bench functional test
although it will always work better with the antenna connected . Simply connect the serial cable
from your PC or laptop to the LAWNII Plus, and plug the power cube to the outlet. Only the
Power LED will remain solid ON at this moment. You then follow the procedures as outlined in
“Chapter 2: Programming the LAWNII” to set up the terminal to communicate with the LAWNII
Plus. You then follow the examples as in “Chapter 4: Operation Modes” to configure the LAWNII
Plus into the operating mode you need.
After both LAWNII Plus are programmed, you need to perform the connect test to make sure that
the system settings are correct and also the loop back test or actual data test by using two terminals to make sure that the interface settings are correct.
This test confirms that the two LAWNII Plus are in a good shape and are ready for installation
Inst
allation
Installation
After the bench functional test, now you are ready to install the LAWNII Plus system. Plan your
installation procedure carefully and completely before you start. Successful installation is largely a
matter of coordination and preparation.
You should first decide whether to install the radio indoor or outdoor with the antenna. It is
recommended that you install the radio indoor so that the status LED of the radio can give you an
instant feedback when you are sending data or doing alignment or test. Besides, without the effect
of the elements, the radio’s enclosure will last forever. The radio itself is packaged in a weatherproofed NEMA 4X enclosure and it can survive the outdoor environment. Nevertheless, the sealer
around the cover will eventually give up over the years if the radio is exposed to the weather all
the time. If you need to install the radio outdoor with the antenna, you should install an aluminum
Raincoat provided by OCI to keep the radio away from the direct exposure to the weather.
Inst
alling the aluminum raincoat for LLA
AW N I I+
Installing
The LAWNII+ is housed in an NEMA4X enclosure. This kind of enclosure is weatherproof but not
waterproof which means that it can be used in an outdoor environment but not to be submerged
into water. The NEMA4X enclosure is a solid box for any electronics equipment to be used outdoors. Nevertheless, the moisture can eventually creep inside the box through the breathing
process which occurs naturally due to the thermal expansion and contraction cycles. The moisture
problem can be worse if the box stays wet for a long period of time.
In order to prevent the moisture problem, OCI supplies an aluminum raincoat (210-ARC) with
each LAWNII+ when it is to be installed in an outdoor environment. This enclosure will reduce the
thermal stress to the LAWNII+ enclosure greatly and also keep the LAWNII+ dry most of the time.
As a result, the operating life of the LAWNII+ is significantly increased.
- Omnispread Communications, Inc. - 68 -
It is strongly recommended that the LAWNII+ is installed with the aluminum raincoat or at a place
that is not directly exposed to the weather. OCI offers an extended warranty of three years for the
LAWNII+ that is installed this way. The warranty for a LAWNII+ that is installed outdoors and
directly exposed to the weather is one year.
The following is the procedure to install the aluminum raincoat,
1. Connect the low-loss RF cable to the LAWNII+.
2. Slightly push the top lid open so that the cable
can be run through the gap between the top lid
and the side lid. The cable can be run through
either the right gap or left gap. Please be careful
when running the cable through the gap. The
black PVC cover of the cable prevents the moisture from coming inside the cable and causing
corrosion problem. You have to make a final
visual inspection of the cable at the end of
installation to make sure that there is no cut or
puncture hole on the black PVC cover. If there is
a cut or puncture hole, then you have to seal it
with a cold shrink tape right away.
3. Position the LAWNII+ so that the LAWNII+
can be installed to the aluminum raincoat through the four mounting screws.
If you decide to install the radio indoors and use a low loss RF cable to connect the radio to the
antenna on the roof top, you must use the cold shrink tape as provided by OCI to seal the connectors of the antenna and cable to protect them from the weather.
Inst
alling the Cold Shrink T
ape
Installing
Tape
OCI now supplies a three-foot long cold shrink tape with each low-loss RF cable. You must use
this cold shrink tape to seal the metallic part of the connectors on the cable and antenna to protect
the connectors from the weather after they are connected together.
Before you start, you need to remove the plastic backing of the tape. A sharp object like a utility
knife can greatly help you pick up a corner of the plastic backing so that you can peel it off easily.
The proper way to apply the cold shrink tape is to start from about 1” below the end of the heatshrink tape on the cable’s connector and winding the cold shrink tape upward until the connector
is covered and them downward until the tape is used up. Every new layer of the tape must cover
ape so that the width of the
at least 50% over the previous layer. You must also stretch the ttape
t ape is re
duce
d by 30% when winding the ttape.
ape. The tape will be fused together under the
reduce
duced
tension and form a permanent protection for the connector.
Please also visually inspect the cable to make sure that the black PVC cover of the cable is not
- Chapter 22: Installing the LAWNII-Plus System - 69 -
punctured or cut through. The PVC must be free from holes and cuts that can let the moisture
get inside the cable and connector and cause problems in the future. If there are holes and cuts,
you must use some sealing tape to fix them.
Please also prevent from pulling the cable too hard. The connectors on the cable are either
crimped or clamped to the cable. Excessive pulling force can damage the connector’s connection
permanently. Please use some cable ties, cables clamps or tape to secure the cable run so that the
long cable itself will not become a load for the connectors.
The RF cable is a very important part of the signal path. Please handle the cable with care.
Inst
allation T
ips and W
arnings:
Installation
Tips
Warnings:
When installing the system, remember do not use a metal ladder. Do not work on a wet or windy
day. Do dress properly - shoes with rubber soles and heels, rubber gloves, long sleeve shirt or
jacket.
If the antenna or other parts start to drop, get away from it and let it fall. Remember, the antenna,
mast, guy wires and cable are all conductors for electricity current. Even a slightest touch on any of
these parts to a power line can kill you.
If any part of the system should come in contact with a power line -- DO NOT TOUCH IT OR
TRY TO REMOVE IT YOURSELF. Call your local power company. They know how to do that
safely.
Before you climb up the ladder to install the LAWNII-Plus system, you should assemble the system
on the ground of the installation site. First clamp the antenna to the mast, then use the adjustable
clamp to mount the radio right under the antenna if you need to install the radio outdoor with the
antenna. The radio should be mounted with the metallic antenna connector pointing to antenna.
Connect the pig tail cable from the antenna directly to the radio.
After you selected the site and the mast, you are now ready to install the LAWNII PLUS system.
Plan your installation procedure carefully and completely before you start. Successful installation is
largely a matter of coordination and preparation.
When installing the system, remember do not use a metal ladder. Do not work on a wet or windy
day. Do dress properly - shoes with rubber soles and heels, rubber gloves, long sleeve shirt or
jacket.
If the antenna or other parts start to drop, get away from it and let it fall. Remember, the antenna,
mast, guy wires and cable are all conductors for electricity current. Even a slightest touch on any of
these parts to a power line can kill you.
If any part of the system should come in contact with a power line — DO NOT TOUCH IT OR
TRY TO REMOVE IT YOURSELF. Call your local power company. They know how to do that
safely.
- Omnispread Communications, Inc. - 70 -
Adjust the location of the radio so that the pig tail antenna cable will follow the backbone of the
antenna and then along the mast to the radio. Rotate the mounting bracket of the radio so that
the mounting plate is in parallel to the antenna as shown in the figure below.
Please use some electrical insulation tape to hold the antenna pig tail cable to the mast and the
backbone of the antenna so that it will not hang loose.
Connect the serial cable to the radio. If the cable will enter the building through a hole, make sure
that the hole is larger than the circular connector. Since the circular connector is the smaller end of
the cable, you must first pass the end of cable with the circular connector from inside of the
building out to the antenna.
Please use electrical tape, cable ties, or clamps to secure the RS-232 cable to the mast and along
the way to the entering hole of the building so that it will not hang loose.
You can now install the mounting bracket for the mast. After done that, carefully take the antenna,
radio and mast assembly to mounting bracket and insert. Make sure that the antennas are pointing to each other by using binoculars or other means.
If it is possible, please keep the antenna and the path of the antenna from any metallic object, like
power lines, water tanks or lamp posts as far as possible.
- Chapter 22: Installing the LAWNII-Plus System - 71 -
Chapter 23: System Che
ck and FFunctional
unctional T
est
Check
Test
After the system is installed, you need to do the following tests to make sure that the installation is
successful.
LE
D st
atus che
ck
LED
status
check
Plug the power cube to the wall and connect the DC plug to the power input socket of the cable.
Make sure that the power LED is ON. Please get yourself familiar with these LED’s. They offer a
great help to you to understand the status of the LAWNII Plus both in normal operation or during
troubleshooting.
Normally, the only light that will stay on solid is the power LED. During the power-up self-check,
the connect LED and transmit LED should both flash and then both will go off. This indicates that
the microprocessor has finished the self-check and the radio is ready to send and receive data for
you.
The transmit LED will come on when the radio is sending data to the air and the receive LED will
come on when it receives data from the air. Please note that you may or may not receive data at
the serial port of the LAWNII Plus even though the receive LED is actively blinking. You will
receive the data at the serial port only when your radio has the same name and system number as
the data packet it received.
The connect LED may or may not come on during the data transmission. The status of the connect light depends upon the operating mode of the radio. The connect LED will not come on at all
if it is operated in the broadcast mode. It will only stay on in the connect mode when it is actively
sending and/or receiving data. The connect LED will go off if the serial port has been idle for a
period longer than the connection time-out. It will come on immediately when the port is busy
again.
If the connect LED comes on first and stays on, it indicates that the microprocessor does not bootup properly. It could be caused by a defective processor, serial port driver, or power supply. You
may use a multimeter or oscilloscope to measure the power supply input. If the voltage drops
below 6V (standard LAWNII-Plus) or 10V (LAWNII-Plus with 12V option), then the microprocessor
will have trouble to boot-up correctly. If the power supply voltage is normal, you will need to
contact OCI to get your LAWNII Plus repaired.
If the LAWNII Plus is booted up successfully, you will need to make sure that the antenna is
aligned properly before performing other tests. To check the antenna alignment, you will need to
send the “FCC” command to one of the radio to turn on the transmitter and go to the remote end
and observe the “Received” status LED. If the antenna is aligned properly, the Received LED
should stay solidly on. If the LED is flickering, it indicates that the alignment could have problems
or the installation site is not good, the path between the antenna is obstructed or problems with
the radios.
- Omnispread Communications, Inc. - 72 -
Then check the receiver‘s antenna alignment, you will need to rotate the receiver’s antenna from
-90 degree to +90degree from the direction to the transmitter. If the antenna path is good, you
should see the Received LED comes solidly on for a continuous span around the direction to the
transmitter. You then fix the antenna to the middle of the continuous span. The angle of the
continuous span can vary from 10 degrees to 60 degrees. If the angle is less than 10 degrees, the
signal strength might be too weak. If the LED only comes on sporadically, then the multipath will
severely deteriorate the radio’s performance. You should either raise the height of the mast or
relocate the antenna to a better location.
After adjusting the receiver’s antenna, you will need to repeat the same test by sending the “FCC”
command to the receiver and checking the Received LED on the transmitter. You can exit the
“FCC” mode by simply typing any character on the keyboard.
Conne
ct test
Connect
The connect test verifies the system settings of the LAWNII-Plus. The system settings include,
name, channel and system number. Please follow the example in “Chapter 10: Examples” to
perform a connect test. If you have done the Connect test on the bench, you are still recommended to do the test again to test the installation. If the installation is successful, the connection
between the two radios should be established immediately as soon as the connection command is
entered. A slow or failed connection indicates installation problems.
Dat
Dataa test
You may perform the Data test to verify the success of the installation of the LAWNII-Plus system.
To perform the data test, you will need to connect the two LAWNII-Plus to two terminals and set
the terminal’s setting to match with the LAWNII-Plus’s setting. You then follow the examples in
“Chapter 10: Examples” to send characters from one terminal to the other and vice versa.
More on the antenna alignment
If, during the “FCC” test mode, the receive LED remains solid for some time and then goes off
quickly and then comes back on solid again. This symptom is called fading which is normal especially for long range communications. As long as the fade out period is brief, say once every 10
seconds. The path is still considered solid. The LAWNII Plus should have no problem to catch up
from the brief loss of path. If you observe fading in a short range link (under 2 miles), you will
probably have to raise the antenna height or find a better location for the antenna. The fading is
most likely caused by the reflections from the earth. When you use a taller mast for the antenna,
you can increase the path difference between the direct wave and reflected wave from the earth
and thus decrease the depth of fading.
It you have raised the antenna to the maximum height you possibly can get, and the multipath or
fading problems are still there, you may try a different polarity for the antenna. Normally, vertical
polarization is preferred in order to minimize the effect of ice and snow during the winter. However, if the multipath is giving you a problem, you then have no other choice but to use the hori-
- Chapter 23: System Check and Functional Test - 73 -
zontal polarization for the antenna . The horizontal polarization usually has less multipath signals
due to its narrower beamwidth.
If you run out of choices, the last thing you can do is to tilt the antenna upward to the sky by 10 to
30 degrees instead of aiming at the same level as shown in the following figure.
The reason that tilting the antenna can solve the multipath problem is due to the fact that the
multipath signals are most likely generated from the earth or metallic objects on the ground. By
tilting the antenna, the antenna can effectively reduce the pickups of ground reflections. As a
result, the multipath problem is solved. However, the more tilt you use, the less powerful the
antenna becomes.
How much can you tilt? Generally speaking , a tilt angle of 30 degree could cost you at least 6db
on your path loss that is equal to losing half of the coverage distance.
The mounting bracket of the 8.5db Yagi antenna provided by OCI allows the user to tilt the
antenna easily. It has four notches for the rear mounting holes. Each notch represents a 10 degrees
tilt.
Loopb
ack T
est
Loopback
Test
The loopback test is an optional test that will give you confidence that the radio is ready to work
for you in the field. It does not take much time to do the test after you have done the path robustness test.
One-to-one network
Assuming that you set the LAWNII Plus up by following the one-to-one example in “Chapter 10:
Examples” and you have the terminal connected to the HOST.
- Omnispread Communications, Inc. - 74 -
First, get into the command mode and issue the following loopback command,
CO HOST VIA REMOTE
After the connection has been established, by checking status of the Connect light or issuing a
“COnnect” command to the firmware to confirm the connection, you may then switch to the
transparent mode and type any key to the keyboard and see it echoed back through the radio
immediately. Every time you hit a key, the Transmit and Receive Light should only flash once. If it
flashes more than once, the radio path might not be robust.
After you are satisfied with the test, you may simply reset the system by turning the power switch
off and then back on. The radio system should be ready to work for you when it is powered up
again.
Multidrop network
If you program all the slaves to have the same identical settings, it can be inconvenient for you to
perform an one-to-one test from the master to each individual slave. You will need to turn the
power of those slaves not under the test off and test one slave at a time. This might cause some
problem especially when the slaves are scattered around in a large area.
One way to solve this problem is to program each slave differently so that each slave has an
unique name but still has the same common broadcast name so that they can still be operated in
a multidrop network. In this way, you can identify and address each slave individually and they
can still work in a unconnected broadcast network receiving the same unconnected packet from
the master. For example, if you have a system with one master and two remote slaves. You can
program them as follows,
Remote#1
MYC SLAVE1
DFCN SLAVE1
LCALLS SLAVE
UNPROTO MASTER
LAWNGRA ON
TRANSGRA ON
TRANS
Remote#2
MYC SLAVE2
DFCN SLAVE2
LCALLS SLAVE
UNPROTO MASTER
LAWNGRA ON
TRANSGRA ON
TRANS
Host
MYC MASTER
DFCN MASTER
LCALLS MASTER
UNPROTO SLAVE
LAWNGRA ON
TRANSGRA ON
TRANS
Now you can perform the loopback test to each slave individually and still run the multidrop
network.
- Chapter 23: System Check and Functional Test - 75 -
Chapter 24: Making R
S-232 Cables for LLA
AW N I I-Plus
RS-232
Conne
ct a LLA
AW N I I-Plus to a PC or printer (D
TE)
Connect
(DTE)
LAWNII-Plus
Computer
DB9
(DB25)
1 ------------------------------------------------------------- 8
2 ------------------------------------------------------------- 3
3 ------------------------------------------------------------- 2
4 ------------------------------------------------------------- 20
5 ------------------------------------------------------------- 7
6 ------------------------------------------------------------- 6
7 ------------------------------------------------------------- 4
8 ------------------------------------------------------------- 5
9
LAWNII-Plus
Computer
DB9
(DB9)
1 ------------------------------------------------------------- 1
2 ------------------------------------------------------------- 2
3 ------------------------------------------------------------- 3
4 ------------------------------------------------------------- 4
5 ------------------------------------------------------------- 5
6 ------------------------------------------------------------- 6
7 ------------------------------------------------------------- 7
8 ------------------------------------------------------------- 8
9
Conne
ct a LLA
AW N I I-Plus to a modem (D
C E)
Connect
(DC
LAWNII-Plus
Modem
(DB9)
(DB9)
2 -------------------------------------------------------------- 3
3 -------------------------------------------------------------- 2
5 -------------------------------------------------------------- 5
7 -------------------------------------------------------------- 8
8 -------------------------------------------------------------- 7
LAWNII-Plus
Modem
(DB9)
(DB25)
2 ---------------------------------------------------------------- 2
3 ---------------------------------------------------------------- 3
5 ---------------------------------------------------------------- 7
7 ---------------------------------------------------------------- 5
8 --------------------------------------------------------------- 4
- Omnispread Communications, Inc. - 76 -
Conne
ct a LLA
AW N I I-Plus to a terminal
Connect
LAWNII-Plus
Terminal
(DB9)
(DB9)
2 ----------------------------------------------------------------- 2
3 ----------------------------------------------------------------- 3
5 ----------------------------------------------------------------- 5
7 ----------------------------------------------------------------- 7
8 ----------------------------------------------------------------- 8
LAWNII-Plus
Terminal
(DB9)
(DB25)
2 --------------------------------------------------------------- 3
3 --------------------------------------------------------------- 2
5 --------------------------------------------------------------- 7
7 --------------------------------------------------------------- 4
8 --------------------------------------------------------------- 5
- Chapter 24: Making RS-232 Cables for LAWNII-Plus - 77 -
Chapter 25: 485 Option
L AW N I I Plus with 485 option.
The pins of the circular connectors are different when the 485 option is installed. The pin-out for
the LAWNII Plus with the 485 option is as follows,
Pin
Description
1
2
3
4
5
6
7
8
9
In +
In Out +
Out Gnd
NC
NC
NC
Vcc (+8V input)
OCI supports the 485 option by installing a special version of firmware that enables the “Push-ToTalk” function to the CTS output at the serial port. This CTS signal is used as the transmitter enable
for the 485 port driver.
Both the input and output pins of the 485 ports are not terminated so that an external termination
resistor will be needed if it is required.
485 Option for the re
gular LLA
AW N I I
regular
For the regular LAWNII model, the 485 option is available with a plug-in 232-485 converter
module outside the unit. This 232-485 convert is designed specifically to convert the RS-232 port
of the LAWNII to an RS-485 port.
The termination resistors for the 485 port are included in the converter module. They can be
activated by simply applying a drop of solder to bridge the connecting pads. The bias resisters for
the RS-485 data bus are also included. These bias resistors set the quiet bus voltage to 2.5V for
optimal noise immunity. These resistors can be activated by the same manner as the termination
resistors.
In the half duplex mode, the CTS signal from the 232 port is used as the transmit enable of the
485 output driver. This control signal is generated automatically by the LAWNII’s microcontroller
so that the serial port is completely transparent to the user.
The converter can be powered directly from the LAWNII. It can be also powered by an external
power supply if it is used with other devices.
The interface to the 232-485 converter can be illustrated as follows,
- Omnispread Communications, Inc. - 78 -
pin # 485 port
1
2
3
4
5
6
7
8
Vout
Gnd
O+
OII+
Vin
Gnd
Description
+9Vdc output from the LAWNII
ground
Positive output
Negative output
Negative input
Positive input
External power supply input (7-10V)
ground
pin # 232 port
Description
2
3
5
RXD
TXD
CTS
7
13
14
Gnd
Vin
Vout
Data to the LAWNII
Data from the LAWNII
Transmitter enable for half-duplex
mode
Ground
5V in from LAWNII
9V out from LAWNII (connected
directly to pin #1 of the 485 port)
OCI supports the 485 option by installing a special version of firmware that enables the “Push-ToTalk” function to the CTS output at the serial port. This CTS signal is used as the transmitter enable
for the 485 port driver. The LAWNII with the 485 option is called LAWNII-485, (model:200-485).
You need to order this way so that it will come with the special firmware. The normal firmware will
not work with the 232-485 converter.
L AW N I I Plus O
EM b
oard with the 485 option
OE
board
Since a DB9 connector is used for the LAWNII Plus OEM board, the 232-485 converter, which
has a DB25 plug for the RS-232 port, can’t be directly plug into the OEM board. Instead, a
special cable is needed to solve the interfacing problem. You need to order this special cable along
with the converter to convert the OEM board to 485 option.
- Chapter 25: 485 Option - 79 -
422 option
The 232-485 converter can be changed to a 232-422 converter easily. To change the mode of
operation, the user needs to open the cover of the converter and set the dip switch to the proper
settings. The dip switch for the mode selection is illustrated as follows, for the 485 option, please
choose the settings for half-duplex and for the 422 option, please use the full-duplex settings.
SW
ON
1 2 3 4
485 Port
RS-232 Port
Half Duplex: 1, 2 ON 3, 4 OFF
Full Duplex: 1, 2 OFF 3, 4 ON
Termination and Bias
The termination resistors for the 485 port are included inside the converter. These resistors, however, are normally not connected to the 485 port until they are needed and activated by the user.
Please refer to the following diagram for the locations of the activation pads.
Applying a drop of solder to bridge the pads of out and in will connect a 120 ohm resistor to the
output and input of the 485 port respectively.
Bias +
T out
Bias -
T in
485 Port
RS-232 Port
Solder Side View
- Omnispread Communications, Inc. - 80 -
In the Half duplex mode, the bus is normally floated until a node sends data to the bus. Ideally,
the bus will be sitting at 2.5V, which is halfway between the power supply and ground, when it is
floated. However, it is not always so. Normally, the bus voltage will be drifted toward the Vcc or
ground and will reduce the noise margin of the bus.
One way to fix this problem is to provide a bias to the bus so that the bus will stay at the 2.5V all
the time. The bias resistors for the 485 bus are included in the converter. One bias resistor connects the Data+ to Vcc and the other connect the Data- to the ground so that the bus will stay at
2.5 V.
Please refer to the above diagram for the location of the connection pads. Applying a drop of
solder to bridge the pads of Bias+ and Bias- will connect the bus to the Vcc and Gnd respectively.
The followings are some notes about using the 232-485 converter,
A. In the half duplex mode, the CTS switching guard time is programmable from 10usec up to
3msec. The guard time is controlled by the ASYNCPH nnn command where nnn represents any
number from 1 to 999 and the unit is 16usec. The actual guard time will vary, depending upon
the state of the firmware. Please make sure that your equipment will wait for the guard time to
expire before sending response data to the bus.
B. In the 485 mode, the minimum baud rate of the converter is 9600 baud. Running baud rate
lower than 9600 baud may cause some errors to the data.
C. The converter is designed to be used with LAWNII which is a DCE device. If you are using the
converter with a DTE device, such as computer, terminal or printer, you will need to cross the pin
2 and pin 3 on the RS-232 port.
D. The converter can be powered by an external power supply. The input voltage range can be
from 7 to 12 V. The current consumption is about 30 mA.
- Chapter 25: 485 Option - 81 -
Chapter 26: Using Repeaters for the Broadc
ast Mode
Broadcast
There are two ways to implement the repeater set for a multidrop broadcast network. One way is
to extend the coverage distance by using the serial repeater set and the other way is to gain the
coverage area by using the parallel repeater set. You may choose either way that best suitable for
your application.
The indoor coverage distance of the LAWN system is normally up to 300’. The distance might be
less if there is severe multipath signals in your building. The typical symptom of multipath is that
the link becomes sporadic and it goes from good communications to bad and from bad to good
communications without apparent reason. This problem becomes more severe especially at the
limit of the coverage range. The only way to reduce the impact of multipath is either to strengthen
the link by reducing the coverage distance or to do multiple broadcast so that the probability of
getting the data through is improved. If you choose to strength the link, you need to implement
the serial repeater set. If your system is mobile, you probably will need to implement the parallel
repeater set to cover more area. You have to make the decision by judging the circumstance or by
simply trying out both ways to determine which is the better solution.
Serial repeater set
In the serial repeater set mode, you simply reduce the coverage distance by half for each leg of
the link and install the repeater set at approximately the half way between the host and remote
units. You may use different RF channel for each leg of the communication path. If only one
channel is available, you then have to use different name for the repeater set. For example, the
distance between MASTER and SLAVE is becoming too great and you need to use serial repeater
set, you will do the following,
A. Using different RF channel
SLAVE
MASTER
Channel 1
Channel 3
RSLAVE
RMASTER
- Omnispread Communications, Inc. - 82 -
Program the radios as follows,
MYC
DFCN
LCALL
UNPROTO
CHA
LAWNGRAM
TRANSGRAM
MASTER
MASTER
MASTER
MASTER
SLAVE
1
ON
ON
RSLAVE
SLAVE
SLAVE
SLAVE
MASTER
1
ON
ON
RMASTER
MASTER
MASTER
MASTER
SLAVE
3
ON
ON
SLAVE
SLAVE
SLAVE
SLAVE
MASTER
3
ON
ON
Please note that a null modem cable is used between RSLAVE and RMASTER.
In the serial repeater set mode, the distance of each leg of the radio path is half of the distance
without the repeater set. As a result, the multipath signal has less effect. If you only have one
channel available, then you have to use a different name for the system such as following,
MYC
DFCN
LCALL
UN
LAWNG
TRANSG
MASTER
M1
M1
M1
SL1
ON
ON
RSLAVE
SL1
SL1
SL1
M1
ON
ON
RMASTER
M2
M2
M2
SL2
ON
ON
SLAVE
SL2
SL2
SL2
M2
ON
ON
Parallel repeater set
The parallel repeater set can increase the coverage area of your system by sending multiple broadcast messages. The parallel repeater set system can be illustrated as follows,
SLAVE
MASTER
RSLAVE
RMASTER
Above: Master to slave path.
- Chapter 26: Using Repeaters for the Broadcast Mode - 83 -
SLAVE
MASTER
RSLAVE
RMASTER
Above: Slave to master path.
Please note that there is no connection between the RMASTER and RSLAVE and the RXD and
TXD of the RMASTER and RSLAVE are tied together so that the data will automatically rebroadcasted as soon as it is received by RMASTER or RSLAVE.
You will need to program the radios as follows,
MYCALL
DFCN
LCALL
UNPROTO
LAWNG
TRANSG
MASTER
RMASTER
RSLAVE
SLAVE
M1
M1
M1,M2
S1
ON
ON
M2
M2
M1
M2
ON
ON
S2
S2
S1
S2
ON
ON
S1
S1
S1,S2
M1
ON
ON
By this way, the MASTER will receive the packet addressed to either M1 or M2. The M1 packet
will come from the SLAVE while the M2 packet is from RMASTER. By the same token, the SLAVE
will receive the packet addressed to either S1 or S2. The S1 packet comes from the MASTER
directly while the S2 packet comes from the RSLAVE.
When the MASTER broadcast a message to the SLAVE, the message can be directly received by
the SLAVE. Since the RSLAVE can also receive the same data packet from the MASTER, the same
data packet will be rebroadcasted by RSLAVE immediately. The rebroadcasted message will only
be received by SLAVE. As a result, the SLAVE will receive the same message twice. The response
packets from the slave can be directly received by the MASTER directly or repeated through the
RMASTER. As a result, the MASTER will receive four responses. The multiple response might
cause air traffic congestion if the system is busy sending and receiving data all the time. One way
to reduce the traffic congestion of the airway is for the SLAVE to ignore the second data packet
- Omnispread Communications, Inc. - 84 -
and only send one response back to the MASTER.
Doubling the message from different paths will greatly reduce the impact of multipath and improve the quality of signal. If the MASTER has trouble to communicate directly with the SLAVE at
one area, you can install the RSLAVE and RMASTER in a favorable position so that the repeaters
can talk to both the MASTER and SLAVE easily. If you still have another trouble area, you can
even add another repeater set to cover that trouble area, however, the MASTER will now receive
nine responses. The following example show you how to use two repeater sets to cover two
trouble areas,
MASTER
MYCALLM1
DFCN M1
LCALL M1,M2,M3
UNPROTOS1
LAWNG ON
TRANSGON
RM1 RSL2
RM2 RSL2
SLAVE
M2
M2
M1
M2
ON
ON
M3
M3
M2
M3
ON
ON
S1
S1
S1,S2,S3
M1
ON
ON
S2
S2
S1
S2
ON
ON
S3
S3
S2
S3
ON
ON
SLAVE
MASTER
RM1
RS1
RM2
RS2
Abvoe: Master to slave path
- Chapter 26: Using Repeaters for the Broadcast Mode - 85 -
MASTER
SLAVE
RM1
RM2
RSL1
RSL2
Above: Slave to master path
The parallel repeater set can be used as many as needed until the air traffic is too congested and
cause collision problems. This problem is caused by two radios trying to transmit the signal at the
same time and unfortunately, one or both of the signals will be lost when it happens. In order to
reduce the possibility of packet collision, you must reduce the number of transmission as much as
possible. One way to achieve that in a parallel repeater set is to hold the MASTER and SLAVE unit
from responding too quickly. For example, in the above system with two repeater sets, the SLAVE
will receive a total of 3 requests from the MASTER unit. Supposed it take 100 msec for the SLAVE
to receive the packet from the MASTER directly, then it will take 200msec from the first repeater
set and 300msec from the second repeater set. To minimize the possibility of collision, the SLAVE
should not respond right away when it receives the direct packet from the MASTER, instead it
should wait for 200 or more msec to make sure that all the repeaters should have been off the air,
and then return the response to the MASTER. The SLAVE may or may not receive all the packets
from the repeater set, but as long as it waits for a another 200 msec after receiving a good packet
before returning a response, the probability of collision will be greatly reduced.
Performance Improvement by P
arallel Repeating
Parallel
The performance improvement by multiple transmission with parallel repeaters can be calculated
as follows,
- Omnispread Communications, Inc. - 86 -
Suppose, the success rate of transmission is p, then the packet will have a failure probability of 1-p.
For example, the success rate is 90%, then 10% will be lost or the failure rate will be 0.1.
If the message is sent twice, then the chance that both packets are failed is equal to (1-p) 2
Using the same success rate of 90%, then the failure rate will be 0.01 which is 1%.
The failure rate can be less than 0.1% with triple transmission.
From these numbers, the success rate is greatly improved by multiple transmission. However, the
system must ignore multiple request and send out only one response per request to minimize the
collision.
- Chapter 26: Using Repeaters for the Broadcast Mode - 87 -