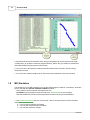
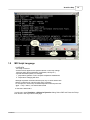
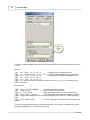
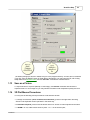
1
XenoView 3.4 User Manual
2008 Rensselaer Polytechnic Institute
Welcome to XenoView
Visualization for Atomistic Simulations
by Sergei Shenogin
This is not a real manual, but it will definitely help you to get started.
Many features of XenoVIew are not documented yet. Sorry . I was
surprised that writing a manual is even worse than reading a manual. So
I never had patience to complete it. But all appropriate procedures can
be found in the menu. If you are familiar with simulation software and
standard user interfaces, it will be easy for you to learn how to use
XenoView.
Your questions and comments are welcome. Please write me to
[email protected]
Thank you for your attention
Contents
I
Table of Contents
0
Part I XenoView Help
1 Content
2
................................................................................................................................... 2
2 Introduction ................................................................................................................................... 2
3 Creating New ...................................................................................................................................
Molecular Structure
4
4 Editing Molecular
...................................................................................................................................
Structure
5
5 Assigning Atom
...................................................................................................................................
Type
6
6 Atom Types and
...................................................................................................................................
Force Fields
7
7 Energy Minimization
................................................................................................................................... 8
8 MD Simulation
................................................................................................................................... 10
9 MD Script Langauge
................................................................................................................................... 15
10 Normal Vibrational
...................................................................................................................................
Modes
19
11 Animation Data
...................................................................................................................................
Files
21
12 Appearance ...................................................................................................................................
of 3D Structure
22
13 Save as a Picture
................................................................................................................................... 23
14 3D Plot Mouse
...................................................................................................................................
Procedures
23
15 Data Plot Mouse
...................................................................................................................................
Procedures
24
16 Interaction Between
...................................................................................................................................
XenoView and Simulation Program
25
17 Data Plot Format
................................................................................................................................... 37
18 Creating Data
...................................................................................................................................
Template
37
Part II XenoPlot Help
1 Content
39
................................................................................................................................... 39
2 Introduction ................................................................................................................................... 39
3 Drawing Format
................................................................................................................................... 40
4 XenoPlot Mouse
...................................................................................................................................
Procedures
41
5 FFT Filtering................................................................................................................................... 42
6 Regressions................................................................................................................................... 43
7 Curve Fitting................................................................................................................................... 44
© 2008 RPI
8 Printing
................................................................................................................................... 46
Index
47
2
XenoView Help
1
XenoView Help
1.1
Content
1. Introduction
2. Creating New Molecular Structure
3. Editing Molecular Structure
4. Atom Types and Force Fields
5. Energy Minimization
6. MD Simulation
7. MD Script Langauge
8. Normal Vibrational Modes
9. Animation Data Files
10. Appearance of 3D Structure
11. Save as a Picture
12. 3D Plot Mouse Procedures
13. Data Plot Mouse Procedures
14. Interaction Between XenoView and Simulation Program
15. Data Plot Format
16. Creating Data Template
1.2
Introduction
XenoView is software package for molecular simulations. It includes Graphical User Interface which
allowes to create molecular structure, see it on the screen, run simulations, and easily monitor and
analize the results on the screen. We tried to make the program as user friendly as possible. First of
all, XenoView interface is made in compliance with Windows standards, and, second, many default
simulation options usually work well from the beginning. This reduces learning time considerably, so
you might be able to run your simulation right after reading this short introduction.
Standard configuration of XenoView includes modules for energy minimization, molecular dynamics
and normal modes analysis, structure builder for polymer chain packing, and modules for data
analysis.
© 2008 RPI
XenoView Help
3
Energy minimization and molecular dynamics modules are using DISCOVER/CERIUS force fields
and data formats. When structure is saved, two text files are always created: *.car file with atomic
positions and *.mdf file for the description of the covalent bonds between the atoms. The third file is
required for molecular dynamics (input file, *.inp). You must save your structure in (*.car), (*.mdf) and
(*.inp) files to run molecular dynamics simulation. Additional files with the initial atomic velocities
(*.avf) , custom-defined force field parameters ("*.ff" ) and script file for special thermostat and external
force settings (*.add) can be created as well.
Structure can be loaded from *.car and *.mdf files (see samples in DATA/Samples folder), converted
from *.pdb format, converted from ASCII text file with atom coordinates, or just
created from the scratch.
Within XenoView, internal data format (*.xvw) is supported. This is non-text format containing
everything including the appearance of the graph and animation data. Default graph appearance is
stored in 'default.xvw' file which is located in program directory. This file may be modified to change
graph appearance, i.e. hide covalent bonds by default. Use "Edit -> Preferences" command to change
the presentation of your data on the screen.
Use "Edit -> Structure Editor" command to change something in the structure. The Structure Editor
has tools for creating, deleting, copying, moving and rotating the objects. It could be more convenient
to use keyboard shortcuts and 3D plot mouse procedures to work with the structure.
Clipboard procedures are implemented according to Windows standards (use Ctrl-C to copy, and CtrlV to paste selected structure). In the same time the whole 3D graph image will be copied to clipboard
and can be retrieved from external program.
Use "Simulation -> Edit MD Parameters" command to change MD settings. The "Visualization" page
of MD toolbox has a list of available data templates to plot simulation results. You may create your own
data templates by using "Edit Data" option in the main program menu or data plot popup menu and
save it to the template directory XTP;
Use "Simulation -> Molecular Dynamics" command to start MD, or "Simulation -> Energy Minimization"
for run energy minimization. You may run several simulation processes with graph interface at a time.
For each process, separate plot window will be open to control the simulation.
Several MD processes can be run simultaneously in command-line mode. The input file data format
(*.inp) is associated with the command - line version of the MD program, so you may simply start
command-line MD by double-clicking on the *.inp file. You may stop command-line MD process by
pressing "Q" key. Pressing "ESC" key pops up simulation menu.
The results of MD simulation are stored in text and/or binary files in the "result" folder with the same
name as your structure file. The "result" folder includes: (1) text file "current.car" with coordinates of all
atoms at the end of simulation; (2) file "movie.anm" with atom trajectories (3) data files with recorded
values such at temperature, pressure, and density; (4) file "FField.txt" with force field parameters used
in the last simulation; and (5) log and error files. MD results can be viewed by "Simulation ->Show MD
results" command at any time.
Two independent control points (files with system position) are stored in the same result folder in two
unformatted "*.fi" files, so the simulation can continue from the point where it was interrupted. To start
simulation from the beginning, delete the whole "result" folder.
Please send your comments, wishes and bug reports to [email protected]
© 2008 RPI
4
1.3
XenoView Help
Creating New Molecular Structure
To create new molecular structure:
1. Open new 3D graphic window by 'File -> New' command;
2. Insert new atom into the structure.
- select 'Edit -> Create Atom' option from main menu or press 'Ins' key on keyboard;
- click on Graphic window with left mouse button;
3. Click on the atom you just created to select it. Atom will be highlighted;
Assign element, atom type and charge to new atom
4. Create another atom or copy already existing. Clipboard procedures are implemented according to
Windows standards (use Ctrl-C to copy, and Ctrl-V to paste selected structure). See
3D plot mouse procedures and Editing Molecular Structure for more options.
5. To connect atoms with covalent bond:
- if you have previous selection, clear it by clicking on empty space on you plot (you need to select
exactly two atoms which you want to connect with bond);
- click on the first atom to select it. Atom will be highlighted;
- press 'Ctrl' key for multiple selection and click on the second atom ;
- run 'Edit -> Create Bond' command or press 'Ctrl-B';
6. To change periodic cell parameters:
- open Graph Editor by 'Edit -> Preferences' command;
- choose 'Cell' tab and edit the parameters;
- click 'OK' to close Graph Editor;
7. To create polymer chain:
- create one chain segment with all bonds and assigned charges;
- select two atoms in the segment ("head" and "tail");
- use Tools->Polymer Builder command;
- add terminal atoms (or select the chain and use Edit->Auto Define->Hydrogens command);
9. To create amorphous polymer builder:
- create one chain in the structure;
- use Tools->Amorphous Builder command;
10. To save you structure:
- run 'File -> Save As' command;
- save structure as Molecular Configuration (*.car and *.mdf) File.
See also Editing Molecular Structure with structure editor.
© 2008 RPI
XenoView Help
1.4
5
Editing Molecular Structure
To modify molecular structure with structure editor:
1. open Structure Editor by 'Edit -> Structure Editor' command;
2. choose 'Modify Structure' tab;
3. to create or delete atoms and bonds, click on the appropriate button;
4. to translate, rotate or duplicate selected parts of the structure, edit the parameters and click on the
appropriate button;
5. to apply changes immediately, press 'Direct' button (not recommended for large structures and slow
computers);
6. click 'OK' button to apply changes and close dialog;
7. In the main menu ("Edit-AutoDefine") there are many options which do not present in data editor.
For example, you may auto define covalent bonds using the connectivity information from the force
field, or saturate structure with hydrogens.
© 2008 RPI
6
1.5
XenoView Help
Assigning Atom Type
To assign the same atom type to all selected atoms:
1. Open Structure Editor by 'Edit -> Structure Editor' command;
2. Choose 'Selection' tab;
3. Press '?' button to see available atom types with descriptions, or type in desired Element and Type
settings.
© 2008 RPI
XenoView Help
7
4. When atom type is selected, close the table by pressing "Accept" button.
4. Make sure that 'Set' button is down to apply changes.
5. Press 'OK' button.
Read more about atom types and force fields.
1.6
Atom Types and Force Fields
Before running simulation (molecular dynamics or energy minimization), each atom must be assigned
correct force field type. Because simulation program can read only one force field file, all atom types
must exist within one force field. The default force field "PCFF_D.frc" works fine for most cases. To
learn more about available force fields and select which force field file to use, go to XenoView program
directory and read files with extension *.frc. Note that different force fields can use different
expressions to calculate nonbonded interactions energy. After you have selected the force field, you
may assign atom types to the atoms.
1. Select the atoms to which you want to assign the type. For example, click on the atom, use the
frame (press 'Ctrl-F' for frame) or select all atoms by 'Ctrl-A'.
© 2008 RPI
8
XenoView Help
2. Assign atom type to the selected atoms.
After atom type was assigned, the color and size of the atom will change according to the type. If
desired, you may change atom size and color by editing 'color.tbl' file in XenoView program directory.
There is a special program - color editor, which may be used to edit 'color.tbl' file. Use Edit->Atom
Colors and Size command to run it from XenoView.
3.You may read force field parameters which are actually used in you simulation. Each simulation
session (energy minimization or MD) creates the file "FField.txt" with complete set of actual force-field
parameters used for this session. For energy minimization session, look for this file in the directory
TEMP/%Sim_ID, located in the program directory (i.e. directory where executable files are installed).
For MD session, look for this file in the directory with simulation results.
4. You may specify force field parameters for MD simulation explicitly. To do this, use Simulation>Force Field->Modify command and edit the script file with the parameters which you want to use.
Make sure to keep the structure of the file intact, with all numbers in the same place with same format.
Note that for non-bonded interactions the actual distance parameters are r3 or r6 (cube or the 6th
power of zero-force distance), depending on the force field. If the script was modified, new parameters
will be saved to the file with extension "*.ff" together with structure files "*.car" and "*.mdf". Parameters
imported from file "*.ff" in the startup directory will override the parameters calculated from the source
force field file "*.frc". File "FField.txt" in the results directory always contains actual parameters used
in the simulation.
1.7
Energy Minimization
To run energy minimization, you must select force field and assign force field types to all atoms.
1. In main menu open Tools -> Energy Minimization dialog
© 2008 RPI
XenoView Help
9
2. Select desired minimization settings and press 'OK'. The plot window will
3. You may stop minimization at any moment by pressing 'Stop' button on the graphic window, or by
Simulation -> Stop command. However, energy minimization program needs to finish iteration cycle
to stop. To force simulation to stop immediately, just close the graphic window (with confirmation).
4. When minimization procedure is finished, close graphic window to see the minimized structure:
© 2008 RPI
10
XenoView Help
5. Minimized structure and information about energy minimization can be retrieved from the folder
"\TEMP\%Sim_ID" located in XenoView program directory, where "Sim_ID" stands for simulation ID
which Minimization program reports in text window.
6. File "Errors.txt" in this directory contains information about errors occurred in the last energy
minimization session.
7. File "FField.txt" contains complete set of actual force-field parameters used for this session.
1.8
MD Simulation
The easiest way to run MD simulations is to use the default program. However, if necessary, XenoView
can be used with the external simulation software because:
- Atom positions can be imported from regular text files;
- Animations can be played from text files with some special formatting (see samples);
- Data are plotted from text files (comma separated columns is the only recommendation);
1. First Create your structure and save it on the disk. Three to six files must be saved in the same
directory:
a. "*.car" file with coordinates of all atoms.
b. "*.mdf" file with covalent bonds information
c. "*.inp" file with simulation settings
© 2008 RPI
XenoView Help
11
d. "*.avf" (optional) file with initial atomic velocities.
e. "*.add" (optional) file with additional script for advanced simulation options .
e. "*.ff" (optional) file with modified force-field parameters.
To run MD simulation with XenoView interface:
2. In main menu open Simulation -> Molecular Dynamics dialog. Select basic MD settings on the
"General" and "MD" tabs:
© 2008 RPI
12
XenoView Help
3. More advanced simulation settings can be performed using MD Script Langauge
4. Select the program for the simulation. In MD settings dialog open the Program tab:
© 2008 RPI
XenoView Help
13
To run default MD program, check the "Run default MD program" checkbox.
To run your own simulation program, uncheck "Run default MD program" box and specify the
parameters:
a. Executable file for your program (use '...' button to browse through directories);
b. Parameters (optional) for your program.
c. Data Sub Directory (optional). The working directory for your program will be the directory where
the structure was saved. In this directory, you may create sub-directory and write you results in it.
XenoView will look for your results in this directory and plot them.
Your program must use special commands for interaction with XenoView.
5. Select the data you want to plot during the simulation. In MD settings dialog open the Visualization
tab:
© 2008 RPI
14
XenoView Help
If you want to read text messages from your program, check "Show Simulation Window" box.
Select required data templates from the list. The active templates will be used to plot the data from
the text files created by simulation program.
You may create your own data template and save it to the "XTP" folder in XenoView working
directory. For more details, see Creating Data Template.
To run MD simulation in command-line mode (without interface):
2. Double-click on the "*.inp" file in the startup directory. This will start "MDCmd.exe" program, which
will re-direct the input to the MD executable specified in the file.
3. To stop command-line MD process, press ESC key. This pops up a menu.
© 2008 RPI
XenoView Help
1.9
15
MD Script Langauge
I. OVERVIEW
The script is used for:
- External forces applied to the specified atoms. Forces may change
with time and/or atom parameters (coordinates, velocity etc.)
- Special thermostat options, for example:
1. Temperature gradient or more complex temperature distributions
2. Temperature changing with time
Although expression evaluation with script is only 3-5 times slower then
with the compiled code, use this script only if necessary.
For example, do not the keep constant temperature with script like this:
"@all : Temp = 298.0;", use thermostat instead
II. EDITING THE SCRIPT
In main menu open Simulation -> Molecular Dynamics dialog. Select "MD" tab. Press the "Script
Edit" button in the very bottom of the page:
© 2008 RPI
16
XenoView Help
The use of script is straightforward. Here are some examples (to make the expression active, remove
"!" sign):
#Forces
!
! @1 : FX = 1.0E-2; FY = 0; FZ = 0;
! Constant force is applied to atom #1
! @2 : FX = 1.0*sin(10*Time); FY = 0; FZ = 0; ! Forced oscillations with frequency 10/2pi THz
! @2-4 : FX = -1.E0; FY = 0; FZ = 0;
! Constant force is applied to atoms #2,3 and 4
! @5 : FX = 1.E-2; FY = 0; FZ = 0;
! @10 : FX = 2.E-2; FY = 0; FZ = 0;
! @all : FX = -((SX<(-0.3))*(SX+0.3)+(SX>0.3)*(SX-0.3))*2.E1; FY = 0; FZ = 0; ! Creates two soft
walls in X-direction
!
#Temperature
!
! @all : Temp = 2.0 + 600 * ABS(SX);
! Constant temperature gradient
! @1 : Temp = 200.0;
! Apply T=200.0 K only to atom # 1
! @10-20 : Temp = 300.0;
! Apply thermostat T=300.0 K to atoms 10 through 20
! @all : Temp = 200.0 + Time*10.0;
! Heat all structure with constant temperature 10 deg/ps
! @all : Temp=(Time<100)*(300+Time*1.0)+(Time>100)*(400-(Time-100)*1.0); ! Heating+cooling
cycle
! @all : Temp = 200.0 + Index;
! For test. Temperature is defined by atom number in the
structure
To write more complicated scripts for your own special case (i.e. for electric or magnetic field, radial
temperature distribution, etc), read the following notes.
© 2008 RPI
XenoView Help
17
_______________________________________________________________________
III. GENERAL NOTES:
1. Each section opens with "#" mark in first position
Line "#Forces" opens external forces section
Line "#Temperature" opens special thermostat section
2. Expression starts with "@" mark followed by the index of the atom
to which it must be applied, then ":" mark, then expression itself
closed by ";" sign. Examples:
@1 : FX = 1.E0; FY = 0; FZ = 0; - to atom # 1
apply constant force
along X-axis
@all : Temp = 2.0 + 600 * ABS(SX);
- to all atoms
apply constant
temperature gradient
along X-axis from
2.0 K in the center to
302.0 K in cell periphery
(SX ranges from -0.5 to 0.5)
3. If atom appears in more then one active expression, the first expression takes precedence.
For example, this script cools first 10 atoms, heats next 10 and keeps the rest of the structure
at the middle temperature:
@1-10 : Temp = 200.0;
@11-20 : Temp = 400.0;
@all : Temp = 300.0;
4. Mark "!" in the first position means comment line
_______________________________________________________________________
IV. VARIABLES, OPERATORS AND FUNCTIONS DEFINED:
1. Variables:
"Time" 1. simulation time in [ps]
"Temp" 2. global temperature in [K]
"Press" 3. internal hydrostatic pressure in [kCal/Mol/A3]
"CellX" 4. cell size X in [A]
"CellY" 5. cell size Y in [A]
"CellZ" 6. cell size Z in [A]
"CellA" 7. cell angle Alpha in [degrees]
"CellB" 8. cell angle Beta in [degrees]
"CellG" 9. cell angle Gamma in [degrees]
"X"
10. atom coordinate X in [A]
"Y"
11. atom coordinate Y in [A]
"Z"
12. atom coordinate Z in [A]
"SX" 13. atom scaled coordinate X (ranges from -0.5 to 0.5)
"SY" 14. atom scaled coordinate Y (ranges from -0.5 to 0.5)
"SZ" 15. atom scaled coordinate Z (ranges from -0.5 to 0.5)
"VX" 16. atom velocity X-component in [A/ps]
"VY" 17. atom velocity Y-component in [A/ps]
"VZ" 18. atom velocity Z-component in [A/ps]
"FX" 19. X-component of the force actig on atom in [kCal/Mol/A]
"FY" 20. Y-component of the force actig on atom in [kCal/Mol/A]
"FZ" 21. Z-component of the force actig on atom in [kCal/Mol/A]
"Mass" 22. atom mass in [amu]
"Chrg" 23. atom charge in [e]
"Index" 24. atom number in the system
© 2008 RPI
18
XenoView Help
2. Operators - Fortran standard (power operator "**" works in addition to "^")
"+"
"-"
"*"
"/"
"^"
">" - logical operator (returns 1 if A>=B, 0 otherwise)
"<" - logical operator (returns 1 if A<B, 0 otherwise)
"=" - logical operator (returns 1 if A=B, 0 otherwise)
3. Functions - Fortran standard
"abs"
"exp"
"log10"
"log"
"sqrt"
"sinh"
"cosh"
"tanh"
"sin"
"cos"
"tan"
"asin"
"acos"
"atan"
_______________________________________________________________________
V. UNITS IN THIS SCRIPT:
Temperature units are [K]
Time units are [ps]
Energy terms are in [kCal/(mole)]
Explicit distances are in [A]
Atom partial charge is in electron charge units [e]
Atom masses are in [amu]
Velocity units are [A/ps]
Scaled coordinates are dimensionless (change from -0.5 to 0.5)
Cell angles here are in [degrees]
Forces are in [kCal/(mole A)]
Pressure and stress tensor components are in [kCal/(mole A^3)]
_______________________________________________________________________
VI. SOME SAMPLE SCRIPTS:
! To activate the line, remove "!" character from the first position.
! Identifiers "#Forces" and "#Temperature" are required
! Each script line is terminated with ";" character
#Forces
! FX,FY,FZ - force vector components in [kCal/(mole A)]
!
! @1 : FX = 1.0E-2; FY = 0; FZ = 0;
! Constant force applied to atom #1
! @2 : FX = 1.0*sin(10*Time); FY = 0; FZ = 0; ! Forced oscillations with frequency 10/2pi THz
! @2-4 : FX = -1.E0; FY = 0; FZ = 0;
! Same constant force applied to atoms #2,3 and 4
! @5 : FX = 1.E-2; FY = 0; FZ = 0;
! @10 : FX = 2.E-2; FY = 0; FZ = 0;
! @all : FX = -((SX<(-0.3))*(SX+0.3)+(SX>0.3)*(SX-0.3))*2.E1; FY = 0; FZ = 0; ! Create two soft walls
in X-direction
#Temperature
! 1. Temp - required temperature in [K]
© 2008 RPI
XenoView Help
19
! 2. Berendsen-type thermostat with strength "thermOut" is used
! 3. This additional thermostat is applyed to the specified atoms
! before the standard thermostat is applyed
! 4. If option "@all" was given, standard thermostat is forced to turn off
!
! @all : Temp = 2.0 + 600 * ABS(SX);
! Constant temperature gradient
! @1 : Temp = 200.0;
! Apply only to atom # 1
! @10-20 : Temp = 300.0;
! Apply thermostat to atoms 10 through 20
! @all : Temp = 200.0 + Time*10.0;
! Heating with constant temperature 10 deg/ps
! Heating+cooling cycle beteen 300 and 400 K at 1 deg/ps:
! @all : Temp=(Time<100)*(300+Time*1.0)+(Time>100)*(400-(Time-100)*1.0);
! @all : Temp = 200.0 + Index;
! For test. Temperature is defined by atom number in the
structure
1.10
Normal Vibrational Modes
To calculate normal vibrational modes of the structure, use Energy Minimization procedure.
1. In main menu open Tools -> Energy Minimization dialog, choose the tab "Normal Frequencies"
and check "Calculate natural Frequencies" box.
© 2008 RPI
20
XenoView Help
2. It is always good to run careful energy minimization (with "zero" tolerance) before calculating normal
vibrational modes. This will allow to create more symmetric dynamical matrix and calculate more
accurate eigen frequencies. The reason is that "*.car" file stores atom coordinates with single
precision, while the calculation of vibrational modes requires atom coordinates to be at energy
minimum with double precision accuracy. Dynamical matric diagonalization is far more computationally
extensive problem then energy minimization. Usually the structures with less then 1000 atoms can be
analized within reasonable time frame (several hours).
3. The procedure will generate text file "eigValues.dat" in the program directory with frequency, density
of states and participation ratio for each mode (the last parameter is calculated from the eigenvectors
and shows the degree of localisation for each mode). The first several (three to six) modes with close
to zero frequencies represent translational and rotational degrees of freedom. All other modes must
have real frequencies.
© 2008 RPI
XenoView Help
21
4. If box "Calculate Eigenvectors" is checked, procedure will create file "EMin.eig" in the program
directory. This is the text file with normalized eigen vectors. XenoView can load "*.eig" files along with
the molecular structure and show the animated vibrations for each mode. To keep the results, move
file "EMin.eig" to the folder where your structure "*.car* file is stored, and give it the same name (but
with "eig" extension).
5. To animate vibrations:
- Go to the next vibrational mode by Normal Modes->Next Frequency command
- Start animation by Animation->Start Movie command
- The animation can be saved in "*.avi" file format using external codec.
6. To unload vibrational modes, use Normal Modes->Unload Modes command
5. You may open "BBall.car" sample structure file to see how the results of normal modes analysis
look.
1.11
Animation Data Files
Animations can be loaded from the text files with extension '*.anm'.
1. The animations can be exported to "*.avi" file by Save As command. You may select video codec
from the list of codecs installed on your computer.
2. To play/pause animation use Animation ->Start Movie Command
3. Many settings for animation, including playback speed and time limits can be modified from
animation control dialog. To open it, use Animation->Show Animation Control Command:
4. Many additional procedures can be performed for animated structures loaded to XenoView. Some
examples are:
- Animation->Average Trajectories
- Calculate->Atom Colors From->Atom Displacements
- Calculate->Atom Colors From->Local Strain
- Calculate->Diffusion Coefficient->From Random Walk
5. The XenoView animation files "*.anm" are usually created by MD or energy minimization program. It
can be text file or binary file with text header (this option is preffered because of much smaller files
and faster reading).
The text version of "*.anm" file may have different directives in addition to the coordinates.
-'!' - comment directive. Comment lines must be preceded by the '!' sign;
© 2008 RPI
22
XenoView Help
- '@Connections=<filename.mdf>' optional directive shows the filename with covalent bonds. If this
directive is missing, connections will be loaded from file with the same name as *.anm file (but
extension *.mdf).
- '@NoColor' optional directive means that the default atom colors and size will be used (i.e. defined in
'color.tbl' file) ;
- '@Header' required directive opens the header section. It defines atom numbers, types, radii and
colors. This section must have 7 comma separated columns. First column is the number of each
atom, second is the atom type in the force-field, third is atom radius for movie representation. The
last 4 columns define atom color.
- '@Coordinates' required directive opens the coordinate section. It has several records, equal to the
number of nodes that will be created in the trajectories. The movements between the nodes are
defined by linear or cubic spline interpolation.
- '@istep=<nnn> , time= <ttt> <units>' directive opens the description of the node. <nnn> is the
simulation time step for this node (not actually used), and <ttt> is the actual node time (required).
Comma between them is required. <units> is the string representing time units to be shown on plot
(optional).
- '@cell= <X_Size>, <Y_Size>, <Z_Size>, <Alpha_Angle>, <Beta_Angle>,
<Gamma_Angle>' directive defines cell shape for current node.
- Node description for atoms: The following 5 columns define atom number, three coordinates and
velocity value for each atom. All columns must be comma separated. For each atom one or two
nodes can be defined at given time. Two nodes must be defined if atom jumps to a new position
because of periodic boundaries. The velocity values are required only for additional calculations (like
temperature calculations) and may be set to 0.
1.12
Appearance of 3D Structure
To change appearance of the graph (the way atoms and bonds are presented, size and shape of
simulation cell, background color, legend size, camera perspective, sensitivity to mouse movements
etc) use Edit->Graph Editor command:
© 2008 RPI
XenoView Help
23
The default settings are stored in "default.xvw" file in the program directory. This file will be overwritten
if you click "Save as Default" button in Graph Editor. Alternatively, you may open this file, edit it using
Graph Editor and Structure Editor, and use "Save As" command to overwrite this file.
1.13
Save as a Picture
To export structure to a picture (Bitmap or JPG image), use Save As command and choose the
required format. For JPG image file, you may select the resolution and compression quality of the file.
1.14
3D Plot Mouse Procedures
You may use the following mouse procedures in 3D structure window:
- To change view direction (move camera around structure), press mouse right button and drag.
Arrows on the keyboard numeric pad work in the same way.
- To translate viewpoint, press mouse left button and move. Arrows on main keyboard do the same.
- To ZOOM in or out, rotate mouse wheel or press '+' or '-' on the numeric pad ;
© 2008 RPI
24
XenoView Help
- To get centered view, press mouse wheel or central button, or '*' on the numeric pad;
- To select an object (atom or bond), click on it with left mouse button;
- To select several objects, hold down Ctrl key (just like in Windows);
- To select objects with the frame, hold down Ctrl key, click on empty space and drag across the area
(there is also a menu option for selection with frame);
- To translate selected objects, hold down Ctrl key and drag with left mouse button;
- To rotate selected objects, hold down Ctrl key and drag with right mouse button;
- To translate selected objects in the specified plane, hold down Shift key and press: left mouse
button for X-Z plane, right button for X-Y plane and left+right buttons for Y-Z plane;
- To duplicate selected objects, hold down Shift and Ctrl keys at the same time and drag;
1.15
Data Plot Mouse Procedures
You may use the following mouse procedures in data plot window:
- To MOVE the individual GRAPH, drag it, holding it on the Upper Left angle;
- To RESIZE the individual GRAPH, drag the Bottom Right angle;
- To ZOOM the FRAME, hold the Shift key down and drag cursor across the area you want to enlarge
(press Left Mouse button while dragging);
- To UNDO FRAME ZOOM, hold the Shift key down and click Left Mouse Button (or click Central
Mouse Button);
- To ZOOM IN or OUT, rotate mouse wheel (use "Auto zoom all" option in pop-up menu to return
back);
- To OFFSET plot area, hold the Ctrl key down and drag the plot area (use "Auto zoom all" option in
pop-up menu to return back);
- To MOVE the LEGEND, hold the Ctrl key down and drag the legend, holding it on the Upper Left
angle;
- To RESIZE the LEGEND, hold the Ctrl key down and drag the legend border;
- To MOVE the MARK, hold the Ctrl key down and drag;
- To DRAW the temporary TRACE, hold the Alt key down and drag. These traces are erased after
redraw;
- To TOGGLE the MARKS ON/OFF use Left mouse button dbl click;
- To open POPUP menu click Right mouse button;
- To check MOUSE POSITION and POINT POSITION in the current DataSet press Left mouse
button;
© 2008 RPI
XenoView Help
1.16
Interaction Between XenoView and Simulation Program
All functions and procedures for interacting between your software and XenoView are residing in
'mssgs.dll' file which must be present in the program directory.
Here are the examples:
C/C++:
1. File "interface.h"
// This unit is responsible for interaction with XenoView
#include <windows.h>
class XVInterface
{
private:
signed char res;
HINSTANCE dllp;
int (__stdcall *SH)(void);
int (__stdcall *XVH)(void);
signed char (__stdcall *CHCK)(int*,int*);
signed char (__stdcall *PS)(int*,int*);
signed char (__stdcall *RP)(int*,int*);
signed char (__stdcall *PF)(int*,int*);
public:
int XenoView_HANDLE;
int SELF_HANDLE;
bool xenoViewFound;
bool exitRequested();
void MDInitialized();
void dataReady();
void MDFinished();
void initialize(char* dllFileName);
void clear();
};
2. File "Interface.cpp"
#include <stdio.h>
#include <windows.h>
#include "interface.h"
void XVInterface :: initialize(char* dllFileName)
{
xenoViewFound = false;
dllp=LoadLibrary(dllFileName);
if (dllp)
{
SH=(int(__stdcall *) (void))GetProcAddress(dllp,"giveMeMyID");
XVH=(int(__stdcall *) (void))GetProcAddress(dllp,"findViewer");
CHCK=(signed char(__stdcall *) (int*,int*))GetProcAddress(dllp,"_StopSimulation");
PS=(signed char(__stdcall *) (int*,int*))GetProcAddress(dllp,"_SimulationInitialized");
RP=(signed char(__stdcall *) (int*,int*))GetProcAddress(dllp,"_MDDataReady");
PF=(signed char(__stdcall *) (int*,int*))GetProcAddress(dllp,"_MDFinished");
if ((!SH)||(!XVH)||(!CHCK)||(!RP)||(!PS)||(!PF)) printf("XenoView interface not found...\n");
else xenoViewFound = true;
© 2008 RPI
25
26
XenoView Help
}
if (xenoViewFound)
{
if (SH) SELF_HANDLE = SH();
if (XVH) XenoView_HANDLE = XVH();
}
}
void XVInterface :: clear()
{
if (dllp) FreeLibrary(dllp);
}
bool XVInterface :: exitRequested()
{
if (xenoViewFound)
{
// printf("exitRequested\n");
// exit(-1);
res = CHCK(&SELF_HANDLE,&XenoView_HANDLE);
return (res==1);
}
else return false;
}
void XVInterface :: dataReady()
{
if (xenoViewFound) res = RP(&SELF_HANDLE,&XenoView_HANDLE);
}
void XVInterface :: MDInitialized()
{
if (xenoViewFound) res = PS(&SELF_HANDLE,&XenoView_HANDLE);
}
void XVInterface :: MDFinished()
{
if (xenoViewFound) res = PF(&SELF_HANDLE,&XenoView_HANDLE);
}
// 3. Main program
#include "interface.h"
static XVInterface XVInt;
main(int argc, char *argv[])
{
XVInt.initialize("mssgs.dll");
// .... prepare the simulation...
XVInt.MDInitialized();
// Signal to XenoView that simulation is initialized
// .. run simulation ...
XVInt.dataReady()
// Check for interrupts
© 2008 RPI
XenoView Help
if (XVInt.exitRequested())
{
printf("Interrupt from XenoView\n");
XVInt.clear();
exit(1);
}
// ... finish simulation
XVInt.MDFinished();
XVInt.clear();
}
Fortran:
1. File "interface.inc"
! =======================================================================
! Parameter responsible for interaction with XenoView
! ----------------------------------------------------------------------INTEGER*4
INTEGER*4
INTEGER*1
LOGICAL
XenoView_HANDLE
SELF_HANDLE
RUN_FLAG
WITH_GUI,NO_DLL
! External viewer handle (signed 32-bit)
! Self window handle (signed 32-bit)
! Common variable showing simulation status
COMMON /viewer_handle/ XenoView_HANDLE,SELF_HANDLE,RUN_FLAG
SAVE /viewer_handle/
COMMON /run_mode/ WITH_GUI,NO_DLL
SAVE /run_mode/
INTERFACE
INTEGER*4 FUNCTION giveMeMyID
END FUNCTION
INTEGER*4 FUNCTION giveMeMyHandle
END FUNCTION
INTEGER*4 FUNCTION findViewer
END FUNCTION
INTEGER*4 FUNCTION initKBDialog
!DEC$ ATTRIBUTES STDCALL :: initKBDialog
END FUNCTION
CHARACTER*8 FUNCTION XenoViewVersion
!DEC$ ATTRIBUTES STDCALL :: XenoViewVersion
END FUNCTION
INTEGER*1 FUNCTION MDDataReady(hProcess,hViewer)
!DEC$ ATTRIBUTES STDCALL :: MDDataReady
!DEC$ ATTRIBUTES REFERENCE :: hViewer
!DEC$ ATTRIBUTES REFERENCE :: hProcess
INTEGER*4 hViewer
© 2008 RPI
27
28
XenoView Help
INTEGER*4 hProcess
END FUNCTION
INTEGER*1 FUNCTION MDStructureReady(hProcess,hViewer)
!DEC$ ATTRIBUTES STDCALL :: MDStructureReady
!DEC$ ATTRIBUTES REFERENCE :: hViewer
!DEC$ ATTRIBUTES REFERENCE :: hProcess
INTEGER*4 hViewer
INTEGER*4 hProcess
END FUNCTION
INTEGER*1 FUNCTION MDFinished(hProcess)
!DEC$ ATTRIBUTES STDCALL :: MDFinished
!DEC$ ATTRIBUTES REFERENCE :: hProcess
INTEGER*4 hProcess
END FUNCTION
INTEGER*1 FUNCTION SimulationInitialized(hProcess)
!DEC$ ATTRIBUTES STDCALL :: SimulationInitialized
!DEC$ ATTRIBUTES REFERENCE :: hProcess
INTEGER*4 hProcess
END FUNCTION
INTEGER*1 FUNCTION MD_EquilStep(hProcess,hViewer)
!DEC$ ATTRIBUTES STDCALL :: MD_EquilStep
!DEC$ ATTRIBUTES REFERENCE :: hViewer
!DEC$ ATTRIBUTES REFERENCE :: hProcess
INTEGER*4 hViewer
INTEGER*4 hProcess
END FUNCTION
INTEGER*1 FUNCTION SimulationStopped(hProcess)
!DEC$ ATTRIBUTES STDCALL :: SimulationStopped
!DEC$ ATTRIBUTES REFERENCE :: hProcess
INTEGER*4 hProcess
END FUNCTION
INTEGER*1 FUNCTION StopSimulation(hProcess,hViewer)
!DEC$ ATTRIBUTES STDCALL :: StopSimulation
!DEC$ ATTRIBUTES REFERENCE :: hViewer
!DEC$ ATTRIBUTES REFERENCE :: hProcess
INTEGER*4 hViewer
INTEGER*4 hProcess
END FUNCTION
INTEGER*1 FUNCTION SimulationError(hProcess)
!DEC$ ATTRIBUTES STDCALL :: SimulationError
!DEC$ ATTRIBUTES REFERENCE :: hProcess
INTEGER*4 hProcess
END FUNCTION
INTEGER*1 FUNCTION MD_EMinStep(hProcess,hViewer)
!DEC$ ATTRIBUTES STDCALL :: MD_EMinStep
!DEC$ ATTRIBUTES REFERENCE :: hViewer
!DEC$ ATTRIBUTES REFERENCE :: hProcess
INTEGER*4 hViewer
INTEGER*4 hProcess
END FUNCTION
© 2008 RPI
XenoView Help
INTEGER*1 FUNCTION simDialog(hProcess)
!DEC$ ATTRIBUTES STDCALL :: simDialog
!DEC$ ATTRIBUTES REFERENCE :: hProcess
INTEGER*4 hProcess
END FUNCTION
INTEGER*1 FUNCTION EMinFinished(hProcess)
!DEC$ ATTRIBUTES STDCALL :: simDialog
!DEC$ ATTRIBUTES REFERENCE :: hProcess
INTEGER*4 hProcess
END FUNCTION
END INTERFACE
pointer (p_giveMeMyID,giveMeMyID)
pointer (p_giveMeMyHandle,giveMeMyHandle)
pointer (p_findViewer,findViewer)
pointer (p_initKBDialog,initKBDialog)
pointer (p_XenoViewVersion,XenoViewVersion)
pointer (p_MDDataReady,MDDataReady)
pointer (p_MDStructureReady,MDStructureReady)
pointer (p_MDFinished,MDFinished)
pointer (p_SimulationInitialized,SimulationInitialized)
pointer (p_MD_EquilStep,MD_EquilStep)
pointer (p_SimulationStopped,SimulationStopped)
pointer (p_StopSimulation,StopSimulation)
pointer (p_SimulationError,SimulationError)
pointer (p_MD_EMinStep,MD_EMinStep)
pointer (p_simDialog,simDialog)
pointer (p_EMinFinished,EMinFinished)
integer iDll
pointer (pDll,iDll)
COMMON /ext_proc/ p_giveMeMyID,
&
p_giveMeMyHandle,
&
p_findViewer,
&
p_initKBDialog,
&
p_XenoViewVersion,
&
p_MDDataReady,
&
p_MDStructureReady,
&
p_MDFinished,
&
p_SimulationInitialized,
&
p_MD_EquilStep,
&
p_SimulationStopped,
&
p_StopSimulation,
&
p_SimulationError,
&
p_MD_EMinStep,
&
p_simDialog,
&
p_EMinFinished,
&
pDll
SAVE /ext_proc/
2. File "initInter.for"
LOGICAL FUNCTION initInterface
USE kernel32
© 2008 RPI
29
30
XenoView Help
IMPLICIT
NONE
INCLUDE 'define.inc'
INCLUDE 'interface.inc'
INTEGER i
NO_DLL = .true.
initInterface = .false.
! Locate the dll and load it into memory
pDll = loadlibrary("mssgs.dll"C)
if (pDll.EQ.0) return
NO_DLL = .false.
initInterface = .true.
! "giveMeMyHandle" - returns WINDOW handle, has a meaning only if special WINDOW was
! created for simulation, i.e. only in command-line mode
! (otherwise returns the same as "findViewer")
!
! "giveMeMyID" returns PROCESS (not window) ID
p_giveMeMyID= getprocaddress(pDll, "giveMeMyID"C)
if (p_giveMeMyID.NE.0) then
SELF_HANDLE = giveMeMyID()
!DEC$ IF DEFINED (_DEBUG_)
write(*,*) "Loaded procedure : giveMeMyID"
!
write(*,*) "SELF_HANDLE = ",SELF_HANDLE
!DEC$ ENDIF
else
SELF_HANDLE = 0
initInterface = .false.
endif
p_findViewer= getprocaddress(pDll, "findViewer"C)
if (p_findViewer.NE.0) then
!DEC$ IF DEFINED(_DEBUG_)
write(*,*) "Loaded procedure : findViewer"
!DEC$ ENDIF
else
write(*,*) "Can not load procedure : findViewer"
initInterface = .false.
endif
p_giveMeMyHandle = getprocaddress(pDll, "giveMeMyHandle"C)
if (p_giveMeMyHandle.NE.0) then
!DEC$ IF DEFINED(_DEBUG_)
write(*,*) "Loaded procedure : giveMeMyHandle"
!DEC$ ENDIF
else
write(*,*) "Can not load procedure : giveMeMyHandle"
initInterface = .false.
endif
p_initKBDialog = getprocaddress(pDll, "initKBDialog"C)
if (p_initKBDialog.NE.0) then
© 2008 RPI
XenoView Help
!DEC$ IF DEFINED(_DEBUG_)
write(*,*) "Loaded procedure : initKBDialog"
!DEC$ ENDIF
else
write(*,*) "Can not load procedure : initKBDialog"
initInterface = .false.
endif
p_XenoViewVersion = getprocaddress(pDll, "XenoViewVersion"C)
if (p_XenoViewVersion.NE.0) then
!DEC$ IF DEFINED(_DEBUG_)
write(*,*) "Loaded procedure : XenoViewVersion"
!DEC$ ENDIF
else
write(*,*) "Can not load procedure : XenoViewVersion"
initInterface = .false.
endif
p_MDDataReady= getprocaddress(pDll, "_MDDataReady"C)
if (p_MDDataReady.NE.0) then
!DEC$ IF DEFINED(_DEBUG_)
write(*,*) "Loaded procedure : MDDataReady"
!DEC$ ENDIF
else
write(*,*) "Can not load procedure : MDDataReady"
initInterface = .false.
endif
p_MDStructureReady= getprocaddress(pDll, "_MDStructureReady"C)
if (p_MDStructureReady.NE.0) then
!DEC$ IF DEFINED(_DEBUG_)
write(*,*) "Loaded procedure : MDStructureReady"
!DEC$ ENDIF
else
write(*,*) "Can not load procedure : MDStructureReady"
initInterface = .false.
endif
p_MDFinished= getprocaddress(pDll, "_MDFinished"C)
if (p_MDFinished.NE.0) then
!DEC$ IF DEFINED(_DEBUG_)
write(*,*) "Loaded procedure : MDFinished"
!DEC$ ENDIF
else
write(*,*) "Can not load procedure : MDFinished"
initInterface = .false.
endif
p_SimulationInitialized =
getprocaddress(pDll, "_SimulationInitialized"C)
if (p_SimulationInitialized.NE.0) then
!DEC$ IF DEFINED(_DEBUG_)
write(*,*) "Loaded procedure : SimulationInitialized"
!DEC$ ENDIF
else
write(*,*) "Can not load procedure : SimulationInitialized"
initInterface = .false.
&
© 2008 RPI
31
32
XenoView Help
endif
p_MD_EquilStep= getprocaddress(pDll, "_MD_EquilStep"C)
if (p_MD_EquilStep.NE.0) then
!DEC$ IF DEFINED(_DEBUG_)
write(*,*) "Loaded procedure : MD_EquilStep"
!DEC$ ENDIF
else
write(*,*) "Can not load procedure : MD_EquilStep"
initInterface = .false.
endif
p_SimulationStopped= getprocaddress(pDll, "_SimulationStopped"C)
if (p_SimulationStopped.NE.0) then
!DEC$ IF DEFINED(_DEBUG_)
write(*,*) "Loaded procedure : SimulationStopped"
!DEC$ ENDIF
else
write(*,*) "Can not load procedure : SimulationStopped"
initInterface = .false.
endif
p_StopSimulation= getprocaddress(pDll, "_StopSimulation"C)
if (p_StopSimulation.NE.0) then
!DEC$ IF DEFINED(_DEBUG_)
write(*,*) "Loaded procedure : StopSimulation"
!DEC$ ENDIF
else
write(*,*) "Can not load procedure : StopSimulation"
initInterface = .false.
endif
p_SimulationError= getprocaddress(pDll, "_SimulationError"C)
if (p_SimulationError.NE.0) then
!DEC$ IF DEFINED(_DEBUG_)
write(*,*) "Loaded procedure : SimulationError"
!DEC$ ENDIF
else
write(*,*) "Can not load procedure : SimulationError"
initInterface = .false.
endif
p_MD_EMinStep= getprocaddress(pDll, "_MD_EMinStep"C)
if (p_MD_EMinStep.NE.0) then
!DEC$ IF DEFINED(_DEBUG_)
write(*,*) "Loaded procedure : MD_EMinStep"
!DEC$ ENDIF
else
write(*,*) "Can not load procedure : MD_EMinStep"
initInterface = .false.
endif
p_simDialog= getprocaddress(pDll, "_simDialog"C)
if (p_simDialog.NE.0) then
!DEC$ IF DEFINED(_DEBUG_)
© 2008 RPI
XenoView Help
write(*,*) "Loaded procedure : simDialog"
!DEC$ ENDIF
else
write(*,*) "Can not load procedure : simDialog"
initInterface = .false.
endif
p_EMinFinished= getprocaddress(pDll, "_EMinFinished"C)
if (p_EMinFinished.NE.0) then
!DEC$ IF DEFINED(_DEBUG_)
write(*,*) "Loaded procedure : EMinFinished"
!DEC$ ENDIF
else
write(*,*) "Can not load procedure : EMinFinished"
initInterface = .false.
endif
!DEC$ IF DEFINED(_DEBUG_)
write(*,*) "Finished loading interface"
!DEC$ ENDIF
END
SUBROUTINE freeInterface
USE kernel32
IMPLICIT
NONE
INCLUDE 'define.inc'
INCLUDE 'interface.inc'
LOGICAL status
status = freelibrary(pDll)
END
3. File "interface.for"
SUBROUTINE checkKeyboardEvents
IMPLICIT
NONE
INCLUDE 'define.inc'
INCLUDE 'interface.inc'
LOGICAL PEEKCHARQQ !function
CHARACTER(1) GETCHARQQ
INTEGER*1 j
CHARACTER(1) key /'A'/
INTEGER ESC
PARAMETER (ESC = 27)
if(PEEKCHARQQ()) then ! Keyboard key pressed
© 2008 RPI
33
34
XenoView Help
key = GETCHARQQ()
IF ((key.EQ.'q').OR.(key.EQ.'Q')) THEN
RUN_FLAG = 1 ! EXIT
ELSEIF (ICHAR (key).EQ.ESC) THEN
RUN_FLAG = simDialog(SELF_HANDLE)
ELSE
RUN_FLAG = -1
ENDIF
if (RUN_FLAG.EQ.1) then
write(*,*) 'Interrupt from keyboard'
write(*,*) 'Saving current configuration...'
IF (WITH_GUI) THEN
j = SimulationStopped(SELF_HANDLE)
received
ENDIF
endif
else
IF (WITH_GUI) THEN
CALL checkExternalExit
ELSE
RUN_FLAG = -1
ENDIF
endif
END
! signal to XenoView that stop signal
SUBROUTINE checkExternalExit
IMPLICIT
NONE
INCLUDE
'define.inc'
INCLUDE
'interface.inc'
INTEGER*1 i,j
RUN_FLAG = StopSimulation(SELF_HANDLE,XenoView_HANDLE)
if (RUN_FLAG.EQ.1) then
write(*,*) 'Interrupt from XenoView'
write(*,*) 'Saving current configuration...'
j = SimulationStopped(SELF_HANDLE)
! signal to XenoView that stop signal received
endif
END
! This procedure stops the program because of critical error
SUBROUTINE criticalError(ErrMsg)
IMPLICIT
INCLUDE
INCLUDE
INCLUDE
NONE
'define.inc'
'const.inc'
'interface.inc'
CHARACTER*(*) ErrMsg
INTEGER*1
i
CHARACTER
CONCAT*maxP
INTEGER
LENSTR_Last
! Function
! function
© 2008 RPI
XenoView Help
WRITE(*,*)
WRITE(*,'(A,$)') 'ERROR: '
WRITE(*,*) ErrMsg
WRITE(*,*) 'Simulation stopped.'
open(unit=100,file=errMsgFile)
write(100,*) ErrMsg(1:LENSTR_Last(ErrMsg))
close(unit=100)
IF (WITH_GUI) THEN
i = SimulationError(SELF_HANDLE)
ELSE
i = SimulationError(-1)
ENDIF
! signal to XenoView that stop signal received
STOP
END
4. Main program (for Molecular Dynamics):
LOGICAL
LOGICAL
initInterface
! Function
interfaceError,WITH_GUI
! Initialize interface and load functions
IF (initInterface()) THEN
interfaceError = .false.
WITH_GUI = .true.
ELSE
interfaceError = .true.
ENDIF
! findViewer() function will find XenoView
IF (WITH_GUI) THEN
XenoView_HANDLE=findViewer()
! SELF_HANDLE=giveMeMyID() is defined already
ELSE
SELF_HANDLE = giveMeMyHandle() !Re-define SELF_HANDLE as handle to simulation
Window, not process
XenoView_HANDLE = 0
i = initKBDialog()
! So that it will automatically get focus in the future
ENDIF
! Signal to XenoView that simulation is initialized
IF (WITH_GUI) THEN
if (SimulationInitialized(SELF_HANDLE).EQ.1) then
write(*,*) 'Connection with XenoView was established...'
else
write(*,*) 'No external data viewer detected...'
endif
ENDIF
! Signal to XenoView that data are ready
if (MDDataReady(SELF_HANDLE,XenoView_HANDLE).EQ.1) then
write(*,*) 'Data exported to XenoView...'
else
© 2008 RPI
35
36
XenoView Help
write(*,*) 'External viewer not detected...'
endif
! Signal to XenoView that structure is ready
if (MDStructureReady(SELF_HANDLE,XenoView_HANDLE).EQ.1) then
write(*,*) 'Structure successfully exported to XenoView...'
else
write(*,*) 'External viewer not detected...'
endif
! Check for interrupts:
CALL checkKeyboardEvents
IF (RUN_FLAG.EQ.1) then
write(*,*) 'Warning: equilibration cancelled'
write(*,*) 'Configuration can not be saved. Exiting...'
dateLine = CurrentDATE()
write(fs(19)%ch,*) 'EQUILIBRATION CANCELLED ON ',dateLine
GOTO 1000
! EXIT
else
RUN_FLAG=-1
endif
! Signal to XenoView that simulation is finished
if (MDFinished(SELF_HANDLE).EQ.1) then
write(*,*) 'Structure successfully exported to XenoView...'
else
write(*,*) 'Connection with XenoView was not established...'
endif
Note that stdcall calling convention is used for passing parameters .
The list of main functions is here:
- giveMeMyHandle : Integer
Used for command-line mode programs. Returns simWindowHandle parameter to be passed
to _checkKBEvents function. Must be called once in the beginning of simulation.
- initKBDialog : Integer
Initializes pop up dialog menu for command-line mode. Must be called once in the beginning of
simulation. Result is always 0.
- _checkKBEvents(simWindowHandle : Integer) : Integer
Used in command-line mode only. Checks, if ESC key was down at the moment of the call. If it
was, pops up a menu with "Save", "Reload", "Pause", "Stop" and "Cancel" buttons. Returns:
-1 if ESC button was not down;
0 if "Cancel" button was pressed;
1 if "Stop" button was pressed;
2 if "Reload" button was pressed;
3 if "Save" button was pressed;
- findViewer : Integer
Used for interaction with XenoView. Returns XenoViewHandle parameter which is the handle
of XenoView program. Must be called once in the beginning of simulation.
© 2008 RPI
XenoView Help
37
- _MDDataReady(XenoViewHandle : Integer) : Integer
Sends XenoView a message that data files are updated. XenoView will reload new points and
plot them. To get XenoViewHandle value, use findViewer function.
- SimulationInitialized : Integer
Sends a signal to XenoView that simulation initialized. Returns 0 if XenoView was not found, 1
otherwise. Required to activate "Pause" and other options in XenoView menu.
- _StopSimulation(XenoViewHandle : Integer) : Integer
Checks if XenoView wants to stop simulation. XenoView handle must be known already (this
saves a lot of time). To get XenoView handle, use findViewer function. Result won't be
received if XenoView wants to pause simulation (until simulation is unpaused).
Returns:
0 if XenoView was not found
0 if XenoView does not want to stop simulation;
1 if XenoView wants to stop simulation;
- SimulationStopped: Integer
Sends message to XenoView that stop signal was received. Returns 0 if XenoView was not
found, 1 otherwise.
- SimulationError: Integer
Sends message to XenoView that simulation finished with error. Returns 0 if XenoView was
not found, 1 otherwise. XenoView will show error message from "cmdLine.err" file located in
program directory.
1.17
Data Plot Format
XenoView program supports XenoPlot graphic format for 2D data plotting. For more information
about this format, see Plot Drawing
.
The default graphic settings are stored in the template file with name default.xtp. If this file does not
exists in XenoView directory, it will be created with the default values assigned.
2D Graph may be copied to the clipboard as a graph and pasted to another graph window or XenoPlot
graph window, or copied as an image to be retrieved by external program.
1.18
Creating Data Template
You may create your own data template to store your DataSet settings (names of DataSets, data
source information, regression settings, colors etc.) and Graph appearance (legend, axes, colors, fonts
etc.). The easiest way to do this is to plot data from your text file.
1. Open plot window for your structure by Simulation -> Show Results command;
2. Open you text file by File -> Open command (select 'ASCII data file' type in the open dialog);
3. If data columns in the file are TAB or comma - separated, simply select X and Y columns your want
to plot. Otherwise first specify column width:
© 2008 RPI
38
XenoView Help
4. Click 'Save Template As' button. To make template available for automatic loading, save it to the
"XTP" folder in XenoView working directory.
5. You may edit your template using two dialogs: Data Template Editor and Graph Template Editor
which may be open by Graph -> Edit Graph command:
© 2008 RPI
XenoView Help
2
XenoPlot Help
2.1
Content
39
Introduction
Drawing Format
XenoPlot Mouse Procedures
FFT Filtering
Regressions
Curve Fitting
Printing
2.2
Introduction
XenoPlot is the program for importing, plotting, and analysis of experimental data. The major part of
it's code was taken from free old version of xyGraph component from © Kestral Computing. XenoPlot
© 2008 RPI
40
XenoView Help
is used to plot simulation results from XenoView program.
Main features of XenoPlot:
- Data may be imported from text files or databases;
- Selective filtering may be applied to the data using fast Fourier transform;
- Data curves may be smoothed with different types of regressions;
- Fitting of the results with custom functions using Curve Fitting procedures;
- Printing of the drawing;
2.3
Drawing Format
The Drawing Contains the following Data:
Graph Appearance (color, size, marks etc.);
Dimensions;
All Axes ;
Legend;
All DataSets with data points, references to the data files etc...
DataSet appearance (points, lines, colors etc.);
Curve fitting settings;
Regression settings;
The graph may be stored in the file with *.xgr extension. You may print it, make some analysis or
export data from it to the text file.
The graph data template stores all graph settings except for the data points. However, if the source
data file associated with the DataSet exists, these points will be automatically loaded. To make
DataSet independent from its data source (text files etc.), you may convert it to Manual format. To do
this, open Data Template Editor by Graph->Edit Data command from main menu (or by Edit Data
command in pop-up menu), go to 'Data Source' page and change 'Source' setting to 'Manual'.
© 2008 RPI
XenoPlot Help
41
2D Graph may be copied to the clipboard as a graph and pasted to another graph window or XenoPlot
graph window, or copied as an image to be retrieved by external program.
2.4
XenoPlot Mouse Procedures
You may use the following mouse procedures in the XenoPlot graphic window:
- To ZOOM the FRAME, hold the Shift key down and drag cursor across the area you want to enlarge
(press Left Mouse button while dragging);
- To UNDO FRAME ZOOM, hold the Shift key down and click Left Mouse Button (or click central
mouse button);
- To ZOOM IN or OUT, rotate mouse wheel (use "Auto zoom all" option in pop-up menu to return
back);
- To OFFSET plot area, hold the Ctrl key down and drag the plot area (use "Auto zoom all" option in
pop-up menu to return back);
- To MOVE the LEGEND, hold the Ctrl key down and drag the legend, holding it on the Upper Left
angle;
© 2008 RPI
42
XenoView Help
- To RESIZE the LEGEND, hold the Ctrl key down and drag the legend border;
- To MOVE the MARK, hold the Ctrl key down and drag;
- To MOVE the BORDER, of the margin hold the Ctrl key down and drag;
- To DRAW the temporary TRACE, hold the Alt key down and drag. These traces are erased after
redraw;
- To TOGGLE the MARKS ON/OFF use Left mouse button dbl click;
- To open POPUP menu click Right mouse button;
- To check MOUSE POSITION and POINT POSITION in the current DataSet press Left mouse
button;
- To MOVE the inserted GRAPH, drag it, holding it on the upper left corner;
- To RESIZE the inserted GRAPH, select it and drag the bottom right corner;
2.5
FFT Filtering
The selective filtering procedure is based on the Finite Impulse Response Digital Filter (FIRDF)
adapted from:
Okan K. Ersoy "Fourier-Related Transforms, Fast Algorithms and Applications"// Prentice Hall PTR,
NJ, 1997
Filtering can be applied only permanently. To smooth the calculated data on the reversible basis, use
regressions instead.
Filter parameters can be verified and changed through the Edit Data|FFT filtering dialogue:
© 2008 RPI
XenoPlot Help
43
Filter parameters are:
- Band Stop or Band Pass - cut off or pass the frequencies specified;
- Frequency Band : the frequency range to be passed or filtered out;
- Count Every "given number" Point : skip ("given number" - 1) of points and pass one to the filter (the
original number of data points will be restored after filtering);
- Response Function Width : the width of filter response function, points;
- Normalize Output : normalize the resulting data to keep the same area under the curve;
- Zero for Normalization : the baseline for normalization (0 by default);
- Apply button : apply filter to the data loaded to Data Editor permanently. To discard this changes,
close the editor with "Cancel" button;
Note : it is recommended to use "Preview" option of the Edit Data dialogue to check the results of
filtering and cancel them, if necessary.
2.6
Regressions
Regressions are procedures for smoothing of experimental points. Original data points may be not
shown on the plot. If the original data points are hidden, the "export ASCII" procedure takes only
smoothed data points and writes it to the data file.
Different types of the regressions may be chosen from the "Edit | Edit Data" Dialogue Menu:
© 2008 RPI
44
XenoView Help
1. Linear Least Squares - fits data with the line;
2. Quadratic Least Squares - fits data with parabola;
3. Passing Bablok - from Bablok W, and Passing, H.: "Application of Statistical Procedures in
Analytical instrument testing", J. Auto. Chem. v7, 1985, pp74-79. (no parameters required)
4. Running Average - simple averaging between data points. Parameter 1/a gives the approximate
number of points to be averaged.
5. Spline - algorythm from the "Numerical Recipes in Pascal" toolkit. Takes gradient at the end as a
parameter.
6. Nonlinear least squares - usually gives the best result. For more details, see Distance Weighted
Least Squares algorythm in McLain DH.: "Drawing Contours from arbitrary data points." Comp. J., v17,
1973? pp 318 - 324; Fitting tension parameter is used to control smoothing quality.
To fit data points with special type of equation and find fitting parameters, use Curve Fitting
procedures.
2.7
Curve Fitting
Curve fitting procedures allow you to write explicit equation that you want to use for fitting of the
datapoints.
To perform curve fitting, open the Data Editor by "Edit -> Edit Data" command from the main menu and
go to the Curve Fitting Page:
© 2008 RPI
XenoPlot Help
45
You may save your custom fitting functions to the file with *.xfn extension. This option is available from
Equation Editor dialogue. Use Data -> Curve Fitting -> Edit option from the main menu:
© 2008 RPI
46
2.8
XenoView Help
Printing
- You may print the drawings both in Landscape or Portrait orientations. This option may be changed
from Printer Setup dialogue.
- The scaling / offset printing options may be adjusted from the Edit -> Edit Plot dialogue menu.
- To suppress Color background everywhere except for the Legend, uncheck "Print with Graph Color"
option from the Plot Editor dialogue:
© 2008 RPI
Index
Index
-!! directive
21
-""Emin_e.car"
8
-**.anm files
*.avf files
*.car files
*.inp files
*.mdf files
*.xgr files
*.xtp files
*.xvw files
21
10
10
10
10
40
40
2
-@@ directive 21
@cell 21
@Connections 21
@Coordinates. 21
@Header 21
@istep 21
@NoColor 21
-__checkKBEvents 25
_MDDataReady 25
_StopSimulation 25
-22D Graph
© 2008 RPI
40
-AAbout 2, 39
Advanced Simulation Options
Amorphous Builder 4
Animation files 21
Animation nodes 21
Appearance 40
2D graph 40
Atactic polumer 4
Atom 4
creating 4
deleting 5
Atom color and size 7
Atom type 6, 7
-BBackground Color
BMP image 23
Bond 4
creating 4
deleteng 5
22
-CCalling convention 25
Camera 23
orientation 23
position 23
Camera Perspective 22
Camera Sensitivity 22
Clipboard 2
copying of 2D graph 40
cmdLine.err file 25
Color Editor 7
Command-line mode 10
Content 2, 39
Control points 2
Convert to manual 40
Covalent bond 4
creating 4
Curve fitting 44
15
47
48
XenoView Help
Graph appearance 2, 22, 40
Graph Template 40
Graph template editor 37
-DData directory 10
Data Editor 44
curve fitting 44
FFT Filtering 42
regressions 43
Data Export 40
Data Filtering 42
Data smoothing 43
Data template 2
creating 37
Data template editor 37, 40
default.xtp 40
default.xtp file 37
Define interaction parameters
Drawing Format 46
Duplicate to manual 40
-IinitKBDialog 25
Interation parameters
Isotactic polymer 4
-JJPG image
7
23
-LLegend 24, 41
move 24, 41
resize 24, 41
-E-
-M-
Element 6
Energy minimizasion 8
Energy minimization 2
Equation editor 44
External Force 15
external simulation program
-FFFT Filtering 42
file "Emin_e.car" 8
Filter Options 42
Filtering 42
findViewer 25
Fitting functions 44
open 44
save 44
Force field 7
Force field parameters
Function editor 44
-GgiveMeMyHandle
7
7
2
Manual dataset format. 40
Marks 24, 41
move 24, 41
toggle 24, 41
MD Script 15
Menu 24, 41
popup 24, 41
Molecular configuration files
Molecular dynamics 2
Molecular structure 4
creating 4
editing 5
Mouse 24, 41
Position 24, 41
Procedures 23, 24, 41
mssgs.dll file 25
4
-NNatural frequencies
New structure 4
Nodes 21
Normal modes 19
19
25
© 2008 RPI
Index
-O-
-T-
Objects 23
copying
deleting
moving
rotating
Temperature Gradient
Trace 24, 41
drawing 24, 41
23
23
23
23
-W-
-PPicture 23
Plotting data from your text file
Polymer Builder 4
Polymer Packing 4
Popup Menu 24, 41
Print Drawing 46
Printer Setup 46
Working directory
37
-SScript Language 15
Selection 23
multiple 23
Selective Filter 42
Show simulation window 10
Simulation 10
data directory 10
running 10
working directory 10
interacting with 25
Simulation results 2
SimulationError 25
SimulationInitialized 25
SimulationStopped 25
Smoothing 43
Syndiotactic polymer 4
© 2008 RPI
10
-XXenoPlot Help content 39
XenoView Help content 2
XTP directory 40
-Z-
-RRegression settings 43
Rescale 23, 24, 41
Rotating objects 5
Run default MD program 10
Run energy minimization 8
Run external simulation program
15
Zoom
10
23
49
50
XenoView Help
Endnotes 2... (after index)
© 2008 RPI
Back Cover