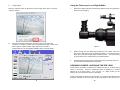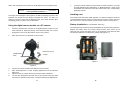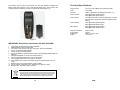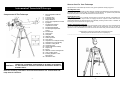
1
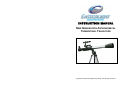
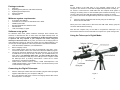
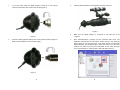
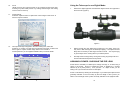
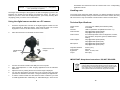
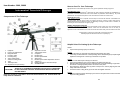
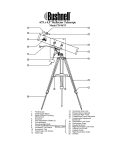
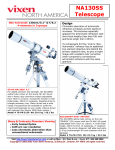
Select by clicking the manual to view:
9920 Manual
9940, 9950 Manual
3069, 30699 Manual
INSTRUCTION MANUAL
4 IN 1 PC LINK E. TELESCOPE
WARNING! THIS TELESCOPE SET IS APPROPRIATE FOR CHILDREN OVER
8 YEARS OLD. OTHERWISE, SUPERVISION OF AN ADULT IS
REQUIRED.
CAUTION! DO NOT VIEW SUN THROUGH TELESCOPE AS SERIOUS
INJURY TO EYE MAY RESUT.
Copyright © 2004 Eastcolight (Hong Kong) Ltd. All rights reserved.
Parent Quick Start Guide (9920)
While the E-Telescope is easy to install and use, the initial hardware and
software setup must be done by
installation.
4.
an adult. Please follow the
and “Install VideoImpression” on the menu screen. Input the license
instructions below to get started.
It is important to install the software first. This telescope will work on
Install the ArcSoft camera suite by clicking “Install PhotoImpression”
key found on the CD sleeve if prompted.
5.
Follow the steps by clicking the appropriate buttons.
6.
You need the Adobe Acrobat Reader software to open the manual.
computers equipped with a USB 1.1 port (USB 2.0 recommended) and
Windows® 2000, Windows® XP SP2 or Windows® Vista. Driver
installation for Windows® 2000 system is mandatory. Driver installation
Click “Install Adobe Acrobat Reader” if your computer does not have
for XP SP2 and Vista systems is optional and only required if your
this software.
computer has issues using this telescope in driverless mode.
7.
1.
Insert the installation CD.
If you have the Adobe Acrobat Reader software installed, you can
read the manuals for the Digital Telescope and the camera suite by
clicking “Telescope Manual” and “ArcSoft Application Software
2.
Wait for the autoplay to start.
Manual” on the menu screen respectively.
(If Autoplay does not automatically launch the installer, go to the
desktop and double-click on the icon named My Computer.
3.
8.
Insert the telescope’s USB plug to the USB port of the computer. A
Double-click the icon for the CD-ROM/DVD drive that contains the E.
new device named “USB 2.0 Camera” will be detected on the first
Telescope software. Sometimes this will cause Autoplay to start. If it
time the telescope is plugged in. Start the PhotoImpression or
doesn’t, double-click on the autorun.exe, and follow the setup steps
VideoImpression application to acquire image with the digital
on this page.)
telescope.
This step is optional for Windows XP SP2 and Vista users, you do
not need to install driver. You can jump to step 4. However, you can
install driver if you really want to. For Windows 2000 users, you
Under the environment with electrostatic discharge, the device
may malfunction and require user to reset the device.
must install driver first: Connect the telescope’s USB plug to the
USB port of the computer. Install the telescope driver by clicking
“Install Driver”. Follow the on screen instructions to complete the
-i-
– ii –
Package contents:
1.
2.
3.
4.
5.
Telescope
Digital Eyepiece (with lens, USB cable and stand)
Digital Eyepiece adaptor lens
Software CDROM
This manual
Minimum system requirements:
·
A computer with USB port
·
Intel Pentium 4 Processor or AMD Athlon XP or faster
·
256MB System RAM
·
Windows 2000/XP SP2/ Windows Vista
·
CD-ROM drive
·
16-bit color display or higher
Software setup guide
4.
5.
Never pull on the cable portion to disconnect the USB cable, always grasp the
connector itself while disconnecting.
Note that the computer may not be able to recognize the telescope if it is
disconnected and then reconnected while the computer is in power saving mode.
Using the Telescope in Digital Mode:
For Windows 2000 users, please install the telescope driver software first.
However, for Windows XP SP2 or Vista users, this digital telescope does not
require any driver installation. Driver installation for XP SP2 and Vista systems
is optional and only required if your computer has issues using this
telescope in driverless mode. In any case, you need to use an imaging and/or a
video application software to capture the images from the digital telescope. You
can use your favorite application or the ones provided on the software CDROM:
1.
2.
3.
Note:
For the location of the USB ports on your computer, please refer to your
computer’s user manual. To ensure that the digital telescope works normally, do
not connect or disconnect the USB cable from the computer while system is
starting up or shutting down. To avoid unstable system software functioning, do not
connect or disconnect the USB cable while application is opening or closing.
If you want to disconnect the digital telescope when the computer is on, remember
to:
1.
Close any software application that currently using for the telescope.
2.
Disconnect the USB cable.
Insert the software CDROM to your CDROM drive
Wait for autoplay to start
If the installer screen does not come up automatically, click “Start”, “Run”,
and execute the file “autorun.exe” of the CD to start the installation program.
This step is optional for Windows XP SP2 and Vista users, you do not need
to install driver. You can jump to step 5. However, you can install driver if you
really want to. For Windows 2000 users, you must install driver first:
Connect the telescope’s USB plug to the USB port of the computer. Install
the telescope driver by clicking “Install Driver”. Follow the on screen
instructions to complete the installation.
Install ArcSoft Camera Suite by clicking “Install PhotoImpression” and
“Install VideoImpression” on the installer screen. Input the license key found
on the CD sleeve if prompted.
Objective
Focusing Knob
Eyepiece
Diagonal Mirror Lever
Micro-Adjustable Altitude
Control
Altitude Control Locking
Knob
Horizontal Rotation Knob
Stand
Connecting the Digital Telescope:
1.
2.
After the E-Telescope software has been installed, plug the Telescope digital
eyepiece USB cable into your computer’s USB port.
Go to the Windows Start menu to launch the imaging software like Arcsoft
PhotoImpression, for example.
-1-
Figure 1
-2-
1.
If you have been using the digital eyepiece module as a web camera,
unscrew the objective lens unit from the camera (figure 2).
Figure 4
Figure 2
2.
Screw the digital eyepiece adaptor lens to the eyepiece position (Figure 3).
Make sure the adaptor lens is screwed in tightly.
4.
Make sure the digital eyepiece is connected to the USB port of the
computer.
5.
Start “PhotoImpression” program from the Windows Start menu. The
application will start with the “Get Photo” screen. Here you can select the
device which you get your photo from. If you have correctly connected the
Digital Telescope, you should be able to select the “Video” icon. (On some
systems, the “Video” icon may not be selectable. In such case, get photo
from “Camera/Scanner” and then select “WIA-USB Video Device”.)
Figure 3
3.
Insert the digital eyepiece to the telescope as shown in figure 4, flip the
diagonal mirror lever to the horizontal position.
-3-
-4-
6.
A window “Capture Image from Video” will pop up, select “USB 2.0 Camera”
from the “Drivers” list.
7.
The image window will be blank. To preview the image from the telescope,
click the “Live” button.
-5-
8.
Set the image size to 640x480 in
the properties window by clicking
the “Format” button, smaller
image size (e.g. 352x288) is
recommended
for
slower
computers.
9.
If there is flickering in the preview
image, click the “Source” button. Try
selecting different “PowerLine
Frequency (Anti Flicker)” setting in
the “Properties” window until
flickering is reduced.
-6-
10.
11.
Focus:
Adjust the focus ring until the image on the computer screen looks clear.
Focusing may take a little practice. Try making small changes and waiting
for the screen to catch up.
Using the Telescope in non-Digital Mode:
1.
Flip the diagonal mirror lever upwards and look through the eyepiece from
the top. You can select different powers by rotating the eyepiece turret until
your hear a click. (figure 5).
Image Capture:
Press the “Capture” button to capture the current image. Press “Done” to
exit the “Capture” window.
View
Rotate
Diagonal
Mirror
Lever
Figure 5
12.
The captured image will appear in the main working area, select the
“Enhance” or “Create” icon near the top to edit the new image, or select “Get
Photo” again to capture another image. Refer to the manual of
“PhotoImpression” (in the supplied installation disc) for further details.
Figure 5
2.
Glance through the main telescope's eyepiece for your object. (Note: You
may have to alter the angle of the telescope slightly.) The object will most
likely seem to be blurry at this stage, but that is normal. You are just trying
to get the object in the viewing field of your telescope lens.
3.
Now adjust the focusing tube by turning the focusing knob slowly back and
forth until the blurred object becomes precise.
HOW MUCH POWER: CHOOSING THE EYE LENS
Power refers to the ability of a telescope to enlarge an image, or, in effect, bring it
closer to the viewer. Amount of magnifying power is signified by a number
followed by an X (read "power"). So if you view an object at 60X, you are
seeing it as if you are 60 times closer to that object.
-7-
-8-
Power is calculated by dividing the focal length of your telescope's objective lens
(probably indicated on the focus tube) by the focal length of the eye lens you
select. The focal length of the eye lens is usually indicated on the eyepiece itself.
400mm (focal length of objectives lens)
Example:
20mm (focal length of eyepiece)
= 20X (power)
The longer the focal length of the eyepiece, the less the magnifying power of the
telescope; the shorter the focal length, the greater the power. So when you
select an eye lens to insert into the diagonal prism, you're really choosing what
magnifying power you wish to use for observation.
Using the digital camera module as a PC camera:
1.
2.
Screw the objective lens unit back to the digital eyepiece module if it has
been removed for telescope viewing. Care should be taken not to make
fingerprints or dust on the lens and the sensor of the camera.
Place the camera unit on the stand as shown below.
4.
5.
6.
7.
Start “PhotoImpression” or other Imaging applications from the Windows
Start menu.
Adjust the focus by rotating the lens until a clear image is displayed.
You can take still pictures and save them in the computer using the same
procedure as described in the section “Using the Telescope in Digital Mode”.
To use the camera module as a web camera for video conference, you need
to install applications like “Netmeeting” or “MSN Messenger”, which can be
downloaded from Microsoft’s web site. Please refer to the corresponding
application manual.
Handling note:
The image sensor inside the digital eyepiece is a delicate integrated circuit and
must be handled carefully. When you remove the lens from the camera, dust may
fall on the sensor. Only use a blower to clean the dust. Never touch the sensor.
Technical Specifications:
Image Sensor:
Color:
Interface:
Video Preview:
1/4.5 inch color CMOS (310k effective pixels)
24 bit RGB
USB 2.0 (backward compatible with version 1.1)
30fps @320x240 pixels (QVGA)
30fps @640x480 pixels (VGA)
PC software provides control for brightness, contrast,
hue, saturation, sharpness, gamma, 50/60Hz flicker
filtering
30fps @320x240 pixels (QVGA)
30fps @640x480 pixels (VGA)
30fps @320x240 pixels (QVGA)
30fps @640x480 pixels (VGA)
Video Control:
Video Capture:
Still Capture:
Rotate to Pan Left
Tilt Adjustment
Knob
or Right
Objective Diameter
Focal Length
Eyepieces
52 mm (2”)
400 mm
15x, 20x, 25x, 35x
IMPORTANT: Keep these instructions. DO NOT DISCARD.
Figure 6
3.
Connect the camera module to the USB port of the computer
-9-
If at any time in the future you should need to dispose of this
product please note that Waste electrical products should not be
disposed of with household waste. Please recycle where facilities
exist. Check with your Local Authority or retailer for recycling
advice.(Waste Electrical and Electronic Equipment Directive)
- END -
INSTRUCTION MANUAL
4 IN 1 PROFESSIONAL DIGITAL TELESCOPE
Copyright © 2005 Eastcolight (Hong Kong) Ltd. All rights reserved.
M101
Parent Quick Start Guide (9940,9950)
While Professional Digital Telescope is easy to install and use, the initial
hardware and software setup must be done by
installation.
4.
an adult. Please follow
and “Install VideoImpression” on the menu screen. Input the license
the instructions below to get started.
It is important to install the software first. This telescope will work on
Install the ArcSoft camera suite by clicking “Install PhotoImpression”
key found on the CD sleeve if prompted.
5.
Follow the steps by clicking the appropriate buttons.
6.
You need the Adobe Acrobat Reader software to open the manual.
computers equipped with a USB 1.1 port (USB 2.0 recommended) and
Windows® 2000, Windows® XP SP2 or Windows® Vista. Driver
installation for Windows® 2000 system is mandatory. Driver installation
Click “Install Adobe Acrobat Reader” if your computer does not have
for XP SP2 and Vista systems is optional and only required if your
this software.
computer has issues using this telescope in driverless mode.
7.
If you have the Adobe Acrobat Reader software installed, you can
read the manuals for the Digital Telescope and the camera suite by
1.
Insert the installation CD.
clicking “Telescope Manual” and “ArcSoft Application Software
Manual” on the menu screen respectively.
2.
Wait for the autoplay to start.
(If Autoplay does not automatically launch the installer, go to the
8.
Insert the telescope’s USB plug to the USB port of the computer. A
desktop and double-click on the icon named My Computer.
new device named “USB 2.0 Camera” will be detected on the first
Double-click the icon for the CD-ROM/DVD drive that contains the E.
time the telescope is plugged in. Start the PhotoImpression or
Telescope software. Sometimes this will cause Autoplay to start. If it
VideoImpression application to acquire image with the digital
doesn’t, double-click on the autorun.exe, and follow the setup steps
telescope.
on this page.)
3.
This step is optional for Windows XP SP2 and Vista users, you do
not need to install driver. You can jump to step 4. However, you can
install driver if you really want to. For Windows 2000 users, you
Under the environment with electrostatic discharge, the device
may malfunction and require user to reset the device.
must install driver first: Connect the telescope’s USB plug to the
USB port of the computer. Install the telescope driver by clicking
“Install Driver”. Follow the on screen instructions to complete the
-i-
- ii -
Package contents:
1.
2.
3.
4.
5.
6.
Telescope
Digital Eyepiece (with lens, USB cable and stand)
Digital Eyepiece 100x zoom adaptor lens
Focus Remote Control unit
Software CDROM
This manual
Minimum system requirements:
·
A computer with USB port
·
Intel Pentium 4 Processor or AMD Athlon XP or faster
·
256MB System RAM
·
Windows 2000/XP SP2/ Windows Vista
·
CD-ROM drive
·
16-bit color display or higher
Software setup guide
For Windows 2000 users, please install the telescope driver software first.
However, for Windows XP SP2 or Vista users, this digital telescope does not
require any driver installation. Driver installation for XP SP2 and Vista systems
is optional and only required if your computer has issues using this
telescope in driverless mode. In any case, you need to use an imaging and/or a
video application software to capture the images from the digital telescope. You
can use your favorite application or the ones provided on the software CDROM:
1.
2.
3.
4.
5.
Insert the software CDROM to your CDROM drive
Wait for autoplay to start
If the installer screen does not come up automatically, click “Start”, “Run”,
and execute the file “autorun.exe” of the CD to start the installation program.
This step is optional for Windows XP SP2 and Vista users, you do not need
to install driver. You can jump to step 5. However, you can install driver if you
really want to. For Windows 2000 users, you must install driver first:
Connect the telescope’s USB plug to the USB port of the computer. Install
the telescope driver by clicking “Install Driver”. Follow the on screen
instructions to complete the installation.
Install ArcSoft Camera Suite by clicking “Install PhotoImpression” and
“Install VideoImpression” on the installer screen. Input the license key found
on the CD sleeve if prompted.
Note:
For the location of the USB ports on your computer, please refer to your
computer’s user manual. To ensure that the digital telescope works normally, do
not connect or disconnect the USB cable from the computer while system is
starting up or shutting down. To avoid unstable system software functioning, do not
connect or disconnect the USB cable while application is opening or closing.
If you want to disconnect the digital telescope when the computer is on, remember
to:
1.
2.
Close any software application that currently using for the telescope.
Disconnect the USB cable.
Never pull on the cable portion to disconnect the USB cable, always grasp the
connector itself while disconnecting.
Note that the computer may not be able to recognize the telescope if it is
disconnected and then reconnected while the computer is in power saving mode.
Using the Telescope in Digital Mode:
Finderscope
York Locking
Knob
Objective
Focusing
Tube
Focus
Ring
Azimuth Locking
Knob
Power
Switch
Tripod
Mount
2.
After the Telescope software has been installed, plug the Telescope digital
eyepiece USB cable into your computer’s USB port.
Go to the Windows Start menu to launch the imaging software like Arcsoft
PhotoImpression, for example.
1
IR Receiver
Focus Mode
Switch
Battery
Compartment
Connecting the Digital Telescope:
1.
Digital
Eyepiece
Figure 1
2
1.
If you have been using the digital eyepiece module as a web camera,
unscrew the objective lens unit from the camera (figure 2).
3.
Insert the digital eyepiece to the telescope as shown in figure 4.
Figure 4
Figure 2
2.
Screw the digital eyepiece zoom adaptor lens to the eyepiece position
(Figure 3). Make sure the adaptor lens is screwed in tightly.
4.
Make sure the digital eyepiece is connected to the USB port of the
computer.
5.
Start “PhotoImpression” program from the Windows Start menu. The
application will start with the “Get Photo” screen. Here you can select the
device which you get your photo from. If you have correctly connected the
Digital Telescope, you should be able to select the “Video” icon. (On some
systems, the “Video” icon may not be selectable. In such case, get photo
from “Camera/Scanner” and then select “WIA-USB Video Device”.)
Zoom Ring
Note: Use the zoom ring to change the zoom ratio while viewing on the
computer.
Figure 3
3
4
6.
A window “Capture Image from Video” will pop up, select “USB 2.0 Camera”
from the “Drivers” list.
7.
The image window will be blank. To preview the image from the telescope,
click the “Live” button.
5
8.
Set the image size to 640x480 in
the properties window by clicking
the “Format” button, smaller
image size (e.g. 352x288) is
recommended
for
slower
computers.
9.
If there is flickering in the preview
image, click the “Source” button. Try
selecting different “PowerLine
Frequency (Anti Flicker)” setting in
the “Properties” window until
flickering is reduced.
6
10. Focus:
There are two focusing mode : Manual and Remote (Note: Remote mode is available
only in model 9940, 9950). To select manual mode, turn the Focus Mode Switch to
“Manual” (Figure 5), and adjust the focus ring until the image on the computer
screen looks clear. Focusing may take a little practice. Try making small changes
and waiting for the screen to catch up. (Note: The Focus mode switch is only available
adjustment key to get precise focus.
Focus Forward
Focus Forward Fine
in model 9940,9950)
Focus Backward
Figure 5
To use the supplied Focus Remote Control unit, turn the Focus Mode Switch to
“Remote” and depress the power button located near the battery door at the
underside of the telescope.
Focus Backward Fine
Figure 7
Note: When using the remote control unit, make sure it is pointed directly at the IR
Receiver. Reception is best within a distance of 6 feet and the remote is pointed
from either side below the telescope tube, otherwise the focusing may not function
properly due to poor reception. Always switch off the telescope power by
depressing the power button to the off position when not in use.
Power Button
Figure 6
IR Receiver
Remote Control Unit: (For model 9940, 9950 only)
The Remote control unit allows the user to control the focusing of the telescope
without leaving the computer.
There are four control keys:
1. Focus Forward
2. Focus Forward (Fine)
3. Focus Backward
4. Focus Backward (Fine)
Use the Forward and Backward key to search for focus and use the Fine
7
Figure 8
8
11.
Using the Telescope in non-Digital Mode:
Image Capture:
Press the “Capture” button to capture the current image. Press “Done” to exit the
“Capture” window.
12.
1.
The captured image will appear in the main working area, select the
“Enhance” or “Create” icon near the top to edit the new image, or select “Get
Photo” again to capture another image. Refer to the manual of
“PhotoImpression” (in the supplied installation disc) for further details.
Remove the digital eyepiece and attach the diagonal mirror and eyepiece to
the focus tube. (figure 9).
Figure 9
2.
Glance through the main telescope's eyepiece for your object. (Note: You
may have to alter the angle of the telescope slightly.) The object will most
likely seem to be blurry at this stage, but that is normal. You are just trying
to get the object in the viewing field of your telescope lens.
3.
Now adjust the focusing tube by turning the focusing ring slowly back and
forth until the blurred object becomes precise.
HOW MUCH POWER: CHOOSING THE EYE LENS
Power refers to the ability of a telescope to enlarge an image, or, in effect, bring it
closer to the viewer. Amount of magnifying power is signified by a number
followed by an X (read "power"). So if you view an object at 60X, you are
seeing it as if you are 60 times closer to that object.
Power is calculated by dividing the focal length of your telescope's objective lens
(probably indicated on the focus tube) by the focal length of the eye lens you
9
10
select. The focal length of the eye lens is usually indicated on the eyepiece itself.
700mm (focal length of objectives lens)
Example:
20mm (focal length of eyepiece)
= 35X (power)
7.
To use the camera module as a web camera for video conference, you need
to install applications like “Netmeeting” or “MSN Messenger”, which can be
downloaded from Microsoft’s web site. Please refer to the corresponding
application manual.
Handling note:
The longer the focal length of the eyepiece, the less the magnifying power of the
telescope; the shorter the focal length, the greater the power. So when you
select an eye lens to insert into the diagonal prism, you're really choosing what
magnifying power you wish to use for observation.
Using the digital camera module as a PC camera:
1.
Screw the objective lens unit back to the digital eyepiece module if it has
been removed for telescope viewing. Care should be taken not to leave
fingerprints or dust on the lens and the sensor of the camera.
2.
Place the camera unit on the stand as shown below.
The image sensor inside the digital eyepiece is a delicate integrated circuit and
must be handled carefully. When you remove the lens from the camera, dust may
fall on the sensor. Only use a blower to clean the dust. Never touch the sensor.
Battery Installation (For model 9940, 9950 only)
The telescope body requires three AA size batteries for remote focusing operation.
Replace the battery when the focusing speed becomes slow. Power off the
telescope and unscrew the battery door on the underside of the telescope tube
and insert the batteries according to the polarity mark (Figure 11).
Rotate to Pan Left
Tilt Adjustment
Knob
or Right
Figure 11
Figure 10
3.
4.
5.
6.
Connect the camera module to the USB port of the computer
Start “PhotoImpression” or other Imaging applications from the Windows
Start menu.
Adjust the focus by rotating the lens until a clear image is displayed.
You can take still pictures and save them in the computer using the same
procedure as described in the section “Using the Telescope in Digital Mode”.
11
12
The Remote Focus Control Unit requires two AAA size batteries. Replace the
battery when the reception is poor. Unscrew the battery door on the back of the
unit and insert the batteries according to the polarity mark (Figure 12).
Technical Specifications:
Image Sensor:
Color:
Interface:
Video Preview:
Video Control:
Video Capture:
Still Capture:
Objective Diameter
Focal Length
Eyepieces
Tripod
1/4.5 inch color CMOS (310k effective pixels)
24 bit RGB
USB 2.0 (backward compatible with version 1.1)
30fps @320x240 pixels (QVGA)
30fps @640x480 pixels (VGA)
PC software provides control for brightness, contrast,
hue, saturation, sharpness, gamma, 50/60Hz flicker
filtering
30fps @320x240 pixels (QVGA)
30fps @640x480 pixels (VGA)
30fps @320x240 pixels (QVGA)
30fps @640x480 pixels (VGA)
60 mm (2.36”)
700 mm
20mm, 12.5mm, 4mm
114cm (45”)
Figure 12
IMPORTANT: Keep these instructions. DO NOT DISCARD.
1.
2.
3.
4.
5.
6.
7.
8.
9.
10.
11.
12.
13.
Only adults should install and replace batteries.
Alkaline batteries are recommended.
If the device has not been used for a long time, remove the batteries.
Do not use rechargeable batteries.
Do not mix old and new batteries.
Do not mix alkaline, standard (carbon zinc) or rechargeable (nickel cadmium)
batteries.
Exhausted batteries are to be removed from the toy.
Non-rechargeable batteries are not to be recharged.
The supply terminals are not to be short-circuited.
Only batteries of the same or equivalent type as recommended are to be
used.
Batteries are to be inserted with the correct polarity.
Do not dispose of batteries in fire, batteries may explode or leak.
Batteries may explode or leak if misused.
If at any time in the future you should need to dispose of this
product please note that Waste electrical products should not be
disposed of with household waste. Please recycle where facilities
exist. Check with your Local Authority or retailer for recycling
advice.(Waste Electrical and Electronic Equipment Directive)
13
- END -
How to Care For Your Telescope
Astronomical Terrestrial Telescope
Appropriate care of the telescope will allow many years of pleasant viewing enjoyment.
The Objective Lens
Components Of The Telescope
1.
2.
3.
4.
5.
6.
7.
8.
9.
10.
11.
12.
13.
14.
15.
16.
17.
18.
19.
20.
21.
22.
23.
24.
25.
26.
Micro-Adjustable Altitude
Control
Focusing Ring
Focusing Tube
Diagonal Mirror
Fine Focus Adjustment Control
Eyepiece
Finderscope Position
Adjustment Control
Finderscope Bracket
Finderscope Adjustment
Screw
Finderscope
Spirit Level
Compass
Altitude Scale
Telescope Tube
Lens Hood
Objective Lens Lid(not shown)
Objective Lens (not shown)
Azimuth Locking Knob
Accessory Tray
Height Adjustment Clamp
Tripod Leg
Mount
Altitude Control Locking Knob
Yoke Locking Knob
Erecting Eyepiece / 21X
Microscope
3X Barlow Lens
The objective lens of Telescope has been intensely polished and established to minute tolerances. It must
be cleaned with care and as seldom as possible to avoid affecting its precision and performance. An
inexperienced person must never take the lenses out of their mount.
Cleaning The Lens
Clean the lens only when it is required. The first step is to remove the dust with a camelhair brush or an
ear-type syringe. Set few drops of ether or isopropyl alcohol on a piece of clean cotton that has been
washed several times and wipe the lenses very delicately, avoiding circular motion. In addition, blow any
remaining lint or dust off with an ear-type syringe.
Sudden Temperature Changes
If possible, avoid taking the telescope from cold outside air into a warm room. This will make the objective
lens to be covered with condensed moisture, which must be removed at once. To do this, place the
objective lens at a safe distance from heat source and let it warm slowly until the moisture has vanished.
It is important to note that any stains left on the lenses must be
delicately wiped off after the lenses are completely dry.
--------------------------------------------------------------------------------------------------------------------------------------------
WARNING ! THIS TELESCOPE SET IS APPROPRIATE FOR CHILDREN OVER 8
CAUTION !
YEARS OLD. OTHERWISE, SUPERVISION OF AN ADULT IS REQUIRED.
DO NOT VIEW SUN THROUGH TELESCOPE AS SERIOUS INJURY TO
EYE MAY RESUT.
Read the following information and instructions before use. Follow them and
keep them for reference.
-1-
Fig.
-2-
2
STEP 6
•
Insert Diagonal Mirror (4) into the Focusing Tube (3).
•
Now insert Eyepiece (6) into Diagonal Mirror.
STEP 7
•
Place the telescope tube assembly and the Yoke onto the tripod mount and tighten from the
underside with the small locking knob provided. (Figure 2c) Insert a brass stud into the screw hole
before tightening the Azimuth Locking Knob(18). (Figure 3d)
STEP 8
•
An Erecting Eyepiece has been provided for terrestrial viewing. It is provided to erect the upside
down image seen through an astronomical telescope.
•
When using the Erecting Eyepiece, remove the Diagonal Mirror and insert the Erecting Eyepiece (18)
into the Focusing Tube (Figure 4).
Fig. 3
STEP 9
•
For use of Barlow, insert the Barlow Lens into the Focusing Tube.
•
Insert the Diagonal Mirror into the Barlow.
•
Now the Eyepiece can then be inserted into the Diagonal Mirror (Figure 5).
Helpful Hints For Setting Up the Telescope
STEP 1
•
Unpack the tripod legs (21) from the box.
•
To fix tripod legs to Mount (22), align holes of tripod legs with those of the Mount. (Figure 2a)
•
Then secure each leg by placing a long 2’’ bolt with washer into the hole given and fixed with a
wingnut and washer.
•
Now tighten the bolts.
Note : When fixing tripod legs to Mount, be sure that hinged flange on each tripod leg faces inward. The
tripod Accessory Tray (19) will attach to these flanges.
STEP 2
•
Stand the tripod up vertically and spread the tripod legs fully apart.
•
Loosen the 3 leg screws.
•
Grab Mount and lift.
•
Then drag out the extension of the tripod legs to the desired height (at equal lengths) and tighten the
thumb screw in each leg to maintain it in position.
Fig. 4
Fig. 5
Observing Astronomical Objects Through Your Telescope
1.
2.
Glance through the main telescope’s Eyepiece (6) for your object. (Note : You may have to alter the
angle of the telescope slightly.) The object will most likely seem to be blurry at this stage, but that is
normal. You are just trying to get the object in the viewing field of your telescope lens. Once you have
accomplished this task, fasten the knob to keep the accuracy of your telescope steady.
Now adjust the Focusing Tube (3) by turning the Focusing Ring (2) slowing back and forth until the
blurred object becomes precise. You can also use the Fine Focus Adjustment Control (5) for more
precise adjustment.
If you are going to be looking through the telescope for a short period of time, you can insert the
Eyepiece directly into the Focusing Tube. To be more comfortable when using your telescope for
longer periods of time, place the Diagonal Mirror (4) into the Focusing Tube and the Eyepiece into the
Diagonal Mirror.
STEP 3
•
Using the small machine screws and wingnuts provided, attach the Accessory Tray (19) to each of
the flanges on the tripod legs. (Figure 2b)
Note : Flange should fit under Accessory Tray when attached.
3.
STEP 4
•
Take out the Telescope Tube (14) from the box.
•
Thread the Micro-adjustable Altitude Control (1) via the Altitude Control Locking Knob (23). (Figure
3a) Insert a brass stud into the screw hole before tightening the Altitude Control Knob.
•
Now attach the Telescope Tube (14) to the Yoke by aligning the hole in telescope body with that in the
Yoke Locking Knob.
•
Screw Yoke Locking Knob (24) via both holes and tighten the knob (Figure 3b).
Viewing Terrestrial Objects Through Your Telescope
STEP 5
•
Take out the finderscope (10), including the Finderscope Bracket (8) attached, from the box.
•
Attach the finderscope assembly to the spirit level (11) and tighten the finderscope position
adjustment control (7).
•
Remove the two knurled thumb screws from the Telescope Tube.
•
Position the Spirit Level (11) on the Telescope Tube so that the holes in the base of the bracket line
up with the exposed holes in the Telescope Tube. (Figure 3c)
•
Replace the two knurled thumb screws and fasten securely.
-3-
For viewing of terrestrial objects, remove the Diagonal Mirror (4) and the Eyepiece (6) from the Focusing
Tube (3) and insert the Erecting Eyepiece (25). The Erecting Eyepiece (25) can also be used as a 21X
Microscope by placing the objective end (the end with the transparent tube) flat on an object and looking
through the Eyepiece.
-4-
Important Note : The finderscope function is for viewing of the sky only, therefore, the object will always
be upside down.
How To Use the Telescope
Our telescope offers an extensive selection parts and accessories for your telescope to further enhance
the exploration of worlds beyond. As well, it is a precision optical instrument certain to give many years of
enjoyment and entertainment.
Viewing
What you see through a telescope and how accurate you see it is a function of three factors ;
•
Power / Magnification
•
Brightness
•
Resolution / Clarity of image
3.
Use the adjustment screws to zero in on the object.
Loosen the adjustment screws on one side, then tighten adjustment screws on the other side to
move the object squarely onto the crosshairs.
Recheck telescope to make sure that it is still on focus.
If it moved, then readjust your telescope and repeat the alignment step for the finderscope.
Power Strength : Selecting The Eye Lens
It is a common misunderstanding that the more power you have, the better it is. Indeed, essential functions
of a telescope are to magnify the image, or give the effect of being closer to object of observation.
However, there are limits to how much power to use effectively. With every increase in magnification,
there is a corresponding reduction of brightness and resolution. Too much magnification and the image
will become dim and blurry so that the features of the object become vague. For best view of any
astronomical body, you mist strike a balance between the three viewing qualities.
Furthermore, with every increase in power, there is a decrease in field of view. The field of view is the
circle of sky you see as you look through your telescope. The more you increase magnification, the more
close that circle becomes. You will also notice that celestial bodies seem to move fast across the field of
view even at low powers. That movement is still more recognizable at high powers. High power will
provide some dramatic views of lunar or planetary features, but can also be somewhat frustrating until you
acquire a certain level of expertise at tracking objects smoothly.
Power means the ability of telescope to increase an image, or appear to bring the image closer to the
viewer. Value of magnifying power is distinguished by a number followed by an X (read power). Therefore,
If you view an object at 175X, you are seeing it as though you are 175 times closer to that object.
Power is calculated by dividing the focal length of objective lens of your telescope by the focal length of the
eye lens you choose. The focal length of the eye lens is usually indicated on the eyepiece itself. For
example : 4mm
Example:
700 mm (focal length of objective lens)
-------------------------------------------------------------------4 mm (focal length of eyepiece)
The longer the focal length of the eyepiece, the less the magnifying power of the telescope. Whereas the
shorter the focal length, the greater the power. Therefore, when choosing an eye lens to insert the
diagonal prism, you are actually selecting what magnifying power you wish to use for inspection.
Aligning the Finderscope
The relatively high magnifying power of the telescope results in a limited field of view. Therefore, finding a
particular star or planet desired to observe could be a little hard.
To aid in correctly aiming your telescope, you have a finderscope. Your finderscope is a small , low power
telescope equipped with crosshairs, and it provides an incomparably wider field of view than your main
telescope. When the finderscope is correctly aligned, locating a celestial body via the main telescope
becomes less difficult.
By loosing the Finderscope Position Adjustment Control (7), you can adjust the Finderscope
desired position.
to your
= 175 X (power)
Technical Specifications
# 3022, #3023, #9940, #9950
Objective Diameter
Focal Length
Eyepieces
Barlow Lens
Maximum Magnification
Accessories
To align the finderscope follow these simple directions:
:
:
:
:
:
:
60 mm (2,36”)
700 mm
20 mm, 12.5 mm, 4 mm
3X
525X
Diagonal Mirror, 5 X 25mm Finderscope,
114cm Adjustable Aluminium Tripod, Erecting Lens/
/ 21X Microscope, 3X Barlow Lens
(Note : We strongly recommend that you follow these directions during daylight hours).
Install the lowest power eye lens into the diagonal mirror.
Pick out an easily recognized, stationary object no closer than a thousand yards away.
Rotate your telescope along its horizontal axis and raise the telescope along vertical axis until
the object is centred in the field of view and focus.
Note:
Tighten the Locking Screw on the mount to hold the telescope in position. The higher the object
above the horizon, the less difficult the position of the telescope.
Eyepiece Chart & Power Limits
1.
2.
Look via the finderscope
If the object lined up in the telescope is not observable, unfasten the adjustment screws and
move the finderscope around until visible.
Once in focus, tighten the adjustment screws while keeping the object centred as much as
possble.
-5-
Eyepiece
Power
Power with 3X Barlow Lens
20 mm
35X
105 X
12.5 mm
56X
168 X
4 mm
175X
525 X
-6-
INSTRUCTION MANUAL
NEW GENERATION ASTRONOMICAL
TERRESTRIAL TELESCOPE
Copyright © 2005 Eastcolight (Hong Kong) Ltd. All rights reserved.
M100
Parent Quick Start Guide (3069, 30699)
While Professional Digital Telescope is easy to install and use, the initial
hardware and software setup must be done by
installation.
4.
an adult. Please follow
and “Install VideoImpression” on the menu screen. Input the license
the instructions below to get started.
It is important to install the software first. This telescope will work on
Install the ArcSoft camera suite by clicking “Install PhotoImpression”
key found on the CD sleeve if prompted.
5.
Follow the steps by clicking the appropriate buttons.
6.
You need the Adobe Acrobat Reader software to open the manual.
computers equipped with a USB 1.1 port (USB 2.0 recommended) and
Windows® 2000, Windows® XP SP2 or Windows® Vista. Driver
installation for Windows® 2000 system is mandatory. Driver installation
Click “Install Adobe Acrobat Reader” if your computer does not have
for XP SP2 and Vista systems is optional and only required if your
this software.
computer has issues using this telescope in driverless mode.
7.
1.
Insert the installation CD.
If you have the Adobe Acrobat Reader software installed, you can
read the manuals for the Digital Telescope and the camera suite by
clicking “Telescope Manual” and “ArcSoft Application Software
2.
Wait for the autoplay to start.
Manual” on the menu screen respectively.
(If Autoplay does not automatically launch the installer, go to the
desktop and double-click on the icon named My Computer.
3.
8.
Insert the telescope’s USB plug to the USB port of the computer. A
Double-click the icon for the CD-ROM/DVD drive that contains the E.
new device named “USB 2.0 Camera” will be detected on the first
Telescope software. Sometimes this will cause Autoplay to start. If it
time the telescope is plugged in. Start the PhotoImpression or
doesn’t, double-click on the autorun.exe, and follow the setup steps
VideoImpression application to acquire image with the digital
on this page.)
telescope.
This step is optional for Windows XP SP2 and Vista users, you do
not need to install driver. You can jump to step 4. However, you can
install driver if you really want to. For Windows 2000 users, you
must install driver first: Connect the telescope’s USB plug to the
Under the environment with electrostatic discharge, the device
may malfunction and require user to reset the device.
USB port of the computer. Install the telescope driver by clicking
“Install Driver”. Follow the on screen instructions to complete the
-i-
- ii -
Package contents:
1.
2.
3.
4.
5.
Telescope
Digital Eyepiece (with lens, USB cable and stand)
Digital Eyepiece adaptor lens
Software CDROM
This manual
Minimum system requirements:
·
A computer with USB port
·
Intel Pentium 4 Processor or AMD Athlon XP or faster
·
256MB System RAM
·
Windows 2000/XP SP2/ Windows Vista
·
CD-ROM drive
·
16-bit color display or higher
Software setup guide
For Windows 2000 users, please install the telescope driver software first.
However, for Windows XP SP2 or Vista users, this digital telescope does not
require any driver installation. Driver installation for XP SP2 and Vista systems
is optional and only required if your computer has issues using this
telescope in driverless mode. In any case, you need to use an imaging and/or a
video application software to capture the images from the digital telescope. You
can use your favorite application or the ones provided on the software CDROM:
1.
2.
3.
4.
5.
Note:
For the location of the USB ports on your computer, please refer to your
computer’s user manual. To ensure that the digital telescope works normally, do
not connect or disconnect the USB cable from the computer while system is
starting up or shutting down. To avoid unstable system software functioning, do not
connect or disconnect the USB cable while application is opening or closing.
If you want to disconnect the digital telescope when the computer is on, remember
to:
1.
Close any software application that currently using for the telescope.
2.
Disconnect the USB cable.
Never pull on the cable portion to disconnect the USB cable, always grasp the
connector itself while disconnecting.
Note that the computer may not be able to recognize the telescope if it is
disconnected and then reconnected while the computer is in power saving mode.
Using the Telescope in Digital Mode:
Insert the software CDROM to your CDROM drive
Wait for autoplay to start
If the installer screen does not come up automatically, click “Start”, “Run”,
and execute the file “autorun.exe” of the CD to start the installation program.
This step is optional for Windows XP SP2 and Vista users, you do not need
to install driver. You can jump to step 5. However, you can install driver if you
really want to. For Windows 2000 users, you must install driver first:
Connect the telescope’s USB plug to the USB port of the computer. Install
the telescope driver by clicking “Install Driver”. Follow the on screen
instructions to complete the installation.
Install ArcSoft Camera Suite by clicking “Install PhotoImpression” and
“Install VideoImpression” on the installer screen. Input the license key found
on the CD sleeve if prompted.
Connecting the Digital Telescope:
1.
2.
After the Telescope software has been installed, plug the Telescope digital
eyepiece USB cable into your computer’s USB port.
Go to the Windows Start menu to launch the imaging software like Arcsoft
PhotoImpression, for example.
1
Figure 1
2
1.
If you have been using the digital eyepiece module as a web camera,
unscrew the objective lens unit from the camera (figure 2).
3.
Insert the digital eyepiece to the telescope as shown in figure 4.
Figure 4
4.
Make sure the digital eyepiece is connected to the USB port of the
computer.
5.
Start “PhotoImpression” program from the Windows Start menu. The
application will start with the “Get Photo” screen. Here you can select the
device which you get your photo from. If you have correctly connected the
Digital Telescope, you should be able to select the “Video” icon. (On some
systems, the “Video” icon may not be selectable. In such case, get photo
from “Camera/Scanner” and then select “WIA-USB Video Device”.)
Figure 2
2.
Screw the digital eyepiece adaptor lens to the eyepiece position (Figure 3).
Make sure the adaptor lens is screwed in tightly.
Figure 3
3
4
6.
A window “Capture Image from Video” will pop up, select “USB 2.0 Camera”
from the “Drivers” list.
7.
The image window will be blank. To preview the image from the telescope,
click the “Live” button.
5
8.
Set the image size to 640x480 in
the properties window by clicking
the “Format” button, smaller
image size (e.g. 352x288) is
recommended
for
slower
computers.
9.
If there is flickering in the preview
image, click the “Source” button. Try
selecting different “PowerLine
Frequency (Anti Flicker)” setting in
the “Properties” window until
flickering is reduced.
6
10.
11.
Focus:
Adjust the focus ring until the image on the computer screen looks clear.
Focusing may take a little practice. Try making small changes and waiting
for the screen to catch up.
Using the Telescope in non-Digital Mode:
1.
Remove the digital eyepiece and attach the diagonal mirror and eyepiece to
the focus tube. (figure 5).
Image Capture:
Press the “Capture” button to capture the current image. Press “Done” to
exit the “Capture” window.
Figure 5
12.
The captured image will appear in the main working area, select the
“Enhance” or “Create” icon near the top to edit the new image, or select “Get
Photo” again to capture another image. Refer to the manual of
“PhotoImpression” (in the supplied installation disc) for further details.
2.
Glance through the main telescope's eyepiece for your object. (Note: You
may have to alter the angle of the telescope slightly.) The object will most
likely seem to be blurry at this stage, but that is normal. You are just trying
to get the object in the viewing field of your telescope lens.
3.
Now adjust the focusing tube by turning the focusing ring slowly back and
forth until the blurred object becomes precise.
HOW MUCH POWER: CHOOSING THE EYE LENS
Power refers to the ability of a telescope to enlarge an image, or, in effect, bring it
closer to the viewer. Amount of magnifying power is signified by a number
followed by an X (read "power"). So if you view an object at 60X, you are
seeing it as if you are 60 times closer to that object.
Power is calculated by dividing the focal length of your telescope's objective lens
(probably indicated on the focus tube) by the focal length of the eye lens you
select. The focal length of the eye lens is usually indicated on the eyepiece itself.
7
8
600mm (focal length of objectives lens)
Example:
20mm (focal length of eyepiece)
= 30X (power)
downloaded from Microsoft’s web site. Please refer to the corresponding
application manual.
Handling note:
The longer the focal length of the eyepiece, the less the magnifying power of the
telescope; the shorter the focal length, the greater the power. So when you
select an eye lens to insert into the diagonal prism, you're really choosing what
magnifying power you wish to use for observation.
Using the digital camera module as a PC camera:
1.
Screw the objective lens unit back to the digital eyepiece module if it has
been removed for telescope viewing. Care should be taken not to leave
fingerprints or dust on the lens and the sensor of the camera.
2.
Place the camera unit on the stand as shown below.
The image sensor inside the digital eyepiece is a delicate integrated circuit and
must be handled carefully. When you remove the lens from the camera, dust may
fall on the sensor. Only use a blower to clean the dust. Never touch the sensor.
Technical Specifications:
Image Sensor:
Color:
Interface:
Video Preview:
1/4.5 inch color CMOS (310k effective pixels)
24 bit RGB
USB 2.0 (backward compatible with version 1.1)
30fps @320x240 pixels (QVGA)
30fps @640x480 pixels (VGA)
PC software provides control for brightness, contrast,
hue, saturation, sharpness, gamma, 50/60Hz flicker
filtering
30fps @320x240 pixels (QVGA)
30fps @640x480 pixels (VGA)
30fps @320x240 pixels (QVGA)
30fps @640x480 pixels (VGA)
Video Control:
Video Capture:
Still Capture:
Rotate to Pan Left
Tilt Adjustment
Knob
or Right
Objective Diameter
Focal Length
Eyepieces
Tripod
50 mm (1.97”)
600 mm
20mm, 12.5mm, 4mm
90cm (36”)
IMPORTANT: Keep these instructions. DO NOT DISCARD.
Figure 6
3.
4.
5.
6.
7.
Connect the camera module to the USB port of the computer
Start “PhotoImpression” or other Imaging applications from the Windows
Start menu.
Adjust the focus by rotating the lens until a clear image is displayed.
You can take still pictures and save them in the computer using the same
procedure as described in the section “Using the Telescope in Digital Mode”.
To use the camera module as a web camera for video conference, you need
to install applications like “Netmeeting” or “MSN Messenger”, which can be
9
If at any time in the future you should need to dispose of this
product please note that Waste electrical products should not be
disposed of with household waste. Please recycle where facilities
exist. Check with your Local Authority or retailer for recycling
advice.(Waste Electrical and Electronic Equipment Directive)
10
Item Number: 3069, 30699
How to Care For Your Telescope
Astronomical Terrestrial Telescope
Appropriate care of the telescope will allow many years of pleasant viewing enjoyment.
The Objective Lens
®
The objective lens of Tele-Science Telescope has been intensely polished and established to minute
tolerances. It must be cleaned with care and as seldom as possible to avoid affecting its precision and
performance. An inexperienced person must never take the lenses out of their mount.
Components Of The Telescope
Cleaning The Lens
Clean the lens only when it is required. The first step is to remove the dust with a camelhair brush or an
ear-type syringe. Set few drops of ether or isopropyl alcohol on a piece of clean cotton that has been
washed several times and wipe the lenses very delicately, avoiding a circular motion. In addition, blow any
remaining lint or dust off with an ear-type syringe.
Sudden Temperature Changes
If possible, avoid taking the telescope from cold outside air into a warm room. This will make the objective
lens to be covered with condensed moisture, which must be removed at once. To do this, place the
objective lens at a safe distance from heat source and let it warm slowly until the moisture has vanished.
It is important to note that any stains left on the lenses must be
delicately wiped off after the lenses are completely dry.
Helpful Hints For Setting Up the Telescope
STEP 1
•
Unpack the tripod legs (18) from the box.
1.
2.
3.
4.
5.
6.
7.
8.
9.
10.
Eyepiece
Fine Focus Adjustment
Diagonal Mirror
Focusing Tube
Focusing Ring
Yoke Locking Knob
Azimuth Locking Knob
Yoke
Telescope Tube
Objective Lens (not shown)
11.
12.
13.
14.
15.
16.
17.
18.
19.
20.
Objective Lens Lid
Tube Clamp Screw
Compass
Finderscope
Finderscope Bracket
Spirit Level
Finderscope Position Adjustment Control
Tripod Leg
Erecting Eyepiece / 21X Microscope
3X Barlow Lens
WARNING ! THIS TELESCOPE SET IS APPROPRIATE FOR CHILDREN OVER 8
YEARS OLD. OTHERWISE, SUPERVISION OF AN ADULT IS REQUIRED.
CAUTION ! DO NOT VIEW SUN THROUGH TELESCOPE AS SERIOUS INJURY TO
EYE MAY RESUT.
Read the following information and instructions before use. Follow them and
keep them for reference.
11
STEP 2
•
Stand the tripod up vertically and spread the tripod legs fully apart.
•
Then drag out the extension of the tripod legs to the desired height (at equal lengths) and
tighten the locking lever in each leg to maintain it in position.
STEP 3
•
Take out the Telescope Tube (9) from the box.
•
Unscrew the Clamp Screw (12) and slide in the Telescope Tube (9).
•
Before tightening the clamp screw, rotate the tube so that the lettering is right side up and
the tube is in the appropriate position as shown in the photo.
•
Now attach the Telescope Tube (9) and the clamp to the Yoke by aligning the hole in the
clamp with that in the Yoke.
•
Screw the Yoke Locking Knob (6) via the hole and tighten the knob.
STEP 4
•
Hold the Telescope Tube assembly by the fork arm and place the fork arm base inside the
tripod mounting platform.
12
STEP 5
•
Take out the finderscope (14), including the Finderscope Bracket (15) attached, from the
box.
•
Attach the finderscope assembly to the spirit level (16) and tighten the finderscope
position adjustment control (17).
•
Remove the two knurled thumb screws from the Telescope Tube.
•
Position the Spirit Level (16) on the Telescope Tube so that the holes in the base of the
bracket line up with the exposed holes in the Telescope Tube.
•
Replace the two knurled thumb screws and fasten securely.
Viewing Terrestrial Objects Through Your Telescope
STEP 6
•
Insert Diagonal Mirror (3) into the Focusing Tube (4).
•
Now insert Eyepiece (1) into Diagonal Mirror.
Tele-Science® offers an extensive selection parts and accessories for your telescope to
further enhance the exploration of worlds beyond. As well, it is a precision optical instrument
certain to give many years of enjoyment and entertainment.
STEP 7
•
An Erecting Eyepiece has been provided for terrestrial viewing. It is provided to erect the
upside down image seen through an astronomical telescope.
•
When using the Erecting Eyepiece, remove the Diagonal Mirror and insert the Erecting
Eyepiece (19) into the Focusing Tube (Figure 2).
STEP 8
•
For use of Barlow, insert the Barlow Lens into the Focusing Tube.
•
Insert the Diagonal Mirror into the Barlow.
•
Now the Eyepiece can then be inserted into the Diagonal Mirror (Figure 3).
Fig.3
Fig.2
Observing Astronomical Objects Through Your Telescope
1.
2.
3.
Glance through the main telescope’s Eyepiece (1) for your object. (Note : You may have
to alter the angle of the telescope slightly.) The object will most likely seem to be blurry at
this stage, but that is normal. You are just trying to get the object in the viewing field of
your telescope lens. Once you have accomplished this task, fasten the knob to keep the
accuracy of your telescope steady.
Now adjust the Focusing Tube (4) by turning the Focusing Ring (5) slowing back and forth
until the blurred object becomes precise. You can also use the Fine Focus Adjustment
Control (2) for more precise adjustment.
If you are going to be looking through the telescope for a short period of time, you can
insert the Eyepiece directly into the Focusing Tube. To be more comfortable when using
your telescope for longer periods of time, place the Diagonal Mirror (3) into the Focusing
Tube and the Eyepiece into the Diagonal Mirror.
13
For viewing of terrestrial objects, remove the Diagonal Mirror (3) and the Eyepiece (1) from the
Focusing Tube (4) and insert the Erecting Eyepiece (19). The Erecting Eyepiece (19) can also
be used as a 21X Microscope by placing the objective end (the end with the transparent tube)
flat on an object and looking through the Eyepiece.
How To Use the Telescope
Viewing
What you see through a telescope and how accurate you see it is a function of three factors ;
•
Power / Magnification
•
Brightness
•
Resolution / Clarity of image
It is a common misunderstanding that the more power you have, the better it is. Indeed,
essential functions of a telescope are to magnify the image, or give the effect of being closer to
object of observation. However, there are limits to how much power to use effectively. With
every increase in magnification, there is a corresponding reduction of brightness and
resolution. Too much magnification and the image will become dim and blurry so that the
features of the object become vague. For best view of any astronomical body, you must strike
a balance between the three viewing qualities.
Furthermore, with every increase in power, there is a decrease in field of view. The field of
view is the circle of sky you see as you look through your telescope. The more you increase
magnification, the smaller that circle becomes. You will also notice that celestial bodies seem
to move fast across the field of view even at low powers. That movement is still more
recognizable at high powers. High power will provide some dramatic views of lunar or
planetary features, but can also be somewhat frustrating until you acquire a certain level of
expertise at tracking objects smoothly.
Aligning the Finderscope
The relatively high magnifying power of the telescope results in a limited field of view.
Therefore, finding a particular star or planet desired to observe could be a little hard.
To aid in correctly aiming your telescope, you have a finderscope. Your finderscope is a small ,
low power telescope equipped with crosshairs, and it provides an incomparably wider field of
view than your main telescope. When the finderscope is correctly aligned, locating a celestial
body via the main telescope becomes less difficult.
By loosing the Finderscope Position Adjustment Control (17), you can adjust the Finderscope
to your desired position.
14
To align the finderscope follow these simple directions:
(Note : We strongly recommend that you follow these directions during daylight hours).
1.
Install the lowest power eye lens into the diagonal mirror.
Pick out an easily recognized, stationary object no closer than a thousand yards
away.
Rotate your telescope along its horizontal axis and raise the telescope along vertical
axis until the object is centred in the field of view and focus.
Note: A) Tighten the Locking Knobs on the mount to hold the telescope in position. The
higher the object above the horizon, the less difficult the position of the telescope.
2.
Look via the finderscope
If the object lined up in the telescope is not observable, unfasten the adjustment
screws and move the finderscope around until visible.
Once in focus, tighten the adjustment screws while keeping the object centred as
much as possible.
The longer the focal length of the eyepiece, the less the magnifying power of the telescope.
Whereas the shorter the focal length, the greater the power. Therefore, when choosing an eye
lens to insert the diagonal prism, you are actually selecting what magnifying power you wish to
use for inspection.
Technical Specifications
# 3067, #3068, #3069, #30699
Objective Diameter
Focal Length
Eyepieces
Barlow Lens
Maximum Magnification
Accessories
Important Note : The finderscope function is for viewing of the sky only, therefore, the object
will always be upside down.
3.
Use the adjustment screws to zero in on the object.
Loosen the adjustment screws on one side, then tighten adjustment screws on the
other side to move the object squarely onto the crosshairs.
Recheck telescope to make sure that it is still on focus.
If it moved, then readjust your telescope and repeat the alignment step for the
finderscope.
Power Strength : Selecting The Eye Lens
Power means the ability of telescope to increase an image, or appear to bring the image closer
to the viewer. Value of magnifying power is distinguished by a number followed by an X (read
power). Therefore, If you view an object at 150X, you are seeing it as though you are 150
times closer to that object.
:
:
:
:
:
:
50 mm (1,96”)
600 mm
20 mm, 4 mm
3X
450X
Diagonal Mirror, 5 X 25mm Finderscope,
91cm Tripod, Erecting Lens/
/ 21X Microscope, 3X Barlow Lens
Eyepiece Chart & Power Limits
Eyepiece
Power
Power with 3X Barlow Lens
20 mm
30X
90 X
4 mm
150X
450 X
Power is calculated by dividing the focal length of objective lens of your telescope by the focal
length of the eye lens you choose. The focal length of the eye lens is usually indicated on the
eyepiece itself. For example : 4mm
Example:
600 mm (focal length of objective lens)
-------------------------------------------------------------------4 mm (focal length of eyepiece)
15
= 150 X (power)
16