1
Leica IC80 HD
Manual
Table of Contents
Leica IC80 HD
Introduction
Effective Displayed Section
Standard Delivery and Optional Accessories
9
10
11
Installation
Assembling the Camera
Connecting to the Windows PC
Limitations in PC Mode
Using an Additional HDMI Monitor in PC Mode
13
14
15
16
Stand-alone Kit
Application, Standard Delivery, Requirements
Cables and Terminals
Information about SD Memory Cards
Capturing Images without a Computer
Viewing images and movies without a computer
Adjusting the White Balance
Remote control
Remote Control: Changing the Battery
Analog Video Display without a Computer
Leica IC80 HD
18
19
20
21
22
23
24
25
26
The Camera Menu
Calling up the Camera Menu
COLOR (Automatic White Balance)
COLOR (Manual White Balance)
EXPOSURE
RESOLUTION
SETUP CAM (Camera Settings)
SETUP USER (User-defined Settings)
Predefined Illumination Scenarios
28
29
30
31
32
33
34
35
Care and Maintenance
Care and Maintenance
37
Specifications
Leica IC80 HD
Dimensional Drawings
39
41
Manual
2
General Instructions
Safety Concept
Before using your Leica IC80 HD for the first
time, please read the "Safety Concept" brochure
included with your instrument. It contains additional information on handling and care.
Leica IC80 HD
Use in clean rooms
The Leica IC80 HD can be used in clean rooms
without any problems.
Cleaning
ϘϘ Do not use any unsuitable cleaning agents,
chemicals or techniques for cleaning.
ϘϘ
Never use chemicals to clean colored
surfaces or accessories with rubberized
parts. This could damage the surfaces, and
specimens could be contaminated by abraded particles.
ϘϘ
In most cases, we can provide special solutions on request. Some products can be
modified, and we can offer other accessories for use in clean rooms.
Manual
Servicing
ϘϘ Repairs may only be carried out by Leica
Microsystems-trained service technicians.
Only original Leica Microsystems spare
parts may be used.
Responsibilities of person in charge of
instrument
ϗϗ
Ensure that the Leica stereomicroscope
is operated, maintained and repaired by
authorized and trained personnel only.
3
Safety Concept
The Leica IC80 HD is shipped with an interactive CD-ROM, where you can find all relevant
user manuals. Keep it in a safe place, and
readily accessible to the user. User manuals and
updates are also available for you to download
and print from our web site www.leica-microsystems.com.
The "Safety Concept" brochure contains additional safety information regarding service work,
requirements and the handling of the stereomicroscope, electrical and other accessories as
well as general safety instructions.
Leica IC80 HD
You can combine individual system articles
with articles from external suppliers (e.g. cold
light sources, etc.). Please read the user manual
and the safety requirements of the supplier.
Before installing, operating or using the instruments, read the user manuals listed above.
In particular, please observe all safety instructions.
To maintain the unit in its original condition
and to ensure safe operation, the user must
follow the instructions and warnings contained
in these user manuals.
Manual
4
Symbols Used
Warning of a danger
This symbol indicates especially important information that must be read and
complied with. Failure to comply can cause the
following:
ϘϘ
Hazards to persons!
ϘϘ
Instrument malfunctions and damage.
Danger due to hot surface.
This symbol warns against touching hot
surfaces, such as light bulbs.
Important information
This symbol indicates additional information or explanations that are intended
to provide clarity.
Warning of hazardous electrical voltage
This symbol indicates especially important information. Failure to comply can
cause the following:
ϘϘ
Hazards to persons!
ϘϘ
Instrument malfunctions and damage.
Leica IC80 HD
Manual
5
Safety Instructions
Description
The individual modules fulfill the highest requirements in terms of observation and documentation with the Leica IC80 HD.
Intended use
ϘϘ Refer to the "Safety Concept" brochure.
Installation location
ϘϘ Refer to the "Safety Concept" brochure.
ϘϘ
ϘϘ
Non-intended use
ϘϘ Refer to the "Safety Concept" brochure.
ϘϘ
The instruments and accessories described
in this manual have been safety-tested and
checked for possible hazards. The responsible
Leica affiliate must be consulted whenever
the instrument is altered, modified or used in
conjunction with non-Leica components that
are outside of the scope of this manual.
Electrical components must be placed at
least 10 cm away from the wall and from
flammable substances.
Avoid large temperature fluctuations, direct
sunlight and vibrations. These conditions
can distort measurements and micrographic images.
In warm and warm-damp climatic zones,
the individual components require special
care in order to prevent the build-up of
fungus.
Requirements to be met by the operator:
ϘϘ Refer to the "Safety Concept" brochure.
Ensure that:
ϘϘ
The Leica IC80 HD is operated, maintained
and repaired only by authorized and trained personnel.
ϘϘ
All operators have read, understood and
observe this User Manual, and particularly
the safety regulations.
Unauthorized alterations to the instrument or
noncompliant use shall void all rights to any
warranty claims!
Leica IC80 HD
Manual
6
Safety Instructions (continued)
Repairs, service work
ϘϘ Refer to the "Safety Concept" brochure.
ϘϘ
Only original Leica Microsystems spare
parts may be used.
ϘϘ
Before opening the instruments, switch off
the power and unplug the power cable.
ϘϘ
Touching the live electric circuit can cause
injury.
Transport
ϘϘ For shipping or transporting the individual
modules of the Leica IC80 HD, use the original packaging.
ϘϘ
Installation in third-party products
ϘϘ Refer to the "Safety Concept" brochure.
Disposal
ϘϘ Refer to the "Safety Concept" brochure.
Legal requirements
ϘϘ Refer to the "Safety Concept" brochure.
EC Declaration of Conformity
ϘϘ Refer to the "Safety Concept" brochure.
In order to prevent damage from vibrations,
disassemble all moving parts that (according to the user manual) can be assembled
and disassembled by the customer and
pack them separately.
Leica IC80 HD
Manual
Health risks
Workplaces equipped with stereomicroscopes
make it easier to examine extremely small
structures, but they also impose high demands
on the eyes and holding muscles of the user.
Depending on the duration of uninterrupted
work at such a workplace, impaired vision and
problems with the musculoskeletal system
may occur. Therefore, corresponding measures
should be taken to reduce the strain:
ϘϘ
Optimal arrangement of workplace, work
assignments and work flow (changing tasks
frequently).
ϘϘ
Thorough training of the personnel, giving
consideration to ergonomic and organizational aspects.
7
Leica IC80 HD
Leica IC80 HD
Manual
8
Introduction
Congratulations on purchasing the Leica IC80
HD Digital Camera Module by Leica Microsystems. The special design of the Leica IC80 HD
makes it a universal, highly versatile tool for
viewing microscopic specimens and capturing
still images or even video.
Real Full HD display
The integrated HDMI output allows the microscope image to be output to a High-Definition
(HD)-capable monitor, where the following
resolutions are possible:
ϘϘ
1920×1080i ("Full HD"). This resolution
provides the best possible imaging performance on a Full HD-capable television.
ϘϘ
1280×720p ("HD ready"). This resolution is
suitable for display on televisions labeled
"HD ready".
Leica IC80 HD
Leica Application Suite
Along with your Leica IC80 HD, you also obtain
the "Leica Application Suite EZ" software (LAS
Core on request). It allows additional scenarios
to be implemented in which the television and
monitor can even be used together. Thus you
are ideally prepared for every situation: work at
the computer, presentations, training sessions,
trade show appearances, material testing and
more.
User-friendly even in the smallest detail
Like every digital camera, the Leica IC80 HD
reacts differently to different light sources.
However, the white balance is factory set to
match the Leica LED illuminators. This means
that if you use a Leica LED illuminator, you automatically obtain the best results!
Manual
9
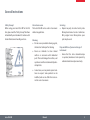
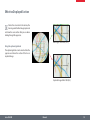
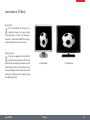
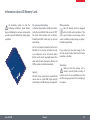
Effective Displayed Section
Due to the sensor size in the camera, the
live image and the final image capture do
not show the same section that you see when
looking through the eyepieces.
Live image 1920×1080 (16:9)
Using the optional graticule
The optional graticule can be inserted into the
eyepiece and shows the section of the live or
captured image.
Captured image 2048×1536 (4:3)
Leica IC80 HD
Manual
10
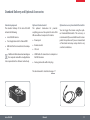
Standard Delivery and Optional Accessories
Standard equipment
The standard delivery of the Leica IC80 HD
includes the following:
Optional stand-alone kit
The optional stand-alone kit provides
everything you need to operate the Leica IC80
HD even without a computer. It contains:
ϘϘ
Leica IC80 HD camera
ϘϘ
"Leica Application Suite" software DVD
ϘϘ
Power pack
ϘϘ
USB cable for the connection to the computer.
ϘϘ
Remote control
ϘϘ
SD card
Additional information about working on
the computer and with Leica Application
Suite is provided in the software's online help.
ϘϘ
HDMI cable for connection to computer or
Full HD television
ϘϘ
Analog video cable with cinch plug
Optional accessory: handswitch/footswitch
You can trigger the camera using the optional handswitch/footswitch. This accessory is
recommended if you need both hands to manipulate the specimen or if you use a boomstand
or floorstand microscope setup which is very
sensitive to vibrations..
The stand-alone kit is described on page 17
Leica IC80 HD
Manual
11
Installation
Leica IC80 HD
Manual
12
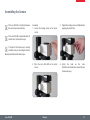
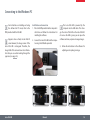
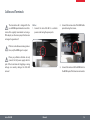
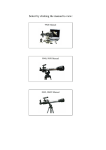
Assembling the Camera
The Leica IC80 HD is installed between
the microscope stand and tube.
Assembly
1. Loosen the locking screw on the optics
carrier.
3. Tighten the locking screw carefully without
applying too much force.
2 Place the Leica IC80 HD on the optics
carrier.
4. Install the tube on the Leica
IC80 HD as described in the manual for your
stereomicroscope.
The Leica IC80 HD is compatible with all
Leica M series stereomicroscopes.
If the tube of the microscope is already
installed, remove it according to the User
Manual provided with the microscope.
Leica IC80 HD
Manual
13
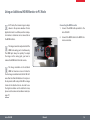
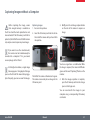
Connecting to the Windows PC
For instructions on installing and using
the software for PC mode, refer to the
DVD provided with the IC80 HD.
Eyepieces have a fixed, circular field of
view. However, the image sensor of the
Leica IC80 HD is rectangular. Therefore, the
image field of the camera shows less information than you see when looking through the
eyepieces (see page 10).
Leica IC80 HD
Installation and connection
1. Place the DVD provided into the computer's
disk drive and follow the instructions for
installing the software.
2. Connect the Leica IC80 HD and the computer using the USB cable provided.
Manual
The Leica IC80 HD is powered by the
computer via the USB cable. This changes the color of the LED on the Leica IC80 HD.
As soon as the LED is green, you can open the
software and view, acquire or manage images.
3. Follow the instructions in the software for
adjusting and acquiring an image.
14
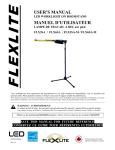
Limitations in PC Mode
Aspect ratio
If the Leica IC80 HD is connected to a
computer, images are always output
in 4:3 aspect ratio – even if a 16:9 monitor or
television is connected via HDMI. The image is
necessarily compressed on such a device.
Remote control
If you have equipped the Leica IC80 HD
with the stand-alone kit and still connect
the camera to the computer, the remote control
will not work. The menus of the camera are also
no longer displayed on the monitor. Instead, all
settings are configured on the computer using
Leica Application Suite.
Leica IC80 HD
4:3 aspect ratio
Manual
16:9 aspect ratio
15
Using an Additional HDMI Monitor in PC Mode
Connecting the HDMI monitor
1. Connect the HDMI cable provided to the
Leica IC80 HD.
In PC mode, the camera image is always
shown in the preview window of Leica
Application Suite. In addition, another computer monitor or television can be connected via
the HDMI interface.
2. Connect the HDMI cable to the HDMI tele
vision or monitor.
The image cannot be output via both the
HDMI and analog ports simultaneously.
The HDMI port always has priority. To output
the image via the analog port, you have to
remove the HDMI cable from the camera.
The image resolution on the attached
HDMI or television screen is limited to
the live image resolution inside the LAS EZ software. Due to technical limitations it is not possible to provide a HD-ready or Full-HD live image
stream to the attached screen. In order to see
the higher resolution on the attached screen,
please use the camera in standalone mode (see
page 17)
Leica IC80 HD
Manual
16
Stand-alone Kit
Leica IC80 HD
Manual
17
Application, Standard Delivery, Requirements
Intended use
The stand-alone kit for the Leica IC80 HD
extends the possibilities of the camera so that it
can be used even without a computer.
The remote control provided enables access
to the menus of the camera, so that a computer is no longer required for brightness, white
balance and other settings.
Because the camera is no longer connected to the computer, the power pack
must be used for the power supply. The power
pack is part of the standard delivery of the
stand-alone kit.
Leica IC80 HD
Standard delivery
The stand-alone kit is composed of the following
components:
Requirements
The following requirements must be met in
order to use the stand-alone kit:
ϘϘ
Power pack
ϘϘ
Leica M series stereomicroscope
ϘϘ
Remote control
ϘϘ
ϘϘ
SD card
HDMI-capable monitor or television that is
at least «HD ready» certified
ϘϘ
HDMI cable for connection to computer or
Full HD television
ϘϘ
Analog video cable with cinch plug
Manual
18
Cables and Terminals
The stand-alone kit is designed for the
use of HDMI-capable monitors and televisions. We urgently recommend not using a
DVI adapter, as otherwise proper function can
no longer be guaranteed!
Cables
1. Connect the Leica IC80 HD to a suitable
power socket using the power pack.
2. Connect the narrow end of the HDMI cable
provided using the camera.
If there is a simultaneous analog connection, only the HDMI signal is output.
Please pay ultimate attention to only
connect the 5V power supply which is
part of the stand-alone kit. Applying a wrong
voltage can severely damage the IC80 HD
camera!
Leica IC80 HD
3. Connect the wide end of the HDMI cable to
the HDMI input of the television or monitor.
Manual
19
Information about SD Memory Cards
Be absolutely certain to read the
following instructions about formatting and handling the memory card provided
in order to prevent malfunctions during image
acquisition.
File system and formatting
So that the SD card works correctly and is detected by the Leica IC80 HD, it has to use the "FAT"
file system. Most memory cards are factoryformatted with FAT so that they can be used
immediately.
An SD card cannot be formatted in the Leica
IC80 HD. If it is necessary to format the card,
use a computer to do so. You can also delete
the files on the card in any digital camera that
works with SD cards. During the deletion, the
FAT file system is installed automatically.
Capacity
SD cards of class 4 and 6 can be used with the
camera. Also so called SDHC (high capacity)
cards with up to 32 GB memory are supported.
Leica IC80 HD
Manual
Write protection
Some SD memory cards are equipped
with a slide for write protection. If the
slide is pressed down, no new images can be
saved. In addition, existing images are protected from being deleted.
If you cannot save any more images to the
SD card, check to make certain that the write
protection is disabled.
Orientation
Make sure that the memory card is
oriented correctly before inserting it
into the camera. If you accidentally insert the
card the wrong way around, this could damage
the camera.
20
Capturing Images without a Computer
Before capturing the image, ensure
that enough memory is available on
the SD card and that write protection has not
been activated. If the SD memory card is full or
protected, the LED of the Leica IC80 HD remains
red, and you cannot acquire any more images.
Capturing images
1. Focus on the specimen.
2. Insert the SD memory card into the slot on
the side of the camera until you hear it click
into position.
3. Briefly press the red image capture button
on the side of the camera to acquire an
image.
If you want to use the stand-alone kit,
the camera must not simultaneously be
connected to a computer. If it is, you cannot
save any images to the SD card.
In the highest resolution, a single image
takes up approx. 1.3 megabytes of storage
space on the SD card. This means that per gigabyte of capacity, you can save over 700 images.
The LED of the camera is illuminated in green.
The camera is now ready to save images to the
SD memory card.
You hear a signal tone as confirmation. While
the image is acquired, the camera LED flashes
green and the word "Capturing" flashes on the
monitor.
4. After the image acquisition is complete,
press the SD memory card into the storage
space so that it pops out.
You can now transfer the images to your
computer using a corresponding SD memory
card reader.
Leica IC80 HD
Manual
21
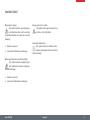
Viewing images and movies without a computer
The Leica IC80 HD shows images und
movie clips directly on an HD monitor.
Thumbnail view
ϘϘ
up/down/left/right ▶ select thumbnail
ϘϘ
OK: Show image in full screen or playback
movie clip
up/down ▶ next image / previous image
OK ▶ Play movie clip
left /right ▶ fast forward / rewind
007/0109 IC800007.MP4
Thumbnail view
007/0109 IC800007.MP4
Playback / fullscreen view
To return to live view press any button on
the camera or press the key 1, 2 or 9 on the
remote control (see page 24).
Leica IC80 HD
Manual
22
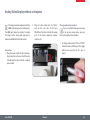
Adjusting the White Balance
The white balance ensures that the
specimen is shown in neutral colors. We
recommend carrying out a new white balance
adjustment whenever you change the illumination type or color temperature. This is particularly necessary if you are working with halogen
light that can be switched from yellow (low
intensity) to blue (high intensity).
Manual white balance
ϘϘ The manual white balance is described on
page 30.
Automatic White Balance
1. Position a gray chart under the microscope
so that the entire image field is filled in.
You can carry out the white balance
using the camera's own menu or via the
camera trigger.
The white balance of the camera is
factory set to automatically provide optimum results when used in conjunction with a
Leica LED illuminator.
Leica IC80 HD
2. Adjust the illumination as desired.
3. Press the trigger and hold it down for 5
seconds. The camera now carries out an
automatic white balance.
Manual
23
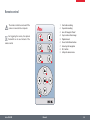
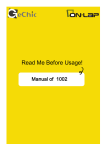
Remote control
The remote control does not work if the
camera is connected to a computer.
For triggering the camera, the optional
footswitch can be used instead of the
remote control.
1
2
3
4
5
6
1.
2.
3.
4.
5.
6.
7.
8.
9.
Start video recording
Stop video recording
Save still image to SD card
Stop / continue freeze image
Playback mode
Show / hide information box
Arrow keys for navigation
OK / confirm
Call up the camera menu
7
8
9
Leica IC80 HD
Manual
24
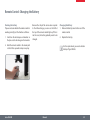
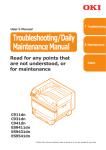
Remote Control: Changing the Battery
Checking the battery
If you are not sure whether the remote control is
working correctly, test the function as follows:
1. Switch on the microscope and monitor so
that you see the live image on the monitor.
Because the chip of the camera also responds
to the infrared range, you can see the LED at
the top of the remote control light up. If this is
not the case, the battery probably needs to be
changed.
2. Hold the remote control in the beam path
so that it faces upwards and press any key.
Leica IC80 HD
Changing the Battery
1. Remove the battery insert on the rear of the
remote control.
2. Replace the battery.
For the replacement, you need a button
battery of type CR2025.
Manual
25
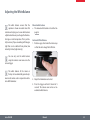
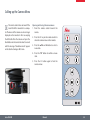
Analog Video Display without a Computer
The image cannot be output via both the
HDMI and analog ports simultaneously.
The HDMI port always has priority. To output
the image via the analog port, you have to
remove the HDMI cable from the camera.
2. Plug the video cable into the "Video"
port on the rear side of the Leica
IC80 HD and the other end into the analog
port of the device (projector, monitor,
recorder etc.).
1. To change between the "PAL" and "NTSC"
video standards, carefully press the toggle
button once using the tip of a pen or
pencil.
Connection
1. Plug the power cable into the corresponding connector on the rear side of the Leica
IC80 HD and the other end into a suitable
power socket.
Leica IC80 HD
Changing the video standard
If you see a distorted image or no image
at all on your analog device, you may
have to change the video standard.
Manual
26
The Camera Menu
Leica IC80 HD
Manual
27
Calling up the Camera Menu
The remote control does not work if the
Leica IC80 HD is connected to a computer. The menus of the camera are also no longer
displayed on the monitor. In this case unplug
the USB cable from the camera and press the
black button on the camera for about 5 seconds
until the message "Standalone mode" appears
on the attached analog or HD screen.
Opening and closing the camera menu
1. Point the remote control towards the
camera.
2. Press the ▤ key on the remote control to
show the camera menus on the monitor.
3. Press the ▲▼◀ and ▶ buttons to select a
menu item.
4. Press the "OK" button to confirm a menu
item.
5. Press the ▤ button again to hide the
camera menus.
Leica IC80 HD
Manual
28
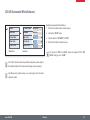
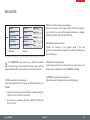
COLOR (Automatic White Balance)
COLOR
SET WHITE BAL
PRESS OK
Enabling automatic white balance
1. Press the ▤ button on the remote control.
EXPOSURE
WB MODE
MANUAL
2. Call up the "COLOR" entry.
RESOLUTION
RED LEVEL
3. Set the value for "WB MODE" to "AUTO".
SETUP CAM
BLUE LEVEL
SETUP USER
BLACK LEVEL
4. Press the ▤ button to exit the menu.
Main menu
Submenu
The values for "RED" and "BLUE" cannot be adjusted if the "WB
MODE" setting is set to "AUTO".
The "Color" function makes it possible to adapt the camera chip to
the ambient light so that color-neutral images can be acquired.
Tip: Whenever possible, always use a neutral gray chart to attain
optimum results.
Leica IC80 HD
Manual
29
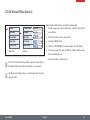
COLOR (Manual White Balance)
SET WHITE BAL
PRESS OK
EXPOSURE
WB MODE
MANUAL
RESOLUTION
RED LEVEL
2. Press the ▤ button on the remote control.
SETUP CAM
BLUE LEVEL
3. Call up the "COLOR" entry.
SETUP USER
BLACK LEVEL
4. Select the "SET WHITE BAL" menu item and press the "OK" button.
Main menu
Adjusting the white balance manually (recommended)
1. Place the gray chart under the microscope so that the entire field of
view is filled in.
COLOR
4. If necessary, correct the values for "RED" and "BLUE" until the image
shows a uniform gray area.
Submenu
5. Press the ▤ button to exit the menu.
The "Color" function makes it possible to adapt the camera chip to
the ambient light so that color-neutral images can be acquired.
Tip: Whenever possible, always use a neutral gray chart to attain
optimum results.
Leica IC80 HD
Manual
30
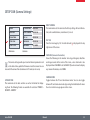
EXPOSURE
MANUAL
Manual exposure
1. Press the ▤ button on the remote control.
COLOR
EXP MODE
EXPOSURE
EXPOSURE
2. Call up the command for manual exposure (see diagram at the left).
RESOLUTION
GAIN
3. Set the value for "EXP MODE" to "MANUAL".
SETUP CAM
BRIGHTNESS
SETUP USER
GAMMA
Main menu
4. Correct the values for "EXPOSURE", "GAIN" and "GAMMA" until you
obtain the desired results for the image.
Submenu
Automatic exposure
1. Press the ▤ button on the remote control.
AUTO
COLOR
EXP MODE
EXPOSURE
EXPOSURE
2. Call up the command for automatic exposure (see diagram at the
left).
RESOLUTION
GAIN
3. Set the value for "WB MODE" to "AUTO".
SETUP CAM
BRIGHTNESS
SETUP USER
GAMMA
4. Correct the values for "BRIGHTNESS" and "GAMMA" until you obtain
the desired results for the image.
Main menu
Leica IC80 HD
Submenu
Manual
31
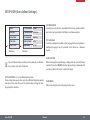
RESOLUTION
COLOR
LIVE RES
1280X1080
EXPOSURE
IMG RES
2048X1536
RESOLUTION
MOVIE RES
720X480
SETUP CAM
QUALITY
HIGH
SETUP USER
SHARPNESS
HIGH
Main menu
IMG RES (resolution of the captured image)
Defines the resolution of the captured image if the Leica IC80 HD is
not connected to a computer. The following resolutions are available:
640×480, 1024×768, 1600×1200 and 2048×1536.
MOVIE RES (resolution of videos)
Indicates the resolution of the captured videos if the Leica
IC80 HD is not connected to a computer. The resolution of 720×480 pixels
cannot be changed.
Submenu
The "RESOLUTION" menu enables you to define the resolution
for the live image on the computer, still image capture and video
capture individually. This provides optimum results in every situation.
LIVE RES (resolution of the live image)
Defines the resolution of the live image. The following resolutions are
available:
ϘϘ
For direct connection of the Leica IC80 HD to a monitor or television:
1280×720 or 1920×1080 (16:9 aspect ratio).
ϘϘ
For connection to a computer: 640×480, 1024×768 and 1440×1080
(4:3 aspect ratio)
Leica IC80 HD
QUALITY (of the image capture)
A higher image quality can slow down the image capture process. Two
quality levels are available for selection: "NORMAL" and "HIGH".
SHARPNESS (internal camera sharpness)
Define the amount of sharpening to be applied to the image.
Manual
32
SETUP CAM (Camera Settings)
COLOR
SET DATE TIME
PRESS OK
EXPOSURE
RESET CAMERA
PRESS OK
RESOLUTION
FLIP 180
PRESS OK
SETUP CAM
CAM LOGO
PRESS OK
SETUP USER
CAM MODE
PC-MODE
Main menu
RESET CAMERA
This command resets the camera to the factory settings. All user information (such as white balance, resolution etc.) is reset.
FLIP 180
Turns the Live image by 180°. A small red mark ( ) is displayed in the top
right corner of the screen.
Submenu
The camera settings enable you to control internal parameters such
as the date or time, update the firmware or reset the camera. You can
also switch the camera from stand-alone to PC mode (or vice versa).
SET DATE TIME
This command sets the date and time as well as the format for displaying them. The following formats are available for selection: YYMMDD –
DDMMYY – MMDDYY
Leica IC80 HD
CAM LOGO (camera information)
Shows the following on the monitor: Leica logo, histogram, date/time
and image counter. In the center of the screen, a cross hair mark is also
displayed when CAM LOGO is set to DEFAULT. If you do not want to display
any camera information, select NONE.
CAMERA MODE
Toggles between the PC and stand-alone modes. You can also toggle
between PC and stand-alone mode by pressing the black button for more
than 5 sec until a message appears on the screen.
Manual
33
SETUP USER (User-defined Settings)
COLOR
SET ILLUM MODE ILLUM-1
EXPOSURE
SET MENUCOLOR LEICA/LAS
RESOLUTION
SET LANGUAGE
ENGLISH
SETUP CAM
SHOW CAPTURE
2 SEC
SETUP USER
SHOW MENU
15 SEC
Main menu
SET MENUCOLOR
Currently, two color schemes are available for the menu guidance. Additional colors may be provided in the future via a firmware update.
SET LANGUAGE
Currently, only English is available as the language for the menu guidance.
Additional languages may be provided in the future via a firmware
update.
Submenu
The user-defined settings enable you to, for example, save illumination scenarios and retrieve them later.
SET ILLUM MODE -1 to 3 (save illumination modes)
These settings allow you to store up to three different illumination modes
and retrieve them later. This saves the current camera settings for recurring acquisition situations.
Leica IC80 HD
SHOW CAPTURE
Defines how long the acquired image is displayed on the screen after being
captured. If you select INFINITE then the captured image is displayed until
you have confirmed to store or to delete the image.
SHOW MENU
Defines how long the menu is displayed on the screen.
Manual
34
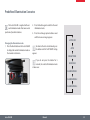
Predefined Illumination Scenarios
The Leica IC80 HD is supplied with various illumination modes that cover a wide
spectrum of possible situations.
Changing the illumination mode
1. Press the black button on the Leica IC80 HD
to display the current illumination mode on
the monitor or television.
2. Press the button again to switch to the next
illumination mode.
3. Press the red image capture button or wait
until the menu no longer appears.
LAST USED
To return to the last selected mode, press
the button until the "LAST USED" setting
appears.
If you do not press the button for 5
seconds, the selected illumination mode
is taken over.
AUTO
BRIGHTFIELD
DARKFIELD
ILLUMINATION-1
ILLUMINATION-2
ILLUMINATION-3
Leica IC80 HD
Manual
35
Care and Maintenance
Leica IC80 HD
Manual
36
Care and Maintenance
General
ϘϘ For good optical results, it is important to
keep optical components clean.
ϘϘ
ϘϘ
ϘϘ
Always cover the microscope and the Leica
IC80 HD with the dust cover included in the
delivery when the instrument is not in use.
If an optical surface is very dirty or
dusty, flush it using a syringe or clean
it using a camelhair brush before attempting to wipe it off.
Optical surfaces should be cleaned using
a lint-free cloth, lens cloth or cotton swab
soaked in methanol or a commercially
available glass cleaner. Do not use alcohol.
Leica IC80 HD
ϘϘ
Avoid excessive use of solvents. The lintfree cloth, lens cloth or cotton swab should
be soaked with solvent, but not so wet that
solvent runs over the lens.
Danger of electric shock
Risk of electric shock. Removing the
cover of the Leica IC80 HD camera or the
stand-alone kit exposes electrically live parts
which, if touched, can cause potentially fatal
injuries. Have technical service carried out by a
Leica Microsystems authorized dealer.
Manual
37
Specifications
Leica IC80 HD
Manual
38
Leica IC80 HD
IC80 HD Digital Camera
ϘϘ Weight 700 g (camera only)
ϘϘ Exposure time 2 msec. – 2 sec.
ϘϘ Live image on computer screen up to 25 fps (1024×768 pixels)
ϘϘ Live image on HDMI screen up to 45 fps (1280 x 760 pixels)
ϘϘ Live image on HDMI screen up to 20 fps (1920 x 1080 pixels)
ϘϘ Full-screen image capture 2048 × 1536 pixels, 3.1 megapixels
ϘϘ Sensor size: 6.55 mm × 4.92 mm
ϘϘ Pixel size: 3.2μm × 3.2μm
Sensor
ϘϘ Sensor type: Micron 1/2" CMOS
ϘϘ Gain 1× – 20×
ϘϘ Color depth 24-bit
ϘϘ File formats JPEG / MP4
Software
Operating systems: Windows XP, Windows Vista
Leica software: LAS EZ Software (PC)
Leica IC80 HD
Mechanical and optical interfaces
ϘϘ Fits between tube and stand via standard Leica dovetail
ϘϘ Midpoint offset between top and bottom of dovetail < 0.4 mm
ϘϘ Light distribution optical 50% / camera 50%
ϘϘ No visible reflections, dust or dirt on the prism
ϘϘ Internal video magnification 0.5×
ϘϘ Sensor centered on optical axis ± 0.1 mm
ϘϘ Sensor aligned horizontally / vertically ±1 degree
Electronic interfaces
ϘϘ Compatibility: USB 2.0 mini socket
ϘϘ Analog video port (RCA plug) PAL or NTSC composite video signal
ϘϘ Pinhole switch for toggling between PAL and NTSC video mode
ϘϘ 2-color LED for power on (green) / image capture (red)
ϘϘ Integrated SD slot (Secure Digital)
ϘϘ Capture switch for image acquisition
ϘϘ Reset function when capture switch is pressed longer than 10 seconds
Manual
39
Leica IC80 HD (continued)
Power supply voltage and frequency
ϘϘ Input: 5 V DC/500mA
ϘϘ When using the stand-alone kit:
85-265 V AC, 50/60 Hz
ϘϘ Input power = 10W
ϘϘ Power consumption 4 W
Ambient conditions
ϘϘ Elevation up to 2000 m
ϘϘ For use in enclosed rooms only
ϘϘ Temperature 5 °C to 40 °C
ϘϘ Installation category II
(overvoltage category)
ϘϘ Pollution degree 2
ϘϘ Maximum humidity 80% for temperatures up to 31 °C; linear decrease to 50% relative humidity at 40 °C.
Leica IC80 HD
Other
ϘϘ Power supply via USB 2.0
ϘϘ External power supply optional
ϘϘ Operating temperature range +5 °C – 50 °C, humidity 10% – 90%
ϘϘ Minimum computer configuration:
ϘϘ Intel Pentium 4 or DuoCore, 2 GHz, 1 GB RAM
ϘϘ 24-bit graphics, 1024 × 768, CD-ROM drive
ϘϘ EC Declaration of Conformity available
Standards
ϘϘ EMI/RFIEN55011-B EN50082-1
ϘϘ EMC61000-3-261000-3-3
Manual
40
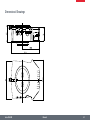
Dimensional 2Drawings
3
4
5
6
34
40
A
80.8
133.4
101.2
t fr
eige
gebe
n
B
95
C
SCALE 7:10
Nich
1
mechanik2002
Material
Remark
Name
Intermediate Product
IC-HD
Scale
Leica IC80 HD
1:1
Manual
D
Tolerierung DIN 7167
ISO 2768-mH
Designer
CLIM
13.02.09Material-No.
Doc.-Type
Sub-ID
Ver.
41
34
40
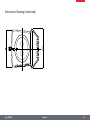
Dimensional Drawings (continued)
80.8
133.4
frei
95
101.2
gege
ben
B
Nich
t
SCALE 7:10
mechanik2002
Material
Remark
Intermediate Product
Name
IC-HD
Scale
D
Tolerierung DIN 7167
1:1
ISO 2768-mH
Designer
CLIM
13.02.09Material-No.
1.Release
Ch.Release
Doc.-Type
TBD
Changed by
MICROSYSTEMS
C
Change-No.:
Z1
TIF-Date:
Sub-ID
Ver.
0000 00
Sheet
1/1
Copyright by Leica Microsystems CMS GmbH, Germany, 2006
Leica IC80 HD
Manual
42