1
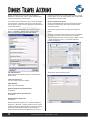
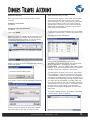
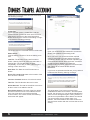
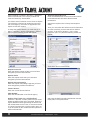
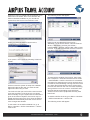
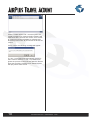
SOFTSUITCASE 2010
DANSK - VER. 7
Diners Travel Account is located in the Menu >
Modules > Diners Club. This is a pay module and
must be licensed by Travel Office.
must save the file to a known location with a unique
known name, so it can be picked by the module that
will upload it to Diners Club.
It is used to send Customer Invoice Lines to Diners.
The customer must have Diners Account and the
Travel Agency must have an agreement with Diners
to use their system.
Diners Payment Account
Enter the SoftSuitCase Account information where
the Diners Club Module will collect all the Diners
Club transactions.
To setup the Diners Module you must first go to
Menu > Modules > Diners Club > Diners Club
Setup and the following screen will appear:
After all the required are correctly entered press
SAVE.
Then you must enter the Diners Account information
for each Customer you have that has an Diners
Travel Account Account. To do this go to Menu > File
> Open Customer (Ctrl + F1) and the following
screen will appear:
File Identification
Enter the File identification that you receive from
Diners Club.
Then select the ACCOUNTS tab:
Last File Sequence
If a new setup, leave as '00000'
IATA Number
Enter your IATA Number.
Agents Department Identification
Is optional.
Diners Club Office Specification
Is Optional.
Establishment Reference
Is optional.
Diners Club Files Folder (ex. C:\DinersClubFiles)
Press the > Browse < button (folder icon) to locate
where the Diners Club Files are to be saved. When
the Diners Club Module finishes generating an
Diners Club File with all the latest Invoice Lines, it
4
SOFTSUITCASE 2010 - USER MANUAL - VER. 7
Customer Account
Approval Code if they so wish.
Enter the Diners Travel Account Number of that
customer.
The Invoice is then put in a list of the next invoices
to be sent to Diners. If the invoice is not closed,
either manually or by the system due to instructions
given in the Finance System, the Invoice may be
edited until the moment it is sent, when the Diners
Module will automatically close the invoice and no
more changes are allowed.
Customer Cost Center
Is optional.
Customer Department Division
Is optional.
To see what is in the Diners Module List, go to Menu
> Modules > Diners Club > Diners Club Invoice List.
Then press SAVE.
When an Invoice is created and the Customer is an
Diners Travel Account holder, the Invoice will have
the Diners Checkbox enabled, so you can tell the
system that, that Invoice is Diners Invoice.
When you check the Diners check box the following
screen will appear:
If you press > YES < then the following screen will
appear:
The following screen will appear:
Here you can see that there is an Invoice >
WAITING < to be sent to Diners. This list will show
all the > WAITING < invoices, plus all the >
POSTPONED < invoices, plus the last 3 files of sent
invoices. If you will to see all the Invoices not sent or
sent then check the > Show All < check box.
To postpone the sending of an Invoice, then check
the > Postpone < check box and the Invoice will be
> POSTPONED < until the check box is unchecked.
the reason for postponing an invoice can be that it is
not finished, that something is wrong with the invoice
etc. When the Diners Module runs it will check the
invoices first and warn the user if it found something
wrong with the invoice or invoices. It will NOT send
invoices that have something wrong with them.
These invoices must be postponed until they have
been fixed.
To send the Diners invoices, go to Menu > Modules
> Diners Club > Diners Club File.
At the moment the system is setup with a default
Approval Code but the user can enter the real
SOFTSUITCASE 2010 - USER MANUAL - VER. 7
5
If there are no invoices to be sent you will receive
the following message:
Create File
If there are then press > Create File < and the
system will then proceed to check each invoice to
make sure it conforms to the exact format that
Diners Club requires. If there is something not right
it will send the following message:
The invoice must be corrected before it will be sent.
Status boxes
Invoices waiting: Number of Invoices waiting to be
sent.
Last File: The Number of the Last File sent to
Diners. Used by Diners to make sure there are no
missing files. The File Numbers are sent
sequentially, so it is easy to see if a file has gone
missing or was never sent.
Date Sent: The Date the Last File was sent to
Diners.
Enter your Username and Password to access the
Diners Club (Sebkort in Denmark) portal.
Once you are in you must enter all the required
fields as instructed by Diners and the file will be
uploaded to Diners. Once it has been uploaded you
must tell Diners Module that it has been successful
so that the Diners Module can create the
corresponding payments, mark the invoices as sent
and update all the historical and relevant
information.
If you have not uploaded the file and you try and exit
it will send the following warning message:
Diners File ready to be sent: Is the location of the
file to be sent is located.
Invoices Checked: Number of Invoices checked.
This File: This File Number about to be sent.
Airline Amount: The total of the airline amounts of
all the Invoice Lines added to the file.
Non-Airline Amount: The total of the Non-airline
amounts of all the Invoice Lines added to the file.
If the check has been successful and all the
invoices were in the correct format, the following
web screen will appear.
6
This is because if you have not pressed the >
CONFIRM File Sent OK to Diners < and did upload
the file, the next time you run the Diners Module the
same invoices will appear again. Having said this, if
you have not uploaded the file to Diners and decide
you want to leave and do it later, there is no
problem, the Diners Module will create another file
with the same number with the invoices that are now
waiting.
SOFTSUITCASE 2010 - USER MANUAL - VER. 7
AirPlus Module is located in the Menu > Modules >
AirPlus International. This is a pay module and
must be licensed by Travel Office.
It is used to send Customer Invoice Lines to Airplus.
The customer must have an Airplus account and
the Travel Agency must have an agreement with
Airplus to use their system.
To setup the AirPlus Module you must first go to
Menu > Modules > AirPlus International > AirPlus
Setup and the following screen will appear:
AirPlus Payment Account
Enter the SoftSuitCase Account information where
the AirPlus Module will collect all the AirPlus
transactions
.
After all the required are correctly entered press
SAVE.
Then you must enter the AirPlus Account information
for each Customer you have that has an AirPlus
Account. To do this go to Menu > File > Open
Customer (Ctrl + F1) and the following screen will
appear:
Then select the ACCOUNTS tab:
Airplus Partner ID
Enter the AirPlus Partner ID that you have been
assigned by AirPlus International.
Aquirer Prefix
Enter the Aquirer Prefix that you have been
assigned by AirPlus International.
Aquirer Processing Page
Enter the Aquirer Processing Page that you have
been assigned by AirPlus International.
Tamara Version
Enter the current Tamara Version.
IATA Number
Enter the IATA Number of the Travel Agency
AirPlus Files Folder (ex. C:\AirPlusFiles)
Press the > Browse < button (folder icon) to locate
where the AirPlus Files are to be saved. When the
Airplus Module finishes generating an AirPlus File
with all the latest Invoice Lines, it must save the file
to a known location with a unique known name, so
it can be picked by the module that will upload it to
AirPlus International.
8
and enter the AirPlus Credit Card Number and the
Expiry Date. Then press SAVE.
SOFTSUITCASE 2010 - USER MANUAL - VER. 7
When an Invoice is created and the Customer is an
AirPlus Account holder, the Invoice will have the
AirPlus Checkbox enabled, so you can tell the
system that, that Invoice is an AirPlus Invoice.
The following screen will appear:
When you check the AirPlus check box the
following screen will appear:
Here you can see that there is an Invoice >
WAITING < to be sent to AirPlus. This list will show
all the > WAITING < invoices, plus all the >
POSTPONED < invoices, plus the last 3 files of sent
invoices. If you will to see all the Invoices not sent or
sent then check the > Show All < check box.
If you press > YES < then the following screen will
appear:
At the moment the system is setup with a default
Approval Code but the user can enter the real
Approval Code if they so wish.
The Invoice is then put in a list of the next invoices
to be sent to AirPlus. If the invoice is not closed,
either manually or by the system due to instructions
given in the Finance System, the Invoice may be
edited until the moment it is sent, when the AirPlus
Module will automatically close the invoice and no
more changes are allowed.
To postpone the sending of an Invoice, then check
the > Postpone < check box and the Invoice will be
> POSTPONED < until the check box is unchecked.
the reason for postponing an invoice can be that it is
not finished, that something is wrong with the invoice
etc. When the AirPlus Module runs it will check the
invoices first and warn the user if it found something
wrong with the invoice or invoices. It will NOT send
invoices that have something wrong with them.
These invoices must be postponed until they have
been fixed.
To send the AirPlus invoices, go to Menu > Modules
> AirPlus International > AirPlus File.
The following screen will appear:
To see what is in the AirPlus Module List, go to
Menu > Modules > AirPlus International > AirPlus
Invoice List.
SOFTSUITCASE 2010 - USER MANUAL - VER. 7
9
Press > Create AirPlus File < and the system will
create an AirPlus File, however before it does it will
make sure all the invoices are correct, and if it finds
an incorrect invoice it will display a message and
abort the process until all the invoices in the list are
correct.
If all is correct the following message will appear:
If > Yes < is pressed it will automatically via SFTP
the invoices to AirPlus. If > No < is pressed it will
ignore the process. A few moments after the file has
been sent to AirPlus. AirPlus via its Tamara system
will reply with a status e-mail.
10
SOFTSUITCASE 2010 - USER MANUAL - VER. 7
Operation systems
GDS
Minimum requiments
Workstations
Minimum requiments
Server
FrontOffice
Online Booking
Platform
Communication
Multi Locations
Max Users
Free support
Free test
Microsoft Windows NT©
Microsoft Windows2008©
Microsoft Windows 7©
Microsoft Vista©
Amadeus, Sabre
& Worldspan
Microsoft Vista/7© 2 GB RAM
NT512 GB RAM
50 GB Harddisk
Microsoft Windows2003©
Microsoft Windows 2008©
2 GB RAM
50 GB Harddisk
In installations less than 6 users
server can be Microsoft Vista©
or Microsoft Windows 7©
Microsoft IIS
Microsoft IIS
Microsoft.NET© 4.0
Internet required
Min. 2 Mbit download
Yes, please contact Soft
SuitCase for information
No maximum
45 days after installation
Disabled
Contact:
www.traveloffice.dk
Headoffice:
Nytorv 7 - B
1450 Copenhagen K
Denmark
Tel.: +45 33 66 90 90
Email: [email protected]
Technical support:
+45 33 66 90 99