1
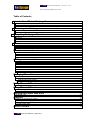
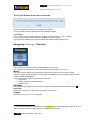
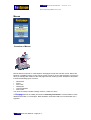
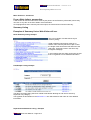
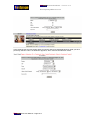
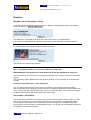
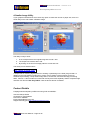
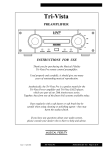
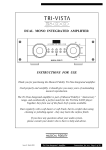
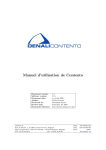
Fastpage Manual End Users – Revision 5.15
Developed by NZServers Ltd
Fastpage Manual for End Users
Fastpage End User Manual – Page No 1
Fastpage Manual End Users – Revision 5.15
Developed by NZServers Ltd
Table of Contents
Introduction- What is Fastpage? ...................................................................................3
How is Fastpage managed?................................................................................................................4
What does the Web Developer do? ...................................................................................................4
What can the End User ( you and/or your staff) do with Fastpage? ...................................................4
How to log into Fastpage ....................................................................................................5
The Welcoming Screen .......................................................................................................................5
The Log off Screen at the end of a session ........................................................................................6
Navigating Fastpage - Overview....................................................................................6
Menus..................................................................................................................................................6
Edit Mode ............................................................................................................................................6
User Info ..............................................................................................................................................6
Logout..................................................................................................................................................6
Menus ................................................................................................................................................7
Overview of Menus..............................................................................................................................7
Summary Listing..................................................................................................................................8
Examples of Summary Lists a Web Visitor will see. ...........................................................................8
How to access and use menus. ...................................................................................10
List Info ..............................................................................................................................................10
Detailed Info ......................................................................................................................................10
Delete ................................................................................................................................................11
The Green and Red Navigation buttons............................................................................................11
Adding a new menu item...................................................................................................12
Step One – Summary Information.....................................................................................................12
*User Defined Fields .........................................................................................................................12
Dropdowns ........................................................................................................................................13
How do you manage the Dropdowns?.......................................................................................13
Step Two – Detailed Information .......................................................................................................14
Edit Buttons .......................................................................................................................................14
Page article........................................................................................................................................15
Converting a Menu Item to Page Article........................................................................................15
Managing Menu Items .........................................................................................................17
Graphical options - what do the Navigation buttons mean? .............................................................18
Inserting Images – Graphical Editor ..................................................................................................20
Changing the Image options ......................................................................................................22
Hyperlinks to other sites ................................................................................................................23
Using Microsoft Word..........................................................................................................25
Word formatting icon ........................................................................................................................26
Using Microsoft Excel .........................................................................................................27
If the formatting does not look correct you have two options:-..........................................................28
Updating Excel Information ...............................................................................................................29
Copying from other Web Sites......................................................................................31
The HTML editor ...............................................................................................................................32
Graphics ........................................................................................................................................33
Graphics for the Summary Listing .....................................................................................................33
What happens if the graphic you have does not fit into the dimensions required? ..............33
Summary ...........................................................................................................................................34
A Smaller Image Utility ......................................................................................................................35
Contact Details .........................................................................................................................35
Fastpage End User Manual – Page No 2
Fastpage Manual End Users – Revision 5.15
Developed by NZServers Ltd
Introduction- What is Fastpage?
Fastpage is a unique product with the sole focus of allowing you to manage the content of your
website with ease. You may initially wish to use a web developer to generate how you wish your web
page to look and feel. Once you have done this you can use Fastpage as a Web Content
Management System.
As you can see in the following picture, the Fastpage Screen layout is similar to that of a basic
word processor and includes a fully graphical editor. These features make it simple to update pages
on your website yourself.
Fastpage gives you the freedom to express yourself quickly and effectively, and dynamically
change content. This ensures YOU have complete control over how when and where to change
content.
Updating content is often frustrating, and may appear to be limited to the world of the technically
minded.
Over the years people have chosen to accept the fact that they are going to require professional
services when it comes time to modify information on their site.
Fastpage is easy to use interface makes this a thing of the past, and introduces you into the world
of content management. You can easily make the changes yourself ☺.
Fastpage equips you with a fully WYSIWYG1 interface, (a user friendly way of changing/editing
information) and also with tools such as "menus".
Menus enable you to add new pages dynamically to your site, giving you the freedom to update
commonly changing content as often as you wish to post changes. Menus provide flexibility, as they
can display a wide variety of content such as news items, product listings, services, staff profiles...the
options are endless.
1
What you see is what you get
Fastpage End User Manual – Page No 3
Fastpage Manual End Users – Revision 5.15
Developed by NZServers Ltd
How is Fastpage managed?
Initially your Fastpage site will be set up by us as the Web Developer. After that you as the End
User can manage your website yourself, using the features of Fastpage, or delegate certain
sections/products/functions to relevant staff members if you wish. However if you prefer, we as the
Web Developers can manage the entire contents for you for a fee.
What does the Web Developer do?
It is the responsibility of the web developer to:
Convert new or existing sites to Fastpage.
Create templates ensuring critical content e.g. navigation links can not be edited.
Create Menu/List/Category/Product templates.
Add New navigational links.
Modify templates.
Ensure the end user knows how to work Fastpage.
What can the End User ( you and/or your staff) do with Fastpage?
The scope is unlimited and this depends on the skill of the web developer in conjunction with the End
User. You may wish to use Fastpage to easily change the content of:
Products specifications, prices and benefits.
Product illustrations
Production information
Special promotions
Terms and Conditions
Availability
Support information
Developer features
Press releases
News items
FAQ’s
Jobs
Office addresses, maps and directions.
Logos, photographs and diagrams
Fastpage End User Manual – Page No 4
Fastpage Manual End Users – Revision 5.15
Developed by NZServers Ltd
How to log into Fastpage
Use the following URL or Web Address to access your Fastpage administration module.
http://www.yourdomain/Fastpage/admin/
Note: - substitute your domain with your own domain name
Example: If your domain name is www.nzservers.com then you would type in: http://www.nzservers.com/Fastpage/admin/
The following screen will display
Enter the Username supplied to you and your password.
Please note the username and password are case sensitive.
The Welcoming Screen
A screen similar to the above diagram will display according to the features that have been enabled
for you to use.
Every Fastpage session will last for a duration of 6 hours.
At the end of the 6hour session you will be automatically logged off.
Each time an option is changed, you will see the remaining session time.
Fastpage End User Manual – Page No 5
Fastpage Manual End Users – Revision 5.15
Developed by NZServers Ltd
The Log off Screen at the end of a session
If this screen appears it indicates your session has expired.
☺ Any work will have been saved before this message appears.
Please Note: You can open up new windows using your browser to create another Fastpage window.
If you do this, the new window will share the same the session number.
If you logout out of any window using the logout option all the windows will log out.
Navigating Fastpage - Overview
A list of options is located on the top Left-Hand Side of your screen.
Your computer screen should be set at 800 x 600 pixels or higher to use Fastpage.
Menus
This option will only appear if you have been granted access rights to use the ‘Menu’ option.
The Menu option controls a dynamic (changing) list of templates where you have the option to add,
modify or delete the templates*
The Menu option is to used to control dynamic lists like: • News Items
• FAQ’s (Frequently Asked Questions)
• Product Lists
Edit Mode
This option will only appear if you have been granted access rights to Edit Static Web Pages.
2
User Info
Allows you to change your user name, logon name or password.
Logout
This will log you out of a Fastpage Session.
2
This is usually arranged in consultation with the Fastpage Web Developers and will depend on how
much access the business owner wishes to delegate to specific staff.
Fastpage End User Manual – Page No 6
Fastpage Manual End Users – Revision 5.15
Developed by NZServers Ltd
Menus
Overview of Menus
Menus allow an end-user to create dynamic web pages to keep the web site current. Menus are
based on Templates (layout of your menus), which are set-up, by the web developer. Once this is
done you manage the creation of the web pages and the content yourself. Example of templates
include the following types of menus:
News Items
FAQ’s
Price Lists
Catalogues
Technical Sheets
Staff Profiles.
You can then modify or delete existing menus or create new ones.
In Fastpage Menus are initially structured on Summary Information. This then leads to more
detailed information. For example a ‘News Headline’ would then lead to more information via a
hyperlink.
Fastpage End User Manual – Page No 7
Fastpage Manual End Users – Revision 5.15
Developed by NZServers Ltd
Menu Overview - Continued
From a Web visitor’s perspective:
A web visitor will see the menus as a summary list (known as the Summary Information) where they
can click on any item in the list to obtain more information.
As Fastpage allows each summary list to be unique, the look and feel of each list will vary.
Summary Listing
Examples of Summary Lists a Web Visitor will see.
News Summary Listing example
This is an example of a basic Menu Layout
summary listing.
Small navigation links appear at the top or
bottom of the summary list which helps control
the length of the list and the look and feel of the
web page. These links work in the same way
throughout Fastpage.
In this example the web visitor clicks onto the text
that is a hyperlink to more detailed information.
FAQ Sample Listing example
The above summary listing has been refined a little further allowing an end user to search by
Keywords or by category.
The hyperlink in this situation is the More Info->>> link which takes a web visitor to more detailed
information.
Sophisticated Relational Listing - Example
Fastpage End User Manual – Page No 8
Fastpage Manual End Users – Revision 5.15
Developed by NZServers Ltd
In this example the summary listing allows for specific data to be displayed based on what you have
previously selected. This is a ‘drill down’ approach, which narrows the selection criteria.
Fastpage End User Manual – Page No 9
Fastpage Manual End Users – Revision 5.15
Developed by NZServers Ltd
How to access and use menus.
When you click on the Menu option the screen may expand to display more options.
If you have access to more than one menu, a screen will display for you choose the applicable
menu, otherwise you will be taken directly to your menu.
The Menu option takes you to Manage Menus, which is the Menu Control Section and allows
you to Add, Modify or Delete Menu items.
If your menu has been set-up with a search option then the above search option will display
The search option will help you manage a large number of menu items.
If no search option has been set-up only the area will display.
Resort Name
ID
List Info
Detailed Info
List Info
The List Info options controls the information displayed on the summary listing.
Detailed Info
This allows you to edit the detailed Information
Fastpage End User Manual – Page No 10
Page Article Delete
Fastpage Manual End Users – Revision 5.15
Developed by NZServers Ltd
Managing your menu …continued
Delete
This allows you to delete the Menu Item
The Green and Red Navigation buttons.
Sample
Beachcomber Resort
When you create a menu item, the navigation button by default is set to Inactive or a Red Button.
When you complete the ‘Detailed Information’ the menu item is activated allowing people to view the
menu item, denoted by a green button.
The reason for this is the time delay from between when you create the menu item to when you
complete the detailed information. As the site is working on ‘Real Time’ data, - in other words ‘live
data’, it is pointless creating a new menu item and allowing people to see the summary listing before
the detailed information is ready for them to view.
Fastpage End User Manual – Page No 11
Fastpage Manual End Users – Revision 5.15
Developed by NZServers Ltd
Adding a new menu item
This allows you to create a new menu/list item.
There is a two part process involved when you create a New Menu Item.
Step One – Summary Information
Creating the Summary information
Click on the Add Menu Button to go to the Add Menu Item function
The descriptions like ‘Resort Name’ will
vary as this is customized according to
the site.
Fastpage allows for user defined *
fields. This section will display if it has
been enabled.
If the summary information has been
set-up for a thumbnail display this is
where it picture/image is loaded from.
Normally you just accept the defaults.
The Item Active should be left as ‘No’
unless otherwise instructed by your
web developer.
Once you have completed the
information click the Add Menu Item
Button
*User Defined Fields
Fastpage by default has two fields for any template as detailed in 1.
User Defined Fields allows more information to be captured for the menu item. These fields are setup by your web developer.
These fields may be in the form of a dropdown selection or just plain standard text boxes.
Fastpage End User Manual – Page No 12
Fastpage Manual End Users – Revision 5.15
Developed by NZServers Ltd
Dropdowns
Dropdown boxes help eliminate user input errors, and also allow web visitors to drill down and find
information by selecting from the dropdown options if your web developer has enabled this.
For example:You have a:
Car sales yard and you want to categorise the types of cars.
Or a
Real estate firm and you want to categorise houses by location.
How do you manage the Dropdowns?
If the menu has extra fields added and you have access to the menu the following menu will
display:-
When you click on User defined Fields the next screen will display:-
Select the dropdown option applicable to the field you want to add, modify or delete.
The following screen will display.
Fastpage End User Manual – Page No 13
Fastpage Manual End Users – Revision 5.15
Developed by NZServers Ltd
Ignore the Descr(2) and Descr(3) columns unless otherwise instructed.
If you want to modify a dropdown option make your changes and click on the Modify button.
To remove a dropdown option click on the Delete button.
To create a new dropdown enter the new details in the Descr(1) box and click on ‘Add New
Value’
When you have finished, click on the Exit Button.
Adding a new menu item:
Step Two – Detailed Information
Once you click on the Add Menu Item, you will then be taken to the detailed information, which
is what a web visitor views if they click on a hyperlink from the summary information.
Your web developer will have designed the look and feel of the detailed information and may include
some of the data from the summary information at their discretion. The detailed information will vary
with each web site.
Edit Buttons
Once you get into the detailed information screen scroll down to find the edit buttons
E – Click this button to add information to the listing item highlighted
P – Click this button to preview how the page looks
C – Will return you to the Menu Control Centre
will appear at the bottom of a menu listing and allows a short cut method to manage the
menu.
M – Means a Menu Item - Click this button to preview how the page looks
C – Will return you to the Menu Control Centre
E – Click this button to edit the menu list items
(This is a short cut to edit a menu from the Edit Page option)
Fastpage End User Manual – Page No 14
Fastpage Manual End Users – Revision 5.15
Developed by NZServers Ltd
Page article
The Multi Page option allows you organise information. The information appears as a List Item, which
allows a web visitor to click on any item in the list to see more information.
Example: If I sell computer hardware it would be better to organize the information as follows: •
•
•
•
•
•
Sales Information
Technical Specifications
Software Updates
Brochure
FAQ
Converting a Menu Item to Page Article
When you first enter a menu template, you will have the option of converting the page to multi page
( Convert to Multi Page ) . If you do not wish to convert the page ignore this button.
If you do change the status, you will now see the Multi Page button.
These buttons will only appear if the Menu Template has been set-up for Page Article.
These buttons will only appear during the edit process. (The web visitor will not see it).
If you click on the button ‘Convert to Multi Page’ you will be taken to the following screen:-
(Click on the button or click on the Browser back button if you do not want to do this).
Once you click on the Convert Menu Item to Multi-page you will reach the following screen.
This is where you set-up the multi page details for this Menu Item.
The default page description is ‘Page One’ - you will probably want to change this.
st
Click on the Change Page Description to change the 1 list item.
The Add Page option allows you to add more list items
The Move Option allows you to move the list item around.
The Delete option allows you to remove the list item
Fastpage End User Manual – Page No 15
Fastpage Manual End Users – Revision 5.15
Developed by NZServers Ltd
Using the previous example we want to set-up the following list items:
•
•
•
•
•
Sales Information
Technical Specifications
Software Updates
Brochure
FAQ
Change the default ‘Page One’ description to Sales Information
Click on the Add Page to create another List Item.
nd
Enter the 2 Listing and keep repeating the process until you have the categorisation you
require.
When you have finished entering your list items, click the Return link which will return you to the
detailed Menu Page as shown below.
You will notice now the display has changed.
<< you are here – tells you which listing you are working on
Fastpage End User Manual – Page No 16
Fastpage Manual End Users – Revision 5.15
Developed by NZServers Ltd
Managing Menu Items
Modify - amend the ‘Summary’ list information.
Edit page - Edit the Detailed the Information.
Display Edit Regions
The edit buttons are always below the editable content.
If you are not sure where the editable content is, use the display edit regions option to display the
editable regions- denoted by a small gray outline- as above.
Delete will remove the Menu Item.
☺After you click on this button you will be asked to confirm your intentions.
Fastpage End User Manual – Page No 17
Fastpage Manual End Users – Revision 5.15
Developed by NZServers Ltd
Graphical Editor
Only Microsoft Internet Explorer 5.0 or above, or Mozilla 1.2 or above, will support the graphical
editor, otherwise the HTML text editor will display.
The Editor is designed to use existing software like Microsoft Word and Excel allowing you to copy
and paste from these software applications directly into the graphical editor.
The editor is designed for screens 800 x 600 or 1024 x 768, and will resize to these screens.
The editable content is displayed in this screen allowing you to change aspects of your web site.
Graphical options - what do the Navigation buttons mean?
If you hold the cursor over any button, text will display to show what the button is used for.
Fastpage End User Manual – Page No 18
Fastpage Manual End Users – Revision 5.15
Developed by NZServers Ltd
Symbol
Short Descr
Cut
Details
Highlight the text you want to cut and select this icon
Copy
Highlight the text you want to copy and select this icon
Paste
Place the cursor at the point you want to insert
Bold
Highlight the text you want to bold and select this icon
Italics
Highlight the text you want to place in Italics and select this icon
Underline
Highlight the text you want to underline and select this icon
Left Aligned
Place the cursor at the point you want to Align the text
Centre
Place the cursor at the point you want to Centre the text
Right Aligned
Align Place the cursor at the point you want to Right Align the text
Numbered
List
Numbered Place the cursor at the point you want to insert a numbered list
Bullet List
Place the cursor at the point you want to insert a bulleted list
Un-indent
Place the cursor at the point you want to un-indent the text
Indent
Place the cursor at the point you want to indent the text
Link
Place the cursor at the point you want to insert a hyperlink
Image
Place the cursor at the point you want to insert an Image -( the image will
be copied to the server)
Link File
Highlight the text/image where you want to create a File Link( the File will
be copied to the server and held in a download folder)
nd
2
Row of buttons
Text
Changes the colour of the selected text
Text
Changes the background colour of the selected text
FONT
Typeface
Font Changes the Font Style - please use this with care if there are styles
attached to the entity
FONT
Size
Font Size Allows you to adjust the size of the font - please use this with
care.
Table
Adds a border to a table
Table
Removes all table borders
Line
Inserts a Horizontal Line
Image
Allows you to modify the properties of a selected image
Link
Removes a hyperlink
Fastpage End User Manual – Page No 19
Fastpage Manual End Users – Revision 5.15
Developed by NZServers Ltd
Word
Cleans up the formatting if you copy from MS Word - by replacing
<P></P> with <br><br>
The problem I occurs withs how the HTML tags are copied over
<B><I><FONT face=Arial><P>Welcome to the Fastpage Demo
Site</P></B></I></FONT><FONT size=2>. If you have a style sheet
attached and this defines the <p> tag you this will supersede the FONT
tag. The Word option overcomes this problem
Stylesheet
Indicates an attached Style sheet is being used - hold the cursor over the
icon to see the stylesheet used. Please Note - if you FTP a style sheet
called editor.css to the Fastpage/templates directory this will override the
Fastpage stylesheet if no stylesheet is found on the template.
Stylesheet
Indicates the default Fastpage style sheet used for the editor is used
At the bottom of the Editor you will see either Standard Template or Menu Template.
Standard Template
Menu Template
HTML
Restore
Cancel
Save
Active
Notes
Click to enter HTML mode – experienced users only
Allows you to restore contents to the original text displayed
Ignores any changes and exits the editor
Save the data back to the database - if you don't want to save just hit the Browser
Back Button or select another menu item from the LHS
Menu Templates Only
Uncheck if you do want the menu item active, otherwise leave as the default
(Unchecked prevents the Menu item from being displayed)
This is where your web developer will place notes applicable to the template.
Inserting Images – Graphical Editor
You can insert images into the graphical editor from images stored on your local hard disk, by
selecting the Image icon on the tool bar.
You can also copy and paste images from other web sites, but you need to be careful of copyright.
Select the copy Icon on the toolbar
Upload Image icon
A pop up box will display asking you to select an image
Fastpage End User Manual – Page No 20
Fastpage Manual End Users – Revision 5.15
Developed by NZServers Ltd
Select image
Click the browse button to select an image from your local hard disk drive.
Note:- only JPG or GIF images accepted.
Normally you would accept the defaults, but you can change these parameters later on.
Click the copy button when you have an image selected.
Make sure you have the focus (cursor position) set before you copy the image onto the edit screen.
Cursor on edit screen
Fastpage End User Manual – Page No 21
Fastpage Manual End Users – Revision 5.15
Developed by NZServers Ltd
Inserting an Image - continued
The image is now copied over to the web server, and is displayed in the graphical editor.
Changing the Image options
Select the image by clicking on the image so a marquee displays around the image.
nd
Click on the Adjust Image Icon found on the 2 row of the top toolbar
Fastpage End User Manual – Page No 22
Fastpage Manual End Users – Revision 5.15
Developed by NZServers Ltd
This will allow you to adjust the image properties (e.g. layout or spacing) as shown in the following
image– do not click the browse button as this will make a direct link to your local hard disk drive,
but the link is only to your hard disk drive and others will not see the images.
Hyperlinks to other sites
Select text or an object
Fastpage End User Manual – Page No 23
Fastpage Manual End Users – Revision 5.15
Developed by NZServers Ltd
Hyperlink
Click on the Hyperlink button (1)
Type in the hyperlink (URL) where you want to go
http – Web | https – Web Secure | mailto – mail | others – consult web developer
To Unlink select text/image to unlink choose Button (2) as above.
Fastpage End User Manual – Page No 24
Fastpage Manual End Users – Revision 5.15
Developed by NZServers Ltd
Using Microsoft Word
You can use Microsoft Word to create content.
1.From the Word document, select the text you want.
Selected text from Word document
2.Select Copy to get the content into the clipboard
Select copy
3. Switch back to Fastpage and place the cursor focus where you want to insert the text.
Continued – next page….
Fastpage End User Manual – Page No 25
Fastpage Manual End Users – Revision 5.15
Developed by NZServers Ltd
Cursor focus
4.Select the paste button or type CTRL V to copy the text into Fastpage
Word formatting icon
Please note: -depending on how your web developer set up your web site and the stylesheets, the
formatting, may initially look wrong.
If this is the situation, click on the ‘Word Formatting Icon’
to correct the situation.
The content from Word is now on your web site – it’s that easy.
Fastpage End User Manual – Page No 26
Fastpage Manual End Users – Revision 5.15
Developed by NZServers Ltd
Using Microsoft Excel
If you use Excel for creating price lists you can copy and paste from Excel directly into Fastpage.
This makes updating price list information so easy.
Select the information you want to copy from Excel and copy to the clipboard (CTRL + C)
Place the focus where you want the text to be copied to:-
Continued – Next page….
Fastpage End User Manual – Page No 27
Fastpage Manual End Users – Revision 5.15
Developed by NZServers Ltd
Using Excel – Continued
If the formatting does not look correct you have two options:1. Remove the borders
2. Add a correct border
Clicking on
Clicking on
the Excel icon will tidy up the border.
will remove the Excel Border
Continued Next page…
Fastpage End User Manual – Page No 28
Fastpage Manual End Users – Revision 5.15
Developed by NZServers Ltd
Excel – continued…
If you format the Excel sheet correctly the selection area will copy correctly
In the example below the spreadsheet has no borders
Note the colour and style will depend if the Web Developer has used Stylesheets and how the text
for tables has been assigned .. check with your web developer.
Updating Excel Information
Select the area within Fastpage and hit the Delete
text.
Fastpage End User Manual – Page No 29
Key or the cut icon to remove the old
Fastpage Manual End Users – Revision 5.15
Developed by NZServers Ltd
If you can’t delete the information choose the HTML mode (from bottom of Graphic editor) and select
all the text and delete.
Then return to the graphical editor.
Fastpage End User Manual – Page No 30
Fastpage Manual End Users – Revision 5.15
Developed by NZServers Ltd
Copying from other Web Sites
It is possible to copy and paste from other web sites, just be aware of web copyright issues.
Caution:
If you attempt this you may copy ‘Javascript’ by accident. If this happens the editor may crash
Just click the cancel button or a menu option on the LHS to escape – no damage is done.
Fastpage End User Manual – Page No 31
Fastpage Manual End Users – Revision 5.15
Developed by NZServers Ltd
The HTML editor
If your browser is not MS Internet Explorer 5.5 or above an HTML text editor displays.
The Graphical button shown above will not display if the Browser is not capable of displaying the
editor in enhanced graphics mode.
The HTML editor can be accessed from the graphical editor.
This is handy for web developers if the code doesn’t look right allowing access to the HTML code, but
you use this option at your own risk
Fastpage End User Manual – Page No 32
Fastpage Manual End Users – Revision 5.15
Developed by NZServers Ltd
Graphics
Graphics for the Summary Listing
If your Menu Summary listing has been enabled to display a small thumbnail graphic the following
screen will display for Add New Menu Item
The Width(134) x Height(88) is the pixel size of the image set by your web developer.
This means the image MUST be resized to fit these dimensions, otherwise the image will distort.
For Manage Menu’s the display is Slightly Different as follows:-
This will show the actual image selected.
Note – all graphics should be no more than 72DPI being JPG or GIF
What happens if the graphic you have does not fit into the dimensions required?
The dimensions set is known as the Paper Size/Canvas Size or the container size for the thumbnail
graphic.
The terminology used is different with each graphics package, so it’s important you understand this
concept.
Changing image dimensions – Corel Photopaint
You can change the dimensions of an image by increasing or decreasing its height and width.
With a thumbnail image changing the paper size lets you modify the dimensions of the printable area,
which contains both the image and the paper. When you resize the paper, you increase or decrease
the paper-colored border, but not the dimensions of the image.
Canvas Size - PhotoShop
The Canvas Size command lets you add or remove work space around an existing image. You can
also use the command to crop an image by decreasing the canvas area. In ImageReady, added
canvas appears in the same colour or transparency as the background. In Photoshop, there are
several options for the background of the added canvas. If your image has a transparent background,
the added canvas will be transparent.
Fastpage End User Manual – Page No 33
Fastpage Manual End Users – Revision 5.15
Developed by NZServers Ltd
Summary
The document's Canvas Size refers to the work space around an existing image.
In the case of an unmodified image the canvas size and the image size of a document will be
identical.
Example
You have an image with the following dimensions
The dimensions are 122 x 150 pixels but the image has to fit into a container size of 100 x 100 pixels.
The picture has been re-sampled to fit into a container size of 100 x 100 pixles.
For this example the canvas or background has been set to blue to illustrate the canvas size.
Fastpage End User Manual – Page No 34
Fastpage Manual End Users – Revision 5.15
Developed by NZServers Ltd
A Smaller Image Utility
If your graphics software does not include any option to resize the canvas or paper size, there is a
small utility on the web called ‘A Smaller Image’
The utility is easy to work.
1. In the example above the original image size is 640 x 480.
2. The output size must be 250 x 250.
3. By clicking on the Use Full Image pads the canvas size out.
This Utility can be obtained from:-
http://www.trivista.com/
A simple tool for reducing digital photos for emailing or publishing on the Web just got better. In
addition to the new features introduced in Version 3.0 for loading several images at once for
streamlined processing, a drop shadow edge effect, smooth text, and several image processing
filters, Version 3.1 also includes an oval border and improved text capability. Still the simplest image
reduction tool around. Still Only $US15. Click the above title link for details.
Contact Details
Fastpage was developed by NZServers using PHP and MYSQL.
Unit 2/65 Carlyle Street
Christchurch, New Zealand.
Phone 64 3 3666099
Email [email protected]
Support ticket by going http://support.nzservers.com/
Fastpage End User Manual – Page No 35