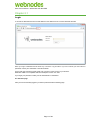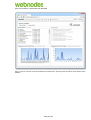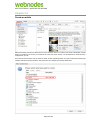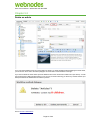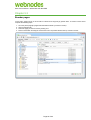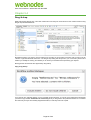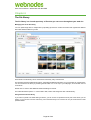
1
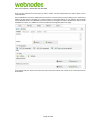
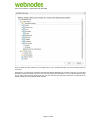
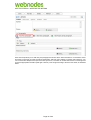
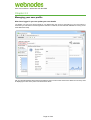
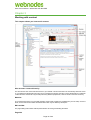
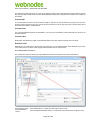
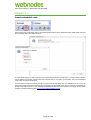
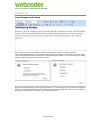
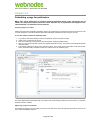
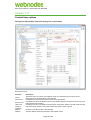
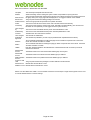
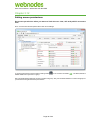
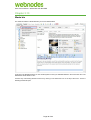
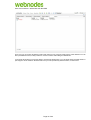
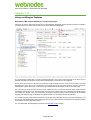
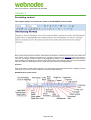
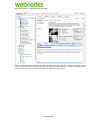
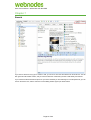
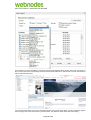
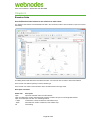
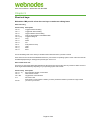
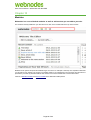
User manual editors Webnodes ASP.Net CMS Last changed 13.01.2012 User manual editors Webnodes ASP.Net CMS Page 1 of 62 User manual editors Webnodes ASP.Net CMS Introduction User manual for content editors What is Webnodes CMS Webnodes CMS is a web content management system that lets you update the content of your website without specific web publishing or technical skills, using only a browser. Once you are logged in to the edit interface of the CMS it lets you create, update, reorganize and delete the content on your website while keeping the original design of the site intact. You are able to upload pictures and video, use bullet lists, create links, spell check your work as well as a wide range of other features. For a full list of features see our detailed featured list. Page 2 of 62 User manual editors Webnodes ASP.Net CMS Overview Introduction Chapter 1 Terms and definitions Chapter 2 Getting started Chapter 2.1 Login Chapter 2.2 Create an article Chapter 2.3 Managing your user profile Chapter 3 Working with content Chapter 3.1 Insert embedded code Chapter 3.2 Insert images and videos Chapter 3.3 Edit image and video Chapter 3.4 Bold, italic, and underline Chapter 3.5 Spell check Chapter 3.6 Translate content Chapter 3.7 Content preview Chapter 3.8 Versioning and archiving Chapter 3.9 Submitting a page for publication Chapter 3.10 Customizing page metadata Chapter 3.11 Content item options Chapter 3.12 Setting access permissions Chapter 3.13 Waste bin Chapter 3.14 Using multilingual features Chapter 4 Formatting content Chapter 4.1 Strip formatting Chapter 4.2 Undo and redo Chapter 4.3 Bullets, numbered lists and indents Chapter 4.4 Insert or edit links Chapter 4.5 Paragraph styles and CSS Chapter 4.6 WYSIWYG versus HTML view Chapter 4.7 Insert or modify tables Chapter 5 Organizing content items Page 3 of 62 User manual editors Webnodes ASP.Net CMS Chapter 5.1 Copying a page Chapter 5.2 Delete an article Chapter 5.3 Reorder pages Chapter 5.4 Drag & drop Chapter 6 The file library Chapter 7 Search Chapter 8 Examine links Chapter 9 Short cut keys Chapter 10 Modules Page 4 of 62 User manual editors Webnodes ASP.Net CMS Chapter 1 Terms and definitions This page gives an introduction to common terms and concepts in the Webnodes CMS. Concept CMS Editor Webmaster / Site-administrator Edit interface Description Webnodes CMS is a Content Management System. It is the software that your site runs on. A person editing the website. A person responsible for maintaining one or more websites. The online editing tool of the CMS that you use to manage content. Web developers implement web sites. These are programmers who creates the site running on Developer Webnodes CMS. In Webnodes we use the term Node to refer to any manageable content item or record. Node / Webnodes is a generic CMS framework and not all content has to be an article with a one to one Content item mapping to a physical page on the website. Web page A web page is one single page of a web site. Each web page has a unique address. Web site A site is a collection of web pages. It has a distinct domain name. A web farm is a collection of web sites. A web farm is used by organizations that have several Webfarm sites at different URL's but running on the same CMS setup. A content type describes the structure of a node. For example if your site is a restaurant review site you may have nodes that represents particular restaurants. The content type would hold the Content type description of typical data of restaurants (metadata). For example a restaurant may have data such as address, cuisine, opening hours etc. these fields would be configured in the restaurant content type. All pages of a Webnodes site are rendered using templates. A template holds all the layout and styling. Content is rendered by reading data from the database and by applying templates onto Template this data. The result is the visual web page that you see on your web site. Templates are setup by developers. WYSIWYG editor A field for editing rich content. It provides What-You-See-Is-What-You-Get-preview as you edit. In Webnodes CMS this is the act of putting a node online, making it visible for one or more Publish people on the Internet. This is additional menu items specific to a particular object or feature. On Windows this is Context menu enabled by clicking the right mouse button on the specific field/object. More information on context menus at Wikipedia. Page 5 of 62 User manual editors Webnodes ASP.Net CMS Chapter 2 Getting started This chapter shows you how to get started with Webnodes CMS Requirements To edit a Webnodes site you need only a web browser and basic computer skills. On writing for web Before you start to create content for your website please be sure to have read this section on how to write for web. People tend to skim-read content on web so make sure your content is more to the point and easily readable in comparison to text that is written for printed media. l l l l l l l l Check that your tense or style of writing is consistent with the rest of the site. Test your links. Spellcheck before you publish. Check that content formatting is consistent with other pages. Think of words that readers may use to find your page. (Write using the reader's language) Use paragraphs to provide space that will make the text more readable. Use bullet or numbered lists for readability. Put the most important information at the top. Page 6 of 62 User manual editors Webnodes ASP.Net CMS Chapter 2.1 Login To access the Edit interface enter the site address in the address bar of a browser followed with /edit. Enter your login credentials and hit enter key or click the 'Log in'-button. If you do not know your user name or password, contact your webmaster or site administrator. For the best user experience please make sure you have a newer version of your browser. Webnodes CMS is not compatible with Internet Explorer version 6 or older. If you forget your password contact your site administrator or webmaster. The welcome page After you have successfully logged in you will be presented with the following page. Page 7 of 62 User manual editors Webnodes ASP.Net CMS Here you get an overview of the last modified and created items, authoring tasks as well as some website visitor statistics. Page 8 of 62 User manual editors Webnodes ASP.Net CMS Chapter 2.2 Create an article Start with selecting Content and New from the menu as shown above. You will then be shown a dialog with several options for what kind of content you would like to create (as shown below). The list depends on what has been configured for you site. There are also several other ways to create an article. Another popular approach is to open an article and clicking the 'Children'-tabs and from there create a new content item as a child of the currently viewed item. Page 9 of 62 User manual editors Webnodes ASP.Net CMS Once you have selected the content type you want to create, you will be asked where you want to place it in the content structure. Some websites do not have a traditional menu structure. In these cases you will probably have to make some relations to other items or add tags etc. to make it appear in meaningful places on your website. See the fields named 'Related articles' and 'Related tourist items' below for examples of relation fields that are often used as substitution for menus or in addition to menus to provide several navigation paths to the page. If we assume that your site has a tree structure then choose the location of the article in the content structure as shown below. Page 10 of 62 User manual editors Webnodes ASP.Net CMS Once the article has been created, you can double click on it in or click the OK-button. You are now ready to edit your new article. Depending on your site setup, each article type will have different fields that you can edit. In this case you must give the article a name to be listed in the menu. You can fill in ingress (short description). You can upload a picture as part of your article, either from the file library or from your PC, and store it as part of the new article. The picture will be placed according to the predefined article template. Page 11 of 62 User manual editors Webnodes ASP.Net CMS Some site setups allow you to add many text paragraphs as shown above. Each text article is a combination of text and image. One article can have several text paragraphs, with their own headings, ingresses and images etc. You can of course also add pictures as part of the text. If you do so, remember to use the context menu on the image and choose the appropriate orientation (float right or left etc.) of the image according to the text in the article, as illustrated below. Page 12 of 62 User manual editors Webnodes ASP.Net CMS Page 13 of 62 User manual editors Webnodes ASP.Net CMS Chapter 2.3 Managing your user profile After have logged in you can update your user details The details you enter here will be saved for your Webnodes user account. Depending on your site setup the information you enter will be used throughout the web farm in extranet, intranet and sister websites etc running on the same Webnodes setup. Ask your site administrator about where these data are used. The first name and surname fields are commonly used to displaying the name of the person who authored an article. Page 14 of 62 User manual editors Webnodes ASP.Net CMS Chapter 3 Working with content This chapter shows you how to edit content Site structure content hierarchy The site structure tree view holds all the items in your website. This structure does not nescessrarly reflect the menu on your website as Webnodes has many ways of showing the articles and other content. Webnodes is a relational content structure and the site may be setup with many different perspectives, views or facets to view the content by. Modules The module listing at the top of the Edit interface shows what modules are installed with your site setup. Some of these, such as the content module are default while other may be added by developers. Main toolbar The page editing main toolbar holds important buttons for saving and deleting the article. Page title Page 15 of 62 User manual editors Webnodes ASP.Net CMS The page title is what gets shown in menus of the website. There is also a field named 'long title' under the options tab. If the long title is entered then this value will be displayed instead of the page title as the articles main heading on the website. Content tabs The content tabs are used to chunk information together, without it the view would be very long and not very userfriendly. Please note that if there are content types that inherit from other types each type (content class) will be presented with its fields in a separate tab. Content fields The content fields differ between site installations. You may have very different content fields than are shown in the screenshot above. Content editor Most pages have atleast one HTML content field this field is most often used as the body text of an article. Relational field Depending on your site setup a content item may contain one or more relational fields. These fields let you pick from a list of other items in order to create a logical relation between the two content items. The content editor view menu The content tree view menu allows you to get additional information presented in the content edit interface. Show deleted content Show unpublished content Show deleted items in content tree. Items will be shown in red. Show unpublished and draft versions in content tree. Items will be shown in light blue color. Page 16 of 62 User manual editors Webnodes ASP.Net CMS Show IDs in treeview Show advanced property options Content link paragraph Show node id in front of node name in content tree. Show additional information on inheritance on fields. For administrators this indicator will also act as a context menu to allow for inheritance settings. Show node relations in graph visualization. Page 17 of 62 User manual editors Webnodes ASP.Net CMS Chapter 3.1 Insert embedded code Click on the 'Insert or edit object'-button, and the dialog below will be shown. Select the button called HTML code, and the embedded HTML code dialog will open. This is a useful feature for HTML snippets such as Social sharing buttons, Google maps, YouTube videos and other type of widgets. Some sites provide small code snippets that you can add to your website. The 'Insert embedded code'-button is used for this purpose. For example if you want to embed your office location from Google Maps into your webpage you can to this by adding the Google maps html snippet into the embedded code dialog field shown above. The same visualization on Google maps will be shown on your webpage embedded with the rest of the content on that page. Google Earth outreach provides information about how to copy the Google Maps preview. Page 18 of 62 User manual editors Webnodes ASP.Net CMS Chapter 3.2 Insert images and videos Images and video can be inserted either through the individual content node or through the site library. You can upload individual files or multiple files through a zip folder in the library or at the bottom of the content page. Video formats will be automatically converted to our flash player during upload. You can choose to play the video in different formats from wide screen to traditional 3:4 ratio. From the insert image button you will get the dialog to the left, and if you want to insert a video file you will get the dialog to the right after clicking on the "insert or edit object" icon. If it's an image you must select the image from where you have uploaded it before. It's either as part of the article you are editing (this content) or in the file library. If the object you want to insert is a video file, you must select "video player" Page 19 of 62 User manual editors Webnodes ASP.Net CMS Chapter 3.3 Edit image and video Opening the image editor There are at least three ways to open the Image editing dialog. For images in an image field click the 'Edit...'-button or click on the thumbnail. For inline images in the WYSIWYG-editor click on the image and use either the 'Image'button in the toolbar or use the context menu. Edit image In the image editor you have a variety of options. You can adjust colors, image size, image format, brightness, contrasts etc. In addition you have 4 pre-selected fitting options. The last one is carving, meaning that the program will analyze the image, and remove unnecessary pixels in-between important elements in the picture. This is one way of reducing the image size when the image has a lot of blue sky or water in-between other elements of more importance in the image. Page 20 of 62 User manual editors Webnodes ASP.Net CMS When editing the image a new copy will created. This means that you can edit the image many times over without loosing quality. Adjusting image size When inserting a new image in the WYSIWYG editor the size will be automatically adjusted. A typical task is to use the image editor to change the size of the image. If you prefer a specific width enter the width in pixles in the width field. To adjust the height according to the selected width press the 'Fit'-button under the Height label. Choosing image formats JPEG are typically best for rich images with many details such as nature shots. GIF and PNG are better suited for clean images, for example desktop screenshots or images with straight lines and fewer colors. GIF is an old format that works just about everywhere. PNG on the other hand does not work on very old browsers. It is more byte size optimized and will load faster for website visitors seeing the image on his or her browser. Image quality The quality slider is used to reduce image byte size. A low value will reduce image details by applying more image compression but make the image load faster for visitors. This setting is particular useful if your site has readers with slow Internet connections (Especially relevant if your site is used with mobile phones). Edit video Page 21 of 62 User manual editors Webnodes ASP.Net CMS Select the video you want to edit (similar to how you open an image). The following dialog (as shown above) will then open up. Here you have the option to edit size, formats and quality. In addition you can select the video to auto play or not on your website. As with images, editing a video will not affect the original video. Please note that editing a video will require it to be re-processed or rendered from scratch. This can take some time depending on the length and fidelity of the original video. Choosing quality for video Selecting a high quality means that the color and details will be better at the cost of more broadband usage. If the website visitor is on a slow Internet connection he or she may have to wait for the video to load or may experience jitters/stops while viewing it. Page 22 of 62 User manual editors Webnodes ASP.Net CMS Chapter 3.4 Bold, italic, and underline Use the B-button in the WYSIWYG toolbar to make text bold, the I-button to make it italic and use the U-button to make text underlined. Be aware that underlined text can be confused with links. Page 23 of 62 User manual editors Webnodes ASP.Net CMS Chapter 3.5 Spell check As with most CMS's Webnodes CMS depend on built in spell checking features of the browser. This means that the spell checker feature may vary from browser to browser. In Safari the spellchecker is often on by default while on Firefox and Chrome you click the spell checker icon in the WYSIWYG editor toolbar as shown above. Misspelled words in the text will be marked with a red stippled underline. You can now use the context menu on the misspelled words, and the system will automatically present you with suggestions and other options for correct spelling. Internet Explorer (IE) does not have a built in spell checker and the button will not be visible in the toolbar. To enable spell checking in IE you might install the IE Spell browser extension. Page 24 of 62 User manual editors Webnodes ASP.Net CMS Chapter 3.6 Translate content Sometimes it can be useful to paste content from other sources and languages and ask the system to translate this content into the default language of your website. The default language is a property decided by the website administrator. A Webnodes installation can have many different sites with different language settings. The system will automatically detect the origin of the language you paste in, and then translate this into the default language for the current website. If you have one Webnodes installation with several sites (web farm) using several different languages, you can also apply the content translation not only to text in a single article, but also to several articles or whole content structures or even an entire website. Page 25 of 62 User manual editors Webnodes ASP.Net CMS Chapter 3.7 Content preview When editing an article in Webnodes you can always open the preview function to the right at the top of your editing page (see button with red circle). The view will then split in two, and you can automatically preview your changes in the template as you save them in the article. You can also navigate or search the article you want to edit from the live web page, and then click edit on the top of the preview window. The edit mode will then automatically open up the selected web page on your left side. You can drag the preview window back and forth as a curtain with your marker, in order to preview your recent changes in a full screen etc. In the menu to your left you can choose from relevant topics in this user manual, or just search for relevant topics and keywords. Good luck! Page 26 of 62 User manual editors Webnodes ASP.Net CMS Chapter 3.8 Versioning and archiving Assuming your web site has been configured for revisions you will be able to manage several versions of a content item To create a new version of a node click the 'New version'-button. This will create a new version of the node. Use the 'Save'-button to edit the current version. The 'Save'-button will only be visible once you have created a new version or the current version is not yet published. Use the 'Archive'-button to take the content item offline. This will remove the content item from your site and it will be marked as archived. An archived item can be restored using the 'Publish'-button. You can also create a new version of an archived node. The 'Delete'-version button will delete the current unpublished version. Viewing all versions To view all versions of a content item click on the 'versions'-tab. If you have the required permissions you will be able to publish, archive, delete and republish previous versions from the list. Page 27 of 62 User manual editors Webnodes ASP.Net CMS Page 28 of 62 User manual editors Webnodes ASP.Net CMS Chapter 3.9 Submitting a page for publication Many sites use a publication or content approval workflow where users having the role of editors are allowed to write content but a user with the role of a publisher must approve the content before it is published to the Internet. Creating a page as an editor Please note that custom publication workflows need to be configured for your particular content or site structure. Ask your site developers or site administrators about what publication workflows has been setup for your site. To use this feature perform the following steps: Log in with a user having editing access for the particular content you want to create. Create a new content item as normal. Save your content as you work with it. (This will save the content as a draft version) When you are ready to publish it press the 'Request publication'-button. (This button has replaced the default 'Activate'-button) 5. The Request publication dialog opens (as seen below). Fill in some relevant information and click the OKbutton. Check the Notify check box to have an e-mail be sent to the publisher group. 1. 2. 3. 4. The button titled 'Request publication' will only visible in the content editing toolbar of the content item if publication workflow has been enabled. Approving a page as a publisher As a publisher logging in into the CMS you will see a new task in the welcome page pending task list. Click on the line to view the publication request. Page 29 of 62 User manual editors Webnodes ASP.Net CMS When navigating to the particular content item you will see the following. You can here decide to approve or reject the item. You can also make some last finishing touches to the content before publication. If you decide to reject the item you will be asked to fill in information about the reason for the rejection and you can Page 30 of 62 User manual editors Webnodes ASP.Net CMS check a check box to allow an e-mail notification to be sent to the editor. Page 31 of 62 User manual editors Webnodes ASP.Net CMS Chapter 3.10 Customizing page metadata The meta tab lets you add additional HTML metadata to your pages. The meta tab is used to add additional metadata to pages. These fields are mostly used for SEO to provide additional information to Search engines. Most of the fields are automatically filled out. Uncheck the 'Automatic ...'-check boxes under each text field to override the automatically created text. This tab also lets you add tags to content. See our separate page on taxonomy tags to learn more about how to use this. Page 32 of 62 User manual editors Webnodes ASP.Net CMS Chapter 3.11 Content item options The options tab provides advanced settings for content items Description of fields Field title Parent Show in tree Show in menu Hide in text searches Automatic address Address Description The parent node. The current node might be shown as a child of the parent node in menus (depending on the implementation of the template). If checked, item will be shown in the tree menu in the edit interface. If checked, item will be rendered in menus on the website. (Please note that this may or may not be implemented in the template) If checked, item will not be listed in the sites search result pages. (Please note that not all web sites have a site search feature or may have implemented custom search engines) Uncheck to override the URL of the web page. The URL address of the item (without the site's domain name). Page 33 of 62 User manual editors Webnodes ASP.Net CMS Template Module The visual layout template used for this node. Advanced setting used for setting the system module responsible for opening this item. The group that should have read access to this item. If this field is changed to something other then Read access the group 'Everyone' a login page will be displayed for non-logged in visitors of the website. Edit access The group that should have editing privileges on this item. Publish access The access group that has permissions to publish the article. Author The user account set as the author of the node. This field must be set manually. The user account set as the creator of the node. This field is set automatically. (This and the next Created by two fields are not updated if you are logged in with a system account) Last changed The user account associated with the person who last edited the node. by Published by The user account associated with the person who last published the node. Created The date when the node was first created. Last changed The last date of modification. Publication The last date of publication. (A node may be published and unpublished several times) approved Time controlled release date for making the page become visible at a specific time in the future. Release Check the 'Activate'-checkbox to enable. Time controlled retain date for making the page go offline at a specific time in the future. Check the Retain 'Activate'-checkbox to enable. If the item should be hidden in the edit interface. If checked the item will not show up in internal Hidden content item searches. Default read The default value for the read access field. Default group is 'Everyone'. access Default edit The default value for the edit access field. Default group is 'Editors'. access Default publish The default value for the publish access field. Default group is 'Editors'. access Access to add The group that should have privileges to create child items under this item. child Default in tree Default value for field 'Show in tree'. Default in menu Default value for field 'Show in menu'. Please note that Webnodes CMS is a customizable framework and developers might have applied custom code to override default behavior of these settings. Page 34 of 62 User manual editors Webnodes ASP.Net CMS Chapter 3.12 Setting access permissions Set access permission when you want to limit who can view, edit and publish a content item Go to a content item and the options tab to view current settings. To change permissions use the 'Select existing'-button Publish- fields can only be set to a group. or the 'Create new'-button . The Read, Edit and Only site administrators will have access to create new group. Ask your site administrators to create new groups if you need more fine grained access permissions. Page 35 of 62 User manual editors Webnodes ASP.Net CMS Chapter 3.13 Waste bin The waste bin feature in Webnodes lets you recover deleted items. As shown in the illustration above you can ask the system to show you all deleted articles in the content tree view. The deleted item will be shown in red. Another way of accessing deleted content is by clicking on the waste bin icon on the top of the menu. Then the following window will open. Page 36 of 62 User manual editors Webnodes ASP.Net CMS From here you can access all deleted content and restore it to its previous location before it was deleted. You can also open deleted content, modify it and then choose to restore while editing the deleted item. In the waste bin window you have the ability to permanently delete items. You can delete either selected articles or just empty the whole waste bin. Be aware that once you have permanently deleted content, it is lost forever. Page 37 of 62 User manual editors Webnodes ASP.Net CMS Chapter 3.14 Using multilingual features Webnodes CMS support websites in several languages Assuming you have a web site set up with two or more languages (language cultures) and this revisions is enabled in your site structure you will be able to create content items with several languages. The content editor header bar (1) holds a language indicator. This is the current language view. When set to a particular language this will be the current view and it will display content items in this language. Further down (2) next to the node title you will find the node language versions. Here you will be able to see what languages are set for the current content item. In this example we can see that an English version is published, indicated with a green check sign. A blue pause sign indicates that the Norwegian version is in a draft mode. The main view (3) shows all current versions for the content item. Here you can see that the English version has both a published and a draft version. The Norwegian version has only a draft version and a seperate line indicates that it has a fallback to English. This means that when viewing the site after having chosen Norwegian as the default language will cause the page be displayed in English as there is no Norwegian version yet published. The content tree view (4) will mark items that do not have the current language version using square brackets '[ ]'. As the currently selected language view is Norwegian and very few nodes has been translated in theis example is shows most nodes in the treee view with brackets. For mor einformation about translating content see the Translate content chapter. Page 38 of 62 User manual editors Webnodes ASP.Net CMS Chapter 4 Formatting content This chapter shows how to format content in the WYSIWYG rich text editor Most of the interface should be intuitive, and familiar from MS Word. However there are some minor differences when editing content in HTML from MS Word. For example line spacing. In the WYSIWYG editor when hitting the return key, you will get a double line space (new paragraph) by default. In order to get a single line space (as you would normally get in MS Word) you need to hold the shift key down while hitting the return key, then the WYSIWYG editor will create a line break (that looks like a single line space) instead of a paragraph break. Important When working with an HTML editor always save your changes with regular intervals and before navigating to another content item. If you move to another content item, unsaved changes will be lost. WYSIWYG editor toolbar buttons Page 39 of 62 User manual editors Webnodes ASP.Net CMS Chapter 4.1 Strip formatting When copying text from another source such as a Microsoft Word document, a PDF or another web site, the original styling will automatically follow from the source. This can often conflict with the predefined web design styles you have on your website. The WYSIWYG editor provides several features for stripping away formatting. l l l The first button (highlighted above) will try to clean up messy formatting. Formatting might become messy when underlying codes for styling and formatting intertwine as a result of copy and paste. Button two will remove style formatting. This will not remove paragraph coding such as headings but it will remove custom styling. Button three will remove all formatting including text paragraph coding such as headings. Another often used method of stripping away all formatting is by first copying the text over to the Windows program named Notepad and then copy it from there over to WYSIWYG editor. Page 40 of 62 User manual editors Webnodes ASP.Net CMS Chapter 4.2 Undo and redo Webnodes CMS keeps a history of the actions you perform. It allows you to undo several actions, and if you decide not to undo the action, you can press the redo button to undo the undoing. Page 41 of 62 User manual editors Webnodes ASP.Net CMS Chapter 4.3 Bullets, numbered lists and indents Create bulleted or numbered lists by clicking the 'Create list'-buttons in the WYSIWYG editor. How the bulleted or numbered lists are displayed on your webpage is predefined by the particular site's design. The third and fourth buttons outlined are used to create indents in text. Page 42 of 62 User manual editors Webnodes ASP.Net CMS Chapter 4.4 Insert or edit links Adding a link to text You can mark the text you want to link to or just click on the 'Insert or edit link button' above. The insert link dialog will open. Setting link properties Page 43 of 62 User manual editors Webnodes ASP.Net CMS You now have the options of creating links to external web pages, internal pages, downloadable documents or e-mail links. To create a file download link, you must first upload the files to the content or to the site library. You will then be able to select the file from this dialog. Removing a link To remove a link you can either use the context menu on the link and choose the Remove Link-context menu item or you can click the Unlink-button in the content editor toolbar (the button next to the insert link button). Page 44 of 62 User manual editors Webnodes ASP.Net CMS Chapter 4.5 Paragraph styles and CSS The paragraph formatting dropdown lets you choose from predefined paragraph types such as headings. Please note that the items available in the Paragraph and Styles drop down boxes can vary from site to site. Also note that the some headings may be reserved for special use. For example Heading 1 may be reserved for the page top title that the system automatically renders on the web page. Consult your website designers or developers for information about what styles are preferred for a consistent look throughout your website. If your website has any custom-made styles you can access these from the drop down list to the right of the paragraph formatting. You must then select the text that you want to apply the custom styles (CSS) to, before selecting type of style to be applied. The custom style is based on different CSS’s custom-made for your website. Page 45 of 62 User manual editors Webnodes ASP.Net CMS Chapter 4.6 WYSIWYG versus HTML view The WYSIWYG view is generally used when creating new articles and editing content in a user-friendly way. However the HTML view allows you to manually adjust the styling and formatting. For example the illustration provided above, shows that h2 (Header 2) was used for the title text (Introducing Norway). The HTML editing dialog is mostly used for advanced end users who are familiar with HTML programming. Page 46 of 62 User manual editors Webnodes ASP.Net CMS Chapter 4.7 Insert or modify tables Tables are used to display information in a grid of rows and columns. Tables provide a clean way to present tabular data. Inserting a table Place the cursor (text marker) in the WYSIWYG editor where you would like the table to be placed in your article. Then select the table icon as shown above and the table dialog will be displayed. Here you can select some basic functions for modifying your table, or choose the advanced function in order to do more customization of your table. Select the number of rows and columns you would like. You can then use the table wizard to style your table. After you have added the table you can format the content in each cell as you like. Table right click context menu Once the table is added in the WYSIWYG editor, you can right click the mouse to modify the table directly from the edit interface. Page 47 of 62 User manual editors Webnodes ASP.Net CMS Formatting table headers By default the tables you add do not get any specific styling on the top rows but you typically want to have the top row assigned for descriptive text and make them appear as a heading. This can easily be done just applying bold formatting to the top row cells. However we recommend using another approach that will change the underlying HTML mark-up and make the top row more semantic and ubiquitous. When formatting the top rows as bold there is no way for blind people who use visual aids or for other computer systems to understand that the top row is a heading row. A better way to create a table headings is to perform the following steps 1. Put the cursor in a cell in the top row. 2. Use the context menu to open the cell property dialog. Page 48 of 62 User manual editors Webnodes ASP.Net CMS Chapter 5 Organizing content items This chapter you will learn how to move, reorder, copy and delete pages. Be aware that moving or deleting pages can break links from other pages on this or other sites. If other pages link to your page and you move or delete that page the origin link will no longer work. If you are renaming the title of a content item, the URL of the corresponding page will also change. The URL is the web address of your web page. To change the title of the page but not the URL follow this procedure. 1. Find the URL of the page (2) on the meta-tab. Copy the URL. 2. Change the title (1). 3. Uncheck the 'Automatic meta title'-checkbox and paste in the old address (3). Your page will now live at the old address but have a new title. Page 49 of 62 User manual editors Webnodes ASP.Net CMS Chapter 5.1 Copying a page You can duplicate or clone a node by performing the following steps 1. In the content tree, locate the nodes you want to copy. 2. Select the articles you want to copy. (Use control key to mark several items) 3. Hold down the control key while you drag them to the preferred location. Do not release the control key until you have actually dropped the articles, or else they will not be copied. To copy an item without its content use the 'New of selected'-menu item in the content menu. This will create a new empty node with the same content type class. The newly created item will be created in the same branch of the content tree at the bottom. The name will be the same as the content type class name. Page 50 of 62 User manual editors Webnodes ASP.Net CMS Chapter 5.2 Delete an article If you only want to delete part of the content within an article (e.g. article paragraph) without deleting the whole article, you can click on the X next to the article paragraph as shown with a red circle above to the right. If you want to delete the whole article press the Delete button at the content item toolbar menu (see above). You will then be presented a dialog window asking if you are sure, and also informing you about any children articles (see below) that will also be deleted with the article in question. How to recover a deleted item. Page 51 of 62 User manual editors Webnodes ASP.Net CMS Page 52 of 62 User manual editors Webnodes ASP.Net CMS Chapter 5.3 Reorder pages I most cases, pages shown in menus will be ordered chronologically by publish date. To reorder content items complete the following steps: 1. 2. 3. 4. Go to the parent page (the page/node that holds the article you want to reorder). Click the Children tab. Select the page you want to move by clicking on it. Press mouse button and drag the content item to its new position either further up or down in the list. Page 53 of 62 User manual editors Webnodes ASP.Net CMS Chapter 5.4 Drag & drop Webnodes support drag & drop. Tree view content items can freely be moved around in the content structure using drag & drop as illustrated below. Be aware that when you want to move an article from one place in the structure to another, that you also move all “children” organized beneath that article. The drag & drop dialog will always warn you of how many articles and children you actually are moving, and will ask you to confirm your selection before performing your request. Moving pictures and text are also supported by drag & drop. Copy, drag & drop If you want to copy and paste articles or even complete content structures, you can do so by selecting the articles that you want to copy and then hold down the control key while you drag them to the preferred location. Do not release the control key until you have actually dropped the articles, or else they will not be copied. Page 54 of 62 User manual editors Webnodes ASP.Net CMS Chapter 6 The file library The file library is a shared repository of files that you can reuse throughout your web site Managing files in the file library You can upload single files or multiple files by uploading zip archives. Create new folders and organize the different files under different folders as you like. Files stored in the file library can be accessed and reused by many content items. The file library itself is a traditional file system, organized with different file folders, as you would like to organize them. You can access the file library by selecting the file folder icon on the top of your edit page, as shown with the red circle above. Double click on a file to view additional advanced settings for the file. The button titled 'More options >>' can be used to filter, search and change the view of the file library. Using files from the file library If you want to upload a file while editing an article, you can choose to upload the file as part of the article you are editing, or as part of the shared file library. Files stored directly on the article can only be accessed from that particular article. Page 55 of 62 User manual editors Webnodes ASP.Net CMS When choosing a file from the file library you will be asked to use a copy of the file or a reference of the file. Choose reference if you would like to make a pointer to the file rather than a duplicate copy. A reference will enable you to change the file once and have changes propagate to all content items using the file. Page 56 of 62 User manual editors Webnodes ASP.Net CMS Chapter 7 Search If you want to search for any type of content to edit, you can do so from the edit interface as shown above. You will then get a list of all relevant content, and you can then select the content that you want to edit directly from that list. If you need more advanced search options or if you don’t find what you are searching for in the dropdown list, you can click on the search icon, and the search for content dialog window pops up as shown below. Page 57 of 62 User manual editors Webnodes ASP.Net CMS In this window you have more filtering- and search options as the illustration above shows. When your content item is found, click on it and the corresponding content item view will be loaded in the edit interface. You will now be able to edit the selected content item. You can also find the article by using the site search function from preview mode. When you have located the page of interest, simply click on the edit icon in the preview toolbar. The particular article will be opened for editing. Page 58 of 62 User manual editors Webnodes ASP.Net CMS Page 59 of 62 User manual editors Webnodes ASP.Net CMS Chapter 8 Examine links Use the Examine links feature to see relations to other items The 'Examine links'-button is located besides the title in the content item editor. Click the button to open the Content links dialog. This dialog shows what other items are linked to this item. You can here click on nodes to see further relations. Hover mouse over relations (arrows) to see the relation type. Hover mouse over nodes to see information suhch as Node Id and content type class. Description of buttons Button title Description Open Opens the selected node in the edit interface Open in module If this node is associated with a specific module it will open it in the designated module Open in window Opens the item in a new dialog window. + depth Increases the number of maximum node relation hops. - depth Decreases the number of maximum node relation hops. Ok Close dialog Page 60 of 62 User manual editors Webnodes ASP.Net CMS Chapter 9 Short cut keys Webnodes CMS provide a few short cut keys to make text editing faster Short cut listing Short cut key Ctrl + b Ctrl + i Ctrl + u Ctrl + k Ctrl + (1-6) Ctrl + c Ctrl + v Ctrl + x Ctrl + f Ctrl + z Ctrl + y Ctrl + s Description Toggle bold text formatting Toggle italic text formatting Toggle underline text formatting Insert or edit hyperlink in WYSIWYG editor Toggle heading 1-6 Copy Paste Cut Find (search for text) Undo Redo Save For text formatting short cuts to work you will first need to select the text for you want to format. Some of these sort cuts will override default actions for your browser or operating system. Some of the short cuts will act differently depending on what type of input field your cursor is on. Other useful short cuts These are not part of the Webnodes CMS but we still include them here as they are very useful for editors. Some of these might behave differently depending on your operating system and browser. Short cut key Ctrl + (+ - 0) Ctrl + n Ctrl + tab F11 Prt Scr Description Zoom browser window, 0=reset zoom New browser window Toggle tab in current browser Full screen view Print screen / screen capture. Useful if you have problems and want to provide an image of what you see on your screen. Page 61 of 62 User manual editors Webnodes ASP.Net CMS Chapter 10 Modules Webnodes has a set of default modules as well as add-ons that you can add to your site. The modules currently installed on your web site can be seen in the modules tabs in the top of the window. Modules act as system components for different type of content. For example a web shop is a separate module that you can add to your website. The number of modules visible to you will depend on the site setup and what level of permissions you have. By default all editors have access to the content module that is used to edit content. View list of standard modules and add-on modules in the Webnodes CMS product. Page 62 of 62