1
LCedit+ and LanBox user manual
A publication of
CDS advanced technology bv,
Maassluis, The Netherlands
Copyright 1995-2010 CDS advanced technology bv
Version 3.5, March, 2010
All rights reserved. This document may not, in whole or in part, be copied, photocopied, reproduced,
translated, or reduced to any electronic or machine readable form without prior consent, in writing, from
CDS advanced technology bv.
The supplied material, hardware and software, is intended for use only as described in the manuals. Use of
undocumented features or parameters may cause damage and unpredictable results for which CDS advanced
technology bv can not assume responsibility. Although every effort has been made to make the supplied
material and its documentation as accurate and functional as possible, CDS advanced technology bv will not
assume responsibility for any damage incurred or generated by such material. CDS advanced technology bv
reserves the right to make improvements and changes in the product described in this manual at any time
without notice.
LanBox-LC and 788-LD are trademarks of CDS advanced technology bv.
Page 1
LCedit+ and LanBox user manual
Index
Introduction
2
Keys, CLI, keystrokes and macros
24
What is LCedit+?
2
Key actions overview
24
System requirements
2
Menu shortcut keys
24
Setup and Install
3
CLI commands
24
TCP/IP settings
3
Macros
25
USB driver for Windows.
3
The keystroke editor
25
The Configure Interface window
3
IR remote and Display
26
If you cannot get “Connected”
4
Setup your IR remote
26
27
Rigging a stage
5
IR controller commands
A stage example
5
Using MIDI with LanBox
Place fixtures
5
Setup for MIDI
29
More view options
6
Using MIDI or MSC to trigger cues
30
Some important notes:
6
Using MIDI wing/commander
30
Groups
6
LanBox MIDI and MAX-MSP, Isadora
30
Control your lights
29
8
External control and triggers 31
Manual control
8
Setup for external DMX desk
31
Using presets
8
Grab values from external desk
31
An instant preset on the fly; i-cue
9
Setup for external switches or buttons
32
What are active channels and what are layers?
9
Setup for triggers and control via TCP or Serial
32
How do we activate and de-activate channels?
9
Setup for digital or serial outputs
33
More about layers
10
Use a digital output as 9600 baud serial port
33
The operation of the LanBox firmware
10
Use MIDI in or Out as RS232 port
33
Cues & Chases
11
UDP networking
34
Create cues
11
Introduction
34
Using the path and pattern tool
12
Usage of the UDP options with Capture 3D
34
Using the pattern generator with RGB fixtures
13
Usage of the UDP options with MAX-MSP
34
Running cues
14
DMX distribution over an Ethernet network
34
Do I need layers, when and how?
14
Synchronizing cues in multiple LanBoxes
35
Make a multistep cue; a chase
14
Network traffic
35
Notes for theater application with a LanBox
15
Cuesteps, scenes, cuelists... what is in the name?
15
Introduction to Art-Net
36
Live and automated shows
Art-Net
36
16
Setup for Art-Net receive
36
Live shows
16
Setup for Art-Net transmitting
36
Layer identifiers and layer locking
17
Network setup and usage 37
Automated shows
17
Files
38
Using internal clocks
18
Interactive shows, using external triggers
19
Create and edit fixture definitions 20
The fixture library
20
Create a new fixture definition file
20
The library files
22
Create presets for your fixture
23
What is saved, where and how?
38
Backup your LanBox data
38
Upgrading from LanBox-LC II to LanBox-LC+
39
Action commands overview
39
Last resort: Resetting the box
40
CE, FCC, and Safety 40
Copyright 1995..2010 CDS advanced technology bv. LanBox is a registered trademark of CDS advanced technology bv. All other names referenced are the service marks,
trademarks or registered trademarks of their respective companies. Comments, suggestions, questions and info: www.lanbox.com Version 3.5, March 2010
Page 2
LCedit+ and LanBox user manual
Introduction
With the LanBox-LC system
you've bought a modern desktop
DMX and Show controller that
can compete with the best. A
LanBox is not just a simple DMX
interface, but a complete lighting
desk, which can be used for
complex multimedia show
control. A LanBox can run a show
completely stand-alone, with or
without triggers from external
sources. So contrary most DMX
controllers, it is a dedicated
computer system, with it’s own memory to hold all show details. The box has many features, so take your time to discover
all options. If you only have simple requirements, you don’t need to read all chapters, but be sure you understand the idea
of active channels, and layers. We hope you will enjoy working with your LanBox.
Note: The LCedit+ was designed for the Macintosh OS X platform, but we also have a Windows XP/Vista/7 version. What is LCedit+?
LCedit+ is a computer program for editing the light cues, sequences and shows inside the LanBox. In other words, LCedit+
is just a friendly way to program the LanBox, all the "real" lighting work is done by the box. The program has several types
of windows: Stage (that holds the fixtures and light groups), Cast (lists all used fixtures and groups as a list), Control (for
light-, and layer- sequencer control, setting layer and chaser parameters), Cuelist editor (for creating & editing of cues,
including paths and patterns), and Monitor (to monitor various in/out values).
LCedit+ also has several built-in tools e.g. to edit the fixture library, to manage files (Utilities, Backup and Restore), to
upload firmware, to edit global settings of a LanBox (e.g. set name, password) and to make patches (DMX channels,
curves, slope limits, etc.). To make fast usage for power users possible, LCedit+ also has a CLI (Command Line Interface),
user definable presets, key sequences, macros etc.
Besides being a light editing program LCedit+ can be used to trigger light scenes and queues during performances. If you
need a more specific run time control program (i.e. jingle machine with light queues), you can use a MIDI sequencer (like
Performer or Logic), use a show control program or built your own one with MAX (examples are included).
System requirements
Macintosh
Any Intel or PPC Macintosh running OS X 10.4 or later, color screen 1024x768, a 10/100 BT Ethernet or USB port
(Optional with high speed RS232 adapter), depending on LanBox type.
PC
Any Pentium PC, Windows XP (Vista/7), color screen 1024x768 (1024x768 recommended), a 10/100 BT Ethernet or USB
port (Optional with high speed RS232 adapter), depending on LanBox type.
Copyright 1995..2010 CDS advanced technology bv. LanBox is a registered trademark of CDS advanced technology bv. All other names referenced are the service marks,
trademarks or registered trademarks of their respective companies. Comments, suggestions, questions and info: www.lanbox.com Version 3.5, March 2010
Page 3
LCedit+ and LanBox user manual
Setup and Install
Before you can use LCedit+ the LanBox needs to be “connected” to your computer. This can be achieved through your
Ethernet network, a USB port direct, or with a high speed RS232 adapter. Ethernet is the preferred method for LanBoxLCX, and the only way for a LanBox-LCE. The LanBox-LCM or old LanBox-LC must be connected by RS232 adapter.
TCP/IP settings
If you connect to a LanBox using Ethernet, it uses the TCP/IP protocol, and the box is set to IP address 192.168.1.77. with a
mask of 255.255.255.0, so your computer should be initially set to an IP of e.g. 192.168.1.1, with mask 255.255.255.0
If above statement is hocus-pocus to you, it’s enough to know that each device on the network must have a unique address,
and “area” code (the mask). If your computer is connected to the Internet in some way, you must find out to what IP and
mask your computer is assigned; the LanBox IP and mask must be set into the same range with LCedit+’s Global Settings,
see also Network setup.
If you have an old LanBox-LC, you must upgrade: Upgrading a LanBox-LC II to LanBox-LC+
USB driver for Windows.
If you are going to use USB with LCedit+ and a LanBox-LCX on Windows, you need to install "CDS USB modem" driver.
In the LCedit+ download (or the CD) you will find the file cdsusb(Win7-Vista-XP), which is needed for Windows. Once
you plug-in the USB cable, connected to the LCX, windows ask you to install software for new hardware, be sure you are
doing this "manual" by letting windows search in the LCedit+ folder!
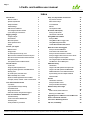
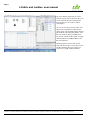
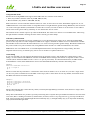
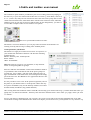
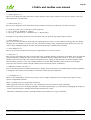
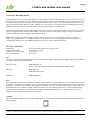
The Configure Interface window
After starting LCedit+ and opening a
New project, this is the first window
you will see. The editor needs to know
what kind of interface you want to use,
in order to communicate with a LanBox.
Note: On OS X or Windows, only serial
ports or TCP/IP can be used.
Note: If you want to connect via TCP/
IP (LanBox-LCX, LCE), the default IP
is 192.168.1.77 (mask is
255.255.255.0), and the password (pin
code) is 777.
Select the medium, port(s) or name, for
AppleTalk and TCP/IP you can optionally save your password. Now give it a descriptive name, select the "Connect"
checkbox and click "OK". The settings will be stored in your project file, in order to connect instantly when you double
click the saved project file.
Note: If you wish to try LCedit+ without a LanBox, you can try to use our demo LanBox (if it is not in use) through the
Internet. In that case you need to select TCP/IP and use the name demo.lanbox.com, with password 777. (you need to have
access to the Internet to use our demo box).
Copyright 1995..2010 CDS advanced technology bv. LanBox is a registered trademark of CDS advanced technology bv. All other names referenced are the service marks,
trademarks or registered trademarks of their respective companies. Comments, suggestions, questions and info: www.lanbox.com Version 3.5, March 2010
Page 4
LCedit+ and LanBox user manual
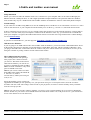
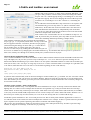
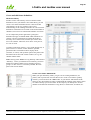
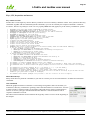
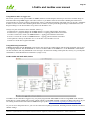
After clicking OK, LCedit+ will try to
establish a connection with your LanBox.
On a network connection it will ask for a
password, use 777 as it is the default
password of a LanBox. If everything goes
well, you will see a green square in the
bottom right half of the control window.
• Put the network name of your LanBox
in the name field e.g. LanBox 1, so you
know which LanBox you are using in
this project (even when it changed to
e.g. serial).
• Once the connection is made, and your
layout looks like the picture right, save
the project (File menu-> Save As).
Note for LC users: If you don't see
anything in the "Layer control" list, like
above, use the Layer menu command
"New Layer", and select it in the list just below the "Go" button.
TIP: Subscribe to the LanBox-Talk e-mail discussion list, see our lists page.
If you cannot get “Connected”
If you cannot get a connection using TCP/IP, check the following:
• If you use a direct connection between your computer and LanBox, be sure to use the “crossover” cable (black or yellow).
• Once you have plugged in the cable, the Green eth (or Cmd) LED should lit, else you have a cable problem.
• Check that your computer TCP/IP settings are manual, IP = 192,168,1,2, Mask = 255,255,255,0
• If your computer is connected to Internet, it gets most of the time automatically an IP assigned. The LanBox must have
the same mask, and the IP must be within the same IP range as your computer is. Ask you network manager for advice for
a “fixed” server IP for the LanBox.
If you cannot get a connection using Serial, check the following:
• Check that you have the latest driver for your USB<>RS232 adapter, but also that it supports virtual COM ports on
Windows.
• Check your RS232 cable; the LanBox only needs tx, rx, and 0V (common).
• On OS X the LanBox gets a name like “usbmodem0000101D1”, the number is depending on used USB port, and/or hub.
Tip: Click on the “advanced” triangle in the upper right (Control) window; Now you will see an Interface status box near
the bottom of this window, showing something like:
12:21:43 Open usbmodem0000101D1
12:21:44 Connected, 38400 Baud
12:21:44 LanBox-LCX, v2.11
Or, in case of problems something like:
12:29:59 Port Unavailable
Copyright 1995..2010 CDS advanced technology bv. LanBox is a registered trademark of CDS advanced technology bv. All other names referenced are the service marks,
trademarks or registered trademarks of their respective companies. Comments, suggestions, questions and info: www.lanbox.com Version 3.5, March 2010
Page 5
LCedit+ and LanBox user manual
Rigging a stage
A stage example
You can place as many fixtures and/or groups on
the stage(s) as you want with the menu commands
"New Fixture" and "Make Group". When your
fixture is not in the library, use the nearest model,
place separate generic channel fixtures, or create
your own fixture with the library editor.
The fixtures (or groups) can be created, deleted and
duplicated with menu commands and shortcuts.
Selecting an item instantly changes the content in
the control panel, reflecting the state of the fixture
or group. Once a fixture or group is selected (e.g.
with the k1 command) you can navigate selections
by using cmd-opt- arrow up/down (on PC ctrl-altarrow up/down), you can even extent the selection
by also pressing the shift key.
When you hold the control key, the stage enables a
popup menu with commands to Cut, Copy, Paste
and clear the background picture. The background
can be moved with option(alt)-control drag on the
background picture.
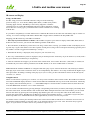
Stage picture: Jon Daggett, Midilite
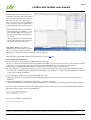
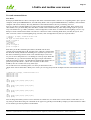
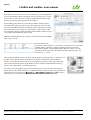
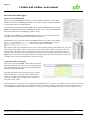
Place fixtures
As we are still staring to a complete empty stage, it's time to do some rigging
(place fixtures). To keep it simple we are going to place just eight single dimmers,
so here we go.
Do the menu command "New fixture", you will get a dialog window like the
picture left. Select "Generic single dimmer channel", name it L01, and close the
dialog. The stage has now one large icon called {1} L01
.
Select this icon and use the "View" menu command to change the appearance to
"small icon + full indicators". Now do the Edit menu command "Duplicate Item" 7
times, you have now eight fixtures on your stage labeled {1}L01 through {8}L08.
Move the icons (by click-drag) in such a way that you get about the same as the
picture right. Copyright 1995..2010 CDS advanced technology bv. LanBox is a registered trademark of CDS advanced technology bv. All other names referenced are the service marks,
trademarks or registered trademarks of their respective companies. Comments, suggestions, questions and info: www.lanbox.com Version 3.5, March 2010
Page 6
LCedit+ and LanBox user manual
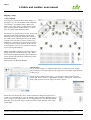
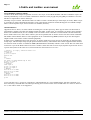
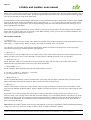
More view options
• It's also possible to view the color of an RGB fixture or the actual intensity of a fixture,
and you can hide labels as shown on the picture right.
• The view menu has the following options:
• Set the icon size to small instead of normal.
• Hide icon (label is shown).
• Hide label (icon is shown).
• Show the intensity, position, color, whatever is appropriate for the fixture.
• Show/hide fixture numbering in label.
• Lock/unlock the position of fixture.
• These view options are very useful when dealing with modern RGB LED matrix setups,
but also for e.g. a line of pars (lower 8 fixtures).
Some important notes:
• Place single channel fixtures (use RGB fixtures for LED panels) even if you use multi channel dimmer packs, or multi
RGB panels! The multi channel packs in the library are intended for unknown multi channel fixtures, not for dimmer
packs.
• You do not to fill in the blank channel and DMX fields, as they will be assigned automatically. Only if you want have the
fixture at a certain light channel or DMX address, you can overrule the auto placement.
• The idea is to organize your fixtures in a way you can find them quickly and represents the real stage. When fixtures are
placed on the stage there are assigned to channel numbers, but that can be changed in the fixture setup.
• Do not change the channel numbers once you have created cues, but use the "Edit Item" command of a fixture to match
the DMX addresses of the fixtures with channels.
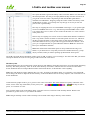
Groups
It's nice to have your fixtures on the stage window, but you also want to organize your
lights in groups related to function. In our example we make one group of all 8 fixtures.
First select fixture L01, then use shift click to add the other 7 fixtures to the selection
(make sure that the order of shift clicking is the same order as your fixtures). When all 8
fixtures are selected, do the "Edit" menu command "Make Group", you will get a dialog
window like the picture right. Name this group "GL1", check that all 8 fixtures in order in
the right list, and click OK.
LCedit+ allows you to create almost any combination of (sub-) grouping in any way you
want. Just select one or more fixtures (but also previous defined groups are allowed) and
do the command "Make Group". When groups are placed on the stage they are assigned to
merge and show only "Identical" panels, but also show intensity channels separately for
easy survey.
Copyright 1995..2010 CDS advanced technology bv. LanBox is a registered trademark of CDS advanced technology bv. All other names referenced are the service marks,
trademarks or registered trademarks of their respective companies. Comments, suggestions, questions and info: www.lanbox.com Version 3.5, March 2010
Page 7
LCedit+ and LanBox user manual
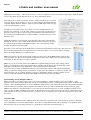
To prove that the group GL1 is correct,
select the group icon. If all went OK, your
screen will look like the screen picture
left, meaning we are ready to control
some lights.
As you can see, the control window does
show now a big Intensity wheel for the
whole group, and 8 smaller wheels named
L01-L08 for each individual fixture. Also,
the Cast window (the top middle) now
has 8 rows with the fixture name, it's light
channel number, it's DMX address, and
the used interface.
Selecting fixtures can be done on the
stage, but also in the cast list. The cast list
has the advantage that you can have it
sorted on e.g. light channel numbers.
Copyright 1995..2010 CDS advanced technology bv. LanBox is a registered trademark of CDS advanced technology bv. All other names referenced are the service marks,
trademarks or registered trademarks of their respective companies. Comments, suggestions, questions and info: www.lanbox.com Version 3.5, March 2010
Page 8
LCedit+ and LanBox user manual
Control your lights
Manual control
After placing the fixtures on the stage, you surely want to check if your lights are working.
So grab the big intensity wheel on the control panel (see picture right), and slowly drag it
to the right. Several things happened: The grey DMX values of the channels became black
(they are made active), and with your mouse dragging you can set all channels to a value
(use 10%). There are many ways to set your lights, so here is a survey of most common
ones:
• Grab & drag the wheels, note that the big intensity wheel changes -all- intensity channels
of the selected group. You may enter e.g. +20 to raise all channels with 20%.
• Enter the setting by typing the value, ending with the enter key. A signed value raises or
lowers channel(s) relative to previous setting.
• Use Tab and shift Tab to move the focus (blue, where you can enter values) from channel
to channel. BTW: You may copy/paste or drag a picture into the fixture controls, and
with RGB fixtures even the color(s) is set to the picture!
• Use arrow up/down to in/decrement the value, with pressed shift key coarse steps are
taken.
Using presets
LCedit+ has many fast shortcuts to set your channels to a certain value, one of them is
presets. There are four groups of presets; ps (shutter), pb (beam), pc (color), and po
(other). If you want to set your group to "Full", you could use ps2 by using the ps preset
popup.
Even a much faster way is just type ps2<enter>, which is a so called CLI (command Line
Interface) command. The chapter Keys describes all short cuts, CLI commands, and single
key definitions, but for now it's handy to know that a "v" selects the group intensity, "x"
and "y" the pan/tilt fields, "u" the "Go" field.
Presets may look a bit overdone for simple lamps, but remember once you are going to use
color scrollers, moving heads, etc., you will be very
happy to have e.g. a "pb1" to center your beams, or a
"po1" which sets your complicated fixture to default.
Presets can have been made as part of the fixture definition, but also for a project. Lets
make a preset only for this project, which set this group to 50% intensity. First set the
Intensity wheel to 50%, so all channels indicate 50%. While holding the option (alt) key,
click and hold on the ps popup, so you get the picture as shown right. Now select Make
Preset, and you get a dialog like this:
Name it "Intensity 50%", and click on OK. Note that in this case you made the preset for
multiple fixtures, but if you select just one fixture you get the choice of whether it should
be made for the fixture in the library, or for this project.
Note: Be careful to add presets to the library, as they will be active in -all- current
and future projects! When in doubt, don't put them into the library ;-)
Copyright 1995..2010 CDS advanced technology bv. LanBox is a registered trademark of CDS advanced technology bv. All other names referenced are the service marks,
trademarks or registered trademarks of their respective companies. Comments, suggestions, questions and info: www.lanbox.com Version 3.5, March 2010
Page 9
LCedit+ and LanBox user manual
An instant preset on the fly; i-cue
As we have shown, you can easily change a group of light channels to another setting with
presets. But what if we want a new setting of several lights in -one- action (such as a black-out),
and do not have a preset? Use the "i-cue" button. When you click on the i-cue button, you
disconnect your channels from the mixer, so you can set your channels without disturbing the
current lighting. Now, set your channels to the required values, and hit space when you want to
"insert" this temporary cue, or shift-space to cancel the i-cue mode.
What are active channels and what are layers?
To understand how cues should be created and edited, the idea of layers and active channels must be clear. As an analogy to
the idea you can see it as a pile of lighting desks. The each light channel output, of each desk, can be turned On or Off by
software, and all desk outputs come together in a special box called mixer. Suppose you use desk 1 for intensities, you must
turn on the channel outputs of the appropriate Intensity channels (activate channels). Now if you use desk tow for color
channels, you can imagine that when a mixer grabs all channels together, you have intensities and colors under control, but
in separate desks! This mean if I start a color chase on desk 2, nothing happens with the Intensities. Add more desks
(layers), and you can have independent control on moves, gobos, effects, etc.
So far each desk used different channels, but what happens if you have two desks for e.g. intensities, so we use the same
channels. This is a conflict, as you can’t tie two outputs together! But here comes the LanBox smart mixer, which default
setting is that in conflict case, the channels of the highest of the pile of desk will be used. So if layer A and B are both using
the same activated channels, layer A wins. It also means that once one or more channels of layer A are de-activated, the
same channels from layer A pops-up from the mixer. So whatever you do, the top most player has the highest priority, any
lower players have a lower priority in that order.
This is still part of the story, as the mixer can do more. If you e.g. put it in HTP mode, it will pass the highest value of the
conflicting channels, so you can easily create a flash, while the normal chase keeps running. There is also LTP (blackout),
Transparent (fade from one layer to another), and more. The concept of layers gives near unlimited possibilities, but if it is
too much for you, just use 1 layer.
How do we activate and de-activate channels?
Well, we already said that inactive channels have grey values, while activated channels have black
values (see pictures right). As most of the times in LCedit+, there are many ways to activate
channels, here are some:
• Set the value by key, wheel, up/down keys, presets, etc.
• Press return to activate the selected channel(s).
• Press v, return to activate all intensities of this group.
• Press v, option (alt)) + return key to activate -all- channels of this group.
• In order to de-activate one or more channels:
• Press backspace on selected channel, to de-activate the channel.
• Press v, backspace to de-activate all intensities of this group.
• Press v, option (alt) + backspace to de-activate -all- channels of this group.
Note: The green square indicators have nothing to do with active, but indicate if a channel is
"connected" to the mixer.
Copyright 1995..2010 CDS advanced technology bv. LanBox is a registered trademark of CDS advanced technology bv. All other names referenced are the service marks,
trademarks or registered trademarks of their respective companies. Comments, suggestions, questions and info: www.lanbox.com Version 3.5, March 2010
Page 10
LCedit+ and LanBox user manual
More about layers
If above is still not enough for you, the LanBox offers even more advanced operations on the layers, like mixing two layers
with Highest Takes Precedence algorithm (HTP), or blend it with a certain amount of lower layers (transparency), etc. It
must be clear that once you fully understand the working of this idea, you can create very complex lighting by hand, but
you still miss a way to automate your show. Luckily we even did for see that ;-)
In the LanBox you can create not only cues/chases with lighting information (we call them scenes), but you can also create
cues (or part of it, called cue step) with just control information. This makes it possible to create e.g. a cue (or complete
show) which starts a certain cue/chase in a certain layer, or output a MIDI command to start a digital audio recorder with a
certain track, or reacts on an external connected switch, etc. It's clear, with the LanBox you can also automate complete
shows, and it can do it completely stand-alone as everything is built-in!
A LanBox can handle 31 layers (8 in an LC) on which a cue can be loaded, sequenced, chased or edited. The layers work as
described above, but have several more mixing modes besides simple copy from the predefined scenes. Layers of the
LanBox-LCX, LCE and LCM can even be reordered, dynamically created, custom labeled and deleted. In LCedit the
channels of a layer (the desks) are off (inactive) if their values are gray, while black values are activated channels set to a
value. So if you ever get confused about our layer and active channels concept, just read the “what are layers” story again
and you will understand.
The operation of the LanBox firmware
The firmware has a fast file system to store and retrieve all kind of data in a very
efficient way. An engine (also called Layer) gets data delivered to it's light channel(s) as
a result of a request from the sequencer to the file system or it's delivered by network,
MIDI or USB commands. As a result of this, the status of a channel which has data will
be "active" and (when "Auto Output" is on), the channel output is also switched on. As
the result of new data, faders are started for each enabled channel.
Light channels
The "active" status of a channel marks that it is used and should be stored when
inserting/appending/replacing a scene. The active status is cleared for all channels when
the sequencer requests a new scene or by hand with the "clear layer" command. When
the output status of a channel is on, the data from the faders are fed into the mixer. The
mixer works like layers in Photoshop and can be set for each layer (engine) to Copy,
HTP, LTP and transparent mode. The order of the layers is from the top layer (has the
highest priority), to the lowest layer and can be reordered at any time. Layers can have an ID (like A) so that they can easily
be referenced.
Note: Each layer has a master output switch, to override the channel output switches. If you turn off the auto output and the
master output you can view or edit scenes while the data is not going to the mixer (blind editing).
Post processing
After the mixer the data of each light channel is mapped to a DMX channel (patcher), multiplied by the channel gain
(channel masters), translated using a curve and limited in change rate (slope limiting). The resulting data is placed in the
DMX output buffer and sent to the DMX cable 20 times per second.
The sequencers
Each layer has it's own sequencer to automate loading of scenes or do special actions. A so called step (there are maximal
99 steps per cue list) contain instructions for the sequencer and can hold scene data when it is a scene instruction. The
LanBox has many possible actions, but most of the time they will be just scenes. Each scene load activates faders with the
fade time of the step instruction and is independent of the hold time of the step. This makes it possible to start at a certain
time with completely different fade times for different channels or have different fade-in and -out times for a cross fade.
Once a sequencer is enabled (Run) and it has been "Go"ed, it keeps sequencing until the end of a cue list. When the Chaser
is set it can keep on going depending of the chaser mode.
Copyright 1995..2010 CDS advanced technology bv. LanBox is a registered trademark of CDS advanced technology bv. All other names referenced are the service marks,
trademarks or registered trademarks of their respective companies. Comments, suggestions, questions and info: www.lanbox.com Version 3.5, March 2010
Page 11
LCedit+ and LanBox user manual
Cues & Chases
Create cues
The first cue we are going to make is one
which has several steps, which can also
be used as a chase. For theatre
applications this is unusual, but initially
the steps are theatre cues ;-) Do the
following:
• Select the GL1 group.
• Select the top layer.
• Do menu "Layer->Edit mode", the red
dot button is now pressed.
• Set -all- your channels to the required
values for step 1.
As you can see, a row with red dot has
appeared in the cuelist editor, and a red
line is now on top of the control window.
The red line and dot means that we have
new or changed data, which is not saved
yet! Note: Your lights are still live.
If you look at step 1 of the cuelist editor,
you see "show scene for ever, crossfading for 5.1s", followed by 8 columns
of numbers. Congratulations, you have made your first cue, but what is it doing? Well, if you "Go" to this cue (it has no
number yet, until we store), it will cross-fade in 5.1 sec. from previous channel setting to the values which are in the
columns, but only for the activated channels (which have values). As it is instructed to "hold forever", we call this a cue
(see explanation of naming later). Remember: A cue compromises of one or more cue-steps in a cuelist, and ends with
a "hold for ever" or the last step of a cuelist.
Now set channel 1-8 to 80, 60, 40, 20, 20, 40, 60, and 80%, so you get the same values (now in decimal) as in the pictures
below. By hitting the space bar (means Next Step), and then option (alt) enter, you made step 2 with the same values as step
1. We do now have two cues, and I am sure you can make more of them this way. However I want to show you some of the
capabilities of the cuelist editor, so we are going to make step 2, 3 and 4 which have shifted patterns of 1.
Select the values of channels 1-8 of step 2, and do the menu command "Copy". Next select -only- channel 2 of step 2, and
do menu "Paste". The result should be as in the pictures above. Before we are going to repeat this, clear channel 1 of step 2
and paste again into channel 3 of step 3, and again into channel 4 of step 4. We do have now a shifted pattern, but we want
to wrap it after channel 8 back into ch 1. So we select (with cmd/ctrl clicks) the "overflows", do menu "Cut", and paste it
into ch 1 of step 2, so you get the result as show below in the pictures.
Before "Cut" After "Paste"
Copyright 1995..2010 CDS advanced technology bv. LanBox is a registered trademark of CDS advanced technology bv. All other names referenced are the service marks,
trademarks or registered trademarks of their respective companies. Comments, suggestions, questions and info: www.lanbox.com Version 3.5, March 2010
Page 12
LCedit+ and LanBox user manual
It's time to save our cues, so type 10 into the Cuelist field, click on
Store. For LanBox-LCM, LCE or LCX also do the menu command
"Save LanBox Data", so our data is safe for power failures. We
have now created cuelist 10, which contains cue 10.1 through 10.4.
If all went well your result is the same as in the picture left.
That was hard working, but you just made a shifting pattern for
four cues (yes, it still are Cues!), without the pattern generator.
Normally you won't make cues this way, but it's very handy to
know how to manipulate your data.
Using the path and pattern tool
Using the path and pattern tool makes is much easier to create above
pattern. Just select the table data of channel 1-8 of step 1, and do copy.
Now click on the Path button, and Pattern tab (see picture above).
The tool generates instantly 8 steps with your data rotated right by one for
every step, and you can even preview the result. In order to get this data
into your cuelist, click on "Copy and close" and paste it into the original
selected cells. Your cue list now contains 8 steps with the created data
pattern, see the picture right.
Before we are going to run the just made cues, we need to learn a bit more of the cuelists editor. You can e.g. move the
current cues to other steps by dragging a cue to a new location. If you drag e.g. the 4 cues to step 5, 10, 15, and 20, you will
see that the in-between steps are marked with "--". This is what theatre people often wants, as they now can safely add a
"forgotten" cue, without fearing that cue numbers change. Cuesteps may be copied and pasted any way you want, and they
can even be copy and pasted as plain text, so you can exchange your cuesteps with others via e.g. email. Just as an exercise
select all steps, do copy, and paste them in your favorite text editor or email program.
Note: The cuelist editor normally shows all light channels (used and unused), but it can show only the used channels by
clicking on the || button (top right of the window). Note: The header of the cuelist editor shows the numbers of used light channels from 1 to the highest placed fixture
channel. If you select a fixture(s) on the stage, the corresponding light channel(s) are blue highlighted, while the selected
DMX field(s) on the control window will be red colored channel numbers in the header. This way you can quickly find
what channels a fixture uses, and what channel(s) you are modifying when changing DMX values in the control panels.
Copyright 1995..2010 CDS advanced technology bv. LanBox is a registered trademark of CDS advanced technology bv. All other names referenced are the service marks,
trademarks or registered trademarks of their respective companies. Comments, suggestions, questions and info: www.lanbox.com Version 3.5, March 2010
Page 13
LCedit+ and LanBox user manual
Using the pattern generator with RGB fixtures
From LCedit+ v3.3 the pattern generator can also be used for RGB
fixtures, even if they are placed as a matrix. In order to get matrix
views correct, it's important that RGB fixtures within a matrix have
sequential light channel numbers from left to right, and top to
bottom.
In the example right there are 32 channels in use, and are assigned
as 8 columns and 4 rows. Each cuelist step of 32 channels is now
shown as an 8x4 matrix, see picture right .
Keep in mind that for some effects like bounce, it is needed to have
a black pixels with a few colored pixels, in order to have
understandable effects.
The X and Y values determines the direction (negative values
means move left, up), and the amount of moves per step.
Copyright 1995..2010 CDS advanced technology bv. LanBox is a registered trademark of CDS advanced technology bv. All other names referenced are the service marks,
trademarks or registered trademarks of their respective companies. Comments, suggestions, questions and info: www.lanbox.com Version 3.5, March 2010
Page 14
LCedit+ and LanBox user manual
Running cues
Once you have stored your cuelist, you
can test each step (cue in this case) just
by clicking on the row. By using the
arrow up and down keys (or the next and
previous step buttons in the control
window), you can go to next and previous
steps. Although it looks the same as in
edit mode, but running by using the
sequencer (edit mode is off) is different
as soon as your steps have programmed
hold times or other actions.
So for final test of your cues turn off the
edit button. Now type
"g10<enter>" (without quotes), and your
lights cross fades to cue 10.1. in 5.1 sec.
Cue 10.1 will hold for ever, until e.g. you
hit the space bar, the lights will cross fade
in 5.1 sec to cue 10.2. As you can see
your cue where edited and now running
in the same layer (the top one), but you
could also start your cue in any other
layer. Try e.g. "g10b", and your cue is
started in layer B.
Do I need layers, when and how?
Up to now, you only used one layer, and that is fine for simple lighting work. You can use one layer to edit and run your
cues, but what if you want to edit a cue, while your cues are running? The solution is simple; Run your cues in the top
layer, and edit them in a lower layer. If both layers are using the same channels, your edits are not live (they are hidden by
the top layer), but you can still see what you are doing on the screen. As soon as you need to run independently cues which
are made for different groups, or you have show control cues, it's obvious you need to run them in separate layers. You can
create, delete, and even re-order layers (not on LC), while any layer can be used to edit or run cues (so cues are not bound
to any layer!).
If you want to stop a running cue, click on stop or type g.0<enter> (g dot zero enter), it goes to the "home" of the current
cuelist (step 0), and disconnects all channels from the mixer, so lower layers become live. If you want to reset a layer
completely to default, type g0<enter> (g zero enter), and all layer setting are back to default. If you only want to disconnect
used channels from the mixer, use the "clear" button or menu command.
Note: There are many more options for layers, but they are hidden by the "advanced" triangle. Once you open this box of
pandora, near anything is possible, but it can be very complex. In the LanBox-Talk archive you can find e.g. some examples
of scaling and shifting shapes for moving heads.
Make a multistep cue; a chase
It's time you are going to change your four cues in cuelist 10 into a
chase (or a multistep cue). As the actions of all four steps are
currently the same "show scene for ever, crossfading for 5.1s", we
can change the action for all together. First select all steps, as the
picture shows.
Copyright 1995..2010 CDS advanced technology bv. LanBox is a registered trademark of CDS advanced technology bv. All other names referenced are the service marks,
trademarks or registered trademarks of their respective companies. Comments, suggestions, questions and info: www.lanbox.com Version 3.5, March 2010
Page 15
LCedit+ and LanBox user manual
Double click on the selection, or do the menu command "Edit Item", and
you get a dialog window as shown in the picture left. Change the "Hold
step for" into 1.0 s with the popup. Change "crossfading for" to 0.9s with
the right lower popup. You are now changing the action of the steps from
"hold for ever, crossfading for 5.1s" into " hold for 1s, crossfading for
0.9s"
As we told before it means that these steps will not be a cue anymore, but
will automatically go to next step after 1 sec (this is sometimes called
linked cues). At the same time it will crossfade to the scene data in 0.9s.
Note: The hold time and fade time are independently from each other.
As you can see, many other actions are possible, but we will come to that
in the show chapter. Now click on OK.
Your cuelist is now converted into one cue 10, which has 4 steps of 1 sec
each. If you store this you can run it just as any other cue, but we want to
turn it into something which keeps running (a simple chase).
Click with the command (ctrl) key pressed in the action field of
step 5, type "go .1" (see picture). Click on the 5 of step 5, and a red
dot also appears before the 5. You have just add a step by typing
(instead of using the dialog) an action. The "go .1" turns this cue
into an endless loop, so it starts again step 1 after step 4.
You can save this cue just by clicking the store button, but you can
also save it as another cue, by changing the cue number field into e.g. 20, and then click store. If you do so, you have in
total 5 cues, namely 10.1 through 10.4, and 20 (actually 20.1), which can run in any layer.
Notes for theater application with a LanBox
As it is common in theater to use fixed cue numbers we have added a feature in the LCX, LCE and LCM to make fixed cue
steps with light (cues). If you store your cues only at odd steps xx.1, xx.3, etc. it will leave space for inserting one cue
afterwards without renumbering. If you want to delete a cue use replace with blank comment as action. Be aware that split
fades (not on LC+) "eats" two steps, so using steps 5,10,15, etc. is more convenient. Here is an example of a split fade, with
a 10s fade in, while the fade-out of 15s starts at 7.5s from the beginning (at 75% of the fade-in):
show d01 for 7.5s, split fading in for 10s
show previous for ever, split fading out for 15s
:d01
1[026] 2[026] 3[230] 4[230] 5[026] 6[026]
If you turn on the manual fader (click on advanced triangle in control window) to e.g. crossfade 1sec, the "Go to the current
cue" (reload, or reset), and "Go previous cue" behave different. Instead of using the cue fade time, it uses the manual fade
time. This enables you to reload or go back to previous cue much faster, so that accidental Go next or intensity changes can
be corrected fast but softly.
Cuesteps, scenes, cuelists... what is in the name?
To start with the smallest entity, a cuestep holds the action information for a layer. A cuestep can have been linked with
lighting data, it is called a scene. Cuesteps must be stored in an organized way, so they are stored into lists of cuesteps
called cuelists. A cuelist may contain up to 99 cuesteps, while there can be up to 999 cuelists (500 in the LC) in a LanBox.
A cue (only in LCX, LCE & LCM) compromises of one or more cuesteps in a cuelist, which ends with a "hold for ever" or
the last step of a cuelist (step 0 of next cuelist). So a cue can be one cuestep, but also a cuelist with 99 steps.
LCedit has special commands to "Go" to next and previous Cue. This is mostly used in theatre applications. A chase is a
cue which is made of one cuelist, but can have multiple non "hold for ever" cuesteps. A chase is special in that way, that the
layers sequencer can do special sequencing, like bounce, backward, and random stepping.
OK, we have now learned how to make cues and chases, but it's still a small part of the story. In order to prevent a huge
manual, we skipped several things, so the best way is practicing. Copyright 1995..2010 CDS advanced technology bv. LanBox is a registered trademark of CDS advanced technology bv. All other names referenced are the service marks,
trademarks or registered trademarks of their respective companies. Comments, suggestions, questions and info: www.lanbox.com Version 3.5, March 2010
Page 16
LCedit+ and LanBox user manual
Live and automated shows
Live shows
Some people think that live shows can only be done from conventional desks, well let's see. A lighting desk is just a special
computer, with special DMX hardware, and with many knobs. You use special DMX hardware (a LanBox), and a standard
computer with screen and keys. The only difference is the human interface, the way of working, and cost.
Let's say you have to do the lighting of a party with a mix of performances (a band, a speaker, a DJ). First, prepare your
show! In this case you need many cues and chases, which can be called instant by a Go. Setup enough layers so you can
easy switch between e.g. a flash, a blackout, a static background, a wild chase, etc. Besides the bare lighting cues, it's very
handy to create some shortcut control cues, like cue 3 below. It's starts a bouncing flash chase (cue 500) in layer A, and
after 3 seconds, it starts a normal lighting loop (cue 100) -and- a background cue (501.4) in layers B and C:
// Cuelist 3 (8 steps), stored 02-10-2003 11:39
-- Flash3s
set layer A to chase bounce loop at 100%
go 500.1 in layer A
hold for 3.0s
-- gonormal
reset layer A
go 100.1 in layer B
go 501.4 in layer C
Each time you do the command g3zz<enter>, the flash will run for 3
seconds, and ends with 100.1 in B, and 501.4 in C, while A is cleared after
the flash. We silently introduced something new; dynamic layer. The zz at
the end of command g3 means create a new unlocked layer to run cue 3.
As you can see in the picture cue 3 is running in a new top layer which has
no identifier (no [..]), and is not locked. This type of layer will be there
until the end of the cuelist 3, and will then be automatically deleted. So, it's
perfect for jobs like a flash. ;-) Note: You can (must for the classic
LanBox) also run a control cue in any static layer.
As cue 500 is used as a bouncing chase, we show you below that even a
simple chase can be turned into a flashy wave. Note: you can copy and paste the examples into the cuelist editor and store
it.
// Cuelist 500 (4 steps), stored 02-10-2003 11:15
show d01 for 0.10s
show d02 for 0.10s
show d03 for 0.10s
show d04 for 0.10s
:d01
1[255] 2[255] 3[127] 4[003] 5[003] 6[127]
7[255] 8[255]
:d02
1[255] 2[255] 3[255] 4[255] 5[127] 6[003]
7[003] 8[127]
:d03
1[003] 2[127] 3[255] 4[255] 5[255] 6[255]
7[127] 8[003]
:d04
1[127] 2[003] 3[003] 4[127] 5[255] 6[255]
7[255] 8[255]
You can image that when you have a nice collection of control cues, it's much easier to insert a flash, a wild chase, etc. at
any time you need them. The g3zz command can be typed very quickly, but in the Keys chapter you will learn how to make
it even shorter; just one keystroke is needed then!
Copyright 1995..2010 CDS advanced technology bv. LanBox is a registered trademark of CDS advanced technology bv. All other names referenced are the service marks,
trademarks or registered trademarks of their respective companies. Comments, suggestions, questions and info: www.lanbox.com Version 3.5, March 2010
Page 17
LCedit+ and LanBox user manual
Layer identifiers and layer locking
As shown in the flash example it's possible to create a new layer, even without identifier with the zz identifier. Layers are
normally identified by a one or two letter combination. Allowed is from [A]-[Z] and [AA]-[BK], no identifier is also fine,
but then it's impossible to refer to that layer.
Normally a layer is locked, which means that even when a cuelist is ended, the layer will be kept (it's static). When a layer
is not locked, it will be automatically deleted as soon as the running cuelist has ended, this happens in our flash example.
This is called a dynamic layer, and is a feature of a LanBox (not LC+).
Automated shows
Opposite from live shows, are shows which are running for ever after power up. These type of shows are often used in
presentations, and they also often use multiple media, like lights, sound, video, etc. Normally you need a show controller
for this, but a LanBox-LCX (or even a LCM) can also be used as show controller to certain extends. We learned already
how to make control cues, well a show control is just one step further, but we need to learn a few more action commands.
We further assume that the audio or video equipment can be controlled using MIDI (on the LCX you also have digital
outputs which can be used to control external equipment).
In order to run a multimedia show from power up, we need to make at least one special cue. First this cue should contain
startup steps, which startups lamps (maybe protect from hot restarts), and initializes the external equipment when needed.
To control an audio recorder we added two MMC (Midi Machine Commands) with the "write" action. The rest of the show
control cue is just as the Flash control cue, but it is endless, and it must run in a static layer (dynamic layers do not survive
a power down). Here is the same cue 3, but now made for auto run and save as cue 1:
// Cuelist 1 (21 steps), stored 02-10-2003 12:11
hold for 10s
-- lamps on
go 99.1 in layer A
hold for 20s
-001:
-- Flash3s
set layer A to chase bounce loop at 100%
go 500.1 in layer A
hold for 3.0s
-- gonormal
reset layer A
go 100.1 in layer B
go 501.4 in layer C
-- MMCplay
write F0 7F 7F to MIDI
write 06 02 F7 to MIDI
hold for 1.0m
-- MMCrew
write F0 7F 7F to MIDI
write 06 05 F7 to MIDI
go 001
If you start this cue e.g. in layer d (g1d<enter>), and immediately do a "Save LanBox Data" after this command, your
show will always start with this cue, and keeps running for ever. Note: In the classic LanBox this cue -must- be stored as
cue 1, and "write to midi" is not supported.
Copyright 1995..2010 CDS advanced technology bv. LanBox is a registered trademark of CDS advanced technology bv. All other names referenced are the service marks,
trademarks or registered trademarks of their respective companies. Comments, suggestions, questions and info: www.lanbox.com Version 3.5, March 2010
Page 18
LCedit+ and LanBox user manual
Using internal clocks
Besides the receiving MIDI Clock support, the LanBox has two real-time clocks built-in:
1. Time (day number, and time of the day in HH, MM, SS, FF)
2. Received MTC ("day number", HH, MM, SS, FF)
Both clocks have an extra indication field for frames/sec value, it's fixed 30 f/s for time, while MTC supports 24, 25, 30,
30DF. Both clocks can be made visible on assignable blocks of 6 light channels (global settings, DMX tab), and can also be
set via the same light channels (locked MTC overrides this of course). In order to check or set the clocks we also added a
Clock fixture in the generic library. Normally we use channel 501-512 for clocks.
The internal clock is started at power up at time 0:00:00:00:00, but will be set to the last "saved LanBox data" when using
the light channels. If NTP is working, the time will be correctly just after startup.
NTP time synchronization
The LanBox-LCX and LCE can also use a NTP server to sync the internal clock with a server, using the standard NTP
protocol. Near any Linux or OSX computer has NTP server support, on Windows XP this service is standard not available.
The LanBox needs to know the IP of the NTP server, so it can be set using LCedit's global settings. Besides the NTP server
IP, you also need to set your local time zone, using hhmm format. For NL it is +0200 in summertime, else +0100.
Note: Please use a local NTP server, as our NTP implementation does not compensate for a large latency, but more
important is that an every 10 minute query can be seen as an abuse of a public NTP server!
Clock tuning
If you can't use NTP, you can still tune the internal clock to maximal accuracy with another new global setting "Clock
tuning". It can be found on the DMX tab, near the clock DMX channel settings. The formula is expected seconds / actual
seconds (add or subtract 0.000011574 to 1.0 for a 1 sec per day correction). It's about 0.99963220 for a LanBox-LCM,
0.99970608 for a LCE, and 0.99998259 for a LCX. Note that NTP automatically calculates this tuning value.
Example1:
Hold until locked MTC x:00:00:10:15
go 90.1 in layer A
go .1
Means: It waits until any time there is a transition to after 0 hour, 0 minutes, 10 sec, at frame 15 (so it runs a single chase/
cue 90, every time at x:00:00:10:15 if the MTC source loops). The x means don't care for day number, and locked means
the MTC time must be in locked situation.
Example 2:
Hold until time after 1:18:00:00:00
Hold until time before x:23:00:00:00
go 90.1 in layer A
Hold for 10m
go .1
Means: Wait until the time is after Tuesday 18:00 (so Tuesday through Sunday), but before 23:00, then run a single chase/
cue 90, every 10 minutes.
Many other combinations are possible, especially when using the xx anytime. Keep in mind that transitions can not be done
on 0 times (there is nothing lower then 0), and that after (or before) can be a very long time. If e.g. you only used the first
hold, it keeps running from 18:00 through 00:00 from Tuesday (day 1), through Sunday (day 6); it only holds on Monday
(day 0) from 00:00 through 18:00.
Copyright 1995..2010 CDS advanced technology bv. LanBox is a registered trademark of CDS advanced technology bv. All other names referenced are the service marks,
trademarks or registered trademarks of their respective companies. Comments, suggestions, questions and info: www.lanbox.com Version 3.5, March 2010
Page 19
LCedit+ and LanBox user manual
Interactive shows, using external triggers
An automated show as we described before is often very useful, but what if you also want some form of interaction to
change the show? As an example we create a show control cue which is capable to run two different shows depending on
which push button has been pressed.
Note: The button could also have been e.g. pressure sensors, connected to the analog inputs of a LanBox-LCX. If you want
to use a button or switch, you must connect a resistor of 4700 Ohm between the analog input and the +. The button is
connected to the input and the 0V.
Normally interactive shows also runs from power up, so we use our previous cue 1, and modify it with interaction. From
the original cue 1 we remove the startup actions, and store it as cue 5 and a copy into 6. Cue 5 and 6 are now our shows to
choose from with a push button. We need to modify the original cue 1 in this way:
// Cuelist 1 (11 steps),
hold for 10s
-- lamps on
go 99.1 in layer A
hold for 20s
-- testsw
001:
hold for 0.50s //
go 002 if input 1 within
go 5.1 in layer D //
002:
go 003 if input 2 within
go 6.1 in layer D //
003:
go 001
stored 02-10-2003 13:54
the sample time
512-max
start cue 5 if button 1 is pressed, else test next input
512-max
start cue 6 if button 2 is pressed, else test next input
Now run this new cue 1 in e.g. layer E. After the initial startup, this show control cue continuously test the two buttons, and
start show control cue 5 or 6 depending on the button pressed.
This was just a simple example of switch testing, but many other solutions are possible. It's e.g. also possible to use certain
light channels instead of inputs, or use several different cues depending on how near you come to a IR sensor. As told
before the LanBox-Talk list is the way to gather and exchange more information.
Since firmware v2.11 it’s possible to Go to a cuelist depending on the value of a channel. You can use it on analog channels,
as they are channel 3061-3068, but you can also use the clock source (channel 504 is seconds):
// Cuelist 10 (5 steps), loaded 07-03-2010 20:57
-- Triggers
001:
hold for 0.05s
-- T504C100
Tr 0 GoCue 100-163 OnCh 504 in layer A
go 001
Above very small control cue does a Go to cuelist 100-163 in layer A, depending on the actual value of channel 504 divided
by 4, plus the base cuelist. So if ch 504 has a level of 24, cuelist 106 is started in layer A, but if ch 504 is 0, cuelist 100 is
started.
If you use channel 3061 instead of 504, a cuelist is started depending on the value of analog input 1. So if you feed the
analog input with music, you can create a huge smart VU meter! Or you can use a big slider / knob (potentiometer of 4700
Ohm) to select from up to 64 cuelists.
As a light channel can also come from other external sources (via DMX input, UDP, Art-Net, MIDI, etc) it’s now possible
to start cues/chases from any source at any place. There are 64 trigger IDs, so you can go completely wild.
Copyright 1995..2010 CDS advanced technology bv. LanBox is a registered trademark of CDS advanced technology bv. All other names referenced are the service marks,
trademarks or registered trademarks of their respective companies. Comments, suggestions, questions and info: www.lanbox.com Version 3.5, March 2010
Page 20
LCedit+ and LanBox user manual
Create and edit fixture definitions
The fixture library
LCedit+ comes with a library of most common fixture
definitions, but if your fixture is not in the library you can
create a new fixture definition file for it. Be aware that
some fixtures can be very complex, and a good
understanding of the working of LCedit+ is a must. Fixture
definitions in LCedit+ have no limit on the used number of
channels, but screen size will limit the number of controls.
As an example the picture right shows (partly) the
definition (design) of a Martin MAC 2000, which has 21
controls, and uses 24 channels! Creating this fixture is
basically not so much work, but when you want to have
nice icons, buttons, indicators, and a basic set of presets,
it's a lot of work.
A fixture is built from "panels" (a row in the design list). A
panel can have a control, a label, and three optional
parameters like used channel offset, display mode
(decimal, % or hex), and separator option. The panel order
determines the order of the visible controls, not e.g. the
channel number order.
Note: The top panel -must- be a big intensity wheel named
"Intensity", even if your fixture has no intensity (set chs to
blank)! To optimize further correct merging in mixed
groups, it's wise to have, as much as possible, the same
panel order in each fixture.
Create a new fixture definition file
When you open the library editor, you get a list of existing definitions (see
picture), but if your fixture is not in the list, let's create it. In order to speedup
creation, you need to have the "DMX table" of your fixture. The manual of the
fixture is also often needed in order to understand the working of the fixture, and to
see what iconstrips you need to make. It also helps if you already have an idea
whether some functions should have a big wheel, a small wheel, or buttons, etc.
Copyright 1995..2010 CDS advanced technology bv. LanBox is a registered trademark of CDS advanced technology bv. All other names referenced are the service marks,
trademarks or registered trademarks of their respective companies. Comments, suggestions, questions and info: www.lanbox.com Version 3.5, March 2010
Page 21
LCedit+ and LanBox user manual
If the fixture we need to create is near an existing one, you could duplicate
it (use menu Duplicate Item), and change it into your fixture. As we want
to learn how to create one from scratch we do the menu command "New
Fixture" (the library editor should be front window).
The first thing you need to do is select "Large Wheel" from the popup
menu below the empty list. This creates a new panel (our first one), and
you can set the other parameters. Change the name, short name, and label,
and set this panel to percentage and "add separator". If this fixture really
has an intensity function, fill in the channel offset number, otherwise leave
"Chs" blank. It should like the picture right.
Note: For channel numbers we use offset, so the first channel of the DMX
table is zero, not one.
Now click below the
selected row of the panel list, so it becomes de-selected. You can now add
another panel by selecting a control again (the popup below the list).
Choose this time the 16 bit trackball. Add in this way panels, so it's the
same as the picture left. Note: The shutter panel has "add separator" not
selected (no "--" in list).
Click on the OK button, and save your file into the library/various/ directory as "mark1.lcf". As
LCedit+ needs to know that the library has been changed, do File menu "Extra->Reload
Library". Close the info window and you can now place your fixture on the stage. If all went
well, it will look like the picture right. While it is not a complete fixture definition (missing
presets, icons and buttons), it can already be used!
You need to do some graphic work in order to provide nice icons at the color wheel and the
shutter buttons. The mark1 fixture has a complicated shutter control, so here is the strip with all
needed small (12x12 pixels) icons.
This strip is
300x12 pixels, so it contains 25 icons.
Copyright 1995..2010 CDS advanced technology bv. LanBox is a registered trademark of CDS advanced technology bv. All other names referenced are the service marks,
trademarks or registered trademarks of their respective companies. Comments, suggestions, questions and info: www.lanbox.com Version 3.5, March 2010
Page 22
LCedit+ and LanBox user manual
Now open the mark1 again in the library editor, select the shutter row, and click on
the Iconstrip button. You will get an empty Edit Icon Strip window. Now how do
you get the icons in it? This is depending on OS and whether QuickTime is
installed, but on Windows, dropping a bmp file on this window will always work.
On Macintosh systems, you can drop near any file type on it, but you can also
paste it from e.g. Photoshop.
Next step is assigning the icons to certain DMX value ranges, so you get the right
icon for each DMX value. Icon 1 e.g. will show up when the DMX value is from
0-19, 20-49 shows icon 2, and so on. For each icon fill in the "to" value as shown
in the picture left.
The last step is assigning one or more icons to a button. Each button is numbered
from 1 up, while 0, means no button. Look at the picture for icons 3-5, which are
all three assigned to button 3. The effect of this is, that when the DMX value is
somewhere between 50-72, you get a three step speed indicator in button 3. So it
gives you a rough indication of speed within this function. Note: It's allowed to
have up to 250 buttons maximal!
Note: The small wheel of the button panel is always limited to the range of a
button, so you don't have to worry that you turn into another function (e.g. lamp
off) by accident, while you where speeding up the blackout strobe speed.
Click OK, and in the Fixture definition window again on OK, in order to save our changes. You will notice that your fixture
already has buttons now, but we also going to add icons for the color wheel.
The library files
Fixture definition files are located inside a made directory (like Martin), while these directories are located inside the library
directory. The library directory -must- be in the same directory as LCedit+, otherwise the files can not be found. Each
fixture definition file has an unique ID and fixture name inside the file, so the filename can be anything.
Note: New and duplicate fixture definition files can -only- be made by the library editor, as it generates a new unique ID.
Never change the name or duplicate the files directly, as the inside ID will not be correctly anymore, and can lead to loss of
fixture definitions.
A little bit more graphic work to go, to get nice icons at the color wheel. The mark1 fixture has a partly continuous color
wheel, so here is the strip with all the (16x16 pixels) icons.
This strip is 272x16
pixels, so it contains 17 icons. Now open the mark1 again in the library editor, select the color row, and click on the Iconstrip button. Do the same
procedure to get the icons in, as you did for the shutter.
Note: The gif and bmp versions of the iconstrips can be found in the images directory of this manual.
Copyright 1995..2010 CDS advanced technology bv. LanBox is a registered trademark of CDS advanced technology bv. All other names referenced are the service marks,
trademarks or registered trademarks of their respective companies. Comments, suggestions, questions and info: www.lanbox.com Version 3.5, March 2010
Page 23
LCedit+ and LanBox user manual
The continuous option makes it possible that your icons scrolling (instead of jumping) in
the same way as your color wheel in the fixture does. It scrolls e.g. from white (value is 0)
to "cc" (value is 26) softly for each in between value. The same colors jumps "hard" at the
values between 200 and 207, while from 208 to 255 the color rotation is linear, indicated
with three icons. If you open several pre-made fixtures (do not change them), you will see
several other examples of how we use all these icon options.
This is how your finished fixture now looks.
The fixture is now near finished, so you can play with it and check if all functions are
working correctly. The last step is adding some standard presets.
Create presets for your fixture
The fixtures we supply all contain at least a basic set of presets, so
your made fixture should have them too. We have the following
standard presets:
Shutter: "Intensity Off", "Intensity Full"
Beam: "Home"
Other: "Fixt Default"
Note: The name of a preset is very important, as only identical
names are merged together for groups!
First let's make the "Fixt Default". In the fixture definition window
of your Mark1, click on the Presets tab. In the preset groups list
(top left list), select "Other", and click in the empty list below it.
Type "Fixt Default" in the field below, and click again in the empty
part of the lower list. Fixt Default is now appeared in the lower list,
select that row.
It's now possible to select a row in the panel list (right list), and set
the panels to your default values as in the picture. Add in this way
also presets for Shutter (only use the intensity channel, leave other
channels blank), and Beam (only pan/tilt channels).
After closing the fixture definition window with OK, and selecting your mark1 on the stage, you must check that in the "po"
popup item 1 is indeed "Fixt default". "Intensity Off" and "Full" should be item 1 and 2 of the "ps" popup, and in "pb" item
1 is "Home".
To give your fixture a finishing touch, you can paste a nice icons (32x32 and 16x16) into the standard fixture icons. This
was all about creating fixture definition files. In the next chapter you will learn to use your keyboard in a very effective way
Copyright 1995..2010 CDS advanced technology bv. LanBox is a registered trademark of CDS advanced technology bv. All other names referenced are the service marks,
trademarks or registered trademarks of their respective companies. Comments, suggestions, questions and info: www.lanbox.com Version 3.5, March 2010
Page 24
LCedit+ and LanBox user manual
Keys, CLI, keystrokes and macros
Key actions overview
LCedit+ has several single key actions. Below you find an overview of the keys and their actions. Once you know these key
commands (together with user defined keystroke commands), you can do extremely fast complex commands. A must for
live shows, but also very handy to create cues very rapidly. Note: The cmd (apple) key is the ctrl key on Windows systems.
•
•
•
•
•
•
•
•
•
•
•
•
•
•
•
•
•
•
•
•
•
•
•
•
•
<alt-tab> cycles over open windows (<ctrl-tab> on Windows systems.
<cmd-alt-up> <cmd-alt-down> selects next or previous fixture or group.
<cmd-shift-alt-up> <cmd-shift-alt-down> same as previous, but adds to selection.
<alt-pgup> or <alt-space> Go next cue (LCX & LCM only)
<alt-pgdn> Go previous cue (LCX & LCM only)
<cmd-up> and <cmd-down> select next and previous layer.
<cmd-shift-up> and <cmd-shift-down> move current layer up and down.
<space> is the Go Next step shortcut (unless in i-cue mode).
<space> applies i-cue mode (<shift-space> cancels)
i toggles icue mode (enable/cancel)
u selects the Go field on the control window.
v select the Intensity field on the control window.
x select the Pan field on the control window.
y select the Tilt field on the control window.
<control> when cursor is above the panels in the control window, shows the used channel number(s).
In the "Go" field of a control window:
• <up> and <down> increments and decrements the cuestep.
• <shift-up> and <shift-down> in- and decrements the cuestep to multiple of 5.
• <enter> Go to entered value in current layer.
• <alt-enter> Go to entered value in a new layer.
In fixture control fields of a control window:
• <up> and <down> increments and decrements the value.
• <shift-up> and <shift-down> increments and decrements the value by 10.
• <enter> in a field applies the data.
• <escape> in a field cancels the data entry.
• <alt-enter> activate all channels of selected fixture(s).
• <alt-backspace> or <alt-del> de-activate all channels of selected fixture(s). CLI command ; is used as command separator within a CLI command.
CLI command g is a "Go" (example: g100.4a1 -- go 100.4 in layer A of interface 1, where a and 1 are optional)
CLI commands k and l to select fixtures and groups (example: k1-10l2 or k2l1-10 -- select fixtures 1-10 and group
2)
CLI command m to run macros (example: m4-6,1 -- run macros 4, 5, 6, 1 (in that order))
CLI command n selects a layer (example: nb -- selects layer B)
CLI command p do presets (example: pc1o1,3 -- color preset 1 and "other" presets 1 & 3)
CLI command r in order repeat last command (the cursor will be at the end of the field, so you can edit the last
command or just press enter to repeat it unchanged)
CLI command s sets channel (example: s1-4,12-15f=20 -- set ch1..4 and 12..15 to 20 in layer F)
Menu shortcut keys
Many menus have key shortcut commands, if you click on a menu, you can see what shortcut is available for what menu
commands.
CLI commands
While the graphical interface of LCedit+ is an advantage to beginners, there are moments you
wished fast, short, key commands to get things done. The CLI interface was made for it, and also
in order to make a single keystroke (see keystroke editor and macros) doing a whole bunch of
actions. As soon as you type a CLI character the CLI interface is activated, until an end of
sequence command is received.
The allowed CLI commands are described in the single key actions overview at the beginning of
this chapter.
Copyright 1995..2010 CDS advanced technology bv. LanBox is a registered trademark of CDS advanced technology bv. All other names referenced are the service marks,
trademarks or registered trademarks of their respective companies. Comments, suggestions, questions and info: www.lanbox.com Version 3.5, March 2010
Page 25
LCedit+ and LanBox user manual
The Command Line Interface is a powerful system to get actions done by typing very short
commands. Look to the right two pictures; the k1-3k5-8 selects fixtures 1-3 and 5-8, while next
command ps2 sets them to 100% intensity.
A sequence must end with enter/return/space/tab, while esc cancels the command. clear clears
command except the first letter. Multiple commands are allowed, but must be separated by a
semicolon. For parameters the dash is allowed for a range, while comma can be used for separate
parameters.
Macros
With CLIs you have a fast way to control LCedit+, but what if you want to have a short
way for sending commands to the LanBox (like setting the chaser, clearing an engine,
etc)? The answer is Macros. A macro is a recorded sequence of lanbox commands, this
means any command which can be send to the LanBox, can be recorded.
Recording a macro is initiated (and ended) by the menu command Tools->Record Macro. A macro may contain up to 20
LanBox commands. When you end the recording, you will be asked a name for the macro. This name popups in the
command macros lists on the control window (see picture). A macro can be started by selecting it from the list, and click on
the Run button. A fast way to run e.g. macro 2 is typing m2 (see CLI commands). Macros can be deleted with the Tools>Delete Macros... menu command. The keystroke editor
With CLIs you have a fast way to control LCedit+, and with the addition of
macros you can actually control anything with CLIs, but...
If you want just a single keystroke in order to simulate some CLIs, you can
use the built-in keystroke editor to assign one key to do CLI commands.
The keystroke editor allows you to assign very unusual key combinations
(like control-alt-shift-F3). Single keystrokes are also a must if you want to
use very handy hardware button, jog, shuttle USB devices, like the Shuttle
Pro of Contour.
Copyright 1995..2010 CDS advanced technology bv. LanBox is a registered trademark of CDS advanced technology bv. All other names referenced are the service marks,
trademarks or registered trademarks of their respective companies. Comments, suggestions, questions and info: www.lanbox.com Version 3.5, March 2010
Page 26
LCedit+ and LanBox user manual
IR remote and Display
Setup your IR remote
For this setup you need a remote IR controller, using one of the following
protocols: Sony (12, 15 or 20 bits), Philips (RC5, RC6), or NEC (many makes,
including Apple remote). The IR Keys can be freely mapped to a LanBox
command. You can control the LCM/LCE with most ordinary IR remote controls,
but as there are so many types, you should test the remote controller if it's working
with the box.
It’s possible to map IR keys to remote functions for 2 different IR remotes at the same time. The IR key map is written as a
cuestep, so it can be exchanged with others. Default IR1 is Apple remote, and IR2 is the Sony RM-V202.
Mapping your IR remote keys to LanBox commands:
1. Press any key but NOT Power or Menu, if the LanBox recognizes your remote it displays either NEC, RC5, RC6, or
SONY. If it does not react, you need to find another type/make of IR remote.
2. Press the Power (or Menu) key 3 times short, one long, 3 times short, one long; you should see IR1 on the display. If not,
try from step 1 again. Note: Short is less then a quarter second pressed, long a full second pressed. Pressing again the power
key within 5 second to toggle between IR map 1 or map 2.
3. Wait until the first key is displayed (Left), and press your "left, back" key.
4. For every command the key name is displayed, and you should press the wanted key. If you do not have (or want) such a
key, press the Power or Menu key to skip this key.
5. After all commands are mapped, you are back in the normal menu, and a cuelist "IR codes" (cuelist 999) is written, but
not flashed. If you want to make it permanent, use the Rec button, or do "Save LanBox Data" in LCedit+.
Note: Default the LanBox-LCM/LCE is configured with four "play" layers called A..D and one edit (load) layer called E.
Each play layer can be used to run/load a chase or cue independently, but if there is an overlap in channels the highest layer
takes precedence. If nothing is running in the play layers (cue = xx.00), you have full manual control via the edit layer E,
see menu 1, 7, 8 and 9.
Using IR control
When we refer below to pressing on a "button", we always refer to buttons on the remote control. The LCM has no buttons
itself. The LCM/LCE display-interface is menu-based. When the LCM/LCE starts up, it'll be in the main menu, which only
has a display state and normally shows "----". If the MIDI-adapter is connected when a LCM is turned on, then the LCM
will enter MIDI-mode and show "====" in the main menu.
You can switch to another menu by pressing the digit corresponding to the menu (see below). The display will briefly show
the name of the menu, and after that the value of that menu. When multiple menus have the same number, you can switch
between the menus by pressing the corresponding digit button again. You can at any time return to the main menu by
pressing the power button. The IR Power or Menu key toggles between Home display (----) and menu 5 (layer/cues), this
makes it possible to use minimal IR remotes (like Apple remote) to do Go, Go next, Go previous.
To edit the value in a menu, press the Play button. The value will now blink to indicate it's in edit mode. You can now use
the Channel Up/Down buttons to alter the value, or use the digit buttons to type a new value. You must always type all
digits, so if you want to set a dmx value to 5% you'll have to press 0, 0, 5.
Copyright 1995..2010 CDS advanced technology bv. LanBox is a registered trademark of CDS advanced technology bv. All other names referenced are the service marks,
trademarks or registered trademarks of their respective companies. Comments, suggestions, questions and info: www.lanbox.com Version 3.5, March 2010
Page 27
LCedit+ and LanBox user manual
When you've set the value you want, you can apply it by pressing the play button again. This may merely store the value, or
it may have some action associated with it. See the description of the menus below. To cancel edit mode without applying,
press the power button to return to the main menu.
To permanently save the current settings of the LCM, go to the main menu and press and hold the record key until "FLSH"
appears on the display. If after 10 seconds the display still remains at "----" (or "====") then your remote control doesn't
send signals the way we expect them. You can try repeatedly pressing the record button instead (it may take up to 10-15
presses quickly after each other).
Some menus assign special meaning to various buttons on your remote control. These are listed in the menu descriptions
below, and do not apply when you are entering a value. When entering a value, you can only use Channel Up/Down, the
digits, play (to apply) and power (to cancel).
IR controller commands
*** Load (1) ***
This menu to loads a previously stored scene. When you go to the menu, it shows the most recently loaded/stored scene (2digit cuelist "." 2-digit cuestep). When you apply a new value, it loads the scene you specified.
As a shortcut, you can use the "Fast forward" and "Rewind" buttons to load the next and previous scene respectively,
equivalent to pressing play, channel up/down, and again play.
*** Store (2) ***
Use this menu to store your lights into a scene. When you go to the menu, it shows the most recently loaded/stored scene.
When you apply a new value, it stores the lights (set using menus 7 through 9) into the scene you specified.
*** Fade Time (3) ***
Set the fade time, which is stored into the scene along with your lights, and used when you run the cuelist where it
determines how long the transition to the new light values should take.
*** Fade number (3) ***
Set the fade type, which determines how the fade mentioned above works:
0 - No fade, 1 - Fade in, 2 - Fade out, 3 - Cross fade
4-7 are constant-rate versions of 0-3.
*** Hold Time (4) ***
You can set the hold time here, which is stored into the scene along with your lights, and used when you run the cuelist
where it determines how long the sequencer will wait until advancing to the next step.
*** Play (5) ***
Control cuelists/chases. It shows the cuelist.cuestep of the currently selected layer. You can choose between the various
layer using the Channel Up/Down buttons. Lights in higher layers take precedence over lower layers when using the same
channels.
If you enter a new value and apply, the selected layer it will go to the cuelist.cuestep you specify. If the layer is on a
nonzero cuestep (of an existing cuelist), the chaser will start running. You can manually make the selected layer go to the
next/previous step (or Cue, see configure) using the fast forward/rew keys. When the chaser hits the end of the cuelist, it
stops at xx.00 and disables all used channels. You can manually stop by pressing stop. You can use the pause button to
pause and resume the chaser.
Note: Whether and when a started cuelist will step automatically to next step is dependent of the programmed hold time of
a step, if it is "for ever", it will stay at that cue until a "Next" or other cue number is entered.
Copyright 1995..2010 CDS advanced technology bv. LanBox is a registered trademark of CDS advanced technology bv. All other names referenced are the service marks,
trademarks or registered trademarks of their respective companies. Comments, suggestions, questions and info: www.lanbox.com Version 3.5, March 2010
Page 28
LCedit+ and LanBox user manual
*** Chase speed (6) ***
Here you can change the speed of the chaser of the currently selected layer (which you can select in menu 5). This only
affects hold times, not fade times.
*** Chase mode (6) ***
Here you can change the mode of the chaser of the currently selected layer (which you can select in menu 5):
0 - No Chase (same as Up, except chase speed is ignored)
1 - Up, 2 - Down, 4 - Random, 6 - Bounce
2 - Up Loop, 3 - Down Loop, 5 - Random Loop, 7 - Bounce Loop
Note that in "loop" modes, the chaser will never finish, until you press the stop button while in menu 5.
*** First channel (7) ***
Here you can set the first channel of the range of light channels you want to view/set. When you change the first channel
and apply, the last channel is set to the same value, therefore creating a range containing only the channel you chose. To
select a range of multiple channels, first the first channel of the range, and then the last channel.
*** Last channel (8) ***
Here you can set the last channel of the range of light channels you want to view/set.
*** Value (9) ***
Here you can view/change the value of the selected range of channel. Initially all channels are disabled. You can enable the
selected channels by setting the value to some value, and disable them by setting them "below 0". If you have multiple
channels selected, it shows the value of the first channel, however when you alter the value, all selected channels will be
affected. When you store a scene, only enabled channels are stored. When building cuelists, make sure all channels
involved in the cuelist are enabled, and all channels not involved in the cuelist are disabled.
*** Shortcuts in menus 7, 8 and 9 ***
You can use the Fast Forward and Rewind buttons to quickly select the next/previous enabled channel, Channel Up/Down
to change the value of the selected channels, and Stop to disable the selected channels.
**** Configure (0) ***
Menu 0 is for configuration. You have to press play, enter a 4-digit configuration code, and press play again to enter a
specific configuration sub menu.
There is currently only two configuration sub menus:
• 0001 toggles between next and previous -step- commands or previous and next -CUE- commands.
• Erase All (9172). To erase all settings and light scenes/chases (permanently: you can't undo by unplugging the LCM), go
to this sub menu and press and hold down the Record button for a while.
Note that we deliberately picked a sub menu number you'll certainly never type accidentally.
Copyright 1995..2010 CDS advanced technology bv. LanBox is a registered trademark of CDS advanced technology bv. All other names referenced are the service marks,
trademarks or registered trademarks of their respective companies. Comments, suggestions, questions and info: www.lanbox.com Version 3.5, March 2010
Page 29
LCedit+ and LanBox user manual
Using MIDI with LanBox
Setup for MIDI
In order to use a LanBox with MIDI, you do need to setup the box, using LCedit+
(Global settings menu, MIDI tab). Here you find the mapping between MIDI channels
and layers, and optional Channel offset, so you can set channels above 127. Note: In
order to prevent unintended MIDI commands, set unused MIDI channels to blank Layer.
For MSC, the MSC IDs can be found in the control window (with advanced triangle),
where each layer can have it’s own MSC ID. Note: The SysEx ID of the box can be
found on the main page of Global Settings, and is default set to 1.
In general a LanBox can be fully controlled as via TCP, but requires SysEx commands.
The most common application is simply trigger cues from MIDI applications, like
CueBase, Performer, etc, where you can add MIDI tracks to sound tracks, for lighting
synchronization. To trigger cues (do a Go), at minimum you must be able to send MIDI
Bank Select and Program Change messages. This limits you to Go xxx, and Go Next/
Prev step or Cue, but is for music synchronization enough. If you want to be able to have more commands, you must be
able to send MIDI controller messages. BTW All possible commands can be found in the LC+ Reference v2.0a1.pdf (the
EngineGo command is at page 30).
Direct control of light channels is possible via MIDI Notes in a very simple way; A NoteOn of pitch 60, velocity 80, sets
light channel 60 to 2*80 = 160. Assumed offset setting in Global Settings is 0, but if you set it to e.g. 128, you will set light
channel 60+128= 188.
In order to use low cost MIDI commanders like BCF2000, the LanBox firmware can be set to two alternate MIDI
command sets, by setting the highest light channel (512 in LCM, 3072 in LCX) to the value of 0-7, 8-15 or 16-23:
Mode Value
0
0-7
1
8-15
2 16-23
description
All MIDI commands are as described in the LC+ Reference v2.0a1.pdf.
All Poly AfterTouch messages are also seen as NoteOns.
All CC messages, except CC0 (bank select) are seen as NoteOns,
and all Poly AfterTouch messages are seen as CC messages.
Note: Mode 2 makes it's possible to use commanders which can only have CC messages from a slider, but you looses easy
CC access, and light channels on 128 or multiple can only be accessed by using LCedit's NoteOn offset.
Tip: If you want to set channel 3072 (512) do the MIDI mapping via LCedit+ as follow:
MIDI ch
1
2
3
4
layer
A
A
A
A
offset
0
100
200
3070
(510 for LCM)
You can now reach 327 channels, and channel 3072 (= channel 2 via MIDI 4). If you send, on MIDI ch 4, a Note 2 pitch
10, the channel 3072 will be set to 20 (10*2). Much easier is to make a startup cue, which sets channel 3072 (512) to 10 or
20. Start this cue 1 in layer A, and do within 2 secs a "Save LanBox Data", it will be loaded at every startup:
// Cuelist 1 (1 steps), stored 30-06-2009 12:16
show d01 for 3.0s
:d01
512[010] // ch 512 for LCM, 3072 for LCX
For LCM in MIDI mode, set the LED display to Layer A, so you can see what cue is running. You need a Sony, Philips, or
NEC based (many Far East makes, including Apple Remote) IR remote controller. Press power or 5 key to see layer status.
For more info, read the IR setup from this manual.
Copyright 1995..2010 CDS advanced technology bv. LanBox is a registered trademark of CDS advanced technology bv. All other names referenced are the service marks,
trademarks or registered trademarks of their respective companies. Comments, suggestions, questions and info: www.lanbox.com Version 3.5, March 2010
Page 30
LCedit+ and LanBox user manual
Using MIDI or MSC to trigger cues
We assume you have setup your LanBox for MIDI, and have read the chapters about layers and active channels. Keep in
mind that when using MIDI triggers, like a Go, behaves as you did the same Go in LCedit+! Sending the bank select +
program change is in many sequencer programs the same as 14 bit Program change. The bank select, is the 128 * multiplier
in order to Go to cuelists with a number greater then 127. There are four special Program changes with Bank select 127:
Program Change 0/1 do Go Next/Prev step, and 2/3 Go Next/Prev cue.
Always test your cues/chases first in LCedit+, where e.g.:
a. bank select 0 + program change 20 on MIDI channel 1 = typing g20a<return> in LCedit+.
b. bank select 1 + program change 20 on MIDI channel 1 = typing g148a<return> in LCedit+.
c. CC20 0 + CC53 20 + CC86 3 on MIDI channel 1 = typing g20.3a<return> in LCedit+.
d. CC20 1 + CC53 20 + CC86 3 on MIDI channel 1 = typing g148.3a<return> in LCedit+.
e. Note pitch 60, velocity 64, duration 1sec = set ch 60 to 128, and after 1sec to 0
f. CC65 127 set the box to ignore NoteOffs.
Using MIDI wing/commander
A MIDI commander like the BCF2000 can be used to put specific Gos under buttons, but the slider and knobs can be used
to set lighting channels. For the BCF2000 we advice to set the LanBox to Alt MIDI set 1, as the BCF2000’s sliders/knobs
can not send Notes, but only AfterTouch or CC messages. So instead of sending a Note pitch 60, velocity xx, you setup the
commander to send AfterTouch 60 with slider 1 (range 0-127).
LanBox MIDI and MAX-MSP, Isadora
A LanBox can be controlled / triggered very easy from programs like MAX-MSP or Isadora using MIDI. In the LCedit+
folder there is a folder “Third party support” which contain several MIDI and MSC examples for MAX and Isadora. If you
are looking for the hex/decimal values of MIDI messages try this: http://www.midi.org/techspecs/midimessages.php
As you can see in the picture above, you can can control near anything from MAX, including manual autofades, and direct
channel settings.
Copyright 1995..2010 CDS advanced technology bv. LanBox is a registered trademark of CDS advanced technology bv. All other names referenced are the service marks,
trademarks or registered trademarks of their respective companies. Comments, suggestions, questions and info: www.lanbox.com Version 3.5, March 2010
Page 31
LCedit+ and LanBox user manual
External control and triggers
Setup for external DMX desk
We have seen in the MIDI chapter that you can use a MIDI commander as wing, but a
LanBox-LCX also has a DMX input, which can be used to connect a simple slider desk
as wing. Here is how to setup in LCedit+:
First connect the external desk with a DMX cable to the LCX DMX input. Next is setup
DMX in, using the Global settings, the DMX tab. In this case it’s only a 49 channel desk,
and I want to have them controlling my channels 50-99.
In Global settings DMX tab, set the DMX input channels to 1-49, to 50-99, in layer E.
So in this case I use my external desk as controller for layer E.
Check that you can see the desk values in the DMX monitor of LCedit+ (use the bottom
left pop-up to switch to DMX input). If it’s the
same as on your desk, it’s working.
Now select layer E, and your fixtures on ch 101-149. That’s disappointing, as all channels are grey, and
not having the desk values, what’s wrong? You forgot to activate those channels you really want to use
within the 101-149 range. Try to set channel 101 by entering any value; once you entered a value it’s
activated, and it was taken over by the external desk, and you can not change it anymore from LCedit+!
Note: If you want to activate all selected channels, just type v then enter. Instead of hand activating, you
could have also load a cue with channels 101-149 set to zero.
Grab values from external desk
You can also grab or edit DMX values with your external
desk into LCedit+ cuelist editor. From above situation put
layer E into edit mode; the cuelist editor should show like
the picture right, but still empty.
If the Intensity field is still selected (else type v), hit the
return key and step 1 is created with the external desk
values as scene data. Now change your desk sliders for
next scene, and hit space, then return keys, and step 2 is
also in the cuelist editor!
Between the space + return step you can change the default Hold for ever, with 5.1 crossfade to whatever you need for each
step. This way you can quickly copy scenes from another desk into the LanBox, but not only from an external desk! If you
are using MIDI or UDP, or TCP to set channels in a layer, you can copy the DMX values into a cuelist, in the same way.
Copyright 1995..2010 CDS advanced technology bv. LanBox is a registered trademark of CDS advanced technology bv. All other names referenced are the service marks,
trademarks or registered trademarks of their respective companies. Comments, suggestions, questions and info: www.lanbox.com Version 3.5, March 2010
Page 32
LCedit+ and LanBox user manual
Setup for external switches or buttons
Although you can use LCedit+ (or LCedit for PDA) to Go to cues and/or Chases, this is not practical for museum
presentations, change lighting buildings, art objects, etc. The solution for simple changing cues/chases is good old buttons
or switches, hardwired to the LanBox; no computer needed, thus simple and reliable!
In order to have your cues selected or started by buttons or switches, you need to connect a button (or up to 64 buttons) to a
analog input of the LCX. For single switches or buttons a resistor must be mounted between the analog input, and the + on
the connector. The switch or button, is connected to the input and 0V.
In order to detect the voltage on the input there are two possible actions in the box: “Go xx if input n is within y-z”, and
trigger “Tr n GoCue x-x+63 OnCh y in layer xx”. You need to create a control cue which runs forever, in a unused layer.
The first example, using the Go xx if input” has two buttons; one to start cue 50.1 in layer A, while the second button starts
a chase 50.1 in layer A:
// Cuelist 20 (9 steps), stored 09-03-2010 09:51
001:
hold for 0.50s
go 001 if input 1 within 512 - max \\ input ranges from 0-1023 we test halfway. switch closed < 512
-- static
go 50.1 in layer A
002:
hold for 0.50s
go 002 if input 2 within 512 - max \\ we could also use “if channel 3062 within 127-max”, it’s also inp 1
-- loop
go 100.1 in layer A
go 001
If you use a variable resistor of 4700 Ohm instead of a switch, you can have 64 different cues, just by turning the knob! A
variable resistor has three connections, the slider must be connected to the LCX analog input, of the two other connections
one goes to 0V, and the other to +. The control cue example does a Go in the range of Cuelist 100-163, depending on the
position of the variable resistor, which is connected to analog input 1:
// Cuelist 10 (4 steps), stored 09-03-2010 12:35
001:
hold for 0.05s
Tr 0 GoCue 100-163 OnCh 3061 in layer A
go 001
While above example switches cues on external hardware, you can also use to switch cues from a MIDI slider, an audio
signal, a slider of your external desk, or even the wind force!
Setup for triggers and control via TCP or Serial
If you open a TCP connection to port 777 of the LanBox, or opens the virtual port to the LanBox USB connection, you
have full control on the box, see LC+ Reference v2.0a1.pdf. LCedit+ uses the same commands, so anything is possible. If
you want to see what commands LCedi+ is sending (and their response), turn off Auto Update, Turn On Debugging mode,
and open a Stream window. If I do e.g. a Go 103.1 you will see in the streamwatcher window: {*565C006701#}>
The string between {} is send to the box, the > is the answer. the 565C means Engine Go to layer ID 5C (we would use 1
for layer A), 0067 = Cuelist 103, and the last 01 is step 1.
Keep in mind that LCedit+ always start with the command *65FF# (set to 16 bit mode), so that channel numbers should
always are send as two bytes; so channel 2 = 0002
Inside the LCedit+ folder, there is a folder Third party support, which contains several TCP and serial examples for MAX/
MSP, as well for Isadora. Also these raw commands are used as the button macros in LCedit+ for PDA, but also in the Web
server script examples, which can be found on our download page.
Copyright 1995..2010 CDS advanced technology bv. LanBox is a registered trademark of CDS advanced technology bv. All other names referenced are the service marks,
trademarks or registered trademarks of their respective companies. Comments, suggestions, questions and info: www.lanbox.com Version 3.5, March 2010
Page 33
LCedit+ and LanBox user manual
Setup for digital or serial outputs
The LanBox-LCX has 8 digital outputs which can be used to drive e.g. (solid-state) or reed
relays to turn on/off classic on/off devices. Each digital output can however also be used as
pseudo RS232 port, with a fixed baudrate of 9600 baud. The digital outputs can be set/cleared by
setting the assigned light channel to 0 or 255. The mapping can be set in LCedit+’s Global
Settings, the DigOut tab (see picture below).
The outputs drive between 0 and about 4 Volts, and can source or sink 20mA (TTL compatible). If you want to connect a
small relay, you can use e.g. the Hamlin HE 3621(5 Volt, 500 Ohm). BTW Relays or LEDs should be connected between
the output and the +. If you want to switch more power, search on sites as www.farnell.com for solid state relays.
Use a digital output as 9600 baud serial port
If you want to use an output as serial output port, be sure it’s mapped to an unused
light channel, in this example to 1024-1037. The DMX values of those channels
should be zero for normal RS232 compatible output, or to 255 for inverse output.
If you want e.g. control a DVD player with RS232 connection, you need to create
some control cues. The actions are as "Write to MIDI", but now to e.g. Ser1.
Example to control Marantz PMD930 DVD player. PLAY1 does the PLAY
command on digout port 1. As it can output at 8 digout channels at the same time
PLAY1-3 shows how to output at digout 1 and 3 a PLAY command.:
// Send ASCII: [PC,RC,44]+chr(13)
// Cuelist 901 (22 steps), stored 09-03-2010 22:42
-- PLAY1
-- PC RC 44
write 5B 50 43 2C 52 to SER 1
hold for 0.05s
write 43 2C 34 34 5D to SER 1
hold for 0.05s
write 0D to SER 1
----- PLAY1-3
-- PC RC 44
write 5B 50 43 2C 52 to SER 1
write 5B 50 43 2C 52 to SER 3
-- other Ch
hold for 0.05s
write 43 2C 34 34 5D to SER 1
write 43 2C 34 34 5D to SER 3
hold for 0.05s
write 0D to SER 1
write 0D to SER 3
-- other Ch
BTW 8 channels at the same time is a heavy load for the CPU, but it gives freedom of use.
Use MIDI in or Out as RS232 port
LCedit+ allows you to set the baudrate of the MIDI port to RS232 speeds like 9600 baud, so you can use it as trigger port
from RS232 if you send MIDI messages. Pin 5 of the MIDI-in plug goes to Common (0V) of RS232 plug, and pin 4 of the
MIDI-in plug goes to TX of RS232 plug.
The MIDI input can be used directly with a RS232 signal, but the output is inverted. If you are capable to add a small npn
transistor in your MIDI to RS232 cable, it should work (we did not tested it). In you MIDI out plug connect the basis of the
transistor to pin 5 of the MIDI plug, emitter to pin 2, collector to pin 4. Pin 4 is also the RS232 tx, which goes to the RS232
input. pin 2 is the common, 0V.
Copyright 1995..2010 CDS advanced technology bv. LanBox is a registered trademark of CDS advanced technology bv. All other names referenced are the service marks,
trademarks or registered trademarks of their respective companies. Comments, suggestions, questions and info: www.lanbox.com Version 3.5, March 2010
Page 34
LCedit+ and LanBox user manual
UDP networking
Introduction
The LanBox-LCX and LCE have several options to use the UDP protocol on an Ethernet network. UDP is a fast internet
protocol which makes it very suitable to transport bulk data (e.g. DMX) between devices. Besides (DMX) data transport
UDP can also be used to synchronize layers of multiple boxes, and can be picked up by 3D visualization software like
Capture. With MAX-MSP you can even receive, besides all DMX data, the analog inputs and transmit DMX data directly
to a LanBox-LCX or LCE, while Isadora converts even realtime video into LanBox UDP DMX data packets!
Usage of the UDP options with Capture 3D
Capture is delivered with a so called LanBox DLL provider which supports up to 6
universes. The LanBox(es), LCedit, and Capture must be connected to a local
ethernet network. In order to use Capture you only need to activate the LanBox
DLL in Capture, turn on broadcast mixer channels in the LanBox with LCedit+,
and you will see your show visualized real-time. If you set the broadcast range of a
LCX to 1-3072, you can use all 6 universes in Capture.
Usage of the UDP options with MAX-MSP
With MAX-MSP (with optional Jitter), you can create near anything based on
lighting, sound, MIDI and video. In the developer folder of LCedit+ you find
several examples how to communicate with a LanBox. In order to receive the
different LanBox broadcast types into MAX use the UDP rx example. Be aware
that DMX-input data will only be broadcasted when you have set the DMX input
range (DMX tab of global settings), to a valid range. Transmitting DMX data
directly to a LanBox is possible in two ways: broadcasting (like a LanBox), or
point to point. The UDP input setting of a LanBox "anyone:4777" allows receiving from any other IP, including broadcasts,
but by assigning an IP to the "from sender" it will listen only for packets from that IP.
DMX distribution over an Ethernet network
DMX-512 supports, as the name indicates, up to 512 channels. If you need more channels you could already use multiple
LanBoxes, but each with it's own cues. From firmware v2.x the LanBox-LCX supports 3072 light channels, and also the
distribution of those channels via UDP on Ethernet. This means that you can built a lighting system with up to 3072
channels, distributed over multiple so called universes. A universe is one DMX cable (one LanBox) with up to 512 DMX
channels.
Let's assume we have a LanBox-LCX and we want to create a second universe with
a LanBox-LCE, in order to get 1024 DMX channels. First of all be sure the boxes
have unique IP addresses and names on the network (see also network setup).
Create in LCedit+ two interfaces, one for each box. Open the Interfaces window,
and check that your current interface has a decent name (like box 1). Now apply the
New Interface command from the Edit menu, you will get a new Configure
interface dialog; choose box 2 (universe 2) as connection. All fixtures on the stage
should be connected to interface 1 (box 1 , the LCX), but you must place a dummy
dimmer on the first channel of each next box. So place it on channel 513, use the
patch tab to set it to DMX address 1, choose box 2 as interface, and name it U2. We
needs this pseudo fixture in order to have access to the post processing of universe 2
(box 2, the LCE). Now select a fixture on the stage, so box 1 is selected, and go to
Global settings the UDP tab (see picture right). Turn on broadcasting of mixer
channels 1-1024.
Copyright 1995..2010 CDS advanced technology bv. LanBox is a registered trademark of CDS advanced technology bv. All other names referenced are the service marks,
trademarks or registered trademarks of their respective companies. Comments, suggestions, questions and info: www.lanbox.com Version 3.5, March 2010
Page 35
LCedit+ and LanBox user manual
Note: Why broadcasting 1-1024, while universe 1 is in box 1? Well two reasons; to keep the setup simple, and all channels
can now be picked up from the network by e.g. 3D visualization software.
Next thing to do is setting up universe 2 (box 2, LCE). In order to do so you must
select U2 (that's why it's needed ;-), and go to global settings. Check that the title
of global settings indicates interface 2 (box 2), and set UDP input settings to copy
1-1024 to light channels 1-1024.
Actually you only need to copy 513-1024 to 1-512, but shifting channels can
become very confusing, so we do it the simple way again. This way the mixer of
the LCE is always a copy of what is going on in the LCX. This means however
that we must patch light channel 513-1024 to DMX 1-512 in this universe 2 box,
but that is easy.
While the U2 fixture is still selected, open the Patch editor. Now select the first
through the last row (1-512), click on the I button (for auto increment), and enter
513 into the set field. After return DMX channel 1-512 is now patched to light
channel 513-1024 (see picture right).
From now on you only work in the LanBox-LCX, which means add fixtures on the stage, and create cues.
Be aware that a fixture can not be separated into two universes (duh), so it's useful to make a planning
where all fixtures should go (on what universe).
Note: Once fixtures are placed above light channel 512, they have a blank DMX address in the fixture
setup and in the cast. The reason is that those channels are processed in other boxes, and the LCX (the
master) has no idea how they are setup or patched.
Note: As you can see on the pictures, the UDP panel of global settings has many more settings. These
settings are outside the scoop of this tutorial, but it's enough to know that we also provided high speed
bulk data communication using UDP which can be used by programs like MAX.
As you can image, setups with multiple universes can become quite complex, but with proper planning
(which is a must for all large setups) you can have a large (up to 3072 channels, 6 universes) system with
a fraction of the cost of a lighting desk for 6 universes. As Ethernet cabling is widely available it's also
easier to setup and maintain, and cheaper then DMX cabling with repeaters and splitters.
Synchronizing cues in multiple LanBoxes
When you want to store many large scenes, you will face that there is a limit on memory space in a LanBox :-) This
happens mostly when you have thousands of steps for large RGB pixel arrays, which must run stand-alone. A solution is to
split the scenes and distribute them on several LanBoxes which all run a part of the total scene. The only problem with this
solution is that you need to be able to keep the cues of the boxes in sync with each other, but could be solved by using
MIDI. From firmware v2.05 and LCedit+ v3.3 it's now also possible to keep layers of "slave" LanBoxes running in sync
with a "master" LanBox via Ethernet. Just turn on "Broadcast layer list" in the master box, and turn on "Synchronize layers
with same ID" in the slaves. If the master has e.g. layers A, B, C, it will keep layers A, B and C of all slaves in sync with
the master.
Network traffic
When you setup a LanBox-LCX to UDP broadcast 3072 channels it generates quite a lot of traffic on your local network
(near 1 Megabit per second for 3072 channels). If you have a stand-alone network just for lighting, it's no problem, but if
the network is part of an existing network, it's a good idea to contact the network manager. ;-)
Copyright 1995..2010 CDS advanced technology bv. LanBox is a registered trademark of CDS advanced technology bv. All other names referenced are the service marks,
trademarks or registered trademarks of their respective companies. Comments, suggestions, questions and info: www.lanbox.com Version 3.5, March 2010
Page 36
LCedit+ and LanBox user manual
Art-Net
Introduction to Art-Net
Art-Net™ is an Ethernet protocol designed by and Copyright Artistic Licence (UK) Ltd, and based on the UDP protocol. Its
purpose is to allow transfer of large amounts of DMX512 data over a wide area using standard networking technology.
Warning: Art-Net uses the 2.x.x.x IPs by default, but they are valid Internet addresses, so NOT allowed for local use,
unless you are absolutely sure there is no connection with the Internet! With Art-Net use the 10.x.x.x or 192.168.x.x IPs, as
they are assigned to be used on local nets.
Setup for Art-Net receive
Art-Net uses universes numbered hex 0-F, and sub-net 0-F, and are written as e.g.
0-0. If you want to receive the data for universe 0, net 0, into LanBox light channels
1-512 do the following in Global Settings (UDP tab):
• Mark Art-Net universe, and set it to 0-0. The port number for receive will change
from 4777 to 6454; the Art-Net port.
• Set “To light channels” to 1-512
After closing you will receive Art-Net data of universe 0-0 into mixer channels
1-512. Be sure you have not activated channels in the 1-512 range, else they block
the Art-Net data. At the moment of writing Art-Net Data can not be received into a
layer, but only into the mixer.
Note: If you are looking for an Art-Net tool for diagnostics, download DMXWorkshop from the Artistic Licence UK site.
Setup for Art-Net transmitting
Art-Net is only supporting up to 4 universes per IP, so only light channels 1-2048
can be sent onto the network. Each 512 channel segment can be assigned to an ArtNet universe, but must be increasing sequential numbered. As example we show
you how to activate Art-Net 0-0 and 0-1 universes from our light channels 1-1024:
• Activate the marker Activate Art-Net; the port changes to 6454.
• Set subnet to 0
• Set 1-512 to 0
• Set 513-1024 to 1
After closing the window, the LanBox sends out 2 Art-Net universes numbered 0-0,
and 0-1. As with our UDP, if the network is part of an existing network, it's a good
idea to contact your network manager. ;-)
This concludes the LCedit+ tutorial. You have learned a lot, and we are sure you can use LCedit+ basically, but there will
be still many application specific questions to answer. In that case send us an email, or better join the LanBox Talk email
discussions, and as always start looking at our support pages. Have fun with your box and LCedit+.
Copyright 1995..2010 CDS advanced technology bv. LanBox is a registered trademark of CDS advanced technology bv. All other names referenced are the service marks,
trademarks or registered trademarks of their respective companies. Comments, suggestions, questions and info: www.lanbox.com Version 3.5, March 2010
Page 37
LCedit+ and LanBox user manual
Network setup and usage
Building an Ethernet network
Building an 10 or 100-BT Ethernet network is not difficult or expensive anymore, and has big advantages over e.g. USB or
serial connections. This type of Ethernet is galvanic isolated from each device, the cable length can be up to 300 meters.
The 10 or 100-BT means 10 or 100 Mbit twisted pair cabling, also called CAT 5 cabling. Such a network is built as a “star”
topology, which means each device is connected with it’s own cable to a central point, called “hub” or “switch”. Switches
are widely available and have 4, 8, 16 or more ports. A port is like a big telephone socket but now with 8 pins and it’s called
RJ45. Each network device (computers, ADSL modem, LanBox-LCX or LCE) must have it’s own cable to the switch.
The TCP/IP protocol
Once you have an Ethernet network, you must setup the devices to use it with TCP/IP. This protocol (also used on the
Internet) is the most used protocol today, but others also exist (e.g. EtherTalk). As long as you use your network only for the
LanBoxes, the setup is not critical, but if you also have access to the Internet via an ADSL or cable Ethernet modem, it
must be planned.
Each TCP/IP device must have an IP address and a so called mask. As near all IP addresses are reserved for the Internet and
must be unique world wide, you can NOT take a random address for private use. There are two common ranges of IPs
reserved for private use; the 10.0.0.0-10.255.255.255 and 192.168.0.0-192.168.255.255.
As the default IP of a LanBox is 192.168.1.77 with the mask on 255.255.255.0 it is the easiest way to make your local net
192.168.1.0-192.168.1.255. It should be noted that the first address (.0) can not be used as it is the cable address, while the
last one (255) can also not be used as it is the broadcast address. Note: With the 255.255.255.0 mask your local network is
limited to 254 addresses.
If you turn on NAPT in your ADSL/cable modem (standard in most modems) and set the local address of the modem to
192.168.1.1 (this is the gateway address in the TCP/IP settings of all other devices), you can use your LanBox and have
Internet at the same time. If your modem also has a fixed internet IP, you can even make your LanBox accessible from the
Internet by mapping TCP port 777 to 192.168.1.77. just like demo.lanbox.com ;-)
Testing your network
If you have an ADSL/cable modem which also provides automatic addresses (DHCP server is On), the TCP/IP setting on
your computer should be “Automatic”, otherwise set it to 192.168.1.2, mask 255.255.255.0 and no “Gateway”. The
gateway is the device to which all non local addresses are send, in order to send it to other networks (e.g. the Internet).
Assuming all cabling is connected and the Link LEDs are on, you want to know if your network is working. You could try
with LCedit+ to connect via TCP/IP to 192.168.1.77 (the LanBox), but a simple test is using the “ping” program which is
on near every computer. From the command line (DOS in Windows, or Terminal in OSX) type: ping 192.168.1.77 and
return. You should see something like:
PING 192.168.1.77 (192.168.1.77): 56 data bytes
64 bytes from 192.168.1.77: icmp_seq=0 ttl=254 time=4.057 ms
64 bytes from 192.168.1.77: icmp_seq=1 ttl=254 time=3.922 ms
This indicates good working of the connection between your computer and the LanBox. The same way you can test your
modem and other computers.
Note: If you are using multiple LanBoxes, be absolute sure that each box has an unique IP address -and- an unique LanBox
name!
Copyright 1995..2010 CDS advanced technology bv. LanBox is a registered trademark of CDS advanced technology bv. All other names referenced are the service marks,
trademarks or registered trademarks of their respective companies. Comments, suggestions, questions and info: www.lanbox.com Version 3.5, March 2010
Page 38
LCedit+ and LanBox user manual
Files
What is saved, where and how?
All project data, like fixtures, presets and screen layout is saved in your project file in your computer by using the "File"
menu "Save" or "Save As..". However as the LanBox is a standalone controller, all DMX data (like cues, scenes, layers,
mappings, etc.) must be stored inside the box, so it's ready to use after power up. In order to save the LanBox data into
nonvolatile memory (flash ROM), use the menu "Save LanBox Data".
Backup your LanBox data
You can also backup your LanBox data onto your computer by using the menu command "Backup" (use "Restore" to put
data from your computer back to the box). If you save your project file together with the backup files, you can restore a
complete show, in the event you erased your box.
The backup files
Backup files are located inside a box & date directory (like "Demo-LCX-2 [2003.10.03.1403]", while these directories are
located inside the "backup files" directory. The file type of backup files are tab separated text files. The advantage of the text
files is that backup files can be read into any word processor and particularly into spreadsheet programs. This also makes it
possible to make custom software that creates backup files, and the files can be read/edited in a spreadsheet program. If you
save the spreadsheet file as a tab separated text file, they can be uploaded to the LanBox with restore.
A backup file is a tab separated text file. Each line contains data for a scene, each column contains data for a DMX channel.
Each line is terminated with a <CR> ($0D).
The header, the first row, contains global information about the file. It consists 10 columns, with the following data: v2.00,
LanBox name, 0, 0, 2, 0, 0, 0, cuelist HSB, cuelist LSB. After the first 10 columns the columns are filled with the numbers
of used DMX channels (in ascending order) in this cuelist.
After the header a number of rows follow. Each row contains data of one cuestep, including the step action data. The first
item in each line is the step number, preceded by the step type code and its 6 parameters (see LC+ reference manual page
82). Column 9 indicates whether it is absolute scene data (0), or relative scene data (1), and column 10 is empty.
Note: The cuestep numbers must be consecutive, otherwise LCedit+ can't restore the file. When generating a LanBox-LC+
backup file from a custom made program, you can best use the save option 'save range'.
Copyright 1995..2010 CDS advanced technology bv. LanBox is a registered trademark of CDS advanced technology bv. All other names referenced are the service marks,
trademarks or registered trademarks of their respective companies. Comments, suggestions, questions and info: www.lanbox.com Version 3.5, March 2010
Page 39
LCedit+ and LanBox user manual
Upgrading from LanBox-LC II to LanBox-LC+
We understand you are in a hurry, but please read this paragraph, it saves you and us a lot of trouble;-) So, before
upgrading to the LanBox-LC+ firmware please read the following steps:
1. Back up ALL scenes of your current LanBox-LC II with LCtools, they will be lost!
2. Be sure you remove your LanBox from the Chooser->CDS devices->List, or better disable the extension "CDS Devices"
with the extension manager, and restart your Mac.
3. You need to upload the LC+ firmware into the box. The following procedure can also be used to revert back to the LCII
firmware if needed or to install new firmware:
•
Choose the "Tools->Upload Firmware..." menu command and in the upload dialogue, click "Update".
•
Choose the "LC+(v3) firmware v1.06.dat" file, the upload procedure is starting.
•
WAIT UNTIL UPLOADING IS COMPLETELY FINISHED!
•
After clicking the OK button, your LanBox will reconnect and the "interface Status" (Control window, click
advanced triangle) should now list e.g. "LanBox-LC+, v1.06
Action commands overview
Below you find the formal list of all actions. Use the action dialog to see the usage of all possible parameters.
• Shows a lighting scene for a certain time, with optional fade actions
• show (<scene>|previous) [for] <time>
• show (<scene>|previous) [for] <time> [,] fading [in|out] [cr] [for] <time>
• show (<scene>|previous) [for] <time> [,] crossfading [cr] [for] <time>
• show (<scene>|previous) [for] <time> [,] split [fading] (in|out) [cr] [for] <time>
• Instructs a layer to Go to a certain cue (step).
• go <cuelist>.<cuestep> [in [layer] <layer>
• go <cuestep> in [layer] <layer>
• go (next|prev) [in [layer] <layer>]
• go <jumplabel>
• go (<cuestep>|<jumplabel> if input <inputnum> (within|outside) <range>
• go (<cuestep>|<jumplabel> if channel <channelnum> (within|outside) <range>
• Loops and holds
• loop <count> [times] [to] <jumplabel>
• hold [for] <time>
• hold until switch [is] (negative|positive)
• Hold until <locked> (MTC |time) (is after | is before | transitions to before | transitions to after)
(Day Hour Minute Seconds Frame) (x = ignore)
Note: locked means that the MTC clock must be locked, or the time must be in sync with NTP server.
• Layer control
• suspend [layer] <layer>]
• resume [layer] <layer>]
• start [layer] <layer>
• halt [layer] <layer>
• reset [layer] <layer>
• Layer and sequencer modes
• set attributes [of [layer] <layer>] to (none | (fade|output|solo|and)+ )
• set [layer] [<layer>] to (no output|copy|mix HTP|mix LTP|add)
• set [layer] [<layer>] to mix [transparent] (at <percentage>|from <percentage> to <percentage> in <time>)
• set [layer] [<layer>] to stop chaser
• set [layer] [<layer>] to chase [up|down|random|bounce] [loop] (at <percentage>|from <percentage> to
<percentage> in <time>
• Writes up to 5 bytes to a stream. Stream can be "midi1" or “ser1..ser8”
• write <hexstring> [ to <stream> ]
• Up to 64 triggers, calculated Go from channel value, to cuelist + val / 4
• Tr <id> GoCue <cuelist>-[<cuelist>+63] OnCh <channelnum> in layer <layer>
Copyright 1995..2010 CDS advanced technology bv. LanBox is a registered trademark of CDS advanced technology bv. All other names referenced are the service marks,
trademarks or registered trademarks of their respective companies. Comments, suggestions, questions and info: www.lanbox.com Version 3.5, March 2010
Page 40
LCedit+ and LanBox user manual
Last resort: Resetting the box
If your LanBox does not seem to work anymore, try uploading the firmware. If all fails there is a last resort to recover your
box: Reset to factory default. To open a LanBox you must remove the top 4 screws. On the printed circuit board you see
(besides all kind of electronic components) a small push button. If you ever loose your password this button can save you.
When pressing it for more then 15 seconds, when the box is powered up, it clears ALL memory including the password.
Note: the button must be pressed already before powering up, and keep pressed all the time!
After the 15 seconds pressing, release the button, wait a few seconds, turn off the power, and on again after a few seconds.
Now you should be able to connect to the LanBox again, but the square in the control window is orange. Use firmware
Upload from the menu bar to install the latest firmware again.
Note: When you have cleared the LanBox with this button, the password is 777, the name of the box is "LanBoxLCX-1" (or "LanBox-LCE-1", or "LanBox-LCM-1"), it's IP is 192.168.1.77 and ALL lighting settings and programs
(including the firmware) are gone. Note: Uploading firmware can only be done with LCedit+.
CE, FCC, and Safety
Dimensions Ambient temperature 100-240 V ac adapter output Power consumption 86 x 104 x 45 mm (LCX: 166 x 104 x 65 mm)
0...40 degrees Celsius
6V DC, ±3%
max. 8 VA
CE
This device complies with the European low voltage directive 73/23/EEG, and the European EMC directive 89/336/EEG,
according to the following specifications:
Electrical safety NEN-EN60950 ’94
This is a class III equipment and must be supplied from a SELV supply.
Emission NEN-EN55014
NEN-EN55022 class B
Immunity
NEN-EN500082-1
FCC
This equipment has been tested and found to comply with the limits for a class A digital device, pursuant to Part 15 of the
FCC Rules. These limits are designed to provide reasonable protection against harmful interference when the equipment is
operated in a commercial environment. This equipment generates, uses, and can radiate radio frequency energy and, if not
installed and used in accordance with the instruction manual, may cause harmful interference to radio communications.
Operation of this equipment in a residential area is likely to cause harmful interference in which case the user will be
required to correct the interference at his own expense.
Caution
The electric safety depends on the used AC-adapter. Only use an AC adapter as specified in the table above that carries the
following sign:
Copyright 1995..2010 CDS advanced technology bv. LanBox is a registered trademark of CDS advanced technology bv. All other names referenced are the service marks,
trademarks or registered trademarks of their respective companies. Comments, suggestions, questions and info: www.lanbox.com Version 3.5, March 2010