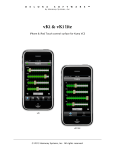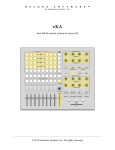
1
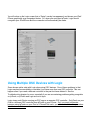
lpTouch
for Logic
Universal
User Manual
delora software
Copyright 2015 by Harmony Systems, Inc.
Under the copyright laws, this manual may not be copied, in whole or part, without the written consent of
Harmony Systems, Inc. Your rights to the software are governed by the accompanying software license
agreement.
Delora Software and lpTouch are trademarks of Harmony Systems, Inc.
Apple, iPad/iPhone, Logic and Mac are trademarks of Apple, Inc., registered in the U.S. and other
countries.
The Bluetooth word mark and logos are trademarks owned by Bluetooth SIG, Inc., registered in the U.S.
and other countries, and any use of such marks by Apple is under license.
Other company and product names mentioned in this manual are trademarks of their respective
companies. Mention of third-party products is for informational purposes only. Harmony Systems assumes
no responsibility with regard to the performance or use of these products.
Please contact Delora ([email protected]) should you have questions regarding information in this
manual.
9
Table of Contents
Getting Started
Starting Up
Using Multiple OSC Devices with Logic
Preference Settings
About lpTouch
lpTouch Screens - iPad
Main Screen - iPad
Pan-Sends Screen - iPad
Channel Strip Screen - iPad
EQ Screen - iPad
Instrument Screen - iPad
iPhone/iPod touch Screens
Main Screen
EFX Screen
EQ Screen
Instrument Screen
Master/Aux Screen
Info Screen
Troubleshooting
Contact Delora Support
3
3
5
7
9
10
12
14
16
18
20
21
21
22
24
26
26
28
29
34
Appendix: Setting Up An Ad-Hoc Wi-Fi Network (OS X
10.5 - 10.9)
35
Appendix: Setting Up An Ad-Hoc Wi-Fi Network (OS X
10.10 and higher)
40
Acknowledgements
44
Getting Started
Thanks for purchasing lpTouch! This guide shows operational functions of both iPad/iPhone and
iPhone versions of lpTouch, a universal app. It also includes Troubleshooting tips and a guide for
setting up an ad-hoc Wi-Fi network.
Wi-Fi & Bluetooth
You must have Wi-Fi access on your iPad/iPhone to the same Mac computer in which Logic is
installed. Go to the ‘Settings’ application on your iPad/iPhone, tap on General, then Network, and
make sure that the correct Wi-Fi network is checked and Wi-Fi is set to ON.
It’s also best to have Bluetooth disabled on your iPad/iPhone whenever you are operating lpTouch
to ensure reliable communications with Logic. Go to the Settings application on your iPad/iPhone,
tap on the General tab, and check that Bluetooth is set to OFF. Note: this only applies to
Bluetooth on your iPad/iPhone. You can keep Bluetooth ON on your Mac.
Starting Up
If you have used another OSC controller app with Logic then there are some additional
steps you must perform before starting up lpTouch. Examples of other OSC controllers are
Logic Remote, TouchOSC, and V Control (including the free version). These extra steps are
also needed if you have previously used lpTouch on an iPad and now wish to use it on an
iPhone or iPod touch, or vice versa. You must first remove those iDevices from Logic’s
control surface setup before going any further. See “Using Multiple OSC Devices with
Logic” later in this chapter.
Open Logic on your Mac. If you startup lpTouch and Logic is not open, the info button will pulse
red & lpTouch won’t be operational.
Launch lpTouch on your iPad/iPhone.
The first time you open lpTouch on your iPad/iPhone, you will need to establish the connection
between Logic and lpTouch. Afterwards, lpTouch should automatically connect and display its
main screen.
• Press the info button in the top corner (it will be pulsing red to indicate that lpTouch is not
connected).
• Click on the red bar/text that says Connect (No host). A screen “Logic Hosts” appears that
shows the names of Macs that you have running Logic. In most cases, you will only see one
name. Click on the name of the computer you want to use.
• lpTouch returns to the previous screen and the Connect bar/text is now green.
• Exit the info screen.
After a few moments Logic will show a message on the computer’s monitor, saying that it wants to
connect or has detected a new OSC device (your iPad or iPhone). If you have been using
TouchOSC on this same iPad, you may not see this message.
The popup looks slightly different for Logic X (left graphic) vs. Logic 9 (right graphic). Tap either
OK or Add.
Note: There is a checkbox option in the popups that says “Don’t install automatically” or “Don’t
show again”. Do not check this box. Doing so prevents Logic from registering any control
surface you might add, and may not recognize lpTouch in the future. If you should check this box
accidentally:
Using Logic X
As of Logic 10.1.1, there is a bug that keeps you from changing this back. The only way to recover
is to either delete Logic’s preferences (not recommended), manually edit the preferences (requires
special knowledge and a ”PLIST Editor” application), or use OSX’s Terminal program. The
Terminal option is the easier one but you must be very careful. If you are not experienced using
Terminal, ask someone for help. You would also be wise to do a full backup!
Now that you have been warned, here are the steps:
1. Quit Logic X if it is running.
2. Start Terminal. You can find it with Spotlight, or you can find it in /Applications/Utilities.
3. At the Terminal prompt, type this exactly:
defaults delete com.apple.logic10 SuppressedAlerts
4. Press the RETURN key (if you have not done so already).
5. Quit Terminal. Logic should be back to properly popping up the alert.
Using Logic 9
Go to the "Logic Pro" menu and select "Preferences/Control Surfaces/Setup...". You will see the
control surface setup window (similar to below). Click on "New" and select “Automatic Installation".
This will reinstate Logic's ability to look for new control surfaces automatically.
You will notice on the Logic screen that a “Setup” overlay has appeared, and shows your iPad/
iPhone graphically as a recognized device. So, when you next open lpTouch, Logic should
recognize your iPad/iPhone and the connection will automatically be made.
Using Multiple OSC Devices with Logic
Some known quirks exist with Logic when using OSC devices. One of these problems is that
Logic may become unreliable or unstable if you have more than one OSC controller. This can
happen even if you used a different controller in the past but have deleted it. See the
Troubleshooting chapter for more, especially if you are encountering problems getting song data
on lpTouch, or lpTouch and Logic are not in sync.
Logic views each iDevice running an OSC app as a separate OSC controller. So lpTouch on your
iPad is a different OSC controller than lpTouch on your iPhone. So if you want to alternate
between using lpTouch on your iPad vs. iPhone/iPod touch, you will need to follow the procedure
listed below each time.
IMPORTANT! - What to do if you have previously used a different OSC
controller
If you have previously used Logic with another controller device (including an iPad, iPhone, iPod
Touch, etc) running any OSC app, OR if you have used an OSC app with Logic on the same iPad/
iPhone you will be using with lpTouch, you must perform the following procedure. These steps
must be done before you try to use lpTouch. Failure to do so may cause unreliable operation
and Logic may become unstable or even crash. This is due to a problem with Logic’s built-in OSC
support and affects all OSC controllers.
1. Exit Logic if it is already running. Also make sure that no OSC controller app is running on any
of your iDevices.
2. Start Logic
3. Select the following menu item from the Logic Pro menu: Preferences/Control Surfaces/Setup
(Logic 9) or Control Surfaces/Setup (Logic X)
4. Locate any OSC controllers that show in the window, select each and press the DELETE key.
5. Confirm the deletions
6. Exit Logic (do not skip this step!)
You can now restart and run Logic and lpTouch. Logic should show a popup message about
detecting a new OSC device once you have selected a Logic Host on lpTouch. When you see this
message click on the Add button. If you decide to use a different OSC controller in the future you
must repeat steps 1-6 each time you change OSC controllers.
Logic may, under some unique circumstances, damage its control surface preference file when
you add or remove controllers, even a non-OSC one. When this happens Logic no longer
responds to and does not update your controller properly. If this happens you will need to use the
Finder to locate the file and move it to the Trash. Please see the Troubleshooting section for
further details.
Preference Settings
At this point, you may want to setup your preferences available under lpTouch in the iPad/iPhone
Settings application. (Linear Rotary settings only applies to the iPad).
Use the iPad/iPhone Settings application to alter or enable several preference settings for
lpTouch.
• close lpTouch if it is open
• go to the Settings application on your iPad/iPhone
• select lpTouch under Apps
• change the state of any of the settings if desired
• exit the Settings app and reopen lpTouch.
Theme allows you to change the look of lpTouch to one of two theme style choices: black (default)
or silver. Click on the theme bar and press the name of your choice. When you next open
lpTouch, you will now have a new look!
Disable Auto-Lock overrides the iPad/iPhone’s standard operation of turning off the screen and
going into “sleep mode” when you do not perform a screen action during a period of time. Select
“ON” to keep the lpTouch screen displayed continuously. This setting only applies to lpTouch and
does not affect your overall setting for Auto-Lock in the Settings application. The default position
is OFF. Note: Setting Disable Auto-Lock “ON” may deplete your iPad/iPhone battery faster.
Swipe Gestures, when ON and for the iPad, allows you to swipe your finger to the left or right
anywhere on a screen to move to the next/previous bank of tracks (when on the Main or Sends
screens), or to the next/previous track (when on the Channel, EQ or Instrument screens). It is an
alternative to using the arrow keys in the top right corner. For best results, avoid swiping over
faders if you have the “Faders Jump on Touch” set to ON. The default position is OFF.
Swipe Gestures, when ON and for the iPhone, allows you to swipe your finger to the left or right
anywhere on a screen to move to the next/previous track (on every screen except the Master
screen). It is an alternative to using the arrow keys. The default position is OFF.
Faders Jump on Touch, when ON, makes any fader thumb also move/”jump” directly to a
position you tap on within the fader bar. When this setting is OFF, the faders only move by sliding
the thumb along the fader bar. The default position is OFF.
Linear Rotaries - If this preference is ON, then the rotary is activated by placing your finger on
the “knob” and sliding up or down/vertically. The default position is ON. If this preference is OFF,
then the endless rotaries operate by moving your finger in a circular motion around the center
knob. On the iPhone, the rotaries only operate in linear mode (slide up and down vertically).
Support - Logging Level
We may request from you additional information to help us diagnose a problem. lpTouch has builtin logging that records information about what it is doing. By default, lpTouch only records error
and warning messages that indicate it is operating in an unusual manner. The “Logging Level”
can be set to provide more detail regarding the cause of a problem. This extra information,
however, can slow down lpTouch operation, and it consumes a small amount of your iDevice’s
Flash storage space.
Logging Level should stay at its default value “”minimal” unless we instruct you otherwise. We
will request either the “moderate” or “maximum” setting depending on the situation.
If you are asked to send us a log that uses a different setting than “minimal”, exit lpTouch and use
the iOS Settings app to change the logging level. Run lpTouch in the same way that led to the
problem. Once the problem has occurred, use the “Email Log” item on the lpTouch “Support”
screen to compose an email message that contains the log as an attachment. Before you send
the log, please type in any relevant information about the problem. Once you have finished
recording the log, change the logging level back to “minimal”.
About lpTouch
lpTouch is a universal iPad/iPhone/iPhone controller app for the Apple Logic Pro (version 9.1.6
and higher) Digital Audio Workstation (DAW) software application that runs on a Mac. Many
functions attempt to emulate how you use Logic on your computer but have been optimized for the
iPad/iPhone and iPhone touch screen devices.
lpTouch works with the built-in “TouchOSC” control surface driver. This driver is provided directly
by Apple as part of your Logic installation. It uses Logic’s new Open Sound Control (OSC) control
surface support.
The TouchOSC driver provides compatible “client” applications, like lpTouch, with a great deal of
useful information about Logic’s current condition (state). This includes, for example, the mixer
channel fader settings, pan settings, and so on. The driver also responds to a number of
commands that lpTouch or another client application uses to control Logic’s operation. This is how
lpTouch is able to control Logic’s mixer faders with a touch fader on the iPad/iPhone’s screen.
The driver thus provides a great deal of remote control over Logic but the included features are
not exhaustive; some information and control settings are unavailable to lpTouch. The current
driver version also contains a number of “quirks” where it operates in an unexpected or incorrect
manner. We will try to alert you to these discrepancies and, where possible, describe workarounds.
We chose to make lpTouch compatible with Logic’s built-in TouchOSC control surface driver so
that you do not have to install any special applications or files to use Logic and lpTouch. All you
need is a working Wi-Fi connection between your Mac and your iPad/iPhone.
Grayed Out Buttons
lpTouch shows, when appropriate, a button as “grayed out”/darkened if it does not make sense to
press it, or the button’s action is currently disabled. It will also show faders and rotaries in the
same fashion where appropriate. An example of this would be when there are less than eight
tracks, the unused faders will be darkened and disabled.
Double Tap Reset Feature
Most of the fader and rotary controls offer a special “double tap” gesture that you can use to
quickly return a setting to its default value. In most cases, lpTouch uses the same value that Logic
assumes is the default. For example, if you tap two times quickly with your finger on the thumb in
any volume fader channel, the thumb and value will reset to a zero dB value. Likewise, double
tapping on Pan rotaries will reset to the center (zero) position, and Sends return to their off
position.
lpTouch Screens - iPad
lpTouch has 5 screens of controls - Main-Volume, Pan-Sends, Channel Strip, EQ, and
Instrument - plus an Info screen. Press on one of the tab bars at the top of the screen to change
screens. The tab bar for the currently displayed screen will be color highlighted.
All screens have the same top header section of tab buttons, and a bottom section of Transport
buttons with the playhead display.
The Main-Volume and Pan-Sends screens provide information for eight tracks at a time, while the
Channel Strip, EQ and Instrument screens show controls that adjust settings of the current track.
The arrow buttons in the header next to the info button apply to different functions depending on
the screen:
• Main-Volume and Pan-Send screens - switches to next or prior bank of tracks, in sets of eight
• Channel Strip, EQ and Instrument - moves to the next or prior track, by one
An alternative to using the arrow keys is to swipe your finger to the left (or right) anywhere on a
screen to navigate to the next/previous bank of tracks or by track, depending on the screen. This
feature, “Swipe Gestures”, must be enabled in the lpTouch preference settings in the iOS Settings
app.
lpTouch emulates many of Logic’s standard transport functions for navigating through your
composition: Backward, Forward, Beginning (of song or Cycle if enabled), Stop, Play, and
Record.
Other standard playback controls are provided: Metronome, Cycle, and Replace (records over
anything on the track at that location).
Just as with Logic, the Play, Record, Cycle, Metronome and Replace buttons will change color
when active.
The bottom section also includes a “display” showing the playhead position in two formats that
replicate a portion of Logic Pro’s display:
• top row: “Timecode” time format (hours-minutes-seconds-frames-subframes)
• bottom row: Musical division of time format (bars-beats-division-tics)
Main Screen - iPad
The main screen shows eight tracks at a time. Change to a new bank using the blue arrow
buttons next to the info button in the header. If you have less than eight tracks, the columns will
be grayed out.
The eight tracks displayed on lpTouch will correspond to the eight tracks that have a colored
vertical strip along their left edge on Logic (if you are using more than one control surface each
has its own color).
Mute or Solo one or more tracks by pressing on the corresponding buttons within each track
column.
The top row of buttons under the track name is dual function: Select (Sel) or Record Enable(o).
In this graphic, they are in the Select mode. Press the Sel/Arm button to toggle between the two.
To select a track, first make sure the Select-Record row of 8 buttons is in the Select mode. (Press
the Sel/Arm button if needed). Press the Sel button for the desired track to make that the
“current” track.
Note: When you use the Sel button on an auxiliary or output track that is showing in the current
bank, Logic does not light the Sel button even though that auxiliary or output channel is selected.
Also the Arm button has a different meaning, and also does not light. When you press it, Logic will
show the “Bounce to file” dialog on the Mac’s screen.
When activated/selected, the Select, Record, Mute and Solo buttons will change color.
Whenever you press on a Solo button, Logic makes the Mute buttons blink on lpTouch for all other
tracks (that are not currently muted or soloed).
Press the Solo Reset button to reset/disable the Solo control for all tracks in which it is active.
In the bottom right corner are two buttons - Cycle and By Marker underneath the text “Move”.
When Cycle is active, clicking on the << and >> transport buttons will move the current loop
points (cycle region) either backwards and forwards respectively. When By Marker is active, the
playhead position moves to the previous or next marker you set. These two buttons toggle on and
off, but only one can be on at a time. Normal playhead position movement occurs when both
buttons are off.
Track Volume Faders
The center section holds individual track volume faders. Each track’s number, name, and
volume value is displayed. Adjust the volume for a track by moving the fader thumb up or down.
In the iPad/iPhone Settings application, under “lpTouch”, you can set a preference (“Faders Jump
on Touch”) that also allows the fader position to “jump” directly to wherever you tap within the
fader bar. This is useful for quickly changing volume settings. Set the preference to ON if you
want this feature.
You can also double tap your finger quickly on the fader thumb and the thumb and value will reset
to 0 dB. This default position is indicated with a different color tic mark. If you move the fader to its
fully down position, the track level is fully attenuated and the display shows “Off”.
Aux 1 and Master Volume Faders
At the right side are the Aux 1 and Master Volume faders. Note: if using Logic X, please read
“lpTouch and Logic X” on the lpTouch Requirements & Setup page at www.delora.com.
Aux 1 corresponds to the auxiliary channel assigned in your project with the lowest channel
number (1= lowest). Normally this is an effect like reverb but it may be anything you assign to it.
The name below the lpTouch fader is the same as that assigned in Logic.
Pan-Sends Screen - iPad
Just as in the Main screen, the Pan-Sends screen shows eight tracks at a time. The arrow keys
by the Info button in the header move to the next bank of eight.
The Select, Record, Mute, Solo, Sel/Arm, Solo Reset, Move Cycle, and Move by Marker buttons
are identical in function and location to the Main screen. In this graphic, the dual function Select/
Arm buttons are in the Arm (Record) mode.
Pan & Sends Rotaries
Pan control for each track is located in the first tier of rotaries. The next three tiers show the first 3
Send effects of your song. The name of the Send effect and the individual values by track are
shown.
Start at the bottom left side of the rotary and move your finger clockwise. The value number
changes, and a segmented arc displays to correspond to the value’s relative position. This allows
you to view the positions for all eight tracks at a time.
In the iPad Settings app under lpTouch, you can enable a preference setting called “Linear
Rotaries”. If this is set to ON, you operate the rotaries differently. Slide your finger up and down
(vertically) starting over the rotary center knob, instead of moving circularly.
If the name and value of a Send is orange,
then that effect is currently in a Bypass state
on Logic. Bypassing an effect on this screen
can only be enabled and disabled on Logic lpTouch will just show the state. You can
adjust the value even if it is in a Bypass state.
Aux 2 and Aux 3 Faders
Note: if using Logic X, please read “lpTouch
and Logic X” on the lpTouch Requirements &
Setup page at www.delora.com.
Aux 2 and 3 corresponds to the second and
third lowest numbered auxiliary channels
assigned (chronologically) in your project.
Normally these are “Send effects”, like a
delay, but may be anything you assign. The
names below the lpTouch faders correspond
to those assigned in Logic.
Note
The built-in Logic control surface driver used
by lpTouch currently has a bug that can leave
the Send showing bypassed on lpTouch
when it is not bypassed on Logic. This does
not affect operation (you can still control the
Send value from lpTouch) but it may mislead
you. You can usually correct this by changing
banks, then returning to this set. This
problem arises when you adjust a Send
control’s value on Logic’s screen while that
Send is bypassed. Logic will turn the bypass
off and show it on its screen, but does not
report this change to control surfaces like
lpTouch.
Channel Strip Screen - iPad
On the Channel Strip screen, all of the controls apply only to the currently selected track.
The blue arrow keys next to the info button move forward or backward, one track at a time (not in
banks of eight).
In the top left section of this screen, you can enable/disable Mute, Solo, Record, and Input
Monitoring for the track. All change color to indicate they are enabled. Pan is adjusted using the
rotary.
Since input monitoring is only applicable to audio tracks, the “I” button will not do anything on
lpTouch if the current track is not an audio track.
Track volume is adjusted using the fader along the right side of the screen.
Press the Automation button to change the automation mode. A popup will display. Click on the
desired selection and the new automation mode name will show above the button.
The levels for 5 Sends for the track are adjustable using the rotaries in the top center of the
screen. The name and value color will appear orange if that Send is in the Bypass state on Logic.
You need to use Logic to bypass or un-bypass a Send effect but the value can be adjusted. Also
see the note in the Pan-Sends Screen section regarding a Logic bug and the suggested work
around.
The rotaries in the bottom center section apply to the Effect parameters of the current Plug-In,
whose name is displayed. Up to sixteen parameters are shown at a time. Press the arrow
buttons next to the page number to go to the next “page” of sixteen parameters (if applicable).
Insert section
The center portion of the Channel Strip screen contains the names of any plug-ins that have been
inserted into the channel’s 12 available slots. Under each of the 12 insert names are two buttons:
• the left toggle button controls whether the insert is enabled or bypassed. The button is color
highlighted (orange) when in a Bypass state.
• click on the right button to edit/adjust the parameters of this insert. The button will color
highlight (blue) to show it is in edit mode. You will see the name of the insert below and its
available parameters adjustable by 16 rotaries. (Use the page buttons to adjust more than
sixteen settings if needed)
Note
The Channel Strip, EQ, and Instrument screens only apply to regular audio or instrument
channels. Auxiliary and output channels by default cannot be accessed using the track left and
right buttons, nor will they display if selected in Logic. External MIDI channels will display but
you will not be able to control sends or inserts. If you wish to be able to control auxiliary
channels you will need to assign them to tracks in Logic’s arrange window. The most direct
way to do so is to select those channels in Logic and then press the shortcut key CNTL-T.
EQ Screen - iPad
Like the Channel Strip screen, all of the controls on the EQ screen apply to the currently selected
track (see the note in the Channel Strip Screen section about restrictions). Pressing the blue
arrow keys in the header next to the info button moves forward or backward by one track.
The lpTouch EQ screen is very similar to the Channel EQ popup window that will show on your
computer when you click on the lpTouch EQ tab. The eight columns correspond to the same eight
EQ bands in Logic (left to right): High Pass Filter; Low Shelf; Low, Low-Mid, Mid-High, and High
parametric filters; High Shelf; and Low Pass Filter.
The buttons on the top are “band bypass buttons”. When these buttons are ON, their color
lightens. This means that that EQ band is active and affecting the sound according to its level,
frequency, and Q setting. You can adjust these settings with the corresponding fader and two
rotaries below the button. When the switch is off (darkened) the band is bypassed and does not
affect the sound. The fader and rotaries are also disabled but they continue to show their last
setting. You can use the band bypass feature to momentarily take a band’s affect out of the EQ so
you can compare the sound to when it is active.
The faders adjust the Gain/Slope levels/values for each band. The first and last bands are simple
highpass and lowpass filters and as such they do not have level controls. Instead the faders adjust
the filter’s order (6 dB/OCT, 12 dB/OCT and so on). They are step controls. The faders for the
middle six bands control the band’s gain; up for “boost” and down for “cut”.
Double tap on any fader thumb and it returns to the default position. (The same applied to the
rotaries).
The first tier of rotaries adjusts each band’s Frequency. Note that the last band, the lowpass filter,
works in a reverse fashion; adjusting the rotary clockwise (or up) causes the frequency value to
decrease. This is done this way because that is how Logic’s default EQ plugin operates.
The second tier adjusts the Q factor or resonance levels.
To adjust the overall Gain level, use the fader along the right edge of the screen.
Below this is the “Link” button, which activates Gain-Q coupling. See Logic’s manual for an
explanation for this control.
Instrument Screen - iPad
The Instrument screen shows software instrument parameters if the track is a software instrument
track. When you tap on this tab on lpTouch, the instrument’s plugin “GUI” display will also show
as a window in Logic.
The blue arrow keys in the header next to the info button move forward or backward by one track.
The instrument parameters for the new track will then show on the Instrument screen.
The name and value for 24 parameters of a plug-in effect are shown at a time. Press the arrow
keys next to the Page number to see additional parameters, if applicable.
iPhone/iPod touch Screens
Main Screen
The main screen incorporates 3 functions:
• standard transport and playback functions: Stop, Play, Record, Beginning (of song or Cycle if
enabled), Backward, Forward, Metronome, Replace, and Cycle
• display of Logic’s bar-beat and time code formats that change real time in playback
• general functions that apply to the currently selected track/channel (channel fader volume,
pan, mute, solo, record, input monitoring, track automation). Since input monitoring is only
applicable to audio tracks, the “In” button will not do anything on lpTouch if the current track is
not an audio track.
The current track name and number show in the center of the screen. Change tracks using the
arrow buttons.
Whenever you press on the Solo button, Logic makes the Mute buttons blink on lpTouch for all
other tracks (that are not currently muted or soloed).
Track Volume Fader
In the iPhone Settings application, under “pTouch, you can set a preference (Faders Jump on
Touch) that also allows the fader position to “jump” directly to wherever you tap within the fader
bar. This is useful for quickly changing volume settings. Set the preference to ON if you want this
feature.
You can also double tap your finger quickly on the fader thumb and the thumb and value will reset
to 0 dB. This default position is indicated with a different color tic mark. If you move the fader to its
fully down position, the track level is fully attenuated and the display shows “Off”.
EFX Screen
Adjust each track’s Sends, Insert Enable/Bypass and Plugin parameters on this screen by
selecting from the bottom segment control.
Sends
Adjust up to 5 Send effects (if applicable) for the selected track. If the name and value of a Send
is orange, then that effect is currently in a Bypass state on Logic. Bypassing an effect on this
screen can only be enabled and disabled on Logic - lpTouch will just show the state. You can
adjust the value even if it is in a Bypass state.
Inserts
Shows the names of any plug-ins that have been inserted into the channel’s 12 available slots.
Under each of the names are two buttons.
The left toggle button controls whether the insert is enabled or bypassed. The button is color
highlighted (orange) when in a Bypass state.
Tap on the right button to allow editing of the parameters of this insert. The button will color
highlight (blue) to show it is in edit mode. The parameters for this selected insert show when
tapping on the “Plugin” segment at the bottom.
Plug-In
The rotaries apply to the Effect parameters of the current Insert Plug-In, whose name is displayed
underneath the track name. Press the arrow buttons at the bottom to go to the next set of eight
parameters for that Plug-in (if applicable). To change the plugin, go to the Inserts segment control
and tap on the right button below its name.
Note
Most of the lpTouch iPhone controls apply only to regular audio or instrument channels.
Auxiliary and output channels by default cannot be accessed using the track left and right
arrows, nor will they display if selected in Logic. External MIDI channels will display but you
will not be able to control sends or inserts. If you wish to be able to control auxiliary channels
you will need to assign them to tracks in Logic’s arrange window. The most direct way to do so
is to select those channels in Logic and then press the shortcut key CNTL-T.
EQ Screen
Adjusting the eight EQ bands is done in groups of two (or four for the iPhone 6 Plus) using
rotaries. The EQ screens will look slightly different depending on if you are running Logic 9 or 10
as the EQ icons and coloring on lpTouch are tailored to each.
The buttons to the left of the rotaries are “band bypass buttons”. When ON, that EQ band is
active and affects the sound according to its gain/slope, frequency, and Q setting. You can adjust
these settings with the corresponding 3 rotaries to the right. When the switch is OFF, the band is
bypassed and does not affect the sound. The rotaries are also disabled. You can use the band
bypass feature to momentarily take a band’s affect out of the EQ so you can compare the sound
to when it is active.
To adjust the overall Gain level, use the horizontal fader.
Above this is the “Link” button, which activates Gain-Q coupling.
(Below: iPhone 5 running Logic 9)
(Below: iPhone 6 Plus running Logic X)
Instrument Screen
The Instrument screen shows software instrument parameters if the track is a software instrument
track.
The name and value for 12 parameters of the instrument are shown at a time (16 are shown on
the iPhone 6 Plus). Press the arrow keys next to the Page number to see additional parameters,
if applicable.
Master/Aux Screen
This screen offers the ability to adjust the overall master volume and 3 aux channels.
Note: if using Logic X, please read “lpTouch and Logic X” on the lpTouch Requirements & Setup
page at www.delora.com.
Normally, the master volume fader is on the left, with Aux 1 on the right. Tap on the ‘Aux 2-3’
button and the 2 faders now adjust Aux 2 and 3 levels.
Aux 1 corresponds to the auxiliary channel assigned in your project with the lowest channel
number (1= lowest). Normally this is an effect like reverb but it may be anything you assign to it.
The name at the top of the lpTouch fader is the same as that assigned in Logic.
Aux 2 and 3 correspond to the second and third lowest numbered auxiliary channels assigned
(chronologically) in your project. Normally these are “Send effects”, like a delay, but may be
anything you assign. The names above the lpTouch faders correspond to those assigned in Logic.
The ‘Solo Reset’ button is used to reset/disable the Solo control for all tracks in which it is active.
In the bottom right corner are two buttons - underneath the “Move by” text. When ‘Cycle’ is active,
clicking on the << and >> transport buttons moves the current loop points (cycle region) either
backwards and forwards respectively.
When ‘By Marker’ is active, the playhead position moves to the previous or next marker you set.
These two buttons toggle on and off, but only one can be on at a time.
Info Screen
Press the i button at the top right of
any screen to obtain access to information
about lpTouch:
• lpTouch User Guide
• Support information
• About screen provides the option to
leave lpTouch and visit the Delora
website, or view legal information
• What’s New lists the improvements
found in the current version, as well as
a version history.
The bottom bar/text ‘Connect’, must be
pressed the first time you open lpTouch,
followed by tapping on the name of the
computer where you have Logic installed.
This initial connection is required to
make lpTouch operational.
Should lpTouch and Logic become
disconnected, you should return to the info
screen and repeat the connection
sequence.
Press Done to exit.
Support
Tapping on ‘Support’ brings up the screen
shown at right. If you have email setup on
your iPad/iPhone, tap on Email Support
and type in a description of your problem.
Please also fill in the information requested
about your system.
‘Email Log’ is described in the first chapter
about Preference Settings.
Troubleshooting
The primary reasons lpTouch may not operate properly are:
1. You have not established the initial connection between lpTouch and Logic
The first time you use lpTouch, you must create the link between it and the computer running
Logic. If this is not done then no data will show on lpTouch and the info button (top right
corner of lpTouch) will pulse red.
Remedy: Make sure that Logic is running and your computer is connected to the same Wi-Fi
network as your iPad/iPhone. Tap on the info button on lpTouch, then tap on “Connect ”. Any
computers currently running Logic on your Wi-Fi network will show in the list. Select whichever
one you wish to use and a checkmark will show.
Now check your computer screen and you should find Logic’s “add control surface” popup
message showing (it may take a few moments). Click “Add”.
On your iPad/iPhone, ‘Connect’ should apppear green, and the i button should no longer pulse
red. Exit the info screen, and the lpTouch screen should populate with data for the currently
open song on Logic. If it does not on the iPhone, tap on the arrow keys on the Main screen, or
select the other tabs and then return to the main screen.
If this should not work as expected, or you believe lpTouch is somehow “out of sync” with
Logic, return to the list of available Logic computers and reselect the same computer you are
connected with. This will cause lpTouch to reconnect, and in the process it will also refresh its
data.
Problems may also occur if you have used another OSC controller app/device in
the past with Logic. See #3b for more on this.
2. Wi-Fi is not enabled or general networking issues
When you start lpTouch, its info button will pulse red if it is unsuccessful connecting to Logic.
This could be because the computer it last connected to is no longer available on the Wi-Fi
network, or it could be that Logic is not running. However it could also be due to a general WiFi connection problem. If lpTouch does not find any computers running Logic and you press
the “Connect to Logic” bar, the info screen will display a message that it is attempting to
connect to Logic, but nothing happens.
Remedy: Wi-Fi networking issues can be tricky to troubleshoot. The first thing you should do is
verify that your iPad/iPhone is connected to the same Wi-Fi network as the computer running
Logic. Next use the Wi-Fi settings in the iOS Settings app to turn Wi-Fi off, wait a few seconds,
then back on again. Sometimes “cycling” Wi-Fi in this fashion gets things unstuck.
Also check the signal strength the iPad/iPhone is showing on its status bar. Low signal
strength can cause connection and operation problems. If the signal level is too low you may
need to move to a different spot to gain better signal quality.
Your computer’s network settings may prevent proper operation even if your computer is still
able to access the Internet. OSC controllers like lpTouch must be on the same subnet as your
computer. A “subnet” is kind of like a network apartment building where all devices share the
same building address but they are in different units. If you are unfamiliar with networking setup you may find that our networking guide at http://www.delora.com/tips_and_trends/
networking_guide/networking_guide.html helpful.
Another possible conflict is if your computer is running its own firewall. OS X’s firewall program
can be set up to allow proper operation of OSC controllers but if you are having connection
difficulties try turning it off and retesting. That way if it starts working you will know you need to
adjust the firewall’s settings.
Desktop computers usually have networking settings that do not change once they have been
set up but laptops can be a bit different. Some users take advantage of OS X’s “locations”
feature to have different network settings for work, home, the studio, or the local coffee shop. If
your laptop is set up in this way, always make sure that you select the correct “location” before
using lpTouch.
Another possible problem concerns Apple’s Bonjour technology. Logic’s built-in OSC support
relies on Bonjour to properly establish communications with lpTouch. If Bonjour is not working
properly on your network you will not see any possible Logic hosts in lpTouch’s connection
screen. Bonjour normally “just works” but some Wi-Fi routers or access points (the “box” you
use to provide a Wi-Fi network) have been known to have problems. Sometimes this can be
remedied simply by power cycling your router/access point but more typically they will require
a firmware update or even need to be replaced.
There are a number of iOS’s newer features like AirPlay and iTunes Wi-Fi sync that also rely
on a properly working Bonjour set up. If you have noticed any issues with these then you will
need to get Bonjour working properly before you can use lpTouch.
Finally, if your computer has a built-in AirPort Wi-Fi interface (as do MacBooks, MacBook Pros,
MacBook Airs, iMacs, and even some Mac Pros) then a simpler way to set up networking for
use with an OSC controller is a “computer to computer” network (also known as “ad-hoc”). OS
X makes this simple to set up. Not only will it help get you connected by taking a lot of the
potential “gotchas” out of the picture, but it usually provides the best responsiveness and
reliability. See the Appendix of this manual for additional information.
3. Logic is displaying an action popup window on your computer
If you are in an lpTouch session and suddenly the controls don’t work, it may be that Logic has
placed a popup window on your computer screen that requires you to take action. Sometimes
it’s not noticeable and hidden behind other views. In this case, lpTouch may seem
unresponsive. For some minor operational messages, simply dismiss/click on the desired
action for the message on your computer and things should behave normally.
However, some specific messages displayed by Logic need to be understood and
handled in a particular way:
3A. Incompatible ports message
If you have any devices running on the same network as Logic that use Open Sound
Control (OSC), there is a rare but possible message you could see on Logic that states that
multiple devices are using the same port number.
If this happens when you are using lpTouch, click “OK” on the message. If one or both of
the mentioned devices are your iPad/iPhone then you also need to reconnect. You can do
this by either accessing the connection screen from the Info Screen (“i button”), or just quit
lpTouch and start it up again. If you are not sure if your iPad/iPhone is mentioned in the
message then you should reconnect just to be on the safe side.
This second, similar message in the graphic above shows that Logic has somehow
confused your iPad/iPhone with itself. As before, dismiss the alert by clicking OK then
either restart lpTouch or reconnect.
3B. Request to add a device message (& problems with multiple OSC registered devices)
When you made the first connection between Logic and lpTouch (described at the
beginning of this manual), Logic displayed a message saying it had detected a new OSC
device and asked to add it to the Setup. You have to add your iPad/iPhone to the
recognized devices or lpTouch will not work.
However, an issue occurs in Logic whenever it detects multiple OSC control surface
devices advertising their “services”, or another OSC control device was previously
added to the setup.
Let’s say you used lpTouch on your iPhone previously with Logic and you now want to use
lpTouch on your iPad. You add lpTouch to the recognized devices when Logic’s request to
add device message appears. Unfortunately, when two or more OSC devices are
registered (evident by two or more device pictures shown on Logic’s Setup screen), Logic
will do some strange things. The song data you get on lpTouch may not be in synch with
Logic, Logic may not respond to lpTouch fader or button actions, and Logic itself may
experience errors and sometimes even crash.
If you have used other OSC controllers/apps with Logic before, or plan to alternate between
controllers, you must perform this sequence each time you wish to switch controllers:
1. Exit Logic if it is already running. Also make sure that no OSC controller app is
running on any of your iDevices.
2. Start Logic
3. Select the following menu item from the Logic Pro menu: Preferences/Control
Surfaces/Setup (Logic 9) or Control Surfaces/Setup (Logic X)
4. Locate any OSC controllers that show in the window, select each and press the
DELETE key.
5. Confirm the deletions
6. Exit Logic (do not skip this step!)
Restart Logic, then lpTouch, and click on “Add” when the popup shows.
If this does not remedy problems then it is likely that Logic has corrupted its control surface
preferences. Unfortunately the only solution is to “trash” those (delete the file) and have
Logic recreate the control surface preferences. For most users this is easy to do but be
warned that if you have customized your Logic control surface settings, including doing
custom assignments and “learns”, then those settings will be lost. We recommend that you
save a copy of the preference file before you delete it. That way if it turns out deleting it did
not fix the problem then you can at least reinstate the prior settings.
The special preference file is named com.apple.logic.cs’ and is located in your “home”
folder at <your_home_folder>/Library/Preferences. Use the Finder to open this folder then
locate the file and move it into the trash. If you are running OS X Lion (10.7) or greater
then it’s a little tricky to find this folder because Finder hides it by default. Select Go/Go To
Folder... from the Finder’s menu. In the prompt enter ~/Library/Preferences, click “Go” and
you should see the correct folder contents.
4. You have previously used TouchOSC with your iPhone or iPod touch
Logic can operate the TouchOSC driver in one of two “modes”, depending on whether
TouchOSC is used on an iPad or an iPhone/iPod touch. However lpTouch requires that Logic
always work in the “iPad mode”, even when it runs on an iPhone or iPod touch.
What this means is that if you run TouchOSC on your iPhone/iPod Touch, then run lpTouch,
Logic sees your iDevice as two different controllers. It will show the popup to add your iDevice
again.
If you answer “Add” then Logic ends up with two OSC controllers and the control surface may
operate erratically. However if you do not add your iDevice again lpTouch also does not
operate properly.
The proper way to handle this situation is to remove your iDevice from Logic’s control surface
setup whenever you wish to change from using TouchOSC to lpTouch, or from lpTouch to
TouchOSC. If you accidentally end up with two OSC control surfaces showing in Logic’s
control surface set up you may also need to delete Logic’s control surface preference file as
described in “3B”.
Remedy: Exit lpTouch, then repeat steps 1 - 6 as listed in “3B” above.
5. Bluetooth is ON on your iPad/iPhone
If controls on lpTouch become sluggish or lpTouch starts to “miss” in displaying changes made
with Logic, Bluetooth may be enabled on your iPad/iPhone
Remedy: Go to the iPad/iPhone Settings application, click on “General”, and set Bluetooth to
OFF whenever you are using lpTouch. (You can turn Bluetooth back ON when done with your
lpTouch session.)
6. You are not running Logic Pro 9.1.6 or higher
Versions prior to this contained bugs related to Open Sound Control (OSC), the control surface
language support that lpTouch uses to communicate with Logic.
Remedy: Select “software update” in the Apple menu when Logic is open and check to see if
you have the latest updates.
Contact Delora Support
If you are still experiencing a problem with lpTouch, email us at [email protected]. Appendix: Setting Up An Ad-Hoc Wi-Fi
Network (OS X 10.5 - 10.9)
OS X provides a simple, straight-forward way of setting up an ad-hoc Wi-Fi network using a Mac’s
built-in Airport. See the next session if you are running OS X 10.10 or higher).
Press this button to turn
Airport on
Step 1:
Open System Preferences and select “Network”. Choose the Airport item from the list at the left.
Turn Wi-Fi on if it is not already.
Step 2:
Open the “Network Name” popup, then select “Create Network…”.
Step 3:
Enter a name for your ad hoc network. Leave “Channel” set to “Automatic” unless you have
problems with interference from other nearby WiFi networks. If you are concerned about another
laptop or device connecting to your Mac check “Require Password” and follow the on screen
directions. If you elect to employ a password you will be required to enter that password also in
your iPhone, iPod touch, or iPad when you attempt to connect to this ad-hoc network. Note that
this kind of password protection is considered “weak” and not really suitable for protecting against
determined intruders. You may want to disable sharing features such as “network sharing”. You
may also wish to enable OSX’s firewall. However, enabling the firewall may require additional set
up to keep it from interfering with communications between your device and computer.
Step 4:
From your device’s Settings application select “Wi-Fi”. Turn “Wi-Fi” ON if it is OFF. After a few
moments you will see the available WiFi network candidates in a list. Select your ad-hoc network.
iOS will show the checkmark next to the network name almost immediately. However the network
connection is still not completed when this happens and can take awhile to become fully active.
Don’t give up if your app does not seem to be able to connect! Give it a bit more time.
Step 5:
You can verify that your device is connected to the ad hoc network by tapping on the "i" button at
the right of the network name to show the following. The connection is established when the
number highlighted below switches from all zeros to something like shown.
When your are finished using the network:
When you are finished using the ad hoc network disconnect all of the devices from the network,
then as the final step disconnect your Mac. It is important that all devices disconnect, otherwise
you may leave a “zombie network” active that could confuse your devices (and you!) that it is
connected when it is not. It is also recommended that you prevent your Mac from entering into its
sleep mode when using an ad hoc network. If your Mac goes to sleep it may disconnect from the
ad hoc network while your devices remain connected. This can create confusion and other
potential issues if you try to recreate the network when your Mac awakens.
Appendix: Setting Up An Ad-Hoc Wi-Fi
Network (OS X 10.10 and higher)
OS X provides a simple, straight-forward way of setting up an ad-hoc Wi-Fi network using a Mac’s
built-in Airport. See the previous session if you are running OS X 10.5 - 10.9).
Step 1:
Open System Preferences and select “Network”. Choose the Airport item from the list at the left.
Enable “Show Wi-Fi status in the menu bar”. Once you have enabled showing Wi-Fi status on the
menu bar, you do not have to perform this step when you create an ad hoc network. Step 2:
Click on the Wi-Fi status menu item at the right side of the OS X menu bar. If Wi-Fi is turned off,
turn it on, then click on “Create Network…”. The popup window below shows. Type in a suitable
name for your network. Normally you do not need to adjust the “Channel” setting unless you
notice very poor or inconsistent Wi-Fi performance, and you suspect that another Wi-Fi network
close-by is interfering. If that is the case, then you may be able to improve matters by selecting a
different channel.
IMPORTANT!
Prior to Yosemite (10.10), OS X had an option to password protect the ad hoc network. This
provided a measure (though weak) of security against unauthorized connection to the Wi-Fi
network. This might be important if say you were performing in a public space and did not wish
anyone to interfere. Password protection is no longer an option so if you need such a feature you
will not be able to set up the ad hoc network from your Mac. If you elect to use OSX’s ad hoc
facility, you should disable sharing features such as “network sharing”. You may also wish to
enable OSX’s firewall. However, enabling the firewall may require additional set up to keep it
from interfering with communications between your device and computer.
Step 3:
Click “Create” and your ad hoc Wi-Fi becomes available to your other devices in a few moments.
The menu bar’s Wi-Fi status icon changes to the one below to indicate that an ad hoc network is
active.
Step 4:
From your device’s Settings application, select “Wi-Fi”. Turn “Wi-Fi” ON if it is OFF. After a few
moments you will see the available WiFi network candidates in a list. Select your ad-hoc network.
iOS will show the checkmark next to the network name almost immediately. However the network
connection is still not completed when this happens and can take awhile to become fully active.
Don’t give up if your app does not seem to be able to connect! Give it a bit more time.
Step 5:
You can verify that your device is connected to the ad hoc network by tapping on the "i" button at
the right of the network name to show the following. The connection is established when the
number highlighted below switches from all zeros to something like shown.
When your are finished using the network:
When you are finished using the ad hoc network, disconnect all of the devices from the network,
then as the final step, disconnect your Mac using the Wi-Fi status icon’s menu. It is important that
all devices disconnect, otherwise you may leave a “zombie network” active that may confuse your
devices (and you!) that it is connected when it is not. It is also recommended that you prevent your
Mac from entering into its sleep mode when using an ad hoc network. If your Mac goes to sleep it
may disconnect from the ad hoc network while your devices remain connected. This can create
confusion and other potential issues if you try to recreate the network when your Mac awakens.
Acknowledgements
In addition to Harmony Systems, Inc.‘s proprietary code, lpTouch contains some code provided by
generous and dedicated independent developers. The following code was used:
oscpack -- Open Sound Control packet manipulation library
Copyright © 2004-2013 Ross Bencina
Permission is hereby granted, free of charge, to any person obtaining a copy of this software and
associated documentation files (the “Software”), to deal in the Software without restriction, including without
limitation the rights to use, copy, modify, merge, publish, distribute, sublicense, and/or sell copies of the
Software, and to permit persons to whom the Software is furnished to do so, subject to the following
conditions:
The above copyright notice and this permission notice shall be included in all copies or substantial portions
of the Software.
THE SOFTWARE IS PROVIDED “AS IS”, WITHOUT WARRANTY OF ANY KIND, EXPRESS OR
IMPLIED, INCLUDING BUT NOT LIMITED TO THE WARRANTIES OF MERCHANTABILITY, FITNESS
FOR A PARTICULAR PURPOSE AND NONINFRINGEMENT. IN NO EVENT SHALL THE AUTHORS OR
COPYRIGHT HOLDERS BE LIABLE FOR ANY CLAIM, DAMAGES OR OTHER LIABILITY, WHETHER IN
AN ACTION OF CONTRACT, TORT OR OTHERWISE, ARISING FROM, OUT OF OR IN CONNECTION
WITH THE SOFTWARE OR THE USE OR OTHER DEALINGS IN THE SOFTWARE.
Reachability Extensions -- Enhancements to Apple’s Reachability class, version 2
Reachability Extensions This is a derived work of Apple's Reachability v2.0 class.
Extensions Copyright (C) 2009 Donoho Design Group, LLC. All Rights Reserved.
Redistribution and use in source and binary forms, with or without modification, are permitted provided that
the following conditions are met:
* Redistributions of source code must retain the above copyright notice, this list of conditions and the
following disclaimer.
* Redistributions in binary form must reproduce the above copyright notice, this list of conditions and the
following disclaimer in the documentation and/or other materials provided with the distribution.
* Neither the name of Andrew W. Donoho nor Donoho Design Group, L.L.C. may be used to endorse or
promote products derived from this software without specific prior written permission.
THIS SOFTWARE IS PROVIDED BY DONOHO DESIGN GROUP, L.L.C. "AS IS" AND ANY EXPRESS OR
IMPLIED WARRANTIES, INCLUDING, BUT NOT LIMITED TO, THE IMPLIED WARRANTIES OF
MERCHANTABILITY AND FITNESS FOR A PARTICULAR PURPOSE ARE DISCLAIMED. IN NO EVENT
SHALL THE COPYRIGHT HOLDER OR CONTRIBUTORS BE LIABLE FOR ANY DIRECT, INDIRECT,
INCIDENTAL, SPECIAL, EXEMPLARY, OR CONSEQUENTIAL DAMAGES (INCLUDING, BUT NOT
LIMITED TO, PROCUREMENT OF SUBSTITUTE GOODS OR SERVICES; LOSS OF USE, DATA, OR
PROFITS; OR BUSINESS INTERRUPTION) HOWEVER CAUSED AND ON ANY THEORY OF LIABILITY,
WHETHER IN CONTRACT, STRICT LIABILITY, OR TORT (INCLUDING NEGLIGENCE OR OTHERWISE)
ARISING IN ANY WAY OUT OF THE USE OF THIS SOFTWARE, EVEN IF ADVISED OF THE
POSSIBILITY OF SUCH DAMAGE.
AsyncUdpSocket
This class is in the public domain.
Originally created by Robbie Hanson on Wed Oct 01 2008, updated and maintained by Deusty Designs
and the Mac development community
http://code.google.com/p/cocoaasyncsocket/
NSObject + Properties, NSString + PropertyKVC
Copyright (c) 2008-2009, Jim Dovey All rights reserved.
Redistribution and use in source and binary forms, with or without modification, are permitted provided that
the following conditions are met:
Redistributions of source code must retain the above copyright notice, this list of conditions and the
following disclaimer.
Redistributions in binary form must reproduce the above copyright notice, this list of conditions and the
following disclaimer in the documentation and/or other materials provided with the distribution.
Neither the name of this project's author nor the names of its contributors may be used to endorse or
promote products derived from this software without specific prior written permission.
THIS SOFTWARE IS PROVIDED BY THE COPYRIGHT HOLDERS AND CONTRIBUTORS "AS IS" AND
ANY EXPRESS OR IMPLIED WARRANTIES, INCLUDING, BUT NOT LIMITED TO, THE IMPLIED
WARRANTIES OF MERCHANTABILITY AND FITNESS FOR A PARTICULAR PURPOSE ARE
DISCLAIMED. IN NO EVENT SHALL THE COPYRIGHT HOLDER OR CONTRIBUTORS BE LIABLE FOR
ANY DIRECT, INDIRECT, INCIDENTAL, SPECIAL, EXEMPLARY, OR CONSEQUENTIAL DAMAGES
(INCLUDING, BUT NOT LIMITED TO, PROCUREMENT OF SUBSTITUTE GOODS OR SERVICES;
LOSS OF USE, DATA, OR PROFITS; OR BUSINESS INTERRUPTION) HOWEVER CAUSED AND ON
ANY THEORY OF LIABILITY, WHETHER IN CONTRACT, STRICT LIABILITY, OR TORT (INCLUDING
NEGLIGENCE OR OTHERWISE) ARISING IN ANY WAY OUT OF THE USE OF THIS SOFTWARE, EVEN
IF ADVISED OF THE POSSIBILITY OF SUCH DAMAGE.
Cocoa Lumberjack
Software License Agreement (BSD License)
Copyright (c) 2010-2015, Deusty, LLC All rights reserved.
Redistribution and use of this software in source and binary forms, with or without modification, are
permitted provided that the following conditions are met:
* Redistributions of source code must retain the above copyright notice, this list of conditions and the
following disclaimer.
* Neither the name of Deusty nor the names of its contributors may be used to endorse or promote
products derived from this software without specific prior written permission of Deusty, LLC.
THIS SOFTWARE IS PROVIDED BY THE COPYRIGHT HOLDERS AND CONTRIBUTORS "AS IS" AND
ANY EXPRESS OR IMPLIED WARRANTIES, INCLUDING, BUT NOT LIMITED TO, THE IMPLIED
WARRANTIES OF MERCHANTABILITY AND FITNESS FOR A PARTICULAR PURPOSE ARE
DISCLAIMED. IN NO EVENT SHALL THE COPYRIGHT OWNER OR CONTRIBUTORS BE LIABLE FOR
ANY DIRECT, INDIRECT, INCIDENTAL, SPECIAL, EXEMPLARY, OR CONSEQUENTIAL DAMAGES
(INCLUDING, BUT NOT LIMITED TO, PROCUREMENT OF SUBSTITUTE GOODS OR SERVICES;
LOSS OF USE, DATA, OR PROFITS; OR BUSINESS INTERRUPTION) HOWEVER CAUSED AND ON
ANY THEORY OF LIABILITY, WHETHER IN CONTRACT, STRICT LIABILITY, OR TORT (INCLUDING
NEGLIGENCE OR OTHERWISE) ARISING IN ANY WAY OUT OF THE USE OF THIS SOFTWARE, EVEN
IF ADVISED OF THE POSSIBILITY OF SUCH DAMAGE.