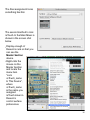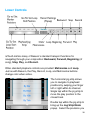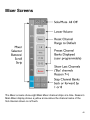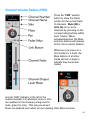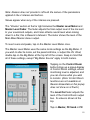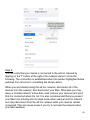
1
rsTouch
rsTouch Pro
Pro
for Reason
User Guide
delora software
Copyright 2015 by Harmony Systems, Inc.
Under the copyright laws, this manual may not be copied, in whole or part,
without the written consent of Harmony Systems, Inc. Your rights to the
software are governed by the accompanying software license agreement.
Delora Software and rsTouch are trademarks of Harmony Systems, Inc.
Apple, iPad, and Mac are trademarks of Apple, Inc., registered in the U.S.
and other countries.
The Bluetooth word mark and logos are trademarks owned by Bluetooth
SIG, Inc., registered in the U.S. and other countries, and any use of such
marks by Apple is under license.
Reason is a trademark of Propellerhead Software.
Other company and product names mentioned in this manual are
trademarks of their respective companies. Mention of third-party products is
for informational purposes only. Harmony Systems assumes no
responsibility with regard to the performance or use of these products.
9
Table of Contents
Getting Started
1
Which Reason?
1
Connecting to Reason
2
Your Computer’s MIDI Requirements
4
Wi-Fi & Bluetooth
5
Install Reason Control Surface Configuration Files6
Set Up Reason To Use rsTouch
7
Assign/Lock Reason’s Main Mixer to rsTouch
14
Connecting rsTouch to Reason
18
MIDI Interface Status and Help
25
Preference Settings
27
About rsTouch/General Operations
Running rsTouch on Multiple iPads
30
33
rsTouch Screens
34
Upper Controls
35
Lower Controls
38
Mixer Screens
40
Channel Volume Faders (FDR)
43
Effect Sends (FX)
46
Inserts (INS)
47
Equalizer (EQ)
47
Dynamics (DYN)
48
Input (IN)
49
Master Screen
50
Device Screens
53
Perform Screens
56
Keys
57
Pads
58
Info Screen
61
Troubleshooting
63
Contact Delora Support
71
Appendix 1: Setting Up OSX Network MIDI
72
Appendix 2: rtpMIDI (network MIDI for Windows)
75
Appendix 3A: Setting Up An OSX Ad-Hoc Wi-Fi Network (OS
X 10.5 - 10.9)
76
Appendix 3B: Setting Up An OSX Ad-Hoc Wi-Fi Network (OS
X 10.10 and higher)
81
Acknowledgements
85
Getting Started
Thanks for purchasing rsTouch Pro! Here’s how to get rsTouch working for
you.
Which Reason?
Reason 6 was the first version that incorporated the Main Mixer. Prior to
that, the Main Mixer was only available when running Record, whether using
Record by itself or with Reason “integrated” inside. Propellerhead includes
Main Mixer control surface support for Reason (starting with Reason 6),
Record 1.5, and Reason Essentials. rsTouch relies on this built-in support
for its access to the Main Mixer’s faders, rotaries, and buttons.
rsTouch’s features are dictated by what Propellerhead exposes through its
Remote control surface system. This is generally good news because
Remote has been supported since Reason 3, and there is strong
compatibility between versions. In most cases, this means that support in
the most current version of Reason is the same as the previous. You, the
user, benefit because rsTouch behaves nearly the same with all supported
Reason versions.
However this also means that unless Propellerhead provides Remote
support for new features, those are not available to any control surface,
including rsTouch. A prime example of this is the spectrum analyzer added
in Reason 7. That capability does not have any Reason Remote support so
rsTouch is unable to accommodate it. Likewise Reason 7 added mixer bus
channels but provides no direct way through Remote support for a control
surface to distinguish or directly access a bus channel; they behave just like
any other Main Mixer channel.
Bus channels provide an example of how rsTouch sometimes tries to
support a Reason feature, even though it is not directly supported by
1
Remote. rsTouch attempts to use "other information" it has available to
decide if a mixer channel is a bus or a regular channel. If it believes its a
bus, it displays it accordingly.
Reason Version Setting
rsTouch, by default, assumes that you are using the most recent version of
Reason. If you are not, there is a preference setting you should change. Tap on the i button at the top, left of the time display. Tap ‘Settings’. Tap
which version of Reason you are running in the selector under ‘Reason
Version Settings’.
For optimal performance, rsTouch should be used with either Reason 6.5 or
above or Reason Essentials 1.5 or above.
Connecting to Reason
rsTouch Pro is actually three separate Reason control surfaces. The “Master
and Mixer” controller is used to control Reason’s “Master Section”, which
includes the main mixer. This is sometimes called “the SSL” because of its
resemblance to a certain famous studio mixing desk.
Controller two is the “Device” section, which is used to remotely edit
Reason’s various synthesizer and effect rack devices. If you have used
other hardware controllers with Reason then you are already familiar with
how Reason works together with the control surface to support editing rack
devices.
rsTouch’s third controller section is “Performance”. This features a music
keyboard and a drum pad controller. These are used to play notes and other
controller “moves” into Reason.
2
Reason normally expects each control surface to use its own dedicated set
of MIDI inputs and outputs. Fortunately, rsTouch is designed to work with a
single MIDI connection. Furthermore, rsTouch’s Reason “codec” control
surface files were created to work with only a single MIDI connection.
However, you still must set up Reason to use each of the three controllers
separately. Reason will also complain that you are trying to use the same
MIDI port for all of the rsTouch controllers (it will show a yellow “caution”
graphic). Ignore this - this is how rsTouch is supposed to be used.
The single MIDI connection
between your iPad and the
computer running Reason can be
one of the following:
• a conventional “MIDI cable” set up
if you have a USB MIDI interface
that works with your iPad, OR
• a “network MIDI” set up using the
iPad’s Wi-Fi. Network MIDI
requires that your Mac or
Windows PC is connected to the
same local area network as your
iPad. It also requires that you set
up the network MIDI interface on
your computer, and in the case of
a Windows PC, you must also
install a special MIDI driver. This
is discussed in depth shortly.
Note: If you use wired MIDI,
rsTouch requires full performance
MIDI interfaces for the iPad and
computer that reliably support all
standard MIDI commands,
including SYSEX. Unfortunately
some MIDI interfaces suffer data
loss or data corruption when
used in demanding applications
like rsTouch. Diagnostics are
included in rsTouch to help
identify possible MIDI interface
problems. See “MIDI Interface
Status and Help” near the end
of this chapter.
A standard cable MIDI connection is the easiest to set up but you sacrifice
the ready portability of using a wireless connection. A wired MIDI connection
is best if you use rsTouch close to your computer, or your studio has an
existing MIDI set up that makes connection and use simple.
3
One benefit of using wired MIDI is that rsTouch will not suffer any
performance or latency degradation due to Wi-Fi signal quality or other
heavy network activity. However that does not necessarily mean that a
wired MIDI connection will be more responsive. Network MIDI has the
potential to substantially move
more MIDI traffic that wired MIDI.
Make sure that you always have
This may be significant if you
your MIDI interface or network
regularly work with very complex
MIDI driver running before you
Reason projects.
start Reason. If not, Reason
may not be able to “find” your
rsTouch is flexible about what
MIDI connection. If you notice
MIDI connection it uses, so you
that Reason does not list your
can easily move back and forth
MIDI port (regular or networked)
from wired to network MIDI if
in the preferences, then quit
desired.
Reason, get the MIDI port
working, and restart Reason.
Your Computer’s MIDI
Requirements
Your computer must have at least a MIDI input and output dedicated to your
iPad connection. Whether you use a wired MIDI connection or a network
MIDI connection, the MIDI port must show as available to Reason from its
control surface set up. If both the input and output are not shown then you
do not have a workable MIDI set up.
A wired MIDI connection involves some type of MIDI interface. A typical
example is a USB MIDI interface “box” or “cable”, but it could also be a USB
MIDI keyboard controller that includes an extra MIDI input and output.
Connect the iPad’s USB MIDI interface output to the computer’s MIDI input
and the iPad’s MIDI input to the computer’s output.
Wireless connections are made through a special “network MIDI” interface.
If you use a Mac, then this is already built-in and it is easy to set up using
the Audio Midi Setup application. We will illustrate the steps later.
4
If you use a Windows PC and have not yet set up a network MIDI interface
for connecting to your iPad, then you have a few additional steps. After
reading the rest of this chapter, see Appendix 2: rtpMIDI.
Whether Mac or PC, a wireless connection requires a working Wi-Fi network
connection between your computer and your iPad. If you already have a
working Wi-Fi network in your studio, then you are probably ready to
proceed. There are, however, some common problems related to Wi-Fi;
these are discussed in the Troubleshooting chapter.
If you do not have a working Wi-Fi network but want to connect wirelessly,
then you will have to provide at least a minimal Wi-Fi network including your
computer and the iPad. One solution (if your computer has built-in Wi-Fi) is
to set up a “computer-to-computer” - also known as “ad hoc” - network.
Instructions for setting up an ad hoc network depend on your computer and
what version of Windows or OSX it runs. Consult Internet sources if you
want to pursue using a computer-to-computer network. If you have a Mac,
instructions for creating an ad hoc network are found in the Appendix.
Wi-Fi & Bluetooth
If you wish to connect wirelessly then you must make sure that your iPad is
correctly set up to communicate. Open the iOS Settings app, tap General,
then Network, and make sure that Wi-Fi is set to ON and the correct Wi-Fi
network is checked.
If your iPad has some type of cellular data connection, such as 3G, that will
NOT work! Network MIDI is designed to operate on a “local area network”;
it is not compatible with the “wide area network” you get with your cellular
phone service. This also means that you cannot use rsTouch through an
Internet connection. The iPad and your computer must be on the same local
network.
5
It’s also best to have Bluetooth disabled on your iPad whenever you
connect rsTouch wirelessly. Bluetooth and Wi-Fi sometimes compete for
network access and Bluetooth can cause problems with sluggish response
(latency), and even data loss. Go to the iPad’s iOS Settings application, tap
on the General tab, and check that Bluetooth is set to OFF. Note: this only
applies to Bluetooth on your iPad. You can keep Bluetooth ON on your
computer and continue using your Bluetooth mouse, keyboard and other
computer accessories.
Install Reason Control Surface Configuration Files
rsTouch uses Reason’s built-in control surface facilities but this requires that
you install some special files, a type of “Reason control surface driver”, in
the location Reason specifies. There are two main components:
• “Codec”
• “Map”
When you use Reason’s preferences to configure MIDI devices you are
working with Codec and Map files. Reason comes preinstalled with quite a
number of these that support common MIDI controllers but it also lets you
install new devices, like rsTouch. You must perform this installation
before you try to use rsTouch for the first time, and you must quit
Reason before running the installer.
Where to Get the Configuration Files
We provide a download link on the rsTouch product page on the
www.delora.com website (click on “Requirements and Setup”). These are
bundled in an easy to use installer that handles all the details of putting
these files in their proper place. Download the installer “ZIP” file, unzip it,
then run the appropriate installer for your type of computer (Windows or
MacOSX). Use your computer to perform the download, not the iPad.
You will only use the installer on your computer and it is tricky to download a
file to the iPad and then move it to your computer.
6
Set Up Reason To Use rsTouch
You must configure
Reason to use rsTouch
as three different control
surfaces (one for each of
rsTouch’s major operating
sections). This is a onetime setup, and must be
performed before you try
to connect rsTouch with
Reason the first time.
Start Reason, then:
• Select the
Preferences... menu
item
• Select the Control
Surfaces tab; you
should see a dialog
similar to the one at
right.
You must add three new
controllers to Reason,
one for each of rsTouch’s major sections. This also must be done manually
as Reason’s “Auto-detect Surfaces” button will not work for rsTouch set up.
7
Add the “Master and
Mixer” controller:
• Press Add
• Select Delora
Software as the
manufacturer. You will
see 4 choices for
“Model”: rsTouch,
rsTouch (SLOW),
rsTouch_Device, and
rsTouch_Perform.
•Select rsTouch
Note: rsTouch (SLOW)
should only be used in
special cases - see #6
of the Troubleshooting
chapter.
8
•Type in/assign an easy
to remember “Name”.
This example uses
“rsTouch Mixer” so it’s
easy to see that this is
rsTouch’s “Master and
Mixer” controller.
•Assign the MIDI input
and output you are
using to connect your
iPad and computer.
Usually the in port and
out port are the same
MIDI device. Here a
network MIDI
connection is used.
9
•Press OK and you
should see
something like the
screen to the left.
You have now
successfully set up
the first of
rsTouch’s three
controllers. The
next two are done
similarly.
10
Here’s how you set up rsTouch’s second controller, the “Device” section.
Note that you must use the same MIDI ports as you used for the first
controller.
11
The final controller, the “Performance” section, would look something like
this:
12
Once you have added all three rsTouch controllers your final Reason set up
will look something like the screen below. The yellow “caution” graphics are
normal (this was explained at the beginning of this section). If, however you
see a red “X” graphic then something is wrong with your MIDI connection.
There is now one last, important setup step: “Locking” Reason’s “Master
Section” to rsTouch’s “Master and Mixer” controller. Please proceed to the
next section!
13
Assign/Lock Reason’s Main Mixer to rsTouch
Reason control surface support defaults to controlling the "currently active
device". Usually this is the synthesizer you have assigned to the current
sequencer track. When you change to a different sequencer track, Reason
automatically switches the control surface to that track’s device. This is how
a controller can “follow along” and automatically provide remote control over
the Reason device you are currently playing.
The scheme is exactly what you want for controlling devices in Reason’s
rack, or playing a keyboard into a Reason track. In fact this is how rsTouch’s
device and performance controllers automatically “follow” the device and
currently selected track. However this method does not work if you want to
be able to control Reason’s Main Mixer “on demand”. Selecting the Main
Mixer requires a manual step from Reason’s user interface and there is
really no practical way to do this from a control surface like rsTouch.
Fortunately it is a simple operation to manually "lock" rsTouch’s “Master and
Mixer” section to Reason’s Main Mixer. Once locked, rsTouch continues to
control the Main Mixer, regardless of the selected track or rack device. So
you can switch back and forth between the mixer, a device, and playing the
keyboard or drum pads, without touching your mouse!
Locking rsTouch to the Main Mixer is required for rsTouch to properly
operate! If you forget to perform this step, rsTouch alerts you by flashing its
“i button”. This must be done once for each of your Reason projects.
Reason remembers this setting when you save your project.
Locking can be done three different ways, so choose the best method for
you.
14
The first method is to
select Reason’s Options
menu, then click on
“Surface Locking...”.
This shows a “Surface
Locking” dialog window
with a drop down menu
to select the controller
you want to lock
(“rsTouch Mixer” in this
case).
Select the
rsTouch_name, where
rsTouch_name is the
name you assigned
rsTouch’s mixer in
Reason’s control surface
preferences, then click
on the “Lock to Device”
drop down menu. Near
the top of the list will be
“Master Section”. Select
that device.
15
The final assignment looks
something like this:
The second method to lock
rsTouch to the Main Mixer is
shown in the screen shot
below.
• Display enough of
Reason’s rack so that you
can see the
Master Section
device.
• Right-click the
mouse on the
Master Section
and locate the
menu item
“Lock
rsTouch_name
to This Device”,
where
rsTouch_name
is the name you
assigned
rsTouch mixer in
Reason’s
control surface
preferences.
16
The third way to Lock is:
• Show the Main
Mixer on the
computer screen
• Right-click in the
Main Mixer’s master
section, for
example, its master
fader/master meter
area. Right-clicking
on any part other
than the master
mixer section will
not work!
• Select the menu
item “Lock
rsTouch_name to
This Device”, where
rsTouch_name is
the name you
assigned rsTouch
mixer in Reason’s
control surface
preferences.
Once you have locked rsTouch to the Main Mixer it will remain so unless
you manually unlock it (don’t!). Locking remains in effect as long as the
project is loaded. When you save a project it will know to lock rsTouch to the
Main Mixer the next time it is loaded.
Unfortunately Reason does not offer a preference setting so you could
choose to always lock rsTouch to the Main Mixer, so you must perform the
Lock function for every new or unsaved song. There is a work around:
template songs. If you already use one or more templates to start your
17
projects, load each one, assign rsTouch to the Main Mixer, then save them
as a template. Now whenever you begin a new project it will automatically
start with rsTouch properly assigned. If you do not use templates take this
opportunity to begin using them; they are a fantastic time saver!
Connecting rsTouch to Reason
Launch rsTouch on your iPad. You will first see the “Master” view.
The “iButton” ,
(shown circled in the
screen shot) is one of
rsTouch’s most
important controls. The
“iButton” notifies you
when something
requires your attention;
it will slowly blink with a
red “halo” whenever
there is a problem.
When you start rsTouch
it automatically
attempts to connect
with Reason using the
same method it last used. If Reason is running, and your MIDI set up is
operating properly, then after a few moments rsTouch automatically
completes the connection and the screen updates to Reason’s current state.
If anything prevents completing the connection, including if you have not yet
assigned rsTouch to Reason’s Main Mixer, the “iButton” shows there is a
problem.
18
When you use rsTouch for the
first time, you must make an
initial connection. Tap the
iButton to initiate a connection;
the “Info Screen” will appear.
Notice that in this example the
Connect text/bar is red. rsTouch
changes the color and provides
helpful messages about the
current connection status. Here
there is no connection, so the
text is red with the appropriate
message.
(In the example to the bottom
right, the Connect item is green
and the status message says
“Connection OK” because
rsTouch is successfully
communicating with Reason.)
Tap on the Connect text/bar to
display the main connection
screen. This “MIDI Connections”
screen provides a summary of
your current connection, and a
way to change it.
The top item shows if rsTouch is
connected to any network MIDI
“hosts”. Notice the red “X”
through the MIDI symbol; this
means that there is either no
selected host, or that the one
19
selected is not currently available. Whether you use a wireless (networked)
MIDI connection, or a wired MIDI connection is up to you. When you use a
wired MIDI connection, then you can ignore the “Network MIDI Hosts” item.
Below it are the “MIDI
Connections”, one for each
input and output. Your iPad
may have multiple MIDI
interfaces attached, internal
MIDI connections provided by
background apps, and of
course network MIDI. Each of
these are possible inputs or
outputs. You will select which
to use by tapping on the input
or output item as needed.
Notice again that the MIDI
symbols show a red “X”
because there is no selection, or the current selection is unavailable.
Wired Connection Setup
Let’s try setting up a wired MIDI connection.
First, make sure that the iPad’s MIDI interface is connected, and if needed,
powered.
• Tap the iButton, then the Connect text/bar.
• Bring up rsTouch’s MIDI Connections screen and tap on the MIDI input
item.
• The next screen (MIDI Input Devices) shows all of the iPad’s available
MIDI inputs. If there is not a current selection, the display looks similar to
the one at the top right.
• Since we want to use wired MIDI, tap on USB MIDI Interface (or
whatever name your iPad MIDI interface uses).
20
rsTouch automatically takes
you back to the MIDI
Connections screen. The
next time you show the MIDI
Input Devices screen, you
should see a check mark at
the right of the last input
selected.
Repeat this procedure to
choose the MIDI output.
Once you have completed
your selections, go back to
the Info Screen and tap
Done.
Network MIDI Connection Setup
Connecting through a network MIDI connection is similar but has an
additional initial step: selecting the “host”. A host is any Mac or Windows PC
set up with a working network MIDI connection. Note that these may or may
not also be running Reason. For example your studio may use network MIDI
for other purposes. rsTouch can only distinguish if a host is also running
Reason by first connecting to that host then attempting to communicate by
sending the appropriate messages.
Select the active network MIDI host:
• Press the iButton, then Connect text/bar to bring up the MIDI
Connections screen
• Tap on the Network MIDI Hosts text/bar. A new popup screen will show
all of the network MIDI hosts “visible” to rsTouch.
21
A typical studio probably has a single host, the computer where you are
running Reason, but there could be more. If you do not see your Reason
computer then you have some type of communications problem; see the
Troubleshooting section for advice on resolving such an issue.
Tap on the desired host and a
checkmark will appear at the
right edge. You can only have
a single network host assigned
at any time so selecting a
different host will automatically
unselect the previous one. If
you wish to no longer use a
network MIDI host, tap on the
current selection to deselect it.
If you select a host and the
iPad has trouble establishing
the network MIDI connection,
then a red “X” appears over
the host’s icon. A Host will
sometimes malfunction even
though it continues to
“advertise” itself as available.
Try deselecting, then
reselecting the host to see if
that clears the error; if not you should use your computer’s network MIDI
control panel to correct the problem.
Once you have successfully
connected to a network MIDI
host then you need to choose
its inputs and outputs. This is
accomplished the same way
as connecting to a wired MIDI
22
input or output: tap on the MIDI Connections screen’s input, and then output
item. Network MIDI has a single input and output that is always named
Network Session 1. If your iPad is also currently connected to wired MIDI
interfaces, those inputs and outputs will also appear in the list. Only a single
input or output can be active at any time.
rsTouch attempts to establish full
communications with Reason
once you have selected your
MIDI connections. The MIDI
Connections screen adds
additional information that shows
whether rsTouch is successful
(as shown with a green
checkmark), and if not, which
step encountered a problem.
This display is very helpful when
troubleshooting connection
issues.
23
This is an example of what you see
if rsTouch cannot communicate with
Reason. The first step is shown
with a red “X” and an appropriate
message is displayed. The most
likely causes of such a failure are:
a)you do not have a working MIDI
connection between the iPad and
Reason computer (for example a
MIDI cable may be disconnected)
b)Reason has not yet been set up
to use rsTouch
c)Reason is not running
Once you correct the problem,
rsTouch will show the step with a
green “check” and the next step is
attempted.
If the second step fails, then it is
displayed with a red “X” and a
helpful message.
Here is an example of the second
step failing because you have not
“locked” rsTouch to Reason’s Main
Mixer. Another possible cause
would be if rsTouch and the
rsTouch Reason Codec are no
longer compatible. This might
happen if a recent rsTouch update
required you to install an updated
version of the Reason control
24
surface files. The message will clearly state this.
Besides a green checkmark and red X, you might also see a yellow triangle
indicating a warning. Warnings are different than errors; you can still use
rsTouch when there is a warning. Some features may be missing, or there
may be a bug that has been corrected with a later version, but overall
rsTouch works properly. If the version problem is severe, then rsTouch
reports it as an error with a red “X” and you should correct it before
proceeding.
Yellow is always used to distinguish a warning from an error. The Info
Screen’s Connect text/bar is colored yellow if there is a warning. However
the “iButton” will pulse red even if it is only a warning. So when you see it
pulsing, you should check to see if it is an error that requires immediate
attention or a warning you can address after your current session.
MIDI Interface Status and Help
The section “Additional
Information and Help” on the
MIDI Connections screen
offers more troubleshooting
help and information.
If you have followed the
connection setup directions
earlier in this chapter and are
still having problems, tap on
the MIDI Interface Status and
Help text/bar.
25
Here is an example of
what you may see. The
messages will vary
depending on the
problem. The bar at top
will be red, yellow or
green to indicate a major
problem, warning or OK
status. The bar
summarizes the problem,
which is further
described at the
beginning of the text box
below it.
The text in italics
provides actions to take
to fix the problem.
Note: this screen does
not change once you
come to this screen, even if conditions change. So, for example, if you open
this screen when there is a problem, and then that problem is resolved, the
message is still the original problem message. So unless you are using the
diagnostic tests below it is best to exit this screen before trying to fix an
issue.
The gray boxes at the bottom are used for diagnosing MIDI interface related
problems. Read more in the “Troubleshooting” chapter, #6.
26
Preference Settings
At this point, you may want to setup your preference settings.
• tap on the i (info) button at the top, left of the time display
• tap Settings
• change the state of any of the settings if desired using the toggles
27
Disable Auto-Lock overrides the iPad’s standard operation of turning off
the screen and going into “sleep mode” when you do not perform a screen
action during a period of time. Select ON to keep the rsTouch screen
displayed continuously. This setting only applies to rsTouch and does not
affect your overall setting for Auto-Lock in the Settings application. The
default position is OFF. Note: Setting Disable Auto-Lock ON may deplete
your iPad battery faster.
Color Bus Channels is only relevant when using Reason 7 or higher (and
with the version setting ‘Version 7’ or ‘Current’ enabled). When ON, rsTouch
looks for track names that begin with “Bus”, or end with ‘**’. Tracks like
these are then treated as bus channels and their track numbers and thumbs
are red.
Faders Jump on Touch, when ON, makes any fader thumb also
move/”jump” directly to a position you tap on within the fader bar. When this
setting is OFF, the faders only move by sliding the thumb along the fader
bar. The default position is OFF.
Mixer Uses iOS Style Vertical Scrolling, affects the direction of vertical
scrolling in the channel strip. If ON, moving your finger upward in the Mixer
channel strip (i.e. INS, EQ, FDR etc vertical strip) scrolls the content down.
This is typical of iOS apps and operation. Alternatively, when this setting is
OFF, moving your finger downward in the Mixer channel strip scrolls the
content down. Set to which mode is most comfortable for you.
Reason Version Compatibility
This is used to set which version of Reason you are working with.
Propellerhead made some UI and other changes, beginning with Reason 7,
that can affect rsTouch operation. The default setting, ‘Current’, is the best
choice unless you are using a version of Reason that matches one of the
other options.
28
Logging Level
We may request from you additional information to help us diagnose a
problem. rsTouch has built-in logging that records information about what it
is doing. By default, rsTouch only records error and warning messages that
indicate it is operating in an unusual manner. The “Logging Level” can be
set to provide more detail regarding the cause of a problem. This extra
information, however, can slow down rsTouch operation, and it consumes a
small amount of your iDevice’s Flash storage space.
Logging Level should stay at its default value ‘minimal’ unless we instruct
you otherwise. We will request either the ‘moderate’ or ‘maximum’ setting
depending on the situation.
If you are asked to send us a log that uses a different setting than ‘minimal’,
use rsTouch’s Settings screen to change the logging level. Operate rsTouch
in the same way that led to the problem. Once the problem has occurred,
use the Email Log item on the rsTouch Support screen (on the info screen)
to compose an email message that contains the log as an attachment.
Before you send the log, please type in any relevant information about the
problem. Once you have finished recording the log, change the logging level
back to ‘minimal’.
29
About rsTouch/General Operations
rsTouch is an iPad controller app for the Propellerhead Reason (version
6.0.0 and higher) Digital Audio Workstation (DAW) software application that
runs on a Mac or Windows PC. Many functions emulate how you use
Reason on your computer but with the benefit of optimization for the iPad
touch screen. No more trying to manipulate tiny controls with a mouse!
Note: rsTouch is a controller for Reason. Many rsTouch buttons and names
are identical to the Reason computer application. This manual does not
describe the meaning and function of these, except where operation on
rsTouch differs from Reason. Please see the Propellerhead Reason manual
for more information.
Most existing Reason control surfaces are “generic” or “universal” MIDI
controllers whose physical layout suits the controller and does not reflect
Reason’s actual screens. These controllers are also not specific to any
Reason device. Their controls are “mapped” to whichever Reason device is
currently selected.
Reason’s Main Mixer is very powerful and offers many of the same features
found in expensive studio mixing desks. But these capabilities come at a
price: the Main Mixer consumes a great deal of the computer display
screen, and it requires many mouse movements and clicks to control.
Realtime mixdowns that require multiple simultaneous fader or rotary
“moves” are very difficult. Existing MIDI controllers, even expensive
“professional studio” models, have a difficult time providing access to all of
the Main Mixer’s many controls in a easy to use and understandable
manner.
rsTouch was developed as a kind of physical Reason “mixing desk”. It aims
to provide intuitive and productive control of Reason’s Main Mixer, plus
other functions that are important to recording and mixing. By not attempting
to make rsTouch “universal” it is able to utilize screen graphics that closely
30
mimic what you see on Reason’s screen, and you can readily grasp the
entire mixer’s condition. You can operate Reason’s transport and Main
Mixer entirely from the iPad without referencing Reason’s screens, whether
you use rsTouch along side your computer, or wirelessly from another studio
location.
One immediate benefit is that you can reduce or even hide Reason’s Main
Mixer display, thus making the extra screen space usable to display more
sequencer tracks or more Rack devices. You can position an iPad within
easy reach of your normal work position and use it like a real mixing desk.
That way, the mixer is always at hand regardless of what you currently have
showing on the computer display.
But the other, more compelling use, is remote operation. Many studio set
ups have a separate “record area” that is away from the computer. This may
be where the guitars are set up for playing, or a drum kit, a synthesizer
keyboard set up, or a vocal booth. This separation of the recording activity
from the computer presents challenges: how to do record, overdub, punchin, or even undo a recording without moving back and forth between the
recording area and the computer area.
rsTouch offers a way of remote controlling those Reason activities, with the
additional benefit that you can adjust critical mixer settings to get the right
sound for the mix, or your monitoring, from the iPad instead of trekking back
to the computer. If you elect to use a wireless MIDI connection your freedom
is even greater!
Since rsTouch is a Main Mixer controller it does not make sense to try and
use it with any version of Reason before version 6. Reason prior to version
6 did not include the Main Mixer.
The latest member of the Reason family, Reason Essentials, offers the Main
Mixer but with a few reduced features. rsTouch works fine with Reason
Essentials and will adjust its displays and the controls available to
correspond to those Reason Essentials provides. This is done automatically.
31
Rotaries
All rotaries on rsTouch work the same way: starting on the center of the
rotary knob, slide your finger up or down (vertically) to go to a higher or
lower value.
Grayed Out Controls
rsTouch shows, when appropriate, faders, rotaries, and buttons as “grayed
out” if those controls are not available, or adjusting it does not make sense.
For example the mixer section always shows eight potential mixer channels.
If your project does not have eight channels then the extras will be shown
as “grayed out”.
Double Tap Reset Feature
Most of the fader and rotary controls offer a special “double tap” gesture to
quickly return a setting to its default value. rsTouch attempts to use the
same value that Reason assigns when you perform an ALT/CMD click on
one of its controls. For example, if you tap two times quickly on a mixer
channel’s volume fader “thumb”, the value will reset to a zero dB value, and
the fader thumb will “move” to the corresponding position. Likewise, double
tapping on Pan rotaries will reset to the center (zero) pan position.
Scrolling
Scrolling is possible in two situations on rsTouch:
• when on any Mixer screen, swipe your finger to the left in the black
horizontal bar where the channel numbers and names are located.
rsTouch will change the display to show the next bank of channels (if you
have more than eight in a song). Likewise a right swipe gesture will
change to the previous bank of eight channels. Alternatively, tap on the
32
channel bank buttons at the right of all Mixer screens or the -1,+1,-8 or +8
buttons to move the channels shown by one or by eight.
• when on a Mixer screen that has more controls than fit on the display, you
can scroll to see more of that screen’s controls. Place your finger on the
selector button (e.g. FDR, FX, EQ, etc), then slide your finger down or up.
(Your finger movement can be modified using the Mixer Uses iOS Style
Vertical Scrolling preference setting (in the iOS Settings app/rsTouch).
Alternatively, repeatedly tap on a selector button to step through its
screens.
Multiple Songs
Reason supports the ability to have multiple songs open at a time on the
computer screen. In this case, rsTouch shows data for the song in the frontmost window of the screen. To prevent confusion, you may want to close
each song before opening another when using rsTouch.
Running rsTouch on Multiple iPads
While it has always been possible to have rsTouch running on multiple
iPads at the same time, rsTouch v2.2 significantly enhanced this capability.
You can use up to 4 iPads running rsTouch simultaneously to control more
than 8 Reason Main Mixer channels. Say you have a 32 track song and
want access to all fader channels at the same time: iPad 1 can show bank
1-8, iPad 2 shows bank 9-16, etc. Using multiple iPads is also useful for
situations where you want to have multiple screens of a device controller
such as Thor available at hand.
Enabling this capability is an advanced feature and requires an additional
level of setup beyond what was covered earlier. Instructions can be found
on the rsTouch product page (tap “Requirements & Setup”) at
www.delora.com.
33
rsTouch Screens
Every rsTouch screen has the same top header section of buttons and
displays, and a bottom section of Transport buttons with the playhead scrub
strip.
The center section changes depending on the current control mode Master, Device, Perform or Mixer. The currently selected mode/button is
shown blue. rsTouch also has an Info screen that is displayed when you
tap the “iButton”. This is discussed later in this manual.
The Master mode controls almost all of the same controls found in the
Master Channel section (far right column) of Reason Main Mixer. All
available Master controls are visible on this one screen, though a few
infrequently used controls are only available through a popup.
The Device section is used to remotely edit various synthesizer and effect
rack devices.
Perform mode features a music keyboard and a drum pad controller that
can be used to play notes and generate other controller actions into
Reason.
In Mixer mode, rsTouch provides information for eight Main Mixer channels
at a time. Since the Main Mixer has a large number of controls, these are
grouped as Reason groups them: Faders, Sends (Effects), Inserts, EQ,
Dynamics, and Input. The right of the mixer section’s center display area
contains a “common area” that contains controls available regardless of
which parameter group is selected.
One of these controls is the “selector strip”, the vertical strip of buttons
labeled (top to bottom): IN, DYN, EQ, INS, FX, and FDR. These let you
switch between (in the same order) inputs, dynamics, equalization, inserts,
effect sends, and faders/pans. The abbreviations are the same that you see
34
in Reason’s Main Mixer overview. Note: if you are using Reason Essentials,
DYN (dynamics) is not available.
Switch parameter groups by tapping on any of the named buttons. If you tap
on the same button repeatedly, it reveals additional controls in that group if
available. A good example is EQ, which has three “pages” of controls.
Alternatively press your finger on the active Selector button and slide it up or
down if you wish to scroll through the extra controls. One great use of this
feature is when showing the FX page; for example, you can control sends
3-6 at the same time. The selected group is always shown colored blue.
Upper Controls
Besides the segmented Mode button, the top section includes Undo and
Redo buttons, and a Tap button. Use the Tap button to manually tap in a
desired tempo in real time.
35
To the right of the Tap button, the Tempo
of the current song is displayed. To
change tempo, tap on it and an Adjust
Tempo popup appears. Swipe your finger
up or down for each position until the
desired value is shown. Tap anywhere
outside of the popover to exit.
At the far right are two “displays” showing
the playhead position in two formats:
• top row: “Timecode” time format (hoursminutes-seconds-frames)
• bottom row: Musical division of time
format (bars-beats-division-tics)
A horizontal audio level meter is located at
the top left of the screen. This is Reason’s
“Big Meter”. The Big Meter offers a way to monitor the physical audio I/O in
your studio. A common use is to monitor the main mix output but it is also
handy to show an input, such as your vocal mic or guitar input.
Tap on the meter once and the meter is reset (clears all peaks and overs).
Double tap on the meter and a popup “Meter Settings” appears. Use the
popup to change the mode shown in the Big Meter (repeatedly tap on the
Mode button to step through the allowable options, shown in the light green
“LED” circles above. (Note: this also changes the mode shown in the Master
Meter on the Master screen.)
Select the Peak Hold time, either 5 seconds or Infinite.
Use the right arrows to step through the VU offset in 2dB increments. Or,
place your finger in the black display window under “VU Offset” and slide up
or down to quickly go through the VU settings.
36
VU Offset deserves special mention.
This setting applies to all channel
meters, the main meter, and the Big
Meter. It is used to define what is
considered “0 dB”. Typically it is set at
12 dB, giving you 12 dB of
“headroom”. Another common setting
is 20 dB; you will almost never use it
with 0 dB offset!
Note: While Reason’s Big Meter
offers this setting it does not
provide its current value to a
control surface. So when you
change Reason’s setting, rsTouch
will not change it, and when you
change the VU Offset on rsTouch,
Reason does not update. You will
have to manually keep this setting
“in sync” by changing both. If you don’t, the meter displays will be
different for rsTouch vs. what you see on Reason’s meters!
Use the left arrows to select the Input or Output channel pairs currently
assigned to the Big Meter. (Or, place your finger in the black display window
under “Big Meter Source” and slide up or down to quickly go through the
pairs settings.) Input channel pairs are in red, output in green. A special
“yellow” input is Reason’s “sampling” input.
Tap outside the popup to make it disappear.
37
Lower Controls
rsTouch mimics many of Reason’s standard transport functions for
navigating through your composition: Backward, Forward, Beginning (of
song), Stop, Play, and Record.
Other standard playback controls are provided: Metronome and Loop.
Just as with Reason, the Play, Record, Loop, and Metronome buttons
change color when active.
The horizontal jog strip allows
you to navigate to playhead
positions by swiping your finger
left or right within its channel.
Single tap within the jog strip to
move the play position to the
closest beat.
Double tap within the jog strip to
bring up the Jog Strip Mode
popup. Select the precision you
38
want when using the rsTouch jog strip.
Tap once on the left Set Loop Start Locator button to cause the play
position to go to the left loop indicator location. Press and HOLD DOWN the
left Set Loop Start Locator button when the playhead is in the desired
location to establish the beginning point of a loop cycle.
Tap once on the right Set Loop End Locator button to cause the play
position to go to the right loop indicator location. Press and HOLD DOWN
the right Set Loop End Locator button to establish the current playhead
location as the end point of the cycle for playback looping.
The M1 - M5 marker buttons facilitate rapid movement to different parts of
the song. Press down for 1-2 seconds on a marker button when the
playhead is in the desired position to
create a “go-to” point for future taps
on that marker button. Once you set
a marker position, it is remembered
for future rsTouch use.
Click on Dub or Alt buttons to add
additional sequencer audio tracks or
note lanes for overdubbing or
alternative takes.
Tap on the Rec More text for a
popup to set additional Record and
Click related functions. Tap Q Rec to
enable auto quantizing or Precount
to hear a count-in click before
recording starts. Tap on the number
below to set the number of precount
bars. Adjust the fader to set the
audible click level.
39
Mixer Screens
The Mixer screens show eight Main Mixer channel strips at a time. Reason’s
Main Mixer display shows a yellow arrow above the channel name of the
first channel shown on rsTouch.
40
If your project has less than eight channels, the extra channels will be
grayed out. If the project has more than 8 channels, access more by:
• swipe your finger from right to left/left to right within the black horizontal
section where the channel names/numbers are displayed to move in
groups of eight OR
• tap on the “-1” or “+1” buttons to move the bank shown by one channel
backward or forward OR
• tap on the “-8” or “+8” buttons to move to the previous or next bank of eight
channels OR
• click on one of the four preset “Bank” group buttons
rsTouch has the four bank buttons configured by default to show channels
1-8, 9-16, 17-24, and 25-32. You can reconfigure these buttons to any
group of 8 consecutive channels. First, have the eight channels you want
showing on any rsTouch Mixer screen. Then press and hold down (1-2
seconds) the bank button you want to “reprogram”. For example, you could
set the second button, which normally shows channels 9-16, to channels
12-19 if you have those currently displayed on rsTouch. The bank button
text changes to reflect the new assignment.
If you want to return the 4 bank buttons to their original groups (e.g. 1-8.
9-16, etc.), tap on the Reset button.
Busses (or Last if rsTouch is set for Reason 6 operation) is a special bank
button. It always moves the bank so that the last eight (the rightmost) mixer
channels are shown. If you make it a practice to place your Reason bus
channels on the far right of the Main Mixer, then this button provides a fast
way to view and adjust the bus settings.
Note: If you do not have at least 32 channels, one or more of the default
bank buttons will not display the channels shown on the button. For
example, if you have 21 channels, the bottom bank button 25-32 will not
show channels 25-32. Instead, Reason shows the last group of eight
channels that have at least one enabled channel. In this case, you will see
41
channels 21-28 when clicking on the 25-32 bank button. (Channels 22-28
will be grayed out).
The mixer channel number and name are shown at the top of every Mixer
screen.
Press the iconic Mute or Solo All Off buttons to clear all instances of either
condition in the song.
Tap on the Dim button to “temporarily” lower the playback volume. Press
again to return to the prior level (as established in Master mode).
rsTouch’s Mixer controls and screens are very similar to those seen on the
Reason Main Mixer screen. Six groups of controls are available, and are
accessed by tapping on one of the vertical “selector” buttons.
• Input (IN)
• Dynamics (DYN)
• Equalizer (EQ)
• Inserts (INS)
• Effect Sends (FX)
• Volume Faders (FDR)
Some groups have additional controls beyond those seen on their first
screens. To access more, repeatedly tap on the selector button to step
through additional available controls under that group. For example, DYN
has Compressor controls on the first screen, and Gate controls on a second
screen. Alternatively, press on the selector button and slide your finger
down (or up) within the vertical selector strip to scroll through the controls
within a category.
42
Channel Volume Faders (FDR)
Press the “FDR” selector
button to show the Fader
section for the current bank
of channels. Mute (M) or
Solo (S) one or more
channels by pressing on the
corresponding buttons within
each column. When
activated/selected, the Mute
and Solo buttons will change
to the colors used in Reason.
Whenever you press on a
Solo button for a track, the
Mute buttons of all other
tracks will turn orange to
indicate they have been
muted.
A circle “LED” indicator to the left of the
channel number is lit whenever mute or solo
are enabled on the channel (orange-red for
mute, green for solo). This lets you know if
these are enabled even when you are viewing other Mixer screens.
43
You can also set mute and solo when on other Mixer screens for each
channel. Simply tap once in the black area with the channel number and
name to mute. Double tap in the same area to solo. Repeat the gesture
to disable them.
Below the Mute and Solo buttons is the Pan rotary. Starting in the center of
the rotary knob, slide your finger up/down (vertically) to change the Pan
level. The value will show to the upper right. Double tap on the center knob
of the rotary to reset its position to “0”.
Adjust the output level of a channel by moving the fader thumb up or down
within the vertical bar. Its value shows at the top of the channel fader.
On the Settings screen (tap the info button), is a preference (Faders Jump
on Touch) that allows the fader position to “jump” directly to wherever you
tap within the fader bar. This is useful for quickly changing volume settings.
Set the preference to ON if you want this feature.
Double tap your finger quickly on the fader thumb and the thumb and value
will reset to Reason’s default position.
Note: Individual tracks with automation impact rsTouch faders and
rotaries. Any automation effects will take precedence over a control
for that effect, including those on rsTouch. For example, if Volume
Level/ automation is enabled on a track, the channel fader on rsTouch
that controls it will “fight” against the automation. When the
automation “wins” it will seem that the rsTouch fader is not working
correctly. This is a normal consequence of automation. rsTouch’s
controls do update to the current automation value. Keep this
limitation in mind when adjusting settings while playing the project. If
this proves inconvenient consider turning OFF track automation as
needed.
To the left of each channel fader is its corresponding channel meter.
44
Gang Fader Operation
Multi-touch fader operation is possible by moving more than one fader
thumb at a time. The “link” feature takes this further by letting you link (or
gang) multiple channels that will then move by the same relative amount
when you move any one the thumbs. Tap on the link icon to the left of the
fader value for all channels that you want to link. The icons will turn blue
when selected.
Now, when you move the thumb of one of the linked faders, all the others in
the link combo will move at the same time and by the same relative amount.
To unlink all, double tap on any one of the blue link icons.
Note: the link feature only works for channels that are on the same
screen.
Fader tab screens 2 and 3
Every channel has an additional rotary control - stereo
width - that is visible on the second Fader screen.
While in the Fader Mixer section, either tap once on
the FDR selector button, or place your finger on the
FDR button and slide down.
Use this same method to go to the third Fader screen (shown in next
graphic), tapping again multiple times on the FDR selector button. This
screen shows longer height/extended faders to use when you want finer
control. The link feature is also available on this screen.
45
Effect Sends (FX)
Reason supports up to 8 Send effects (four on Reason Essentials), which
are global for all Main Mixer channels. Tap on the “FX” selector button to
bring up the first set of Sends rotaries, i.e. 1-4. View additional rotaries by
swiping/sliding your finger downwards within the selector strip to scroll to the
desired view, or tap again on the FX button to see Send rotaries 5 - 8.
Click the numbered button for every send you want enabled. It will show
blue when enabled. Tap again to disable. Like all rsTouch rotaries, increase
the value by pressing on the “knob” and moving your finger upwards;
downwards decreases the value. The value will show to the upper left when
a rotary is pressed.
46
Send outputs are taken post channel fader, but Pre-fader mode is possible
by tapping on the “Pre” button. In this mode, the send level is independent
of the channel fader.
Inserts (INS)
Tap on the “INS” selector
button to view the first Insert
screen. Below the Bypass
button is the name of the
current Insert patch (if you have
loaded one). Tap on the arrow
keys below to select the next or
previous patch in the same
folder as the current one.
Each insert patch is really a
Reason “Combinator”. Like all
Combinators it offers up to four
rotary parameters and four
switch parameters. rsTouch
offers the same controls, 1-4
from top to bottom. Tap again
on the INS button to see
rotaries 3 and 4, or scroll in the
selector strip. Buttons glow
blue when they are on. (Note:
Reason does not currently
supply the button or rotary
names to the control surface.)
Equalizer (EQ)
Tap on the “EQ” selector button to bring up the first of three EQ screens.
Additional EQ controls are accessed by scrolling downwards with your
47
finger in the pointer channel, or tap repeatedly on the EQ selector button.
(Note: when the Reason version preference setting is ‘prior to version 7’, the
LPF and HPF rotaries are colored blue-purple).
The buttons below enable all EQ adjustments (EQ On) and activate E mode
(E).
EQ rotary controls are displayed on rsTouch in the same order as seen on
Reason: LPF (Low Pass Frequency), HPF (High Pass Frequency), HF
(High Frequency), HMF (High-Mid Frequency), LMF (Low-Mid Frequency)
and LF (Low Frequency). A yellow “LED light” will show for any of these
parameters when enabled.
The value will show next to a rotary when pressed.
Dynamics (DYN)
Tap on the “DYN” selector button to bring up the Dynamics
compressor controls. The Compressor section has a five
level “LED meter” that shows the compressor’s current gain
reduction. Below that are buttons to enable compression
(“On”), Peak mode and Fast. Consult Reason’s
documentation if you are unfamiliar with these controls.
Rotaries for Ratio, Threshold and Release are also on the
first screen.
The Key button is only active if you have cabled a control
signal to the dynamic’s special “sidechain” inputs. When
sidechaining is in use, you can use the Key button to
enable or disable it; otherwise it is always disabled.
Sidechaining applies to both the Compressor and Gate.
“Scroll” in the selector strip or tap again on the DYN
selector button to bring up the Gate controls. These
48
include a five level meter that shows how much the gate affects the audio,
followed by “On”, “EXP” and “Fast” enable buttons. Four parameter rotary
controls complete the Gate function. Consult Reason’s documentation if you
are unfamiliar with this feature.
The value will show to the upper left when a rotary is
pressed.
Input (IN)
The Input screen replicates most of the controls in
Reason’s Input section. Here you will find a rotary to adjust
gain, INV (invert input), Insert Pre, Dyn Post and
SideChain (SC) Filter enable buttons.
The value will show to the upper left when the rotary is
pressed. 49
Master Screen
The master screen shows similar controls to the Mixer screens, but is
applicable to the Main Mixer’s master channel. This is the section of the
Main Mixer that Reason displays on its right edge of the window.
rsTouch altered the layout slightly to better work with the iPad screen.
Master FX Sends and Master FX Returns (Level and Pan) rotaries are
placed together instead of separately as Reason does. Individual meters are
shown for both Send and Return, and the send effect “patch” name is
shown. A Mute (M) button is also provided.
The master channel includes a single insert (again a Reason Combinator)
shown in rsTouch’s “Inserts” area. The four rotaries and buttons correspond
to the Combinator’s controls. The up and down arrows browse through the
current folder of effects, provided one has been assigned from Reason. Use
the Bypass button to disable the master channel insert.
50
Note: Reason does not provide to rsTouch the names of the parameters
applied to the 4 rotaries and buttons.
Values appear when any of the rotaries are pressed.
The “Volume” section at the far right includes the Master Level Meter and
Master Level Fader. The fader adjusts the final output level of the mix sent
to your soundcard outputs, and it also affects overall level when mixing
down to a file; this is Reason’s behavior. The meter shows the level of the
Main Mixer Master stereo output.
To reset overs and peaks, tap on the Master Level Meter once.
The Master Level Meter uses the same mode settings as the Big Meter. If
you wish to alter its mode, set the peak hold time, or adjust the VU offset,
double tap on the Big Meter at the top left of the screen. Keep in mind that
all of these settings, except “Big Meter Source” apply to both meters.
Tapping on the Control Room
button brings up a popup display
of Control Room settings, where
monitoring level is adjusted, and
you can choose what you wish
to monitor. (Note: Control Room
functions are not available on
Reason Essentials so this popup
does not show on rsTouch.)
The Level Out fader adjusts the
level of the Control Room output
bus. Its value is shown at the
top.
Tap on Master, FX Send or FX
51
Return to switch monitoring to one of these. If FX Send or FX Return is
enabled, use the numbered buttons to set which Send/Return bus is
monitored.
52
Device Screens
rsTouch offers Reason Rack device editing. Many of Reason’s built-in
synths, drum machines and most effects have custom device panels to edit
your sounds using the iPad. Please note that Reason does not send
information for all of the controls and parameters on every device, so it is
not possible to have strict emulation. We also chose some alternative
operational methods that are more conducive to a touch screen controller
application.
Tap on the Device mode segment at the top of rsTouch. The device
associated with the currently selected sequencer track appears. If rsTouch
does not support the current device, a blank ‘brushed aluminum rack’
screen will show.
The track arrows at right move you from one sequencer track to the next.
The device currently assigned to that track is automatically shown on
rsTouch (provided rsTouch supports it). Normally this is a Reason
synthesizer but it can also be an effect if you have created a sequencer
track to provide the device with automation.
The other way to choose which device is shown is to use Reason’s “surface
locking” facility. This is a Reason command performed at the computer that
53
assigns a particular device to a control surface, in this case rsTouch’s
“device” control surface. Once you have locked a Reason device to
rsTouch’s device section, that device is the only one that rsTouch can
control until you either lock a different device, or unlock rsTouch’s device
section. See the Reason user guide for more on how to use surface locking.
Note: this use of surface locking is separate from the set up you did to get
rsTouch assigned to the Reason Main Mixer. That surface lock must always
be active for rsTouch to operate properly.
Notes on Specific Devices
As mentioned earlier, not all control information is provided to rsTouch from
Reason, which is why not every control you see in Reason is available on
the corresponding rsTouch device screen. In addition, please note the
following regarding some specific Rack devices:
Combinator
The names for the rotaries and buttons are not provided to rsTouch, but they
are usable for adjusting and selection.
Mix Channel/Audio Track
On the SND/INS screen, the names of the parameters for the 4 Insert
rotaries and buttons are not provided to rsTouch, but the rotaries and
buttons are adjustable and selectable.
Thor
On the Global screen, the names are not provided to rsTouch for the
‘Assignable’ rotaries and buttons, but they are usable for controlling and
selection.
Kong
54
Reason does not offer updates of the currently selected drum pad (blue
outline on Reason, blue filled on rsTouch) with rsTouch. So, you must
manually select the same pad on both Reason and rsTouch if you want
them to be in sync. The controls on rsTouch always apply to the blue filled
(selected) pad on rsTouch.
On the ‘Master’ and ‘Module’ subscreens on the right, the names of the
effects and parameters are not provided to rsTouch, but the rotaries are
usable for controlling the effects shown on Reason.
55
Perform Screens
When the Perform mode is selected, rsTouch offers a way to send MIDI to
an rsTouch instrument track using a keyboard or drum pad.
• Select an existing or add a new instrument track
• Tap on either the Keys button or the Pads button to bring up a keyboard
or drum pad screen
• You will hear the keys or pads as you tap out a melody or beat. Press the
Record transport button on rsTouch if you wish to record your playing onto
the selected track in your song.
The 3 sliders left of the keyboard control overall pitch (MIDI Pitchbend), AT
(Aftertouch) and modulation (MIDI ModWheel), as you would typically use
with an electronic keyboard. Each strip provides “relative changes”.
Wherever you first touch the strip corresponds to the last value. Slide your
finger upwards to increase the value, downward to decrease it. The “Mod”
strip retains the last value after you lift your finger. To reset the value to
zero, double tap inside the MOD strip. The “Pitch” strip always resets to
zero when you lift your finger.
The top navigation bar is identical to that for the Device screens.
56
Keys
Press close to the lower end of a key to get a louder sound. The level
decreases the closer you get to the top of a white or black key.
Change octaves using the + - stepper button. To sustain a note, like holding
down a foot pedal on a piano, press and hold down the Sustain button for
as long as you want the sustain to occur. Double tap the Sustain button to
keep it in constant Sustain mode. Tap again to return to normal. This button
sends an actual MIDI sustain command.
Tap Hold to keep any notes played always ‘on’. This is a toggle on/off
button. Hold operates differently than Sustain. Instead of sending the MIDI
sustain command, it prevents the key from “releasing” until the key is tapped
again. In other words, it makes the keyboard keys act like toggle buttons.
When you tap Hold to turn it off, all currently “held” keys are released. Think
of it as like placing something heavy on the key to hold it down.
57
The Panic button kills all notes/sounds playing by sending the proper MIDI
command to stop all playing notes. Use this if you hear a “stuck note”
sounding.
Press Zoom to bring up a keyboard with wider but fewer keys.
The horizontally striped areas above the top keyboard and below the bottom
keyboard are used for scrolling. Swipe your finger to the left within that area
to go up/higher on the keyboard. Swipe to the right to go to a lower register.
The two keyboards are independent and can be set/scrolled through
separately.
Pads
The Pads screen has a typical 4x4 drum kit pad arrangement to tap in a
beat or melody. The pads send a different MIDI velocity value depending
how far you tap away from the pad center; tap close to the center of a drum
pad for a loud sound.
58
Four different “kits” are provide. Each of these sends the proper MIDI note
value to play the corresponding drum instrument for that kit. Kong is used
when you want to play Reason’s Kong drum machine, and ReDrum is used
with Reason’s ReDrum device. GM provides a layout that is compatible with
the “General MIDI” (GM) standard and is often used with sample library
drum kits. Chrom, an abbreviation for “Chromatic”, assigns MIDI note
values sequentially from the lower left to the upper right pad.
If the selected kit offers more than 16 possible pads, then the bank buttons
are available to switch between groups of 16.
The Panic button kills all notes/sounds playing by sending the proper MIDI
command to stop all playing notes. Use this if you hear a “stuck note”
sounding.
16 Levels Feature
To achieve more variation for a specific pad note/sound, use the 16 Levels
feature. First, tap on the pad within the kit desired, then tap the “16 levels”
button. The pads will show red numbers that now correspond to the velocity
that will be sent when you tap on that pad, and all pads will send the same
note/sound that you first pressed.
Example (make sure the 16 levels button is off/shows black text):
• tap on the Kong selector button
• tap on the #8 pad
• tap on the 16 levels button
• tap on any of the pads and the #8 sound will be sent at the velocity
showed in red text on the pad (see next graphic)
59
60
Info Screen
Press the
i
button to obtain access to information about rsTouch:
• Settings (this is described in the last section Preference Settings of the
first chapter Getting Started)
• User Guide (a pdf version is also available on the rsTouch product page
on the Delora website, www.delora.com)
• Support information (see “Support Information” below)
• About screen provides the option to leave rsTouch and visit the Delora
website, or view legal information
• What’s New lists the improvements found in the current version, as well
as a version history.
• Follow Us on Twitter takes you to our Twitter page so you can follow us
to get announcements about future updates
Two additional items are available: Refresh Controls and Connect, which
was discussed in the “Getting Started” section Connecting rsTouch to
Reason.
Refresh Controls is used any time you believe that rsTouch is no longer “in
sync” with Reason. rsTouch and Reason constantly exchange information
but sometimes a transmission error causes differences. Tapping Refresh
Controls sends a request to Reason to send a complete update of all
controls. There are a large number of controls so this update can take a few
seconds. Pressing Refresh Controls also closes the Info Screen.
There is a shortcut way to request a refresh. Tap on the active main mode
button to request an update. For example if “Master” is the current mode
(shown in blue), tap on the Master button to request a refresh.
Press Done to exit the Info Screen.
61
Support Screen
Tapping on Support brings up the Support screen. If you have email setup
on your iPad, tap on Email Support and use the iPad keyboard to type in a
description of your problem. Please also fill in the information requested
about your system.
Email Log to Support is described in the first chapter about Preference
Settings.
62
Troubleshooting
The primary reasons rsTouch may not operate properly are:
1. You have not established the initial connection between rsTouch and
Reason
Each time you use rsTouch, you must create a MIDI connection between
your iPad and the computer running Reason. If this is not done then the
Info Button will pulse red.
Remedies:
Confirm that your have installed the rsTouch Reason Codec properly
on your Reason computer.
II. Confirm that Reason is running.
III. Check the MIDI connection between your iPad and the Reason
computer:
A. If using wired MIDI make sure that the MIDI interfaces are
connected and powered on both the computer and iPad. Check that
both MIDI cables are properly connected. If you suspect a bad MIDI
cable, swap it for a known working cable.
B. If using wireless (network) MIDI check these things.
1. If your Reason computer is a Windows PC, make sure you have
properly installed the “rtpMIDI” driver and that it is operating
properly. A proper installation also requires you to have installed
Bonjour support. rsTouch will not operate unless your PC and
network are set up for Bonjour. Consult the appropriate
materials that came with your rtpMIDI installer.
2. Make sure that network MIDI is running on your Reason
computer and that it is set up to offer at least one network MIDI
port, and that any client can connect to that port.
3. Verify that the iPad’s Wi-Fi is turned on and connected to the
same local Wi-Fi network as the Reason computer. This must be
I.
63
a local network where both devices are on the same IP “subnet”.
You cannot connect rsTouch to your Reason computer through
the Internet; it must be the same “local network”. Only Wi-Fi is
supported; rsTouch will not operate with cellular data connections
such as 3G.
IV. Check that Reason’s control surface preferences have rsTouch
assigned as an available controller. Also verify that its assigned MIDI
ports are the ones the iPad is currently connected to.
V. Verify that rsTouch’s connection is to the expected MIDI port or
network MIDI host.
2. Issues specific to network MIDI: Wi-Fi is not enabled or general
networking issues
When you start rsTouch, its info button will pulse red if it is unsuccessful
connecting to Reason. If you previously connected using network MIDI
then the fault could be that your Reason computer is not showing as an
available “host”. This type of problem is normally corrected using the
steps outlined in the previous scenario.
However it could also be due to a general Wi-Fi connection problem. WiFi and general networking issues can be varied and tricky to
troubleshoot. Since rsTouch uses iOS standard network MIDI facilities,
the most likely cause of such problems lies outside of rsTouch! In fact if
you have noticed other iOS features, such as AirPlay or iTunes Wi-Fi
sync do not work with your iPad, then you have an overall network
problem that must be addressed before you can use any wireless
controller, including rsTouch.
“Attack” these type of network difficulties from the point of view that the
issue is caused by something network specific. Verify that the iPad’s WiFi settings are correct for connecting to another device on the same
network. Even if you have successfully connected to the Internet it does
not mean you can connect to your Reason computer. By the same token
64
your computer’s network facilities must also be appropriate for a local
network connection.
One special consideration is if you run some type of “firewall” or “network
security monitor” on the Reason computer. These can interfere with
network MIDI unless they are properly configured. Unfortunately there are
quite a number of these products, especially for Windows PCs, so it is
difficult to outline a specific procedure. If you suspect your firewall (or
other security utility) is preventing connection, disable it temporarily and
try again to connect. If you are successful contact us with the details.
Desktop computers usually have networking settings that do not change
once they have been set up but laptops can be different. Some users set
up special “location profiles” with different network settings for work,
home, the studio, or the local coffee shop. If your Reason computer is a
laptop, and you have a variety of network profiles, always make sure that
you select the correct “profile” before using rsTouch.
Another possible problem concerns Bonjour (also known as “ZeroConf”).
Network MIDI relies on this to establish what network MIDI connections
are available. Your Reason computer, your iPad, and your local network
must all be set up properly for Bonjour. If your Reason computer is a Mac
then usually you have nothing else to do; Bonjour is there by default. If
you use a Windows PC then you have to have Bonjour installed. This
normally happens when you installed iTunes but it can also take place
when you install network MIDI drivers.
Unfortunately network routers and Wi-Fi access points sometimes
improperly handle Bonjour. These errors can be temporary; resetting or
re-powering the router/access point fixes the problem. In other cases the
errors are constant and the only remedy is a router/access point firmware
upgrade. This problem is more widespread then you expect and there is a
decent chance that a malfunctioning router/access point already has a
firmware update available for download from the manufacturer.
65
Though rare, the iPad itself is not immune to temporary Wi-Fi and
Bonjour issues. Sometimes a connection issue can be resolved by
turning the iPad’s Wi-Fi off, back on, then reselecting the proper Wi-Fi
network. If that fails to correct the problem and you still suspect the iPad,
try powering down the iPad and forcing it to do a “cold boot”.
Poor Wi-Fi signal quality can sometimes lead to unreliable or noconnection problems. Network MIDI uses a different way of connecting
two devices then you use when browsing the Internet from your iPad. Do
not assume that having decent Internet speed means you have a reliable
Wi-Fi signal. If you suspect a poor signal is causing intermittent problems
or an overall connection issue try moving closer to the Wi-Fi access point.
Also try different physical orientations. For example sometimes placing
your body between the iPad and your Wi-Fi access point is enough to
transform a marginal but working signal to an unreliable, non-working
one. If you suspect Wi-Fi signal quality do not accept the iPad’s Wi-Fi
signal strength status as an accurate indicator. It can be misleading when
moving through a marginal location.
There is an introductory networking guide available on the Delora website
at http://www.delora.com/tips_and_trends/networking_guide/
networking_guide.html.
One thing to try is something called a “computer-to-computer” or “adhoc”
Wi-Fi network. This is a simple network set up between your Reason
computer and the iPad. This type of set up requires that your Reason
computer has a built-in Wi-Fi interface. Laptops almost always have this
but many desktops, especially “all in ones” have built-in Wi-Fi. The details
of such a set up depend on the make and model of computer so if you
have a Windows PC you will have to do some Internet searching (or
consult a knowledgable colleague). Mac users can reference the brief
step by step instructions in the Appendix.
66
3. You have not locked/assigned Reason to rsTouch
As described in the section “Assign/Lock Reason’s Main Mixer to
rsTouch” of the Getting Started Chapter, you must lock the current song
to rsTouch if it is new or has not been saved after previously locking. The
section describes 3 different ways you can do this easy but important
step.
4. You left your iPad’s Bluetooth ON
If controls on rsTouch become sluggish or rsTouch starts to “miss”
Reason changes, you may have left Bluetooth on.
Remedy: Go to the iPad Settings application, click on “General”, and set
Bluetooth to OFF whenever you are using rsTouch. (You can turn
Bluetooth back ON when done with your rsTouch session.)
5. The VU Offset has been changed on rsTouch but not Reason (or vice
versa) making all meter values “out-of-sync” between rsTouch and Reason.
Reason does not provide information to the control surface (rsTouch) and
vice versa about any change to the VU Offset value (on the Big Meter). If
you change the default value, you must change it on both Reason and by
double tapping on the Big Meter on rsTouch to get the popup. If you
don’t, then the meter values for all the meters, including the faders, will
be “out-of-sync”.
6. Your MIDI interfaces (either the iPad USB interface or computer MIDI
interface) are not working properly
If you are using wired MIDI, the MIDI interfaces you use must reliably
handle standard MIDI commands, including SYSEX. rsTouch is a more
demanding use of a MIDI interface than a simple sequencer app or a
synthesizer app played from an external keyboard. A poorly performing
MIDI interface can prevent rsTouch from connecting with Reason. Usually
67
though, the errors are more subtle and lead to an occasional missing
rsTouch screen update.
rsTouch includes diagnostic tools to check for MIDI interface related
problems. Tap the info button, tap on the “Connect” bar, then tap on
“MIDI Interface Status and Help” bar.
The MIDI Interface Status screen includes two gray boxes at the bottom:
the left is a “Loopback Test” that measures the quality of the end-to-end
MIDI connections. The second box, “MIDI Interface Status” shows a
running total of errors since rsTouch was started, or you last cleared the
errors.
The “MIDI Interface Status” box is helpful to see if you may be
experiencing MIDI errors. If you have been able to operate rsTouch but
find periodic problems, check this area for the error count. Errors indicate
that the MIDI interfaces do not always handle the MIDI data properly. The
second number, “Peak error rate” reflects the worst error performance
rsTouch has experienced since it was started, or the errors last cleared. A
number above 1 is usually an indication that the connection can impact
rsTouch operation, and may prevent rsTouch from even connecting to
Reason. The status numbers can be reset back to zero by clicking on
“Clear”. Do this after you have taken steps to address the quality of your
MIDI connection, then use rsTouch normally to see if it still experiences
errors.
68
If the error count is above 2, or the peak average is above 0.5, you
should probably run the Loopback Test. The Loopback Test is a tool you
can use to help troubleshoot your MIDI interfaces. It cannot detect all
types of errors, nor does failing the test necessarily mean rsTouch cannot
operate. The Midi Interface Status error count and average shows actual
errors in normal use and is a clearer indication if you are actually having
problems. So think of the loopback test results as a “predictor of
problems” and the status as an indication of actual problems.
A MIDI failure can be due to either the USB MIDI interface connected to
your iPad, or the MIDI interface connected to your computer. rsTouch
does not have a way of detecting which MIDI interface is at fault. So
when troubleshooting, you may have to try different combinations.
To use the Loopback Test, you must be connected, otherwise the test
buttons will be grayed out. Reason must be running and rsTouch must
be an assigned Reason control surface, just as you would normally use it.
Perform the test by simply pressing the Start button. The test only takes
a short while and you can observe its progress through the “progress
bar”. If you want to stop it before it ends, press Stop. The test will begin
stopping but will take a few seconds before it is completely stopped.
The loopback test sends a large number of data items to Reason, and
Reason responds to each with special test data. rsTouch checks each of
the return messages to see if it is valid, and also takes note of missing
responses. The error number is the total number of mishaps.
A properly operating MIDI interface will not show any errors. Some
interfaces only have one or two errors and may still be usable with
rsTouch’s special SLOW Reason codec (see below). We still recommend
replacing the interface when you can. A large number of errors indicates
an interface that should be immediately replaced. If you get an unusually
high number of errors, like over 50, try running the test multiple times just
to confirm the result.
69
Our own testing uncovered a few USB MIDI interfaces that sometimes
failed and basically “crashed”. Once crashed, the MIDI interface would
seem to work for simple MIDI messages but every SYSEX message sent
to the iPad was damaged, preventing rsTouch from connecting to
Reason. The only way to recover was to unplug the USB MIDI interface
from the iPad, and if it was externally powered, turn off the power.
There is a special way to use the loopback test to test just the iPad USB
MIDI interface. Instead of connecting the iPad’s MIDI cables to your
computer interface, connect them so that the iPad MIDI interface’s output
is directly connected to its input. If your MIDI interface is the type with
built-in cables, this set up requires a MIDI “female to female” converter
plug. Alternatively a hardware MIDI THRU can accomplish the same
thing.
Once you have the iPad’s MIDI interface connected back onto itself (in a
loop, hence the origin of the name “loopback test”) run the test as normal.
This test is more demanding than connecting through your computer and
Reason, so some MIDI interfaces will show errors under this test that may
not show with the standard test.
If one of your MIDI interfaces causes errors it is probably best to replace
it. That said, there will be circumstances where you might need to use an
existing MIDI interface that does not perform properly with rsTouch.
The Reason control surface support files you installed on your computer
contain a special version called “rsTouch (SLOW)” that is a second
choice from Reason’s control surface setup screen (in Preferences).
rsTouch (SLOW) attempts to minimize errors by reducing the rate Reason
sends certain updates to rsTouch. Sometimes that is enough to change a
failing MIDI interface into one that works. However it may not help! Your
only alternative is to replace the problem MIDI interface, or switch to
using a network MIDI connection. Also remember if if it seems to work
70
that it can only reduce the chance of errors; you may still experience an
occasional error.
Alas this comes at a price: some of rsTouch’s displays and other
information from Reason will not be as responsive as they would be using
the “normal” codec. Whether you notice the difference depends on the
amount of Reason activity.
rsTouch (SLOW) affects the update rate for the bar-beat display, the
timecode display, and faders or rotaries that also show values, like the
volume faders or pans. This affects updates only from Reason to the
iPad; updates from rsTouch to Reason are unaffected.
rsTouch (SLOW) can help you get your set up working but it really is not
an ideal long-term solution. rsTouch and really all of your other iPad apps
that use external MIDI benefit from a obtaining a fully working USB MIDI
interface.
Remember, never use rsTouch (SLOW) with network MIDI!
The loopback test can also be used for network MIDI if you suspect you
have a poor Wi-Fi connection. Network MIDI is very “robust”, meaning it
takes special measures to reliably deliver MIDI data. However, under
marginal Wi-Fi conditions you may experience occasional MIDI data
errors. Loopback can be used to see if Wi-Fi may cause MIDI errors.
However do not be discouraged if the tests shows a couple of errors. WiFi related errors are usually very different than what you encounter from a
problem USB MIDI interface. Wi-Fi errors tend to be of a more random
nature and rsTouch can work well even when there are a few such errors.
Contact Delora Support
If you are still experiencing a problem with rsTouch, email us at
[email protected]. 71
Appendix 1: Setting Up OSX Network MIDI
If you wish to send and receive MIDI over the Wi-Fi network between your
iPad and a Mac then you need to set up that computer to offer a network
MIDI connection. OS X has offered network MIDI as a part of its CoreMIDI
facilities for quite a few years now; any Mac running OS X Leopard or later
already has network MIDI built in. All you need to do is use the OS X Audio
Midi Setup application to create a network MIDI port.
Start by running Audio Midi Setup. Double-click the “Network” icon. This will
bring up the network MIDI setup screen. If you have never set up a network
MIDI connection before you will be greeted with a screen like the one here.
Apple refers to network MIDI connections as “sessions”, and you provide a
name for each one. You can define as many sessions as you wish, each
with its own settings.
72
You can have as many sessions active at once as needed, but rsTouch only
needs a single session. Click the “+” button under “My Sessions” to create
a new network MIDI connection. Provide a local name of your choosing
(something easy to figure out and that does not conflict with other MIDI
ports), and a “Bonjour name”. This is what you will see in rsTouch’s
connection screen.
The final step is to enable the session and make it ready to accept
connections. First select the session by name, then verify that the popup
under “Who may connect to me:” is set to “Anyone”. This popup can be
used to restrict connections to only certain devices.
73
Now tick the check box next to the session you wish to use. This will enable
the session to accept connections. This is how the network host appears in
the rsTouch connection screen (above).
IMPORTANT! - do not assign anything to the “Live routings” popups. Doing
so will prevent proper communications between Reason and rsTouch.
Leave these set to “-”.
74
Appendix 2: rtpMIDI (network MIDI for
Windows)
Currently there is only one network MIDI driver for Windows PCs that is
compatible with the iOS (and OSX) network MIDI driver. This driver was
developed by Tobias Erichsen who has generously made it available to
users through his website. You can learn more about rtpMIDI here: http://
www.tobias-erichsen.de/software/rtpmidi.html where you will find a link to
download the installer and a tutorial that covers setup and use.
Whether you use rtpMIDI or elect to use the iPad’s USB MIDI is entirely
up to you. Harmony Systems, Inc. does not endorse or otherwise
encourage you to use rtpMIDI, nor does it guarantee that rsTouch will
work properly with rtpMIDI. Furthermore your use of rtpMIDI is
governed by the licensing and requirements of Tobias Erichsen; you
should understand what conditions, including any licensing payments,
he requires.
75
Appendix 3A: Setting Up An OSX Ad-Hoc Wi-Fi
Network (OS X 10.5 - 10.9)
OS X provides a simple, straight-forward way of setting up an ad-hoc Wi-Fi
network using a Mac’s built-in Airport. See the next session if you are
running OS X 10.10 or higher).
Press this button to turn
Airport on
Step 1:
Open System Preferences and select “Network”. Choose the Airport item
from the list at the left. Turn Wi-Fi on if it is not already.
76
Step 2:
Open the “Network Name” popup, then select “Create Network...”.
77
Step 3:
Enter a name for your ad hoc network. Leave “Channel” set to “Automatic”
unless you have problems with interference from other nearby WiFi
networks. If you are concerned about another laptop or device connecting to
your Mac check “Require Password” and follow the on screen directions. If
you elect to employ a password you will be required to enter that password
also in your iPhone, iPod touch, or iPad when you attempt to connect to this
ad-hoc network. Note that this kind of password protection is considered
“weak” and not really suitable for protecting against determined intruders.
You may want to disable sharing features such as “network sharing”. You
may also wish to enable OSX’s firewall. However, enabling the firewall may
require additional set up to keep it from interfering with communications
between your device and computer.
78
Step 4:
From your device’s Settings application select “Wi-Fi”. Turn “Wi-Fi” ON if it is
OFF. After a few moments you will see the available WiFi network
candidates in a list. Select your ad-hoc network. iOS will show the
checkmark next to the network name almost immediately. However the
network connection is still not completed when this happens and can take
awhile to become fully active. Don’t give up if your app does not seem to be
able to connect! Give it a bit more time.
79
Step 5:
You can verify that your device is connected to the ad hoc network by
tapping on the "i" button at the right of the network name to show the
following. The connection is established when the number highlighted below
switches from all zeros to something like shown above.
When you are finished using the ad hoc network, disconnect all of the
devices from the network, then disconnect your Mac. Otherwise you may
leave a “zombie network” active that could confuse your devices (and you!)
that it is connected when it is not. It is also recommended that you prevent
your Mac from entering into its sleep mode when using an ad hoc network
as it may disconnect from the ad hoc network while your devices remain
connected. This can cause issues if you try to recreate the network when
your Mac awakens.
80
Appendix 3B: Setting Up An OSX Ad-Hoc Wi-Fi
Network (OS X 10.10 and higher)
OS X provides a simple, straight-forward way of setting up an ad-hoc Wi-Fi
network using a Mac’s built-in Airport. See the previous session if you are
running OS X 10.5 - 10.9).
Press this button to turn
Airport on
Step 1:
Open System Preferences and select “Network”. Choose the Airport item
from the list at the left. Enable “Show Wi-Fi status in the menu bar”. Once
you have enabled showing Wi-Fi status on the menu bar, you do not have to
perform this step when you create an ad hoc network.
81
Step 2:
Open System Preferences and select “Network”. Choose the Airport item
from the list at the left. Enable “Show Wi-Fi status in the menu bar”. Once
you have enabled showing Wi-Fi status on the menu bar, you do not have to
perform this step when you create an ad hoc network.
IMPORTANT!
Prior to Yosemite (10.10), OS X had an option to password protect the ad
hoc network. This provided a measure (though weak) of security against
unauthorized connection to the Wi-Fi network. This might be important if say
you were performing in a public space and did not wish anyone to interfere.
Password protection is no longer an option so if you need such a feature
you will not be able to set up the ad hoc network from your Mac. If you elect
to use OSX’s ad hoc facility, you should disable sharing features such as
“network sharing”. You may also wish to enable OSX’s firewall. However,
enabling the firewall may require additional set up to keep it from
interfering with communications between your device and computer.
82
Step 3:
Click “Create” and your ad hoc Wi-Fi becomes
available to your other devices in a few moments.
The menu bar’s Wi-Fi status icon changes to the
one below to indicate that an ad hoc network is
active.
Step 4:
From your device’s Settings application,
select “Wi-Fi”. Turn “Wi-Fi” ON if it is
OFF. After a few moments you will see
the available WiFi network candidates in
a list. Select your ad-hoc network. iOS
will show the checkmark next to the
network name almost immediately.
However the network connection is still
not completed when this happens and
can take awhile to become fully active.
Don’t give up if your app does not seem
to be able to connect! Give it a bit more
time. awhile to become fully active.
Don’t give up if your app does not seem
to be able to connect! Give it a bit more
time.
83
Step 5:
You can verify that your device is connected to the ad hoc network by
tapping on the "i" button at the right of the network name to show the
following. The connection is established when the number highlighted below
switches from all zeros to something like shown above.
When you are finished using the ad hoc network, disconnect all of the
devices from the network, then disconnect your Mac. Otherwise you may
leave a “zombie network” active that could confuse your devices (and you!)
that it is connected when it is not. It is also recommended that you prevent
your Mac from entering into its sleep mode when using an ad hoc network
as it may disconnect from the ad hoc network while your devices remain
connected. This can cause issues if you try to recreate the network when
your Mac awakens.
84
Acknowledgements
In addition to Harmony Systems, Inc.‘s proprietary code, rsTouch contains some
code provided by generous and dedicated independent developers. The
following code was used:
Reachability Extensions -- Enhancements to Apple’s Reachability
class, version 2
Reachability Extensions This is a derived work of Apple's Reachability v2.0 class.
Extensions Copyright (C) 2009 Donoho Design Group, LLC. All Rights Reserved.
Redistribution and use in source and binary forms, with or without modification,
are permitted provided that the following conditions are met:
* Redistributions of source code must retain the above copyright notice, this list
of conditions and the following disclaimer.
* Redistributions in binary form must reproduce the above copyright notice, this
list of conditions and the following disclaimer in the documentation and/or other
materials provided with the distribution.
* Neither the name of Andrew W. Donoho nor Donoho Design Group, L.L.C. may
be used to endorse or promote products derived from this software without
specific prior written permission.
THIS SOFTWARE IS PROVIDED BY DONOHO DESIGN GROUP, L.L.C. "AS IS"
AND ANY EXPRESS OR IMPLIED WARRANTIES, INCLUDING, BUT NOT
LIMITED TO, THE IMPLIED WARRANTIES OF MERCHANTABILITY AND
FITNESS FOR A PARTICULAR PURPOSE ARE DISCLAIMED. IN NO EVENT
SHALL THE COPYRIGHT HOLDER OR CONTRIBUTORS BE LIABLE FOR
ANY DIRECT, INDIRECT, INCIDENTAL, SPECIAL, EXEMPLARY, OR
CONSEQUENTIAL DAMAGES (INCLUDING, BUT NOT LIMITED TO,
PROCUREMENT OF SUBSTITUTE GOODS OR SERVICES; LOSS OF USE,
85
DATA, OR PROFITS; OR BUSINESS INTERRUPTION) HOWEVER CAUSED
AND ON ANY THEORY OF LIABILITY, WHETHER IN CONTRACT, STRICT
LIABILITY, OR TORT (INCLUDING NEGLIGENCE OR OTHERWISE) ARISING
IN ANY WAY OUT OF THE USE OF THIS SOFTWARE, EVEN IF ADVISED OF
THE POSSIBILITY OF SUCH DAMAGE.
NSObject + Properties, NSString + PropertyKVC
Copyright (c) 2008-2009, Jim Dovey All rights reserved.
Redistribution and use in source and binary forms, with or without modification,
are permitted provided that the following conditions are met:
Redistributions of source code must retain the above copyright notice, this list of
conditions and the following disclaimer.
Redistributions in binary form must reproduce the above copyright notice, this list
of conditions and the following disclaimer in the documentation and/or other
materials provided with the distribution.
Neither the name of this project's author nor the names of its contributors may be
used to endorse or promote products derived from this software without specific
prior written permission.
THIS SOFTWARE IS PROVIDED BY THE COPYRIGHT HOLDERS AND
CONTRIBUTORS "AS IS" AND ANY EXPRESS OR IMPLIED WARRANTIES,
INCLUDING, BUT NOT LIMITED TO, THE IMPLIED WARRANTIES OF
MERCHANTABILITY AND FITNESS FOR A PARTICULAR PURPOSE ARE
DISCLAIMED. IN NO EVENT SHALL THE COPYRIGHT HOLDER OR
CONTRIBUTORS BE LIABLE FOR ANY DIRECT, INDIRECT, INCIDENTAL,
SPECIAL, EXEMPLARY, OR CONSEQUENTIAL DAMAGES (INCLUDING, BUT
NOT LIMITED TO, PROCUREMENT OF SUBSTITUTE GOODS OR SERVICES;
LOSS OF USE, DATA, OR PROFITS; OR BUSINESS INTERRUPTION)
HOWEVER CAUSED AND ON ANY THEORY OF LIABILITY, WHETHER IN
CONTRACT, STRICT LIABILITY, OR TORT (INCLUDING NEGLIGENCE OR
86
OTHERWISE) ARISING IN ANY WAY OUT OF THE USE OF THIS SOFTWARE,
EVEN IF ADVISED OF THE POSSIBILITY OF SUCH DAMAGE.
Cocoa Lumberjack
Software License Agreement (BSD License)
Copyright (c) 2010-2015, Deusty, LLC All rights reserved.
Redistribution and use of this software in source and binary forms, with or without
modification, are permitted provided that the following conditions are met:
* Redistributions of source code must retain the above copyright notice, this list
of conditions and the following disclaimer.
* Neither the name of Deusty nor the names of its contributors may be used to
endorse or promote products derived from this software without specific prior
written permission of Deusty, LLC.
THIS SOFTWARE IS PROVIDED BY THE COPYRIGHT HOLDERS AND
CONTRIBUTORS "AS IS" AND ANY EXPRESS OR IMPLIED WARRANTIES,
INCLUDING, BUT NOT LIMITED TO, THE IMPLIED WARRANTIES OF
MERCHANTABILITY AND FITNESS FOR A PARTICULAR PURPOSE ARE
DISCLAIMED. IN NO EVENT SHALL THE COPYRIGHT OWNER OR
CONTRIBUTORS BE LIABLE FOR ANY DIRECT, INDIRECT, INCIDENTAL,
SPECIAL, EXEMPLARY, OR CONSEQUENTIAL DAMAGES (INCLUDING, BUT
NOT LIMITED TO, PROCUREMENT OF SUBSTITUTE GOODS OR SERVICES;
LOSS OF USE, DATA, OR PROFITS; OR BUSINESS INTERRUPTION)
HOWEVER CAUSED AND ON ANY THEORY OF LIABILITY, WHETHER IN
CONTRACT, STRICT LIABILITY, OR TORT (INCLUDING NEGLIGENCE OR
OTHERWISE) ARISING IN ANY WAY OUT OF THE USE OF THIS SOFTWARE,
EVEN IF ADVISED OF THE POSSIBILITY OF SUCH DAMAGE.
87