1
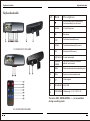
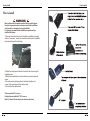
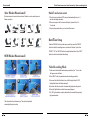
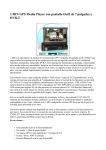
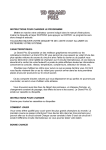
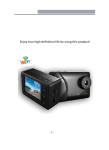
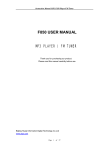
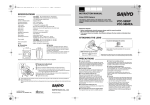
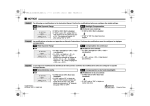
DVR MIRROR
◆
Rear Camera Display
◆ 120 Degree wide angle
LCD Auto-dimming
The information contain herein maybe changed any time
with out prior notification
Owner’s manual
CV-043LAIN / CV-043LABK / EV-043LAIN / EV-043LABK
Table of contents
Table of contents
Foreword
Foreword
Foreword . . . . . . . . . . . . . . . . . . . . . . . . . . . . . . . . . . . . 2
Thank you for purchasing high resolution car DVR mirror.
Certifications . . . . . . . . . . . . . . . . . . . . . . . . . . . . . . . . . 3
DVR mirror features the dual-camera system for extra
Product Description . . . . . . . . . . . . . . . . . . . . . . . . . . . 3
wide filming angles which is unique of its own kind and
Features of DVR mirror. . . . . . . . . . . . . . . . . . . . . . . . . 3
provides enhanced recording capability to users.
Certifications . . . . . . . . . . . . . . . . . . . . . . . . . . . . . . . . . 4
This manual describes the technical specification,
Keyboard and cable . . . . . . . . . . . . . . . . . . . . . . . . . . . 5
setup and operation of DVR mirror in detail. Please read
How to install . . . . . . . . . . . . . . . . . . . . . . . . . . . . . . . . . 9
this manual carefully and keep it for future reference. Hope
On/off and screen saver . . . . . . . . . . . . . . . . . . . . . . . 12
DVR mirror can meet your need and be the indispensable
Date/Time Setup . . . . . . . . . . . . . . . . . . . . . . . . . . . . . 12
driving companion to you.
Video Recording Mode . . . . . . . . . . . . . . . . . . . . . . . . 12
Photo Mode . . . . . . . . . . . . . . . . . . . . . . . . . . . . . . . . . 13
Playback Mode . . . . . . . . . . . . . . . . . . . . . . . . . . . . . . 13
Menu and Mode . . . . . . . . . . . . . . . . . . . . . . . . . . . . . . 13
1
2
Certifications / Prodect description / feateres of DVR mirror
Certifications
DVR mirror passes E-MARK / FCC / C-TICK certifications and is ROHS compliant,
Certificarions
Certifications
Image sensor
1280(H)*960(V)CMOS sensor
Frame rate
30fps@full resolution 720p, VGA
Language
English, Korean, Japanese, Simplified Chinese, Traditional Chinese.
Product Description
Display
4.3″ 16:9 TFT-LCD display monitor
DVR mirror adopts top-level program coming with superior digital HD auto-adjust
Memory
SD card for CV model(Max. 32GB) ; tf card for EV model(Max. 32GB)
brightness system monitor, so the brightness on the DVR mirror screen varies with
Focus range
2m- infinite
the front car ambient light, in this way driver can view clear images on the screen
Photo format
JPEG
Video format
MOV
Audio
Built in microphone and speaker
Working temperature
-200C- 700C
Accessories
Cable, user manual, remote(optional), reverse camera(optional),
32GB SD card(optional)
which makes car driving safety.
and avoid from dizzy and ensure driving safety even though the brightness on the
screen has discrepant 20 times from daytime to nighttime.
It features superior digital HD audio/video recording and high quality photo taking
capability. Also, DVR mirror is crafted with G-sensor and enjoys many other
patented technologies which make DVR mirror have wide application potential to car
market.
Features of DVR mirror:
Dual channel simultaneous recording and displaying on screen
G-Sensor When the gravity acceleration reaches 6g (1g = 9.8m/sec^2), DVR
mirror will automatically keep the images before and after the impact interval as
undeletable file to preserve the evidence.
4.3'' 16:9 HD display without distortion.
H.264 image compression technique
According to system time, the device auto-adjust exposure issue during
daytime and nighttime.
60fps smooth images with no delay or blur.
Cyclic recording mode with no memory run out issue
Motion detection
Automatic recording when the vehicle starts, charging while recording.
Remote control supported (optional)
3
4
Keyboard and cable
keyboard and cable
Keyboard and cable
2
3
4 5 6 7
1
8 9 10 11
12
13
NO. Mark
Description
1
Switch between reverse camera display/
front camera display/ turn off screen
2
Screen
4.3 inch tft lcd screen
3
Mic
Microphone
4
</UP
Fast forward/ upward(for menu)
5
>/Down
Fast backward/ downward (for menu)
6
Rec
Start/ pause/ OK(for menu)
7
Light sensor
To detect ambient light
8
Operation
indicator
If the mirror is recording, the indicator
will flash, and vice versa.
9
Mode
Switch operation mode and corresponding menu
10
Menu
Option menu of each operation mode
11
PIP
Picture in picture
12
SD card slot
MAX: 32GB
13
Front camera
Rotation angle--- X: 150 Y: 360 Z: 150
CV-043LAIN/CV-043LABK
12
7
1
8
1
6
10
13
4
10
5
11
The menu: REC ,DOWN ,MODEL , > , are unavailable
during recording mode
EV-043LAIN/EV-043LABK
5
6
Keyboard and cable
keyboard and cable
Keyboard and cable
6
4
5
4
3
2
1
1
Acc (Red)
12V + Acc constant power supply
2
Gnd (Black)
-Chassis ground
3
Battery (Yellow) 12V+Constant power supply
4
Back up(Green) 12V Reversing trigger line
5
Camera power
12V Reverse camera power
6
Camera input
Rear camera input
7
Video power
12V + Acc constant power supply
8
Video input
User defined
Cable (Two videos input)
6
4
7
5
4
8
4
3
2
1
Cable (Three videos input)
7
8
How to install
How to install
How to install
WARNIING
Most vehicles have the mirror mounted directly onto the glass;
there fore improper tools or techniques used in the installation
could result in a damaged or broken windshield .
It is strongly recommend that installation be performed by a
qualified technician.
1) Remove the existing mirror.(note: all vehicles use different mounting
solution. If necessary , consult your local automotive dealer or installation
professional for specific instructions).
2) Attach the vehicle-specific mount to the back of the mirror using the
supplied screws.
3) Attach the assembled mirror to the vehicle mirror mounting tab and
secure.
4) Route the mirror cable along the roof and down the pillar, and
connect to the receiving end of the module cable.
5) Connect the three power leads:
Yellow-constant 12V + source
Red-Ignition controlled ACC 12V + source
Black (-) Ground (Connecting to car chassis works best)
9
10
How to install
On/off and screen saver / dare time setup / video recording mode
After Market Mount install
On/off and screen saver
We have various of mounts to choose from. if there's no one to match your car.
Please contact us.
1.When the car is activated, DVR mirror will automatically turn on in 3
seconds and begin recording.
2.When car engine is off, the screen will display “power off now.” in
10 seconds.
3.To press the power button, you can turn off the screen.
Date/Time Setup
Press the “MENU” button to enter setup mode, then press the “MODE”
button to switch to the setting menu, and choose “date set” option. Use
“MODE”, “UP” and “DOWN” buttons to adjust date and time. Press “REC”
OEM Market Mount install
button to confirm and activate the settings.
Video Recording Mode
1.Video record is the default mode when powered up, the “ ” icon on the
left upper corner will flash.
2.Press “REC” button to pause/resume the recording operation.
3.Press and hold the left button to turn on/off the night vision IR LED
(taking affect when the button released).
4.Press the Left button to switch in between day/night recording mode.
5.Press the Right button to switch the camera displayed.
6.“H_HD” high resolution mode is preferred for the smooth filming during
high speed motion.
The information is for reference only, The product is updated
constantly without prior notice
11
12
Photo mode / playback mode / menu and mode
Photo Mode
Press “MODE” button once switches to photo taking mode. The upper left corner
Water Mark OFF/ON
of the display will show “” icon. There are three resolutions 1M, 2M and 3M for
record audio OFF/ON
choice. Photo mode works only with the wide angle camera.
auto record OFF/ON
Setting
Playback Mode
1.Press “MODE” to enter the playback mode to check the video images taken.
2.Press “MODE” will stop the playback.
3.Press “MENU” for delete option can delete the selected file.
Screen
Protection
15 sec/30 sec/45sec/OFF
Language
中文简体, 中文繁體, English, русский,
español, Deutsch, 한국의 日本語
,
Frequency
50hz/60hz
Back_IN
PAL/NTSC
Menu and Mode
Menu
Mode
MP
VGA/720P
RT
1min/2min/5min/OFF
Record Mode
Front_Record/Back_Record/Double_Record
Setting
Bright
Auto/sunlight/fluorescence/cloudy sky/tungsten
Exposal
-3/-2/-1/0/1/2/3
Color
Null/black and white/negative/ancient/reseda
Screen
Protection
15 sec/30 sec/45sec/OFF
G-sensor
High/middle/low/close
Auto detect OFF/ON
13
14