1
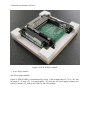
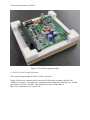
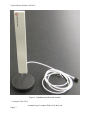
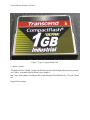
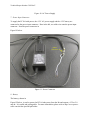
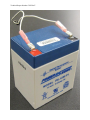
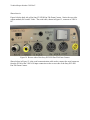
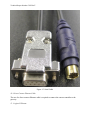
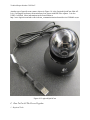
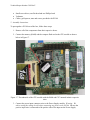
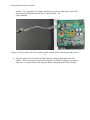
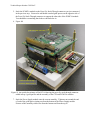
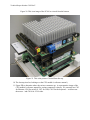
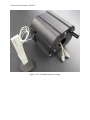
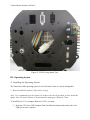
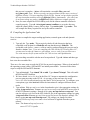
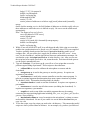
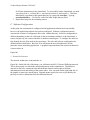
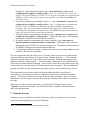
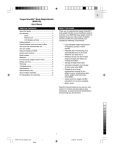
Technical Report Number CSSE10-07 User Manual for PC104-based Compact Wireless Sensor Nodes Brandon Maharrey ([email protected]) Alvin Lim ([email protected]) Qing Yang ([email protected]) Computer Science & Software Engineering Shelby Center for Engineering Technology Auburn University Auburn, AL 36849 I. Overview This manual describes the hardware of the PC104-based compact wireless sensor node and the target tracking application and related software. II. Hardware & Technical Specifications A. PC104 Components In the current version of the PC104-based target tracking application, we use three PC104compliant modules, the main CPU module, the PCMCIA module and the Power Supply module, the details of which are listed below. 1. CPU Module The CPU module ( Figure 1), PFM-550S, is manufactured by Aaeon. It has a 533MHz VIA Mark processor and has features such as 10/100Base-TX Fast Ethernet port, one RS-232 port and one RS-232/485 port, four USB 1.1 ports, a SDRAM-SODIMM socket for up to 512 megabytes of RAM and supports type I compact flash cards. It supports 36-bit TL & 18/36-bit dual LVDS LCD panel, has a watchdog timer and fully supports ISA. It is also fanless with an operating temperature of 0 to +60 degrees Celsius. It requires +5V for operation. More information can be found online at http://www.tri-m.com/products/aaeon/pfm550s.html. Technical Report Number CSSE10-07 Figure 1 PC104 CPU module 2. PCMCIA Module The PCMCIA module ( Figure 2), PCM-3115C, is manufactured by Aaeon. It is a 2-slot PCMCIA module which supports two Type I/II cards or one Type III card. It complies with PCMCIA v2.1 and JEIDA v4.2. It has a 16-bit data bus and a busy status LED. It requires +5V for operation. More information can be found online at http://www.tri-m.com/products/aaeon/pcm3115c.html. Technical Report Number CSSE10-07 Figure 2 PC104 PCMCIA module 3. Power Supply Module The Power Supply module ( Figure 3), PFM-P13DW2, is manufactured by Aaeon. It has an input range of +7V to +30V and an output of +5V and +12V. It is used to intake +12V from the AC power supply or battery and convert it into the +5V used by the PCMCIA and CPU modules. Technical Report Number CSSE10-07 Figure 3 PC104 Power Supply module 4. Press-Fit, Stack-Through Connector This connector (part number PC104-C104-PS1), shown in Figure 4, allows us to continue the bus from one PC104 module to another module if the modules are too thick. The connector is manufactured by Emulation Technology, Inc., and the part number is PC104-C104-PS1. More information can be found online at http://www.emulation.com/173/pc104.cfm. Technical Report Number CSSE10-07 Figure 4 PC104 Press-Fit, Stack-Through Connector B. Other Hardware Items The rest of the hardware items described are more commonplace items: 1. Orinoco Wireless Card Shown in Figure 5 is the Orinoco Gold wireless PCMCIA LAN card we use is a 2.4 GHz radio which supports the four IEEE 802.11 High-Speed compliant speeds 11Mb/s, 5.5 Mb/s, 2 Mb/s and 1 Mb/s within the IEEE 802.11 Standard for Wireless LANs. Technical Report Number CSSE10-07 Figure 5 Orinoco Gold Wireless PCMCIA LAN Card 2. Lucent External Antenna Shown in Figure 6 is a 2.4 – 2.5 Ghz omnidirectional external antenna used to boost the wireless signal with a +5dBi gain and a 60” cable. Technical Report Number CSSE10-07 Figure 6 Omnidirectional External Antenna 3. Compact Flash Card A standard type I compact flash card is shown in Figure 7. Technical Report Number CSSE10-07 Figure 7 Type I Compact Flash Card. 4. Memory (RAM) The RAM used is a 256MB, 144 pin Synchronous Dynamic RAM high-density memory module at 133 Mhz. Its technical specifications can be found at http://www.transcendusa.com/Support/DLCenter/Datasheet/TS32MSS64V6G_6755.pdf. Please see Figure 8 for an image. Technical Report Number CSSE10-07 Figure 8 256MB, 144 pin Synchronous Dynamic RAM High-Density Memory Module 5. Microphone This plastic USB microphone, manufactured by Sound Professionals, is a mono, high sensitivity, omnidirectional microphone with headphone amplifier. Its dimensions measure 1.5” x 1.0” x 0.25”, and it can detect frequencies from 20 – 20,000 Hz. More information can be found online at http://www.soundprofessionals.com/cgi-bin/gold/item/SP-USB-MIC-1. Please see Figure 9 for an image. Technical Report Number CSSE10-07 Figure 9 USB Microphone 6. AC Power Supply The AC Power Supply, shown in Figure 10 below, is manufactured by Sunny Computer Technology. It has an input range of 100 – 240V and an output of +12V. This is what we use in the lab to power the PC104s. For more information, please refer to http://www.sunnyeuro.com/HTML/PRODUCTS/POWERSPL/SYS1183UP.html online. Technical Report Number CSSE10-07 Technical Report Number CSSE10-07 Figure 10 AC Power Supply 7. Power Input Connector To supply the PC104 with power, the +12V AC power supply and the +12V battery are connected to the power input connector. Here in the lab, we solder wire onto the power input connector. Note the power connector in Figure 11 below. power connector Figure 11 Power Connector 8. Battery The battery, shown in Figure 12 below, is used to power the PC104 when away from the lab and outputs +12V at 5.0 amp hr. It is sealed and rechargeable. For more information, please refer to http://www.powersonic.com/site/doc/prod/86.pdf online. Technical Report Number CSSE10-07 Technical Report Number CSSE10-07 Technical Report Number CSSE10-07 Figure 12 Power Sonic Battery 9. Sony EVI-D30 Pan-Tilt-Zoom Camera with Serial Cable The camera controller tracks a moving target using the Sony EVI-D30 Pan-Tilt-Zoom camera shown in Figure 13. The EVI-D30 is a serial-controlled (RS232) camera with a total pan area of 200° (100° to the left and 100° to the right of center) and a total tilt area of 50° (25° up and 25° down from center). It has zoom capability and auto-focus. For more information, visit http://www.axis.com/techsup/cam_servers/ptz/sony_d30.htm online. Also, see http://bssc.sel.sony.com/Professional/docs/manuals/evid30commandlist1-21.pdf for more technical details from Sony. Figure 13 Sony EVI-D30 Pan-Tilt-Zoom Camera Technical Report Number CSSE10-07 Shown here in Figure 14 is the back side of the Sony EVI-D30 Pan-Tilt-Zoom Camera. Notice the two video output methods, RCA and S Video. The serial cable, shown in Figure 15, connects to VISCA IN. Figure 14 Reverse side of the Sony EVI-D30 Pan-Tilt-Zoom Camera Shown below in Figure 15 is the serial communication cable used to connect the serial connector from the PC104 to the VISCA IN input connection on the reverse side of the Sony EVI-D30 Pan-Tilt-Zoom Camera. Technical Report Number CSSE10-07 Figure 15 Serial Cable 10. Direct Connect Ethernet Cable The use of a direct connect Ethernet cable is required to connect the camera controller to the gateway. 11. Logitech Webcam Technical Report Number CSSE10-07 Another type of pan-tilt-zoom camera, shown in Figure 16, is the Logitech QuickCam Orbit AF. It is a 2-megapixel webcam with an autofocus lens system with HD video capture. It is also USB 2.0 certified. More information can be found online at http://www.logitech.com/index.cfm/webcam_communications/webcams/devices/3480&cl=us,en. Figure 16 Logitech QuickCam C. How To Put All The Pieces Together 1. Required Tools Technical Report Number CSSE10-07 Small screwdrivers, one flat head and one Phillips head Voltmeter Cables, gold spacers, nuts and screws provided with PC104 2. Assembly Instructions To put together a PC104 out of the box, follow these steps: 1. Remove all of the components from their respective boxes. 2. Connect the memory (RAM) and the compact flash card to the CPU module as shown below in Figure 17. Figure 17 The underside of the CPU module with the RAM and CFC inserted in their respective slots. 3. Connect the power input connector wire to the Power Supply module. Warning: We advise testing the voltage levels before connecting any power to the PC104. Be sure the positive input wire is connected to the positive side of the input on the Power Supply Technical Report Number CSSE10-07 module. You can plug the AC adapter into the power connector and test the ends of the wire before inserting them into the Power Supply module. See Figure 18 below. + sign indicates positive side Figure 18 The top side of the Power Supply module with the power cord inserted and screwed in. 4. Press one of the Press-Fit, Stack-Through connectors onto the underside of the CPU module. This is necessary because the next module, the PCMCIA module, is too thick to stack next. You must connect this connector before connecting the PCMCIA module. Technical Report Number CSSE10-07 5. Stack the PCMCIA module on the Press-Fit, Stack-Through connector you just connected in the previous step. You need to add double-stacked gold spacers on the opposite side of the Press-Fit, Stack-Through connector to support the other side of the PCMCIA module. You should have something that looks as shown below in 6. Figure 19. gold spacer press-fit, stack-through connector added in step 4 Figure 19 An upside-down image of the PC104 showing the press-fit, stack through connector added in step 4, gold spacers and the assembly of the CPU and PCMCIA modules. 7. Stack the Power Supply module onto the current assembly. Tighten a nut around the end of each of the gold spacers jutting out from the bottom of the Power Supply module. Pictures of the assembly can be seen from the bottom and from the top in Technical Report Number CSSE10-07 8. Figure 20 and 9. Figure 21, respectively. Technical Report Number CSSE10-07 Figure 20 This is an image of the PC104 as viewed from the bottom. Figure 21 This is the picture if viewed from the top. 10. The last step involves looking over the CPU module’s reference manual ( 11. Figure 22) to determine where the various connectors go. A representative image of the CPU module’s reference manual for various connectors is shown. We currently use CN3 for Ethernet, CN4 for serial I/O, CN7 for USB, CN15 for the keyboard – we do not use the mouse – and CN16 for VGA video. Technical Report Number CSSE10-07 Figure 22 Excerpt from the CPU module's reference manual. Technical Report Number CSSE10-07 12. A completed PC104 assembly including connectors is shown in 13. Figure 23, and a completed assembly inside its protective enclosure can be seen in Figure 24 below. A picture detailing the PC104 cable interface and showing the microphone’s position can be seen in Figure 25. CPU module PCMCIA module Power Supply module Figure 23 PC104 assembly Technical Report Number CSSE10-07 Figure 24 PC104 Inside Protective Casing Technical Report Number CSSE10-07 Figure 25 PC104 Casing Detail View III. Operating System A. Installing the Operating System The Linux-based Slax operating system is our OS of choice since it is easily configurable. 1. How to Install Slax (option 1) [the easiest, by far] Note: It is recommended you use Fedora 10 as that is the only OS on which we have tested this option. Note: We used a Fedora 10 virtual machine running on a Windows 7 host. To install Slax 6.0.7 to a compact flash card (CFC), you must: 1. Insert the CFC into a USB Compact Flash Card Reader and insert the reader into a free USB port on your computer. Technical Report Number CSSE10-07 2. Copy the boot, slax and slaxchanges directories onto the CFC. 3. cd to the boot directory on the CFC. 4. You will now run the script liloinst.sh (as root) which makes the CFC bootable. You can also edit liloinst.sh to include other Slax boot options. One we include is copy2ram which copies the entire operating system into RAM to increase access speed. To see how this is done, open liloinst.sh by typing vi liloinst.sh from your current location. Near the bottom of the file on the line append = "ramdisk_size=6666 ...", we inserted copy2ram like this: append = "ramdisk_size=6666 changes=slaxchanges copy2ram". You can type vi slax.cfg for a few more boot options to insert like copy2ram. Also, maybe more can be found on Slax.org. 5. Safely remove the USB CFC Reader from the USB port of your computer. 6. Remove the CFC from the CFC Reader and insert the CFC into the CFC slot on the underside of the PC104’s CPU module. 7. Power up the PC104. The system should now boot to a log in screen. Import note to remember: The Slax operating system has a neat feature that smoothes development. Alongside the boot and slax directories is a directory named slaxchanges. If you take a look into liloinst.sh, you will see where you can give the changes directory another name. We use the default slaxchanges for simplicity. Inside slaxchanges is a changes folder. This basically mirrors Slax’s file system. Anything you put into this folder will “show up” in the file system when you boot the PC104. If you assume this changes folder is the root directory (“/”) of the file system in Slax, you can add any directory hierarchy in this folder you wish. Suppose, for instance, you want to include the file idosomethingimportant.txt in the /etc folder of Slax. Simply create the directory etc in changes and copy and paste idosomethingimportant.txt into this newly created etc folder. As another example, assume you want to include a bunch of files in a directory under root’s home directory. Simply create root/anotherDirectory under changes and copy and paste your files there. Once you boot Slax, the files will appear in the correct place. 2. How to Install Slax (option 2) [more difficult and time consuming] To install Slax 6.0.7 to a compact flash card (CFC), you must: 1. Remove the power cord from the PC104. 2. Ensure the CFC and the RAM is in the correct slots on the underside of the PC104 CPU module. 3. Insert the supplied USB-CDROM into a USB-CDROM device and insert the USBCDROM device into a free USB port on the PC104. 4. Insert the power cord. Edit the bios settings of the PC104 to boot from USB-CDROM. Save and exit. The PC104 reboots itself. It should now boot from USB-CDROM. 5. Boot in text mode as the GUI has been removed. Select text mode from the menu. 6. Copy the two directories boot and slax from the supplied CDROM to /mnt/hdc1, the CFC. The boot and slax directories should be located under /mnt/live/mnt/sr0. Type cd /mnt/live/mnt/sr0 to enter the directory where the boot and slax directories are located. Type cp -r boot /mnt/hdc1 to copy the boot directory to /mnt/hdc1, the CFC. Type cp r slax /mnt/hdc1 to copy the slax directory to /mnt/hdc1, the CFC. Technical Report Number CSSE10-07 7. Type cd /mnt/hdc1/boot to enter the boot directory on the CFC. 8. You will now run the script liloinst.sh, located in /mnt/hdc1/boot, which makes the CFC bootable. You can also edit liloinst.sh to include other Slax boot options. One we include is copy2ram which copies the entire operating system into RAM to increase access speed. To see how this is done, open liloinst.sh by typing vi liloinst.sh from your current location. Near the bottom of the file on the line append = "ramdisk_size=6666 ...", we inserted copy2ram like this: append = "ramdisk_size=6666 changes=slaxchanges copy2ram". You can type vi slax.cfg for a few more boot options to insert like copy2ram. Also, maybe more can be found on Slax.org. 9. After editing liloinst.sh, return to the command line and type ./liloinst.sh. Just press enter when it tells you to do so until it is finished. The CFC should now be bootable. Type poweroff to power off the PC104. You will get to a point in the power off process where the PC104 complains, “this code should never get here”. This is normal. We have not found a fix for the problem. We believe that more advanced hardware may be required to power off the PC104 completely through software. Note: You may need to change the execution flag of liloinst.sh by typing chmod 744 liloinst.sh. 10. Remove the power cord after the PC104 powers off. 11. Remove the USB-CDROM device from the USB port. 12. Plug in the power cord. 13. Edit the bios settings to boot from HDD-0. Save and exit. The PC104 reboots itself. 14. The PC104 will boot to a log-in screen. Log in with user name root and password toor. At this point, the PC104 contains a clean install of the Slax operating system without any additional software or user-space applications, except NTP. IV. Compiling and Running Software A. Compiling Directed Diffusion & EVILib Libraries To compile the Directed Diffusion and camera controller EVILib libraries, follow these steps: Note: If you used method 1 in the previous section to install Slax to the CFC, you may be able to skip these steps. 1. Insert the supplied USB flash drive into a free USB port. Mount it to the file system by typing mount -t vfat /dev/sda1 /mnt/sda1. Type cd /mnt/sda1 to navigate to the USB flash drive. Copy the target tracking application to root's home directory (“~”) on the PC104 by typing cp tt ~. That is cp tt ~ without the ending period. 2. Type cd ~ to get back to root's home directory. Unmount the USB flash drive by typing umount /mnt/sda1. You can now safely remove the USB flash drive after umount returns. 3. Navigate to the directed diffusion 3.2.0 folder in the diffusion directory by typing cd ~/tt/diffusion/3.2.0. If it is empty, you should copy the contents of ~/tt/diffusion/3.2.0fresh to ~/tt/diffusion/3.2.0. Do that by typing cp -r ~/tt/diffusion/3.2.0-fresh/* ~/tt/diffusion/3.2.0. Now, type cd ~/tt/diffusion/3.2.0 if you are not already in that directory. In this step, you will compile diffusion. First, you must configure the compilation by typing ./configure --with-ethernet. After it is done, type make. After Technical Report Number CSSE10-07 this process is complete, ~/tt/exe will contain the executable filter_core and two_phase_pull. Note: We have recently run into problems with the newer version of diffusion (version 3.2.0) not compiling ON the PC104. Instead, we have had to perform this step on another machine and copy diffusion/3.2.0 to ~/tt manually. Also, there can be no spaces along any path to ~/tt/diffusion/3.2.0 for diffusion to compile properly. 4. Next, we must compile the EVILib library code for the camera controller software to compile properly. Type cd ~/tt/extAgnts/camera/camlibsrc to get to the directory where the camera library's source files are kept. Type make clean. Type make. This will compile the library required for use by the camera controller. B. Compiling the Application Code Now, it is time to compile the target tracking application, external agent code and dynamic services. 1. Type cd ~/tt. Type make. This recursively checks all sub-directories that have compilable code in them for a Makefile and runs that directory's Makefile. The executable code dynServ, camera, calibrate and log produced during this process can be found in ~/tt/exe. Note: If you are compiling this code ON the PC104 using Slax 6.0.7, you may need to alter the camera.cc and camera_reset.cc code if you run into errors. For some reason, the file system on Slax 6.0.7 has an issue with capitalization. All the target tracking executable code has now been produced. Type cd ~/tt/exe and then type ls to view the executable files. There are a few more steps to ready the PC104 for an actual experiment. When a clean install of the operating system is done, SSH and NTP are initially unavailable. You must follow these steps to ready the SSH and NTP daemons: 1. Type cd /etc/rc.d/. Type chmod 744 rc.sshd. Type chmod 744 ntpd. This will enable the SSH and NTP daemons. 2. We have altered /etc/rc.d/rc.local in the Slax 6.0.7 image to automate the configuration process upon powering on the PC104. As you may or may not know, the script /etc/rc.d/rc.local is run each and every time the PC104 is powered on. To configure your own options, type vi rc.local and follow the instructions to configure different sensor nodes. 3. Type cd /etc. Edit ntp.conf.server in the clusterhead to give it the appropriate settings by typing vi ntp.conf.server. Rename ntp.conf.server to ntp.conf in the NTP server to use it as the NTP daemon's settings. Rename it by typing mv ntp.conf.server ntp.conf. You can also edit ntp.conf.client in the NTP clients to give it the appropriate settings by typing vi ntp.conf.client. Rename ntp.conf.client to ntp.conf to use it as ntpdate's settings. Do that by typing mv ntp.conf.client ntp.conf. The settings you changed in either ntp.conf.client or ntp.conf.server and rc.local will now be applied when the system restarts. Note: The format of ntp.conf.server is: server 127.127.1.0 prefer Technical Report Number CSSE10-07 fudge 127.127.1.0 stratum 10 driftfile /var/lib/ntp/drift logfile /var/log/ntp.log broadcastdelay 0.008 restrict 127.0.0.1 restrict [subnet of addresses to which to reply] mask [subnet mask] nomodify notrap On the last line starting restrict, the field [subnet of addresses to which to reply] refers to those addresses to which the server is allowed to reply. Be sure to set the subnet mask appropriately. Note: The format of ntp.conf.client is: server [IP address of NTP server] restrict default ignore restrict 127.0.0.1 restrict 0.0.0.0 mask 0.0.0.0 nomodify notrap noquery driftfile /var/lib/ntp/drift logfile /var/log/ntp.log 4. While we are still on this NTP stuff, let us talk about the nifty little script we wrote that enables time synchronization to be forced every XX minutes, where XX is user-supplied. You have probably already noticed the lines in /etc/rc.d/rc.local that enable you to configure this. All you need to do is supply the IP address of the NTP server – in our case, it is the clusterhead – and the time interval between synchronization attempts. Be sure that the script ~/tt/scripts/syncClock.sc is in the directory ~/tt. After you are sure the script has been copied or moved to ~/tt, restart the node. Each time the node powers on, the script is automatically run. 5. Type cd ~/tt/scripts. If you now type ls, you will see a few scripts that are used to perform target tracking experiments. Those scripts are described now. • calibrateMic.sc is used to calibrate the microphone on sensors and the clusterhead. • startgateway.sc is used in the gateway to start the gateway. It requires one argument, a port number. • startcamera.sc is used in the camera controller to start the camera program. It takes in an optional argument that determines how many camera iterations to perform. The default is 1000. This number should probably be smaller. • startclusterhead.sc is used to start the clusterhead. It requires one argument, a port number. • startsensor.sc is used to start all other sensors (excluding the clusterhead). It requires one argument, a port number. • stopall.sc is used to stop all the executable programs that may be running concerning the target tracking application including filter_core, two_phase_pull, dynServ, gateway, camera and log. • maximizemicvolume.sc is used to maximize the microphone’s volume on sensor nodes and the clusterhead. Be sure if you enable it to run in /etc/rc.d/rc.local that you copy it to ~/tt. 6. To use the scripts, copy the scripts you need to the ~/tt directory. This ensures that useful scripts are where you need them at all times. As an example, say you have just followed Technical Report Number CSSE10-07 all of these instructions for the clusterhead. To successfully run the clusterhead, you need startclusterhead.sc, calibrateMic.sc, maximizemicmolume.sc and stopall.sc. Therefore, individually copy them to their parent directory by typing cd ~/tt/scripts. Type cp startclusterhead.sc ... Do this for each of the other scripts that you need. 7. Repeat these steps for the remaining sensors. C. Software Configuration At this point, the environment is configured and all application software has been installed; however, the application software has not been configured. Software configuration mostly concerns the creation of configuration files in the ~/tt/exe directory. Software configuration is different depending on the role of the node in the environment, whether it is the clusterhead, a sensor, the gateway, the camera controller or another external agent. To configure the software, first identify the role of the node in the experiment. The roles and software configuration are defined and described below. But first, let us talk about the network architecture of this particular sensor networking application. A graphical representation of the network architecture is shown below in Figure 26. 1. Network Architecture The network architecture is shown below in Figure 26. On the left side of the image, you will notice the 802.11 Directed Diffusion network. This is the network over which the sensor and gateway nodes communicate. The diffusion network on the left is connected to the infrastructure network on the right to facilitate information retrieval and tasking of the sensor nodes. Also, any node on the right-hand side of the graphic is termed an external agent. External agents require the services provided by the gateway to retrieve information from the diffusion network. Technical Report Number CSSE10-07 Figure 26 Network architecture of the target tracking application. 2. Description of Roles There are several different roles of nodes in this network architecture. They are as follows: a. Clusterhead Role The role of the clusterhead is to gather a CPA (closest-point-of-approach) time through sensing sound, gather the CPA times of its neighbors, run the Enhanced CPA algorithm and produce target location and speed information. 1. config.txt is used by the directed diffusion protocol to determine the network layout. It is organized line-by-line. Each neighbor's IP address, port and simulated link quality should be on its own line. Note: We always use 100 as the link quality. The format of config.txt is as follows: Technical Report Number CSSE10-07 <IP address of neighbor> - <port> - <link quality> <IP address of neighbor> - <port> - <link quality> ... 2. position.txt is used by the node to determine its current GPS location. Notice that there is a blank space between “Lat:” and “<latitude>” and between “Long:” and “<longitude>”. Any program reading this file should take this into consideration. The format of position.txt is as follows: Lat: <latitude> Long: <longitude> 3. sensor.txt is an output file of the calibrate program. It provides a way for the target tracking application to filter out background noise in the deployment environment. Simply run the calibrate program directly or use the script provided in ~/tt/scripts and follow the on-screen directions. When we calibrate sensor nodes in the lab and during field experiments, we use a target threshold of 80-85% and a target recording interval of five seconds. Be sure to write the output file before closing the calibrate program. Note: You should not edit sensor.txt directly unless you are very sure you know what you are doing. You may manually adjust the first number in the file depending on the results of your target tracking experiment. Any sensor not triggered during a run of the experiment should probably have its value LOWERED slightly. Any sensor triggered prematurely should have its value RAISED slightly. A lower threshold means greater sensitivity to soft sounds and therefore more false positives. 4. services.txt is used by dynServ to determine which data types the current node is able to produce. The file is organized line-by-line and should include keywords from the list of legal keywords. In the clusterhead, both VISUAL1 and MIC1 should be included on different lines. b. Sensor Role Sensor nodes sense CPA time through the use of microphones and relay this information to the clusterhead. 1. config.txt should be set up using the same method as the clusterhead. 2. position.txt should be set up using the same method as the clusterhead. 3. sensor.txt should be set up using the same method as the clusterhead. 4. services.txt should be set up using the same method as the clusterhead except that only MIC1 should be included. c. External Agent Role External agents drive the network. When you start a sensor using startsensor.sc or startclusterhead.sc, you are, in actuality, starting the dynServ process. dynServ does nothing (there are no threads running) until it receives an interest from the network. Therefore, when an external agent sends an interest to the gateway, those interests cause dynServ to start threads corresponding to this interest. 1. gatewayinfo.txt is required of all external agents and contains the IP address of the gateway on the first line and the port on which the gateway is listening for incoming UDP Technical Report Number CSSE10-07 packets on the second line. Note: The port number should always be 8899, for that is the port number on which the gateway listens. d. Camera Controller Role The camera controller program is responsible for controlling the pan of a camera once it receives target information from the clusterhead. 1. cameraPosition.txt lets the camera controller get its current GPS position and must follow the same pattern as position.txt as described in the clusterhead above. 2. Note: The camera controller is an external agent and therefore should also contain all files required by external agents. e. Gateway Role The gateway’s job is the facilitate information passing from the directed diffusion network to the IP network. The gateway is considered to be on the directed diffusion network and not an external agent. 1. config.txt should be set up using the same method as the clusterhead. Note: In the gateway, only the clusterhead is its neighbor. D. Running the Application At this point, you should have the environment set up and the application software configured and ready to run an experiment. To run the current version of the target tracking software, we remotely log in to the different machines. Usually, we use the clusterhead as the base of operations. From the clusterhead, we are able to communicate with all of the other sensors, the gateway and the camera controller. We use different terminals on the same sensor node to control other remote sensors. If you are running Slax, you can press Ctrl+[Fi] to change to terminal i, where i is between 1 and 6, inclusive. Assume all of the sensors' SSH daemons have been properly configured. For demonstration purposes to show you how we run an experiment, assume you have logged in to the clusterhead locally. Press Ctrl+F2. This will take you to terminal 2. You must now log in. After you log in, type ssh <IP address of node>. If this is the first time you have tried to SSH to this IP address, you will be asked to accept that node's public key. You should accept the public key by typing yes. Then, log on to each different IP address in a different terminal. By default, when the operating system starts up, terminal 1 (Ctrl+F1) is selected. We usually log in to sensor 1 in terminal 2, sensor 2 in terminal 3, sensor 3 in terminal 4, the gateway in terminal 5 and the camera controller in terminal 6. Be sure your current working directory on each sensor is ~/tt. 1. This section assumes you are already logged in at the clusterhead and that you already have all other sensors, the gateway and camera controller in the other terminals F2 Technical Report Number CSSE10-07 2. 3. 4. 5. through F6. At the clusterhead terminal, type ./startclusterhead.sc <port as it is configured in its neighbor's config.txt files>. Note: As a convention in our lab, if we assign a PC104 the IP address 131.204.152.138, then the port number we assign directed diffusion is 10138. Also, if the scripts are not available, copy them from scripts to the current directory. In the other terminals corresponding to sensors 1-3, type ./startsensor.sc <port as it is configured in its neighbor's config.txt files>. Note: It is important to remember that dynServ is more of a middleware solution to the directed diffusion programming paradigm. After you've started the clusterhead and sensors, they will not actually be performing any calculations until they receive an INTEREST message from an external agent, any node not located on the diffusion network. In another terminal corresponding to the gateway, type ./startgateway.sc <port as it is configured in its neighbor's config.txt files>. This readies the gateway for forwarding information to and from the directed diffusion network. In another terminal corresponding to the camera controller, type ./startcamera.sc [optional number of camera iterations to undertake] 1. Starting the camera causes an interest message for VISUAL1 to be sent to the gateway. The gateway will then send out INTEREST messages to the directed diffusion network. Cycle through terminals 1 through 6, starting each node type by pressing <enter> in each terminal. This starts the experiment. Now, the experiment should be ready to run. If you take a look at each of the clusterhead and sensor terminals, they should have a statement saying “Waiting for target ...”. This means the clusterhead and the sensors are ready to detect a moving target. When the target appears, the application displays “Target appears ...” followed by more calculations on the clusterhead if all of the sensors actually detected something. After all of the sensors have detected the target, they will record for five seconds and relay CPA information to the clusterhead. The clusterhead will perform calculations on this information to determine position, velocity and direction of travel. If the clusterhead receives data on which its target tracking algorithm can perform its calculations, the clusterhead will send out a data packet to the camera controller through the gateway. The gateway will then forward the data to the camera controller. Now, the camera should pan to view the target or output to the screen any conditions under which it cannot track the target. When you are ready to stop the application, cycle through F1 through F6 again, typing ./stopall.sc at each of the terminals. This will kill all of the executables associated with the target tracking application. V. Dynamic Services Now that you have completed a run of the experiment, what if you wanted to write your own sensor networking application over directed diffusion? 1 Note: The camera's optional parameter defaults to 1000. Technical Report Number CSSE10-07 A. Introduction to Dynamic Services Dynamic Services (DS) is an application which runs over the standard diffusion network. The services DS provides are very useful for extending the capabilities of a sensor node in a sensor network. Within DS is programmed the logic to automatically handle interests. DS is pre-programmed with 15 key words as follows: 1. 2. 3. 4. 5. 6. 7. 8. 9. 10. 11. 12. 13. 14. 15. SEIS1 SEIS2 SEIS3 INFRA1 INFRA2 INFRA3 MIC1 MIC2 MIC3 VISUAL1 VISUAL2 VISUAL3 SOUND1 SOUND2 SOUND3 When DS is started, it first checks services.txt to determine which types of sensor data the current sensor node can provide. DS expects all or a subset of the key words defined above. As DS reads entries from services.txt, it sets up local-scope subscriptions for interests matching the entry read from services.txt. This is so that when the diffusion core receives an interest from the diffusion network, the node will know if it can or can not provide the requested data type corresponding to the received interest type. When DS receives an interest from the diffusion network for which there is a corresponding entry in services.txt, DS starts a thread which will begin producing data. DS is also responsible for sending out data to the diffusion network. When a thread has data it wishes to send out onto the diffusion network, it simply calls DIFF_SEND(). B. Adding a Sensor Capability 1. Adding a Sensor Capability Using Predefined Key Words To add a sensor capability, you must first be sure that all of the predefined key words are not all used. If they are not all used, select one which is most appropriate to your needs. I will use as an example a regular sensor in our target tracking application. In our target tracking application, we use two key words, MIC1 and VISUAL1. MIC1 corresponds to CPA data, and VISUAL1 corresponds to data which the camera uses to track the moving target. For a regular sensor (not Technical Report Number CSSE10-07 the clusterhead), only MIC1 is used. Thus, services.txt on a sensor node would include, on a line by itself, the key word MIC1. This indicates to DS that this sensor has the capability of producing data with the label MIC1. Note that these key words are global. This means that two different sensors can not use the same key word and expect the network to interpret them differently. Next we must implement the code for producing this data. This is where DS comes in handy. Located in dynServ/dynServ.cc are stubs which a sensor network programmer can implement to do the job of producing data. These are merely the starting points of the threads that DS will create once an interest for a data type is received. So, when the sensor receives an interest from the diffusion network for type MIC1, DS will increment a counter corresponding to the number of subscriptions for MIC1. DS's main thread checks these counters every time an interest or disinterest is received to appropriately start up or cancel threads. Once the counter corresponding to MIC1 is greater than zero, DS starts the thread corresponding to the production of MIC1 data. Now that the thread is running corresponding to the interest for MIC1, how do you actually send information onto the diffusion network? As an example of how to send information onto the diffusion network, look into targettracking/ttMic1.cc. Notice the variable declaration near the beginning of the file: GlobalData mic_1_struct;. This is the structure this thread will send out onto the network. Notice around line 35 when we start to fill this structure. It is important to fill in the type field because this is how the gateway will identify different packet types. Then, you will fill in the structure with your own information. Next, you will notice DIFF_SEND() around line 55. It returns a negative number on failure and a non-negative number on success. Simply call DIFF_SEND() with your information to send it out to the network. 2. Adding a Sensor Capability by Appending to Predefined Key Words If the sensor network's capabilities have grown to such an extent that all of the key words have been used, you can append to the list of key words and do a little more programming to add more key words to DS. Let us say you want to add three new predefined key words. Assume the key words you want to add are “SOUND1”, “SOUND2” and “SOUND3”. Follow the following steps: 1. In dynServExt.h, create a “typedef struct” which corresponds to the three key words. 2. In dynServExt.h, add SOUND1, SOUND2 and SOUND3 to the DataType enumeration list. 3. In dynServExt.h, add the three new structure names to the union structure inside the GlobalData structure. 4. Near the bottom of dynServExt.h, add three new function prototypes to the list. 5. In dynServ.h, create three new thread IDs. 6. In dynServ.h, create counters for keeping track of the number of subscriptions for each of the new key words. 7. In dynServ.h, create three new boolean variables to keep up with the status of running threads. Technical Report Number CSSE10-07 8. In the constructor in dynServ.cc, set the initial values for the counters created in step 6 to zero and the boolean flags we creating in step 7 to false. 9. Also in this constructor, set the thread IDs to zero. 10. At the bottom of dynServ.cc, add stubs corresponding to the newly created key words. 11. In dynServ.cc, find the function named dynServ::recv. In this function, add more if-elseif statements to change the counters of the corresponding key words for the case for the NRAttribute::INTEREST_CLASS and NRAttribute::DISINTEREST_CLASS. 12. In dynServ.cc, find the function named dynServ::run(). In this function, add more if (data_type_subs > 0) ... to the end to take care of starting the appropriate threads once subscriptions are received. This version of the target tracking application incorporates a method for external agents (those machines not directly connected to the diffusion network) to gain access to data packets of a particular data type. The gateway application has been totally re-written to make it easier for external agents to request data from the diffusion network. An external agent can submit a request to the gateway, and the gateway will forward this request to the rest of the diffusion network. The gateway keeps track of the external agents' IP address, port and requested data type. When the gateway receives a data type from the diffusion network for which an external agent has previously sent a request, the gateway simply forwards the data packet to the requesting external agent. This being said, the gateway needs more information to be able to forward packets correctly. So, the following steps are also required when appending to the list of key words: 13. It is now necessary to edit the two functions str2DataType and convertToStrChr in gatewayDefs.cc. Add more cases to the switch statements corresponding to SOUND1, SOUND2 and SOUND3. C. Subscribing to Data in a Thread You will notice in dynServExt.h that the stubs (the thread starting points) have the argument void *dr. Also notice that we pass the variable dr to the constructor in ttVisual1.cc. This is to give threads access to the underlying diffusion routing core contained inside dynServ.cc. Notice that the class TargetAnalysis has its own version of dr named myDr_ which can be found in TargetAnalysis.h. In the code that you will write, just assign myDr_ the value of dr, or just use dr directly. You can see an example by looking in the TargetAnalysis constructor in TargetAnalysis.cc. You will use myDr_ inside threads to make subscriptions. Here's the function for subscribing for MIC1 from the clusterhead, TargetAnalysis.cc: handle TargetAnalysis::setupSubscription() { char type[5] = "MIC1"; NRAttrVec attrs; attrs.push_back(NRClassAttr.make(NRAttribute::IS, NRAttribute::INTEREST_CLASS)); attrs.push_back(TaskNameAttr.make(NRAttribute::IS, type)); handle h = myDr_->subscribe(&attrs, mr_); if (h < 0) { Technical Report Number CSSE10-07 cout << "TargAnalysis::setupSubscription failed for type " << type << endl; } else { cout << "TargAnalysis::setupSubscription succeeded for type " << type << endl; } return h; } Notice the line handle h = myDr_ -> subscribe(&attrs, mr_); in the preceding function. The variable mr_ is defined to be the pointer to the callback function associated with this subscription. In other words, if the diffusion network passes to this node a packet with data type MIC1, the diffusion routing core should pass the incoming packet to this function, mr_. As an example, see TargetAnalysis.cc. D. Compiling Other Directed Diffusion Applications Diffusion applications are a little difficult to compile because of the complexity of directed diffusion. This is why the original authors of the diffusion code delivered with it a special configuration file. Our lab has slightly altered it to make the diffusion application compilation process easier and faster. The file diffAppConfig.mk can be found in ~/tt/diffusion. Whenever you need to compile a diffusion application, simply copy this file to the folder of the source code of your diffusion application. You will then be responsible for editing the line beginning srcdir near the top of the file to point to the relative location of the diffusion library files. For an example of how to use diffAppConfig.mk to aid in compiling your own directed diffusion code, see diffAppConfig.mk and Makefile both located in ~/tt/dynServ. VI. External Agents Any node not directly connected to the directed diffusion network is assumed to be playing the role of an external agent. For instance, the camera controller and the log programs are both external agents. For an external agent to gain access to any information contained or provided by the diffusion network, it must rely on the services provided by the gateway node. A simple API has been implemented for an external agent to request data from the diffusion network through the gateway. Since an external agent is not directly connected to the diffusion network, it must request subscriptions be sent on its behalf. The gateway takes care of this function. The three provided functions are prototyped as follows: int GATEWAY_UNSUBSCRIBE(const int sock, const vector<DataType>* vec); int GATEWAY_SUBSCRIBE(const vector<DataType>* vec); int RECEIVE_FROM_GATEWAY(const int sock, GlobalData* g); As an external agent, just follow these steps for requesting and receiving data from the diffusion network. 1. Include the header file extAgnts/API/externalAgentAPI.h in the source file for external agents. Technical Report Number CSSE10-07 The header file gives the programmer access to the function GATEWAY_SUBSCRIBE. The function returns an integer corresponding to a UDP socket through which the gateway will respond with data packets. Note: Be sure to have gatewayinfo.txt in the current directory of each external agent. This file gives the IP address and port of the gateway process. To use GATEWAY_SUBSCRIBE, you must first fill up a vector of subscriptions with the DataTypes for which you wish to send a request to the gateway. Suppose an external agent wanted data corresponding to interest types VISUAL1 AND MIC1. The sample request to the gateway is given as follows: vector<DataType> vectorOfSubscriptions; vectorOfSubscriptions.push_back(VISUAL1); vectorOfSubscriptions.push_back(MIC1); if ((sock = GATEWAY_SUBSCRIBE(&vectorOfSubscriptions)) < 0) { perror("GATEWAY_SUBSCRIBE failed"); } To receive information from the gateway, use the function RECEIVE_FROM_GATEWAY as given below: GlobalData pkt; if (RECEIVE_FROM_GATEWAY(sock, &pkt) < 0) { perror(“RECEIVE_FROM_GATEWAY failed”); } This is a blocking call so the external agent will wait here until it receives a data packet from the gateway. As an example, see extAgnts/log/log.cc. To gracefully unsubscribe from your previous subscriptions to the gateway, use GATEWAY_UNSUBSCRIBE as shown below: if (GATEWAY_UNSUBSCRIBE(sock, &vectorOfSubscriptions) < 0) { perror(“GATEWAY_UNSUBSCRIBE failed”); } GATEWAY_UNSUBSCRIBE should be called with the socket which was returned with GATEWAY_SUBSCRIBE. 2. When you are ready to compile the external agent code which includes the header file extAgnts/API/externalAgentAPI.h, you must link in the actual code which implements the function prototypes listed in externalAgentAPI.h. See extAgnts/log/Makefile to see how to prepare your own Makefile.