1
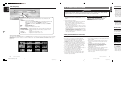
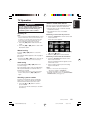
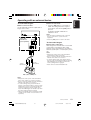
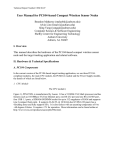
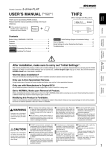
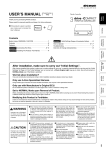
Owner’s manual & Installation manual
TB851P/
TB853W
8-INCH WIDE COLOUR LCD TV
Clarion Co., Ltd.
All Rights Reserved. Copyright © 2005: Clarion Co., Ltd.
Printed in Japan /
/
2005/3 (Y·Y)
*TB851P/TB853W(001-cover)E
1
QZ-8000K
280-8212-00
05.2.24, 5:21 PM
English
Thank you for purchasing this Clarion TB851P/TB853W.
∗ This owner’s manual is for the TB851P/TB853W.
∗ Please read this owner’s manual completely before operating this equipment.
∗ After reading this manual, be sure to keep it in a handy place (e.g., glove compartment).
∗ Check the contents of the enclosed warranty card and keep it carefully with this manual.
Contents
1.
2.
3.
4.
5.
FEATURES ................................................................................................................... 2
PRECAUTIONS ............................................................................................................ 3
CONTROLS ................................................................................................................... 5
PART NAMES ................................................................................................................ 6
OPERATION .................................................................................................................. 9
Basic Operation .............................................................................................................. 9
TV Operation ................................................................................................................ 11
Operating with an external device ................................................................................ 13
Changing the settings (ADJUST mode) ....................................................................... 15
6. TROUBLESHOOTING ................................................................................................. 19
7. SPECIFICATIONS ....................................................................................................... 20
Installation and Wire connection manual ....................................................................... 21
1. FEATURES
■ 8" Wide-Screen Colour LCD
■ Full Auto Mechanism
■ Multi 12/8 Frames Selection Mode
2
TB851P/TB853W
*TB851P/TB853W(001-cover)E
TB851P/TB853W
2
280-8212-00
05.2.24, 5:21 PM
81
280-8212-00
WARNING
For your safety, the driver should not watch the TV or operate the controls while driving.
Watching the TV while driving is prohibited by law in some countries. Also, while driving,
keep the volume to a level at which external sounds can still be heard.
1. This unit is a precision mechanism. Even if
trouble occurs, never open the case,
disassemble the unit, or lubricate the rotating
parts.
Superimpose
Appears for 7 seconds when the media source was switched to TV
mode.
CINEMA2: Screen size display
This was set to “FULL WIDE” prior to shipping. Besides Full
Wide, you can also select “CINEMA1” (cinema 1),
“CINEMA2” (cinema2), “NORMAL” (normal), and “WIDE”
(wide).
P.12
: Preset channel
66ch
: Receivable channels
TV
: Displays the media source name
Other displays
• AUTO STORE : Appears during auto store operation in TV mode.
• PRESET MEMO : Appears during preset memory operation in TV
mode.
• VTR1, 2
: Appears in VTR mode 1 or 2.
• VISUAL1, 2
: Appears in Visual mode 1 or 2.
Cleaning
• Cleaning the cabinet
Use a soft, dry cloth and gently wipe off the dirt. For tough dirt, apply some neutral detergent
diluted in water to a soft cloth, wipe off the dirt gently, then wipe again with a dry cloth.
Do not use benzene, thinner, car cleaner, etc., as these substances may damage the cabinet or
cause the paint to peel. Also, leaving rubber or plastic products in contact with the cabinet for long
periods of time may cause stains.
• Cleaning the LCD panel
The LCD panel tends to collect dust, so wipe it off occasionally with a soft cloth. The surface is
easily scratched, so do not rub it with hard objects.
INFORMATION FOR USERS:.
CHANGES OR MODIFICATIONS TO THIS
PRODUCT NOT APPROVED BY THE
MANUFACTURER WILL VOID THE
WARRANTY.
Concerning the wide screen
2. TV broadcast reception
When receiving TV broadcasts, the strength
of the signals changes since the car is
moving, so receiving a clear picture may be
impossible in some cases.
• TV signals travel by line of sight, so reception is affected by buildings, mountains and
other obstacles.
• External factors such as electric train lines,
high voltage lines, and signal devices may
disturb the picture or cause noise.
∗ If the reception is poor, switch to a station
with good reception.
• A wide-screen TV comes with a function for selecting various screen modes. If you select a screen
mode that differs from the picture ratio of the TV program or other software media, you will not be
able to view the original pictures as was originally intended. Bear this point in mind when selecting
the screen mode.
Ensuring safe driving
To ensure driving safety the TV video images are only shown when the car is stopped (parking
brake engaged). Always make sure the vehicle is stopped before watching the TV.
(A screen image as shown in the figure appears while the vehicle is moving and only the TV audio
can be heard.)
(screen while vehicle is moving)
● List screen display
You can use the [P.LIST] button or [CH.LIST] button to display the preset channel list or the receivable
channel list.
Either 8 or 12 screens can be set on this multiscreen. See “Set the number of multiscreens”. (See
page 17.)
8
LCD panel/General items
For longer product service life, be sure to read the following cautions.
• Be sure to store the LCD panel inside the
main unit when parking the car outdoors for
long period of time. The LCD panel will
operate properly in a temperature range of 0
to 60˚C.
• Don’t allow any moisture or liquid from items
such as drinks or umbrellas to get on the unit.
Doing so may damage the internal circuitry.
• Do not disassemble or modify the set in any
way. Doing so may result in damage.
• Do not let cigarettes burn the display. Doing so
may damage or deform the cabinet.
• If a problem should occur, have the set
inspected at your store of purchase.
• Do not insert objects or poke into the space
between the LCD panel and the main unit
when the panel is tilted.
• Do not place anything on the display when the
panel is tilted.
• The remote controller might not work if the
remote control sensor is exposed to direct
sunlight.
• In extremely cold weather, the display
operation may slow and the display may
darken, but this is not a malfunction. The
display will work normally when the
temperature rises.
• Small black and shiny spots inside the LCD
panel are normal on LCD products.
• The LCD panel may stop temporarily when it
opens or closes, when the engine stops or
when it is cold.
TB851P/TB853W
1
This unit has a system check function.
The system check display for this unit is displayed in the following cases. After this appears, press
the [POWER] button 1 times to return to normal operating mode.
System check appears:
• when power is turned on right after this unit was installed
• when external equipment was connected or removed
• when the power was cut off due to battery replacement, etc.
Be sure to unfold and read the next page.
TB851P/TB853W
*TB851P/TB853W(03-08)E
System check
3
TB851P/TB853W
4
05.2.24, 5:22 PM
280-8212-00
280-8212-00
280-8212-00
English
2. PRECAUTIONS
English
English
TV Display
/
Remote Control
4. PART NAMES
Note:
• Except for the following buttons, the remote control button names are the same as the buttons on the main
unit.
Operating Buttons
Note:
• Be sure to read this chapter while referring to the front diagrams in chapter “3. CONTROLS” on page 5
(unfold).
[OPEN/CLOSE]
[SRC] button
• Press to turn on the power.
• Press and hold for 2 seconds or longer to turn off the power.
Signal transmitter
LCD panel open /
/
[OPEN/CLOSE]
[SENSOR]
[OPEN/CLOSE] button
[WIDE] button
• Use this button to open/close the LCD panel.
• Press and hold this button for about 2
seconds or longer so that the LCD panel is
positioned horizontally when the LCD panel is
open. Press the button again to return the
panel to the original position. Even if this
button is not pressed, the panel returns to the
original position after about 10 seconds.
The unit angle and the operating time until
return to original position can be set on “Set
the LCD panel operating time”. (See page
17.)
• Press this button to switch the display sizes.
[SENSOR]
• Remote control infrared sensor.
[POWER] button (
)
• Press this button to turn on/off the power.
[MONI] button
• Press this button to turn allow any moisture or
liquid from items such as drinks or umbrellas
to get on the unit.
[TILT]
[POWER]
• Use to enter the selected item in the unit
memory when making settings.
• Press in TV mode to store as a preset station.
Hold down button for at least 2 seconds to
store the station.
[SRC]
[DISP]
[w], [z] buttons
• Press to select the preset channel.
• Press to select the desired menu on the
adjustment menu screen.
[ADJ]
[TILT] button
• Use this button to adjust the angle of the LCD
panel in 5 steps.
• Each time this button is pressed and held for
about 2 seconds or longer, the LCD panel
moves forward/backward in 3 steps.
[P.LIST]
1. Turn the remote control unit over, then slide
the rear cover in the direction of the arrow.
2. Insert the AA (SUM-3, IECR-6/1.5V)
batteries that came with the remote control
unit to face in the directions shown in the
figure, then close the rear cover.
Notes:
Inserting the batteries the wrong way can cause
them to explode. Take note of the following points:
• When replacing batteries, replace both batteries
with new ones.
• Do not short-circuit, disassemble or heat the
batteries.
• Do not dispose of batteries into fire or flames.
• Dispose of spent batteries properly.
[WIDE]
AA (SUM-3/1.5V)
Batteries
[CH.LIST]
[A], [D] buttons
• Use to switch to a media source such as TV or
VISUAL.
• Press to perform the Manual tuning.
• Press and hold for 1 second or longer to
perform Seek tuning operation.
• Press to select the desired mode on
adjustment menu screen.
[CH.LIST] button
[ADJ] button
• Displays a list of channels that can be
received.
• Shows the adjustment menu to change the
settings.
[SRC] button
[ADJ]
[MEMO/ENT]
[ENT] button
Inserting the Battery
Rear cover
Rear side
[P.LIST] button
• Displays a list of channels stored in the preset
memory.
• Press and hold for 2 seconds or longer to
perform the auto store operation.
[MONI]
[SRC]
[ENT]
[WIDE]
[DISP]
[DISP] button
[CH.LIST]
• Press this button to show the information on
the screen.
[P.LIST]
Note: Be sure to unfold this page and refer to the front diagrams as you read each chapter.
5
6
TB851P/TB853W
*TB851P/TB853W(03-08)E
2
280-8212-00
TB851P/TB853W
TB851P/TB853W
05.2.24, 5:22 PM
280-8212-00
7
280-8212-00
English
LCD panel closed /
/
English
English
3. CONTROLS /
/
Remote Control
4. PART NAMES
Note:
• Except for the following buttons, the remote control button names are the same as the buttons on the main
unit.
Operating Buttons
Note:
• Be sure to read this chapter while referring to the front diagrams in chapter “3. CONTROLS” on page 5
(unfold).
[OPEN/CLOSE]
[SRC] button
• Press to turn on the power.
• Press and hold for 2 seconds or longer to turn off the power.
Signal transmitter
LCD panel open /
/
[OPEN/CLOSE]
[SENSOR]
[OPEN/CLOSE] button
[WIDE] button
• Use this button to open/close the LCD panel.
• Press and hold this button for about 2
seconds or longer so that the LCD panel is
positioned horizontally when the LCD panel is
open. Press the button again to return the
panel to the original position. Even if this
button is not pressed, the panel returns to the
original position after about 10 seconds.
The unit angle and the operating time until
return to original position can be set on “Set
the LCD panel operating time”. (See page
17.)
• Press this button to switch the display sizes.
[SENSOR]
• Remote control infrared sensor.
[POWER] button (
)
• Press this button to turn on/off the power.
[MONI] button
• Press this button to turn allow any moisture or
liquid from items such as drinks or umbrellas
to get on the unit.
[TILT]
[POWER]
• Use to enter the selected item in the unit
memory when making settings.
• Press in TV mode to store as a preset station.
Hold down button for at least 2 seconds to
store the station.
[SRC]
[DISP]
[w], [z] buttons
• Press to select the preset channel.
• Press to select the desired menu on the
adjustment menu screen.
[ADJ]
[TILT] button
• Use this button to adjust the angle of the LCD
panel in 5 steps.
• Each time this button is pressed and held for
about 2 seconds or longer, the LCD panel
moves forward/backward in 3 steps.
[P.LIST]
1. Turn the remote control unit over, then slide
the rear cover in the direction of the arrow.
2. Insert the AA (SUM-3, IECR-6/1.5V)
batteries that came with the remote control
unit to face in the directions shown in the
figure, then close the rear cover.
Notes:
Inserting the batteries the wrong way can cause
them to explode. Take note of the following points:
• When replacing batteries, replace both batteries
with new ones.
• Do not short-circuit, disassemble or heat the
batteries.
• Do not dispose of batteries into fire or flames.
• Dispose of spent batteries properly.
[WIDE]
AA (SUM-3/1.5V)
Batteries
[CH.LIST]
[A], [D] buttons
• Use to switch to a media source such as TV or
VISUAL.
• Press to perform the Manual tuning.
• Press and hold for 1 second or longer to
perform Seek tuning operation.
• Press to select the desired mode on
adjustment menu screen.
[CH.LIST] button
[ADJ] button
• Displays a list of channels that can be
received.
• Shows the adjustment menu to change the
settings.
[SRC] button
[ADJ]
[MEMO/ENT]
[ENT] button
Inserting the Battery
Rear cover
Rear side
[P.LIST] button
• Displays a list of channels stored in the preset
memory.
• Press and hold for 2 seconds or longer to
perform the auto store operation.
[MONI]
[SRC]
[ENT]
[WIDE]
[DISP]
[DISP] button
[CH.LIST]
• Press this button to show the information on
the screen.
[P.LIST]
Note: Be sure to unfold this page and refer to the front diagrams as you read each chapter.
5
6
TB851P/TB853W
*TB851P/TB853W(03-08)E
2
280-8212-00
TB851P/TB853W
TB851P/TB853W
05.2.24, 5:22 PM
280-8212-00
7
280-8212-00
English
LCD panel closed /
/
English
English
3. CONTROLS /
WARNING
For your safety, the driver should not watch the TV or operate the controls while driving.
Watching the TV while driving is prohibited by law in some countries. Also, while driving,
keep the volume to a level at which external sounds can still be heard.
1. This unit is a precision mechanism. Even if
trouble occurs, never open the case,
disassemble the unit, or lubricate the rotating
parts.
Superimpose
Appears for 7 seconds when the media source was switched to TV
mode.
CINEMA2: Screen size display
This was set to “FULL WIDE” prior to shipping. Besides Full
Wide, you can also select “CINEMA1” (cinema 1),
“CINEMA2” (cinema2), “NORMAL” (normal), and “WIDE”
(wide).
P.12
: Preset channel
66ch
: Receivable channels
TV
: Displays the media source name
Other displays
• AUTO STORE : Appears during auto store operation in TV mode.
• PRESET MEMO : Appears during preset memory operation in TV
mode.
• VTR1, 2
: Appears in VTR mode 1 or 2.
• VISUAL1, 2
: Appears in Visual mode 1 or 2.
Cleaning
• Cleaning the cabinet
Use a soft, dry cloth and gently wipe off the dirt. For tough dirt, apply some neutral detergent
diluted in water to a soft cloth, wipe off the dirt gently, then wipe again with a dry cloth.
Do not use benzene, thinner, car cleaner, etc., as these substances may damage the cabinet or
cause the paint to peel. Also, leaving rubber or plastic products in contact with the cabinet for long
periods of time may cause stains.
• Cleaning the LCD panel
The LCD panel tends to collect dust, so wipe it off occasionally with a soft cloth. The surface is
easily scratched, so do not rub it with hard objects.
INFORMATION FOR USERS:.
CHANGES OR MODIFICATIONS TO THIS
PRODUCT NOT APPROVED BY THE
MANUFACTURER WILL VOID THE
WARRANTY.
Concerning the wide screen
2. TV broadcast reception
When receiving TV broadcasts, the strength
of the signals changes since the car is
moving, so receiving a clear picture may be
impossible in some cases.
• TV signals travel by line of sight, so reception is affected by buildings, mountains and
other obstacles.
• External factors such as electric train lines,
high voltage lines, and signal devices may
disturb the picture or cause noise.
∗ If the reception is poor, switch to a station
with good reception.
• A wide-screen TV comes with a function for selecting various screen modes. If you select a screen
mode that differs from the picture ratio of the TV program or other software media, you will not be
able to view the original pictures as was originally intended. Bear this point in mind when selecting
the screen mode.
Ensuring safe driving
To ensure driving safety the TV video images are only shown when the car is stopped (parking
brake engaged). Always make sure the vehicle is stopped before watching the TV.
(A screen image as shown in the figure appears while the vehicle is moving and only the TV audio
can be heard.)
(screen while vehicle is moving)
● List screen display
You can use the [P.LIST] button or [CH.LIST] button to display the preset channel list or the receivable
channel list.
Either 8 or 12 screens can be set on this multiscreen. See “Set the number of multiscreens”. (See
page 17.)
8
LCD panel/General items
For longer product service life, be sure to read the following cautions.
• Be sure to store the LCD panel inside the
main unit when parking the car outdoors for
long period of time. The LCD panel will
operate properly in a temperature range of 0
to 60˚C.
• Don’t allow any moisture or liquid from items
such as drinks or umbrellas to get on the unit.
Doing so may damage the internal circuitry.
• Do not disassemble or modify the set in any
way. Doing so may result in damage.
• Do not let cigarettes burn the display. Doing so
may damage or deform the cabinet.
• If a problem should occur, have the set
inspected at your store of purchase.
• Do not insert objects or poke into the space
between the LCD panel and the main unit
when the panel is tilted.
• Do not place anything on the display when the
panel is tilted.
• The remote controller might not work if the
remote control sensor is exposed to direct
sunlight.
• In extremely cold weather, the display
operation may slow and the display may
darken, but this is not a malfunction. The
display will work normally when the
temperature rises.
• Small black and shiny spots inside the LCD
panel are normal on LCD products.
• The LCD panel may stop temporarily when it
opens or closes, when the engine stops or
when it is cold.
TB851P/TB853W
1
This unit has a system check function.
The system check display for this unit is displayed in the following cases. After this appears, press
the [POWER] button 1 times to return to normal operating mode.
System check appears:
• when power is turned on right after this unit was installed
• when external equipment was connected or removed
• when the power was cut off due to battery replacement, etc.
Be sure to unfold and read the next page.
TB851P/TB853W
*TB851P/TB853W(03-08)E
System check
3
TB851P/TB853W
4
05.2.24, 5:22 PM
280-8212-00
280-8212-00
280-8212-00
English
2. PRECAUTIONS
English
English
TV Display
Note: Be sure to read this chapter referring to the front diagrams in
chapter “3. CONTROLS” on page 5 (unfold).
Basic Operation
Opening and adjusting the LCD
panel
WARNING
• To prevent the battery from going dead,
operate this unit with the engine running
if possible.
• When the LCD panel is operating, be
careful not to get your hands or finger
caught between the panel and main unit
or the vehicle instrument panel.
• Do not move the LCD panel by hand.
Raising the LCD panel
1. Press the [OPEN] button. The LCD panel
then ejects and rises automatically.
Panel calibration function
The LCD panel’s maximum angle of tilt can be
adjusted to match the installation configuration
within the automobile.
• Perform this with the LCD panel closed.
1. Press and hold the [OPEN] button for 5
seconds or longer, until the electronic beep is
heard.
2. The beep will sound twice, the panel will rise
and the calibration function will begin.
3. After completion of calibration, the panel will
close automatically.
∗ If the panel does not strike the instrument
panel or other parts of the car during
calibration, then the maximum tilt is 110°.
∗ If the panel comes in contact or strikes a car
part during calibration in a range of 70° then
the maximum downward tilt is 70°.
Adjusting the angle, etc. of the LCD
panel
The angle of the LCD panel or amount the panel
protrudes from the mounting surface can be
adjusted depending on the mounting angle of
the unit or light coming into the vehicle.
● To adjust the angle
1. Every time the [TILT] button is pressed, the
LCD panel tilts forward or backward at up to
about 20 degrees. The adjusted angel is
stored in the memory.
∗ While the LCD panel is opening or closing, the
blue LED of the [OPEN] button will flash.
Notes:
• If the LCD panel stops in the middle of this
operation, press the [OPEN] button to house the
panel and then press the button again to stand it
up. The unit will be in the same display mode as
when last turned off.
Note:
• Do not move the LCD panel by hand.
TB851P/TB853W
*TB851P/TB853W(09-20)E
9
05.2.25, 11:26 AM
280-8212-00
9
English
5. OPERATION
English
Basic Operation
● To adjust the slide position
1. Hold down the [TILT] button and release it
when a beep is heard.
The LCD panel slides forward or backward.
This adjusted slide position is stored in
memory.
∗ There are 3 adjustable positions available on
this panel.
Turning power ON or OFF
1. Press the [POWER] button.
Use to turn the power on or off.
Note:
• The LCD panel does not store away even if the
power is turned off. If not using for a long period
of time, press the [OPEN] (open/close) button on
the LCD panel to store it away.
Select a media source
1. Press the [SRC] button. The source settings
switch in the following sequence each time
you press the button.
TV ➔ VTR1 ➔ VTR2 ➔ VISUAL1 ➔
VISUAL2 ➔ TV ➔ ...
• The media source you select appears on the
screen (superimpose) for 7 seconds.
Changing settings on the TB851P
model
Housing the LCD panel
1. Press the [OPEN] button and the LCD panel
is housed automatically.
Note:
• When leaving this unit unused for a long period of
time or leaving your car, be sure to house the
LCD panel into the main unit.
Turning the LCD panel horizontal
(Air conditioner operation mode)
The factory settings on this model may
sometimes have to be changed according to
usage conditions.
● Select the country (See page 17.)
∗ The factory setting is “STANDARD”.
● Changing the FM modulator frequency
(See page 16.)
∗ The factory setting is “88.1 MHz”.
When the way the LCD panel is mounted
hinders air conditioner operation, the panel can
temporarily be turned to a horizontal position.
1. Press and hold the [OPEN] button when the
LCD panel is upright, and release the button
when a beep is heard.
2. The LCD panel turns horizontal.
∗ Press the [OPEN] button again when the LCD
panel is in the horizontal position, and the
panel returns to the original position.
∗ Alarm sounds and returns to original position
if the button is not operated after about 10
seconds in horizontal state.
∗ The unit can also be set so that the panel
returns to its original angle after a preset time
in the horizontal position (See page 17).
10
TB851P/TB853W
*TB851P/TB853W(09-20)E
10
05.2.25, 11:26 AM
280-8212-00
WARNING
For your safety, the driver should not
watch or operate TV while driving. Viewing
and operating the TV while driving are
prohibited by law in some countries.
Watching TV
Note:
• For your safety, the TB851P/TB853W has a safety
function which turns off the picture when the car
is moving, so only the audio can be heard. The
picture can only be watched when the car is
stopped and the parking brake is applied.
1. Press the [SRC] button and select the TV
mode.
Select a station from the list
Two types of lists can be displayed. One is the
preset list and the other is the channel list.
• The preset list is a list of channels already
stored in the memory.
• The channel list is a list of receivable
channels.
● Selecting a station from the preset list
1. Press the [P.LIST] button shown on the main
screen of the TV.
Preset list screen appears.
2. Press the [A] or [D] button to tune in the
desired TV station.
Manual tuning
Press the [A] or [D] button to select the
channel.
The channel number appears at the top right of
the screen.
∗ Each time the [A] or [D] button is pressed, the
channel number increases or decreases by 1.
Seek tuning
Press and hold the [A] or [D] button for 1
second or longer.
The seek tuning mode is now selected. Tuning
will stop automatically at a channel where a
broadcast is received.
∗ If seek tuning stops before or after a broadcast
channel, then press the [A] or [D] button
again.
2. Select a channel by pressing the [A], [D],
[w], or the [z] button.
3. Press the [ENT] button for that channel.
● Selecting a station from the channel list
1. Press the [CH.LIST] button shown on the
main screen of the TV.
A list of receivable channels appears on the
channel list screen.
2. Select a station from the preset list using
steps 2 and 3 above.
Notes:
• Either 8 or 12 screens can be displayed.
∗ The factory setting is “12 Stations”.
• To change the number of broadcast stations
displayed on the list screen, see “Set the number
of multiscreens”. (See page 17.)
Recalling a preset station
A total of 12 TV stations can be stored. This
allows you to select your favorite TV stations
and store them in memory for later recall.
1. Press the [w] or [z] button to select a
preset channel.
You can now view the channel you stored in
the memory.
TB851P/TB853W
*TB851P/TB853W(09-20)E
11
05.2.25, 11:26 AM
11
280-8212-00
English
TV Operation
English
TV Operation
Auto store function
Selecting the screen size
This function automatically stores a received
broadcast as a preset channel.
1. Press the [P.LIST] button for 2 second or
more. The broadcast stations are
automatically stored in the memory in order
starting from the currently received station.
2. To cancel, press the [P.LIST] button again.
Notes:
• Poor signal conditions might cause a channel with
no station to be stored in the memory.
• Some stations might not be stored if their signals
are too weak.
• When a station cannot be stored or a channel
without a station was stored in the memory, refer
to the following on the manual memory function,
and redo the settings.
Five screen size are supported: normal, wide,
full wide, cinema1 and cinema2.
Note:
• The screen size cannot be selected while the
vehicle is in motion.
1. Press the [WIDE] button to select the screen
size.
Each time this button is pressed, the screen
size changes in the sequence shown below.
■ To view a normal 4:3 picture
The picture might sometimes appear
distorted due to the mode that was set.
Store channels in the preset
memory
1. Press the [ENT] button to switch to the
preset memory mode. “PRESET MEMO” is
displayed on the top of the screen.
2. Press the [A], [D] buttons to select a TV
channel you want to store as a presetting.
3. Press the [w], [z] buttons to select a
preset channel to which the selected TV
channel is stored.
4. Press and hold the [ENT] button for 2
seconds or longer to store in the memory.
The new channel currently received is stored
in the memory.
Note:
• The memory is reset to initial settings if power is
cut off such as when changing the battery.
To just hear audio (monitor off)
1. Press the [MONI] button.
• The screen display turns off so you can enjoy
just the audio.
• Press the button once again to return to the
original state (screen display).
12
• FULL WIDE mode
• NORMAL mode
Entire picture is
stretched sideways.
Black borders appear on
the right and left.
• CINEMA1 mode
• WIDE mode
The picture is off the
screen at top and
bottom.
The picture at the left
and right of the screen
is stretched sideways.
• CINEMA2 mode
The picture is slightly off
the screen at top and
bottom.
Note:
• If wide mode or full mode is used to view a 4:3
picture, it will fill the entire screen and parts of the
picture will be off the screen or the picture will
distort. If this happens use normal mode to view
the image as originally intended.
TB851P/TB853W
*TB851P/TB853W(09-20)E
12
05.2.25, 11:26 AM
280-8212-00
To view video images:
● How to connect to video
Use the VTR mode to transfer output audio or
images such as video.
Video out/VTR
input cable
CCA-623-500
(sold separately)
Gray Yellow
Black Yellow
Black Red
Black White
Left Right
To audio
OUT terminal
To video
OUT terminal
● Select the video mode
1. Press the [SRC] button to select VTR1 or
VTR2. The setting shifts in the sequence
shown below, each time the [SRC] button is
pressed.
TV ➔ VTR1 ➔ VTR2 ➔ VISUAL1 ➔
VISUAL2 ➔ TV ➔
Notes:
• See the instruction manual for the connected
device to learn how to operate the video
equipment.
• Press the [SRC] button to return to TV mode.
To view other images:
● Connecting to other video
Video images from external devices can viewed
on this unit by connecting the video output
terminals on the external device to the video in
terminals (visual input 1 or visual input 2) on this
unit.
Notes:
• Always turn off the power on this unit and the
external devices when connecting.
• Before connecting, always check the instruction
manual of the device for connection.
• To ensure driving safety, video images will not
appear on the screen while the vehicle is moving.
The VTR images are viewable only when the
vehicle parking brake is engaged.
• Audio cannot be heard in VISUAL mode.
Video (video camera) etc.
Notes:
• Always turn off the power on this unit and the
video (video camera, etc.) when connecting.
• Before connecting, always check the instruction
manual of the device for connection.
• To ensure driving safety, just as with the TV
images, even when the VTR is connected, video
images will not appear on the display while the
vehicle is moving and only the sound can be
heard. The VTR images are viewable only when
the vehicle parking brake is engaged.
• Video from external devices connected to VTR1
or VTR2 can be viewed on a rear monitor sold
separately.
TB851P/TB853W
*TB851P/TB853W(09-20)E
13
05.2.25, 11:26 AM
13
280-8212-00
English
Operating with an external device
English
Operating with an external device
● Viewing video images
1. Press the [SRC] button to select VISUAL1 or
VISUAL2.
The setting shifts in the sequence shown
below, each time the [SRC] button is
pressed.
TV ➔ VTR1 ➔ VTR2 ➔ VISUAL1 ➔
VISUAL2 ➔ TV ➔ ...
Video from the external device connected to
the video in terminal (visual input 1 or visual
input 2) appears on the screen.
Notes:
• See the instruction manual of the external device
to be connected to find out how to operate that
external device.
• Video from external devices connected to visual
input 1 or visual input 2 can be viewed on a rear
monitor sold separately. To view on that rear
monitor, connect the rear monitor to the VIDEO
OUT (video output) terminal on this unit.
Viewing CCD camera images
Connect the CCD camera to this unit correctly
When the CCD camera is correctly connected to
this unit and set, the following functions are
activated.
• Automatically displays CCD camera images
when the gear is set in reverse.
Note:
• Connect the reverse gear signal wire from the
power supply box of the CCD camera to the
positive (+) backlamp wire.
• A caution message appears during display of
the camera images.
See “Setting the caution message for use
during CCD camera operation”. (See page
18.)
14
TB851P/TB853W
*TB851P/TB853W(09-20)E
14
05.2.25, 11:26 AM
280-8212-00
How to set
(Main screen during TV mode)
1. Press the [ADJ] button to display the
ADJUST mode screen.
Each press of the [ADJ] button switches the
ADJUST mode screen.
2. Press the [w] or [z] button to select the
item to set.
3. Press the [A] or [D] button to select the
setting value.
4. Press the [ENT] button to return to the
original screen.
(ADJ_MONITOR screen)
(ADJ_EXTERNAL screen)
(BRIGHT adjustment)
(ADJ_HVAC screen)
(ADJ_OTHER screen)
(Main screen during TV mode)
Note:
• The description for making settings does not include selecting the setting item or returning to the previous
screen. Proceed to the next item after you fully understand this description.
TB851P/TB853W
*TB851P/TB853W(09-20)E
15
05.2.25, 11:26 AM
15
280-8212-00
English
Changing the settings (ADJUST mode)
English
Changing the settings (ADJUST mode)
Adjust the screen image quality
Screen image quality
Adjust the screen luminance, brightness, hue
and color level to view video at your own
preferred image quality.
• You can only make this adjustment in TV/VTR/
VISUAL modes while the vehicle is stopped.
• Only the screen luminance and brightness
can be adjusted in modes other than TV/VTR
or when driving in TV/VTR mode.
• Only the screen luminance and brightness
can be adjusted during an interrupt (break-in)
by the rear camera.
● DIMMER adjustment
1. Select “DIMMER” on the ADJ_MONITOR
screen.
2. Press the [A] or [D] button to adjust the
dimmer.
• A : Darkens the screen
• D : Brightens the screen
● BRIGHT adjustment
1. Select “BRIGHT” on the ADJ_MONITOR
screen.
2. Press the [A] or [D] button to adjust the
brightness.
• A : Lowers the screen luminance.
• D : Increases the screen luminance.
● COLOR adjustment
1. Select “COLOR” on the ADJ_MONITOR
screen.
2. Press the [A] or [D] button to adjust the
color.
• A : Decreases the color density.
• D : Increases the color density.
● HUE adjustment
1. Select “HUE” on the ADJ_MONITOR screen.
2. Press the [A] or [D] button to adjust the
hue.
• A : Adds green.
• D : Adds red.
Note:
• Can be adjusted on the NTSC system. Cannot be
adjusted on PAL system.
16
Rear monitor lock
∗ The factory setting is at “OFF”.
1. Select “MONILOCK” on the
ADJ_EXTERNAL screen.
2. Press the [A] or [D] button to select ON
or OFF.
Switching the FM modulator audio
output (only on TB851P)
FM modulator is a system for temporarily
converting audio signals on this unit to FM
signals and playing them back as FM stereo on
the car audio radio section.
∗ The factory setting is at “ON”.
1. Select “MONILOCK” on the
ADJ_EXTERNAL screen.
2. Press the [A] or [D] button to select ON
or OFF.
• ON : To use the FM modulator to output
stereo sounds from car radio peaker.
• OFF : If not using the FM modulator.
Changing the FM modulator
frequency (only on TB851P)
∗ The factory setting is at “88.1MHz”.
1. Select “MODUFREQ” on the
ADJ_EXTERNAL screen.
2. Press the [A] or [D] button to select the
FM modulator frequency.
• Settable frequency range is 88.1 to
89.9MHz. Frequencies outside this range
cannot be set.
TB851P/TB853W
*TB851P/TB853W(09-20)E
16
05.2.25, 11:26 AM
280-8212-00
Select the FM modulator and RCA
audio output levels
∗ The factory setting is at “HIGH”.
• In TV mode, the FM modulator output is at
“HIGH”, even when set to “LOW” during TV
mode.
• Not displayed during VISUAL mode.
1. Select “AUDIO LEV” on the
ADJ_EXTERNAL screen.
2. Press the [A] or [D] button to select the
“HIGH” or “LOW”.
• HIGH : Outputs signal at same level as the
audio from the car radio.
• LOW : Lowers the output level to -6dB.
(Set to LOW when audio is
distorted when set at HIGH.)
Set the LCD panel angle (in
airconditioning mode)
∗ The factory setting is at “0°”.
Set the number of multiscreens (list
screen)
∗ The factory setting is at “12”.
1. Select “LIST” on the ADJ_OTHER screen.
2. Press the [A] or [D] button and select “8”
or “12”.
Select the country (only on TB851P)
Setting the country name here, automatically
sets the video standard and audio frequency
band for that country.
Select the country name from:
• STANDARD
• AUSTRALIA
• CHINA
• HONG KONG
• NEW ZEALAND
1. Select “COUNTRY” on the ADJ_OTHER
screen.
2. Press the [A] or [D] button and select the
country.
1. Select “TILT” on the ADJ_HVAC screen.
2. Press the [A] or [D] button and select
“0°”, “30°” or “50°”.
Set the LCD panel operating time
(in airconditioning mode)
∗ The factory setting is at “10 sec”.
1. Select “TILT” on the ADJ_HVAC screen.
2. Press the [A] or [D] button to select
“5sec”, “10sec” or “30sec”.
Set the beep tone used for button
operation
The beeping sound heard when pressing the
keys is called the beep tone.
∗ The factory setting is at “ON”.
1. Select “BEEP” on the ADJ_OTHER screen.
2. Press the [A] or [D] button and select
“ON” or “OFF”.
TB851P/TB853W
*TB851P/TB853W(09-20)E
17
05.2.25, 11:26 AM
17
280-8212-00
English
Changing the settings (ADJUST mode)
English
Changing the settings (ADJUST mode)
Select PAL or NTSC
This setting allows you to select the video
system for input to the VTR.
This can be separately set for VTR 1, VTR 2,
VISUAL 1 and VISUAL 2.
∗ The factory setting is at “AUTO”.
• This setting can be made in the VTR and
VISUAL modes.
1. Select “PAL/NTSC” on the ADJ_OTHER
screen.
2. Press the [A] or [D] button and select
“PAL”, “NTSC” or “AUTO”.
Setting the caution message for use
during CCD camera operation
This setting can be made while the CCD
camera image is displayed.
∗ The factory setting is at “ON”.
1. Select “CAUTION” on the ADJ_OTHER
screen.
2. Press the [A] or [D] button and select
“ON” or “OFF”.
18
TB851P/TB853W
*TB851P/TB853W(09-20)E
18
05.2.25, 11:26 AM
280-8212-00
English
6. TROUBLESHOOTING
■ If you think that something is wrong with your unit, check the following points before
requesting servicing.
Problem
No image display.
Cause
Action
The parking brake is not set.
Check that the parking brake is set.
Vehicle is moving.
No video is displayed on the unit while driving. Park
the vehicle before playing this unit. (Set the parking
brake.)
No TV mode (function).
To watch TV, press the source button and check that
the TV screen is now set.
Monitor is at OFF.
Press the power button or another button to turn on
the monitor.
Poor or blurred
image.
Poor antenna receiving
conditions.
Reception is blocked by mountains or buildings.
Check reception again at a place where radio waves
can be received properly.
Display is too dark.
The brightness control is too
low.
Adjust the brightness properly.
Poor operating conditions.
The temperature inside the vehicle might be 0°C or
lower. Set to an appropriate temperature (25°C or
so) and check it again.
Vehicle headlights are on.
The display is designed to darken at night to prevent
glare from headlights.
Display also darkens if the headlights are used in the
daytime.
Display color is weak
or poor face color.
The color is not adjusted
adequately.
Check that COLOR and HUE are adjusted properly.
The TV tuner has a
double or triple
image.
Bad receiving conditions.
Possible poor antenna reception due to mountains or
buildings, etc.
Check again in a different location and position.
Spots or stripes in
image.
Other signals are interfering
with reception.
Possible signal interference from other vehicles,
power lines, streetcars, etc. Check reception later
after changing your location.
No sound.
Volume is too low.
Volume level might be set at minimum. Adjust once
more.
TB851P/TB853W
*TB851P/TB853W(09-20)E
19
05.2.25, 11:26 AM
19
280-8212-00
Screen size:
7-inch wide type
(176.4 mm Width ✕ 99.2 mm Height)
Display method:
Transmission type TN LCD
Drive method:
TFT(thin-film transistor) active matrix
driving
Pixels: 336,960 (1440 ✕ 234)
TV Tuner
Tuning system: PLL synthesizer system
Reception channels:
• TB851P
VHF: CCIR
2 to 12 ch
(47 to 230 MHz)
NEW ZEALAND 1 to 11 ch
(44 to 230 MHz)
AUSTRALIA
0 to 12ch
(45 to 230 MHz)
CHINA
1 to 12ch
(48.5 to 223 MHz)
UHF: CCIR
21 to 69 ch
(470 to 862 MHz)
NEW ZEALAND 21 to 69 ch
(470 to 862 MHz)
AUSTRALIA
28 to 69ch
(526 to 820 MHz)
CHINA
13 to 57ch
(470 to 870 MHz)
HONG KONG
21 to 69 ch
(470 to 862 MHz)
• TB853W
VHF: 2 to 13 ch (54 to 216 MHz)
UHF: 14 to 69 ch (470 to 806 MHz)
Antenna input: 75 Ω unbalanced
Audio output:
HIGH 230 ± 100 mV (at VTR Input 130 mV rms)
LOW 125 ± 50 mV (at VTR Input 130 mV rms)
(Load resistance 10 kΩ)
General
Power source voltage:
DC13.2 V (10.8 to 15.6 V)
Ground:
Negative
Current consumption:
Less than 2.0 A
Weight:
2.2 kg
Dimensions: 178 mm Width ✕
50 mm Height ✕
209 mm Depth
165
LCD Monitor
44
English
7. SPECIFICATIONS
172
178
50
Remote Control Unit dimensions:
44 mm Width ✕
27.2 mm Height ✕
110 mm Depth
Remote Control Weight: 50 g
Note:
• Specifications and design are subject to change
without notice for further improvement.
Input/Output
Video input:
1.0 ± 0.2 Vp-p (input impedance 75 Ω)
Audio input:
130 ± 60 mVrms
(input impedance 45 kΩ or greater)
Video output:
1.0 V ± 0.2 Vp-p
(output impedance 75 Ω)
20
TB851P/TB853W
*TB851P/TB853W(09-20)E
20
05.2.25, 11:26 AM
280-8212-00
Installation and Wire connection manual
■ Contents
1.
2.
3.
4.
5.
6.
7.
8.
9.
BEFORE STARTING ...............................................................
PACKAGE CONTENTS ...........................................................
GENERAL CAUTIONS ............................................................
CAUTIONS ON INSTALLATION ..............................................
INSTALLING THE MAIN UNIT .................................................
REMOVING THE MAIN UNIT ..................................................
CAUTIONS ON WIRING ..........................................................
WIRE CONNECTION ..............................................................
SAMPLE SYSTEMS ................................................................
21
21
22
22
23
25
25
26
28
1. BEFORE STARTING
1. This set is exclusively for use in vehicles with
a negative ground 12 volt power supply.
2. Read these instructions carefully.
3. Be sure to disconnect the battery “-”
terminal before starting. This will prevent
short circuits during installation. (Figure 1)
Car battery
Figure 1
2. PACKAGE CONTENTS
1 Main unit
2 Manuals
Owner’s manual & Installation manual
Warranty card
3 Power supply lead wires
4 Bag for accessories (No. 1)
Flat head screw (M5 × 8) ............................ 4
Sems hexagonal bolt (M5 × 8) .................... 5
Electro tap
Machine screw (M4 × 3) .............................. 4
5 Bag for accessories (No. 2)
Hook plate ................................................... 2
Cord clamp
Rubber cap
Special screw
6 Universal mounting bracket
7 Remote control unit
8 Battery
(for remote control unit)
9 Outer Escutcheon
TB851P/TB853W
*TB851P/TB853W(21-28)E
21
05.2.25, 11:27 AM
21
280-8212-00
English
TB851P/TB853W
English
3. GENERAL CAUTIONS
1. Do not open the case. There are no user
serviceable parts inside. If you drop anything
into the unit during installation, consult your
dealer or an authorized CLARION service
centre.
2. Use a soft, dry cloth to clean the case. Never
use a rough cloth, thinner, benzine, or
alcohol, etc. For tough dirt, apply a little cold
or warm water to a soft cloth and wipe away
the dirt gently.
4. CAUTIONS ON INSTALLATION
1. Prepare all articles necessary for installing
the main unit before starting.
2. This model is used with the LCD panel slid
forwards (shell loading system). On some
types of cars, the LCD panel may touch the
dashboard or shift lever, in which case it
cannot be installed. Check that the set will
not hamper operation of the shift lever before
choosing where to install it.(Figure 2)
5. Use the enclosed screws for installation.
Using other screws can cause damage.
(Figure 4)
Chassis
Chassis
Damage
Max. 8 mm (M5 screw)
Figure 4
Dashboard
6. The source unit has mounting screw holes
for NISSAN (N marks) and TOYOTA (T
marks) vehicles.
T
N
T
Shift lever
Shift lever
(check that it does not
touch the LCD.)
Figure 2
3. Install the unit within 30° of the horizontal
plane. (Figure 3)
N
T
N
Figure 5
Max. 30˚
Figure 3
4. If you have to do any work on the car body,
such as drilling holes, consult your car dealer
beforehand.
22
TB851P/TB853W
*TB851P/TB853W(21-28)E
22
05.2.25, 11:27 AM
280-8212-00
English
5. INSTALLING THE MAIN UNIT
■ Universal Mount
1. Place the universal mounting bracket into the
instrument panel, use a screwdriver to bend
each stopper of the universal mounting
bracket inward, then secure the stopper as
shown in Figure 6.
2. Wire as shown in Section 8.
3. Insert the main unit into the universal
mounting bracket until it locks in place.
4. Mount the outer escutcheon so that all the
hooks are locked.
Notes:
1) Some car models require special mounting kits
for proper installation. Consult your Clarion
dealer for details.
2) Fasten the front stopper securely to prevent the
main unit from coming loose.
• Console opening dimensions
Rear fastening hole (of vehicle)
182 mm
Instrument panel
53 mm
Hole
Hole
Stoppers
Special Screw
Screwdriver
Rubber cap
Main unit
Universal mounting bracket
Stoppers
2-Spring
Outer escutcheon
Note: Set the outer escutcheon so that its metallic
part on the back side
fits the upper edge of
the main unit.
Figure 6
TB851P/TB853W
*TB851P/TB853W(21-28)E
23
05.2.25, 11:27 AM
23
280-8212-00
English
■ Fixed Mount (TOYOTA, NISSAN and other ISO/DIN equipped vehicles)
This unit is designed for fixed installation in the
dashboard.
If the vehicle is equipped with a factory-installed
radio, install the main unit with the parts and
screws marked (∗). (Figure 8)
If the vehicle is not equipped with a factoryinstalled radio, obtain an installation kit to install
the main unit with the following procedure.
1. Remove the screws from both side of the
main unit. Then, at either side, lift the leaf
spring until the engaging claws are released
from the holes, and slide the spring to the
direction of arrow to remove it. Repeat the
same for the other side to remove the
springs from the both sides. (Figure 7)
2. Secure the mounting brackets to the chassis
as shown in Figure 8. Holes are pre-tapped
for TOYOTA and NISSAN vehicles;
modification, such as drilling new holes, of
the mounting brackets may be required for
other models.
3. Wire as shown in Section 8.
4. Secure the unit in the dashboard, and then
reassemble the dashboard and the centre
panel.
2-Screws
Engaging claw
Main Unit
2-Springs
Screwdriver
Figure 7
Mounting bracket
(1 pair for the left and right sides)
4-Hexagonal screws ∗ (M5 × 8)
Main Unit
Pocket
Note 2
Centre Panel (Note 1)
∗: Screws with this mark come supplied
with the unit.
★: The parts and screws with this mark
are used to install the radio or are
included in the installation kit.
Note 1: In some cases, the centre panel may
require some modification (trimming,
filling, etc.).
24
Figure 8
Note 2: If a hook on the installation bracket
interferes with the unit, bend and flatten it
with a nipper or a similar tool.
TB851P/TB853W
*TB851P/TB853W(21-28)E
24
05.2.25, 11:27 AM
280-8212-00
1. After the rear of the main unit has been
secured by the method shown in Figure 6
unfasten the special screw.
2. Remove the outer escutcheon.
3. Insert the hook plate between the spring and
the universal mounting bracket, fit tab B of
the spring into hole A of the hook plate, then
English
6. REMOVING THE MAIN UNIT
pull the main unit out by the hook plate.
(Insert both the right and left edges of the
hook plate.) (Figure 9)
Note: Do not dispose of the hook plate. You cannot
remove the main unit without disengaging
the hook plate.
Instrument panel
Universal mounting bracket
2-Hook plate
Main
Unit
Spring
Outer escutcheon
A
B
Figure 9
7. CAUTIONS ON WIRING
1. Be sure to turn the power off before wiring.
2. Be particularly careful where you route the
wires.
Keep them well away from the engine, and
exhaust pipe, etc. Heat may damage the
wires.
3. If the fuse should blow, check to see if the
wiring is correct.
If it is correct, replace the fuse with a new
one with the same amperage rating as the
original (15A FUSE).
4. To replace the fuse, remove the old fuse of
the power supply lead and insert the new
one. (Figure10)
Note: There are various types of fuse holders. Do
not let the battery side touch other metal
parts.
CAUTION
After connecting, secure the lead with a clamp
or insulation tape for protection.
Fuse (15A FUSE)
Fuse holder
Figure 10
TB851P/TB853W
*TB851P/TB853W(21-28)E
25
05.2.25, 11:27 AM
25
280-8212-00
English
8. WIRE CONNECTION
TV antenna input
Connect to 4-line diversity
antenna (sold separately).
Black
Red
Black
White
Black
Yellow
(Right)
Audio out
(Left)
Visual input 1
Gray Yellow
Visual input 2
∗1
Video out/VTR input cable
CCA-623-500(sold separately)
Red
Audio input (right)
White
Audio input (left)
Yellow
video input
Yellow
video output
Connect the vehicle radio antenna jack.
Connect to the antenna terminal of the
car audio (with radio).
Power supply lead
Yellow
+12 V main power
Fuse
(5A)
Black
Ground
Red
+12 V accessory
Orange/White
Illumination
Grass-green
Parking brake
∗1: Connect the CCD camera power supply box.
VTR2 is connected to this connector using CCA-389-500
(AV adapter cable 8-Pin ←→ RCA 3-Pin).
26
TB851P/TB853W
*TB851P/TB853W(21-28)E
26
05.2.25, 11:27 AM
280-8212-00
English
■ Connecting the Accessories
• Connection to the CCD camera for vehicle
For detailed information, refer to the instruction sheet or manual for the CCD camera.
Notes:
• A power supply box (sold separately) is required for connecting the main unit and the CCD camera.
• The power supply box for camera CAA147 cannot be used. Please use the CAA188 instead.
■ Connect the parking brake wire
Connect the parking brake wire (supplied with
unit) from this unit to the parking brake lamp
ground wire in the dashboard panel. Use the
electrotap (comes supplied with this unit) when
making the connection.
• Connecting this parking brake wire to the
ground of the lamp allows you to watch video
on this unit when the parking brake is on.
• No TV images will appear unless you connect
this parking brake wire as shown below.
Parking brake lamp
wire
1. Press the parking brake wire (orange) from
this unit against the (opened) stopper and
fold the stopper towards the arrows as
shown.
Vehicle parking
brake lamp
ground wire
Latch
Parking brake
wire from this
unit
Stopper
2. Lay the vehicle wire as shown and fold the
stopper towards the arrows.
Electrotap
Vehicle parking brake
lamp ground wire
wire
Parking brake
wire from this unit
(grass green)
Parking brake
Tighten with long-nose
pliers or similar tool until
the latch engages
Parking brake
wire from this
unit
TB851P/TB853W
*TB851P/TB853W(21-28)E
27
05.2.25, 11:27 AM
27
280-8212-00
English
9. SAMPLE SYSTEMS
■ Sample System 1
CeNET cable
DVD Receiver
Yellow
TV antenna input
CeNET CD changer
Black
Yellow Visual input 1
Yellow Visual input 2
Gray
VTR etc.
Black Red
Audio out
(Right)
White
(Left)
Black
CeNET DVD changer
Video device connector cable
CCA-623-500
(sold separately)
CCD camera
(sold separately)
Red
Audio (right)
White
Audio (left)
Yellow
Video input
Yellow
Video output
Rear monitor
(sold separately)
Power supply box
28
TB851P/TB853W
*TB851P/TB853W(21-28)E
28
05.2.25, 11:27 AM
280-8212-00
Owner’s manual & Installation manual
TB851P/
TB853W
8-INCH WIDE COLOUR LCD TV
Clarion Co., Ltd.
All Rights Reserved. Copyright © 2005: Clarion Co., Ltd.
Printed in Japan /
/
2005/3 (Y·Y)
*TB851P/TB853W(001-cover)E
1
QZ-8000K
280-8212-00
05.2.24, 5:21 PM