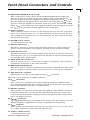
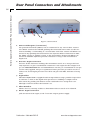
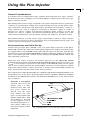
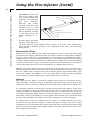
1
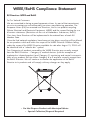
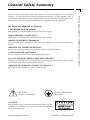
Model PLI-100A
Pico-Injector
User's Manual
PLI-100A Basic Pico-Injector
PLI-100A Plus Pico-Injector
PLI-100A Deluxe Pico-Injector
64-1735
64-1736
64-1737
Publication 5403-004-REV-E
WEEE/RoHS Compliance Statement
EU Directives WEEE and RoHS
To Our Valued Customers:
We are committed to being a good corporate citizen. As part of that commitment,
we strive to maintain an environmentally conscious manufacturing operation. The
European Union (EU) has enacted two Directives, the first on product recycling
(Waste Electrical and Electronic Equipment, WEEE) and the second limiting the use
of certain substances (Restriction on the use of Hazardous Substances, RoHS).
Over time, these Directives will be implemented in the national laws of each EU
Member State.
Once the final national regulations have been put into place, recycling will be offered
for our products which are within the scope of the WEEE Directive. Products falling
under the scope of the WEEE Directive available for sale after August 13, 2005 will
be identified with a “wheelie bin” symbol.
Two Categories of products covered by the WEEE Directive are currently exempt
from the RoHS Directive – Category 8, medical devices (with the exception of
implanted or infected products) and Category 9, monitoring and control instruments.
Most of our products fall into either Category 8 or 9 and are currently exempt from
the RoHS Directive. We will continue to monitor the application of the RoHS
Directive to its products and will comply with any changes as they apply.
• Do Not Dispose Product with Municipal Waste
• Special Collection/Disposal Required
Table of Contents
1
PAGE NO.
Warranty and Repair Information ........................2
General Safety Summary ......................................3
Specifications ........................................................4
Introduction ............................................................5
Preliminaries ....................................................6 - 7
Front Panel Controls and Connections..........8 - 9
Rear Panel Connectors and Attachments ........10
Using the Pico-Injector ..................................11-13
Micro-Injection Substances/Cell Types ............14
Setting, Pressure and Time Pulse ......................14
Gas Usage Warning ............................................14
Hose Connections................................................14
Volume Calibration Chart ....................................15
Power Entry Module ............................................16
Footnotes and References..................................17
www.harvardapparatus.com
Publication 5403-004-REV-E
Har vard Apparatus Model PLI-100A Pico Injector User's Manual
SUBJECT
Warranty and Repair Information
2
Har vard Apparatus Model PLI-100A Pico Injector User's Manual
Serial Numbers
All inquires concerning our product should refer to the serial number of the unit.
Serial numbers are located on the rear of the chassis.
Calibrations
All electrical apparatus is calibrated at rated voltage and frequency.
Warranty
Harvard Apparatus warranties this instrument for a period of one year from date of
purchase.At its option, Harvard Apparatus will repair or replace the unit if it is found
to be defective as to workmanship or material.
This warranty does not extend to damage resulting from misuse, neglect or abuse, normal wear and tear, or accident.
This warranty extends only to the original customer purchaser.
IN NO EVENT SHALL HARVARD APPARATUS BE LIABLE FOR INCIDENTAL OR
CONSEQUENTIAL DAMAGES. Some states do not allow exclusion or limitation of
incidental or consequential damages so the above limitation or exclusion may not
apply to you. THERE ARE NO IMPLIED WARRANTIES OF MERCHANTABILITY,
OR FITNESS FOR A PARTICULAR USE, OR OF ANY OTHER NATURE. Some states
do not allow this limitation on an implied warranty, so the above limitation may not
apply to you.
If a defect arises within the one-year warranty period, promptly contact Harvard
Apparatus, Inc. 84 October Hill Road, Building 7, Holliston, Massachusetts
01746-1371 using our toll free number 1-800-272-2775. Goods will not be accepted
for return unless an RMA (returned materials authorization) number has been issued
by our customer service department. The customer is responsible for shipping
charges. Please allow a reasonable period of time for completion of repairs, replacement and return. If the unit is replaced, the replacement unit is covered only for the
remainder of the original warranty period dating from the purchase of the original
device.
This warranty gives you specific rights, and you may also have other rights which vary
from state to state.
Repair Facilities and Parts
Harvard Apparatus stocks replacement and repair parts. When ordering, please
describe parts as completely as possible, preferably using our part numbers. If practical, enclose a sample or drawing.We offer a complete reconditioning service.
CAUTION
This apparatus is not registered with the FDA and is not for clinical use on human
patients.
CAUTION: Not for clinical use on human patients.
Publication 5403-004-REV-E
www.harvardapparatus.com
General Safety Summary
3
To Prevent Hazard or Injury:
USE PROPER POWER SUPPLY
The product is supplied with an approved power supply.
MAKE PROPER CONNECTIONS
Make sure all conections are made properly and securely.
ORIENT EQUIPMENT PROPERLY
Do not position the equipment such that it is difficult to reach the disconnecting
device.
OBSERVE ALL TERMINAL RATINGS
Review the operating manual to learn the ratings on all connections.
AVOID EXPOSED CIRCUITRY
Do not touch any electric circuitry inside the product.
DO NOT OPERATE WITH SUSPECTED FAILURES
If damage is suspected on or to the product do not operate the product. Contact qualified service personnel to perform inspection.
OBSERVE ALL WARNING LABELS ON PRODUCT
Read all labels on product to ensure proper usage.
Protective Ground
Terminal
CAUTION
Refer to Manual
CAUTION
This product is not registered with the FDA and is not for
clinical use on human or veterinary patients. It is intended
for research use only.
www.harvardapparatus.com
Publication 5403-004-REV-E
Har vard Apparatus Model PLI-100A Pico Injector User's Manual
Please read the following safety precautions to ensure proper use of your pico
injector. To avoid potential hazards and product damage, use this product only as
instructed in this manual. If the equipment is used in a manner not specified by the
manufacturer, the protection provided by the equipment may be impaired.
Specifications
Har vard Apparatus Model PLI-100A Pico Injector User's Manual
4
PLI-100A Pico-Injector Specifications
Input Gas Pressure
70-105 psi (480 - 720 kPa)
Injection Pressure
0.2 - 60.0 psi (413 kPa) - regulated, multi-turn control
Balance Pressure
0.1 - 9.9 psi (68.9 kPa) - regulated, multi-turn control
Fill Vacuum
0 to -12 psi (-82 kPa) regulated
Hold Vacuum
-0 to 1.25 kPa (-12.7 cm. of water)
Clearing Pressure
Inlet pressure (unregulated)
Injection Time
0.01 to 99 Seconds
Injection Time Accuracy
±0.01% (Crystal Time Base)
Injection Count Display
0-9999
Duration Mode
Internally timed or externally gated
Trigger Mode
Front Panel, Foot Switch, external TTL pulse (BNC)
Pressure Units
PSI/KPa switch selectable
Pressure Monitor Out
BNC Connector, 10 mV/psi or 1mV/KPa
Pressure Readout
Inject, Balance, Clear
Pressure Display Resolution 3.5 digits, 0.1 PSI or 1 KPa
Power Input
External 9VDC @400mA(min) Power Supply universal input
90 to 264 VAC
Accessories Supplied
Input hose, output hose, holding hose and power module
Weight
12 pounds (5.44 kg)
Dimensions
89 x 432 x 250 mm (H x W x D)
Optional Accessories
Foot Switch(es) up to four functions, Pipette Holder - up
to 2, Input Hose Adaptor
Warranty
One year, parts and labor
Publication 5403-004-REV-E
www.harvardapparatus.com
Introduction
5
This digital injection pressure is enhanced by three auxiliary pressures:
FILL:
HOLD:
Suction can be applied to the delivery pipette to fill it from the tip.
A second internal vacuum pump is available to hold a suspended cell
(for injection)with a second holding pipette.
BALANCE: A (lower) balance pressure applied to the delivery pipette between
injections prevents clogging caused by pipette movement as well as
dilution of the injected material by capillary action.
CLEAR:
Momentary application of high pressure can be used to clear clogged
pipettes.
Triggering of injection is accomplished three ways: panel push button, optional foot
switch, or an externally applied electrical signal (TTL pulse).
The duration of injection can be determined by an internal clock set with a optically
encoded rotary switch or can be gated by the duration either of an externally applied
electrical pulse or of the depression of an optional foot switch.
This manual assumes the reader has no previous experience with microinjection,
either extracellular or intracellular.Those planning on larger volume delivery (100 pL
and up) can ignore the BALANCE feature. Some reference will be made to a less
precise technique for smaller volume delivery to highlight the precision determining
features of this instrument.This technique3,4 involves pressurizing the gas in a macrosyringe attached to a delivery micropipette by advancing the piston of the syringe
with a micrometer screw. Ejection takes place continuously from the pipette: the
volume delivered depends both on the unregulated over pressure in the syringe and
the amount of time the pipette is left inside the cell. This continuous ejection
technique supposedly reduces the frequency of pipette clogging.
Reliable microinjection also requires skill in making and using micropipettes.
Authorities on microinjection5,6 state that the most important single factor in microinjection is the micropipette.The PICO-INJECTOR with its reproducibility simplifies the
search for the optimum micropipette.
www.harvardapparatus.com
Publication 5403-004-REV-E
Har vard Apparatus Model PLI-100A Pico Injector User's Manual
The PLI-100A PICO-INJECTOR allows small liquid volumes to be delivered precisely
through micropipettes by applying a regulated pressure for a digitally set period of
time1,2. The pressure is applied pneumatically (compressed gas) to deliver volumes
from microliters to femtoliters from the same instrument.
Preliminaries
6
Har vard Apparatus Model PLI-100A Pico Injector User's Manual
Microinjection
Microinjection also involves other skills,several other instruments and accessories,and
various supplies.The purpose of this section is to give an overview of these techniques
for those new to microinjection: some guidance on equipment selection is also supplied.
Required Auxiliary Equipment for Microinjection
The required equipment includes a pipette puller and micromanipulator(s).Ideally, the
puller should be capable of making pipettes with tip diameters in the 0.2 to 1.57
micron range with a short enough taper length for both mechanical strength and low
flow resistance. If most injections are to be extracellular, then a puller suitable for
extracellular patch clamp pipettes is satisfactory. For intracellular injections, some
magnetic pullers may be suitable.Alternatively, a two stage gravity puller with variable
weights can be satisfactory over the entire range. The required three dimensional
movement can be produced by an inexpensive mechanically linked micromanipulator
for large cells such as frog oocytes. More commonly, a hydraulic one for fine, vibrationfree movement is mounted on a coarse mechanical manipulator. Suitable equipment is
available from Harvard Apparatus, Inc.
Required Supplies
These are compressed gas and microcapillaries. Compressed air is suitable for oxygen
insensitive injection material. Nitrogen is a satisfactory inert gas for the general case.A
pressure of 105 psi is sufficient: a regulator will be needed if supplied from a bottle of
compressed gas.
Optional Equipment for Microinjection
This includes a microforge (to bend a micropipette or to polish a pipette tip for holding a cell), a microgrinder (to bevel the pipette tip to increase the delivery rate without additional cell damage), and an micro-incubator (to hold the cells at incubation
temperatures during microinjection). Suitable equipment is available from Harvard
Apparatus, Inc.
Accessories
These are also available to enhance your PICO-INJECTOR (see Price List).
Micropipettes
The micropipettes are made with a pipette puller from a microcapillary (1-2 mm. in
diameter) by heating some 3-10 mm. of its length with a concentric heater while
applying a force (gravitational or magnetic) to pull both ends of the capillary apart.
Two micropipettes are produced per capillary.
1. Distinguishing Parameters
Two useful distinguishing parameters of the micropipette are the inside diameter of
its tip and the angle of taper to the tip.The smaller this angle, the longer the tapered
region8 The larger the tip, the more material is delivered for the same applied pressure
and time. Just a 10% decrease in diameter decreases the delivery rate by over 30%. A
10% decrease in taper angle (longer taper) would decrease the delivery rate about
10%. The extreme sensitivity of delivery rate on tip diameter makes it important to
have a reproducible pipette puller. If you use published tip sizes as a starting point, distinguish between the relevant inside diameter and the more visible outside diameter.
(The ratio of the two is the same at the tip as for the original capillary glass.)
Publication 5403-004-REV-E
www.harvardapparatus.com
Preliminaries (Contd)
7
Micropipettes (continued)
Although intracellular injection can be done from below with an upright microscope6, most injections are done from the side or from above the cells. Four different
strategies have been used to suitably fix the cell in position for successful intracellular
injection.
For suspended cells, a second, larger pipette is used to hold the cell.This pipette’s tip
is first polished with a microforge (done by placing the pipette within 5 microns of a
hot filament for a few seconds). With its axis horizontal, it is moved to hold the cell
with applied suction.The injection pipette is also straight and is inserted horizontally
from the opposite side.This geometry avoids damage to the cell membrane caused by
shearing forces.The optics are straightforward because the pipettes remain in focus as
they are advanced.
For cells that can be or are attached to a surface in a closely packed layer, straight injection pipettes can also be used. In this case, the pipette axis slopes slightly down from
the horizontal.The tendency of the cells to slide when the pipette enters is resisted by
the extracellular environment or attachment to the culture surface. The microscope
should be focused on the cell’s surface. The pipette tip then comes into focus just
before injection. If the cell is nearly spherical (the hardest case), the pipette should
again enter the cell membrane at right angles to avoid shearing. Non spherical cells (
for example, cultured fibroblasts) have a more robust cytoskeletal structure so the
pipette can be pushed in even if not perpendicular to the membrane surface.
For less firmly attached cells, the injection pipette can be bent near the tip after
pulling.The pipette’s main axis slopes slightly down from the horizontal.The angle of
bend should allow the tip to point straight down.With an inverted microscope, the tip
is viewed through the cell as it is lowered for injection.The microscope is focused on
the cell’s top surface and the tip comes into focus just before insertion. Again shearing forces are avoided. (Suitable bends can be made with a microforge: a simple way
to do this is to move the pipette near a hot filament at the position of desired bend.
The tip will spontaneously bend away).
In all of the above techniques, a three dimensional micromanipulator controls the
movement of the injection pipette.If this (straight) pipette is instead attached to a condenser mount (inverted scope), then a one dimensional manipulator can be used.The
remaining two directions of manipulation are done with stage micrometers moving
the vertical injection pipette over each cell in turn. If the vibrations transmitted with
the condenser mounting are manageable, then this approach gives the fastest rate of
cell injection.
www.harvardapparatus.com
Publication 5403-004-REV-E
Har vard Apparatus Model PLI-100A Pico Injector User's Manual
2. Choosing the Right Pipette
Choosing a pipette size and shape for intracellular injection is difficult. Larger tips
deliver more material but increase the risk of cell damage caused by leakage around
the pipette while in the cell or later by incomplete sealing.The smaller the cell, the
smaller the pipette tip it will tolerate.The smaller the tip, the more likely it is to clog.
For reference, intracellular electrophysiologists routinely record for an hour or so from
cells of 10 micron diameter with pipette tips of 0.1 micron inside diameter. Larger tips
can therefore be used for brief injection in such cells. For nuclear injections, a smaller
taper angle is needed to avoid leakage further up the shank of the pipette at the plasma membrane.
Front Panel Connectors and Controls
9 2.1
Har vard Apparatus Model PLI-100A Pico Injector User's Manual
8
8 21
13
1
14 3
2
4
6
15
17
7 10
5
16
18
19
11 20
21
12
Figure 1: Front Panel
Refer to Figure 1 for the location of controls and connectors. Numbers refer to the
order of listing below.
1. INJECT pushbutton
Push this to manually trigger the injection pressure for a time set by the internal
timer.The switch remains lit for the duration of the injection.
2. INJECT TIME SETTING DIAL
This dial controls the injection time setting.Turning the dial changes the injection time in seconds; pressing the dial in and turning changes the injection time
in fractions of a second.
2.1 INJECT TIME Display
Displays injection time in seconds.
3. CLEAR pushbutton
Push this briefly to deliver a half second pressure surge to clear a clogged
pipette.The pressure applied is the supply pressure. If the button is left pushed
in for longer than a half second, the clearing surge is extended.The button
remains lit for the duration of the clear.
4. FILL pushbutton
Push the button to apply suction to the delivery pipette to fill it from the tip.
The suction is applied as long as this button is held and LED is lit.
5. HOLD pushbutton
Push this button to apply sufficiently small suction to holding pipette (LED is lit)
to hold a cell for injection. Push this a second time to drop this suction to zero.
6. PRESSURE display
This three digit display gives the “gauge” pressure selected by the PRESSURE
METER SELECT switch. A negative (-) sign indicates suction.
7. PRESSURE UNITS toggle switch
Toggle switch controls injection pressure display unit of measure. Injection
pressure can be displayed in either pound-force per square inch (PSI) or in
kilopascals (kP.) 1 psi = 6.89 kP.
8. RESET pushbutton
This button resets the injection count display to zero.
9. INJECTION COUNT display
This four digit display (0-9999) gives the total number of injections triggered manually by the panel pushbutton or footswitch or electrically since the last reset.
Publication 5403-004-REV-E
www.harvardapparatus.com
Front Panel Connectors and Controls
9
11. P INJ regulator
This seven turn control is used to set the injection pressure over the range from
about 0.4 to 60.0 psi (about 2.8 - 413 kP). Clockwise rotation increases the pressure. Locking nut should be loose to avoid damaging the shaft's threads if changing pressure constantly.
12. POWER rocker switch
Controls power to the unit.
13. TRIG IN connector
This BNC connector is for electrically initiating injection.A positive TTL level
pulse is required (baseline 0.0 V, trigger 5 V, lasting at least 50 microseconds).
14. GATE IN connector
This BNC connector is for external timing of the duration of injection.A positive
TTL level pulse (see 13.) is required with the duration of injection determined by
the duration of the applied pulse.
15. TRIG/GATE OUT connector
This TTL output (see 13.) can be used to trigger or synchronize other electrical
instruments. Its duration is that of the injection.
16. PRESSURE MONITOR out
This BNC connector delivers an electrical level whose amplitude gives the actual
pressure applied to the meter.The conversion factor is 10 mV /psi or 1mV/KPa.
17. FILL VACUUM regulator
This regulator sets the vacuum applied to the POUT connector.
The range is 0 to -12 PSI (0 to -82KPa, regulated.
18. POUT connector
This connector is attached to the injection pipette using the supplied output
hose (PLI-OH).Without the hose attached the port is closed. In use, the injection,
balance, fill, and clear pressures are delivered here.
19. PHOLD regulator
This regulator sets the (low) suction pressure applied to the PHOLD connector.
counterclockwise increases the pressure. Like the other pressure controls the
current rotational position is uniquely related to the pressure.The range is 0-0.5
kP. ( 5 cm. height of water).
20. PHOLD connector
The supplied holding hose is attached to this connnector. The suction set by the
PHOLD regulator is applied here to hold a suspended cell for injection.
21. PBAL regulator
This regulator sets the balance pressure over the range from 0.1 to 10 psi. (about
0.7-70 kP.). Clockwise rotation increases the pressure.
21. AUDIO / MUTE switch
Controls injection sound.
www.harvardapparatus.com
Publication 5403-004-REV-E
Har vard Apparatus Model PLI-100 Pico Injector User's Manual
10. PRESSURE METER SELECT switch
This switch selects various places inside the PICO-INJECTOR for reading the
pressure. It does not change the pressure applied to the output. PINJ is the
pressure applied to pressure applied at the output during injection. PBAL is the
pressure applied to the pipette when injection is not taking place. PCLR is the
pressure externally supplied to the input on the rear panel and used the CLEAR
mode. PFILL is the negative pressure applied to fill the injection pipette from the
tip. POUT is the pressure currently applied to the output port.
Rear Panel Connectors and Attachments
Har vard Apparatus Model PLI-100A Pico Injector User's Manual
10
5
3
4
2
1
Figure 2: Rear Panel
1. Foot Switch Inputs (Connectors)
An optional footswitch (PLI-FS) can be connected to any one of these connectors.When connected to HOLD, pushing the footswitch once turns on the suction for holding a cell. Pushing it a second time turns that suction off.When connected to INJ, pushing the footswitch starts injection.When connected to FILL,
the filling suction is applied as long as the footswitch is depressed.When connected to GATING, injection pressure continues as long as the footswitch is
depressed.
2. Pressure Input Connector
To have all the functions working, the instrument needs 70 to 105 psi.To have
only injection, 70 psi is needed.This connector is the input for the compressed
gas. See PRELIMINARIES for recommendations on the gas.A maximum of 105 psi.
can be safely applied; 100 psi. is optimal.At lower pressure gas will be used at a
slower rate.Avoid input pressures less than 100 psi if the FILL function is being
used.
3. Input Filter
The PICO-INJECTOR is supplied with an input filter. It traps particles larger than
0.5 micron as well as the liquid often present in a building’s compressed air
lines. Drain by pushing the button on the underside of its transparent case.
Through a hole located in the bottom case.
4. Filter Window
Allows for easy viewing of filter to determine when it needs to be drained.
5. Power Input Connector
Jack for universal AC input 9 volt 6 watt DC output power supply.
Publication 5403-004-REV-E
www.harvardapparatus.com
Using the Pico-Injector
11
General Considerations
The dividing line between large and small is not rigid: it depends on how quantitative
a delivery is required.That volume line would typically be in the 10-100 pLiter range.
(For convenient visualization and approximate geometric measurement, 1 fLiter is a
cube 1 micron on a side or a sphere 1.24 microns in diameter, 1 pLiter is a cube 10
microns on a side or a sphere 12.4 microns in diameter, while 1 nLiter is a cube 100
microns on a side or a sphere 124 microns in diameter. Because volume goes as the
cube of linear dimensions, such geometric volumes are imprecise, but often useful).
Extracellular delivery is nearly always “large”. Intracellular is often of “small” volumes
(but not for frog oocytes).A more quantitative way to distinguish between “large” and
“small” is given in the balance section below.
Interconnections and Initial Set-Up
Connect the gas input hose (PLI-IH) to the rear panel input connector of the PICOINJECTOR. Connect the other end (with optional input hose adapter, if needed) to the
gas supply.Turn on the POWER switch and verify the input gas pressure with the digital meter by setting the PRESSURE METER SOURCE switch to P CLR. Practice with the
inject and balance pressure controls by first turning the METER SELECT switch and
then adjusting each in turn.
With non zero values of inject and balance pressure set the PRESSURE METER
SOURCE switch to POUT. NOTE:The PRESSURE METER SELECT switch must be set to
P OUT to read changes in pressure on the display or MONITOR output. Set the inject
time to five seconds and push the panel INJECT switch to see the temporary change
in pressure from balance to inject and back. (A buzzer will sound during injection. If
this is not wanted, turn the switch to the mute position.)
Two output hoses (PLI-OH & PLI-HH) are supplied with the PICO-INJECTOR.These are
designed for any of the three optional pipette holders (PLI-PH1, PLI-PH1A, PLI-PPH)
described in the PRICE LIST. Connect the PLI-OH & PLI-HH hoses to the chosen holder(s) as follows:
PLI-PH1 & PLI-PH1A:
Unscrew the end of the
holder with a 2 mm.
diameter hole. This end
hex piece should be
placed over the tube
end. Thread the hex
piece on the holder and
tighten firmly. The 1 mm
OD capillary is inserted
in the opposite end of
the holder through its“o”
ring (silicon rubber gasket) and its fitting is then
tightened.
www.harvardapparatus.com
Fig. 3. PLI-PH1/PH1A 1.0 mm OD Glass Pipette Assembly
Publication 5403-004-REV-E
Har vard Apparatus Model PLI-100A Pico Injector User's Manual
It is much easier to reliably inject large volumes than small ones. For “large” volumes,
the balance pressure capability is not needed. Pipettes seldom clog so the clear capability is also not needed.
Using the Pico-Injector (Contd)
Har vard Apparatus Model PLI-100A Pico Injector User's Manual
12
PLI-PPH: Unscrew the
end of the holder with
the 2 mm. diameter hole
and place it over the output hose (PLI-OH).
Reattach this fitting
securely with the hose
inserted as far as it will
go.The 1.5 mm. OD capillary is similarly attached
to the other end of the
holder through its “o”
ring.
Hex Nut
Output Hose
Holder
Bushing (Metal Sleeve)
Silicon Rubber Gasket (7.5mm L x 1.5mm ID)
Knurled Nut
Glass Tube
Fig. 4. PLI-PH1/PH1A 1.5 mm OD Glass Pipette Assembly
Attach output and holding hose to the appropriate front panel gas ports. Tighten them securely so that the valves within these
ports are open, allowing pressure to be controlled in the hose and connecting
micropipette.
Micropipette Filling
Filling can be done from the tip of the micropipette, or, with a few extra steps, from
the barrel of the pipette. Filling from the tip is most suitable if a filling fiber is deliberately not being used due to irregularities in the balancing (see BALANCE below).
Simply prepare a bolus of injection material on a glass slide and maneuver the tip into
it using a micromanipulator. Depress the FILL button to apply about 12 psi (82 kP.) of
suction continuously as long as needed. If evaporation of a small bolus is a concern, it
can be prepared under oil and the micropipette tip similarly moved into it.
Filling can be done from the back end (barrel) of the pipette using a syringe with a
thin hypodermic needle inserted so its tip is down in the tapered section. If the capillary has a filling fiber attached to the inner wall the pipette tip will then fill by capillary action without air bubbles, at least for larger tips. Variations on this procedure
involve filling a smaller capillary first and inserting it for the back fill.
Balance
The inflow into the pipette (caused by capillary forces) prior to or in-between injections should be a small percentage of that being injected.As the volume desired gets
smaller,the relative inflow gets larger even faster due to the smaller tip size being used.
To avoid this problem, set the balance pressure before placing the pipette in the cell’s
external medium.Ten percent of the injection pressure is a good starting value. Exact
balance is difficult to determine: often the fastest way to handle this is to set the balance high enough that slight outflow is observed. Balance is assessed by watching the
movement of the liquid meniscus in the pipette. The outflow left is still small compared to the continuous streaming used in the continuous ejection technique.
If a filling fiber is used, the capillary inflow is larger so a higher balance pressure is
needed. In general, however, when a balance pressure is being used, such a fiber
should not be used:sometimes the injection material will run out spontaneously or the
pressure needed to balance will abruptly change with time. (These may be due to particles lodging on the fiber).
Publication 5403-004-REV-E
www.harvardapparatus.com
Using the Pico-Injector (Contd)
13
Balance (continued)
Clear
To clear a clogged micropipette, push the CLEAR button momentarily once the tip has
been removed from a cell. Watch the tip region while this is done to see the brief
movement of liquid denoting that the tip is clear. Repeat if needed.The clearing pressure pulse has a preset duration of 500 msec. to avoid excessive release if the clog
clears immediately. Repeat as needed.
Hold
To hold a suspended cell for injection, attach a suitable holding pipette to the pipette
holder/holding hose. Momentarily attach to the P OUT port. Backfill the holding
pipette (using the fill function switch) with fluid so that tube length is half to three
quarters filled.* Disconnect the holding hose connector from the P OUT port and
attach to the P HOLD port. Set the hold pressure control to minimum and move the
micropipette to the cell using a micromanipulator. Turn on the HOLD panel switch
and increase the hold pressure as needed. When finished with that cell turn off the
hold pressure with the panel or footswitch. If more cells of the same kind are being
injected then subsequent holds require only the ON/OFF control of the switch. If the
cell doesn’t drop off the holding pipette tip when hold is turned off, a brief, gentle
squeeze of the rubber bulb located on the holding output hose should release it.
*Note: Be careful not to overfill the hose to avoid liquid going into the pneumatic system inside the unit.
Footswitch(es)
Optional footswitches can be used for inject, fill, and turning on and off the hold function.These switches are plugged into the rear panel: each is wired in parallel with the
corresponding front panel switch. See the instructions for each panel switch to see
how they operate.When a footswitch is used with the GATE connector, the duration
of injection is manually determined by the duration of pressing the footswitch. In
some applications, users may prefer to set up the duration of injection manually: connect the MONITOR output to an oscilloscope or fast enough strip chart recorder to
measure this time and then switch to the internal timer for subsequent injections.
Electrical Inputs/Outputs (13-16 in Figure 1)
These connectors allow additional control, especially when synchronizing injection to
other stimulations or recording. See items 13-16 on pages 8 and 9 for details. In particular, the PRESSURE MONITOR output signal is a precise measure of relative injection volume ( for a given pipette). Since the volume delivered is linear in the net injection pressure (P INJ -P BAL and injection time, the area under a graph of this signal versus time is a measure of the relative volume.
Injection Volume Adjustment
Adjust injection volume by changing either injection pressure, injection duration, or the
micropipette (inside) tip diameter or taper. The dependence on (net) injection pressure,
duration and pipette taper angle is linear; the dependence on tip diameter is cubic.
www.harvardapparatus.com
Publication 5403-004-REV-E
Har vard Apparatus Model PLI-100A Pico Injector User's Manual
If desired, a rough estimate of the volume coming in can be made. Focus the microscope on the liquid meniscus in the loaded pipette while its tip is still in air (with the
balance pressure set to zero). Use an eyepiece reticle to measure the meniscus movement when liquid is then raised to cover the tip.The inflow volume is approximately
the difference between the volume of two cones. The estimate is more precise for
smaller initial volumes in the pipette.
General Information
14
Har vard Apparatus Model PLI-100A Pico Injector User's Manual
Micro-Injection Substances/Cell Types
A wide range of substances have been micro-injected onto or into a large number of
cell types. References 10- 17 on page 16 give some recent examples.
Setting Pressures and Time Pulses
1. Balance Pressure
Set the balance pressure while viewing the pipette under magnification. This method
will help the user to stabilize the solution within the pipette easily.
2. Injection Pressure and Time Pulse
Setting the initial injection pressure low prevents the loss of solution. To easily obtain
the desired pressure setting, set the time pulse on (1) one second with the injection
pressure set at its minimum. Trigger the time pulse while viewing under magnification. Increase the injection pressure until the solution within the pipette begins to
flow out the tip opening. The pressure shown on the LCD can now be used as the initial injection pressure setting. Adjust the injection pressure and timing to obtain the
desired injection
3. Holding Pressure
Set the holding pressure at the minimum. This will prevent possible damage to the
cell. Fill 3/4 of the pipette’s capillary tube with a solution (medium). This serves as a
buffer, when the holding function is 2Z preventing a constant vacuum at the pipette
tip caused by capillary action.
Gas Usage Warning
To provide finely controllable output pressure, the gas regulators are of the “bleeding”
type. Such regulators use gas even in the absence of ejections.
The PICO-INJECTOR thus uses gas even when off. To eliminate this consumption and
as a good safety practice, turn off the gas supply at the source when the PICO-INJECTOR is not in use.
The suction functions (HOLD and FILL) use much more gas than INJECT and BALANCE. Plan accordingly. Notice, that the BALANCE is on continuously once an output
hose is attached to the front panel: without a micropipette attached, even this gas
usage can be significant.
Hose Connections
The input, output, and holding hoses should be attached to their respective connectors. If each connector’s needle valve, located in the micro-injector body, is not fully
opened, the airflow will be restricted or blocked. To prevent this from happening,
check each connector for tightness by turning clockwise. This will ensure needle
valve depression.
Publication 5403-004-REV-E
www.harvardapparatus.com
Volume Calibration Chart
15
Example:
Volume = .17952 x (5)3 X (10) X (1) Nanoliters = 224.40 Nanoliters
Pressure
(p.s.i.)
Time
(sec.)
Pipette Tip
I.D. (µm)
Femtoliters Picoliter
Nanoliter
Microliter Milliliter
1
1
0.1
179.52
0.18
-
-
-
10
1
0.1
1795.20
1.80
-
-
-
20
1
0.1
3590.40
3.59
-
-
-
30
1
0.1
5385.60
5.39
-
-
-
40
1
0.1
7180.80
7.18
-
-
-
50
1
0.1
8976.00
8.98
-
-
-
60
1
0.1
10771.20
10.77
-
-
-
1
1
1
-
179.52
0.18
-
-
10
1
1
-
1795.20
1.80
-
-
20
1
1
-
3590.40
3.59
-
-
30
1
1
-
5385.60
5.39
-
-
40
1
1
-
7180.80
7.18
-
50
1
1
-
8976.00
8.98
-
-
60
1
1
-
10771.20
10.77
-
-
1
1
5
-
-
22.44
0.02
-
10
1
5
-
-
224.40
0.22
-
20
1
5
-
-
448.80
0.45
-
30
1
5
-
-
673.20
0.67
-
40
1
5
-
-
897.60
0.90
-
50
1
5
-
-
1122.00
1.12
-
60
1
5
-
-
1346.40
1.35
-
1
1
10
-
-
179.52
0.18
-
10
1
10
-
-
1795.20
1.80
-
20
1
10
-
-
3590.20
3.59
-
30
1
10
-
-
5385.60
5.39
-
40
1
10
-
-
7180.80
7.18
-
50
1
10
-
-
8976.00
8.98
-
60
1
10
-
-
10771.20
10.77
-
1
1
75
-
-
-
75.74
0.08
10
1
75
-
-
-
757.35
0.76
20
1
75
-
-
-
1514.70
1.51
30
1
75
-
-
-
2272.05
2.27
40
1
75
-
-
-
3029.40
3.03
50
1
75
-
-
-
3786.75
3.79
60
1
75
-
-
-
4544.10
4.54
(*) Constant includes unit conversion factors, and effects of water like viscosity and needle taper for a cone
half angle of 10 (medium taper).
www.harvardapparatus.com
Publication 5403-004-REV-E
Har vard Apparatus Model PLI-100A Pico Injector User's Manual
Formula:
Volume in Nanoliters = .17952(*) x (tip I.D.in micron)3 x (Pressure in psi) x (Time in sec)
Universal Switching Power Supply
16
Har vard Apparatus Model PLI-100A Pico Injector User's Manual
The PLI-100A is equipped with a universal AC input 9 volt 6 watt DC output power
supply with interchangeable input blades.
Figure 1.Wall adapter with interchangeable input blades
blade lock
1. Slide the blade lock in the direction
of the arrow with one hand and lift
out the contact protector with your
other hand.
Figure 2. Remove contact protector
Rounded
corners
2. Align the rounded corners of the
input blade being installed with the
rounded corners on the adapter.
3. Lower the square corners of the
blade into the adapter.
4. Pull back on the blade lock and
lower the rounded corners into
adapter, release the blade lock.
Figure 3. Install input blade
Figure 4. Complete assembly
Publication 5403-004-REV-E
www.harvardapparatus.com
Footnotes and References
17
2. Palmer, M.R. et al.,“Physical and physiological characteristics of micropressure
ejection ... from ... pipettes”. Neuropharmacology-y 19, 931-938 (1980).
3. Hiramoto,Y. Exp. Cell Res. 27, 416-426 (1962). Pneumatic, micrometer syringe,
mercury. See Kiehart, D.P. Methods Cell Biol. 25, 13ff (1982) for a careful
explanation.
4. Graessmann. A. Exp. Cell Res. 60, 373-382 (1970).
5. Mario Capecchi (private communication).
6. Dennis Stacey (private communication).
7. 10 micron pipettes would be suitable for frog oocytes, but there is little need for
the sizes between 1.5 and 10 microns.
8. Pipettes will have more than one taper angle if the pulling force and/ or heat
change during pulling. (Two stage pullers give two angles. for example.) Delivery
rate depends on the angle nearest the tip.
9. Stephens, D.L. et al,“ Easy to use equipment for the accurate microinjection of
nanoliter volumes into ... oocytes”Anal. Biochem. 114, 299-309 (1981).
10. Brinster, R. L.,et al, Proc. Natl. Acad. Sci. 82, 4438-4442 (1985), DNA into mouse
oocytes.
11. Webster,D. R., et al J. Cell Biol. 105, 265-276 (1987), tubulin into human fibroblasts and hamster ovary cells.
12. Palmer, M. R. et al, in Electrophysiological Techniques in Pharmacology, pages 169187 (1986),Alan R. Liss, Inc. Various materials onto mammalian neurons.
13. mRNA into Xenopus oocytes- see footnote 9.
14. Stacey, D.W. et al, Exp. Cell Res. 171, 232-242 (1987), ras protein into tumor cells.
15. Pasti, G., et al, Nature 324, 375-377 (1986), protein kinase C into Swiss 3T3 cells.
16. Silver, R.B. Proc. Nat. Acad. Sci. 83:4302-4306 (1986) antibodies into sand dollar
embryo
17. de Laat,A.M. and Blaas,J.Pl. Sci.50:161-169 (1987) cytoplasmic organelles into
plant protoplasts
www.harvardapparatus.com
Publication 5403-004-REV-E
Har vard Apparatus Model PLI-100A Pico Injector User's Manual
1. McCaman, R.E. etal “ A pressure system for intracellular and extracellular ejections
of microliter volumes” Brain Research 142, 141 (1977).
U.S.A.
France
Harvard Apparatus
Harvard Apparatus, S.A.R.L.
84 October Hill Road
Holliston, Massachusetts 01746, USA
Phone
(508) 893-8999
Toll Free (800) 272-2775
Fax
(508) 429-5732
E-mail
[email protected]
Web
www.harvardapparatus.com
6 Avenue des Andes
Miniparc – Bat. 8
F-91952, Les Ulis Cedex, France
Phone
(33) 1-64-46-00-85
Fax
(33) 1-64-46-94-38
E-mail
[email protected]
Web
www.harvardapparatus.fr
Warner Instruments, Inc.
Germany
1125 Dixwell Avenue
Hamden, Connecticut 06514, USA
Phone
(203) 776-0664
Toll Free (800) 599-4203
Fax
(203) 776-1278
E-mail
[email protected]
Web
www.warneronline.com
Hugo Sachs Elektronik
Coulbourn Instruments
5583 Roosevelt Street
Whitehall, Pennsylvania 18052, USA
Phone
(610) 395.3771
Toll Free (800) 424-3771
Fax
(610) 391-1333
E-mail
[email protected]
Web
www.coulbourn.com
Canada
Harvard Apparatus, Canada
6010 Vanden Abeele Street
Saint Laurent, Quebec, H4S 1R9, Canada
Phone
(514) 335-0792
Toll Free (800) 361-1905
Fax
(514) 335-3482
Toll Free (800) 335-0792
E-mail
[email protected]
Web
www.harvardapparatus.ca
Harvard Apparatus GmbH
Gruenstrasse 1
D-79232, March - Hugstetten, Germany
Phone
+49 (0)7665 92000
Fax
+49 (0)7665 920090
E-mail
[email protected]
Web
www.hugo-sachs.de
Spain
Panlab, S.L.U.
Harvard Apparatus Spain
C/Energia, 112
08940 Cornellà, Barcelona, Spain
Phone
34.934.750.697 (International Sales)
Phone
934.190.709 (Sales in Spain)
Fax
34.934.750.699
E-mail
[email protected]
Web
www.panlab.com
U.K.
Harvard Apparatus, Ltd.
Fircroft Way, Edenbridge
Kent TN8 6HE, United Kingdom
Phone
(44) 1732-864-001
Fax
(44) 1732-863-356
E-mail
[email protected]
Web
www.harvardapparatus.co.uk