1
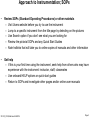
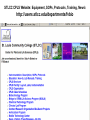
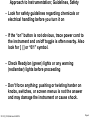
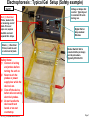
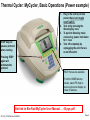
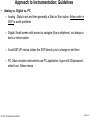
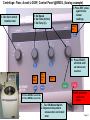
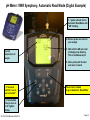
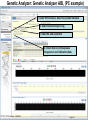
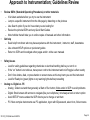
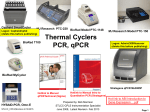
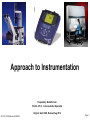
Approach to Instrumentation
Prepared by: Bob Morrison
STLCC-CPLS , Instrumentation Specialist
Original: April 2008, Revised Aug 2014
STLCC_CPLS;Morrison 8/25/2014
Page 1
Approach to Instrumentation; Guidelines
• Review SOPs (Standard Operating Procedures)
• Safety Issues
• Analog vs. Digital vs. PC
• Get help
STLCC_CPLS;Morrison 8/25/2014
Page 2
Approach to Instrumentation; SOPs
•
Review SOPs (Standard Operating Procedures) or other materials
– Visit Users website before you try to use the instrument
– Jump to a specific instrument from the title page by detecting on the pictures
– Use Search option if you don’t see what you are looking for
– Review the pictorial SOPs and any Quick Start Guides
– Note hotlinks that will take you to online copies of manuals and other information
•
Get help
– If this is your first time using the instrument, seek help from others who may have
experience with the instrument: instructor, staff, classmates
– Use onboard HELP options or quick start guides
– Return to SOPs and investigate other pages and/or online user manuals
STLCC_CPLS;Morrison 8/25/2014
Page 3
STLCC CPLS Website: Equipment, SOPs, Protocols, Training, News\
http://users.stlcc.edu/departments/fvbio
STAY IN TOUCH: Send comments or suggestions
to:
Bob Morrison, Instrumentation Specialist
Contact [email protected]
Cepheid SmartCycler
MJ Research PTC-220 BioRad Model PTC-1148
Logon: Cepheid/cphd
(delete this before publishing)
MJ Research Model PTC-150
Thermal Cyclers
PCR, qPCR
Standard Operating Procedures
BioRad MyCycler
Select Picture to Jump to that Section/device
Stratagene qPCR Mx3005P
HYBAID-PCR, Omn-E
STLCC_CPLS;Morrison 8/25/2014
Prepared by: Bob Morrison
FVCC, Instrumentation Specialist
June 2008, Latest Revision Oct 2011
Logon: Admin/3000hanover
(delete this before publishing)
Page 5
Approach to Instrumentation; Guidelines, Safety
– Look for safety guidelines regarding chemicals or
electrical handling before you turn it on
– If the “on” button is not obvious, trace power cord to
the instrument and on/off toggle is often nearby. Also
look for [ | ] or “0/1” symbol.
– Check Ready/on (green) lights or any warning
(red/amber) lights before proceeding
– Don’t force anything; pushing or twisting harder on
knobs, switches, or screen menus is not the answer
and may damage the instrument or cause shock.
STLCC_CPLS;Morrison 8/25/2014
Page 6
Electrophoresis : Typical Gel Setup (Safety example)
On/Off
Red ( +) Electrical
Probe; leads to far
or receiving end of
plate. If lose or
pops out, expose
metallic end and
expand thin strips.
Black ( – ) Electrical
Probe; leads to well
or start end of plate
Safety Notes:
1) Connect all wiring
and probes before
turning the unit on.
2) Never touch the
probes or power
supply box while the
device is on.
3) Turn off the device
before disconnecting
electrical probes.
4) Do not handle the
device with wet
hands or on wet
countertop.
STLCC_CPLS;Morrison 8/25/2014
Voltage or Amps dial
control. Typically set
to maintain 95 volts
during run.
Digital Volt or
Amp readout
Window
Rocker Switch: Set to
constant Volts (or Amps)
per lab procedure.
Typically 95 Volts DC.
Page 7
Electrophoresis: E-gel Basic Operations
(SOP and Safety example)
1.
2.
3.
4.
5.
6.
7.
8.
9.
10.
11.
Before putting an E-gel cartridge in the powerbase, attach the circular end plug of the power adapter
cord into the hole in the base and then plug the adapter itself into the 110V outlet. A brief self-test of
flashing lights and beeping will occur, then no lights until step 2 is completed.
Insert the E-gel cartridge into the base right side first, then press the left side down. There should be an
click sound as the cartridge snaps into place and a steady red light will appear (Ready Mode). No button
pushes are required to reach this state.
A two minute “pre-run” with the E-Gel comb in place is required before you will load samples into
the wells. Press and hold either the 15 or 30 min button for a few seconds as the steady red light turns
into a flashing green light for the 2-minute run.
At the end of the “pre-run”, the flashing green light will turn to flashing red and a rapid beep will sound.
Press and release either button to stop the beeps and return to a steady red.
Remove the comb from the E-gel cartridge carefully lifting straight out and then clear up any gel residue
near the wells.
Prepare and load your samples into the wells per the E-gel manual guidelines.
For a single-comb gel, press the 15 min button, a steady blue light will appear for the duration of the
run.
For a double-comb gel, press the 30 min button, a steady green light will appear.
You may interrupt the run at any time by pressing either button once and then again to restart but you must
manually time the remaining portion to avoid overrunning the gel.
At the end of the run periods, the steady light will return to a flashing red light and beeps will sound. Press
either button to stop the beeping and return the light to a steady red.
Remove the E-gel carefully from the powerbase and you are now ready for the transilluminator and/or other
analysis. Bands will diffuse within 20 minutes however!
STLCC_CPLS;Morrison 8/25/2014
Page 8
Thermal Cycler: MyCycler, Basic Operations (Power example)
1.
2.
3.
STOP key will
pause a protocol
when running.
4.
Plug in the unit to provide
power, there is no toggle
on/off switch.
Turn on by pressing the
Stand-by key once
To put into Stand-by mode
conserving power, hold down
for > 3 sec
Turn off completely by
unplugging the unit, there is
no on/off switch.
Pressing STOP
again will
terminate the
protocol
HELP menus are available
From the HOME/startup
screen, select F5-Help to
review topics and display an
index of features.
Hot link to Bio-Rad MyCycler User Manual … 45 pgs pdf
STLCC_CPLS;Morrison 8/25/2014
Page 9
Approach to Instrumentation; Guidelines
•
Analog vs. Digital vs. PC
– Analog : Dials to set and then generally a Start or Run button; follow order in
SOP to avoid problems
– Digital: Small screen with arrows to navigate (like a cellphone), not always a
back or return option
– Avoid SETUP menus unless the SOP directs you to change or set them
– PC: More complex instruments use PC application, logon with ID/password,
select Icon, follow menus
STLCC_CPLS;Morrison 8/25/2014
Page 10
Centrifuge: Floor, Avanti J-20XP, Control Panel @BRDG, (Analog example)
3. Set dial to match
installed rotor
4. Press SET, press
again to see
Actual
readings
5. Set Speed
6. Set Time (hr/min)
7. Set Temp (C)
Actual
Set
10. Press START;
will blink until
set values are
reached.
Max
Slow
Max
Slow
Off
Door
STOP; will blink
until rotor
stops
8. Press ACCEL to set rate
9. Press DECEL to set rate
STLCC-CPLS:Morrison 8/25/2014
1. Turn ON MasterSwitch
2. Depress foot pedal to
release door and install
rotor
Page 11
pH Meter: VWR Symphony, Automatic Read Mode (Digital Example)
3. System should start in
Automatic Read Mode with
“AR” blinking
4. Remove probe and insert in
your sample
Current
Temperature of
sample
5. Wait until the AR and small
pH display stop blinking.
This is the Measured pH.
6. Rinse probe with DI water
and return to stand
1. Press and
hold for 2 sec to
turn unit on/off
Press once if needed
to go to Automatic Read Mode
2. Press bottom
of key to turn on
or off lighted
display
STLCC-CPLS;Morrison 8/25/2014
Page 12
Genetic Analyzer: ABI
Maintenance,
Calibration, and Supplies
ABI 3500 Genetic Analyzer
(PC Driven Instrument)
ABI @BRDG, R126B
Windows Logon ID: 3500-User
Password: 3500-USER
Supplies
Delete LOGON boxes
before publishing)
3500 Run/Data Acquisition Logon ID: Administrator
Password: Administrator1
Sequence Analysis Logon ID : SLCC3500
Password: password
Gene Mapping Logon ID :gm
Password: SLCC3500
Link to ABI 3500 User Manual…pdf (18mb)
STLCC_CPLS Morrison 8/25/2014
Prepared by: Bob Morrison
STLCC-CPLS, Instrumentation Specialist
Initiated: Sep 10, Last Update Jan 2012
Page 13
Genetic Analyzer: Genetic Analyzer ABI, (PC example)
1. Under Performance, Select Seq Install Standard
2. Select General Sequencing
3. Select 96, and A position
4. Check this box to Keep/save
Sequenced and Calibration Data
STLCC_CPLS_Morrison 8/25/2014
Page 14
Approach to Instrumentation; Guidelines Review
•
•
•
•
Review SOPs (Standard Operating Procedures) or other materials
– Visit Users website before you try to use the instrument
– Jump to a specific instrument from the title page by detecting on the pictures
– Use Search option if you don’t see what you are looking for
– Review the pictorial SOPs and any Quick Start Guides
– Note hotlinks that will take you to online copies of manuals and other information
Get help
– Seek help from others who may have experience with the instrument; instructor, staff, classmates
– Use onboard HELP options or quick start guides
– Return to SOPs and investigate other pages and/or online user manuals
Safety Issues
– Look for safety guidelines regarding chemicals or electrical handling before you turn it on
– If the “on” button is not obvious, trace power cord to the instrument and on/off toggle is often nearby
– Don’t force knobs, dials, or press harder on screen menu as this may harm you and the instrument
– Look for Ready/on (green) lights or any warning lights before proceeding
Analog vs. Digital vs. PC
– Analog : Dials to set and then generally a Start or Run button; follow order in SOP to avoid problems
– Digital: Small screen with arrows to navigate (like your cellphone), not always a back or return option
– Avoid SETUP menus unless the SOP directs you to change or set them
– PC: More complex instruments use PC application, logon with ID/password, select Icon, follow menus
STLCC_CPLS;Morrison 8/25/2014
Page 15
Join Us on FACEBOOK
for News on Plant and Life Sciences
Search for: FVBiotech or Stlcc-fv Biotech