1
User Manual
v1 .0
Android OS 4.0
1.
2.
3.
3.1
4.
4.1
4.2
4.3
5.1
5.2
5.3
5.4
Online Video..........
5.5
5.6
5-7
5.7.'14 Gallery.....
...7
USER MANUAL
1.
x
USER MANUAL
v1.0
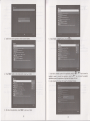
Functional Gharacteristics
2.
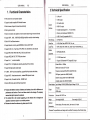
Technical Specification
With android 4.0 smart Operation System
X Support to install compatible APK Android firmware
Expand
X Built-in browser, Support to browse the web directly
lnterface
X
Built-in genuine thunder
X
Built-ln rich network video platform to find the wanted video through the search directly
x
Support 720P. 10801. 1080P(1920x1o80)High-definition
X Built
resolution video decoding
in Wi-Fi and External antenna
X Support network commonly used RM/RMVB-HD format,1920.1080P
X Support H.264, VC-1,
Real Video, VP6, MPEG-1I214, DivX4/5/6 etc video decode
X Support MP3, WMA, WMV AMR, AAC, OGG etc audio format
HDD Formats
Video files
Audio Files
Subtitle
SubDorted
X Support JPEG BMR GlF, TIFF, PNG photo format
X Support *.srt
.
*.sub format subtitle
LAN
e
s
6
A
6
I
s
S
&
&
LAN port"1
6
SRT,SUB,SMT,SSA
I
I
Support USB external Wi-Fi Dongle:8o2.11b/g/n
CVBS output
Rl/L audio output
HDMI 1.3 output
Coaxial output(support5.1. 711 soundtrack)
Memory card slot(support SD/MMC Pro)
USB 2.0 host*2 (compatible USB 1.'l)
NTFS/FAT32
H.264, Real Video, MPEG-11214, Divx, etc
MP3, WMA, WMV, AMR, AAC, OGG Vorbis, PCM/ADPCM, etc
10i100 Network card
X Support DTS. AC3 Digital audio decoding, decoding UR track directly
Bit rate 32Kb/s
X Support the digital audio coaxial output
Stereo audio output:2.0V
X For MKV. TSffP etc format video files, supports Multi-Audio-track switch freely
Frequency response:20H2-20KHz <2db(1 KHz 0db)
Specs
X Support WlFl. lnfrared remote control. wireless/USB keyboard mouse
x
Support U
X
Built-in USB (host), external USB port requirement.
*
*
*
320Kbis
* 0.2Vp
SNR signal: greater than 80dB(1 kHz0dB)
Dynamic range: greater than 80 dB(1 kHzodB)
disk. Moveable hard disk. SD/MMC card
Products with Different version of Software and hardware, there will be differences in
performance and functions. There is no further notice for the changes' The company
reserves the right to improve the products.
The Android OS is with constant upgrading, so the software will be changed and
upgraded, Customers subject to our available products.
Pictures and content for reference only, please prevail in kind'
-
crosstalk: greater than 80 dB(1 kHzodB)
Power Adaptol
lnput Voltage: 1 00-240V,50/60Hz,Output Voltage: 5.2V 2A
AV outout
Outpul
HDMI output
Product size
Unit size:145.145*27 mm
Weiqht
Unit
Standard
weioht:0.462Kc
Gross weioht:1.023 KG
Power adaptor, lR remote control, User manual , AV cable
Accessories
Remarks: The speciflcations and designs will be modified if necessary without further notice.
USER
3.
MANUAL
V1.O
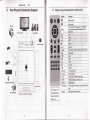
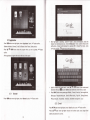
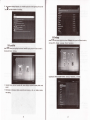
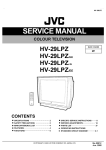
Host Physical Connection Diagram
3.1
Exterior view and instruction for remote control
Button
Function
o
Power on/off
@
d\h
INFO
qP
5.lAmplifier
HD TV or SO
Mute control
Pour lire les fichiers appuyez sur ce boutton,
vous verrez toutes les informations pour le
fichiers lus
.UP
^.
Y
DoWN
LEFT
a
\
RIGHI
\
\ll
sq-+nl
t1
/
@
ENTER
HOME
Main Screen Theme / Starter system SWITCH
,ll
BreakJenter
t3
Il*l
wn
USB INPUT/STORAGEI.f-
{-J
I
l{
r;r
BACK
)}l
NEXT
t{
PREV
}}
{(
Forward
Rewind
Volume+
Volume increase
Volume-
Volume reduce
Track
switch over the different audio track
MENU
DisDlav oDeratinq in the menu bar
Subtitle
Subtitle switch
Number key
enter to search information and browse the web
site
CLEAR
Remove the entered contenl
iil
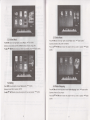
4.lnitial usage
4.1 Power and Remote
5.
Operation Menu
5.1
control operating range
* Before turn it
off, please keep the device is in "standby" status in case of destroyed.
*
We suggest taking off the adapter if you don't use it for a long time.
" Remote control operating range is within 7 meters from the front panel to the player, angle is
within 60 degrees;
* Remote
control distance will be affected by the ambient light and the obstructions.
robot body ,wait about 15 seconds, you can see the login screen, about 20 seconds after, it will
be launched. The player has two systems: Main Screen Theme/Launcher. Go to the Main
Screen Theme system, the main menu goes to: Video, Music. Dating. News. Shopping.
Application. Localfile. Settings.
4.2 Connection
A.
When connecting the video input to a TV set, connecl the CVBS video output terminal to the
display device; connect the L / R audio output terminal to the L / R input terminals of the
display device.
B.
When connecling to a HDMI TV Set, connect the HDMI interface to the TV HDMI interface.
When the operation of plugging the HDMI interface does, please turn off the player and
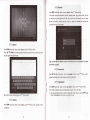
Main Screen Theme
Plug in the power supply, it means power on when the icon light is figured in the middle of the
power off. Otherwise, it may courses the damage of some electronic elements
C.
D.
Plug the HDMI and AV terminals into the display device together, may cause abnormal
images.(Recommended to use one terminal output)
There are two USB ports on the right side of the player's front panel. The two USB ports are
with HOST function. HOST can be connected to U disk, Mobile Hard Disk and other
extension witfr USg interface. However, please notice that you can only plug-in one external
hard disk. There is a multi-function card slot, compatible with SD card and MMC cardr Just
)
:t
i
i
I
insert it correctly.
il
4.3 Upgrade feature
I
The upgrade function is: to make the upgrades to the latest version:
.!
.:.
On the top side of the screen is the submenu of the main menu choice.
The function of the down side of on the screen is; back , main menu, in processing program,
Beijing Time (it will update Beijing time from the net when it working )and the condition of net
1,
Copy the update file to SD card firstly
2.
3.
PUtSD card into card slotand connectwith HDMI cable ;
There are small hole in the right side of the device , use some slim (like toothpick )put into
the small hole ,not release it until connect with electronic and see the menu ;
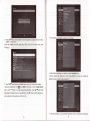
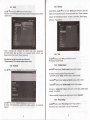
5.2 Online Video
;
4. The device will go to update menu automatically, and will show progress bar
5, Device restarts automatically after finish the progress
6. After update need set "open setting", can choose the function which users need.
;
;
Tips: Do not cut off lhe electronic when in the progress of updating , otherwise it will
leads firmware refresh failed to make the machine meet an unexpected problem .
press
"{'/"}
buttom move high-lighter, choose "Video" choose+-J"confirm.
Submenu can devide as: YouTube, IMDB, iDesktop, blinkx, allmovie;
pressA"/"V"/"{"/"}
buttom go to your desire video website,€"buttom for confirm
U
5.5 Online News
5.3 Online Music
Press{"/"}
button move highlighter, choose "Music",
"#'for
Press
confirm
.
Submenus can be divided as: MP3, GARMMY allmusic, emusic, songza, ilike
PressA"/"V"/"{"/"}button choose your desire music website, press "<J"button confirm.
"{"/'}"button move high -lighter, choose "News" option, "+r" button confirm.
Submenus divided as: BBC, CNN, FOX NEWS
"A"/"V"/"{"/"}"button choose the program which you want to operate, "#"button
Press
confirm.
5.4 Dating
Press"{'/"}"move high-lighter, choose "Dating" option, "<J"confirm.
5.6 Online Shopping
"{"/"}button move high-lightei choose "Online Shopping" option, "#"button confirm
Submenu divided: MSN, Facebook, SKYPE.
Press
pressA"/"V"/"{"/"}"button choose the program which you need operate, "#"confirm
Submenu divided as: Ebay, Amazon
press "1,"/"V"/"{"/"}"Outton choose the program which you want to operate, "+J"button
confirm
6
,i
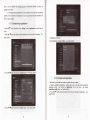
5.7 Application
Press
Move high-lighter to searching , press"#" button , shows swift keyboard, choose the
keyboard icon exchange input way , choose "setting input " choice , system will back to the
setting menu , choose Android keyboard or Japanese IME or Google Pinyin input , press
"{"/"}button move high-lighter, choose "Application" option, "d"button confirm.
Submenu divided as: Browser, E-mail, flle Browser, Music Player, Gallery and etc.
press "A"/"V"/"{"1"}"Uutton choose the program which you want to operate, "#"button
confirm;
All the applications or games will show on the menu of this optlon
()or:g[e,,,,,
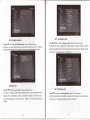
5.7.1
Press
Browser
+
lnput the content which need search , press "L"fY"f<"f>"button on the remote-control
press "delete" button delete the content which you input
and choose this icon
*
Press"MENU"buttonshowoperatepage:Refresh,
(E)or
Share page. Request desktop
"{"/"}button move high-lighter, choose "Browser" option, "d"button confirm
Forward. Newtab, Newincognitotab.
site. Save for offline reading, Page info. Settings(General.
Privacy & security, Accessibility. Advanced. Bandwidth management, Labs)
5.7.2
E-mail
Press "<("/")"button move high-lighter, choose "E-mail" option, press
#"button
confirm
press "4"/"V"button move high-lighter choose email address option, input Google email
address and password to connect.
10
ll
C[:
play forward of the video
+ fil: ptay back of the video
* Ill: play forward music
+ EII: play next music
* 6: Repeating-/Folderrepe-/Random
+ Press "volume -/+" button , low/high volume
* Press "back" button go to last page
5.7.5
Gallery
Press"{"/"}"button move high-lighter, choose "Gallery" option , press"#"button to confirm
system show all the file on the storage device ,press"A"l"V"l"{"1"}outton
you need , press
5.7.3
Press
"#"button
for play
File Browser
"{"/"}"button move highJighter, choose "File Browser" option, press"d"button confirm
choose
"#'button
,
choose the picture
,
to make sure go to this options to see all the file of system and move storage
device ,operation is the same as 5.9 local file.
5.7,4 Music player
eress "{"/"}"button move high-lighter, choose "music player" option, press
"d"button
make
sure again, system shows all the file in the storage device, press "A"/"Y"button choose the
music which you want to play,
"d"button for play
.
Press "MENU" button shows operate page:
Confirm play, system go to scanning mode automatically
* [E:Pause or play picture before projector mode
* E:Stop the projector mode to play the picture
* [II:Play forward picture
+ f,[:Play next picture
+ EE:rotder repeaUsingle repeavNo repeat
+ H:Wnen playing the projector mode , can setting
the stop time :3 seconds/S seconds /10
seconds /Manual
Efl:When playing the projector mode , can setting the play mode:Normal/Random
Press "MENU" button show operate menu:
On the middle of down left side show the total time and playing time of the music
[E' Par." or play music
E:
*
+ f,[:turn off the picture:Normal/g0 degrees/180
+ El:zoom in /Zoom out
* Press "back" button back to the last page
5.7.6 Market
degrees /270 degrees
Press"{"/"}"button high -lighter, choose "market" option, press"+"button confirm
stop play the music
12
13
This option can download applicattons or games, you need create a Google email before you go
to this function, next is logn in step:
1, There are tips after you go to the system: you must add a account to proceed, do you want to
add one? choose "yes",press
"+r"button
2, add Google account, choose "next",#"confirm
3, choose "create" option , create a Google accounl ; if you have , choose logn in option
,
d"confirm
4, combined with the system swift keyboard and digital button on the remote control, input the
user name and password
5, after the input, choose "complete" button, and then 'logn
in,#"confirm
6, logn completed!
7 choose "accept" option agree with Google play service rules:
5.7.9
8 create title and name; (can be optional)
9, setting completed, already logn in on the google play store page, can download any kind of
applications or games freely
Movie Player
press".("/")"button high -lighter, choose "Movie Player" option , press "d"confirm , system
will list all the files on the portable storage device, it will divided as the different form , press
"A"/"V"button choose the movie you want to play , #"confirm
5.7.7 Galculator
Press".("/',>"Outton high -lighter, choose "Calculator" option,#"confi rm
press
"A"/"V"/"{"/'}"button or with digital button input what you need calculate.
f:;ii"ilRr
il:l rounr
;
,.,
,.,.,,.
:rs,
i:l $vhi"
,I\
,Xrrx_8r,rf {iliiif IXSS$S{}{I :lt:t:iliii.iilxil,i$,X}li,
ffi
',i|,irffittffi
System list all the files on the storage devise, when you go to file scanning, will only show the
video format which can play.
After the finish the video, will automatic play next file, if go to the end, will back to the first
play all the video again.
*
5.7.8
PPPoE
Press"{"/"}"button high -lighter, choose "PPPOE" option,d"conflrm this function to go to
Broadband Dial-up.
Tips: when you dial-up, please be noted that the line which you connected must be the
line from Link, not from any distributor.
14
t5
.l
o
+
o
+
Ecnoo""
track mode
Eilop"n or close subtitles
Elcr,nn". show mode
ffiCne"rtile information
5.7.10 Settings
press"{"/"}"button high -lighter, choose "setting" option, press "d"button confirm, choose
this function can see the system and all the files on the portable storage device , operation like
5.9 local file.
5.7.1'l Upgrade
Combined the remote control can do as below when play the video
*
Press "retreat quickly" to play the video back, press "fast forward" to play the video
forward.
Press "volume -/+"button , lower /higher the volume
Press "one song on"/"play last video", press "the next song" plays the next video.
Press 'Xl" button pause or play the video
Press "back" back to last page.
Press "MENU" button show operate page , choose this icon ]E",can operate the functions as
*
*
*
follows
:
Copy the update firmware to the root directory of SD card
1. press"{"/"}"button choose "application" on the main menu , +:"button confirm
2. Press L"fY"ra"f)" button Ghoose "others" option , <J"button confirm
3. Press'.("/")"outton choose "upgrade" button , .J"button confirm
4. Choose "Local Upqrade" , <J"button confirm
5. Press "A"/"V" choose update applications , then press "V"choose "choose update pack"
option
6.
7,
Press
, +J"button confirm
"A"/"V" choose "restart and install update pack" option , and press "V" choose
"update need restart " and then press "+J"button to confirm update
Now the system will closed, and the screen will keep black for 2 minutes, and then go to
update menu.
System go to update menu , will show program bar in the middle , show update on the left
side
9. When the program bar disappeared , device keep black screen and restart , means the
update is completed
the progress bar disappear, automatic machine screen and restart, said the upgrade is
complete;
Tips: when on the AV mode, system closed, black screen means system is updating, device will
8.
10.
restart automatically and to go main menu means the update is finished. During the progress of
update, please do not cu1 offthe electronic, otherwise will leads the firmware refresh failed, and
make unexpected problems.
(This function is perfect, such as the need to upgrade the refer to 4.3)
5.7.12 Clock
press"<("/")"button high -lighter, choose, choose "Clock" option,#"button confirm.
Users can setting clock, play pictures, music, by proiector, exchange the system which you need
operate
16
t7
-Y
r$
5.7.15 Network
Press"{"f'}"button high -lighter, choose "network" option,#"button
confi rm
This function can see the share files , can edit , including :shear , copy , paste , delete , also line
up , including :line up as lhe name of the flle , line up as the time , line up as the size, or change
the way of checking , including :the way of line up , slightly mini actures; help (describe the
functions of the icons in the middle )
;N
r)
5.7.13 Search
Press"{'/"}"button high -lighter, choose "search" button,#"button confirm
eress
"A"/"V"t"{"/"}button move highlighter choose the content which you want to input, also
you can together with
Tips: connect with net neighbors, please confirm the line you are connected is the same
line with the computer.
5.7,16 Downloads
Press"{"/"}"button high-lighter, choose "Downloads" options, press"+"button confirm,
choose this function can see the progress of which you download.
5.7.17 Applnstaller
)
lI
Afterfinish the input, choose the "go" icon,d"button confirm
Press"{"/"}"button high -lighter, choose "app installer" option, press"#"button confirm
This function to download any kind of applications or games, here is the steps:
L.
Copy the applications which you want to install to the U disk /SD card , press "A"/"V'button
choose "/mmc/sdcard" option ,press ".r-t"confirm to scan
5.7.14 Gallery
Press"{"/"}"button high -lighter, choose "callery" option,d"button confirm, operate as same
as 5.5picture
18
t9
2.
Press "A"/"V"button move high-lighter choose the applications or games which you want to
installed, ".J" for choose
(lf you need installed more APK, please press "MENU" button on the remote control. press
4.
When
"+"button)
5. Afater finish the applications or installation , choose "complete" option
(After the program bar disappesred , icons of the applications just now you installed will
lightered as yellow , means installed completed
3.
)
Press "A"/"V"move high-lighter to "install" option, press "<-J" button confirm installed.
"[",press "MENU" button again , choosq "install/uninstall"
button , if no need install all the applications , press 'lA"/"V"button move
(after all the applications show
option , press
"#'
high-lighter to the place which you no need download
, press
")"
button cancel the applications
,
now the right side of the applications will not show tick )
6.
20
Finish the installation , you can operate the applications which you download or games freely
21
Tips: 1, can use computer visit: wwwAndroid"com to download the software, and copy it to
storage card to install
2, or download Android applications from other website, but there are some compatibility
problems of the smart device and applications, we can not guarantee that all the installation will
work in a good condition.
5.7.18 uninstall singer applications
Press "A"/"V"move high-lighter, choose "setting" choose "applications" uninstall steps as
below:
1
.
Press "A"/"V"move highlighter choose the applications which you want to uninstalled ,
button confirm
"#"
4
Applications uninstalling ...
5
Uninstall finished , choose "confirm",
"{J"
button confirm
5.7.19 Uninstall multi applications
This function is for uninstall multi function or games, here are the steps:
1,
Ready to uninstall the applications , need put the U disk or SD card which download the
applications before , then choose the "applications" on the main menu , and choose
"application install" option, "{-J" button confirm
2. Press "A"/"V" button choose the Udisk or SD card which storage the applications , "+r"
button confirm
a.
press
"{"/"}"button choose need "confirm" option , "+-r" button confirm
22
23
3.
System will list all the applications which has been installed
4,
Press "MENU" button on the remote control , press
"d"
button
6.
only need to uninstall a portion of the application, press the 'E 'l'V " keys to move the
highlight to need to uninstall the application, press the ") " f"y to cancel the seiected
application program, the application of rrght does not display a tick icon
7.
8.
5.
After tick all the applications , press "MENU" , press "<-J" button
Select "lnstall / uninstall"
when
9,
the progress messaqe disappears, be uninstalled application at the beginning of the icon for
" gray
rtll",
said the completion of unloading;
5.9 Settings
press".("/'|"button move highlight bar,choose "settings" option,press"+-r"button to enter
2ndmenu:Wi-Fi. Display. Language. Sound. Securityetc.
5.8 Local file
pr""s"{"/"}"button move highlight bar,choose "Local file" option,press'<J"button to enter
2nd menu:SD Card. USB sda.
+ Connect U-disk,
card and moveable dish, screen
in;
equipment, movies, photo, music
and all;
+
Edit include: in order(as per letters, revised time and size)copy. stick. cut. delete. rename.
new catalog;
in;
5.9.1
5.9.3 Ethernet
Wi-Fi
press" "/"V"button to choose "Wi-Fi",press"+:" button to enter ln;
this function can on/off Wi-Fi,setup network notification,display the researching wireless network,
readd wifi network
Connect Ethernet, press"A"/"V"buton to choose "Ethernet",press"<'J"button to enter in;this
function can set up:use Ethernet(on/off), Ethernet equipment(MAC add). Ethernet Configuration
(address). high Ethernet(Dynamic allocation, lP address. Subnet Mask. Default Gateway.
DNS service. Physical address).
Choose researched
and connected wifi network name, input
<J "button to be connected,if connect
aS:TP-LINK*4FD526, press"
password,such
OK,Wi-Fi name
display:connected;if can't connect, it display: disconnected.
Warm stips:there are two factors at the case of disconnect:
1. Wrong password;2, The connection wireless network closed;
5.9.4
press"A"/"V"button to choose "vPN",press"+-r"button to enter in;
This function can add VPN network.
5.9.5
5.9.2 Bluetooth
press"A"/"V"button
.J"buttonto on/off bluetooth
VPN
Portable hotspot
press"A"/"V"button to choose "Portable hotspot",press"+J"button
to enter in;
This function can become portable wifi hotspot, steps as below:
1. connect with Lan, enter "setting", Ethernet on,display"r/" display connected
2. press"A"/"V"button to choose "wireless and network",press"+J"button
to enter in;
3. press"A"/"V"button to choose "portable hotspot",press"sJ"button to enter in;
4.Put mark on "portable Wi-Fi hotspot" option,wait the screen display portable hotspot
connected... set up finished
5. After set up finished, the equipment use wireless network connect to "AndroidAP"
5.9.6
press"A"/"V"outton c.hoose
setting",press".J"button to enter in ;
this function on/off bluetooth,setup equipment.Fname,
uipment.Fname, testing
testinq equipment,
eouioment, scan researching
equipment
28
Proxy settings
press"A"/"V"button to choose "Proxy settings",press"<r"button to enter in;
this function can set up: Proxy hostname, proxy port, Bypass proxy for'
29
5.9.7
Sound
this function can check the internal storage space: Total space. Apps. Avaiiable /SD CARD: Total
press"A"/"V"button to choose "Sound",press"<J"button to enter in;this function can
setup:Volumes(Music. video. games. &media\ Ringtone & notifications\Alarms). Touch sounds,
space, Misc. Available, Unmount SD card. Erase SD card/tNTERNAL NAND STORAGE: USB
STORAGE. Total space. Available, Unmount USB storage.
Digital audio output(PCM. RAW).
5.9.10 Apps
5.9.8 Display
press"A"/"V"button lo choose "Display",press"+-r"button to enter in;this function can
setup:Wallpaper(Gallery. LiveWallpapers, Watlpapers), Outputmode(480. 576. 720. 1080).
Dual output mode(48ocvbs, 576cvbs). Display position(adjust the suitable screen
press"l"/"V"button to choose "Apps",press"+J"button to enter in
this function can check the internal installed apllications or games: DOWNLOADED. ON SD
CARD. RUNNING. ALL.
size), Font
size(Small. Normal. Large. Huge).
5.9.11 Accounts & sync
press"A"/"V"button to choose "display position",press"+r"button to enter in. this function
caadjust the suitable TV screen size, after setting, choose "confirm".
5.9.9
press"A"/"V"button to choose "Accounts & sync", press"<J" buton to enter in;
enter in Google account, to use this function.
Storage
press"A"/"V"button to choose "Storage",press".+-r"button to enter in;
30
31
5.9.14 Language & input
5.9.12 Location services
Press"A"/"V"button to choose "Location services", press".*-r"button to enter in;
this function can setup: Google's location service(Location determined by Wi-Fi). Location &
Google search(Let
search results
services).
Press"A"/"V"button to choose "Language & input", press"+r"button to enter in;
this function can setup: Language(setup system language). Spelling correction. Personal
dictionary. Default(English(US)- Android Keyboard). Android Keyboard(on/off). Remote controller
input method, Texfto-speech output, Pointer speed.
5.9.13 Security
Press"A"/"V"outton to choose "Security", press"<J"button to enter in;
this function can setup and check: Make passwords visjble, Device administrators(View or
deactivate device administrators). Unknown sources(Allow installation of non-Market apps).
Trusted credentials(Display trusted CAcertificates). lnstall from SD card(lnstall certificates from
SD card).
5.9.15 Backup & reset
Press"A"/"V"button to choose "Backup & reset", press"+J"button to enter in;
this function setup: Back up my data(Back up app data. Wi-Fi passwords, and other settings to
Google servers). Factory data reset(Erases all data on MediaBox).
33
5.9.18 Developer options
5.9.16 Date & time
press"A"/"V"button to choose "Date & time", press"d"button to enter in;
this function can setup: Automatic date & time(Use network-provided time). Set date('1018/2012),
Set time(8:13 AM). Select time zone(GMT+00:00, GMT+00:00). Use 24-hour format. Seltct date
Press"A"/"V"button to choose "Developer options", press"&r"button to enter in;
this function can check: USB debugging, Development device lD. Stay awake, Allow mock
locations. Desktop backup password. Strict mode enabled. Pointer location. show touches.
show screen updates. Show CPU usage. Force GPU rendering. Window animation scale,
Transition animation scale. Don't keep activities, Background process
format
limit. Show
all ANRs.
5.9.19 About MediaBox
Warmly stips: need to close "automatic confirmation date and time" first, than setup the
date and time
5.9.17 Accessibility
press"A"/"V"button to choose "Accessibility", press"#"button to enter in;
this function can setup and check: Large text. Speak passwords. Touch & hold delay. lnstall web
scripts.
Press"A"/"V"button to choose "About MediaBox", press"+-r"button to enter in;
this function can check: System updates, Status. Legal information. Model number. Android
version, Kernel version. Build number.