1
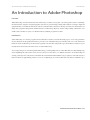
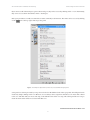
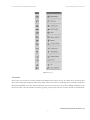
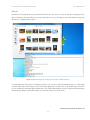
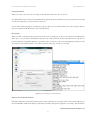
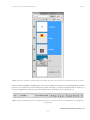
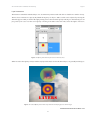
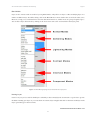
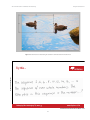
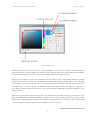
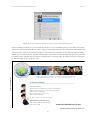
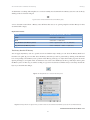
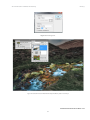
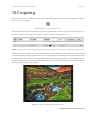
Steve Bark
An Introduction to Adobe Photoshop
Download free ebooks at bookboon.com
2
An Introduction to Adobe Photoshop
© 2012 Steve Bark & Ventus Publishing ApS
ISBN 978-87-403-0016-1
Download free ebooks at bookboon.com
3
An Introduction to Adobe Photoshop
Contents
Contents
An Introduction to Adobe Photoshop
6
1
Photoshop Panels and Tools
7
2
Basic Operations
13
3
Navigating and Zooming
21
4
Simple Global Adjustments
24
5
Layers 32
6
Simple Selections
41
7
Choosing Colours
53
8
Guides and Rulers
59
9
History
64
10
Cropping
70
11
Basic Printing
72
Please click the advert
Fast-track
your career
Masters in Management
Stand out from the crowd
Designed for graduates with less than one year of full-time postgraduate work
experience, London Business School’s Masters in Management will expand your
thinking and provide you with the foundations for a successful career in business.
The programme is developed in consultation with recruiters to provide you with
the key skills that top employers demand. Through 11 months of full-time study,
you will gain the business knowledge and capabilities to increase your career
choices and stand out from the crowd.
London Business School
Regent’s Park
London NW1 4SA
United Kingdom
Tel +44 (0)20 7000 7573
Email [email protected]
Applications are now open for entry in September 2011.
For more information visit www.london.edu/mim/
email [email protected] or call +44 (0)20 7000 7573
www.london.edu/mim/
Download free ebooks at bookboon.com
4
An Introduction to Adobe Photoshop
About the Author
About the Author
After leaving school in Sheffield, UK, Steve worked in the print industry for 10 years before being made redundant. He
decided to return to education and completed courses in many subjects including Information Technology, Business and
Finance, Sound Engineering and Music Production, Science and a BSc. in Biomedical Science.
After graduating, Steve had several jobs in various scientific fields including immunology and developmental genetics,
during which time he developed a keen interest in digital imaging which progressed into an interest in creative Photography.
After his current contract had expired, he undertook a course in Photoshop Artistry at the University of Sheffield. He
soon realised that he had already amassed a great deal of knowledge in this field and knew more about image editing
and processing than the lecturer. The lecturer asked if Steve would take over in teaching the course as he was leaving
for another position. He contacted the University and was given a position as an associate lecturer teaching Photoshop
Artistry, Computer Graphics and Advanced Digital Imaging.
Steve taught at the University of Sheffield for three years and then decided to pursue a career in providing bespoke training
and consultancy in Photoshop and Digital Photography. He has continued in this role for the past seven years.
Steve remains an avid consumer of knowledge and education and has completed over thirty online courses and has become
an Adobe Certified Expert in Photoshop and a respected Photographer in his own right.
Download free ebooks at bookboon.com
5
An Introduction to Adobe Photoshop
Introduction
An Introduction to Adobe Photoshop
Foreword
When Photoshop was first introduced back in February of 1990 it caused quite a stir amongst the creative community.
For the first time, designers and photographers were able to perform image editing tasks without resorting to high end
equipment that cost double the amount. It started a revolution that continues to this day. Over the years there have been
many other programs that perform similar functions to Photoshop. However, Adobe’s image editing software has seen
off all comers and after 21 years, it is still the industry standard program in its field.
Introduction
Adobe Photoshop is a massive program and it would take a volume of several thousand pages to cover every parameter
of every function. In this publication I aim to provide a tour of the Photoshop user interface and cover some of the basic
functions of Adobe Photoshop, in the form of a general overview. This will provide a good foundation to build on as you
read the more advanced books in this series on Adobe Photoshop.
As you begin the process of learning Adobe Photoshop, you will quickly come to realise that there are often multiple way
of accomplishing the same task. It is not necessary for you to learn the 5 or 6 different ways there are in Photoshop for
creating a new layer. You only need to remember the one method that fits with the way you prefer to work. This may be a
keyboard shortcut, right clicking, menus or icons, it’s completely up to you how utilise the tools that are available to you.
Download free ebooks at bookboon.com
6
An Introduction to Adobe Photoshop
Photoshop Panels and Tools
1 Photoshop Panels and Tools
Photoshop is modular in it is layout and it is infinitely customizable. In the default configuration, the panels are located on
the right hand side, the tools are on the left and the options bar which displays the most useful parameters for a selected
tool is across the top of the work area. There is also a standard menu bar at the very top of the application.
Workspaces
All of the program elements, with the exception of the menu bar, can be dragged around and docked with other panels
to create your own custom work area called a workspace. There are a number of pre-set workspaces that can be selected
from the right hand side of the menu bar, the default workspace is called “Essentials” and can be recalled at any time
by clicking on the button. This is very useful because beginners will often accidently close or collapse panels and can’t
remember how to restore them.
Fig 1.1 the default Photoshop workspace layout
Fig 1.2 a close up of the workspaces available from the top right corner of the menu bar
Download free ebooks at bookboon.com
7
An Introduction to Adobe Photoshop
Photoshop Panels and Tools
If you cannot see all of the workspace options shown in f ig 1.2, they can be accessed by clicking on the >> icon. Alternatively,
they can be accessed from the Window menu > Workspace.
Each open panel has its own fly-out menu that contains commonly used functions. The menu can be accessed by clicking
on the
icon at the top right of the respective panel
Fig 1.3 an example of a fly-out menu, in this case, accessed from the layers panel
Some panels are often represented by a strip of icons docked on the left hand side of the open panels. The full panel can be
revealed by simple clicking on the icon. However, it is not always clear to beginners what these icons mean. The solution
to this is to left-click with you mouse and drag on the left hand side of the icon strip. This will expand the icon strip to
reveal the name of the function associated with that icon.
Download free ebooks at bookboon.com
8
An Introduction to Adobe Photoshop
Photoshop Panels and Tools
Fig 1.4 panel icons
The Tool Bar
The tool bar (or tool panel) is located by default on the left hand side of the work area. It contains mouse based tools that
are used for editing and navigation in Photoshop. Most of the tool icons have a small black down-pointing arrowhead in
the bottom right hand corner. This indicates that these are more tools that can be accessed by clicking and holding down
the mouse button. Once the extended tools have appeared, you may release the mouse button and the tools will remain.
Download free ebooks at bookboon.com
9
An Introduction to Adobe Photoshop
Photoshop Panels and Tools
Fig 1.5 an example of multiple tools, available from a single tool icon.
The tools in the tool bar are loosely grouped according to their functionality. You may notice that there are small lines
or spacers separating the groups of tools. The first group of tools are used for creating selections, the second group are
the pixel editing tools, the third group are the vector editing tools and the final group are the navigation tools. At the
bottom of the tool bar there is colour picker and very bottom is an icon that allows you to enter the quick mask mode
for creating and editing selections.
Selection tools. Navigation tools. Pixel editing tools. Colour picker Text and Vector editing tools.
Quick Mask mode
Fig 1.6 tool groupings
Download free ebooks at bookboon.com
10
An Introduction to Adobe Photoshop
Photoshop Panels and Tools
The Options Bar
The options bar is a context sensitive panel. Which is to say, that it changes depending on which tool is selected in the
tool bar. It provides access the most important configuration settings for a particular tool. For example, in fig 1.7 the
options bar has changed to provide the attributes associated with the Move tool. We have the show transform controls
and a range of alignment options, which are faded in appearance, because in this case, no layer was highlighted in the
layers panel.
Please click the advert
You’re full of energy
and ideas. And that’s
just what we are looking for.
© UBS 2010. All rights reserved.
Fig 1.7 the options associated with the move tool.
Looking for a career where your ideas could really make a difference? UBS’s
Graduate Programme and internships are a chance for you to experience
for yourself what it’s like to be part of a global team that rewards your input
and believes in succeeding together.
Wherever you are in your academic career, make your future a part of ours
by visiting www.ubs.com/graduates.
www.ubs.com/graduates
Download free ebooks at bookboon.com
11
An Introduction to Adobe Photoshop
Photoshop Panels and Tools
The Menu Bar
Fig 1.8 all of the menus and items located in the menu bar of the Photoshop standard edition
The menu bar contains many menu items and many sub menu items. The most important functions in the menu bar have
been assigned keyboard shortcuts which are customisable from the Keyboard Shortcuts section of the Edit menu. Many
of the functions in these menus are accessible from the Fly-out menus in the various panels. The option to work with
keyboard shortcuts, the menu bar or the fly-out menus is one of personal choice and is down to your particular workflow,
or may be determined by the type of input device you are using – mouse, graphics tablet or track pad etc.
We will cover many of the menu items in detail in subsequent chapters, and some of the more advanced menus in
subsequent books.
Download free ebooks at bookboon.com
12
An Introduction to Adobe Photoshop
Basic Operations
2 Basic Operations
Opening Files
Open
As with most programs, the option to open a file can be found in the File menu, fig 2.1. This operation also has a keyboard
shortcut Ctrl-O/Cmd-O (PC/Mac).
Fig 2.1 opening a file from the file menu
Once you’ve selected to open a file, the Open dialogue box will appear. From here you can navigate to your files and
images, fig 2.2.
Fig 2.2 the Open dialogue box
Download free ebooks at bookboon.com
13
An Introduction to Adobe Photoshop
Basic Operations
Open As
In addition to the standard Open option in the File menu, there is also choice to Open As. The Open As dialogue box is
almost identical to the Open dialogue box, except that it allows you open an image in one format and have it appear in
Photoshop as a different format, Fig 2.3.
Fig 2.3 the Open As dialogue box, showing some of the many available file formats.
A useful application of the Open As command is that you can open most single layered file formats as a Camera Raw
document. This will open the image into the Camera Raw plugin (fig 2.4) that is part of Abobe Photoshop. From here
you can quickly and easily make simple adjustments to your image without having to get into complex editing techniques
in Photoshop. Editing in Camera Raw will be covered in the second book in this series.
Download free ebooks at bookboon.com
14
An Introduction to Adobe Photoshop
Basic Operations
Fig 2.4 Camera Raw
Open As Smart Object
The third option is to use Open As Smart Object. A Smart Object allows non-destructive editing of your image and is
useful if you are planning on making extreme edits or multiple transformations, such as scaling, to your image. Smart
objects appear in the Layers panel with a small icon in the bottom right hand corner and if you apply a filter to them,
they will display the filter below the layer fig 2.5. The application of a filter to a Smart Object is not permanent and the
settings can be changed at any time by double clicking on the filter name in Layers panel.
Download free ebooks at bookboon.com
15
An Introduction to Adobe Photoshop
Basic Operations
Fig 2.5 a Smart Object
There are several other ways of getting an image into Photoshop, including simply dragging an image onto the work area.
You can also use one of the two file browsing options; Bridge and Mini-Bridge. Adobe Bridge and Mini-Bridge will be
Please click the advert
covered in detail in the second book in this series.
Download free ebooks at bookboon.com
16
An Introduction to Adobe Photoshop
Basic Operations
Saving Your Work
When you need to save your work you will go to the File menu and choose Save or Save As.
Save: If the file has been saved previously, the file will be updated. If the document has not been previously saved you will
see the same dialogue box as if you had pressed Save As.
Save As: This command brings up a dialogue box (fig 2.6) where you can name the file, choose the properties that you
wish to be included in the file and also choose the file format.
File Formats
When you click on the Format drop down menu in the “Save As” dialogue box (fig 2.6) you will notice that Photoshop
allows you to save your file in many different formats. Some of these formats are now redundant and are only there to
provide backwards compatibility. Others are specialist formats used in areas such as medical imaging. In reality you only
need to know a few of these formats – the number depends on the type of work you are doing.
Fig 2.6 the Save As dialogue box and file formats
Popular and Useful File Formats:
PSD: This is Photoshop’s native file format and if you only use Photoshop as you image editor, it’s the one that will give you
the most flexibility. It will retain all layers, adjustments and effects that you have applied to your image. This format also
Download free ebooks at bookboon.com
17
An Introduction to Adobe Photoshop
Basic Operations
supports high bit depth filed up to 32bits. The file sizes for high bit depth files can be extremely large so think carefully
before you consider saving your image in anything other than 8bits.
TIFF: Tagged-Image File Format (TIFF, TIF) has most of the same attributes as the PSD format (when opened in
Photoshop). This format is useful for its compatibility with almost all software that will open image data. It also allows
the use of several different compression methods to reduce the size of your file.
JPEG: Joint Photographic Experts Group (JPEG, JPG) format is mostly used for images that will be displayed on screen
or the web. This file format uses “Lossy” compression, which is to say, that data is lost during the compression process
resulting in a much smaller file, but may also compromise image quality. If your camera only takes JPEG images I
recommend that you save the image as a PSD during the editing process, as repeatedly opening and saving JPEG images
causes recompression of the images and can severely degrade the data, resulting in very noticeable compression artefacts.
GIF: Graphics Interchange Format (GIF) is used to display indexed colour mode graphics. This file format may only
contain 256 colours so it is not commonly used for photographs. However, it has several characteristics that have made
it very popular in web graphics.
• Small file size
• Supports transparency
• Supports animation
PNG: Like the GIF format this format is commonly used for web graphics. The PNG format is a lot more flexible in its
support for 24bit photographic images and alternative colour modes than the GIF format. However, it is not as widely
supported in web browsers.
We will look at the JPEG, GIF and PNG formats in more detail when we cover saving images for the web in book three
of this series.
PDF: The Portable Document Format (PDF) is very useful for displaying files across multiple platforms and applications.
It has the benefit of supporting compression, 16bit format and common colour modes, whilst retaining font, vector, raster
information and Photoshop editing (if selected).
Creating a New Document
You can create a new document by selecting New from the File menu or by using the keyboard shortcut Ctrl-N/Cmd-N
(PC/Mac). The New dialogue box allows you set all of the parameters for your new document and has a number of presets
to get you started, fig 2.7 and fig 2.8. It is important to set up your document correctly. For example, you need it to be
at the correct size and resolution for its intended purpose. If you select a paper size preset, it will automatically set the
resolution for print. Likewise, if a web preset is selected the resolution will be set accordingly.
Download free ebooks at bookboon.com
18
An Introduction to Adobe Photoshop
Basic Operations
Fig 2.7 the New dialogue box and Preset options
Please click the advert
Shaping tomorrow’s world – today
Our business is at the heart of a connected world – a world
where communication is empowering people, business and
society. Our networks, telecom services and multimedia
solutions are shaping tomorrow. And this might just be your
chance to shape your own future.
It’s a people thing
We are looking for high-caliber people who can see the
opportunities, people who can bring knowledge, energy and vision
to our organization. In return we offer the chance to work with
cutting-edge technology, personal and professional development,
and the opportunity to make a difference in a truly global company.
We are currently recruiting both new graduates and experienced
professionals in four areas: Software, Hardware, Systems and
Integration & Verification.
YOUR CHANCE
TO CHANGE
THE WORLD
Are you ready to shape your future? Begin by exploring a career
with Ericsson. Visit www.ericsson.com/join-ericsson
Download free ebooks at bookboon.com
19
An Introduction to Adobe Photoshop
Basic Operations
Fig 2.8 International Paper and Web size options
There are other options in the New dialogue box that also need to be determined:
• Colour Mode – For example, RGB for web design and photography and CMYK for commercial print
• Bit Depth – 8 bit is generally fine unless you are intending to perform some major image editing or have a
lot of gradients in a design, in which case it would be better to work in 16 bit mode and then convert to 8
bit once the editing process is completed. Web graphics must be 8 bit.
• Background Contents – This determines the colour of your background layer.
Under the Advanced section of the dialogue box there are two options:
• Colour Profile – you should leave the colour profile set to sRGB except for those wishing to do advanced
photographic work, in which case you may wish to use Adobe RGB or ProPhoto RBG.
• Pixel Aspect Ratio – in almost all cases this should be set to Square Pixels. Rectangular pixels are only
generally used to correctly display widescreen video content.
When you click OK, you will have a new empty document with a single layer.
Download free ebooks at bookboon.com
20
An Introduction to Adobe Photoshop
Navigating and Zooming
3 Navigating and Zooming
The Navigator Panel
When you are zoomed in to and image in Photoshop it is easy to lose where you are. By quickly checking the Navigator
panel, the red square (fig 3.1) will indicate the zoomed area. Navigation can also be undertaken by dragging the red
square to a new position.
Fig 3.1 the Navigator Panel
The Hand Tool
The Hand tool is used for moving the image around whist zoomed in. In CS5, flick panning is possible and can be enabled
or disabled in the general preferences dialogue box which is found in the Edit menu on the PC, or the Photoshop menu
on the Mac. If you are performing some close up editing and need to quickly access the Hand tool, holding down the
Space Bar will temporarily select the tool, your original too will be reinstated once the Space Bar is released.
The Zoom Tool
When the zoom tool is selected, the default setting is to enable you to zoom in to an image in two ways:
• Click on the desired portion of the image to zoom in predefined increments.
• Click and drag to define a particular area that you wish to zoom in on.
Download free ebooks at bookboon.com
21
An Introduction to Adobe Photoshop
Navigating and Zooming
When you wish to zoom back out, you can either click on the icon with the magnifying glass containing the minus symbol
(fig 3.2), or Alt/Option (PC/Mac) – Click to temporarily change the tool. The second method is preferable because unless
you remember to click on the zoom in icon (the one with the plus), you may zoom out when you want to zoom in the
next time that you come to use the tool.
Fig 3.2 the Options associated with the Zoom tool.
If you have the Scrubby Zoom option selected (fig 3.2) you can quickly zoom in to your image by clicking and dragging
to the right. You can then zoom back out by clicking and dragging to the left.
There are four buttons in the Zoom options that can help you navigate your image:
• Actual Pixels – shows your image at 100% magnification
• Fit Screen – zoom’s your image to fit the available work area, respecting the panels and tool bar
• Fill Screen – zoom’s you image to fill all the available work area without respect the position of any open
panels.
• Print Size – show the image at the size it will be printed based on the documents resolution setting.
The above four options are also available from the View menu.
e Graduate Programme
for Engineers and Geoscientists
I joined MITAS because
I wanted real responsibili
Please click the advert
Maersk.com/Mitas
Real work
Internationa
al opportunities
International
wo
or placements
ree work
Month 16
I was a construction
supervisor in
the North Sea
advising and
helping
foremen
he
ssolve problems
Download free ebooks at bookboon.com
22
An Introduction to Adobe Photoshop
Navigating and Zooming
Useful Keyboard Shortcuts
Experienced Photoshop users will often use keyboard shortcuts for navigating and zooming. I recommend that you try
to learn the following shortcuts, as it will speed up your workflow and productivity. It will also, ultimately, make using
Photoshop a more pleasant and rewarding experience.
Keyboard/Mouse Shortcut
Action
Ctrl + Alt/Option (PC/Mac) + 0
100% Magnification
Ctrl + 0
Fit Screen
Ctrl + Spacebar
Temporarily select the Zoom tool (Zoom in)
Ctrl + Alt/Option (PC/Mac) + Spacebar
Temporarily select the Zoom tool (Zoom out)
Spacebar
Temporarily select the Hand tool
Tab
Hide the Tool bar and Panels
Shift + Tab
Hide the Panels but keep the Tools
Page Up or Page Down
Scroll Up or Scroll Down the area contained within the screen
Shift + Page Up or Page Down
Scroll Up or Scroll Down in 10 units
Double Click on the Zoom tool icon
100% Magnification
Double Click on the Hand tool icon
Fit Screen
Download free ebooks at bookboon.com
23
An Introduction to Adobe Photoshop
Simple Global Adjustments
4 Simple Global Adjustments
In this section we are going to take a look at Global Adjustments. This means adjusting the whole image to correct colour,
contrast or exposure of an image. It can also be used a special effect to create a specific look.
There are two different way in which you can apply an adjustment to and image. The first is to go to the Image menu and
choose Adjustments:
Fig 4.1 the list of Adjustments available under the Image menu
There are 22 different adjustment that you can apply to you image from this menu. However, if you apply an adjustment
to your image and save it, the adjustment is permanent and destructive. The second method for applying an adjustment
is non-destructive and utilizes a special type of layer called an Adjustment layer.
Download free ebooks at bookboon.com
24
An Introduction to Adobe Photoshop
You can apply an adjustment layer by clicking on the
Simple Global Adjustments
icon at the bottom of the layers panel (if you can’t see your layers
panel press the F7 key to open it). Alternatively, you can create an adjustment layer from the Layers menu by choosing
New Adjustment layer. You can also apply an adjustment layer by clicking on the appropriate icon in the Adjustment list.
The Adjustment list is visible in the Adjustments panel if no adjustment layer is highlighted in the Layers panel.
Fig 4.2 the list of Adjustment Layers available from the Layer menu
You will notice that this time there are only 15 adjustments instead of the 22 we saw previously. However, with the exception
of Shadows/Highlights, we have all of the important adjustments available to us.
Download free ebooks at bookboon.com
25
An Introduction to Adobe Photoshop
Simple Global Adjustments
Fig 4.3 an Adjustment Layer in the Layers Panel and the Adjustment Panel
Once you’ve added the adjustment layer it will be visible as a new layer above your image in the Layers panel, fig 4.3. The
dialogue box for the adjustment will also appear in the Adjustments panel (if you can’t see the Adjustments panel, select
it from the Windows menu).
There are many different adjustments, but the most useful adjustments for beginners to start with are:
• Levels
• Hue/Saturation
Download free ebooks at bookboon.com
26
An Introduction to Adobe Photoshop
Simple Global Adjustments
Levels
Levels is an extremely powerful tool for adjusting exposure problems and can also be used to colour correct an image.
Fig 4.4 the Levels Adjustment
When you apply a Levels correction you will notice that there is a histogram, this is a representation of all of the tonal
values in the image. The black point slider on the left is set at 0 which is pure black and the white point slider on the right
is set at 255 which is pure white. This gives us a complete range of 256 possible values.
The middle Gamma slider works differently to the black and white sliders. If the Gamma is adjusted to the left (towards
the black end of the scale) the image will get lighter in the mid tones and the opposite will happen if you move it to the
right, the image will get darker in the mid tones.
Download free ebooks at bookboon.com
27
An Introduction to Adobe Photoshop
Simple Global Adjustments
Fig 4.5 the Levels histogram showing values from 0 (black) to 255 (white)
In this Histogram we can see that the dark values don’t go all the way to the black point on the left and the white values
don’t go all the way to the white point on the right. This means that there are no true blacks or whites in the image and
this may result in the image lacking in contrast. We can adjust this histogram by moving the black and white point inwards
to meet the beginning and end of the pixel values.
Fig 4.6 the black point and white point have been adjusted to give a full range of tones from black to white
Please click the advert
678'<)25<2850$67(5©6'(*5((
&KDOPHUV8QLYHUVLW\RI7HFKQRORJ\FRQGXFWVUHVHDUFKDQGHGXFDWLRQLQHQJLQHHU
LQJDQGQDWXUDOVFLHQFHVDUFKLWHFWXUHWHFKQRORJ\UHODWHGPDWKHPDWLFDOVFLHQFHV
DQGQDXWLFDOVFLHQFHV%HKLQGDOOWKDW&KDOPHUVDFFRPSOLVKHVWKHDLPSHUVLVWV
IRUFRQWULEXWLQJWRDVXVWDLQDEOHIXWXUH¤ERWKQDWLRQDOO\DQGJOREDOO\
9LVLWXVRQ&KDOPHUVVHRU1H[W6WRS&KDOPHUVRQIDFHERRN
Download free ebooks at bookboon.com
28
An Introduction to Adobe Photoshop
Simple Global Adjustments
The black and white values have been changed and in the left hand box the input value now reads 14. This means that
any pixel values of 14, or less, will be mapped to 0 (black). Similarly, the right hand input box now reads 238. This means
that any pixel values in the image of 238 or greater will be mapped to 255 (white). By moving these sliders inwards to
meet where the pixel values begin and end, we now have an image that contains a full range of values from pure black to
pure white. This results in an increase in contrast within the image.
If you are confident as to where your black points and white point should be in your image, you can select the appropriate
sample point selectors (commonly known as the eyedropper tools, fig 4.7) in the Levels dialogue box and click directly in
your image to set the value. The eyedroppers will also attempt to created neutral values, so they will remove any colour
cast that your image may have.
Fig 4.7 the black point, gamma and white point eyedroppers
Hue Saturation
The Hue/Saturation adjustment allows us to manipulate the colours in an image, either globally or independently.
Fig 4.8 Hue/Saturation in the Adjustments Panel (left) and as a free floating dialogue box (right)
Download free ebooks at bookboon.com
29
An Introduction to Adobe Photoshop
Simple Global Adjustments
As with the Levels adjustment, I recommend that you apply it as an Adjustment layer. In the Hue/Saturation dialogue
box we have three main sliders:
• Hue: affects the colour value. When you move it the spectrum of colours is shifted. This is not useful as a
global adjustment but can be very useful when applied to a specific colour.
• Saturation: represent the intensity of the colour. Moving the sliders value to the right will make the colours
in your image appear stronger. Moving the slider to the left will decrease the intensity of the colours and if
you move it all the way to the left, will result in a grayscale image. For the best and most natural looking
results you should do this on a per-colour basis.
• Lightness: as the name implies, will affect the lightness of the image and unless used with care, can result in
loss of contrast.
The default setting is to affect all of the colours in the image, as indicated by “Master” in the drop down menu. However,
individual colours can be affected independently, by either selecting the appropriate colour from the drop down menu,
fig 4.8 (right), or by using the small icon that depicts a finger on a left and right pointing arrow, to click directly on the
image. Clicking and dragging to the right will increase the saturation of the selected colour and clicking and dragging to
the left will desaturate the selected colour.
Near the bottom of the panel is a check box called Colorize, fig 4.8. If you click in this box your entire image will be
tinted with one specific colour. The Hue slider will allow you to change the colour and the Saturation slider will adjust
the intensity.
Turning a challenge into a learning curve.
Just another day at the office for a high performer.
Please click the advert
Accenture Boot Camp – your toughest test yet
Choose Accenture for a career where the variety of opportunities and challenges allows you to make a
difference every day. A place where you can develop your potential and grow professionally, working
alongside talented colleagues. The only place where you can learn from our unrivalled experience, while
helping our global clients achieve high performance. If this is your idea of a typical working day, then
Accenture is the place to be.
It all starts at Boot Camp. It’s 48 hours
that will stimulate your mind and
enhance your career prospects. You’ll
spend time with other students, top
Accenture Consultants and special
guests. An inspirational two days
packed with intellectual challenges
and activities designed to let you
discover what it really means to be a
high performer in business. We can’t
tell you everything about Boot Camp,
but expect a fast-paced, exhilarating
and intense learning experience.
It could be your toughest test yet,
which is exactly what will make it
your biggest opportunity.
Find out more and apply online.
Visit accenture.com/bootcamp
Download free ebooks at bookboon.com
30
An Introduction to Adobe Photoshop
Simple Global Adjustments
Fig 4.9 the effect of clicking in the Colorize check box
Download free ebooks at bookboon.com
31
An Introduction to Adobe Photoshop
Layers
5 Layers
Layers
Beginners to Photoshop often have a problem with the concept of layers and how they can be made to interact with one
another. They can be partially hidden using layer masks, they can be blended together in several different ways, they can
be re-ordered, renamed, linked, grouped, clipped, duplicated and flattened.
So what are layers? Layers are simply stacks of images, objects or text. Layers are very powerful because they allow us to
edit and move individual image components without affecting other elements within the scene. Let’s look at an example
of a layered document, fig 5.1.
Fig 5.1 a layered Photoshop document and the corresponding Layers panel.
In the image of the Layers panel, fig 5.1, we can see that there are a total of 5 layers. From the bottom upwards, there is
a Background layer, an image of the Sky, a layer containing a Square, a layer containing a Circle and a Text layer which
contains the word “LAYERS”. We can see 4 of the 5 layers; the background layer is completely covered up by the Sky layer.
The two shape layers and the Text layer do not completely cover the Sky layer because they are surrounded by transparency
which allows the underlying layers to show through. Transparency is represented in the Layers panel as a chequer-board
pattern and is apparent in this example, in the Square and Circle layers. Finally, the Text layer is a special kind of layer
and although text is always surrounded by transparency, it does not show in the Layers panel.
Download free ebooks at bookboon.com
32
An Introduction to Adobe Photoshop
Layers
Aligning and Moving Layers
To move the contents of a layer, select the Move tool which is located at the top of the Tools panel, fig 5.2. You must then
highlight the layer you wish to move by clicking on it in the Layers panel. Once the layer is selected it will appear blue,
fig 5.3. With a layer selected, you can use the Move to click and drag the layer into a new position.
Fig 5.2 the Move tool
Fig 5.3 the “Circle” layer is selected, as indicated by the blue highlight.
Multiple layers can be selected by choosing a layer and then holding down the Shift key and clicking on different layer.
All of the layers between the two selected layers will be highlighted in blue, fig 5.4. Non-adjacent layer can be selected by
Ctrl/Cmd-Click (PC/Mac) on the required layers.
Download free ebooks at bookboon.com
33
An Introduction to Adobe Photoshop
Layers
Fig 5.4 by clicking on the Text layer and Shift clicking on the “Square” layer, all layers in between the two selected points have been selected.
With several layers highlighted, multiple layers can be moved simultaneously. However, they will maintain their relative
positions to one another. If you wish to change the position of the layers so that they are aligned with one another, you
can use the Alignment tools that are present in the Options bar once the Move tool is selected, fig 5.5.
Fig 5.5 the Align and Distribute functions are available once the Move tool is chosen in the Tools panel and multiple layers are highlighted in
the Layers panel.
Download free ebooks at bookboon.com
34
An Introduction to Adobe Photoshop
Layers
Align top edges
Align vertical centers
Align bottom edges
Align left edges
Align horizontal centers
Align right edges
Distribute top edges
Distribute vertical centers
Distribute bottom edges
Distribute left edges
Distribute horizontal centers
Please click the advert
Distribute right edges
THE BEST MASTER
IN THE NETHERLANDS
*
Master of Science
in Management
Kickstart your career. Start your MSc in
Management in September, graduate within 16
months and join 15,000 alumni from more than
80 countries.
Are you ready to take the challenge? Register for
our Online Business Game and compete to win a
full-tuition scholarship worth € 24,000!
www.nyenrode.nl/msc
*‘Keuzegids Higher Education Masters 2011’
in the category of business administration
Download free ebooks at bookboon.com
35
An Introduction to Adobe Photoshop
Layers
Layer Interactions
The manner in which the individual layers in a document may interact with each other is editable in a number of ways.
The most basic interaction is Opacity. By default the Opacity of a layer is 100%, but this can be adjusted by moving the
slider that appears when you click on the right pointing arrow at the side of the Opacity value, fig 5.5. Alternatively, you can
just position your cursor over the word “Opacity” and drag to the left to reduce the value, and to the right to increase it.
Fig 5.5 the Opacity of the “Circle” layer has been lowered to 40%.
When we reduce the Opacity of a layer it allows any layers that may be below the altered layer, to be partially visible, fig 5.6.
Fig 5.6 the reduced Opacity of the “Circle” layer allows the underlying layers to show through.
Download free ebooks at bookboon.com
36
An Introduction to Adobe Photoshop
Layers
Blend Modes
Layer can also interact with one another by using Blend Modes. They allow one layer to affect underlying layers in a
number of different ways. We will be taking a look at the Blend Modes in more detail in the second book in this series.
However, to help you to understand in broad terms what their function is, similar modes are grouped together, fig 5.7.
You can alter a layers blend mode by clicking on the down arrow next to the word Normal in the Layers panel.
Fig 5.7 the Blend Mode groupings that can be found in the Layers panel.
Naming Layers
It can be very easy to lose track of which layer is which if you have a many layered document. It is a good idea to get into
the habit of naming your layers as you create them. To rename a layer simply double click on the mane of the layer in the
Layers panel and type in the new name.
Download free ebooks at bookboon.com
37
An Introduction to Adobe Photoshop
Layers
Text Layers
Adding a text to an image is very simple and can be done in two ways.
• Select the Type tool from the Tool panel and click in the image where you would like the type to appear. A
flashing cursor will appear and you can commence typing.
• If with to create a column of text for a magazine layout, choose the Type tool, but instead of just clicking,
click and drag to create the text box. Now when you type, it will be contained within the box.
You will notice that when you type a new type layer appears in the Layers panel so there is no need to manually create a new
layer when you wish to add text. We will take a look at more advanced text functions and formatting in subsequent books.
Shape Layers
When you choose one of the Shape tools, fig 5.8, the default setting in the associated Options bar is to create what is
known as a Shape layer. In the same manner as the Type tool, Shapes layers are created automatically when you start to
draw with one of the tools, provided that the Create Shape Layer icon is selected in the Options bar – the first selected
Please click the advert
icon from the left in fig 5.9.
We will turn your CV into
an opportunity of a lifetime
Do you like cars? Would you like to be a part of a successful brand?
We will appreciate and reward both your enthusiasm and talent.
Send us your CV. You will be surprised where it can take you.
Send us your CV on
www.employerforlife.com
Download free ebooks at bookboon.com
38
An Introduction to Adobe Photoshop
Layers
Fig 5.8 the various Shape tools available.
Fig 5.9 the default Shape options – to create Shape Layers.
Shape layers consist of a solid colour layer with a vector mask, fig 5.10. A vector mask is like a stencil, only allowing the
colour to be seen where the shape has been drawn. The colour of a shape can be changed at a time by double clicking on
the coloured thumbnail icon in the layers panel. The icon will reflect the currently chosen colour. As you double click the
Colour Picker dialogue box will appear, fig 5.11, allowing you to choose any colour you wish.
Fig 5.10 Shape layers created using the shape tools
Download free ebooks at bookboon.com
39
An Introduction to Adobe Photoshop
Layers
Fig 5.11 the Colour Picker – use the slider on the right to choose a colour and then click inside the main box to specify the saturation and
luminance values for that colour.
Please click the advert
In Paris or Online
International programs taught by professors and professionals from all over the world
BBA in Global Business
MBA in International Management / International Marketing
DBA in International Business / International Management
MA in International Education
MA in Cross-Cultural Communication
MA in Foreign Languages
Innovative – Practical – Flexible – Affordable
Visit: www.HorizonsUniversity.org
Write: [email protected]
Call: 01.42.77.20.66
www.HorizonsUniversity.org
Download free ebooks at bookboon.com
40
An Introduction to Adobe Photoshop
Simple Selections
6 Simple Selections
Selections allow us to isolate a particular portion of the layer. We can then edit the selected region without affect the rest
of the layer. There are many ways in which we can generate a selection in Photoshop. In this book we will start by taking
a look at some of the simple selection tools.
The Magic Wand Tool
The Magic Wand tool is located fourth from the top in the Tools panels and is stacked with the Quick Selection tool. To
access a stacked tool, simply click and hold on a particular tool to see the other tools available in that location. Stacked
tools are indicated by the small black triangle in the bottom right hand corner of the icon.
The Options bar functions associated with the Magic Wand tool play an important role in its functionality, fig 6.1.
• Tolerance: determines how much of the image is selected when you click on a particular part of your image.
A value of 10 indicates that 5 darker values and 5 lighter values will be chosen based on the position where
you clicked, fig 6.2.
• Anti-alias: make selection edges smoother.
• Contiguous: when this option is selected only neighbouring pixels are selected, fig 6.2. When unchecked all
pixels of the chosen Tolerance value will be selected, fig 6.3.
• Sample All Layers: if chosen, will take all layers into consideration and not just the highlighted layer. Fig 6.1 the Magic Wand tool options
Fig 6.2 a Contiguous selection with a Tolerance of 10
Download free ebooks at bookboon.com
41
An Introduction to Adobe Photoshop
Simple Selections
Fig 6.3 a Non-Contiguous selection, the same values are select in both gradients.
There are other icons in the Magic Wands Options that allow us to make more accurate selections.
Create a new selection
Add to an existing selection
Subtract from an existing selection
Select the intersection between two selections
In the following example we will look at making a selective edit to an image. In fig 6.4, the orange poppy was selected
with the magic wand tool so that we can change the colour of the flower without affect the rest of the image. The poppy
contains a surprising amount of different tones so it’s very difficult to make an accurate selection. If you keep increasing
the tolerance value you will get to a point where areas outside of the poppy start to become selected. We don’t want this,
so a better solution for an image like this, is to keep the tolerance value relatively low (in this example, I used a value
of 20) and chose the Add to Selection icon in the Options bar. You can then keep clicking various parts of the flower
until you are happy with the selection. If you still manage to have unwanted selection areas appear, click on the Subtract
from Selection icon to remove those values from the selection (note: take care not to leave this icon selected once you’ve
removed the unwanted selection areas).
Download free ebooks at bookboon.com
42
An Introduction to Adobe Photoshop
Simple Selections
Fig 6.4 selecting the flower for editing
Brain power
Please click the advert
By 2020, wind could provide one-tenth of our planet’s
electricity needs. Already today, SKF’s innovative knowhow is crucial to running a large proportion of the
world’s wind turbines.
Up to 25 % of the generating costs relate to maintenance. These can be reduced dramatically thanks to our
systems for on-line condition monitoring and automatic
lubrication. We help make it more economical to create
cleaner, cheaper energy out of thin air.
By sharing our experience, expertise, and creativity,
industries can boost performance beyond expectations.
Therefore we need the best employees who can
meet this challenge!
The Power of Knowledge Engineering
Plug into The Power of Knowledge Engineering.
Visit us at www.skf.com/knowledge
Download free ebooks at bookboon.com
43
An Introduction to Adobe Photoshop
Simple Selections
Once the selection is complete you can go to the Image menu>Adjustments>Hue/Saturation. The values that I chose to
use can be seen in fig 6.5.
Fig 6.5 the Hue/Saturation adjustments are only applied to the selected area.
Not only can you apply Adjustments to selected areas, you can also apply filters from the Filter Menu. In fig 6.6 you can
see that the Filters>Artistic>Plastic Wrap filter has been applied to the same selection
Fig 6.6 the selection was used to apply the Plastic Wrap filter
Download free ebooks at bookboon.com
44
An Introduction to Adobe Photoshop
Simple Selections
Selections can be saved and loaded from the Select menu, fig 6.7. If you’ve taken the time to make a selection, it is a good
idea to save it in case you decide to make further edits. Once you’ve finished with your selection you can remove it by
choosing Deselect from the Select menu.
Fig 6.7 the Select menu
The Marquee Tools
The Marquee tools allow us to draw basic shapes with selections, fig 6.8. As with the Magic Wand tool, the selection can
then be used to edit the image.
Fig 6.8 the Marquee selection tools
Download free ebooks at bookboon.com
45
An Introduction to Adobe Photoshop
Simple Selections
The Options bar for the Marquee tools is very similar in appearance to that of the Magic Wand tool. However, you will notice
that you also have an option called Feather. By default, the Marquee tools will define a hard edged selection. However, by
entering a pixel value in to the Feather option we can create a selection that will have a soft edge. Soft feathered selections
can be very useful as they allow us to blend edits with underlying layers, fig 6.9.
Please click the advert
Fig 6.9 a hard edged selection and a feathered selection filled with the foreground colour
We have ambitions. Also for you.
SimCorp is a global leader in financial software. At SimCorp, you will be part of a large network of competent
and skilled colleagues who all aspire to reach common goals with dedication and team spirit. We invest in our
employees to ensure that you can meet your ambitions on a personal as well as on a professional level. SimCorp
employs the best qualified people within economics, finance and IT, and the majority of our colleagues have a
university or business degree within these fields.
Ambitious? Look for opportunities at www.simcorp.com/careers
www.simcorp.com
Download free ebooks at bookboon.com
46
An Introduction to Adobe Photoshop
Simple Selections
As well as being able to edit the content of a selection on a layer that contains an image or design, we can also create a
new empty layer and use the active selection to:
• Fill with a colour (fig 6.10)
• Stroke with an outline (fig 6.10)
• Paint or Clone inside (fig 6.10)
• Apply an Adjustment or Filter to the selected area (as was saw with the Magic Wand tool, fig 6.6 and 6.7)
The Fill and Stroke commands can be found in the Edit menu, fig 6.12.
Fig 6.10 the square selection has had a red Fill and a black Stroke applied and the circular selection has been used to contain brush strokes
created using the Brush tool.
Download free ebooks at bookboon.com
47
An Introduction to Adobe Photoshop
Simple Selections
Fig 6.12 the Fill and Stroke commands in the Edit menu
Marquee Selection Modifier Keys
When drawing a selection using the Marquee tools there are a number of keys on the keyboard that will alter how the
selection is drawn.
• Shift key – constrains the Rectangular and Ellipical Marquee tools to a perfect square or circle respectively.
• Alt key – draws a selection from the centre instead of the edge.
• Space bar – allows the selection to be moved during the drawing process.
Download free ebooks at bookboon.com
48
An Introduction to Adobe Photoshop
Simple Selections
• Shift key (after the selection is drawn) – temporarily chooses the Add to Section option.
• Alt key (after the selection is drawn) – temporarily chooses the Subtract from Section option.
• Shift and Alt - temporarily chooses the Intersect with Section option.
Fig 6.13 the “Add to Selection” and “Subtract from Selection” options have been used create a more complex selection shape. The selection was
then filled with a gradient using the Gradient tool.
The Lasso Tools
Another set of selection tools are the Lasso tools, fig 6.14. These tools are used to create more of a free-hand drawn selection.
Download free ebooks at bookboon.com
49
An Introduction to Adobe Photoshop
Simple Selections
Fig 6.14 the Lasso tools
The Lasso tools comprise of:
• The Lasso tool – a completely hand drawn selection.
• The Polygonal Lasso tool – draws straight lines between clicked points.
• The Magnetic Lasso tool – used for drawing selections around image contents by detecting contrast changes
around the edge of the subject.
Copying a Selected Item to a New Layer
The act of copying a selected item to a new layer is a crucial editing technique in Photoshop. It allows you to work nondestructively, by applying edits to a new layer instead of the original pixels that are located in the Background layer. It
Please click the advert
also allows you to duplicate items to create composite images (fig 6.15) or complex designs.
Download free ebooks at bookboon.com
50
An Introduction to Adobe Photoshop
Simple Selections
Fig 6.15 the bird has been selected and copied to a new layer, as indicated by the layers panel on the right.
There are a number of ways to copy an item to a new layer. Once you’ve made your selection, go to Layer menu and choose
New>Layer Via Copy. Alternatively, you can use one of the most useful keyboard shortcuts in Photo shop to do the same
task – Ctrl J. When you make the new layer it will appear as if nothing has changed, this is because the duplicate item will
be in perfect register with the original image below. Select the Move tool (the first tool in the tool bar) and reposition the
item as required. If you are using an image as in fig 6.15, a large feathered selection will help the new layer blend more
effectively with the one below for a more seamless result.
It is often the case that you will wish the copies item to be of a different size or orientation to the original, fig 6.16 . This
can be achieved by going to the Edit menu and choosing one of the Transform commands (covered in depth in book 2
of this series). In fig 6.16 the item has been scaled down slightly and flipped horizontally, so that it appears to be a little
further away and swimming in the opposite direction. Once you’ve made your Transform edits, you must click on the tick
in the Options bar in order to accept the changes (if you don’t like what you’ve done, click on the X to cancel the edits).
Download free ebooks at bookboon.com
51
An Introduction to Adobe Photoshop
Simple Selections
Fig 6.16 the bird has been edited using the transform commands found in the edit menu
Please click the advert
Try this...
Challenging? Not challenging? Try more
www.alloptions.nl/life
Download free ebooks at bookboon.com
52
An Introduction to Adobe Photoshop
Choosing Colours
7 Choosing Colours
The Foreground and Background colours
At the bottom of the Tools panel there are two colour chips that represent the colours that are currently selected. There
are commonly known as the foreground and background colours. The foreground colour is the colour currently in use
by a specific tool and is represented as the top colour chip in the tools panel. In fig 7.1 we can see that the foreground
colour is set to blue and the background colour is set to red. The reason for having a background colour is that it can be
switched for the foreground colour very quickly by clicking on the double headed arrow icon (fig 7.1). The background
colour can also be used in gradients – in this case drawing a gradient with the gradient tool will result in a blue to red
gradient being drawn (using the default gradient settings)
Fig 7.1 the foreground and background colour chips, the switch foreground and background icon and the default colours icon.
The black and white icon in fig 7.1 will return the colours to their default setting of black as the foreground and white
as the background.
Changing the Colours
You can change the selected colours by simply clicking on either the foreground or background colour chips at the bottom
of the Tools panel. This will result in the Color Picker dialogue box appearing, fig 7.2.
Download free ebooks at bookboon.com
53
An Introduction to Adobe Photoshop
Choosing Colours
Fig 7.2 the Color Picker
Click in the multi-coloured area to choose your colour. The brightness of the colour can be adjusted by clicking higher or
lower in the large area on the left dialogue box, which represents variations of the chosen colour with respect to brightness
and saturation. Saturation of the colour is increased by clicking further to the right of this area.
If your color picker dialogue box does not look like the one in fig 7.2, there could be reasons for this. Firstly, the operating
system colour picker has selected in the General Preferences, found in the Edit menu. If this is the case, you can change
it to the Adobe version if you wish. The colours represented in the Adobe Color Picker may also appear different. The
“Only Web Colors” box may be ticked or an alternative colour mode chosen. To have the dialogue box appear as in
fig 7.2 make sure that the Only Web Colors box is not checked and that the HSB (Hue, Saturation, Brightness) colour
option is selected.
There are two small warning boxes that may appear to the right of the new/current box. The top one indicates an out of
gamut for printing warning, which means that it’s outside the range of colours that the printer can reproduce correctly.
The lower one is warning that the colour may not be displayed correctly if viewed in a web browser. If you click on either
one of warning icons, it will alter chosen colour to make it print and/or web safe.
Download free ebooks at bookboon.com
54
An Introduction to Adobe Photoshop
Choosing Colours
The Swatches Panel
The Swatches panel contains a number of useful preset colours, fig 7.3. If your Swatches panel is not visible in your current
workspace you can access it by choosing Swatches in the Window menu.
Fig 7.3 the Swatches panel
Additional swatches are available from the flyout menu in the top right hand corner of the panel, fig 7.4. You can also
create your own swatches by:
• Click on the turning page icon at the bottom of the Swatches panel to add the current foreground colour to
the list.
• Click on the “Add to Swatches” button in the Color Picker dialogue box.
• Click on an empty space in the Swatches panel to add the current foreground colour to the list.
Swatches are extremely useful for graphic and web designers because you can create your own set of custom colours from
a layout or web page. You can then save that set of colours from the Swatches panel flyout menu, fig 7.4. They be quickly
loaded (from the flyout menu) the next time that you are required to create a design for a particular client and need the
colour palette that was used in a previous design.
Download free ebooks at bookboon.com
55
An Introduction to Adobe Photoshop
Choosing Colours
Fig 7.4 the Swatches Flyout menu
Download free ebooks at bookboon.com
56
An Introduction to Adobe Photoshop
Choosing Colours
The Color Panel
You can create a foreground or background colour from the Color panel, fig 7.5.
Please click the advert
Fig 7.5 the Color panel HSB and RGB sliders and the flyout menu.
Download free ebooks at bookboon.com
57
An Introduction to Adobe Photoshop
Choosing Colours
The colours are changed by either moving the sliders or by clicking directly on the spectrum. Both the sliders and the
spectrum are configurable to accommodate working in the most popular colour spaces. The most useful setup for this
panel, is to have the sliders set to HSB and the colour spectrum set to RGB. If you create a colour that is out of the gamut
for you printer, a warning icon will appear, fig 7.6. If you click on the icon, the colour will automatically be change to the
nearest in gamut colour.
Fig 7.6 the Color panel showing an out of print gamut warning
If you are a web designer, you can choose the “Web Color Sliders” and “Make Ramp Web Safe” options from the flyout
menu, fig7.5. The Color panel will then appear as in fig 7.7 and the out of print gamut warning will become a non-web
safe colour warning.
Fig 7.7 the Color panel set up for web design.
Download free ebooks at bookboon.com
58
An Introduction to Adobe Photoshop
Guides and Rulers
8 Guides and Rulers
Designers of all types will find using guides and rulers a great help in laying out pages for the web or for print. The options
for turning on and off ruler and guide functions can be found in the View menu, fig 8.1.
Fig 8.1 the View menu.
To have the Rulers appear around the outside of you work area, select Rulers from the View menu, or use the keyboard
shortcut (the keyboard shortcut for commonly used functions are indicated to the right of the menu item), Cmd/Ctr +
R (Mac/PC).
You can create guides by clicking on the New Guide option in the View menu. However, it is far quicker and easier to
simply click and drag from inside one of the rulers to create a guide. Clicking and dragging from the vertical ruler will
create a new vertical guide and performing the same procedure from the horizontal ruler will result in a horizontal guide.
Download free ebooks at bookboon.com
59
An Introduction to Adobe Photoshop
Guides and Rulers
Once your guides have been created, you can change or refine your layout by selecting the move tool and repositioning
the guides. To do this you must select the move tool and place the cursor over the guide that you wish to move. When
the cursor changes, you can then move the guide.
Fig 8.2 the Move tool
You will notice that the guides are cyan in colour by default. This can be changed if you wish by changing the colour
setting in the Preferences. The Preferences are found in the Edit menu and the guide settings are found in the sub category
“Guides, Grid, & Slices”. I find it easier to fill my background layer with a dark neutral colour to that I can see the guides
more clearly when preparing a layout, fig 8.3. You can do this by selecting the required colour as your foreground colour
and then use the Paint Bucket tool, fig 8.4 (grouped with the Gradient tool), to click on the background layer to apply the
colour. It can be returned to white (or whatever colour you like) by repeating the process once your guides are in place.
Fig 8.3 temporarily darken your background to better judge your guide placement
Download free ebooks at bookboon.com
60
An Introduction to Adobe Photoshop
Guides and Rulers
Fig 8.4 the Paint Bucket tool
If you wish to change the units displayed on the Rulers, you change the “Units and Rulers” setting in the Preferences.
Alternatively, you can right click in the ruler and select you alternative units from the box that appears fig 8.5.
Fig 8.5 changing the units by right-clicking on the ruler.
Destination MMU
Please click the advert
MMU is proud to be one of the most popular universities in the UK.
Some 34,000 students from all parts of the globe select from its
curricula of over 1,000 courses and qualifications.
We are based in the dynamic yet conveniently compact city of Manchester,
located at the heart of a sophisticated transport network including a major
international airport on the outskirts. Parts of the campus are acclaimed for
their architectural style and date back over 150 years, in direct contrast to
our teaching style which is thoroughly modern, innovative and
forward-thinking.
MMU offers undergraduate and postgraduate courses in
the following subject areas:
•
•
•
•
•
•
•
Art, Design & Performance
Computing, Engineering & Technology
Business & Management
Science, Environmental Studies & Geography
Law, Education & Psychology
Food, Hospitality, Tourism & Leisure Studies
Humanities & Social Science
For more details or an application form
please contact MMU International.
email: [email protected]
telephone: +44 (0)161 247 1022
www.mmu.ac.uk/international
Download free ebooks at bookboon.com
61
An Introduction to Adobe Photoshop
Guides and Rulers
You can create a layout mock up by using the Vector Shape tools (fig 8.6) to draw shapes to represent where specific items
will appear in your layout, fig 8.7. Drawing with Vector Shapes has many similarities to using the Selection Marquee
tools. The modifier keys for adding and subtracting from shapes are the same as for creating selections (Shift to add, Alt/
Option to subtract).
Fig 8.6 the Vector Shape tools
Fig 8.7 layout items represented by Vector Shapes
Download free ebooks at bookboon.com
62
An Introduction to Adobe Photoshop
Guides and Rulers
Whist drawing a layout, it is useful to utilise the Snap setting in the View menu, fig 8.1. This will cause the drawing tools
to snap precisely to the guides as you are dragging out the shapes.
Once your design is complete you may wish to view it without the guides. However, if you use the Clear Guides option
from the View menu, the guides will be gone for good. A better way to work is to Hide the guides. This can be done
from the Show options in the View menu or by simply pressing Cmd/Ctrl + ; (Mac/PC) to toggle the guides on and off.
Please click the advert
Your guides will be saved with your document, but they will not appear in a print or an exported web slice.
Download free ebooks at bookboon.com
63
An Introduction to Adobe Photoshop
History
9 History
If you make a mistake in Photoshop you can undo that mistake by going to the edit menu and choosing either Undo or
Step Backward. Clicking Undo will take you back a single step, the command will then change to Redo (followed by the
name of the action that you have just performed). Selecting the Step Backward option take you once set backwards in
the History panel, fig 9.1. The History panel can be opened from the Window menu and contains a record of operations
performed up to a finite number. The number of steps visible in the History panel are set in the Performance section of
the Preferences, fig 9.2. The Preferences are found in the Edit menu.
Fig 9.1 the History panel
The default number of History states is 20, fig 9.2. The minimum value for History states is 1 and the maximum value is
1000. It is very tempting to set a high number of History states. However, this will have serious consequences with respect
to performance of your computer as Photoshop has to remember the exact configuration of your document in each of the
History states. I recommend 20-30 History states for a beginner. When you become more experienced at using Photoshop
try reducing the number of History states to 8-12. This will free up some of your computer resources so that it performs
other functions faster. I also recommend setting the History states to a low value if you are trying to run Photoshop on
a minimum specification machine.
Download free ebooks at bookboon.com
64
An Introduction to Adobe Photoshop
History
Fig 9.2 set the number of History states in the Performance section of the Preferences.
Snapshots
When you create or open a document, an initial Snapshot is created. This Snapshot appears at the top of the History panel
and is the default source for the History brush, fig 9.1. If you make many edits to your document and make a mess of
things, you can always return the document to its original state by clicking on this Snapshot.
Download free ebooks at bookboon.com
65
An Introduction to Adobe Photoshop
History
Fig 9.3 create a new Snapshot by clicking on the camera icon at the bottom of the History panel.
If you are making several edits to your document and are about to run out of History states you can click on the camera
shaped icon at the bottom of the History panel in order to create another Snapshot. The new Snapshot will remember all
of the edits that you have created to that point, fig 9.3. You can then proceed with your edits, knowing that if you make a
mistake, you can click on the new snapshot and don’t have to start all the way from the beginning again. It’s a good idea
to rename any new Snapshots that you make by assigning them a descriptive name. To rename a Snapshot, double click
on Snapshot name and type in the new name.
Please click the advert
In Paris or Online
International programs taught by professors and professionals from all over the world
BBA in Global Business
MBA in International Management / International Marketing
DBA in International Business / International Management
MA in International Education
MA in Cross-Cultural Communication
MA in Foreign Languages
Innovative – Practical – Flexible – Affordable
Visit: www.HorizonsUniversity.org
Write: [email protected]
Call: 01.42.77.20.66
www.HorizonsUniversity.org
Download free ebooks at bookboon.com
66
An Introduction to Adobe Photoshop
History
An alternative to working with Snapshots is to create an entirely new document from a History state. You can do this by
clicking on the icon shown in fig 9.4.
Fig 9.4 create a new document from the current History state.
A new document created from a History state will have that state as its opening Snapshot and the History for that
document will be empty.
Keyboard shortcuts:
Action
Keyboard Shortcut (Mac and PC)
Undo
Cmd/Ctrl + Z (Mac/PC)
Redo
Cmd/Ctrl + Z (Mac/PC)
Step Backward (in History states)
Cmd + Option/Ctrl + Alt + Z (Mac/PC)
Step Forward (in History states)
Cmd + Shift/Ctrl + Shift + Z (Mac/PC)
The History Brush & Fill History
You can apply any History state to a specific area in two different ways. Firstly, you can select the History Brush tool
from the tools panel, fig 9.5. You then select the History State that you wish to paint with, by clicking in the left hand
box corresponding to that History states position in the History panel, fig 9.6. Adjust the brushes properties from the
Option panel (fig 9.7) and paint on the document. It is best create a new blank layer at the top of the layer stack to paint
the History state on. This way you will be working in a good non-destructive workflow and you can always discard the
layer is you don’t like the changes.
Fig 9.5 the History Brush tool – located in the Tools panel.
Fig 9.6 the History Brush icon appears when you click in the box to the left of the desired History state (in this case Hue/Saturation).
Download free ebooks at bookboon.com
67
An Introduction to Adobe Photoshop
History
Fig 9.7 the Options panel associated with the History Brush Tool
Another way of applying a History state to a specific area is to make a selection using any of the methods described in
Chapter 6. Click in the left hand box at the appropriate History State in the History panel. Create a new empty layer
at the top of the Layer stack, go the Edit menu and choose Fill. In the dialogue box that appears (fig 9.8), use the drop
down menu next to the word Use: to select History then click OK. The selection will be filled with selected History
Please click the advert
State, fig 9.9.
our ambition!
Copenhagen Master of Excellence
are two-year master degrees taught
in English at one of Europe’s leading
universities
Come to Copenhagen - and aspire!
PHARMACEUTICAL
SCIENCES
LIFE SCIENCES
SCIENCE
COPENHAGEN
RELIGIOUS STUDIES
LAW
Apply now at www.come.ku.dk
SOCIAL SCIENCES
HUMANITIES
Download free ebooks at bookboon.com
68
An Introduction to Adobe Photoshop
History
Fig 9.8 the Fill dialogue box.
Fig 9.9 the selection has been filled with the Snapshot History State in a new layer
Download free ebooks at bookboon.com
69
An Introduction to Adobe Photoshop
Cropping
10Cropping
There are two main ways in which we can crop a document in Photoshop. The first and most commonly used method,
is to use the Crop tool, fig10.1.
Fig 10.1 the Crop tool – located in the Tools panel.
The Options panel that is associated with the Crop tool is unusual in that, before the crop area is drawn there are one set
of options. After the crop area has been selected a second set of options will appear, fig 10.2.
Fig 10.2 two sets of Crop option. The top one will appear before the crop is drawn. The lower set of options will appear after the Crop is drawn.
The first set of Crop tool options are to enter specific dimensions and resolution for the document. This is very useful if
you need the document output to specific criteria, to fit a certain print size or if the image has to be placed inside a design
or web page layout. The second set of options pertain to the shield that is drawn with the Crop tool and defines the crop
area. You can change the colour and opacity of the shield and you can also use the small drop down menu to determine
which type of grid overlay is visible, fig10.3.
Fig 10.3 a cropped area, showing the shield and grid overlay
Download free ebooks at bookboon.com
70
An Introduction to Adobe Photoshop
Cropping
You are not restricted to the original crop boundaries. The edges of the crop area can be dragged until desired effect is
achieved. Please note that if a specific size has been entered in the first Options panel, the aspect ratio of the crop cannot
be changed. However, you can drag the corner points of the crop area to scale the crop area. The final document will then
be interpolated to match the required output size. Once the final crop area has been decided upon, you must click on the
Tick in the Options panel to accept the changes, fig 10.2.
Another way to crop an image is to use any of the selection techniques mentioned in Chapter 6 and make a selection.
You may then go to the Image menu and choose Crop. The image will then be cropped to encompass the selected area.
Get qualified without leaving your desk
Please click the advert
At EIT we offer live, interactive online distance learning on a large range of engineering areas such
as electrical, mechanical, electronic and industrial automation to name a few. If you’re looking for a
qualification to back up your years of experience which is flexible and cutting edge with expert instructors
then look no further.
We offer 3 month Professional Certificate of Competency courses and 18 month Advanced Diplomas in various
areas of engineering as well as a Masters qualification in Industrial Automation. Our Advanced Diploma courses are
accredited**, recognised qualifications. Our expert instructors have a considerable amount of practical experience in
real world situations and will help you to apply what you learn to your workplace.
With flexible payment plans, technical eBooks and ongoing support from a dedicated course coordinator and your
instructors, our Advanced Diplomas are a great way to achieve a qualification without taking valuable time off from work.
Enquire about our courses today at www.eit.edu.au/course-enquiry
INDUSTRIAL DATA COMMS s MECHANICAL ENGINEERING s TELECOMMUNICATIONS
AUTOMATION & PROCESS CONTROL s ELECTRICAL POWER s OIL & GAS ENGINEERING
**Our courses are accredited through various organisations globally. To find out more about our accreditation for our courses go to our
website: www.eit.edu.au/accreditation-international-standing.
Phone: +61 8 9321 1702
Email: [email protected]
Website: www.eit.edu.au
Download free ebooks at bookboon.com
71
An Introduction to Adobe Photoshop
Basic Printing
11Basic Printing
Printing is one of the areas of Photoshop that causes people problems. Typically, their prints don’t look like the on-screen
version of the document. You have to accept that your monitor and printer reproduce colours in very different ways and
that they will never be completely identical in their output. Having said that, there are a number of things that we can
do to help narrow the gap.
The very best method of getting a good print output that closely resemble the version you see on your monitor, is to buy
(or borrow) a calibration device. There are many calibration devices on the market. However, the best ones enable you
to calibrate both your monitor and printer so that their out matches as closely as possible. This kind of device will create
custom “Profiles”, which Photoshop can use to display and print you documents accurately.
A good calibration device can be expensive, so let’s look at how we can be better results from Photoshop if we don’t have
access to one.
• Go your printer manufacturer website. Download and install the latest drivers for your printer.
• Make sure that you are viewing your monitor in a colour neutral environment. Colours that are around us
strongly influence how we see colours on the screen. If you have strong colours in the room that you are
working in, try working in the dark.
• Check your document for out of gamut colours – colours that your printer is unable to reproduce, such as
strong, heavily saturated colours.
• If you are working with images, make sure that you adjust your image so that there is good detail in both the
highlight and shadow areas.
• Let Photoshop handle the printing. Turn off your printers colour management options.
• If you are making high quality photo or fine art prints on high quality paper, check the manufacturer’s
website to see if they have produced a custom profile for the particular paper stock that you are using.
The Photoshop Print Dialogue Box
When you wish to make a print go to the File menu and choose the Print option, fig 11.1.
Download free ebooks at bookboon.com
72
An Introduction to Adobe Photoshop
Basic Printing
Fig 11.1 the Print option, found in the File menu.
Once the Print option is chosen, the Print Dialogue box will be displayed, as shown in fig 11.2.
Download free ebooks at bookboon.com
73
An Introduction to Adobe Photoshop
Basic Printing
Fig 11.2 the Photoshop print dialogue box
Please click the advert
Fast-track
your career
Masters in Management
Stand out from the crowd
Designed for graduates with less than one year of full-time postgraduate work
experience, London Business School’s Masters in Management will expand your
thinking and provide you with the foundations for a successful career in business.
The programme is developed in consultation with recruiters to provide you with
the key skills that top employers demand. Through 11 months of full-time study,
you will gain the business knowledge and capabilities to increase your career
choices and stand out from the crowd.
London Business School
Regent’s Park
London NW1 4SA
United Kingdom
Tel +44 (0)20 7000 7573
Email [email protected]
Applications are now open for entry in September 2011.
For more information visit www.london.edu/mim/
email [email protected] or call +44 (0)20 7000 7573
www.london.edu/mim/
Download free ebooks at bookboon.com
74
An Introduction to Adobe Photoshop
Basic Printing
Make sure that the following settings are made:
• Select your printer from the drop down list at the top of the dialogue box.
• Set Photoshop Manages Colors from the Color Handling drop down list.
• In the Printer Profile section, have this set to either your printer or any custom that you may wish to use.
• For photographic documents, have the Rendering Intent drop down menu set to either Perceptual or
Relative Colorimetric and make sure that the Black Point Compensation Check box is ticked.
• For documents containing graphics or charts, you may use any of the Rendering Intents, but you may be
able to reproduce stronger colours if you use the Saturation option.
• Click on Print Settings to open up you printers settings (this will be different for every printer – refer to
your user manual for how to make the required settings). Select the resolution, paper size and paper type
that you wish to use. Find the Colour Management settings for your printer and turn them off, fig 11.3.
Fig 11.3 a typical Printer settings dialogue box. Turn off the printers colour management options.
If you want to produce a high quality print, it is often a good idea to use the “Scaled Print Size” option to make a smaller
test print. Enter a percentage value in the Scale box (make sure that the Scale to Fit Media check box is unchecked or you
will not be able to do this). This will save you ink in the long run, as you will probably have to make some adjustments to
you document and make a few prints before you are happy with the results. Prints are almost always darker than their on
screen versions, so it’s a good idea to make a Levels Adjustment Layer (see Chapter 4) and brighten the image slightly before
you print. Once you have made a print that you are happy with, you can turn off or discard the Levels Adjustment Layer.
75