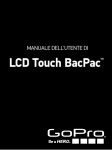
1
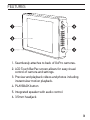
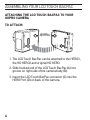
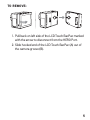
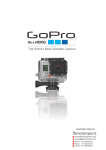
LCD Touch BacPac
™
User Manual
PRODUCT UPDATE
GoPro adds new product updates through software
updates. Check to see if updates are available for
your GoPro camera or other GoPro products at
gopro.com/update.
Note: Touch functionality is not available when using the
LCD Touch BacPac™ with the HD HERO2 and original
HD HERO.
2
FEATURES
1.Seamlessly attaches to back of GoPro cameras.
2.LCD Touch BacPac screen allows for easy visual
control of camera and settings.
3.Preview and playback videos and photos including
instant slow motion playback.
4.PLAYBACK button
5.Integrated speaker with audio control
6.3.5mm headjack
3
ASSEMBLING YOUR LCD TOUCH BACPAC
ATTACHING THE LCD TOUCH BACPAC TO YOUR
GOPRO camera
To Attach:
1.The LCD Touch BacPac can be attached to the HERO3,
the HD HERO2 and original HD HERO.
2.Slide hooked end of the LCD Touch BacPac (A) into
groove on right side of the camera body (B).
3.Insert the LCD Touch BacPac connector (C) into the
HERO Port (D) on back of the camera.
4
To Remove:
1.Pull back on left side of the LCD Touch BacPac marked
with the arrow to disconnect from the HERO Port.
2.Slide hooked end of the LCD Touch BacPac (A) out of
the camera groove (B).
5
SWAPPING HOUSING DOORS
A deeper housing backdoor is required when using the
HERO3 with the LCD Touch BacPac attached. There are
three backdoor options to choose from: Waterproof,
Touch (enables touch functionality when in the housing)
and Skeleton (non-waterproof backdoor for better sound
quality by allowing more sound to reach the camera’s
microphone. It also reduces wind noise when at speeds
up to 100mph).
Note: Touch functions will not work underwater.
6
To swap out the backdoor:
1.Open the backdoor of the housing so it hangs
downward.
2.Gently pull downward on the backdoor until it snaps
free from the hinge.
3.Line up the replacement backdoor to the hinge
opening.
4.Push upwards on the backdoor until it clicks into place.
7
USING THE LCD TOUCH BACPAC
You can operate your GoPro camera via touch using
the LCD Touch BacPac screen, via control button using
and
buttons on your GoPro camera or using a
combination of both methods. When touch functionality
is not available, for example when using the camera
underwater, follow the button control instructions.
Turning LCD Touch BacPac Screen ON/OFF:
The LCD Touch BacPac screen will automatically turn ON
when the camera is powered ON. The LCD Touch BacPac
screen may also be turned ON/OFF by holding down the
button on the side of the camera.
Note: Remember to turn your LCD Touch BacPac screen
OFF when it’s not in use to conserve battery power.
8
CHANGING CAMERA MODES
You can use the LCD Touch screen to change camera
modes and settings on your GoPro camera. To change
camera modes, use the LCD touch screen or camera’s
button controls.
Via Touch Screen
Tap the camera mode icon in the upper left hand corner
and push to select the desired camera mode from the
menu.
Via Button Controls
Use
to cycle through camera modes and select the
desired option.
9
CAPTURING VIDEO
When recording Video, the following icons appear on the
LCD Touch BacPac screen:
1. Camera Mode
2. Resolution/fps/FOV
3. Advanced Settings
Modes
4. Wi-Fi Mode
5. Battery Level
6. Status Bar: Displays
elapsed time and
time remaining on the
SD card
Note: The LCD screen shown above is what is displayed
on the LCD Touch screen when using the HERO3: Black
Edition + HERO3: Silver Edition cameras. The HERO3:
White Edition camera display will vary slightly.
10
CAPTURING PHOTO/BURST/TIME LAPSE/
CONTINUOUS PHOTO*
When capturing a Photo, the following icons appear on
the LCD Touch BacPac screen:
1. Camera Mode
2. Resolution/FOV
3. Advanced Settings
Modes
4. Interval Setting (Time
Lapse, Photo Burst)
5. Wi-Fi Mode
6. Battery Level
7. Status Bar: Displays
number of photos
taken and number of
photos that can be
taken before SD card
is full
*Continuous Photo is available only on the HERO3: Black
Edition camera.
PRO
TIP:
While in Video or Photo capture mode
you can double tap the touch screen to
view the last video or photo captured.
11
Settings MENU
Customize your camera’s Video and Photo capture
options using the Settings menu.
Via Touch Screen
1. Tap the camera mode icon in the upper left hand
corner and select
to enter the Settings menu.
Tap the screen to select a Settings option.
2. To navigate through previous and next Settings
menu options, tap and .
3. T o navigate through each Settings sub-menu, tap
and .
4. Tap a menu item to make selection.
5. To exit tap
12
.
Settings MENU (continued)
Via Button Controls
1.Use
2.Press
to locate
.
to enter the Settings menu.
to cycle through the Settings menu
3.Use
to select a desired Setting.
options. Press
to cycle through the Settings sub-menus.
4.Use
to select desired selection.
Press
To exit after making a selection, use
to exit.
to select
. Press
1. Back arrow navigates
to previous menu
page
2. Forward arrow
navigates to next
menu page
3. Exit menu
13
PLAYBACK
Videos and Photos can be viewed directly on the LCD
on the
Touch BacPac screen. To PLAYBACK—press
side of the LCD Touch BacPac or access via touch on the
LCD screen—in the mode menu tap the .
Video and Photo files saved on your memory card will
appear as thumbnail images on the LCD screen.
Note: Files recorded in 2.7k and 4k video (HERO3: Black
Edition only) will not appear in the thumbnail view on your
LCD Touch BacPac.
Via Touch Screen
1. To select a file, tap
the thumbnail.
2. The file will display in
a full screen view.
3. Tap the screen
again to activate
more controls such
as prevoius, next,
delete and return to
thumbnail view.
14
Via Button Controls
1. Use
to cycle
through the thumbnails and control
buttons.
2. Press
to select a
thumbnail.
3. Use
to navigate
through mode control
options or return to
thumbnails view.
15
Playback Video
After you have selected a video thumbnail, you can Play,
Fast Forward, Reverse, play in Slow Motion, adjust
Volume and Delete (available by touch only) your Videos.
1. Play/pause
2. View previous/
reverse
3. Activate slow motion
settings (1/2, ¼, 1/8)
4. Return to thumbnails
5. Delete file
6. Control volume
16
Playback VIDEO (continued)
Via Touch Screen
1.From the full screen view on your LCD, tap
button.
2.To see additional files, press
or
play
.
3.To exit and return to the thumbnails screen, tap
.
Via Button Controls
1.Use
to toggle to and highlight the playback button.
Press
on your camera to select.
2.To view additional files, use
Press
to select.
3.To exit, use
to toggle to
to highlight
. Press
or
.
to select.
17
playback photo
Using the LCD Touch BacPac screen, you can view and
delete (touch screen only) your Photo, Photo Burst, Time
Lapse and Continuous Photo files.
1. Previous file/Next file
2. Return to thumbnails
3. Delete file
Via Touch Screen
1.From the thumbnails view on your LCD screen, tap a
Photo file to select it.
2.The file will display in a full screen view.
3.To view additional files when in the full screen view,
tap
or .
4.To exit and return to the thumbnails screen, tap
18
.
PLAYBACK PHOTO (CONTINUED)
Via Button Control
From the thumbnails menu on your LCD screen, use
to toggle to a Photo file. Press
to make selection.
1.To exit use
to highlight
. Press
to select.
19
Viewing Photo BURST, TIME LAPSE, CONTINUOUS
PHOTO
1. View Button/Playback
2. View previous photo
3. View next file
4. Return to thumbnails
When viewing Burst, Time Lapse or Continuous Photos,
the first saved Photo in the series will be displayed in the
thumbnail profile.
Via Touch Screen
1.To view all Photos automatically, tap
screen, then .
on your LCD
2.To view Photos one at a time, tap PAUSE then
or .
3.To exit and return to the thumbnail preview screen, tap
, then tap
.
20
Via Button Controls
1.To view all Photos automatically, use
. Press
to select.
2.Press
to select
.
1.To view Photos one at a time, use
. Press
select.
2.Then use
to highlight
to highlight
or
to highlight
. Press
.
3.To exit and return to the thumbnail preview screen,
use
to highlight . Press
to select.
4.Use
PRO
TIP:
to highlight
. Press
.
When viewing Videos and Photos in the
image library, sets taken in Photo Burst,
Time Lapse and Continuous display first
photo in the series.
21
IMPORTANT SAFETY AND
HANDLING INFORMATION
WARNING: Failure to follow these safety instructions
could result in fire, electric shock or other injury or
damage to LCD Touch BacPac or other property.
Handling
The LCD Touch BacPac contains sensitive components.
Do not drop, disassemble, open, crush, bend, deform,
puncture, shred, microwave, incinerate, paint or insert
foreign objects into the port opening on the LCD Touch
BacPac. Do not use the LCD Touch BacPac if it has been
damaged—for example, if cracked, punctured or harmed
by water. The LCD Touch BacPac screen is made of glass.
Glass may break if dropped or receives a substantial
impact, or is crushed, bent or deformed. If glass chips or
cracks, do not touch or attempt to remove broken glass.
Glass cracked due to misuse or abuse is not covered
under warranty.
Keeping LCD Clean
Clean LCD screen immediately if it comes in contact
with any contaminant that may cause staining, such
as ink, dye, makeup, dirt, food, oil or lotion. To clean
the LCD, use a soft, slightly damp, lint-free cloth. Do
not allow moisture to enter port openings. Do not use
window cleaners, household cleaners, aerosol sprays,
22
solvents, alcohol, ammonia or abrasives to clean LCD
Touch BacPac.
Avoid Water and Wet Locations
Do not use unprotected LCD Touch BacPac in rain or
near washbasins or other wet locations. Do not spill food
or liquid onto the LCD Touch BacPac. If the LCD Touch
BacPac gets wet, turn off the camera and disconnect before cleaning. Allow to dry thoroughly before using again.
Do not dry the LCD Touch BacPac with an external heat
source such as a microwave oven or hair dryer. Damage
to the LCD Touch BacPac caused by contact with liquid is
not covered under the warranty.
Altitude and Temperature Changes
Increases or decreases in altitude and temperature can
cause the Touch Backdoor to bulge slightly when housing
is sealed closed (with or without camera inside). Where
possible, leave door open until ready to use.
Using Connectors and Ports
Never force a connector into a port; check for
obstructions on the port. If the connector and the port do
not join with reasonable ease there may be a mismatch.
Be sure the connector matches the port and that
connections line up.
23
Acceptable Temperature Range for LCD
Touch BacPac
Low or high temperature conditions may temporarily
shorten the battery life or cause the LCD Touch BacPac
to temporarily stop working properly. Avoid dramatic
changes in temperature or humidity when using the LCD
Touch BacPac, as condensation may form on or within
LCD Touch BacPac. When using the LCD Touch BacPac or
charging battery, device may get warm. Exterior of the
LCD Touch BacPac functions as a cooling surface that
transfers heat from inside the unit to cooler air outside.
The Ubuntu Font License
Copyright 2010, 2011 Canonical Ltd.
This Font Software is licensed under the Ubuntu Font
Licence, Version 1.0
https://launchpad.net/ubuntu-font-licence
24
Learn about more GoPro products
at: gopro.com.