1
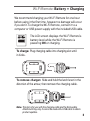
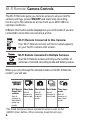
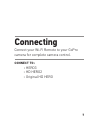
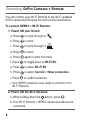
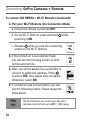
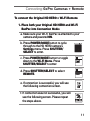
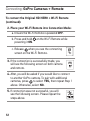
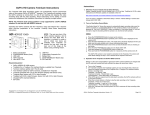
Wi-Fi Remote
User Manual
Wi-Fi Remote: Features
The Wi-Fi Remote is waterproof to 10ft / 3m.
1. LCD Display
2. Status LED
3. SHUTTER/SELECT Button
4. POWER/MODE Button
5. Removable Attachment Key + Key Ring
6. Charging Port/Attachment Key Slot
2
Wi-Fi Remote: Battery + Charging
We recommend charging your Wi-Fi Remote for one hour
before using it the first time, however no damage will occur
if you don’t. To charge the Wi-Fi Remote, connect it to a
computer or USB power supply with the included USB cable.
The LCD screen displays the Wi-Fi Remote’s
battery level while the Wi-Fi Remote is
powering ON or charging.
To charge: Plug charging cable into charging slot until
it clicks.
To remove charger: Slide and hold the latch lever in the
direction of the arrow, then remove the charging cable.
Note: This slot is for use with the charging cable and the Removable
Attachment Key only. It cannot be used with a USB cable to obtain
product updates.
3
Wi-Fi Remote: Camera Controls
The Wi-Fi Remote gives you remote access to all your GoPro
camera settings, power ON/OFF and start/stop recording.
Control up to 50 cameras at a time from up to 600’/180m in
optimal conditions.
Different information will be displayed on your LCD screen if you are
connected to more than one camera at a time.
Wi-Fi Remote Connected to One Camera:
Your Wi-Fi Remote screen will mirror what appears
on your GoPro camera LCD screen.
Wi-Fi Remote Connected to Multiple Cameras:
Your Wi-Fi Remote screen will tell you the number of
cameras connected, recording mode and battery status.
When you cycle through the camera modes on the Wi-Fi Remote
screen*, you will see:
Wi-Fi Remote Video Mode
Default StartSets all
up Modes
cameras to
Sets all
video mode
cameras to
their default
power-up
modes
Photo Mode Burst Mode Time lapse
mode
Sets all
Sets all
cameras
cameras to Sets all
to photo
burst mode cameras to
mode
time-lapse
mode
*The mode list shown above represents what is seen on the
HERO3: Silver Edition. Other cameras mode list will vary.
4
Wi-Fi Remote: Ways to Wear
The Attachment Key makes it easy to attach the Wi-Fi Remote
to your car keys, lanyards, straps, zippers and more.
To insert the Attachment Key:
Insert the Attachment Key into the key slot until it clicks.
To remove the Attachment Key:
Slide and hold the latch lever in the direction of the arrow, then
remove the key.
5
Wi-Fi Remote: Ways to Wear
The Attachment Strap (Optional Accessory) attaches to your
wrist, backpack straps, poles, bike frames and more. To
attach the Wi-Fi Remote to the Attachment Strap:
1. Thread the Attachment Strap through the slots on the bottom
of your Wi-Fi Remote.
2. Position Wi-Fi Remote along the strap until situated as
shown below.
6
Connecting
Connect your Wi-Fi Remote to your GoPro
camera for complete camera control.
Connect to:
• HERO3
• HD HERO2
• Original HD HERO
7
Connecting: GoPro Cameras + Remote
You can connect your Wi-Fi Remote to any Wi-Fi-enabled
GoPro camera by following the instructions listed below.
To connect HERO3 + Wi-Fi Remote:
1. Power ON your Hero3:
a. Press
to cycle through to
b. Press
to enter.
c. Press
to cycle through to
d. Press
to enter.
.
.
e. Press
again to enter the menu.
f. Press
to toggle down to Wi-Fi RC.
g. Press
to select Wi-Fi RC.
h. Press
to select Current or New connection.
i. Press
to confirm selection.
j. Your HERO3 camera is now ready to connect to the
Wi-Fi Remote.
2. Power ON the Wi-Fi Remote:
a. While holding down the
button, press
.
b. Y our Wi-Fi Remote + HERO3 camera should now be
connected.
8
Connecting: GoPro Cameras + Remote
To connect HD HERO2 + Wi-Fi Remote:
1. Put your camera into Connection Mode:
a. Make sure your Wi-Fi BacPac is attached to your
HD HERO2 camera and both are powered ON.
b. Press POWER/MODE button on the
Wi-Fi BacPac to enter the camera’s Wi-Fi
Menu screen.
c. Press SHUTTER/SELECT to enter the Wi-Fi
Connection Menu.
d. Use POWER/MODE button to highlight
New WiFi RC. Press SHUTTER/
SELECT.
e. T he Wi-Fi connection icon will appear
indicating that the Wi-Fi BacPac is
searching for a connection. Press
SHUTTER/SELECT at any time to cancel.
9
Connecting: GoPro Cameras + Remote
To connect HD HERO2 + Wi-Fi Remote (continued):
2. Put your Wi-Fi Remote into Connection Mode:
a. Ensure the remote is powered OFF.
b. On the Wi-Fi Remote, press and hold
powering it ON.
while
c. Release when you see the connecting
screen on the Wi-Fi Remote.
3. If the connection is successfully made,
you will see the following screen on both
camera and remote.
4. A
fter, you will be asked if you would like to
connect to additional cameras. Press
to select YES, then repeat step one above.
Otherwise, select NO.
5. If connection was not successful, you will
see the following screen. Please repeat the
steps above.
PRO
TIP:
10
The Wi-Fi Remote can control up to 50 GoPro
cameras at a time from up to 600ft / 180m away.
Connecting: GoPro Cameras + Remote
To connect the Original HD HERO + Wi-Fi Remote:
1. Place both your Original HD HERO and Wi-Fi
BacPac into Connection Mode:
a. Make sure your Wi-Fi BacPac is attached to your
camera and powered ON.
b. Press POWER/MODE button to cycle
through to the HD HERO camera’s
Settings menu. Press SHUTTER/
SELECT to enter.
c. Press POWER/MODE button to toggle
down to the Wi-Fi Menu. Press
SHUTTER/SELECT to enter.
d. Press SHUTTER/SELECT to select
REMOTE.
e. If connection is successful, you will see
the following connection screen.
f. If connection was not successful, you will
see the following screen. Please repeat
the steps above.
11
Connecting: GoPro Cameras + Remote
To connect the Original HD HERO + Wi-Fi Remote
(continued):
2. Place your Wi-Fi Remote into Connection Mode:
a. Ensure the Wi-Fi Remote is powered OFF.
b. Press and hold
powering it ON.
on the Wi-Fi Remote while
c. Release when you see the connecting
screen on the Wi-Fi Remote.
3. If the connection is successfully made, you
will see the following screen on both camera
and remote.
4. After, you will be asked if you would like to connect
to another GoPro camera. To pair with additional
to select YES, then repeat Step 1
cameras, press
above. Otherwise, select NO.
5. If connection was not successful, you will
see the following screen. Please repeat the
steps above.
12
Safety Information
WARNING: Failure to follow these safety instructions
could result in fire, electric shock or other injury
or damage to the Wi-Fi Remote or other property.
HANDLING
The Wi-Fi Remote contains sensitive components. Do not
drop, disassemble, open, crush, bend, deform, puncture,
shred, microwave, incinerate, paint or insert foreign objects
into the product. Do not use the Wi-Fi Remote if it has
been damaged—for example, if the product is cracked,
punctured or damaged by water.
KEEPING THE WI-FI REMOTE’S LCD CLEAN
Clean your LCD screen immediately if it comes into contact
with any contaminants that may cause stains, such as
ink, dyes, makeup, dirt, food, oils and lotions. To clean
the LCD, use a soft, slightly damp, lint-free cloth. Avoid
getting moisture in openings. Don’t use window cleaners,
household cleaners, aerosol sprays, solvents, alcohol,
ammonia or abrasives to clean LCD.
13
Safety Information
Water Resistance
Do not submerge the Wi-Fi Remote in more than 10ft / 3m
of water. Damage to the Wi-Fi Remote caused by excessive
water pressure is not covered under warranty.
USING CONNECTORS AND PORTS
Never force a connector into a port. Check for obstructions
on the port. If the connector and port don’t join with
reasonable ease, they probably don’t match. Make sure
that the connector matches the port and that you have
positioned the connector correctly in relation to the port.
14
Safety Information
KEEPING THE WI-FI REMOTE WITHIN ACCEPTABLE
TEMPERATURES
The Wi-Fi Remote is designed to be operated in
temperatures between 0° C and 40° C and stored
in temperatures between 0° C and 70° C. Extreme
temperatures may temporarily affect battery life or affect
the functionality of the Wi-Fi Remote. Avoid dramatic
changes in temperature or humidity when using the
Wi-Fi Remote as condensation may form on or within the
product. When you’re using the Wi-Fi Remote or charging
the battery, it is normal for the product to get warm. The
exterior of the product functions as a cooling surface that
transfers heat from inside the unit to the cooler air outside.
15
Learn about more GoPro products
at: gopro.com.
130-00430-000 REVA
Please Recycle.