1
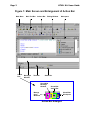
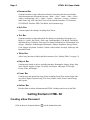
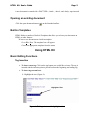
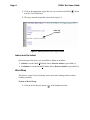
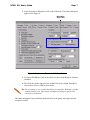
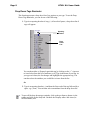
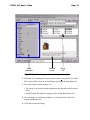
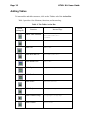
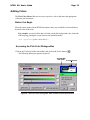
HTML Kit: A User Manual
by Paul Strickberger
HTML Kit User Manual
Contents
Introduction ......................................................................................... 1
The Main Screen ................................................................................ 1
Displaying or Hiding Elements of the Screen ....................................................1
Getting Around the Main Screen ....................................................... 3
The Workspace .................................................................................................3
Actions Bar ........................................................................................................3
Getting Started in HTML Kit ............................................................... 4
Creating a New Document ................................................................................4
Opening an existing document..........................................................................5
Built-in Templates..............................................................................................5
Using HTML Kit ................................................................................... 5
Basic Editing Functions .....................................................................................5
Tag Insertion .................................................................................................5
Indent and Un-indent.....................................................................................6
Word Wrap ....................................................................................................6
Drop Down Tags Reminder...........................................................................8
Previewing Your Page.......................................................................................9
Inserting an Image.............................................................................................9
Using the Workspace ....................................................................................9
Using the Insert Image Tags Wizard.............................................................10
Adding Tables ...................................................................................................12
Adding Colors ....................................................................................................13
Before You Begin .........................................................................................13
Accessing the Pick Color Menu ....................................................................13
Choosing Colors............................................................................................14
Inserting Colors .............................................................................................15
Uploading files...................................................................................................15
Add your FTP server to the Workspace Menu ..............................................15
Uploading Files .............................................................................................16
Additional Resources ......................................................................... 16
Index..................................................................................................... 17
HTML Kit User’s Guide
Page 1
Introduction
This manual gives a brief introduction to HTML Kit, a full featured HTML editor. The
manual is geared to people who already have some basic understanding of HTML authoring and a familiarity with basic Windows commands.
HTML (Hyper Text Markup Language) is a language designed to allow a reader to easily
navigate between documents. Because of this capability, HTML is the chosen language for
documents shared over the Internet and World Wide Web. The building blocks of HTML
are tags which are inserted around text. A Web browser (such as Internet Explorer or
Netscape Navigator) interprets each tag and applies structure and formatting to the the text
surrounded by the tag. The formatted (or “marked up”) text is then displayed in the
browser window.
HTML Kit offers numerous tools that make the process of insertion and editing of HTML
tags easier. In contrast to many WYSIWYG (“What You See Is What You Get”) editors,
HTML Kit gives complete control over the HTML development and editing process.
HTML Kit can be downloaded free from the following site:
http://www.chami.com/html-kit.
The Main Screen
Figure 1 (next page) shows the main screen of HTML Kit as it appears after a new document is created. Note that document type, title, header, and body types have been automatically inserted.
Displaying or Hiding Elements of the Screen
Go to View in the Main Menu and choose which component to view or remove.
Or
To display/hide the Message Window, the Action Bar, or the Workspace, click on the
appropriate button in the Action Box (as shown enlarged in Figure 1).
Page 2
HTML Kit Users Guide
Figure 1: Main Screen and Enlargement of Action Bar
Main Menu
Action
Box
Main Tool Bar
Messages
Window
Actions Bar
Task Bar
Editing Window
Workspace
Status Bar
Show/Hide
Message
Window
Show/Hide
Action Bar
Manage
Open
Windows
Show/Hide
Workspace
Action Bar Enlarged
HTML Kit User’s Guide
Page 3
Getting Around the Main Screen
The Workspace
Allows quick access to files, including opening and uploading. To show/hide the Workspace, click on the appropriate button in the Action Box (Figure 1).
Actions Bar
The Actions Bar provides an easy way to access many commonly used tags. Along the top
of the bar are tabs that allow access to the various bar components ( Figure 2). To view a
bar component, click on the corresponding tab.
Figure 2: Actions Bar Tabs
"
Favorites Bar
You can customize this bar to add functions from the other Action Bars that you use
most often:
1. Choose a button from another Action Bar that you want to add to your Favorites Bar.
2. Right click on the button.
3. Select Add to Favorites from the drop down menu.
"
Tools Bar
Includes a number of useful tools to modify or clean up your HTML (Figure 3).
HTML
Tidy
HTM L
Attributes
HTML
Tags
HTML
Tags
Wizard
Colors
Calculator
Insert
File
Names
Insert
Date/
Time
Insert
ID
Figure 3: Tools Bar
Expand
Tab 2
Spaces
Text
Tools
Prototype
Pad
Page 4
"
HTML Kit Users Guide
Document Bar
Contains a number of tags and options related to formatting documents including:
whole document tags, document type tags, <head>, <title>, <meta>, <link>, <base>,
<body>, headings tags, <div>, <span>, <center>, <frameset>, <frame>, <noframe>,
Inline Frame tag, ASP code block, Server Side Includes functions, CGI functions,
CGI/SSI/ASP Variables, PHP Code Block, and Comments tags.
"
Style Bar
Contains options for editing Cascading Style Sheets.
"
Text Bar
Contains a number of tags and options for editing text including: Paragraph (<p>),
Bold (<b>), Italic, Big, Small, <font> tags, Horizontal Rule, Line Break, Unordered
and Ordered lists, List Items, Directory List, Menu, Definition List, Preformatted Text,
teletype, Underline, Strikethrough, Blockquote, Address, Emphasis, Strong, Define,
Code, Sample, Keyboard, Variable, Citation, Abbreviation, Acronym, Subscript, and
Inserted/Deleted.
"
Tables Bar
Allows easy insertion of tables and table structures (See “Adding Tables” on page 12).
"
Objects Bar
Contains tags related to objects including Anchors, Bookmarks, Images, Maps, Map
Area, Objects, Applets, Scripts, No Script, JavaScripts, VBScripts, TCLScripts,
Events, Links, and Images.
"
Forms Bar
Contains tags and options for using Forms including: Form/Form Action, Input, Button, Select, Option, Option Group, Text Area, Isindex, Label, Form Control Group,
and Legend.
"
OnLine Bar
Provides links to online information and HTML validators and access to the Web.
Getting Started in HTML Kit
Creating a New Document
Click on the new document button (
) on the Standard tool bar.
HTML Kit User’s Guide
Page 5
A new document is started with <DOCTYPE>, <html>, <head>, and <body> tags inserted.
Opening an existing document
Click the open document button (
) on the Standard toolbar.
Built-in Templates
HTML Kit has a number of built-in Templates that allow you to base your document on
HTML or other features.
To base a new document on a built-in template:
Go to File, New. The template box will appear.
Choose an appropriate template from the menu.
Using HTML Kit
Basic Editing Functions
Tag Insertion
!
To insert a new tag: Click on the tag button you would like to insert. The tag is
inserted and the insertion point is placed between the beginning and ending tag.
!
To insert tags around text:
1. Highlight the text (Figure 4):
Highlighted Text
Figure 4: Editing window with highlighted text
Page 6
HTML Kit Users Guide
2. Click on the appropriate tag (in this case you can choose the Bold (
from the Text Action Bar).
) button
3. The tag is inserted around the selected text (Figure 5).
After Tag
Insertion
Figure 5: Editing window after tag insertion
Indent and Un-indent
Select any part of the line(s) you would like to indent or un-indent.
!
Indent: From the Main Edit Menu choose Increase Indent or press Ctrl + ].
!
Un-Indent: From the Main Edit Menu choose Decrease Indent or press Ctrl + [.
Word Wrap
This feature “wraps” lines so that they can be seen in the editing window without
scrolling vertically.
To turn on Word Wrap:
1. Click on the Preferences button (
) in the Standard tool bar.
HTML Kit User’s Guide
Page 7
2. In the Preferences dialog box, click on the Editor tab. The Editor dialog box
appears (See Figure 6).
Word Wrap
Option Box
Figure 6: Preferences Window with Editor Options
3. To turn on WordWrap, click on the check box next to the Wrap at column
checkbox.
4. The fill-in box to the right gives the width of the wrap column. Enter 0 for
auto-wrap or select a width of your choice.
Tip: For convenience, use a width that allows viewing of the Workspace window
without blocking text. Experiment with different settings to get the best
results for your monitor.
The Mark wrapped lines checkbox marks the lines in the gutter, showing where the
wrap has occured.
Page 8
HTML Kit Users Guide
Drop Down Tags Reminder
This function presents a drop down list of tag options as you type. To use the Drop
Down Tags Reminder, you can do one of the following:
1. Type in an opening bracket of a tag (<). After a brief pause, a drop down list of
tags will appear:
Opening
Bracket
Drop
Down
List
You can then either: a) Expand a particular tag by clicking on the “+” sign next
to it and select from the list of attributes, or b) Type in the name of your tag. As
you type each letter, the list changes and highlights the appropriate tag. You
can then select the attribute you would like to insert from the list.
Or
2. Type in an opening bracket (<) and then the first word of the tag followed by a
space: eg. (<font ). You can then select an attribute from the drop down list .
!
To turn off the drop down tags reminder, click on the preferences button in the
toolbar and click on the Help tab. Uncheck the Display after idle time (in
milliseconds) box.
HTML Kit User’s Guide
Page 9
Previewing Your Page
To preview your HTML document:
"
Use the built-in browser
Click on the Preview tab below the editing window.
"
Use your default browser
Right Click anywhere in the Editing Window and select Preview in Default
Browser from the drop-down Menu.
Inserting an Image
Using the Workspace
The Workspace provides a convenient way to insert images without leaving the desktop.
Before You Begin
Display the Workspace if it is not already on your desktop by clicking on the Workspace display button in the Task Bar Action Box (See “Figure 1: Main Screen and
Enlargement of Action Box” on page 2).
Step 1: Place the insertion point in the HTML document where you would like to
insert the image.
Step 2: Add the folder containing the image to your Workspace.
If the folder containing the desired image is currently on the Workspace, skip to Step 3.
a. Right Click on the Workspace and select Add/Remove FTP/Folder from
the drop down menu.
b. Select Add Local Folder.
c. In the Add Folder dialog box, type in the folder path or choose the open
folder icon to browse your folders and select the folder containing your image.
d. Type in the name you would like displayed for the folder in the Workspace
and click OK.
Page 10
HTML Kit Users Guide
Step 3: Insert the Image.
a. In the Workspace, click on the “+” sign to expand the folder containing your
image.
b. Right Click on the desired image file.
c. From the pop-up list choose Insert as Image.
Using the Insert Image Tags Wizard
1. In the Objects Action Bar click on the Insert Image button (
).
or
Go to the Tags menu, select Image, and then Insert Image from the slide-out
menu.
The dialog box shown in Figure 7 appears.
HTML Kit User’s Guide
Image
Attributes
Page 11
Preview
Pane
Image
List
Figure 7: Tags Wizard Image with example figure previewed
2. Select the file containing the image from the Look in drop down box. If the
file is not available, click on the Add button and select the appropriate file.
3. Select the image from the Image List.
#
#
The image is previewed with the appropriate tag and path in the Preview
Pane.
Default height and width are assigned in the Image Attributes box.
4. You can change or add image attributes by selecting from the list in the
Image Attributes box.
5. Click OK to insert the image.
Page 12
HTML Kit Users Guide
Adding Tables
To insert tables and table structures, click on the Tables tab of the Action Bar.
Table 1 provides a list of buttons, functions, and inserted tag.
Table 1: The Tables Action Bar
Button
(enlarged)
Function
Inserted Tags
Whole Table Insertion
<table summary="">
<tr><td></td></tr>
</table>
Table Row
<tr></tr>
Table Cell
<td></td>
Table Row and Cell
<tr><td></td></tr>
Table Header Cell
<th></th>
Table Caption
<caption></caption>
Table Header
<thead></thead>
Table Footer
<tfoot></tfoot>
Table Body
<tbody></tbody>
Table Column Group
<colgroup></colgroup>
Table Column
<col></col>
HTML Kit User’s Guide
Page 13
Adding Colors
The Pick Color Menu offers an easy way to preview, select, and insert the appropriate
color into your document.
Before You Begin
Place the cursor in the current HTML document where you would like to insert the hexadecimal value of the color.
For example: to create a table data cell with a particular background color, insert the
following tag, placing the cursor between the quotation marks:
<td
bgcolor="(place cursor here)">
Accessing the Pick Color Dialogue Box
Click on the Tools tab of the Action Bar and click on the Color button (
The following dialog box appears (Figure 8):
).
Closest Web
Safe Color Preview Panels
Figure 8: The Pick Color Dialog Box with Custom Colors tab selected
Page 14
HTML Kit Users Guide
Choosing Colors
From this dialog box, you can select colors in a number of different ways. The color
that you choose will be previewed as background and as text in the preview panels in
the top right corner.
The 25 most recently used colors are shown along the top of the dialog box. To reuse a
color simply click on the square of your choice.
You can choose colors using the following methods:
"
Custom Colors Tab
!
Use the three sliders to choose the color. Each slider corresponds to the Red, Blue,
Green (RGB) color scale. As you move the slider, the corresponding colors
change in the preview color panels. The Convert to drop-down list converts the
numbers of the chosen color to different values based on other color models
including HSB, CMY, CMYK, and HSL.
!
System Color: Allows color selection from a palette and storage of 16 custom
colors.
!
Copy Screen Color: Allows copying of any color on the screen.
1. Open the document or page from which you would like to copy a color.
2. Reduce the size of HTML Kit by clicking on the restore button ( ) in the
upper right hand corner and then use the mouse to drag or resize the HTML
Kit window so that the color you want to copy is visible.
3. Click the Copy Screen Color button.
4. The cursor becomes a 4-headed arrow, and a preview box appears in the right
bottom corner of the screen.
5. As you move the cursor, the preview box changes to the color upon which the
cursor rests. Once the color in the preview box is the one you want, click OK.
6. The new color is now shown in the preview panels in the dialogue box.
7. Click OK to insert the hexadecimal code into your document.
"
Web Safe Colors Tab
The Web Safe Colors tab provides a selection of web safe colors.
Tip: Once you have chosen a color, you can select the web safe color closest to it by
clicking on the box below the preview panel (See Figure 1).
HTML Kit User’s Guide
Page 15
Inserting Colors
Once you have chosen a color using one the previous methods, click on OK to insert the
hexadecimal value of that color at the appropriate place in the document.
Uploading files
One convenient feature of HTML Kit is that it allows you to upload your files directly from
the Edit menu without having to separately access your FTP Server program.
To upload files, follow the following steps:
Step 1: Add your FTP server to the Workspace Menu
a. Click on the Workspace Menu.
b. Select Add FTP Server/Folder from the drop-down list.
c. Select Add FTP Server from the two available choices. The following box
appears:
Figure 9: The Add FTP Server dialog box
Page 16
HTML Kit Users Guide
d. Type in your Server address, Login user name, Password and Display
name (your server’s name on the Workspace).
e. Click OK
Step 2: Uploading Files
If the Workspace is not open already, click on the view Workspace button on the Task
Bar Action Box (see “Figure 1: Main Screen and Enlargement of Action Box” on
page 2).
The Workspace shows a list of files with “+” signs and should now include the name
you have chosen for your ftp server (see Step 1).
To Upload a file follow these steps:
a. Open the HTML document that you would like to upload.
b. In the Workspace window, click on the “+” sign beside the name of your FTP
server. The message window should now show the messages that HTML Kit
is establishing a connection to the server.
c. Drag and drop the upload icon (
Workspace.
) on the bottom of the editor menu onto the
Additional Resources
HTML Kit offers many other features that are beyond the scope of this manual.
Further information can be found at the HTML Kit home page at
http://www.chami.com/html-kit.
Support is available through the newsgroup chami.public.htmlkit.misc.
Many plugins are also available at http://www.chami.com/html-kit/plugins.
HTML Kit User’s Guide
Page
Index
A
Action Box 2
enlarged 2
Actions Bar 2, 3
Additional Resources 16
C
Colors
adding 13
choosing 14
inserting 15
D
Document Bar 3
Drop Down Tags Reminder 8
turning on/off 8
E
Editing Window 2
Existing document
opening 5
F
Favorites Bar 3
Forms Bar 4
FTP server
adding to Workspace 15
H
HTML Kit
Newsgroup 16
plugins 16
support 16
HTML Kit home page 16
I
Image Insertion
using the Tags Wizard 10
using the Workspace 9
Indent and Un-indent 6
creating 4
Newsgroup 16
O
Objects Bar 4
OnLine Bar 4
P
Pick Color Menu
accessing 13
Custom Colors Tab 14
Web Safe Colors Tab 14
Plugins 16
Previewing Document
with default browser 9
Previewing document
with built-in browser 9
S
Status Bar
Action Box
enlarged 2
Style Bar 4
T
Tables
adding 12
Tables Bar 4
Tag Insertion
around text 5
new 5
Task Bar 2
Templates 5
Text Bar 4
Tool Bars 2
Tools Bar 3
U
Un-indent and Indent 6
Uploading files 15
M
W
Main Menu 2
Main Screen 2
displaying 1
hiding 1
Messages Window 2
Web safe colors
inserting 14
Word Wrap 6
turning on 6
Workspace 2, 3
WYSIWYG editors 1
N
New Document