1
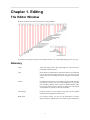
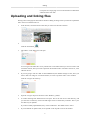
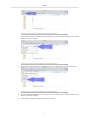
OISTweb User Manual
OISTweb User Manual
Table of Contents
I. General Drupal Knowledge .......................................................................................... 1
1. Editing ............................................................................................................ 3
The Editor Window ....................................................................................... 3
Uploading and linking files ............................................................................. 5
II. WWW (www.oist.jp) ................................................................................................. 7
2. CPR User Guide ............................................................................................... 9
Media Links ................................................................................................. 9
Photo Nodes ............................................................................................... 10
News, Features, Tida News, and Press Release Nodes ........................................ 10
3. Procurement User Guide ................................................................................... 12
Add a Tender Node ..................................................................................... 12
4. Human Resources User Guide ............................................................................ 13
Add a Job Posting Node ............................................................................... 13
5. PRP Librarian Guide ........................................................................................ 14
Implementation ........................................................................................... 14
Get started editing ....................................................................................... 14
Managing Links: how the PRP pages are managed ............................................ 14
Updating or modifying the content of a Book Page ............................................ 15
Moving a section of the document .................................................................. 15
Adding a PRP Library Page .......................................................................... 15
III. GROUPS (groups.oist.jp) ........................................................................................ 17
6. Administrative Member Guide ........................................................................... 18
Managing group members ............................................................................. 18
Adding Pages ............................................................................................. 18
Managing Menus ......................................................................................... 19
Managing Blocks ........................................................................................ 20
The All-Events Calendar Grid Page ................................................................ 20
Adding a Posts Page .................................................................................... 21
Editing the Group Node ............................................................................... 21
Create a Webform ....................................................................................... 21
Components ............................................................................................... 22
IV. Recipes ................................................................................................................ 23
Glossary ............................................................................................................ 25
V. Terminology .......................................................................................................... 27
Glossary ............................................................................................................ 29
iii
List of Examples
5.1. Updating Printable PDF ......................................................................................... 15
iv
Part I. General Drupal Knowledge
Table of Contents
1. Editing .................................................................................................................... 3
The Editor Window ............................................................................................... 3
Uploading and linking files ..................................................................................... 5
2
Chapter 1. Editing
The Editor Window
Website content can be edited in the browser using CKEditor:
If you know the special properties of the toolbar buttons, you will find that editing can be very easy:
Glossary
Align
Align Left, Align Center, and Align Right are only relevant for
paragraphs and other blocks.
Lists
Insert/ Remove Numbered List and Insert/ Remove Unnumbered
List are best used after entering all your text. You can next lists
within other lists, but editing nested lists usually has unexpected
results.
Anchor
Creating an anchor allows you to make a hyperlink that takes the
user directly to another part of the same webpage or to a specific
part of another webpage. Once you have created the anchor, make
a note of the name you gave it. When you make your link, append
'#anchorname' (no quotes) to the end of the URL.
Insert Image
Click this button to insert images in the page. The file upload
mechanism is integrated into this process.
Blockquote
For research content, you can use the blockquote to enclose
figures and their explanation texts in a block of gray background.
3
Editing
Show and Edit HTML Source
If you prefer to edit the html directly, you can. If you do not
properly close your tag pairs or make errors, the editor will change
and correct your code, however.
Paste as Text
Paste in content with all formatting and other information
removed.
Paste from Word
If you copy and paste content from Word, a browser, and other
applications like Evernote, you will inadvertently paste in styles,
formatting codes, and other content that will interfere with the
layout and consistency of the webpage. It will also make your
page difficult to edit and maintain. Use "Paste from Word"
when pasting from Word, web pages, and other applications
that contain formatting information. Things like bold, italics,
underline, indents, etc. will be retained, but font faces, id's, and
other application-specific information will be filtered out.
Show Blocks
When editing a page, it is difficult to know if a part of the page
is set as a header, a paragraph, or a div that was copied from a
browser or Word document. Use this feature to see a line around
all blocks which identifies the format of that block of text.
Remove Formatting
Select a block of text and then click this button to remove
formatting like bold, italics, Word styles, and other information,
but it will leave hyperlinks and paragraphs.
Format
The Format pull-down changes to show you the format of a block
when you click inside that block of text.
You don't have to select the entire block then change the format.
Just click inside a block, open the pull-down, and select the format
you want to give it.
Insert/Edit Table
Use this button to create tables. Click inside a table and then click
this button to change the table properties.
You can also click a table and use right-click/ctrl-click to get
a choice of options for modifying the table, specific rows, and
specific columns.
You can select a block of cells and then use right-click/controlclick to get a selection of options for modifying cell properties.
Separate teaser and body
When you create a Post, which is somewhat like a blog post, the
system will use the first few lines as the teaser when it shows a
4
Editing
list of posts on a single page. You can use this button to determine
where the teaser text ends.
Uploading and linking files
Putting a file on the page for download is similar to adding an image in that you must first upload the
file to the server and then link to it.
1.
In the browser, select the block of text that you want to be the link to the file.
2.
Click the Link button
3.
.
The editor's "Link" dialog box will open.
You can type a full URL like "www.youtube.com" in the URL field if you want to create a link
to another website, but if you want to upload a file and then link to it from the web server, click
"Browse Server".
4.
If you are going to link to a PDF or downloadable file, the default settings are fine, but if you
want to link to an image or an external website, it is best to open the link in a new window.
Click the "Target" tab at the top.
5.
Open the "Target" drop-box and select "New Window (_blank)".
6.
A window showing files and directories will open. This is the web server's file directory, and
you will start in a directory with a title that begins with "u" followed by a number. This is your
user directory for uploads.
If you have already uploaded files, they will be visible here. Just double-click to select.
7.
If you would like to upload a file, click "Upload" in the top left corner of the window.
5
Editing
Then click the "Select" button to open a file browser for your PC which will allow you to select
the file you want to upload.
8.
Once the file is selected, hit the "Upload" button to copy the file from your PC to the server.
9.
You can repeat the upload process as many times as you like to put a number of files in your
directory for use in the page.
10. Once the file is uploaded, double-click to insert the link.
6
Part II. WWW (www.oist.jp)
Table of Contents
2. CPR User Guide ....................................................................................................... 9
Media Links ......................................................................................................... 9
Photo Nodes ....................................................................................................... 10
News, Features, Tida News, and Press Release Nodes ................................................ 10
3. Procurement User Guide ........................................................................................... 12
Add a Tender Node ............................................................................................. 12
4. Human Resources User Guide .................................................................................... 13
Add a Job Posting Node ....................................................................................... 13
5. PRP Librarian Guide ................................................................................................ 14
Implementation ................................................................................................... 14
Get started editing ............................................................................................... 14
Managing Links: how the PRP pages are managed .................................................... 14
Updating or modifying the content of a Book Page .................................................... 15
Moving a section of the document ......................................................................... 15
Adding a PRP Library Page .................................................................................. 15
8
Chapter 2. CPR User Guide
Members of the Communications and Public Relations Division create and maintain a large variety
of content on the public webserver.
Media Links
MediaLinks introduce instances in which OIST appears in the media, particularly newspapers and the
web. Each MediaLink must have a Title (of the original story), a Source (the outlet that produced the
original), a Publication Date, and one or more source materials.
Each MediaLink is displayed as a single line - like "New Model Organisms for Alzheimer's Research,
New York Times, May 1st, 2012" - which, when clicked, opens a window that contains the source
materials.
MediaLink source materials consist of one or more of the following:
• PDF of a scanned paper-based or magazine article (Attachment)
• Translation or summary of the material (Body)
• URL to a webpage where users can read the original material (URL)
MediaLinks are stored in the YWC Media Links content type on www.oist.jp, but they appear on both
the public website (scope=public) and Tida (scope=internal) in order of most recent Publication Date
first. OIST has permission from the local newspapers to distribute PDF scans of newspaper articles
ONLY within the organization, so when one creates a MediaLink containing a newspaper scan PDF,
it is important to set the "scope" to "internal".
Procedure 2.1. Adding MediaLinks
1.
Login to www.oist.jp.
2.
From the The Black Toolbar at the Top of the Screen, click the triangle at the far right and choose
"Add content".
3.
Select Language: Tida is monolingual, displaying only English and Language Neutral content,
but Japanese may be mixed with English in Language Neutral content.
Note that MediaLinks which contain PDFs of local newspaper clippings must be set to
Scope=Authorized, which means that they will only appear on Tida and therefore should always
be set to Language=neutral.
4.
Select Scope: "Authorized" links will only be displayed on Tida, while "public" links will be
displayed on www and Tida. MediaLinks set to Scope=Authorized should always be set to
Language=Neutral.
Regarding PDF scans of newspapers
Unless OIST has special permission to distribute the PDF scan of a printed
article, make sure that media links containing PDF scans of articles are set
Scope=Authorized.
5.
Creator: Author of the summary, if applicable.
6.
Translator: The person who did the translation/summary, if applicable.
7.
Publication Date: Please enter the date of the publication. It will usually not be necessary to
indicate the time, so check the box next to "All Day".
9
CPR User Guide
8.
Source: Enter the name of the media outlet in "Source".
9.
URL: If you have a URL for the material, enter it into the "URL" field.
10. Attachment: If you have a PDF of a scanned newspaper clipping or other non-digital media,
upload it in the "Attachment" field.
Use unique filenames
Before uploading your PDF scan, rename the file something like "20120308_primeminister.pdf", using the date as part of the filename. This will prevent inadvertently
overwriting a previous file with the same name, e.g. if you consistently use
"scan.pdf" as a filename, it will overwrite previous files.
11. Title: What will show on the websites as the link, usually the title of the article.
12. Body: If you have a summary or translation of the content or any other content to add to this
item, enter it into the "Body" field.
13. Save: Until you hit "Save" at the bottom of the page, the information is not stored to the server,
so be sure to click "Save".
Photo Nodes
Each photo used in an article will be an item in the image archive, an online database of images that
can be accessed by anyone anywhere. Each image is stored as a "Photo Node" which has its own title,
description, and tags in English and Japanese.
Photos used only in Tida News can be English-only, but each photo or image used in an article needs
to be first created as a Photo Node. During the article creation process, you will select which photo
nodes (photos and other images) to associate with the article and the website will do the format and
layout for you.
It is very important that we be selective and chose a minimal number of very good photos to use in
web articles.
Watch a video of Photo Node creation here: http://www.youtube.com/watch?v=_T_Q_YN9Ur8
Procedure 2.2. Adding
1.
Login to www.oist.jp.
2.
Click the triangle in the black menu at the top right of the screen.
3.
Select "Add Content".
4.
Click "Photo".
5.
.
News, Features, Tida News, and Press
Release Nodes
The news articles produced in CPR are all created in more or less the same way.
Procedure 2.3. Creating
1.
Login to www.oist.jp.
10
CPR User Guide
2.
From the The Black Toolbar at the Top of the Screen, click the triangle at the far right and choose
"Add content".
3.
Click "News Article".
4.
Select Language: It is easiest to create the News articles
Tida is monolingual, displaying only English and Language-Neutral content, but Japanese may
be mixed with English in Language-Neutral content.
5.
Select Scope: Should be public.
6.
Creator: Author of the summary, if applicable.
7.
Translator: The person who did the translation/summary, if applicable.
8.
Publication Date: Please enter the date of the publication. It will usually not be necessary to
indicate the time, so check the box next to "All Day".
9.
Source: Enter the name of the media outlet in "Source".
10. URL: If you have a URL for the material, enter it into the "URL" field.
11. Attachment: If you have a PDF of a scanned newspaper clipping or other non-digital media,
upload it in the "Attachment" field.
12. Title: What will show on the websites as the link, usually the title of the article.
13. Body: If you have a summary or translation of the content or any other content to add to this
item, enter it into the "Body" field.
14. Save: Until you hit "Save" at the bottom of the page, the information is not stored to the server,
so be sure to click "Save".
11
Chapter 3. Procurement User Guide
The website pages for article and construction procurement are maintained by members of the
Procurement and Supplies and Campus Building sections of the Finance and Administration Division.
These users create and delete Tender nodes and edit pages in the Procurement area of the website.
Add a Tender Node
Caution
Before uploading files, rename the PDF file according to the following conditions:
1. The filename should only contain lowercase alphabet, numbers, hyphens, and
underbars.
2. The filename must be unique, because identical filenames can overwrite one another.
In order to facilitate this, begin with the date in ISO format YYYYMMDD, followed
by an underbar, ie. "20120310_xray-machine.pdf".
1.
Login
2.
Under Staff Links, click "Create Tender".
3.
Title: The title will usually be the same as the text for the link.
4.
Body: The body is usually just one or more links to the PDFs that are uploaded.
5.
Category: Choose the category of the tender. The category determines where this Tender item
will appear on the website.
6.
Scheduling Options: To publish and then unpublish at specific times and dates, set them here.
Leave "Publish on" blank to publish immediately. Leave "Unpublish on" to allow the Tender to
be visible indefinitely.
7.
Publishing Options: Published.
8.
Save.
12
Chapter 4. Human Resources User
Guide
Members of the Human Resources Section of the Finance and Administration Division create and
modify Job Postings on the Careers page.
Add a Job Posting Node
Caution
Before uploading files, rename the PDF file according to the following conditions:
1. The filename should only contain lowercase alphabet, numbers, hyphens, and
underbars.
2. The filename must be unique, because identical filenames can overwrite one another.
In order to facilitate this, begin with the date in ISO format YYYYMMDD, followed
by an underbar, ie. "20120310_assistant.pdf".
1.
Login
2.
Under Staff Links, click "Create Job Posting".
3.
The fields in the node follow the HR PDF job posting format, so input the information in the
corresponding fields.
4.
Scheduling Options: To publish and then unpublish at specific times and dates, set them here.
Leave "Publish on" blank to publish immediately. Leave "Unpublish on" to allow the Tender to
be visible indefinitely.
5.
Publishing Options: Published.
6.
Save.
13
Chapter 5. PRP Librarian Guide
Implementation
The PRP Library is implemented as a Drupal Book, so each item on the Table of Contents (TOC) is a
Book Page. Some modifications have been made in the system to make the language switching work,
but most Book operations apply.
The PRP Library has been structured so that each part of the PRP documents, up to level 3, is a separate
Book Page, meaning that there is a Book Page for Chapter 1, another for 1.1, and another for 1.1.1,
but all depper levels, such as 1.1.1.1 and so on, are included in the body of 1.1.1 and referenced with
anchor tags in HTML.
The URL alias of each Book Page should be set to the number of the document section: for example,
Chapter 2, section 2.4.2 would have a URL alias of "policy-library/2.4.2", regardless of the language.
Internal links from one part of the PRP to another must follow the format 'href="internal:policylibrary/2.4.2"', regardless of the content language. Modifications to the site will ensure that Japanese
sections link to Japanese sections, English sections to English sections.
English Book Pages must be created from the English interface, while Japanese translations of these
Book Pages must be created from the Japanese interface. When selecting the Book and Parent items
in the Node, the language of the options is restricted to the language of the interface, so in order to be
able to select the Japanese PRP Book, you must be using the Japanese interface.
Get started editing
Procedure 5.1. Get started editing
1.
Login.
2.
Start at the PRP Table of Contents [http://www.oist.jp/book/policy-library], which is the Book.
3.
Find the Book Page you want to edit.
4.
Click "Edit" in the Tab Menu.
5.
Edit the page.
6.
Make sure to make a revision of the page before hitting "Save" at the bottom.
Managing Links: how the PRP pages are
managed
At the bottom of the Edit page for each node, there is a field for "URL Alias". While you can link to
a node using the node ID and syntax like "www.oist.jp/node/123", the URL alias enables you to set
another URL from which you can access the node.
The default setting for nodes is that the system create the URL alias by removing the punctuation and
replacing spaces with hyphens in the title.
In order to keep the PRP library consistent, we must manually maintain the URL alias of each book
page according to the following pattern: "policy-library/1.2.3", so that even if the title of the node is
"Chapter 0 Principles and Fundamental Ideas", the URL Alias will be "policy-library/0", etc..
14
PRP Librarian Guide
When making internal links (links from one part of the PRP to another), use the syntax "internal:policylibrary/1.2.3" for English and "internal:ja/policy-library/1.2.3" for Japanese.
Updating or modifying the content of a Book
Page
Procedure 5.2. Updating or modifying the content of a page
Every update to the master documents managed by the Administrative Compliance Division must
be reflected in the online version of the library. Modifications should follow the PRP Library
Management Procedure which ensures that each set of changes will be represented by an "archive"
version copy of the master document. This archive version copy will contain the changes made in
Word's Track Changes so that the librarian can easily update the online library.
1.
Login with PRP Librarian Role.
2.
Go to the node/Book Page you want to modify.
3.
Click Edit in the Tab Menu and make the changes.
4.
After all changes have been made, replace the Printable PDF copy of that chapter on the Level
1 Book Page of that chapter.
Example 5.1. Updating Printable PDF
If 23.3.1 has been changed, then the Librarian must also edit the Book Page for Chapter 23 and
replace the file in the "PDF Version" field. This file will be available for download from all the
children or subsection Book Pages of that chapter so that a reader can always go from a part of
the chapter to a printable version of the chapter in its entirety.
Moving a section of the document
Procedure 5.3. Moving a section of the document
If the master document is changed so that one part of the document outline (ex 1.2.3) must be moved
to another part (ex 6.5.4), the online version of that section and all the links in the library that were
pointing to it have to be updated.
1.
Create the new Book Page and move the content over to it.
2.
Replace the content of the former Book Page.
3.
Record the change so that links pointing to this part of the document can be updated.
4.
Give the information about which links must be changed to the website administrator.
5.
The website administrator will use the /admin/content2 menu to find all links pointing to the
node that was changed and then edit the links or give the librarian a list of links to edit. All links
pointing to the altered Book Page must be changed to point to the new one.
Adding a PRP Library Page
Caution
Make sure that you are using the English interface, so the URL should be "http://
www.oist.jp", NOT "http://www.oist.jp/ja".
15
PRP Librarian Guide
The language of the interface must be English when creating the PRP JA and EN Book
Page pair in order to be able to link the new content to the Book correctly.
Creating or editing the EN Book Page from the JA interface will break the link to the
Book upon saving.
As a best practice, consistently create the English (EN) then Japanese (JA) Book Pages together, in
that order.
Procedure 5.4. Creating a New Book Page
1.
To create the English as source node, first click the "Create Book Page" link in the Staff Links box.
2.
Title: The number of the section, without the word "Chapter", and the title of the section, if
appropriate. Ex: "1.3.1 Openness in Research".
3.
Language: English. You will make the English page first, and then use the Translate link to create
the Japanese counterpart.
4.
Body: Paste in the block of text for that section of the PRP using the "Paste from Word" button
in the Editor.
5.
PDF Version: Ignore for Book Pages other than Level 1 sections. For Level 1 sections like Chapter
1, upload the printable PDF of the current version represented by the online PRP Library.
6.
PRP Tags: Select the tags that relate to this chapter.
7.
Image: Ignore.
8.
Add to Menu: None.
9.
Book Outline > Book: Policy Library
Note
If you are using the JA interface, you will not see the "Policy Library" Book choice
in the drop-down menu. Make sure you are using the EN interface.
10. Book Outline > Parent Item: Select the section of which this section is a part, so if you are creating
a section for 23.3.1, then the parent is 23.3, one level up from the section you are creating.
11. Publishing Options: Published.
12. Save the new English Book Page.
13. Now create the Japanese version of this section using the Translate button on the Tab Menu. The
system will copy the English content into the Japanese node by default. You then must replace
the English content with the Japanese translations.
14. Language: "Japanese". This should be automatically set.
15. Book Outline > Book: none.
Unlike the English original, the Japanese translation Book Pages should have Book set to None
because the system has been customized to ensure that the language switch functions properly.
16. URL Path Settings: Make sure that the URL Alias is set in the same way as the English original
node. When the pages are rendered, the system will insert the "ja", so do not add it to the alias
here. However, when you link to a Japanese PRP page, you must include the "ja", as described
in the section called “Managing Links: how the PRP pages are managed”.
16
Part III. GROUPS (groups.oist.jp)
OIST Groups (groups.oist.jp) is an installation of Drupal 6 Organic Groups, but you don't need to understand that
in order to use it. OIST Groups is a single website inside of which the Site Administrator can create subsites, each
of which is a Group Site with manager(s) (Administrative Member).
Chapter 6. Administrative Member
Guide
Managing group members
Once the Site Administrator creates the Group Site and adds at least one Administrative Member, the
Administrative Member can add more members and even assign more Administrative Members.
Procedure 6.1. How to add a group administrator member
1.
All group website members are determined by LDAP. When someone logs into groups.oist.jp,
they are added to each group that is listed in their LDAP records. If the group member does
not appear on the Tab Menu > Group > People page, first make sure that she has logged into
groups.oist.jp. If she is still not visible in the list, contact IT at [email protected]. A user must
be a member and appear in the list of group members before you can give her administrative
privileges.
2.
On the Tab Menu, go to Group > People.
3.
Select the user by clicking the checkbox.
4.
In "Update options", select "Add a role to the selected users > Administrator member" to give
the user the role of administrative member.
5.
Click Update.
Adding Pages
In the group sites, the pages you see are called "posts".
Procedure 6.2. Adding a Page
1.
Go to the Group Site main page.
2.
Click the "Page" link in the "Add Content" menu on the left.
3.
Fill in the form. The fields marked with an asterisk are required.
18
Administrative Member Guide
4.
The "Language" field should be set to "Language neutral" if you want that content to be visible
regardless of which language the visitor is using. Any content marked as "English" will only
be shown on the English interface, and content marked as Japanese will only be shown in the
Japanese interface. Content marked "Language neutral" will always be visible, regardless of
interface.
In order to create bilingual content, first create the page as language=English. After setting the
page to one of these languages and saving, a "Translate" tab will appear in the Tab Menu for
that page.
5.
Click the "Translate" tab in the Tab Menu.
6.
Click the "Add Translation" link.
7.
Fill in the form. You will notice that the content of the original English. Fields like "Language",
"Groups audience", and "Group content visibility" are grayed out because this new node is linked
to the first one as its translation, so you are not allowed to alter these fields.
Managing Menus
A group site can have more than one menu, but a main navigation menu will be created already.
Administrative Members are able to add, remove, modify, and rearrange menu items.
Bilingual menus are achieved by maintaining two parallel menus - one for each language. The menus
are set to only appear in the target language interface, so the Japanese menu is hidden when users are
using the English interface, and vice-versa.
1.
Go to Tab Menu > Group > Menus.
2.
Link "list links" enables you to rearrange links and select individual links for Editing or Deletion.
19
Administrative Member Guide
3.
Link "edit menu" does not enable you to do much more than change the name of the menu itself.
4.
Link "add link" lets you add a link to the menu. See "Add a Menu Link".
a.
Go to Tab Menu > Group > Menus > Add Link.
b.
Enter the Menu Link Title, which is what will appear in the menu as the link.
c.
Enter the Path. As the help message under the text box indicates, this can be an external
URL or an internal Drupal path. In most cases, you will be adding a link to a new post, so
you will use the pattern "node/nid" where "nid" is the numerical Node ID. Read about how
to Find the Node ID
d.
The Description field can be set so that mousing over the menu item will show a message,
but this should be used sparingly because it is very distracting for users.
e.
The Parent Link indicates under which other menu item this link should appear.
f.
Weight allows you to set the relative order of the links, but it is easier to use "list links" to
rearrange menu items.
Managing Blocks
A block is an area on the screen, usually outside the main content area, which allows you to display
things like menus, a list of events, etc.
1.
Go to Tab Menu > Group > Blocks to see the blocks available.
2.
Click "configure" to change the block settings. For components like menus, the block title
overrides the menu title, so if you cannot change the title of a menu or other content in a block,
change the setting here.
The All-Events Calendar Grid Page
The Events content type is an event which has a start and end date with optional times. Each Event
also has a Title, a language setting, and a Body which is actually a full web page which can include
links, downloads, text, images, and any other content you would expect in a webpage.
20
Administrative Member Guide
The URL for the Calendar page is /node/GROUP-NODE-ID/calendar, so if your group Node ID is
35, it will be http://www.groups.oist.jp/node/35/calendar.
1.
To set a link to view your group's Events in a calendar format, first Find the Node ID.
2.
Create a new menu item or a regular in-page hyperlink to http://www.groups.oist.jp/node/NID/
calendar.
Adding a Posts Page
The Post is a content type that can be used like a News feed or a blog. Each Post has a timestamp that
shows when it was posted, a Title, and a Body. As with Events, the Post's Body is a full webpage that
can hold anything a webpage can hold.
The URL for the Posts page is /node/GROUP-NODE-ID/posts, so if your group Node ID is 35, it will
be http://www.groups.oist.jp/node/35/posts.
1.
To set a link to view your group's Posts in a single list, first Find the Node ID.
2.
Then create a new menu item or a regular in-page hyperlink to http://www.groups.oist.jp/node/
NID/calendar.
Editing the Group Node
???.
1.
Go to Tab Menu > Group > Blocks to see the blocks available.
2.
Click "configure" to change the block settings. For components like menus, the block title
overrides the menu title, so if you cannot change the title of a menu or other content in a block,
change the setting here.
Create a Webform
A webform is a special node that has a block of HTML content at the top of the page, followed by a
form. The data entered into the form by users is stored in the Drupal database. Users with administrative
privileges can download and browse the information entered in the webform.
Watch a video example of creating a webform here: here [http://www.youtube.com/watch?
v=5kvsCBGmquE]
1.
As Group Administrative Member, click "Webform" link in the "Add Content" menu on the left.
2.
Fill in the form. The Title will be the title of the page in the browser, and the Body will be the
block of content over the form fields.
3.
The Language field works in the same way as the Language field in other content: English content
is filtered out or hidden when using the Japanese interface, Japanese content is filtered out when
using the English interface, and Neutral content is never filtered out, regardless of the interface
language.
21
Administrative Member Guide
4.
Click Preview to test and see how it will look. Click Save to save and finalize your changes.
5.
You will now see a screen where you can set the webform components, the fields and functions
of the webform.
Components
Group Events will only be visible on the group site. If you want the public to see an event, please have
it added to the public website's Events by the designated member of your group. If you want the event
to be visible to OIST members only, add it to Tida's Upcoming Events.
22
Part IV. Recipes
Table of Contents
Glossary .................................................................................................................... 25
24
Glossary
Login
1.
The link to login to public OIST web systems is not on the site. For each
server, go to "http://HOSTNAME/user" to login. For example, to login to
the public web server www.oist.jp, you would go to http://www.oist.jp/
user.
2.
Navigate to the page you want to edit, or use the "Create" links under
"Staff Links", if it is visible to your Role.
Logout
For each server, go to "http://HOSTNAME/user/logout" to logout. For
example, to logout of the public web server www.oist.jp, you would go to
http://www.oist.jp/user/logout.
Find the Node ID
This recipe only applies to users who have administrative privileges.
Select Scope
1.
Login with Administrative Privileges.
2.
Go to the Node the ID of which you want to know.
3.
Mouse over or right-click and copy the "edit" links to get the nid's.
4.
The Edit link will have a format like "http://groups.oist.jp/node/9/edit".
The number after "node/" - "9" in this example - is the Node ID. Be sure
to remove the "/edit" at the end of the URL if you copy-paste.
Most content in the websites will have a scope. Scope refers to who can see
the content.
The scope setting of content determines to whom the content is visible. Each
piece of content can have one of the following scopes:
• Authorized: Only users who are logged in with an OIST account can see this
content. This includes Tida users and family members of OIST employees
who have accounts.
• Editorial: This scope is for use by CPR to hide content from everyone but
CPR members so that content can be reviewed before being made public.
(not yet implemented; cannot use)
• Internal: Restricted to OIST employees and students.
• Public: Visible by anyone on the internet.
Select Language
With the exception of Tida, OIST websites are bilingual Japanese-English.
The language setting of content determines where content is visible. Each
piece of content can be English, Japanese, or Neutral.:
• English items are filtered out of the Japanese mode or interface of the
website, so when using the Japanese website, you will not see content set
to Language=English.
• Japanese items are filtered out of the English mode or interface of the
website, so when using the English website, you will not see content set to
Language=Japanese.
• Language=Neutral is sometimes referred to Language None, and this
content is never filtered out, so a piece of Language=Neutral content is
visible on both English and Japanese websites.
25
Glossary
• The "Translate" function is only available when a piece of content has
been set to English or Japanese and then saved. Neutral content cannot be
translated.
Manage Media File with ICME
IMCE is a part of the system that allows you to upload, inspect, and manage
files like images and documents on the server.
1.
In the Editor, click the "Image" or "Link" button.
2.
The media file browser opens in a new window.
3.
Please store files in your unit or division/section folder. If you cannot see
a folder for your group, ask the webmaster.
4.
Many images and files have a link URL that begins with "media:". The
system replaces the media server mediasv.oist.jp with this for you. When
you are adding files, you should use the web server.
26
Part V. Terminology
Table of Contents
Glossary .................................................................................................................... 29
28
Glossary
Administrative Member
The administrative member has control over the pages, membership, menus,
and other aspects of the Group Site. However, unlike the Site Administrator,
the Administrative member of a group has no control over the contents of
other Group Sites.
Book
A Book is a Node which serves at the main connection point for a set of nodes
called Book Pages, which are ordered and linked to one another like the pages
of a physical, paper book.
The Black Toolbar at the Top of
the Screen
Some users will have a black toolbar across the top of the screen. By clicking
the triangle on the far right, you can access menus to create new content and
search content already in the system.
Book Page
Book Pages are nodes which are associated with a Book and linked to one
another in a certain order, like the pages of a physical, paper book.
Group Menu
The Administrator User sees a Tab Menu on each node, but on the Group
Node there is an additional tab labeled "Group".
The "Group Menu" opens a menu to other group-site-wide menus for
managing People, Content, Menus, and Blocks.
Group Node
What looks like the Home Page of the groups website is a special node called
the "Group Node" because it is the core of the group website. All other nodes
in that website are associated to this Group Node.
The Administrator Member sees the Tab Menu on each node in the site, but
only on the Group Node can you find the link to the Group Menu.
Group Site
Each Group Site is a website inside a larger website, which is an installation
of Drupal. The "Site" in this manual is the larger Drupal in which the groups
have been created.
Node
This system runs on the open source CMS Drupal. In Drupal, almost every
chunk of content is a node, so each new Page or Event you create is a node.
A node is a piece of content you see in the web system.
Node ID
Every node has a node ID, which is often abbreviated "nid".
Parent Book Page
The Book Page nodes in a Book are linked hierarchically. The Parent of each
Book Page node is the Book node, and each level down in the hierarchy is the
child of the parent above it, so 23.1 is the parent of 23.1.2, etc.
Role
Each user is given one or more roles, and each role has a set of permissions
and access privileges. The roles you have been given determines what you
can see and do in the site.
Site Administrator
The administrator of the larger website inside of which each Group Site exists.
The Site Administrator can create new groups, assign group members, and
assign administrative members for groups.
Tab Menu
The menu specific to a node. In the case of a Group Site's main page, this
is the main menu for managing the group. The Tab Menu is only visible to
administrative members.
29
Glossary
WYSIWYG Editor
The OIST website system is using the WYSIWYG CKEditor. WYSIWYG
means "what you see is what you get", a name for an in-browser editor which
allows you to modify your page without reading HTML, by using the menus
to change the look of the page and see it as it changes.
Learn more about how to use the CKEditor at the CKEditor Docs Site. [http://
docs.cksource.com/CKEditor_3.x/Users_Guide]
30