1
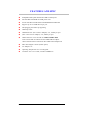
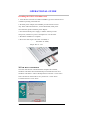
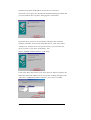
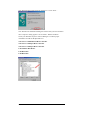
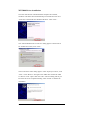
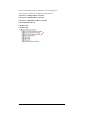
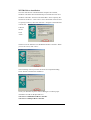
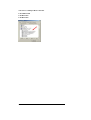
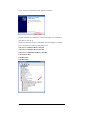
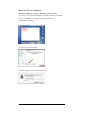
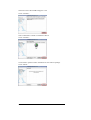
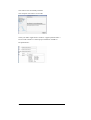
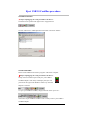
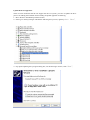
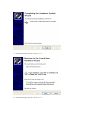
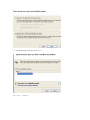
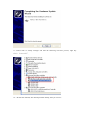
Table of Contents INTRODUCTION........................................................................... 1 FEATURES AND SPEC ................................................................ 2 OPERATIONAL GUIDE............................................................... 3 USB2.0 CARDBUS DRIVER INSTALLATION ....................... 3 WIN98 DRIVER INSTALLATION............................................ 3 WIN2000 DRIVER INSTALLATION........................................ 6 WINME DRIVER INSTALLATION ......................................... 8 WINXP DRIVER INSTALLATION ........................................ 10 MAC OS X DRIVER INSTALLATION .................................. 12 EJECT USB2.0 CARDBUS PROCEDURE.............................. 15 INTRODUCTION This manual is for both: the USB2.0 CardBus Dual, a type IICardBus PC Card (2-4 ports ), They are designed to the provisions of the USB2.0 OHCI standards. Ports for various high speed USB devices connection, up to 480 Mb/s data rate, hotplugging, legacy devices supporting, are provided for the maximum USB device connections. USB2.0 Cardbus User’s Manual 1 FEATURES AND SPEC Independent full speed downstream USB 2.0 OHCI ports Full 480 Mb/s bandwidth for USB power users Works with Microsoft Windows 98/2000/ME/XP & MacOSX Supports up to 127 USB devices per port Hot-plugging, and wake-up supporting USB Chip: NEC USB Bus Power: (PC Card w/o Adapter) +5V, 100mA per port (PCI or PC Card w/ Adapter) +5V, 500mA per port USB Connectors: Two external for USB2.0 CardBus Dual Four external and one internal for PCI USB2.0 Host Adapter Three external and two internal for PCI USB2.0 Host Adapter LP Max cable length: 5 meters (Order option) AC Adapter: 5V Operating Temperature: 0 to 45 centigrade Card Size: 85.6 x 54 x 5mm , TYPE II CardBus PC USB2.0 Cardbus User’s Manual 2 OPERATIONAL GUIDE Installing the USB 2.0 Cardbus card 1. Insert the PC Card into an available CardBus type II slot with the arrow orientation pointing toward the slot. 2. Without power Adapter, the USB Bus provides 100mA current only. If the USB external device, such as Hard Disk, needs power more than this; please install the power adapter. * Note the maximum power supply is 500mA. Please provides self-power, if the device power consumption is over this limit. 3. Hardware installation is complete. 4. DC Power Jack: Input: 100-120V AC 60HZ, or 200-240V AC 50HZ, Output: DC 5V 1.2A WIN98 Driver installation Once the card has been installed and the computer has restarted, Windows will detect the board and attempt to load the drivers from it. Windows will detect a “NEC USB Open Host Controller”. Click “Next.” Select “Search for the best driver for your device.” Click “Next.” Uncheck all boxes. Click “Next.” USB2.0 Cardbus User’s Manual 3 Windows has found an updated driver for this device. Click“Next.” Then Click “Next” again. The “Window has finished installing the software that your new hardware device requires” dialog appears. Click“Finish.” Repeat the above process for the second NEC USB Open Host Controller. Windows will find a “PCI Universal Serial Bus” device. Click “Next. Select “Display a list of all the drivers in a specific location, so you can select the driver you want”. Click “Next.”In the dialog that appears, highlight “USB Controllers”. Click“Next.” Click on the “Have Disk” button, click on the “Browse” button. Navigate to the folder that contains the USB 2.0 drivers. Click “OK.”A dialog will appear with “NEC PCI to USB Enhanced Host Controller”, click “Next” to continue. USB2.0 Cardbus User’s Manual 4 The “Windows driver file search for the device”. Click “Next” . The “Window has finished installing the software that your new hardware device requires” dialog appears. Click “Finish.” Restart Windows. Check your Windows System→Device Manager to confirm proper installation of USB 2.0 Hi-Speed drivers: NEC PCI to USB Enhanced Host Controller NEC PCI to USB Open Host Controller NEC PCI to USB Open Host Controller USB 2.0 Root Hub Device USB Root Hub USB Root Hub USB2.0 Cardbus User’s Manual 5 WIN2000 Driver installation Once the card has been installed and the computer has restarted, Windows will detect the board and attempt to load the drivers from it. “Welcome to the Found New Hardware Wizard”. Click “Next.” The “Install Hardware Device Drivers” dialog appears. Check Search for suitable driver then, click “Next.” The Locate Driver Files dialog appears. Click “Specify Location”, click “Next.” Click “Browse.” Navigate to the folder that contains the USB 2.0 drivers. Click “Open” then click “OK.” The next dialog will let you know the driver has completed loading. Click “Finish” to finalize the installation. USB2.0 Cardbus User’s Manual 6 Check your Windows System→Hardware→Device Manager to confirm proper installation of USB 2.0 Hi-Speed drivers: NEC PCI to USB Open Host Controller NEC PCI to USB Open Host Controller NEC PCI to USB Enhanced Host Controller USB 2.0 Root Hub Device USB Root Hub USB Root Hub USB2.0 Cardbus User’s Manual 7 WINMe Driver installation Once the card has been installed and the computer has restarted, Windows will detect the board and attempt to load the drivers from it. Windows will find a “PCI Universal Serial Bus”. Select “Specifiy the location of t he driver”. Click “Next.” Put a check mark in the box next to “Specify Location,” then click “Browse.” Navigate to the folder that contains the USB 2.0 drivers. Click “Next.” The driver will be NEC PCI to USB Enhanced Host Controller” When you see the screen, click “Next.” The next dialog will let you know the driver has completed loading. Click “Finish” to finalize the installation. Check your Windows System→Device Manager to confirm proper installation of USB 2.0 Hi-Speed drivers: NEC PCI to USB Enhanced Host Controller NEC PCI to USB Open Host Controller USB2.0 Cardbus User’s Manual 8 NEC PCI to USB Open Host Controller USB 2.0Root Hub USB Root Hub USB Root Hub USB2.0 Cardbus User’s Manual 9 WINXP Driver installation Once the card has been installed and the computer has restarted, Windows will detect the board and attempt to load the drivers from it. “Welcome to the Found New Hardware Wizard”. Select “ Install from a list or specific location”, click “Next.” Click “Browse” Navigate to the folder that contains the USB2.0 drivers. Click “Open” then click “Next”. Following Screen appears. Click “Continue Anyway” USB2.0 Cardbus User’s Manual 10 Click “Finish”, now the driver setup has been finished. WinXP will detect new hardware “USB 2.0 Root Hub”, the installation procedure is same as up. Check your Windows System→Hardware→Device Manager to confirm proper installation of USB 2.0 Hi-Speed drivers: NEC PCI to USB Open Host Controller NEC PCI to USB Open Host Controller NEC PCI to USB Enhanced Host Controller USB 2.0 Root Hub USB Root Hub USB Root Hub USB2.0 Cardbus User’s Manual 11 Mac OS X Driver installation The Mac USB20 driver requires Mac OS X v10.0.4 or later Copy the driver file to Mac Hard disk, and double click this file. Double click on “USB2EHCI_v108.pkg.img”, and double click on “USB2EHCI_v108.pkg”. Click the lock to mark changes. Input the user name and password, Click “Ok”. USB2.0 Cardbus User’s Manual 12 Welcome to the USB 2.0 EHCI Support v1.0.8 Click “Continue”. Select a destination volume to install the USB 2.0 Click “Continue”. Click install to perform a basic installation of t his software package. Click “Install”. USB2.0 Cardbus User’s Manual 13 The software was successfully installed. The computer will restart in 30 seconds. Check your MAC Applications→Utilities→Apple System Profiler→ Devices and Volumes to confirm proper installation of USB 2.0 Hi-Speed drivers: USB2.0 Cardbus User’s Manual 14 Eject USB2.0 CardBus procedure Win2000 and WinXP: ★ Before unplugging the card, first Remove the driver: Click the arrow symbol at the right corner of page bottom. Choose “NEC PCI to USB Open Host Controller” and click “STOP”. Win98 and WinME: Please install USB2.0 safe remove program. and reboot computer. ★ Before unplugging the card, first Remove the driver: Setup will now install an eject utility for your USB2.0 CardBus adapter. This utility will display the eject icon pictured to the right in the Windows status tray when the adapter is inserted. To eject your USB2.0 CardBus, simply left click on the eject icon… Then select “Eject USB2.0 Cardbus Card” to safely remove your USB2.0 CardBus adapter. USB2.0 Cardbus User’s Manual 15 When the adapter can be safely removed, the following dialog will pop up: After you click “Ok” you may safely remove your USB2.0 CardBus adapter. USB2.0 Cardbus User’s Manual 16 Update the drive approach: There are some notebooks that do not support the drive of system, you have to update the drive process for making the notebook work normally, the update approach is following; 1、Move the drive installation procedure of disc; 2、Please go to facility manager and find the following drive process, right key Click “Next”; 3、Pop-up the updating drive program dialog box, see the drawing to choose, Click“Next”; 4、Click “Next” ;See the drawing to choose, Click“Next” ; 5、See the drawing to choose, Click“Next”; 6、See the drawing to choose, Click“Next”; 7、See the drawing to choose, Click“Next”; 8、See the drawing to choose, Click“Next”; 9、See the drawing to choose, Click“Next”; 10、Click “Finish”; 11、Please back to facility manager and find the following two-drive process, right key Click “uninstall” ; 12、Re-start the noebook, auto-install procedure facility, then you can use。