1
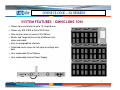
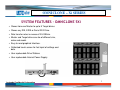
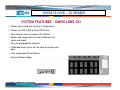
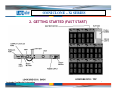
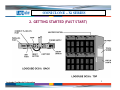
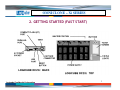
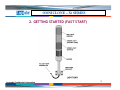
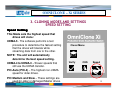
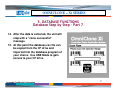
OMNICLONE – Xi SERIES
L O G I C U B E T R A I N I N G:
Omniclone – Xi Series
Logicube Confidential Information
1
OMNICLONE – Xi SERIES
USING THIS TRAINING MANUAL
This manual is made up of 7 chapters:
1.Introduction
2.Getting Started (Fast Start)
3.Cloning Modes and Settings
4.Omnidiagnostics
5.Database Functions
6.Other Features
7.User Replaceable Hardware
Logicube Confidential Information
2
OMNICLONE – Xi SERIES
1. INTRODUCTION TO THE OMNICLONE – Xi SERIES
The Omniclone-Xi series is designed to meet the needs of high-volume hard drive
duplication facilities. It is an ideal solution for the following scenarios:
•High Volume Roll-outs of workstations for a large company, university or
other facility.
•Production Line needs for manufactured products that require hard disk
drives, such as Digital Video Recorders or GPS Devices.
•Computer Manufacturers that build a large quantity of PC’s.
The Omniclone Xi™ is designed to be easy enough to be used by a novice, yet
offers many professional features that are not available anywhere else.
Logicube Confidential Information
3
OMNICLONE – Xi SERIES
SYSTEM FEATURES – OMNICLONE 10Xi
• Clones from one Master to up to 10 Target drives.
• Clones any IDE, EIDE or Serial ATA Drive.
• Data transfer rates in excess of 3.5 GB/min.
• Master and Target drives can be of different size,
make and model.
• Easy to read graphical interface.
• Calibrated touch screen for fast input of settings and
data.
• User-replaceable Drive Stations
• User-replaceable Internal Power Supply.
Logicube Confidential Information
4
OMNICLONE – Xi SERIES
SYSTEM FEATURES – OMNICLONE 5Xi
• Clones from one Master to up to 5 Target drives.
• Clones any IDE, EIDE or Serial ATA Drive.
• Data transfer rates in excess of 3.5 GB/min.
• Master and Target drives can be of different size,
make and model.
• Easy to read graphical interface.
• Calibrated touch screen for fast input of settings and
data.
• User-replaceable Drive Stations
• User-replaceable Internal Power Supply.
Logicube Confidential Information
5
OMNICLONE – Xi SERIES
SYSTEM FEATURES – OMNICLONE 2Xi
• Clones from one Master to up to 2 Target drives.
• Clones any IDE, EIDE or Serial ATA Drive.
• Data transfer rates in excess of 3.5 GB/min.
• Master and Target drives can be of different size,
make and model.
• Easy to read graphical interface.
• Calibrated touch screen for fast input of settings and
data.
• User-replaceable Drive Stations
• External Power Supply.
Logicube Confidential Information
6
OMNICLONE – Xi SERIES
2. GETTING STARTED (FAST START)
Logicube Confidential Information
7
OMNICLONE – Xi SERIES
2. GETTING STARTED (FAST START)
Logicube Confidential Information
8
OMNICLONE – Xi SERIES
2. GETTING STARTED (FAST START)
Logicube Confidential Information
9
OMNICLONE – Xi SERIES
2. GETTING STARTED (FAST START)
Logicube Confidential Information
10
OMNICLONE – Xi SERIES
2. GETTING STARTED (FAST START)
USER INTERFACE
Logicube Confidential Information
11
OMNICLONE – Xi SERIES
2. GETTING STARTED (FAST START)
Attaching Drives (PATA) – Part 1
This next series of slides will
Show you how to attach a
Parallel-ATA (PATA) hard disk
Drive to the Omniclone-Xi.
Note: PATA hard drives are also referred to as IDE, EIDE, UDMA or Parallel drives.
Logicube Confidential Information
12
OMNICLONE – Xi SERIES
2. GETTING STARTED (FAST START)
Attaching Drives (PATA) – Part 2
1.
Locate the Master position on the top of
your Omniclone-Xi™ unit. You will
notice three connections: One for a flat
cable (the drive data cable) and another
for a small drive power cable. Above is
the third connector for the Serial ATA
cable.
Note: The drive that is cloned from is always referred to as the Master drive and the drives
that are cloned to are always referred to as the Target drives.
Logicube Confidential Information
13
OMNICLONE – Xi SERIES
2. GETTING STARTED (FAST START)
Attaching Drives (PATA) – Part 3
2.
Attach the 5” UDMA ribbon cable and
the drive Power cable to the connectors.
3.
Connect the Master hard drive to the
cables and verify that the drive’s jumper
is set to Single Master.
Logicube Confidential Information
14
OMNICLONE – Xi SERIES
2. GETTING STARTED (FAST START)
Attaching Drives (PATA) – Part 4
4.
Follow steps 1 – 3 to attach drives to the
Target positions of the Logicube
Omniclone Xi™.
5.
Connect the AC Power Cord to the back
of the Logicube Omniclone Xi™ and
power-up the unit. In 2 – 3 seconds, the
main “Splash” screen appears.
Logicube Confidential Information
15
OMNICLONE – Xi SERIES
2. GETTING STARTED (FAST START)
Attaching Drives (SATA) – Part 1
This next series of slides will
Show you how to attach a
Serial-ATA (SATA) hard disk
Drive to the Omniclone-Xi.
Logicube Confidential Information
16
OMNICLONE – Xi SERIES
2. GETTING STARTED (FAST START)
Attaching Drives (SATA) – Part 2
1.
Locate the Master position on the top of
your Omniclone-Xi™ unit. You will
notice three connections: One for a flat
cable (the drive data cable) and another
for a small drive power cable. Above is
the third connector for the Serial ATA
cable.
Note: The drive that is cloned from is always referred to as the Master drive and the drives
that are cloned to are always referred to as the Target drives.
Logicube Confidential Information
17
OMNICLONE – Xi SERIES
2. GETTING STARTED (FAST START)
Attaching Drives (SATA) – Part 3
2.
Attach the 5” SATA cable to the SATA
and drive power connectors.
3.
Connect the Master hard drive to the
cables.
Note: SATA drives usually do not need to use jumper settings.
Logicube Confidential Information
18
OMNICLONE – Xi SERIES
2. GETTING STARTED (FAST START)
Attaching Drives (SATA) – Part 4
4.
Follow steps 1 – 3 to attach drives to the
Target positions of the Logicube
Omniclone Xi™.
5.
Connect the AC Power Cord to the back
of the Logicube Omniclone Xi™ and
power-up the unit. In 2 – 3 seconds, the
main “Splash” screen appears.
Logicube Confidential Information
19
OMNICLONE – Xi SERIES
CONNECTING OTHER TYPES OF DRIVES
Logicube offers specialized adapters that allow other types of drives
to be connected to the Omniclone – Xi series. Such drives include:
2.5” laptop drives
1.8” laptop drives (e.g. Toshiba “iPod™” drives)
Compact Flash (CF) drives.
Other specialized adapters are also available. If you are unsure about
the type of drive that you have, please contact Logicube Technical
Support for assistance.
Logicube Confidential Information
20
OMNICLONE – Xi SERIES
3. CLONING MODES AND SETTINGS
Logicube Confidential Information
21
OMNICLONE – Xi SERIES
3. CLONING MODES AND SETTINGS
Touch Screen Display
The Omniclone Xi™ features an LCD
Touch Screen that allows the user to
quickly input commands.
The screen is bright and easy to read. It
also emits an audible beep every time the
touch screen is pressed. This lets the
user know that the touch screen is active.
Logicube Confidential Information
22
OMNICLONE – Xi SERIES
3. CLONING MODES AND SETTINGS
Calibrating the Touch Screen – Part 1
There may be times when the user wants
to recalibrate the Touch Screen.
The procedure for this is very simple:
Logicube Confidential Information
23
OMNICLONE – Xi SERIES
3. CLONING MODES AND SETTINGS
Calibrating the Touch Screen – Part 2
1.
Press the Reset button on the back of the unit and hold it in.
Logicube Confidential Information
24
OMNICLONE – Xi SERIES
3. CLONING MODES AND SETTINGS
Calibrating the Touch Screen – Part 3
2.
Press and hold the Set button, then release the Reset button.
Logicube Confidential Information
25
OMNICLONE – Xi SERIES
3. CLONING MODES AND SETTINGS
Calibrating the Touch Screen – Part 4
3.
Hold the Set button until the unit
boots to a screen that reads
“Touchpad Calibration. Please
touch square with finger (1/5)”.
4.
Look for a square at the top of the
screen. Touch the square when it
is located.
5.
Repeat the previous step four more
times. The unit will count each time
the square is pressed correctly. It
will count (1/5), (2/5), etc.
6.
Once the screen has been
calibrated, it will reboot to the Main
Menu Screen.
Logicube Confidential Information
Touchpad Calibration. Please touch
square with finger. (3/5)
26
OMNICLONE – Xi SERIES
3. CLONING MODES AND SETTINGS
Main Screen
Logicube Confidential Information
27
OMNICLONE – Xi SERIES
3. CLONING MODES AND SETTINGS
Main Screen
Time/Date Settings
The Omniclone Xi™ has a real-time clock
that keeps track of the correct time and
date.
The time and date can be easily set by
touching it on the screen and entering in
the new time/date.
Logicube Confidential Information
28
OMNICLONE – Xi SERIES
3. CLONING MODES AND SETTINGS
Main Screen
About Icon
Select the About Screen by pressing the
“About” icon. It will display the serial
number of your unit along with the
software and firmware versions that are
loaded.
In addition, the About screen lists all
options currently enabled on the unit and
provides contact information for Logicube
Technical Support.
To return to the main menu, simply press
the “Back” icon at any time.
Logicube Confidential Information
29
OMNICLONE – Xi SERIES
3. CLONING MODES AND SETTINGS
Main Screen
Drives Icon
Select the Drive Info screen by pressing
the “Drives” icon. The unit will then power
up all of the drives that are attached.
After 30 to 45 seconds, the unit will show a
list of all the drives it has detected.
If a drive is pressed on the Touch Screen,
the unit will access the drive and report
back the drive’s model number, capacity,
geometry and other information.
Logicube Confidential Information
30
OMNICLONE – Xi SERIES
3. CLONING MODES AND SETTINGS
Main Screen
Drives Icon
To see the drive’s partition information,
press the “See More” icon to display all of
the partitions located on that drive.
To return to the list of drives, you may
press the “Back” icon at any time.
Pressing the Back icon again will go back
to the Main Menu Screen.
Logicube Confidential Information
31
OMNICLONE – Xi SERIES
3. CLONING MODES AND SETTINGS
Main Screen
A Note About the Back Icon
The Back icon can be found in the lower left hand corner on most of the
Touch Screens. Touching this icon will go back to the previous Settings
screen or the Main Menu Screen.
Logicube Confidential Information
32
OMNICLONE – Xi SERIES
3. CLONING MODES AND SETTINGS
CLEVER CLONE – Part 1
This is the default mode. It clones ALL partitions on the Master drive to the
Target drives. It scales all known partitions (FAT16/32, and NTFS) to fill the
Target in its entirety and makes all the necessary adjustments to ensure
valid and bootable Target drives.
NOTE: Clever Clone is available by default for FAT partitions. NTFS Clever
Clone is available as a purchased option.
NOTE: Any unrecognizable partition is automatically cloned with
Mirror Clone mode. This includes non-Windows partitions like
Linux, Unix, BSD and other partition types.
33
Logicube Confidential Information
OMNICLONE – Xi SERIES
3. CLONING MODES AND SETTINGS
CLEVER CLONE – Part 2
Clever Clone – Step by Step
1.
From anywhere in the menu system
click the “Set” button to enter the
Settings menu.
2.
Press the Cloning Mode icon that
appears in the upper left-hand corner.
A list of the available cloning modes
appears.
3.
Press the “Clever” icon, the Clever
Clone™ settings screen will appear.
Logicube Confidential Information
Settings Menu
34
OMNICLONE – Xi SERIES
3. CLONING MODES AND SETTINGS
CLEVER CLONE – Part 3
Clever Clone – Step by Step
4.
5.
Adjust the “Verify”, “CHS” and
“SPEED” settings as needed. (These
settings are discussed later in this
chapter).
Clever Menu
You may now double-click the
“Start/Stop” button to start cloning.
Verify
CHS
Speed
NOTE: When Clever Clone™ scales down
an NTFS partition, it can only scale it
to 55% of the original size.
Logicube Confidential Information
35
OMNICLONE – Xi SERIES
3. CLONING MODES AND SETTINGS
VERIFY SETTING
Verify Setting
The Verify preference allows you to scan
the Target drives for bad or weak
sectors.
Clever Menu
Verify Settings
No Verify (Default) - No data verification is
performed.
1% Verify - Only the first 1% of the data
sectors are verified. This is faster but
less thorough than using the All
setting.
100% Verify - Every data sector on the Target
drive to which data has been written
is checked.
Logicube Confidential
Information
Verify
CHS
Speed
36
OMNICLONE – Xi SERIES
3. CLONING MODES AND SETTINGS
CHS SETTING
CHS Setting
This Mode sets the geometry (Cylinder,
Head and Sector) translation used on
the Target drive. The Settings are:
LBA (Default) – 95% of PC’s use this setting.
Clever Menu
LARGE – Used only by Compaq, HP, IBM
Thinkpad and a handful of other PC’s.
LBA/LARGE –1 or –2 – Shaves off 1 or 2
cylinders from the end of the formatted
drive.
Verify
CHS
Speed
LBA/LARGE 8.5 – Setting used by older
BIOS systems that cannot see drives >
8.5GB.
Logicube Confidential Information
37
OMNICLONE – Xi SERIES
3. CLONING MODES AND SETTINGS
SPEED SETTING
Speed Setting
This Mode sets the highest speed that
drives will clone:
UDMA-5 - The software performs a test
procedure to determine the fastest setting
that the drives will tolerate while
streaming data from one to the other.
Clever Menu
NOTE: The unit will automatically
determine the best speed setting.
UDMA-4 to UDMA-0 – Slower speeds that
still use the UDMA transfer.
Verify
CHS
Speed
PIO-Auto (PIO-4) – The highest non-UDMA
speed for older drives.
PIO Medium and Slow – These settings are
used
for older
or damaged Master drives.
Logicube
Confidential
Information
38
OMNICLONE – Xi SERIES
3. CLONING MODES AND SETTINGS
SELECTIVE CLONE – Part 1
This is the most elaborate and most flexible mode. It allows the
highest level of control over the cloning process.
NOTE: Selective Clone Mode is an optional function that has to be
purchased in order to be enabled.
Selective mode allows you to select one or multiple partitions to
clone. It also allows you to choose a unique copy method to use
for each. The available methods are:
Logicube Confidential Information
39
OMNICLONE – Xi SERIES
3. CLONING MODES AND SETTINGS
SELECTIVE CLONE – Part 2
Logicube Confidential Information
40
OMNICLONE – Xi SERIES
3. CLONING MODES AND SETTINGS
SELECTIVE CLONE – Part 3
Selective Clone – Step by Step
1.
From anywhere in the menu system
click the “Set” button to enter the
Settings menu.
2.
Press the Cloning Mode icon that
appears in the upper left-hand corner.
A list of the available cloning modes
appears.
3.
Press the “Selective” icon, the unit will
immediately power the Master drive
and display the partition table.
Logicube Confidential Information
Settings Menu
41
OMNICLONE – Xi SERIES
3. CLONING MODES AND SETTINGS
SELECTIVE CLONE – Part 4
Selective Clone – Step by Step
4.
5.
On the right hand side you will see a
designator for the partition type.
Some examples are:
•
16 - FAT16 partition
•
32 - FAT32 partition
•
NT - NTFS partition
•
Linux – Linux partition
•
?? - unknown partition
Touch the scroll icons to place the
cursor by a given partition, and then
touch the space to the left of the
partition multiple times to choose.
Logicube Confidential Information
Settings Menu
42
OMNICLONE – Xi SERIES
3. CLONING MODES AND SETTINGS
SELECTIVE CLONE – Part 5
Selective Clone – Step by Step
6.
Scroll to other partitions and repeat
Step 5. Note that it is OK to assign
unique cloning modes to each
selected partition.
7.
When finished, press the “Set” button.
The Selective Clone™ settings screen
will appear.
8.
Adjust the “Verify”, “CHS” and
“SPEED” settings as needed.
9.
You may now double-click the
“Start/Stop” button to start cloning.
Logicube Confidential Information
Selective Menu
Verify
CHS
Speed
43
OMNICLONE – Xi SERIES
3. CLONING MODES AND SETTINGS
MIRROR CLONE – Part 1
This mode simply makes a bit-by-bit mirror copy of the Master
drive. It does not adjust any values. This mode is only
recommended when all else fails and even then only between
similar geometry drives. It is also recommended for non-Windows
partitions like UNIX, LINUX and other such systems.
You can dial the percentage of Master disk you wish to mirror. For
example, setting to 50% will mirror the first 50% of the Master
drive’s size.
Logicube Confidential Information
44
OMNICLONE – Xi SERIES
3. CLONING MODES AND SETTINGS
MIRROR CLONE – Part 2
Mirror Clone – Step by Step
1.
From anywhere in the menu system
click the “Set” button to enter the
Settings menu.
2.
Press the Cloning Mode icon that
appears in the upper left-hand corner.
A list of the available cloning modes
appears.
3.
Press the “Mirror” icon.
Logicube Confidential Information
Settings Menu
45
OMNICLONE – Xi SERIES
3. CLONING MODES AND SETTINGS
MIRROR CLONE – Part 3
Mirror Clone – Step by Step
4.
5.
A screen appears asking you what
percentage of the Master drive to
clone. Touch the numeric keypad to
adjust this value from 0 – 100% for the
front and rear of the drive.
Settings Menu
For example, if you were to enter 20
for the front and 30 for the back, Mirror
Clone would copy the first 20% of the
Master drive, skip over the next 50%
and clone the remaining 30%.
Logicube Confidential Information
46
OMNICLONE – Xi SERIES
3. CLONING MODES AND SETTINGS
MIRROR CLONE – Part 4
Mirror Clone – Step by Step
6.
Adjust the “Verify”, “CHS” and
“SPEED” settings as needed.
100% Mirror Menu
7.
You may now double-click the
“Start/Stop” button to start cloning.
Verify
Logicube Confidential Information
Speed
47
OMNICLONE – Xi SERIES
3. CLONING MODES AND SETTINGS
MASTER MANAGER – Part 1
This is a special mode that assists in the creation of Master drives.
It lets the user choose exactly one partition from the drive in the
Master position (referred to henceforth as the Source drive) and
clone it to the drive in the Target 1 position (referred to henceforth
as the Destination drive).
The Omniclone Xi™ can hold up to 24 partitions on one Master
drive. Drives over 250GB in size have been tested with Master
Manager successfully.
Logicube Confidential Information
48
OMNICLONE – Xi SERIES
3. CLONING MODES AND SETTINGS
MASTER MANAGER – Part 2
The Master Manager is a useful tool to aid in the creation of a
multi-partition Master drive. Many MIS technicians like to store
multiple partitions (e.g. one for accounting, one for marketing,
etc.) on a single Master drive. When a drive crash occurs or a new
PC is to be configured, all the technician needs to do is select that
partition and clone it. The tool is also useful to create backups of
important partitions.
NOTE: Master Manager Mode is an optional function that has to
be purchased
order to be enabled.
Logicube
Confidential in
Information
49
OMNICLONE – Xi SERIES
3. CLONING MODES AND SETTINGS
MASTER MANAGER – Part 3
Master Manager – Step by Step
To create a Master drive using Master
Manager, you must start with an
unformatted drive. (Use the
Wipeclean™ Mode, FDISK or a third
party tool to wipe out the intended
drive’s partition table.)
Logicube Confidential Information
50
OMNICLONE – Xi SERIES
3. CLONING MODES AND SETTINGS
MASTER MANAGER – Part 4
Master Manager – Step by Step
1.
From anywhere in the menu
system click the Set button to
enter the Settings menu.
2.
Press the Cloning Mode icon that
appears in the upper left-hand
corner. A list of the available
cloning modes appears.
3.
Press the “MMgr” icon, the Master
Manager™ settings screen will
appear.
Logicube Confidential Information
Settings Menu
51
OMNICLONE – Xi SERIES
3. CLONING MODES AND SETTINGS
MASTER MANAGER – Part 5
Master Manager – Step by Step
4.
5.
Adjust the “Verify” and “SPEED”
settings as needed. (These settings
are discussed later in this chapter).
You may now double-click the
“Start/Stop” button to start cloning.
You will be warned that continuing will
modify your Destination drive. If you
are ready to do this, choose “Yes” to
continue.
NOTE: When Clever Clone™ scales down
an NTFS partition, it can only scale it
to 55% of the original size.
Logicube Confidential Information
Master Mgr. Menu
Verify
Speed
52
OMNICLONE – Xi SERIES
3. CLONING MODES AND SETTINGS
MASTER MANAGER – Part 6
Master Manager – Step by Step
6.
Touch the scroll icons to place the cursor by one single partition, and then
touch the space to the left of the Volume Label multiple times to cycle
among the 4 options. Master Manager uses the same cloning icons as
Selective Clone Mode.
Logicube Confidential Information
53
OMNICLONE – Xi SERIES
3. CLONING MODES AND SETTINGS
MASTER MANAGER – Part 7
Master Manager – Step by Step
7.
8.
9.
Press the Start/Stop button. After a
few seconds, the Destination
partitions (if any) are displayed.
Touch the Scroll icons to place the
cursor by a Destination partition you
want to overwrite, or scroll down to
the “Add Partition” item. Touch the
space to the left of the Volume Label
to choose the desired partition or to
add a new partition.
Hit the “Start/Stop” button to begin
cloning.
Logicube Confidential Information
Master Mgr. Menu
Verify
Speed
54
OMNICLONE – Xi SERIES
3. CLONING MODES AND SETTINGS
MASTER MANAGER – Part 8
Master Manager – Step by Step
10. Repeat the previous steps to add partitions to the Destination drive.
Master Manager will let you add more partitions until you reach 24
partitions or run out of space.
Logicube Confidential Information
55
OMNICLONE – Xi SERIES
4. OMNIDIAGNOSTICS
Logicube Confidential Information
56
OMNICLONE – Xi SERIES
4. OMNIDIAGNOSTICS
OmniDiagnostics™ is a powerful set of features that aid in the
recovery and repair of drives with bad or weak data sectors, and
in the secure erasure of sensitive data.
NOTE: OmniDiagnostics™ like NTFS Clever Clone,
Selective and Master Manager is an option that needs to
be purchased in order to be enabled.
Logicube Confidential Information
57
OMNICLONE – Xi SERIES
4. OMNIDIAGNOSTICS
Scan Target Mode – Part 1
Scan Target mode scans the Target drives for weak and bad data
sectors. It uses the Read-Verify command of the ATA specification
to detect bad or weak spots on the Target drives. When a suspect
area of the drive is detected, a sector-by-sector analysis is
performed.
If a given sector is read incorrectly one or more times out of 10
tries, it is considered to be weak. If it is read incorrectly 10 times
out of 10, it is considered to be bad.
Any drive that shows weak sectors should be returned to the
manufacturer or retired due to the higher risk of potential data
loss.
Logicube Confidential Information
58
OMNICLONE – Xi SERIES
4. OMNIDIAGNOSTICS
Scan Target Mode – Part 2
When using Scan Target mode there are two levels of scanning
speed to choose from:
•Fast (Default) – This is the fastest.
•Thorough – This is the most thorough.
The Thorough operation writes patterns to some sectors, which
can cause data corruption. Use this setting only when data loss is
not an issue.
Logicube Confidential Information
59
OMNICLONE – Xi SERIES
4. OMNIDIAGNOSTICS
Scan Target Mode – Part 3
Scan Target Mode – Step by Step
1.
From anywhere in the menu
system click the Set button to
enter the Settings menu.
2.
Press the Cloning Mode icon that
appears in the upper left-hand
corner. A list of the available
cloning modes appears.
3.
Press the “Scan” icon, the Scan
Target settings screen will appear.
Logicube Confidential Information
Settings Menu
60
OMNICLONE – Xi SERIES
4. OMNIDIAGNOSTICS
Scan Target Mode – Part 4
Scan Target Mode – Step by Step
4.
Adjust the “SPEED” setting as
needed.
5.
You may now double-click the
“Start/Stop” button to start cloning.
You will be warned that continuing will
modify your Destination drive. If you
are ready to do this, choose “Yes” to
continue.
6.
When finished, the Logicube
Omniclone Xi™ will notify you and
display a list of the scanned drives
along with bad or weak sectors found
on each drive.
Logicube Confidential Information
Settings Menu
61
OMNICLONE – Xi SERIES
4. OMNIDIAGNOSTICS
Repair Target Mode – Part 1
Repair Target mode scans Target drives using a Logicube
exclusive algorithm in an attempt to repair all weak and bad
sectors encountered. Please note that this process can take a long
time.
The Repair Target operation directly manipulates the contents of
the Target drive with no effort being made to retain the original
data. It does not prompt the user when a bad sector is reallocated
so any data on a repaired sector is lost.
Logicube Confidential Information
62
OMNICLONE – Xi SERIES
4. OMNIDIAGNOSTICS
Repair Target Mode – Part 2
Repair Target Mode – Step by Step
1.
From anywhere in the menu
system click the Set button to
enter the Settings menu.
2.
Press the Cloning Mode icon that
appears in the upper left-hand
corner. A list of the available
cloning modes appears.
3.
Press the “Repair” icon, the
Repair Target settings screen will
appear.
Logicube Confidential Information
Settings Menu
63
OMNICLONE – Xi SERIES
4. OMNIDIAGNOSTICS
Repair Target Mode – Part 3
Repair Target Mode – Step by Step
4.
5.
You may now double-click the
“Start/Stop” button to start cloning.
You will be warned that continuing will
modify your Destination drive. If you
are ready to do this, choose “Yes” to
continue.
Settings Menu
When finished, the Logicube
Omniclone Xi™ will notify you and
display a list of the scanned drives
along with bad, weak and repaired
sectors found on each drive.
Logicube Confidential Information
64
OMNICLONE – Xi SERIES
4. OMNIDIAGNOSTICS
WipeClean Target Mode – Part 1
The WipeClean™ Target mode erases all data on the Target drives.
This may be required when discarding drives that contain
sensitive information to which you do not want others to have
access, e.g. financial information, trade secrets, etc.
WipeClean™ writes a pattern over the whole Target drive 2 X n+1
times, where n is the selected number of iterations of all 0’s and all
1’s. The last pass then writes the chosen pattern to every byte of
the drive.
For example, if you set the Value to “0xff” and the number of
iterations (the value of n in the above formula) to 1, WipeClean™
will perform a total of three passes, first writing all 0’s then again
writing all 1’s. Then one more pass will be made that leaves a
repeating “FF” pattern.
65
Logicube Confidential Information
OMNICLONE – Xi SERIES
4. OMNIDIAGNOSTICS
WipeClean Target Mode – Part 2
The following settings are used in configuring WipeClean™ Target
mode:
•Passes – Determines how many passes of all 0’s and all 1’s are written
to the drive. The default is 1 for compliance with DoD M-5220.
•Value – Select the value to be written on the last pass. The options are
0xf6, 0x00, 0xff, and Random (DoD default). (The Random setting will fill
the Target drive with a pseudo random pattern.)
•Speed – The speed can be manually set from UDMA 5 to PIO-SLOW.
If no drive is attached to the Master position the unit will still wipe the
Target drives, but it will run at speeds ranging from 60 – 100 MB/min.
66
Logicube Confidential Information
OMNICLONE – Xi SERIES
4. OMNIDIAGNOSTICS
WipeClean Target Mode – Part 3
WipeClean Target – Step by Step
1.
From anywhere in the menu
system click the Set button to
enter the Settings menu.
2.
Press the Cloning Mode icon that
appears in the upper left-hand
corner. A list of the available
cloning modes appears.
3.
Press the “WipeOut” icon, the
WipeClean Target settings screen
will appear.
Logicube Confidential Information
Settings Menu
67
OMNICLONE – Xi SERIES
4. OMNIDIAGNOSTICS
WipeClean Target Mode – Part 4
WipeClean Target – Step by Step
4.
Touch the “Passes” icon to set the
number of passes. Use the numeric
keypad to enter the number of passes.
Press OK when finished.
5.
Touch the “Value” icon to scroll
through the different patterns.
6.
Touch the “Speed” icon to choose the
best speed, if necessary.
WipeOut Menu
Passes
Value
Speed
NOTE: The unit will automatically adjust
itself to the best speed for the
attached drives.
7. Press
theInformation
Start/Stop
Logicube
Confidential
button twice.
68
OMNICLONE – Xi SERIES
4. OMNIDIAGNOSTICS
WipeClean Target Mode – Part 5
WipeClean Target – Step by Step
8.
9.
A message will appear stating that
portions of your Target drive will be
overwritten. If you are prepared to
continue, choose “<Yes>”. If you wish
to abort the operation, choose “<No>”.
WipeOut Menu
If “<Yes>” is chosen, a second
message will appear stating that you
are about to erase the Target. If you
wish to continue, choose “<Yes>”. If
you want to abort the operation,
choose “<No>”.
Passes
10. If “<Yes>” is chosen, the WipeClean™
Target operation will begin and a
screen
will appear.
Logicubestatus
Confidential
Information
Value
Speed
69
OMNICLONE – Xi SERIES
5. DATABASE FUNCTIONS
Logicube Confidential Information
70
OMNICLONE – Xi SERIES
5. DATABASE FUNCTIONS
The Logicube Database/Barcode Option gives your Omniclone Xi™
the ability to record vital cloning information and store it on the
Compact Flash (CF) drive.
This information is stored in a format that is easily read by most
database programs (i.e. Microsoft Excel, Microsoft Access, dBase,
etc.).
The information is gathered from parts of the cloning session like
drive firmware, cloning success and the Barcode Scanner.
NOTE: The Database/Barcode option can be purchased for
your Omniclone Xi™ unit.
Logicube Confidential Information
71
OMNICLONE – Xi SERIES
5. DATABASE FUNCTIONS
When the Logicube Database/Barcode option is purchased, it
comes with the following items:
•A Barcode Scanning Wand, (this plugs into the PS/2
connector in front of the Omniclone-Xi™).
•A User’s Manual for the Barcode Scanner.
•A User’s Manual for the DataBase™ option.
•A sheet that contains the code to unlock the Logicube
DataBase™ option.
Logicube Confidential Information
72
OMNICLONE – Xi SERIES
5. DATABASE FUNCTIONS
The Logicube Database/Barcode option adds two files to the
Compact Flash (CF) drive.
The two files are Config.txt and Database.csv.
Logicube Confidential Information
73
OMNICLONE – Xi SERIES
5. DATABASE FUNCTIONS
Config.txt – Part 1
Config.txt is a list made up of the items below. It tells the
Database function what to record from the cloning session.
[Title] - This is a user-entered name for the Config List. The
name should be 18 characters or less.
IncludeHeaders – If this line is included, it tells the database to
put headers as the first line of data in the Database.csv file.
UnitSN – This is the serial number of the Omniclone-Xi™ unit.
UnitFirmware – This is the Omniclone-Xi’s current Firmware.
Logicube Confidential Information
74
OMNICLONE – Xi SERIES
5. DATABASE FUNCTIONS
Config.txt – Part 2
Config.txt contents – (cont’d)
Scan1-UserEnteredName1 – This is the first line of information
collected by the Barcode Scanner (i.e. Operator’s Badge
Number). The entered name needs to be 18 characters or less.
Scan2- UserEnteredName2 – This is the second line of data
collected by the Barcode Scanner (i.e. Batch Number). The
entered name needs to be 18 characters or less.
Scan3- UserEnteredName3 – This is the third line of information
collected by the Barcode Scanner (i.e. Location Number). The
entered name needs to be 18 characters or less.
Logicube Confidential Information
75
OMNICLONE – Xi SERIES
5. DATABASE FUNCTIONS
Config.txt – Part 3
Config.txt contents – (cont’d)
Time – This records the time that the cloning session completed.
The time comes from the Omniclone-Xi’s own internal clock.
Date – This records the date from the unit’s internal clock.
Cloning Modes for more information on how to set the internal
clock.
MasterModel – This line records the Model Number of the Master
drive.
MasterSerial – This line records the Serial Number of the Master
Drive.
Logicube Confidential Information
76
OMNICLONE – Xi SERIES
5. DATABASE FUNCTIONS
Config.txt – Part 4
Config.txt contents – (cont’d)
TargetModels – This line records the Model Number of each
Target drive connected to the Omniclone-Xi.
TargetSerials - This line records the Serial Number of each
Target drive connected to the Omniclone-Xi.
Mode – This line records the Cloning Mode used (i.e. Clever,
Mirror, etc.)
Outcome – This records whether or not the cloning session was
completed successfully. It will either say PASS or FAIL.
Logicube Confidential Information
77
OMNICLONE – Xi SERIES
5. DATABASE FUNCTIONS
Database.csv – Part 1
The Logicube DataBase™ option writes all of the collected
information to a file named Database.csv. The “csv”
extension stands for “comma separated values” and is a
common database format. It can be read by most database
programs (i.e. Microsoft Excel, Microsoft Access, dBase,
etc.). This file is stored on the Compact Flash (CF) drive.
Logicube Confidential Information
78
OMNICLONE – Xi SERIES
5. DATABASE FUNCTIONS
Database.csv – Part 2
A typical .CSV file opened in a text editor looks something
like this:
TEST, Date, MasterModel, TargetModels-1,
TargetModels-2, TargetModels-3, TargetModels-4,
TargetModels-5, TargetModels-6, TargetModels-7,
TargetModels-8, TargetModels-9, TargetModels-10,
Mode, Outcome, 5/18/05, WDC WD400BB-22HEA1,
ST380023AS, NA, NA, NA, NA, NA, NA, NA, NA, NA,
Mirror, SUCCESS
We can see from this example that a Master drive was cloned
to a single Target drive on May 18, 2005. Mirror Clone mode
was used and the cloning session completed successfully.
Logicube Confidential Information
79
OMNICLONE – Xi SERIES
5. DATABASE FUNCTIONS
Database.csv – Part 3
NOTE: The database.csv file will continue to receive data
from cloning sessions until it is renamed or deleted, at which
point a new database.csv file will be created. If you need to
change Config Lists, make sure that you rename or remove
the old database.csv file from the CF drive.
Logicube Confidential Information
80
OMNICLONE – Xi SERIES
5. DATABASE FUNCTIONS
Database Step by Step – Part 1
NOTE: This procedure goes from
attaching the Barcode Scanner
to choosing a Config List to
running the cloning session and
collecting the database.csv file.
It is a basic rundown of the
Database process. Details such
as the menu options and the
Barcode Scanner will be
discussed later in the chapter.
Logicube Confidential Information
81
OMNICLONE – Xi SERIES
5. DATABASE FUNCTIONS
Database Step by Step – Part 2
1.
Attach the Barcode Scanner to
the PS/2 Port on the front of the
Omniclone-Xi unit.
2.
Insert the Compact Flash (CF)
Drive in the CF Slot and power
up the unit.
Logicube Confidential Information
82
OMNICLONE – Xi SERIES
5. DATABASE FUNCTIONS
Database Step by Step – Part 3
3.
From the Main Screen, press the Set
button.
4.
Touch the General Preferences icon in
the Lower left-hand corner of the
screen.
5.
Settings Menu
Touch the Database icon. This will
open the Database Settings Menu.
NOTE: If the Database/Barcode option is
not enabled, a warning message will
appear and the Database Menu will not
open.
Logicube Confidential Information
83
OMNICLONE – Xi SERIES
5. DATABASE FUNCTIONS
Database Step by Step – Part 4
6.
Touch the Select Config icon. It will
bring up all of the Config Lists that are
stored in the Config.txt file that is on
the CF Drive.
7.
Touch the desired Config List. A check
mark will appear next to it. Touch OK.
8.
NOTE: Once a Config List is chosen,
the name of the list will appear at the
top of the Database Menu.
9.
Touch the Database icon to set it to
ON, (the default is OFF).
Logicube Confidential Information
General Preferences Menu
84
OMNICLONE – Xi SERIES
5. DATABASE FUNCTIONS
Database Step by Step – Part 5
10. Touch the Back icon twice to go back
to the Cloning Settings Menu. Change
the settings as desired.
11. Press START/STOP to begin cloning.
Logicube Confidential Information
General Preferences Menu
85
OMNICLONE – Xi SERIES
5. DATABASE FUNCTIONS
Database Step by Step – Part 6
12. When the cloning Session is finished,
the unit will write data to the
database.csv file. If one or more
“Scan” lines are in the Config List, then
the User will be prompted to use the
Barcode Scanner.
13. When prompted, aim the Barcode
Scanner at the Barcode to be read.
Hold the scanner at an angle about 6 –
8 inches from the barcode. Hold down
the trigger until the Scanner beeps.
Logicube Confidential Information
86
OMNICLONE – Xi SERIES
5. DATABASE FUNCTIONS
Database Step by Step – Part 7
14. After the data is collected, the unit will
stop with a “clone successful”
message.
15. At this point the database.csv file can
be copied from the CF drive and
imported into the database program of
your choice. Use USB Mode to gain
access to your CF drive.
Logicube Confidential Information
87
OMNICLONE – Xi SERIES
6. OTHER FEATURES
Logicube Confidential Information
88
OMNICLONE – Xi SERIES
6. OTHER FEATURES
Light Bar Buzzer
The Light Bar now comes with an audible
buzzer. It has one of two functions:
1.
Upon completion of a successful
cloning session, the buzzer will emit a
pleasant tone alerting the technician of
it’s success.
2.
If the Omniclone-Xi unit stops with an
error, the buzzer will emit a different
tone to alert the technician.
Logicube Confidential Information
89
OMNICLONE – Xi SERIES
6. OTHER FEATURES
Serial Cable Link – Part 1
The Omniclone-Xi can now be controlled
remotely from a PC via a special serial
cable.
NOTE: This feature, like NTFS Clever
Clone, Selective and Master Manager is
an option that needs to be purchased
in order to be enabled.
Logicube Confidential Information
90
OMNICLONE – Xi SERIES
6. OTHER FEATURES
Serial Cable Link – Part 2
This feature comes with a proprietary serial cable that connects the
Omniclone-Xi to a PC.
The user can control the Omniclone-Xi from the PC via Hyperterminal.
Logicube Confidential Information
91
OMNICLONE – Xi SERIES
6. OTHER FEATURES
Serial Cable Link – Part 3
From the laptop, the user can send a
variety of commands to the OmnicloneXi such as:
•
Start/Stop a cloning session.
•
Set unit to Mirror Clone mode.
•
Get constant progress info of a cloning
session.
•
Connect Omniclone-Xi to PC via USB.
•
Create an end-of-session report.
•
Get unit information such as
software/firmware version.
Logicube Confidential Information
92
OMNICLONE – Xi SERIES
6. OTHER FEATURES
USB Connection
The Omniclone-Xi has a USB port on the
back. This allows the unit’s Compact
Flash to be accessed by a PC. This
allows the user to:
•
Load software updates to the CF.
•
Copy Database reports to the PC.
•
Modify .ini files such as Config.txt
Logicube Confidential Information
93
OMNICLONE – Xi SERIES
6. OTHER FEATURES
Verification Station
The Omniclone-Xi now has a new piece of
hardware called the Verification
Station. This new drive station is able
to scan cloned drives with a 128-bit
MD5 Checksum!
The Verification Station is also able to
function as a normal drive station for
cloning drives.
Logicube Confidential Information
94
OMNICLONE – Xi SERIES
6. OTHER FEATURES
Verification Station
Using the Verification Station is as easy as these simple steps:
1.
Replace the Omniclone-Xi’s Target Drive Stations with Verification
Stations.
2.
Obtain the MD5 Hash value of the Master Drive
3.
Add the Master’s MD5 value to a file on the Compact Flash called
checksum.txt.
4.
Clone the Target drives with Mirror Clone mode.
5.
After cloning, run a new mode called “MD5 Checksum”.
6.
The Verification Stations will scan the Target drives and return a
PASS/FAIL message.
Logicube Confidential Information
95
OMNICLONE – Xi SERIES
7. USER REPLACEABLE HARDWARE
Logicube Confidential Information
96
OMNICLONE – Xi SERIES
7. USER REPLACEABLE HARDWARE
The Omniclone-Xi has two major pieces of
hardware that can be replaced by the
user.
•
The first is the Drive Stations.
•
The other is the Power Supply.
Logicube Confidential Information
97
OMNICLONE – Xi SERIES
7. USER REPLACEABLE HARDWARE
DRIVE STATIONS
Drive stations are easily removed by
loosening two thumb screws and
pulling the Drive Station unit straight
off the Omniclone-Xi.
This allows bad drive Stations to be
replaced without sending the entire
Omniclone-Xi unit in for repair.
This also allows the user to replace the
standard Drive Station with a
Verification Station or other Stations
that we may offer in the future.
Logicube Confidential Information
98
OMNICLONE – Xi SERIES
7. USER REPLACEABLE HARDWARE
The power supply is located on the bottom
of the Omniclone-10Xi and 5Xi. It can
be replaced by the user.
Logicube Confidential Information
99
OMNICLONE – Xi SERIES
QUESTIONS AND DEMO
Logicube Confidential Information
100