1
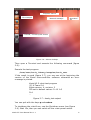
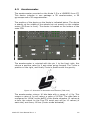
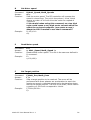
KOALA 2.5
User manual
Revision 1.1
Revisions history
Rev. Date (EUR)
1.0
21.02.2014
1.1
15.04.2014
Description
Initial creation
Add Magnetometer description
Documentation Authors
Julien Tharin, Frédéric Lambercy and Timothée Carron
K-Team S.A.
Z.I. Les Plans-Praz 28
CH-1337 Vallorbe
Switzerland
E-mail
URL
[email protected]
www.k-team.com
Trademark Acknowledgements
IBM PC
Macintosh
SUN Sparc-Station
LabVIEW
Matlab
Khepera
:
:
:
:
:
:
International Business Machines Corp.
Apple Corp.
SUN Microsystems Corp.
National Instruments Corp.
MathWorks Corp.
K-Team and LAMI
Legal Notice
•
•
•
The content of this manual is subject to change without notice
All efforts have been made to ensure the accuracy of the content of
this manual. However, should any error be detected, please inform
K-Team.
The above notwithstanding, K-Team can assume no responsibility
for any error in this manual.
TABLE OF CONTENTS
1
INTRODUCTION .......................................................................................................... 1
1.1
1.2
1.3
2
UNPACKING AND INSPECTION .................................................................................... 3
2.1
3
HOW TO USE THIS HANDBOOK ...................................................................................... 1
SAFETY PRECAUTIONS ................................................................................................ 2
RECYCLING ............................................................................................................. 2
PACKAGE CONTENT ................................................................................................... 3
THE ROBOT AND ITS ACCESSORIES ............................................................................ 4
3.1
GLOBAL VIEW ......................................................................................................... 4
3.2
FIRST START-UP ....................................................................................................... 7
3.2.1
Console access ................................................................................................ 7
3.2.2
Direct Connection ............................................................................................ 8
3.3
KOALA 2.5 ROBOT ................................................................................................. 10
3.3.1
Wheels and gear box....................................................................................... 10
3.3.2
On/Off switch ................................................................................................. 10
3.3.3
Power LED ..................................................................................................... 10
3.3.4
Charge LED .................................................................................................... 10
3.3.5
Power supply jack ........................................................................................... 11
3.3.6
Reset button .................................................................................................. 11
3.3.7
Ultrasonic sensors........................................................................................... 11
3.3.8
Contacts for docking station ............................................................................. 11
3.3.9
Pico-ITX ........................................................................................................ 11
3.3.10 Microcontroller ............................................................................................... 12
3.3.11 GPS module ................................................................................................... 12
3.3.12 Accelerometer & Gyroscope sensor ................................................................... 12
4
IN DEPTH LOOK......................................................................................................... 13
4.1
ULTRASONIC SENSORS ............................................................................................. 13
4.2
BATTERY .............................................................................................................. 15
4.2.1
NiMH battery .................................................................................................. 15
4.2.2
Li-Pol battery ................................................................................................. 16
4.2.3
Li-Pol External charger .................................................................................... 16
4.3
DOCKING STATION CONNECTION PADS ......................................................................... 17
4.4
TERMINAL BLOCKS (GPIO & SUPPLY) ......................................................................... 18
4.5
ACCELEROMETER .................................................................................................... 19
4.6
GYROSCOPE .......................................................................................................... 20
4.7
GPS MODULE ........................................................................................................ 22
4.8
PICO-ITX ............................................................................................................ 23
4.9
MOTORS............................................................................................................... 25
4.9.1
Speed control (“D” command) .......................................................................... 27
4.9.2
Speed profile control (“K” command) ................................................................ 28
4.9.3
Position control (“F” command) ........................................................................ 29
4.9.4
Open loop (“L” command)............................................................................... 30
5
PROGRAMMING ......................................................................................................... 31
5.1
INTRODUCTION ...................................................................................................... 31
5.2
CONFIGURATION .................................................................................................... 31
5.3
PROGRAMMING ...................................................................................................... 32
5.4
PROGRAMMING WITH ECLIPSE GUI ............................................................................ 33
5.5
DEBUGGING .......................................................................................................... 34
5.5.1
Direct debugging ............................................................................................ 34
5.5.2
Remote debugging .......................................................................................... 35
5.6
MICROCONTROLLER UPDATE ...................................................................................... 35
5.7
SERIAL PORT ......................................................................................................... 35
5.8
TRANSFERRING FILES .............................................................................................. 36
6
SERIAL COMMUNICATION PROTOCOL ....................................................................... 37
7
MECHANICAL DRAWINGS .......................................................................................... 46
8
WARRANTY ............................................................................................................... 48
1
INTRODUCTION
Thank you for buying a Koala 2.5 robot! The Koala 2.5 is a high end
robot that will initiate your experience to the extraordinary world of
mobile robotics. Thanks to its wealth of sensors, motors and its
software openness, you will be able to create complex behavior,
making you an expert of this promising technology.
1.1
How to use this handbook
This handbook introduces the Koala 2.5 robot and its various operating
modes.
If this handbook does not answer one of the problems you are
confronted with, please consult the K-Team web site (www.kteam.com) and especially the Forum and the FAQs.
Three kinds of symbols are used in this document; in order to keep you
and your robot safe, please respect them:
Ignoring the mentioned warning could lead to malfunction
or reduced performance.
Ignoring the mentioned warning could lead to perpetual
damage and would void the warranty.
Danger: risk of electric shock
Koala 2.5 User Manual Rev 1.1
1
1.2
Safety precautions
Here are some recommendations on how to correctly use the robot:
•
•
•
•
•
•
•
1.3
Keep the robot away from wet area. Contact with
water could cause malfunction and/or breakdown.
Store your robot in a stable position. This will avoid
the risk of falls, which could break it or cause damage
to a person.
Use only the official charger or the cable which is
delivered with the robot. Do not try to use another
charger; this can cause irreversible damage to the
battery and or the electronics.
Do not attach any connector while the robot is
powered. To avoid any damage, make all connections
when the robot power is off.
Never leave the robot powered when it is unused.
When you have finished working with the robot, turn it
off. It will save the battery life.
Do not manually force any mechanical movement.
Avoid to force, by any mechanical way, the movement
of the wheels or any other part.
Never open the case. Only qualified technicians are
allowed to do so.
Recycling
Think about the end of life of your robot! Parts of the robot can be
recycled and it is important to do so. It is for instance mandatory to
keep batteries out of the solid waste stream. When you throw away a
battery, it eventually ends up in a landfill or municipal incinerator. This
battery, which contains Lithium Polymer, can contribute to the toxicity
levels of landfills or incinerator ash. By recycling the batteries through
recycling programs, you can help to create a cleaner and safer
environment for generations to come. For those reasons, please take
care to the recycling of your robot at the end of its life cycle, for
instance sending back the robot to the manufacturer or to your local
dealer.
Thank you for your contribution to a cleaner environment!
Made in
Switzerland
Koala 2.5 User Manual Rev 1.1
2
2
UNPACKING AND INSPECTION
2.1
Package Content
•
Koala robot
•
Battery
•
Battery charger
•
Power supply adapter
Koala 2.5 User Manual Rev 1.1
3
3
THE ROBOT AND ITS ACCESSORIES
3.1
Global View
Figure 3.1 : Top view
1
2
3
4
5
6
Wheels
Ultrasonic sensor (9x)
Mounting plate
Pico-ITX Front Panel
IO and power supply terminal blocks
Battery
Koala 2.5 User Manual Rev 1.1
4
Figure 3.2 : Rear view
7
8
9
10
11
12
Reset button
Charge LED
Power LED
On/Off switch
Battery
External power supply connector
Koala 2.5 User Manual Rev 1.1
5
Figure 3.3 : Bottom view
13
14
Gear Box
Docking station connection
Koala 2.5 User Manual Rev 1.1
6
3.2
First start-up
It is required, before to use the robot for the first time,
to let the battery charge completely. In order to do that,
remove the battery from the Koala and connect the
battery to the dedicated charger. Please consider a time
of 5 hours for the initial charge.
You can test the Koala either with a serial cable to have console
access or directly to the Koala itself via USB.
3.2.1
Console access
Connect a crossed (Null-Modem) serial cable on the top of the Koala
to a computer with these settings: 115200 baud, 8N1). Open your
serial software on your computer and use settings above.
For Windows, you can use Teraterm (http://ttssh2.sourceforge.jp).
On Linux, minicom:
Open a terminal console and type (example below based on Linux):
minicom -s
Go the "Serial port setup" menu and configure as described in
figure 3.4 .
+----------------------------------------------------------+
| A - Serial Device : /dev/ttyUBS0
|
| B - Lockfile Location : /var/lock
|
| C - Callin Program :
|
| D - Callout Program :
|
| E - Bps/Par/Bits : 115200 8N1
|
| F - Hardware Flow Control : No
|
| G - Software Flow Control : No
|
|
|
| Change which setting?
|
+----------------------------------------------------------+
Figure 3.4: Minicom serial parameters
Save the settings with the command “Save setup as dfl” of the
menu [configuration].
Switch on the robot power and wait for the login (you may need to
push the ENTER key): KOA2 login
Koala 2.5 User Manual Rev 1.1
7
Enter the username user and password koala
Then execute the test program:
/home/user/koala_library/examples/koala_test
If the result is good (figure 3.5), you can see at the beginning the
version of the Koala microcontroller software otherwise an error
message is printed.
Koala V2.5 robot test program
(C) K-Team S.A
Koala version: A revision: 2
PID set to default values: P=10 I=3 D=1
…
Figure 3.5 : koala_test output
You can quit with the keys q and return.
To shutdown the robot from the terminal use the command:
sudo shutdown –h now
Wait 15s, then you can switch off the robot power switch.
3.2.2
Direct Connection
Connect a USB mouse and keyboard and a screen on the top of the
Koala robot (4 : Pico-ITX front panel of figure 3.1).
Switch on the robot power, and wait for the login window. The user is
user and password koala.
Koala 2.5 User Manual Rev 1.1
8
Programs menus
File manager
Network manager
Shutdown
wn
Terminal / console quick access
Figure 3.6 : Ubuntu desktop
Then open a Terminal and execute the following command (figure
3.6):
Execute the test program:
/home/user/koala_library/examples/koala_test
If the result is good (figure 3.7), you can see at the beginning the
version of the Koala microcontroller software otherwise an error
message is printed.
Koala V2.5 robot test program
(C) K-Team S.A
Koala version: A revision: 2
PID set to default values: P=10 I=3
D=1
…
Figure 3.7 : koala_test output
You can quit with the keys q and return.
To shutdown the robot from, use the Shutdown menu (see Figure
3.6). Wait 15s, then you can switch off the robot power switch.
Koala 2.5 User Manual Rev 1.1
9
3.3
Koala 2.5 Robot
3.3.1 Wheels and gear box
The Koala is driven by two DC motors, one for the three left wheels
and one for the three right wheels. The motors are coupled with the
wheels through a 58.5:1 reduction gear. Each motor is equipped with
an incremental encoder which delivers 100 pulses per revolution of
the motor (increased to 400 pulses with the internal hardware).
This allows a resolution of 23’400 pulses per resolution of the wheel.
As the diameter of the wheel is approximately 82.5mm (could
decrease to 80.5mm with a 3kg payload), the resolution is 90.3
pulses per mm.
3.3.2 On/Off switch
This switch will have an action on the internal regulators of the robot
and not on the battery, meaning that you can charge it even if it is off
(only for the Li-Pol version, the NiMH battery can be charged only by
the external charger). To turn the robot on, put the switch low. To
turn it off, put the switch high.
When turned on, the onboard Pico-ITX will automatically start the
installed OS.
Please be careful when turning off the system to first stop all
applications on the Pico-ITX and halt the system (to avoid any loss of
data).
3.3.3 Power LED
This green LED indicates when the power supply is enabled (switch
ON and battery or external supply plugged).
3.3.4 Charge LED
This bicolor LED indicates the charge of the battery (only available
with a Li-Pol battery). During the charge the LED is red and it turns to
green when the charge is finished. This indication is only available if
the Robot is turned on. If the robot is off, the LED will remain off, but
the charge will be active. To know the state of the charge, turn on the
robot.
Koala 2.5 User Manual Rev 1.1
10
3.3.5 Power supply jack
This is the 2.5mm center positive jack used to charge the battery of
the robot. Use only the provided adapter. This will supply the whole
Koala and charge in the meantime the battery (Li-Pol version only).
Input voltage is 15V (max 18V). Current drawn by the robot is 1A and
battery charge is 2A, so the external supply must be able to provide
at least 3.5A.
3.3.6 Reset button
This button resets the whole robot, including the Pico-ITX
motherboard. A simple pulse on this button is enough to restart the
whole system.
3.3.7 Ultrasonic sensors
There are 9 ultrasonic sensors, 1 on both sides, 5 in the front of the
robot and 2 at the back. With these sensors, the robot is able to see
obstacles from approx. 250 to approx. 2500mm. Please notice that it
is not possible to measure distance of nearer obstacles due to the
principle of operation of this kind of sensors.
3.3.8 Contacts for docking station
The Koala 2.5 has some apparent contacts below its body meaning
that you could use a docking station to charge its battery or to
communicate with it. The signals that are provided are: 15V DC input
and I2C connection.
3.3.9 Pico-ITX
The Koala 2.5 is provided with a Pico-ITX computer module with Intel
Atom processor N2800 and 4GB DDR3 SO-DIMM. A SSD hard drive of
40GB (size can change due to evolution of available SSD) is already
installed with an Ubuntu OS.
This computer will be the main intelligence of the robot which means
that the Robot only executes command sent by the Pico-ITX through
a serial port (see Serial communication for more details).
The main connectors of the computer are available on the TOP of the
robot (Pico-ITX front panel):
-
VGA Display connector
Serial port connector (/dev/ttyS0)
2x USB 2.0 connector
LAN interface
Audio IN (MIC) and OUT (headset)
Koala 2.5 User Manual Rev 1.1
11
3.3.10 Microcontroller
The Koala 2.5 has a dsPIC33FJ64GS608 microcontroller which is
dedicated to the sensors & motors management. This microcontroller
cannot be programmed by the end-user but answers to a list of serial
commands sent by the Pico-ITX (through /dev/ttyS1 COM port). See
chapter “Microcontroller update”.
3.3.11 GPS module
The Koala 2.5 is equipped with a GPS module UC530 from U-blox.
As soon as the robot is turned ON, the GPS module will search for
valid satellites. The robot must be placed outdoor in order to find
enough GPS to get its position.
The dsPIC of the Koala will automatically retrieve main data from the
GPS (position, speed, date, hour, etc…). But the user can also directly
send NEMA command to the module to obtain more specific
information
(see
“NMEA_manual_for_Fastrax_IT500_Series_GPS_receivers.pdf”
documentation).
3.3.12 Accelerometer, Gyroscope & Magnetometer sensor
The Koala 2.5 is equipped with a LSM9DS0 iNEMO inertial module
from ST. This module is a system-in-package featuring a 3D
accelerometer, a 3D angular rate sensor and a 3D magnetometer.
Coupled with the onboard GPS, this will provide a complete solution to
make outdoor positioning and path finding.
The max payload of the robot is 3.5kg.
Operating temperature range of the robot is 0 to 55°C.
Battery charging temperature range is 0 to 35°C. Never
attempt to charge it by higher temperature.
Koala 2.5 User Manual Rev 1.1
12
4
4.1
IN DEPTH LOOK
Ultrasonic sensors
Nine sensors are placed around the robot and are positioned and
numbered as shown in figure below. These sensors are transceivers,
meaning that they can emit and receive pulses.
The ultrasonic sensors are powered by a 85 Vpp source. The nominal
frequency of these transducers is 40kHz +/- 1kHz.
The returned value is the distance to the object in centimeters, with a
tolerance of +/-2cm. Measuring range is from 25 to 250cm.
If the obstacle distance is smaller than 25cm, the Koala will return a
value of 0. If no obstacle is seen in the 250cm range, then the value
will be set to 1000. Finally, when disabled, the sensor will always
return 2000.
Each sensor can be disabled in order to get higher refresh rate for a
particular one (or group). One sensor measure takes 20ms. All 9
sensors need 180ms to be read.
If the auto mode is enabled for the US sensor, every time all enabled
sensor are refreshed, the dsPIC will print the value on the Pico-ITX
serial port (every 180ms if all enabled, every 20ms if only one sensor
enabled). This can be useful for application using the US sensors for
obstacle avoidance. If all sensors are disabled and the auto mode is
still active, no message will appear.
For more details about the ultrasonic sensor, please have a look at
the 400PT12B datasheet from Prowave.
Koala 2.5 User Manual Rev 1.1
13
Figure 4.1 : Ultrasonic sensors viewed from top
Danger: High voltage! There is about 85Vpp on the PCB
in the area of the ultrasonic sensors: never touch it!
Turn the ultrasonic sensors off while recording sound!
Koala 2.5 User Manual Rev 1.1
14
4.2
Battery
The Koala 2.5 is provided with a removable battery. There are two
types of available batteries for the Koala, a NiMH and a Li-POL. See
the pictures below to determine the type of your battery:
NiMH Battery
Li-Pol Battery
There’s another way to determine the type of battery. When the robot
is turned on and the external supply is connected, the Koala can
detect the type of battery (see the serial command protocol,
command “V”).
This command reads also the current and the voltage of the battery
which can be used to calculate the remaining capacity (based on the
standard discharge curve of the battery technology).
4.2.1
NiMH battery
The NiMH battery can be charged only using the dedicated external charger.
If the battery is inserted in the Koala and the external power supply is
connected, the battery won’t be charged. The internal charger of the Koala
will be automatically disabled to prevent any damage to the battery.
This allows the user to change the battery with another one fully charged
without stopping the application (plug the external supply, then exchange
the battery).
Nominal voltage
Charging voltage
Nominal capacity
Max discharge current
Charging current
Time for a complete charge
:
:
:
:
:
:
12V
14V
3800mAh
7600mA (2C)
1000mA
about 6 to 7 hours
NiMH Battery specification
With this kind of battery the koala is able to run completely autonomously
during more than 2 hours with the motor on and 3 hours with motors off,
running with a basic configuration.
There’s no specific power management on the Koala, the user must verify
that the voltage does not drop below 10V to avoid damaging the cells.
Koala 2.5 User Manual Rev 1.1
15
4.2.2
Li-Pol battery
The Li-Pol battery can be charged either on the Koala itself (using the
external power supply) or externally with the external charger. When
charged on the Koala, the indication of the charge (Charge LED) is only
available when the Robot is powered on. The LED is red when the charge is
in progress and it turns to green when the charge is complete.
Nominal voltage
Charging voltage
Cut-off voltage
Nominal capacity
Max discharge current
Charging current
Time for a complete charge
:
:
:
:
:
:
:
11.1V
12.6V
9V
5000mAh
25000mA (5C)
2000mA
about 4 to 5 hours
Li-Pol Battery specification
With this kind of battery, the koala is able to run completely autonomously
during more than 2.5 hours with the motors on and 4 hours with motors off,
running with a basic configuration.
There’s no specific power management on the Koala, the battery will
automatically cut-off when the voltage drops below 9V.
4.2.3
Li-Pol External charger
The Li-Pol External charger embeds the same charging system as the Koala.
The charge duration will be exactly the same as with on-board charging. The
only difference will be the LED.
On the external charger, there’s only one red LED which turns ON when the
battery is in current regulation mode. When switching to voltage regulation,
the LED turns off. This means the battery is approximately at 90% of full
charge. To complete a full charge, keep the charger connected around 1h
after the red LED turns off. The polarity of the charger is defined by its two
polarizing slots.
Figure 4.3: Li-Pol External charger
Do not connect this charger to a NiMH Koala battery.
Koala 2.5 User Manual Rev 1.1
16
4.3
Docking station connection pads
Five contact pads are situated below the robot and can be used to
connect the Robot to a docking station. The pads are placed
symmetrically to ensure a correct connection even if the Robot goes
backwards on the docking station. The main purpose of these
contacts is to charge the embedded battery (works only with Li-Pol
Battery). Apply +15V between VIN and GND (max 18.0V) to perform
the charge. The VIN signal is the same as the external power supply
connector and will be available on the terminal blocks (+15V).
Communication with the outside is done via I2C external bus (level is
0 to +3.3V, same as the one available on the terminal blocks). Use
level adapter if needed.
Figure 4.4: Contact pads viewed from bottom
Never apply more than 18.0VDC between the VIN & GND
contacts.
Koala 2.5 User Manual Rev 1.1
17
4.4
Terminal blocks (GPIO & supply)
Two terminal blocks located at the rear of the robot provide different
IO and power supply. The terminal blocks support wire from AWG 26
(0.2mm2) to AWG 16 (1.3mm2).
Figure 4.5: Terminal blocks connection
+15V:
Direct connection of the External power supply voltage and VIN
from the docking station. This supply output is protected by a 1.85A
polyfuse.
+Vbat:
Two connections of the battery voltage. Each output is protected by
a 3A polyfuse. When an external power supply is connected, these
two outputs will have the same voltage as the external supply.
PW Output:
Power output connection. These four open-drain outputs could drive
any charge up to 30V/3A. The protection will be made by the
polyfuse of the selected voltage (+Vbat, +5V or +3.3V).
Input:
Two digital inputs which can be read by the dsPIC (+3.3V level)
+5V:
+5V power supply which can provide up to 1.85A (protected by a
polyfuse).
+3V3:
+3.3V power supply (protected by a 1.85A polyfuse)
I2C:
I2C external bus to connect additional devices. The level of the bus
must be +3.3V.
ADC:
Two Analog to digital converter 10bits inputs. The measured voltage
must be between 0V and +3.3V (3.3V=1023).
GPIO:
Four GPIOs which can be configured as input, output or PWM output
(used to drive servo motor). The level of these GPIOs is +3.3V.
When configured as PWM, the frequency will be fixed at 50Hz and
the ON time (duty cycle) can be configured between 1ms and 2ms.
Koala 2.5 User Manual Rev 1.1
18
4.5
Accelerometer
The accelerometer mounted on the Koala 2.5 is a LSM9DS0 from ST.
This device includes in one package a 3D accelerometer, a 3D
gyroscope and a 3D magnetometer.
The position of the device on the Koala is indicated below. The device
is exactly at the middle of the wheels but not exactly on the rotation
center (28.5mm in front). The device is located on the bottom of the
main PCB.
Figure 4.6: Position of the LSM9DS0
The accelerometer is oriented with the pin 1 to the front right; this
returns a positive value for X axis when going forward. The Y axis is
positive on the right, and finally Z axis is positive with the gravity.
Figure 4.7: Direction of detectable accelerations (TOP view)
The accelerometer returns 16 bits data with a range of +/-2g. This
means a value of 1g will return a value of 16’384. The data rate is
configured to 100Hz, as the dsPIC of the Koala refreshes 10 values at
a time, the output on the Pico-ITX serial port will be 10 values (of
each axis) sent every 100ms (if auto mode activated).
Koala 2.5 User Manual Rev 1.1
19
4.6
Gyroscope
The gyroscope of the Koala is included in the same package as the
accelerometer.
The directions of detectable angular rates are defined around the
accelerometer axis.
Figure 4.8: Direction of detectable angular rates (TOP view)
The data format is on 16 bits too, the full range is configured at +/2’000dps (360dps = 5’898) and the data rate is configured at 95Hz.
The gyroscope data are read by packet of 10 values at a time, which
means the output date rate on the serial port will be 10 values (of
each axis) every 105ms (if auto mode enabled).
Koala 2.5 User Manual Rev 1.1
20
4.7
Magnetometer
The magnetometer is a part of the LSM9DS0. The direction of
detectable magnetic fields are shown below:
Figure 4.9: Direction of detectable magnetic fields (TOP view)
The data format is on 16 bits, the full range is configured at +/-2
gauss.
The magnetometer data is read one by one at the same time than the
accelerometer. This means a new data is available every 100ms. If
the auto mode is activated, a packet of 3 data (X, Y, Z) will be sent at
a frequency of 10Hz.
The Magnetometer needs to be calibrated by the user to detect the
middle point of each axis. It can be done easily for X and Y axis. Place
the Koala on a flat surface, set a constant speed to turn the robot on
itself (i.e. “D,10,-10”), and retrieve all the data (enable the auto
mode).
Store the maximum and minimum value for each axis. The maximum
value will indicate the North, the minimum the South.
Koala 2.5 User Manual Rev 1.1
21
4.8
GPS module
A GPS module UC530 from U-blox is mounted on the Koala. This
module is placed at the rear of the Robot, just above the battery
housing between the US sensors 8 & 9. To keep a good reception, do
not place metallic parts near the GPS antenna.
The module supports NMEA-0183 rev 3.01 communication protocol
and is configured at 115200bps.
The dsPIC of the Koala autonomously manages the main data
acquisition (number of satellites, latitude and longitude position, date
and hour, speed and altitude).
If you need more specific data, you can directly configure the GPS
module using the “X” command (see “NMEA_manual_for_Fastrax_
IT500_Series_GPS_receivers.pdf”
documentation
for
available
commands) and enable the transparent mode to get all the NEMA
commands sent by the GPS module (set auto mode bit 7, “A,128”
command).
The module is configured to return new data every second. If the user
enables the auto monitoring mode for the GPS (“A,64”), new data will
be printed every second.
Be careful, do not change baud rate of the GPS
module, as the dsPIC will then be unable to retrieve
data of the module. Do not change user parameters
too, as the number of writes is limited to 8.
Koala 2.5 User Manual Rev 1.1
22
4.9
Pico-ITX
The Pico-ITX mounted in the Koala 2.5 is a LP-172N motherboard
based on an Intel Atom Processor N2800.
The main specifications of the Pico-ITX are listed below:
-
Processor:
Memory:
Chipset:
VGA interface:
Serial AT:
Audio:
LAN interface:
Power:
Hard drive:
Operating System:
Intel® AtomTM processor N2800, 1.86GHz
4GB DDR3 SO-DIMM
Intel® NM10 Express Chipset
Intel® integrated extreme GMA 3650 technology
SATAII interface with 300MB/s transfer rate
Realtek ALC888 Audio
Intel® 82583V Giga LAN
DC 5V input
40GB SSD
Ubuntu (Linux)
The motherboard and the SSD are located just below the mounting
plate as shown in picture below:
Figure 4.9: Pico-ITX location
1
2
3
4
5
6
7
SSD Harddrive
Ethernet connector
Pico-ITX motherboard
Serial connector to communicate with the Robot
Pico-ITX power supply (+5V/3A)
Power & reset button connection
VGA connector
Koala 2.5 User Manual Rev 1.1
23
The main connectors are directly accessible on the TOP of the Koala
as shown below:
Figure 4.10: Pico-ITX front panel
1
2
3
4
5
6
Serial port (RS232 Male) connector. Can be accessible through /dev/ttyS0
2x USB 2.0 connector
Gigabit Ethernet connector
MIC In
Headset Out
VGA display connector
Koala 2.5 User Manual Rev 1.1
24
4.10 Motors
The Koala 2.5 has got 2 DC motors in order to drive its six wheels.
The motors have 6W nominal power. The gearbox has a reduction
ratio of 58.5:1.
Figure 4.11 : Motor block with wheels
The encoder has a 100-pulse by turn resolution. With the reduction
ratio of 58.5:1 and an internal hardware 4x multiplier, we have
23’400 pulses by wheel turn. As the diameter of the wheel with the
tire is 82.5mm (no load), this gives 90.3 pulses by millimeter. Or 1
pulse is 0.01107mm (11.076um).
Reminder: 1 revolution = 259.18mm = 23’400 pulses.
1m = 90’284 pulses
Be careful, when placing a payload on the Koala the tires will crush
and the diameter will be slightly modified. For example, with a
payload of 3kg, the effective diameter falls to 80.5mm, changing the
speed and position calculation.
The best solution when placing a payload on the koala is to perform a
travel of 1m (command “F,90284,90284”) and measure the real
distance crossed by the Robot.
Both motors are controlled via Pulse Width Modulation (PWM) at
20kHz. This technique switches the motor on and off at a given
frequency and during a given time. By this way, the motor reacts to
the average of the power supply, which can be modified by changing
the period the motor is switched on. This means that only the ratio
between on and off periods is modified, as illustrated in the figure
below:
Koala 2.5 User Manual Rev 1.1
25
Figure 4.12: Duty cycle with PWM
The dsPIC calculates the PWM to apply to each motor in speed
control and position control. The user can override the PID and apply
directly a desired PWM to the motor using the open loop command
(see “L” command details).
Default PID settings applied to the koala controller are:
Kp:
10
Ki:
3
Kp:
1
These values will be used by the PID speed controller. In position
control, the PID is the same as the position controller calculates a
speed order then calls the speed controller to reach this order.
User can modify these values to improve behaviour to his particular
use.
In addition to the speed controller, a current limitation controller
verifies that the current of each motor does not exceed the
configured value (default = 1.0A). In this case, the controller will not
try to reach the desired speed, but will manage the PWM to keep the
motor current below the limit current. The state of the controller can
be checked at any time by the application with the command “Y”.
This current limitation is not active when used with the open loop
control mode.
When selecting a type of control, this mode will be applied to both
motors. It’s not possible to set the left motor in speed control and
the right motor in another mode.
To put the motor in idle mode (no more current drawn by the
motors), use the open loop command with parameters set to 0. In
speed control, even with a parameter of 0, the controller will struggle
against any movement.
Koala 2.5 User Manual Rev 1.1
26
4.9.1
Speed control (“D” command)
Both DC motors are controlled by a PID controller executed every 10ms in
an interrupt routine of the dsPIC. Every term of this controller
(Proportional, Integral, Derivative) is associated to a constant, setting the
weight of the corresponding term: Kp for the proportional, Ki for the
integral, Kd for the derivative.
The controller has as input the speed value of the wheels, and
controls the motor to keep this wheel speed. The speed modification is
made as quick as possible, in an abrupt way. No limitation in acceleration is
considered in this mode.
Be careful when using this mode; avoid a big difference of
speed order as the current drawn by the motor could reset
the Pico-ITX (battery voltage drops due to high current).
For example, do not change the direction of the two motors
at once.
The solution is to use the speed control with acceleration
ramp or use a weaker PID (decrease the Proportional part).
The speed unit corresponds to the difference measured in position between
the two controllers’ routine (10ms). Here’s the formula to convert the speed
unit to metric unit.
10ms
82.5mm
23’400 [pulses]
Refresh time:
Wheel diameter:
Revolution resolution:
Speed [mm / s ] =
v pulses
t Re fresh
•
φWheel • π
Nb pulses
=
v pulses
0.01
•
82.5 • π
= 1.10761 • v pulses
23400
Formula to calculate real speed from the measured value
Note: this formula must be adapted if a payload is placed on the Koala.
The minimum speed order to ensure a correct control is 10 (=11mm/s).
Under this value, the control is not very stable with default PID parameters.
User can modify the PID to try to improve the behavior for this kind of very
low speed.
The maximum speed order is approximately 500 (=553mm/s). It’s still
possible to move the robot faster if the control mode is set to open loop. In
this case, the maximum speed will vary with the battery voltage and the
payload.
Koala 2.5 User Manual Rev 1.1
27
4.9.2
Speed profile control (“K” command)
This type of control uses the same PID as standard speed controller but
adds an acceleration ramp to travel from the actual speed to the new speed
order.
The ramp used in this mode can be configured with the speed profile
command (“J” command). Three parameters define the ramp:
Acc_Inc:
value of increment to add or subtract every Acc_Div
+1 control loop (value from 1 to 255).
Default = 5
Acc_Div:
defines the number of control loops where no increment
is added to the speed order. For example, a value of 0
means that at every control loop, the speed will be
increased by Acc_Inc. A value of 4, means that every
5 control loops (50ms) the speed will be modified.
(value from 0 to 255) Default = 1.
Min_Speed:
this parameter defines the minimum speed used by the
controller. This value avoids setting a speed too low
where the controller is not efficient. If the order value is
smaller than this parameter, the controller will
automatically limits the speed to Min_Speed. Do not set
a value lower than 1.
Default = 10.
Here’s an example of speed profile with default parameters (Acc_Inc = 5,
Acc_Div = 1, Min_Speed = 10).
A speed profile order has been set to 45. After 200ms at constant speed, a
new speed order of 100 is set. The motor keeps this speed during 100ms,
and finally decreases until reaching 0.
Koala 2.5 User Manual Rev 1.1
28
This curve corresponds to the order sent to the PID speed controller. The
real speed of the motor will depend of the payload and the PID reactivity.
A higher Acc_Div parameter will increase the time between two steps to
allow the PID to reach the speed order. A value of 0 means that the
effective motor speed will always be late on the order during the
acceleration.
This type of control must be preferred to the simple speed profile in order
to avoid high current peaks and preserve the mechanical parts. The user
needs to adapt the parameters Acc_Inc and Acc_Div to match the desired
behavior (high Acc_Inc for a reactive profile, high Acc_Div for a smooth
profile).
4.9.3
Position control (“F” command)
In this mode, the Koala will calculate a speed order (which will be
processed by the PID) to move the robot using an acceleration ramp, a
constant speed, and finally a deceleration ramp.
Speed profile using in position control
Position profile
Koala 2.5 User Manual Rev 1.1
29
This example shows a travel of 370mm (33’405 pulses) using the default
parameters.
The position control mode uses the same parameter as the speed profile
control to calculate the acceleration ramp. The Min_Speed parameter is
used only at the starting. When reaching the position target, the speed is
not limited (to improve precision).
In addition to these three parameters, the travel speed can be configured
through “Speed_Order” parameter (see command “J”, default = 200).
Finally, the “Pos_Margin” parameter defines the threshold when the position
controller stops completely the motor (set 0 to the speed controller). A low
margin will increase the precision, but will add an instability to the control.
It is not recommended to set this parameter below the default value (10).
To calculate the real distance travelled by the motor, use the formula
below:
Wheel diameter:
Revolution resolution:
Position[mm] = Ppulses •
82.5mm
23’400 [pulses]
φWheel • π
Nb pulses
= Ppulses •
Ppulses
82.5 • π
=
23400 90.2843
The position is stored in a signed 32 bits data, which means that the
maximum position order is +/- 231 pulses (=23’785m).
When performing straight travel (same distance on each wheel), the best
solution is to reset the position encoder before sending the Target position
command.
4.9.4
Open loop (“L” command)
This control mode disables the PID controller and sets directly the PWM to
the two motors. This can be useful if the application wants to calculate its
own PID.
The range of this command is +/- 2’940 where 2’940 correspond to 100%
of PWM in forward direction and -2’940 in backward direction.
If the application wants to disable the motor (to decrease current
consumption), the best way is to use this mode and set the PWM to 0.
The motor will be in free wheel mode.
Koala 2.5 User Manual Rev 1.1
30
5
PROGRAMMING
5.1
Introduction
The 64 bit Linux Ubuntu operating system (OS) is installed on the
Pico-ITX.
5.2
Configuration
The system should connect autonomously at start-up to your wired
network if an Ethernet cable is connected and you have a DHCP
server without identification. You can get the IP address on a
Terminal with the command:
ifconfig eth0
If this is not the case, with the icon in the figure 3.6 you can setup
your network connection.
You should configure the network settings to have access to the Koala
OS by WiFi or wired Ethernet.
Connect directly the robot (see chapter «Direct Connection»).
Open the "Network connection" (Figure 3.6 : Ubuntu desktop).
If you have the optional USB WiFi key (this key model WNA3100 from
Netgear is recommend as the drivers are already installed), edit the
connection named WiFi, meeting your network system configuration,
or add a new on under Wired tab if you don’t have Wifi.
With Ethernet (WiFi or wired), you will be able to access from a
computer through SSH the robot:
ssh –X user@ROBOT_IP
The password is koala. With the –X parameter, you will be able to
open remotely graphical programs.
To shutdown the robot from a terminal (remote by ssh or serial, or
local), use the command: sudo shutdown –h now
Wait 15s, then you can switch off the robot power switch.
Koala 2.5 User Manual Rev 1.1
31
5.3
Programming
In the directory /home/user/koala_library of the koala, there is
the library to gain access to the Koala hardware.
The library is a dynamic library and is already installed in
/usr/local/lib
It is accessing the Koala micro-controller through the serial port
/dev/ttyS1 with the commands defined in the chapter « Serial
Communication Protocol ».
Here is the description of the sub-directories of the library:
•
build-x86: contains the compiled library and its include files
•
doc:
contains the API documentation auto generated.
Open in your favorite browser the file
doc/html/index.html
•
examples: contains examples using the library
•
src:
•
template: contains a template (very basic example code) for
contains the source code of the library itself
using the library.
You can start with the examples/koala_example.c source code for
your program. To recompile it:
cd /home/user/koala_library
make examples
If you modify any source code in src directory or after installing a
new version, you will have to recompile and install the library with
the commands:
cd /home/user/koala_library
make clean
make all
sudo make install
You can also use the already installed Eclipse GUI. See chapter
below.
Koala 2.5 User Manual Rev 1.1
32
5.4
Programming with Eclipse GUI
Eclipse is already installed.
1.
Launch it (from a Terminal, execute : eclipse &).
2.
Go to file menu “File => NEW => Project => C/C++ => C
Project”.
3.
Choose « empty project » and choose a Project Name (ex: test).
4.
Push next button and then the "Advanced Settings" button.
5.
On the “C/C++ Build”, “Settings”, GCC C Linker, “Libraries” add
button under “Libraries (-l)”.
koala with the
6.
Still "Advanced Settings", go to ”Run/Debug Settings”, and push
“New” button. Push OK. Under “Project:”, enter your project
name and push OK. This will create a Debug part of the project.
7.
Push “OK” button, then “Finish”.
8.
Go to menu “File => New => File” and choose test.c as
filename.
Insert your C code, copying:
/home/user/koala_library/template/prog-tremplate.c or
/home/user/koala_library/examples/koala_example.c
9.
Then compile the project with menu “menu Project => Build-All”
=> The output file will be in the subdirectory Debug or Release
of the project (/home/user/workspace/test).
Go to the menu Project, Properties “Run/Debug Settings” and
edit the configuration you made under 6. Click “Search Project”
and select the available binary. Push OK and OK buttons.
10. You can run your program by the menu Run. In the lower part of
the Eclipse window, you will see the output of your program in
the Console tab.
Koala 2.5 User Manual Rev 1.1
33
5.5
Debugging
You can debug a program you made directly in console/GUI or
remotely.
5.5.1
Direct debugging
Your program must be cross-compiled with the option –g . Edit your
Makefile and replace the flag -O2 by -g .
You can use and run for debugging it:
gdb YOUR_PROGRAM
or
ddd YOUR_PROGRAM
if you are logged with the GUI.
You can also use Eclipse for debugging. If you already compiled you project
as explained in the previous chapter “Programming with Eclipse GUI”,
choose Debug on the menu Run.
The basic commands of gdb are:
r
: run
s
: next: one step in the program; enter in
subroutines
n
: one step in the program
b line/function
: break at line/function
delete break
: delete breakpoint number
until line
: continue until line
c
: continue
l
: list code
q
: quit gdb
h
: help; you can have all the commands here
A common sequence of debugging can be:
•
to list the code with l
•
set a breakpoint at the beginning of main with b main
•
run the program with r
•
execute a step with n
•
display a variable with p VAR_NAME
•
execute next step with n
•
continue to the end with c
•
Quit with q.
Koala 2.5 User Manual Rev 1.1
34
5.5.2
Remote debugging
If you have a wired or wireless Ethernet connection (see chapter
Configuration), you can access the Koala robot for debugging.
ssh –X user@ROBOT_IP
Where ROBOT_IP is the IP address of the Koala.
You can launch ddd or even eclipse as described in the chapter before
through the ssh console.
5.6
Microcontroller update
You can reprogram the micro-controller from the Koala Linux OS.
Into a Terminal, go to /home/user/koa2.5_bootloader folder
and run:
./koa2.5_bootloader –f FIRMWARE.hex
where FIRMWARE.hex is the micro-controller firmware file to
update with.
5.7
Serial port
By default, the serial port on the top of the Koala gives access to the
console.
If you need the serial port for connecting a device, you need to stop
the console mode with the command:
sudo stop ttyS0
You can start it again after having finished using it with:
sudo start ttyS0
You can access it with Minicom:
minicom
Remark: the ttyS1 is used to control directly the microcontroller.
The commands are defined in chapter «SERIAL
COMMUNICATION PROTOCOL ».
Koala 2.5 User Manual Rev 1.1
35
5.8
Transferring files
Establish a network connection between the computer and the Koala
(see chapter “Configuration”).
On the PC, for transferring from the PC to the KOALA, execute the
following command:
scp FILE user@KOALA_IP:/home/user
where
FILE
: is the file to transfer,
KOALA_IP : is the Koala ip address.
For the Koala to the PC, on the PC execute:
scp user@KOALA_IP:/home/user/FILE
On Windows, you can use WinSCP (http://www.winscp.net).
Koala 2.5 User Manual Rev 1.1
36
6
SERIAL COMMUNICATION PROTOCOL
This communication protocol allows complete control of the
Koala’s functions through the Pico-ITX serial line.
The protocol is made of commands and answers, all in standard
ASCII codes. A command is sent from the Pico-ITX to the Koala: it is
starting with an upper case alpha character and is followed, if
necessary, with numerical parameters separated with comma and
terminated by a line feed. The answer is sent by the robot to the PicoITX: it is starting with the same character that was initiating with the
command but using lower case, and followed, if necessary, with
numerical parameters.
The Koala could also send automatically some information (if
enabled) to provide an instantaneous update when new data (sensor,
motor, GPS, etc…) are available. This will avoid the Pico-ITX to read
many times the same data. To enable this mode, see “A” command in
the list below.
Notation:
↵
stands for carriage return key (Enter or Return key pressed)
\r
stands for ASCII character 0x0A (line feed)
\n
stands for ASCII character 0x0D (carriage return)
Specification:
- 115200bps
- 8 data bits
- 1 stop bit
- No parity
Koala 2.5 User Manual Rev 1.1
37
A
Configure the auto monitoring mode
Command:
Answer:
Function:
Example:
B
Read Firmware Version
Command:
Answer:
Function:
Example:
C
A, Auto_Mask ↵
a \r
Configures the auto monitoring mode. Enables a peripheral to
return automatically its value when refreshed. The values are
returned with the same format as the protocol below.
The Auto_Mask value must be sent in decimal value, but will
be processed as a binary value. If set as 0, the auto mode will
be disabled (default):
- Bit 0:
US sensor
- Bit 1:
Motor Speed
- Bit 2:
Motor Position
- Bit 3:
Motor Current
- Bit 4:
Accelerometer value
- Bit 5:
Gyroscope value
- Bit 6:
GPS data
- Bit 7:
GPS NEMA Data (will return all GPS raw data)
- Bit 8:
Magnetometer value
A,6↵
a\r
B↵
b,Version-Revision \r
Reads the version and revision of the Koala firmware
B↵
b,A-02\r
Configuration
Command:
Answer:
Function:
C, US_Mask, IO_Dir ↵
c \r
Configures Koala parameters:
US_Mask:
US sensor active. Bit 0 =
LEFT_Rear, Bit 1 = LEFT_FRONT, etc…
Default: 511= all US active.
IO_Dir: Direction of the four IO (0..3). Each
IO is configure with two bits (IO0 = bit0 & 1,
IO1 = bit2&3,…). 00 = output, 01 = input, 10
= PWM servo (50Hz).
Default: 0 = all output
Example:
C,28,204↵
c\r
Koala 2.5 User Manual Rev 1.1
38
D
Set Motor speed
Command:
Answer:
Function:
Example:
E
Read Motor speed
Command:
Answer:
Function:
Example:
F
D,MotL_Speed, MotR_Speed↵
↵
d \r
Sets the motor speed. The PID controller will manage the
speed in closed loop. The unit is the pulses / 10ms, which
means an order of 100 will drive the motor to a speed of
110mm/s.
!!! Be careful when using this command, as a too high
order could cause a very high motor current which can
affect the on-board computer (can create a reset).
Adapt the PID if needed or use the K command!!!
D,100,100↵
d\r
E↵
e, MotL_Speed, MotR_Speed \r
Reads actual motor speed. The unit is the same as defined in
D command.
E↵
e,100,100\r
Set Target position
Command:
Answer:
Function:
Example:
F,MotL_Pos, MotD_Pos↵
↵
f \r
Sets a target position to be reached. The move will be
performed with three phases: an acceleration to reach the
maximum speed, a constant speed and a deceleration phase
before the target position. The unit is the pulse, which means
a position of 1000 will correspond to 11mm.
F,50000,50000↵
f\r
Koala 2.5 User Manual Rev 1.1
39
G
Read the Ultrasonic sensor
Command:
Answer:
Function:
Example:
H
Configure PID controller
Command:
Answer:
Function:
Example:
I
G↵
↵
g, Left, Left_Front, Front_Left, Front, Front_Right,
Right_Front, Right, Rear_Right, Rear_Left \r
Reads the Ultrasonic sensor value. The returned value
corresponds to the distance of the first obstacle seen by the
sensor (unit: cm). Each sensor can be disabled if not
necessary. Here are the possible values:
0:
Obstacle <25cm
25-250: Obstacle distance
1000:
No obstacle detected
2000:
Sensor disabled
G↵
g,50,60,180,250,200,1000,2000,0,0\r
H,Kp,Ki,Kd↵
↵
h \r
Configures the PID controller value used for the speed control.
H,10,5,1↵
h\r
Set the position encoder value
Command:
Answer:
Function:
Example:
I,MotL_Pos, MotR_Pos↵
↵
i \r
Resets the position encoder value of the motor.
If set during a position control move, the motors will be
stopped to avoid an incorrect behaviour.
I,0,10000↵
i\r
Koala 2.5 User Manual Rev 1.1
40
J
Configure the speed profile parameters
Command:
Answer:
Function:
J,Acc_Inc, Acc_Div, Min_Speed, Speed_Order,
Pos_Margin,Max_Current↵
↵
j \r
Configure the parameters used for the position control:
Acc_Inc:
Increment
of
the
speed
“Acc_Div+1” control loop.
Acc_Div:
Number of control loop before adding the
Acc_Inc to the speed order
Minimum speed order used during the position
control
Min_Speed:
added
every
Speed_Order: Travel speed used during the position control
Pos_Margin: Margin of the position control to detect when
the robot reach its target.
Max_Current: Maximum current for each motor. If above this
value, the controller will limit the motor
command. (unit is 0.1[A], 0 = disable , max 30
(=3A), default = 10 (=1A)).
Example:
K
Set Motor Speed with acceleration ramp
Command:
Answer:
Function:
Example:
L
J,10,0,5,150,10,0↵
j\r
K, MotL_Speed, MotR_Speed↵
↵
k \r
Sets a speed order to reach with acceleration ramp. The
parameters used during this mode are the same as for the
position control.
K,-100,-100↵
k\r
Set open loop
Command:
Answer:
Function:
Example:
L, MotL_PWM, MotR_PWM ↵
l \r
Sets a PWM value for each motor. Value can be from -2940
(100% in backward direction) to +2940 (100% forward)
L,500,-1000↵
l\r
Koala 2.5 User Manual Rev 1.1
41
M
Get Accelerometer value
Command:
Answer:
Function:
Example:
N
Get Gyroscope value
Command:
Answer:
Function:
Example:
O
N↵
n, x1, y1, z1, x2, …, x10, y10, z10 \r
Reads the last 10 values of the XYZ gyroscope value
X1 is the latest value and x10 the oldest.
N↵
n,0,0,550,0,0,553, 0,0,552, 0,0,551, 0,0,554, 0,0,556,
0,0,557, 0,0,558, 0,0,540, 0,0,551\r
Read the Motor current
Command:
Answer:
Function:
Example:
P
M↵
m, x1, y1, z1, x2, …, x10, y10, z10 \r
Reads the last 10 values of the XYZ acceleration
X1 is the latest value and x10 the oldest.
M↵
m, 0,0,1000,0,0,1003, 10,0,990, 5,0,995, 6,3,980, 0,0,1000,
0,0,1010, 21,12,965, 0,20,988, 0,23,980\r
O↵
o, MotL_Current, MotR_Current \r
Reads the actual Motor current (unit is 0.1[A])
O↵
o, 150,-100 \r
Get Encoder value
Command:
Answer:
Function:
Example:
P↵
p, MotL_Pos, MotR_Pos \r
Reads the actual value of the position encoder.
P↵
p,5520, -4500 \r
Koala 2.5 User Manual Rev 1.1
42
Q
Get GPS Data
Command:
Answer:
Function:
Example:
R
Read I2C external bus
Command:
Answer:
Function:
Example:
S
R, I2C_addr, Reg, Nb_Read ↵
r, Val1, Val2, …, Valn \r
Reads n bytes on the I2C external bus (terminal blocks or
docking station)
R,118,0,10↵
r,10,56,250,255,128,127,1,5,78,98 \r
Set the output value (PWR and IO)
Command:
Answer:
Function:
Example:
T
Q↵
q,Valid_Sat,Nb_Sat,Latitude, Longitude, UTC_Time,
UTC_Date, Speed, Altitude \r
Reads the last GPS data received by the koala
Valid_Sat:
Valid data flag (V = Warning, A = Valid)
Nb_Sat:
Number of satellites used
Latitude:
Latitude of the actual position
Longitude:
Longitude of the actual pos.
UTC_Time:
UTC time of the latest fix
UTC_Date:
UTC date of the latest fix
Speed: Speed over ground value (in knots)
Altitude: Actual Altitude (in meters)
Q↵
q, 5,4124.8963N,08151.6838W, 17:08:34,25.11.13,5.5,650\r
S, PWR_Value, IO0, IO1, IO2, IO3 ↵
s, \r
Sets the state of the four PWR outputs (bit 0 = PWR0, bit 1 =
PWR1, …), and four IO (if set as output, 0 = GND, 1 = +3.3V,
if set as PWM servo, defines the position of the servo (0 =
1ms, 255 = 2ms duty cycle)).
S,6,0,125,1,1↵
s\r
Read IO state
Command:
Answer:
Function:
Example:
T↵
t, IO_State, IN_State\r
Reads the four IO and the two Input states. If the IO are
defined as output, will be the same value as set with S
command, if defined as PWM servo output, will return the
value of the PWM when the command is received.
T↵
t,8,3 \r
Koala 2.5 User Manual Rev 1.1
43
U
Read AD input
Command:
Answer:
Function:
Example:
V
Read the battery value
Command:
Answer:
Function:
Example:
W
V↵
v, Bat_Type, Bat_Voltage, Bat_Current, Chrg_Current
\r
Reads the different values of the battery.
Bat_Type:
0 = Li-ION, 1 = NIMH,
2 = Not Initialized
Bat_Voltage: Voltage of the battery (unit is
0.1V)
Bat_Current: Current of the battery (unit is
0.1A)
Chrg_Current: Charge Current (unit is 10mA)
V↵
v,0,115,450,56,0\r
Write on the I2C external bus
Command:
Answer:
Function:
Example:
X
U↵
u, AD0_Val, AD1_Val\r
Reads the two AD value (0-1023).
U↵
u,580,465 \r
W, I2C_addr, Reg, Data_1, Data_2, …, Data_n ↵
w \r
Writes n Bytes on the external I2C bus. All data must be sent
as decimal.
W,89,10,1,3,187,243↵
w \r
Send GPS command
Command:
Answer:
Function:
Example:
X,GPS_Command ↵
x
Prints a complete message directly on the GPS serial port.
Used to configure special GPS function. All data after the “X,”
will be sent to the GPS. See NMEA_manual_for_Fastrax_IT500
_Series_GPS_receivers.pdf” document for available command.
X, $PMTK314,1,1,1,1,1,5,1,1,1,1,1,1,0,1,1,1,1,1,1*2C ↵
x\r
Koala 2.5 User Manual Rev 1.1
44
Y
Get Motor control status
Command:
Answer:
Function:
Example:
Z
Reset microcontroller
Command:
Answer:
Function:
Example:
?
Z↵
z
Resets the microcontroller (used to started bootloader)
Z↵
z\r
Scan I2C external bus
Command:
Answer:
Function:
Example:
&
Y↵
y,MotL_CTRL,MotR_CTRL,MotL_OnTrg, MotR_OnTrg
Reads the actual status of the motor control
Motx_CTRL:
Type of actual control:
0: Idle
1: Speed
2: Speed with Acceleration
3: Position
4: Open Loop
5: Current limitation
6: Error
Motx_OnTrg: Define if the target is reached
(position control)
Y↵
y,1,3,1,0 \r
?↵
!,Nb_Device, Addr1, Addr2, …, AddrN
Scans the external I2c bus.
?↵
!,4,10,25,85,121 \r
Get Magnetometer value
Command:
Answer:
Function:
Example:
&↵
@,X,Y,Z
Read the XYZ Magnetometer value.
&↵
@,-721,1074,-2393\r
Koala 2.5 User Manual Rev 1.1
45
7
Mechanical drawings
Unit is [mm]
Figure 6.1 : Top view
Koala 2.5 User Manual Rev 1.1
46
Figure 6.2 : Right view
Figure 6.3 : Front view
Koala 2.5 User Manual Rev 1.1
47
8
WARRANTY
K-TEAM warrants that the Product is free from defects in materials and
workmanship and in conformity with the respective specifications of the
product for the minimum legal duration, respectively two years from the
date of delivery.
Upon discovery of a defect in materials, workmanship or failure to meet
the specifications in the Product during the aforementioned period,
Customer must request help on K-TEAM Internet forum on www.kteam.com/forum/ by detailing:
• The type of Product used (package, version).
• The expansion modules.
• The programming environment of the Product (standard,
version, OS).
• The standard use of Product before the appearance of the
problem.
• The description of the problem.
If no answers have been received within two working days, Customer
can contact K-TEAM support by phone or by electronic mail with the full
reference of its order and Product serial number.
K-TEAM shall then, at K-TEAM's sole discretion, either repair such
Product or replace it with the equivalent product without charging any
technical labor fee and repair parts cost to Customer, on the condition that
Customer brings such Product to K-TEAM within the period mentioned
before. In case of repair or replacement, K-TEAM may own all the parts
removed from the defective Product. K-TEAM may use new and/or
reconditioned parts made by various manufacturers in performing warranty
repairs and replacement of the Product. Even if K-TEAM repairs or replaces
the Product, its original warranty term is not extended.
This limited warranty is invalid if the factory-applied serial number has
been altered or removed from the Product.
This limited warranty covers only the hardware and software
components contained in the Product. It does not cover technical assistance
for hardware or software usage and it does not cover any software products
contained in the Product. K-TEAM excludes all warranties expressed or
implied in respect of any additional software provided with Product and any
such software is provided "AS IS" unless expressly provided for in any
enclosed software limited warranty. Please refer to the End User License
Agreements included with the Product for your rights with regard to the
licensor or supplier of the software parts of the Product and the parties'
respective obligations with respect to the software.
This limited warranty is non-transferable.
It is likely that the contents of Customer's flash memory will be lost or
reformatted in the course of the service and K-TEAM will not be responsible
Koala 2.5 User Manual Rev 1.1
48
for any damage to or loss of any programs, data or other information stored
on any media or any part of the Product serviced hereunder or damage or
loss arising from the Product not being available for use before, during or
after the period of service provided or any indirect or consequential
damages resulting therefore.
IF DURING THE REPAIR OF THE PRODUCT THE CONTENTS OF THE
FLASH MEMORY ARE ALTERED, DELETED, OR IN ANY WAY MODIFIED, KTEAM IS NOT RESPONSIBLE WHATEVER. CUSTOMER'S PRODUCT WILL BE
RETURNED TO CUSTOMER CONFIGURED AS ORIGINALLY PURCHASED
(SUBJECT TO AVAILABILITY OF SOFTWARE).
Be sure to remove all third parties' hardware, software, features, parts,
options, alterations, and attachments not warranted by K-TEAM prior to
Product service. K-TEAM is not responsible for any loss or damage to these
items.
This warranty is limited as set out herein and does not cover, any
consumable items (such as batteries) supplied with the Product; any
accessory products which is not contained in the Product; cosmetic
damages; damage or loss to any software programs, data, or removable
storage media; or damage due to (1) acts of God, accident, misuse, abuse,
negligence, commercial use or modifications of the Product; (2) improper
operation or maintenance of the Product; (3) connection to improper
voltage supply; or (4) attempted repair by any party other than a K-TEAM
authorized robot service facility.
This limited warranty does not apply when the malfunction results from
the use of the Product in conjunction with any accessories, products or
ancillary or peripheral equipment, or where it is determined by K-Team that
there is no fault with the Product itself.
K-TEAM EXPRESSLY DISCLAIMS ALL OTHER WARRANTIES THAN
STATED HEREINBEFORE, EXPRESSED OR IMPLIED, INCLUDING WITHOUT
LIMITATION IMPLIED WARRANTIES OF MERCHANTABILITY AND FITNESS
FOR A PARTICULAR PURPOSE TO THE FULLEST EXTENT PERMITTED BY
LAW.
Limitation of Liability: IN NO EVENT SHALL EITHER PARTY BE LIABLE
TO THE OTHER FOR ANY INDIRECT, SPECIAL, INCIDENTAL OR
CONSEQUENTIAL DAMAGES RESULTING FROM PERFORMANCE OR FAILURE
TO PERFORM UNDER THE CONTRACT, OR FROM THE FURNISHING,
PERFORMANCE OR USE OF ANY GOODS OR SERVICE SOLD OR PROVIDED
PURSUANT HERETO, WHETHER DUE TO A BREACH OF CONTRACT, BREACH
OF WARRANTY, NEGLIGENCE, OR OTHERWISE. SAVE THAT NOTHING
HEREIN SHALL LIMIT EITHER PARTY'S LIABILITY FOR DEATH OR PERSONAL
INJURY ARISING FROM ITS NEGLIGENCE, NEITHER PARTY SHALL HAVE ANY
LIABILITY TO THE OTHER FOR INDIRECT OR PUNITIVE DAMAGES OR FOR
ANY CLAIM BY ANY THIRD PARTY EXCEPT AS EXPRESSLY PROVIDED
HEREIN.
Koala 2.5 User Manual Rev 1.1
49
K-Team S.A.
Z.I. Les Plans-Praz 28
1337 Vallorbe
Switzerland