1
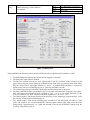
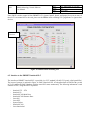
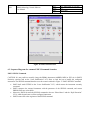
E U R O P E A N S O U T H E R N O B S E R V A T ORY Organisation Européenne pour des Recherches Astronomiques dans l'Hémisphère Austral Europäische Organisation für astronomische Forschung in der südlichen Hemisphäre ESO - EUROPEAN SOUTHERN OBSERVATORY VERY LARGE TELESCOPE VLTI PRIMA Metrology Control Software User Manual Doc. No.: VLT-MAN-ESO-15736-4547 Issue 2.0 Date: 08/12/2008 Prepared: R. Frahm Name Approved: Date S. Leveque/F. Delplancke Name Released: Name Signature Date Signature Date Signature R. Gilmozzi ESO PRIMA Metrology Control Software User Manual Doc: Issue: Date: Page: VLT-MAN-ESO-15736-4547 2.0 08/12/2010 2 of 45 CHANGE RECORD ISSUE DATE SECTION/PAGE AFFECTED REASON/INITIATION DOCUMENTS/REMARKS 1.0 2.0 2008-04-29 2010-12-08 All All First release. Updated with all changes during PRIMA commissionings 1 to 13. ESO PRIMA Metrology Control Software User Manual Doc: Issue: Date: Page: VLT-MAN-ESO-15736-4547 2.0 08/12/2010 3 of 45 TABLE OF CONTENTS 1 1.1 1.2 1.3 1.4 1.5 2 2.1 2.2 3 3.1 3.2 3.3 3.4 3.5 4 4.1 4.2 4.3 4.4 4.5 5 5.1 5.2 5.3 5.4 5.5 5.6 6 6.1 6.2 6.3 Purpose ............................................................................................................................................ 4 Scope..................................................................................................................................................... 4 Applicable Documents ........................................................................................................................... 4 Abbreviations and Acronyms ................................................................................................................. 5 Glossary ................................................................................................................................................ 5 Stylistic Conventions ............................................................................................................................. 7 Architecture Overview .................................................................................................................... 8 PRIMET Overall Description ................................................................................................................. 8 PRIMET Deployment ............................................................................................................................ 8 Phase Meter ................................................................................................................................... 10 Overview ............................................................................................................................................. 10 Troubleshooting ................................................................................................................................... 13 Engineering Files ................................................................................................................................. 14 Periodic Healthchecks .......................................................................................................................... 17 Command Interface.............................................................................................................................. 18 Laser Stabilization......................................................................................................................... 19 Overview ............................................................................................................................................. 19 Troubleshooting ................................................................................................................................... 21 Periodic Healthchecks .......................................................................................................................... 22 Engineering Files ................................................................................................................................. 24 Command Interface.............................................................................................................................. 25 Position Sensor Detection .............................................................................................................. 27 Overview ............................................................................................................................................. 27 Calibrating the PSD background noise ................................................................................................. 31 Troubleshooting ................................................................................................................................... 32 Periodic Healthchecks .......................................................................................................................... 33 Engineering Files ................................................................................................................................. 33 Command Interface.............................................................................................................................. 36 PRIMET WS Control SW: PMCS ................................................................................................ 38 Overview ............................................................................................................................................. 38 Sequence Diagrams for common PMCS Command Scenarios .............................................................. 41 PMCS Command Interface .................................................................................................................. 42 ESO 1 PRIMA Metrology Control Software User Manual Doc: Issue: Date: Page: VLT-MAN-ESO-15736-4547 2.0 08/12/2010 4 of 45 PURPOSE This document describes the usage of the PRIMA Metrology Control Software, running on the PRIMA Workstation (PMCS), the PRIMET Detection LCU (PMACQ), the PRIMET Laser Stabilization LCU (PMLSS) and the PRIMET Position Sensor Detection LCU (PMPSD). The intended audience of this document are users of the PRIMA MET system, as well as administrators. The internal design and technical background of the PRIMA MET system is described in [AD 01]. Please refer to this document for a more indepth explanation of the subsystems. 1.1 Scope The document is released for the VLT archive at specified project milestones, with a release number and a release date, to document the history of the project and for reference. 1.2 Applicable Documents The following documents, of the issue shown if specified, form part of this manual to the extent specified herein. In the event of conflict between this document and those referenced, the content of this document shall be considered as a superseding requirement unless explicitly stated otherwise herein. Document Number Ref [AD 01] VLT-SPE-ESO-157363384 VLT-MAN-ESO-17200[AD 02] 0908 VLT-SPE-ESO-15410[AD 03] 1957 VLT-ICD-ESO-15736[AD 04] 3060 VLT-SPE-ESO-15736[AD 05] 3899 VLT-MAN-ESO-17210[AD 06] 0690 LT-MAN-SBI-17210[AD 07] 0001 VLT-TRE-ESO-15732[AD 08] 4087 Issue Date 2 2008-04-29 Title PRIMET Control Software, Detailed Design Description 1.6 2002-10-24 Tools for Automated Testing User Manual 4 2004-05-24 VLTI, Final Lay-out of VLTI Control LANs 3.1 2008-03-31 1 02/03/08 6.0 2008-02-01 VLT GUI User Manual 4 2005-12-21 LCC User Manual 1 2008-04-02 Design of the Pupil Tracker for PRIMET VLTI PRIMA Supervisor Software Interface Control Document Specifications for the PRIMA Metrology data files, data logging and algorithms Table 1 – Applicable documents ESO PRIMA Metrology Control Software User Manual Doc: Issue: Date: Page: VLT-MAN-ESO-15736-4547 2.0 08/12/2010 5 of 45 1.3 Abbreviations and Acronyms This document employs several abbreviations and acronyms to refer concisely to an item, after it has been introduced. The following list is aimed to help the reader in recalling the extended meaning of each short expression. AT CCS DDL DL DLCS dOPDC ESO FSU GD GDT GUI LCC LCU MET OLDB OPD OPDC OPL PRICS PRIMA PSS RMN TIM UT UTC VLT VLTI VLTICS VME WS Auxiliary Telescope Central Control Software Differential Delay Line Delay Line Delay Line Control Software Differential Optical Path Difference Controller European Southern Observatory Fringe Sensor Unit Group Delay Group Delay Tracking Graphical User Interface LCU Common Software Local Control Unit Metrology Online Database Optical Path Difference Optical Path Difference Controller Optical Path Length PRIMA Control Software Phase Referenced Imaging and Microarcsecond Astrometry facility PRIMA Supervisor Software Reflective Memory Network Time Interface Module Unit Telescope Universal Time Coordinates Very Large Telescope Very Large Telescope Interferometer Very Large Telescope Interferometer Control Software VERSA Module Euro card Workstation 1.4 Glossary This glossary defines those terms (single words or phrases) concerning Software Engineering, Telescope Control and Interferometry, mentioned in this document, but firstly introduced and extensively described in other documents. The meaning of each term is carefully explained, focusing on its usage in the context of this specific document. Words, belonging to a term, which are enclosed in brackets, are implicit when no ambiguity can arise. Those words contained in the definition of a term and included also in the glossary, which are used with a specific technical meaning, are printed in italics. Entries are ordered alphabetically. Actor: An actor is a role of an entity external to the system. Actors can be humans, machines, or devices. One physical object may play several roles and therefore be modeled by several actor. A primary actor is one having a ESO PRIMA Metrology Control Software User Manual Doc: Issue: Date: Page: VLT-MAN-ESO-15736-4547 2.0 08/12/2010 6 of 45 goal requiring the assistance of the system. A secondary actor is one from which the system needs assistance to satisfy its goal. Beam combiner: an optical system which combines the light beams coming from different telescopes used for interferometry. Channel: a channel consists of two light beams of the same object from two telescopes. There are two Fringe Sensor Units, each handling one channel: channel B for the first object and channel A for the second object. Database attribute: A location, uniquely identified by a name, within the WS or the LCU real-time database, where a value is stored.Dual feed: an optical system, located at the telescope focus, capable to select two narrow field-of-view beams. Exposure time: the time during which the photons are accumulated in an exposure. Function: A defined objective or characteristic action of a system or component. Functional requirement: A requirement that specifies a function that a system or component must be able to perform. Functional specification: A document that specifies the functions that a system or component must perform. Mode: A condition of existence that a system, subsystem, or component, may be in. Normally it comprises a set of possible states. Module: See software module. Optical path difference: is the sum of the external optical path difference and the internal optical path difference. External optical path difference: the geometric difference in the optical path length from the observed object to the telescope. It depends on the object position and on the baseline vector, and varies in time as the Earth rotates (sidereal motion). It is computed by using the formula: OPD ext = S B (where S is the unit vector pointing to the object, and B the baseline vector. Internal optical path difference: the difference in the optical path length, due to the interferometer layout, from the telescope to the detector. It is also called delay offset or delay constant. Operational state: The state of a system, subsystem, or component that is installed in its intended environment. Package: See software package. Process: See software process. Software device driver: A collection of subroutines and data that constitutes the software interface to an I/O device. Software life cycle: The period of time that begins when a software product is conceived and ends when the software is no longer available for use. The software life cycle typically includes a concept phase, requirements phase, design phase, implementation phase, test phase, installation and check-out phase, operation and maintenance phase, and, sometimes, retirement phase. These phases may overlap or be performed iteratively. (Software) module: A relatively large subdivision of the implementation items in a software package. In most cases a software package correspond to one single software module, but complex software packages can be split across more software modules. A software module is handled as a single configuration control unit and follows a standardized directory structure. Software modules correspond to components in UML terminology. (Software) package: A major subdivision of a software project that collects a set of correlated functions that are designed, developed and tested all together and independently from other packages. Software packages can be recursively defined as containing other software packages. (Software) process: A program in execution. It consists of the executable program, the program's data and stack, the support data stored in the database, its program counter, stack pointer and other registers, and all the other information needed to run the program. State: The value assumed at a given instant by the variable used by the control software to represent the condition of a system, subsystem, or component. Normally it is a finer specification within a given mode. Status: The set of values of all the parameters (state, numeric read-outs, flags,...) that define the condition of a system, subsystem, or component. ESO PRIMA Metrology Control Software User Manual Doc: Issue: Date: Page: VLT-MAN-ESO-15736-4547 2.0 08/12/2010 7 of 45 Stereotype: UML term for "a new kind of model element defined within the model based on an existing kind of model element. Stereotypes may extend the semantics but not the structure of pre-existing metamodel classes." Subsystem: A secondary or subordinate system within a larger system. It usually refers to a device equipped with the control electronics and low level software. System: A collection of components organized to accomplish a specific function or a set of functions. When no further characterized, it is generally used to refer to the whole of a complex equipment made up by heterogeneous parts. Use case: "A specific way of using the system by performing some part of the functionality. Each Use Case constitutes a complete course of action initiated by an actor, and it specifies the interaction that takes place between an actor and the system.... The collected use cases specify all the existing ways of using the system" [RD 01]. Working wavelength ( 0): is the effective wavelength of the FSU. 1.5 Stylistic Conventions The following styles are used: bold in the text, for commands, file names, pre/suffixes as they have to be typed. italic in the text, for parts that have to be substituted with the real content before typing. teletype for examples. <name> in the examples, for parts that have to be substituted with the real content before typing. bold and italic are also used to highlight words. ESO 2 PRIMA Metrology Control Software User Manual Doc: Issue: Date: Page: VLT-MAN-ESO-15736-4547 2.0 08/12/2010 8 of 45 ARCHITECTURE OVERVIEW This section is intended to present a brief overview of the PRIMA MET system. It is taken from [AD 01] and listed hereafter for completeness. 2.1 PRIMET Overall Description The PRIMA Metrology (PRIMET) is a component of PRIMA facility. Depending on the mode of operation, PRIMA can be used either to measure the angular separation between the two objects (astrometry observation) or to produce images of the fainter of the two objects using a phase reference technique (imaging observation). 2.2 PRIMET Deployment Physically, the PRIMA Metrology system consists of four LCUs for three different subsystems. Two LCUs are identical: The “Phase Meter” LCUs run the same SW on identical HW. While the first measures the differential delta L = FSUB – FSUA, the second one measures one single channel, FSU-B. Knowing these two measurements, the remaining channel can easily be deducted. The HW deployment of the PRIMA MET system is shown in Figure 1: PRIMET HW Deployment. For a context view of PRIMET in the VLTI network, please refer to [AD 03]. Figure 1: PRIMET HW Deployment ESO PRIMA Metrology Control Software User Manual Doc: Issue: Date: Page: VLT-MAN-ESO-15736-4547 2.0 08/12/2010 9 of 45 The functionality of the PRIMA metrology system is logically split into four modules, which can be used independently of each other. An overview of the SW packages is given in Figure 2: PRIMET SW Packages. PRIMET Laser Stabilization SW: PMLSS PRIMET Acquisition Unit (=Phase Meter) SW: PMACQ PRIMET Position Sensor Detection SW: PMPSD PRIMET WS Control SW: PMCS Figure 2: PRIMET SW Packages In order to communicate with one of the PRIMET subsystems, the user has the option to: (1) Send commands to the corresponding server processes of the module. This process uses the name <moduleName>Server. Example: In order to send a command to PMACQ, use “pmacqServer”. (2) Use the GUI panel of the subsystem, named <moduleName>Gui. For PMACQ, alias names have been created to allow fast access to the GUI panels of both PMACQ instances: <moduleName>guiab is used for the differential “A-B” PRIMET measurements, while <moduleName>guib accesses the single channel “-B” results. (3) Read or write attributes of the subsystem’s OLDB. These are accessible via “<alias>moduleName” on the CCS environment on which the module has been deployed. The software deployment of the individual processes is shown in Figure 3: PRIMET SW Deployment. ESO PRIMA Metrology Control Software User Manual Doc: Issue: Date: Page: VLT-MAN-ESO-15736-4547 2.0 08/12/2010 10 of 45 Figure 3: PRIMET SW Deployment 3 PHASE METER 3.1 Overview The PRIMA metrology system consists of two heterodyne Michelson interferometers which are operated simultaneously, and have common optical paths with both observed stars through the VLTI optical train. The disturbance to be measured (ΔL) corresponds to the difference between the path variations recorded by the two Michelson interferometers. The phase difference between the two channels of the PRIMA metrology system is measured by a stand-alone device, the “Phase Meter” [AD 01]. Two Phase Meter LCU’s are available within the PRIMA system, which are identical in terms of HW and SW. Different CCS environments are however used to address each of the two systems. The names of the corresponding LCU and the CCS environment are identical, and outlined in Table 2: PRIMET Phase Meter LCUs. LCU Environment Phase Meter (A-B) lprmac lprmac Phase Meter (-B) lprma2 lprma2 Table 2: PRIMET Phase Meter LCUs The user interface to the PRIMET Phase Meter SW is provided via a VLT standard [AD 06] GUI panel, called pmacqGui. This panel requires one environment variable to be set before being invoked from the shell. Following, please find an example about how to start pmacqGui for the “A-B” Phase Meter. For the “-B” measurements, the LCU name must be “lprma2”: ESO Doc: Issue: Date: Page: PRIMA Metrology Control Software User Manual VLT-MAN-ESO-15736-4547 2.0 08/12/2010 11 of 45 wprima primamgr:~ 1009 > export lcuTat=lprmac wprima primamgr:~ 1010 > pmacqGui & For convenience, two alias commands are created: pfmacqguiab and pmacqguib. These can simply be invoked from the shell, without having to set any environment variables in advance. The definition of the alias commands is done in $USER/.pecs/misc-all.ali, which is automatically created when the PRIMA WS is reinstalled via the pkgin module primaBUILD. Only one instance of the GUI is sufficient to control both LCU’s simultaneously: The current LCU is switchable via the “LCU” option button. The layout of pmacqGui is outlined in Figure 5: PMACQ GUI. The computed quantity “deltaL” is published on the RMN network, together with a time stamp and a validity flag, and additionally displayed in the GUI at a fixed rate. The update rate is set to 3 Hz by default within CCS, but can be overridden by the user by adding one parameter to the pmacqGui command. The following example starts “pmacqGui” with an update rate of 1 Hz. This is the fastest rate possible: wprima primamgr:~ 1010 > pmacqGui pollRate=1 & The nominal sequence to go ONLINE with PMACQ consists of the following steps: Command INIT Command ONLINE Reset the Phase Meter with the RESMET command. This command clears internal counters of the Phase Meter and ensures that internal overflow conditions are avoided. Command STRTMET Zero the metrology via the REFMET command. This command is used to perform a software referencing of the PRIMA metrology in one of four different ways: o ZERO simply sets the correction factor to 0 o AVG sets the correction factor to the arithmetic mean of the last <n> measurements o CURRENT sets it to the current measurement. o TS allows to supply a timestamp. In that case, the correction factor is set to the measurement taken at that specific UTC timestamp which follows the mode parameter. The effect on deltaL is outlined in Figure 4: REFMET Command. HW Reset while Lref= 0 T Figure 4: REFMET Command Lref to be used ESO PRIMA Metrology Control Software User Manual Doc: Issue: Date: Page: VLT-MAN-ESO-15736-4547 2.0 08/12/2010 12 of 45 Figure 5: PMACQ GUI During ONLINE, the following criteria must be fulfilled in order to regard the delivered data as “valid”: The 450k/650k probe and reference signals must be flagged as “detected”. The 200k probe signal must be detected. The flag “PLL Locked” must be set, while “PM Overflow” and “FC Overflow” must be cleared. On the panel, correct flags are always displayed in GREEN colour. Note: Due to a problem in the Phase Meter HW, the “PLL Locked” flag toggles between “0” and “1”. A problem (RED checkbox) is reported by PMACQ only if the level of that flag stays at “0” value for more than 3 seconds. The external trigger delivered from the TIM board to the Phase Meter must be detected. The status of the Phase Meter’s photodiodes (=DC levels) must not be saturated, nor display “low signal”. Note: The range of the Photodiode levels is defined as 7 mV – 1.8 V. A “low signal” translates to a DC level of less than 60 mV, while “saturated” should be regarded as a “DC level > 1.6 V”. The “Block Counter” field should increase at the frequency of the “Metrology Acquisition Rate”, while the field “Nr. Of Blocks lost” should display “0”. The “Glitch counter” fields for the 450 kHz probe, 450 kHz ref., 650 kHz probe, 650 kHz ref., 200k probe, PM overflow, FC overflow and RESET detected signals indicate how many times the status changed from "signal detected" to "signal not detected" since the last STRTMET (which resets the counters). They shall all read “0”. ESO PRIMA Metrology Control Software User Manual Doc: Issue: Date: Page: VLT-MAN-ESO-15736-4547 2.0 08/12/2010 13 of 45 The “Nr. Of Samples” field shall display a value calculated by dividing the Phase Meter’s internal working frequency of 200 kHz by the “Metrology Acquisition Rate”. For the 8 kHz nominal case this translates to 200 kHz/8kHz = 25. Please note that the full “PhaseMeter Status” information is always delivered to the RMN network together with “deltaL”. It is up to the (d)OPDC controller to decide if the delivered “deltaL” value is valid or not. The “nominal” Phase Meter status value on the RMN network should read 0x013F. 3.2 Troubleshooting 1. If the status of the Phase Meter’s photodiodes (=DC levels) reads “saturated” or “low signal”, decrease or increase the output of the AOM’s via the PRIMET “Laser Stabilization” subsystem. 2. In case no data is delivered by the Phase Meter, the “Nr. Of Blocks” field within pmacqGui does not increase. Additionally, the check box “No PhaseMeter Data” is displayed in RED colour. In that case, please check the flat ribbon cable from the Phase Meter to the HPDI32 board mounted in the PMC slot of the CPU board, and the trigger cable from the TIM board to the the Phase Meter. Check that the Phase Meter is switched ON. 3. If data is delivered, but not visible by the (d)OPDC controller, please check the node ID of the RMN board of the corresponding PMACQ LCU with the following command: lprmac->rfm2gDevShow Device Base Addr Memory ------- ---------- ---------/rfm2g0 0xc4000000 0x04000000 total number of RMN devices: Int Level NodeID --------- -----0x50 0x13 1 For “lprmac”, the node ID shall be 0x13, while it shall read 0x14 for “lprma2”. 4. A HW reset of the Phase Meter can be commanded via the RESMET command. The reset is achieved by applying 0V to the back plane “clear” connector of the phasemeter for 10 ms. The number of commanded resets is displayed by the output field to the right of the “RESET Det.” flag. RESMET clears internal counters of the Phase Meter which could lead to a “FC Overflow” or “PM Overflow” condition. It shall be sent before every observation. 5. RTDScope can be started for each of the PMACQ LCU’s by pressing the “RTDScope” button in the PMACQ GUI. Command INIT, ONLINE in the RTDScope GUI to display the data delivered by the RT algorithm. The following information can be displayed in realtime, see Figure 6: RTDScope GUI: Calculated “deltaL” value DC levels of the Photodiodes: Probe 650k, Probe450k, Ref. 650k, Ref. 450k ESO PRIMA Metrology Control Software User Manual Doc: Issue: Date: Page: VLT-MAN-ESO-15736-4547 2.0 08/12/2010 14 of 45 Figure 6: RTDScope GUI 3.3 Engineering Files For offline evaluation of the Phase Meter measurements, the user can record “engineering files” via the PMACQ commands STRTENG and STOPENG. In this mode, the Phase Meter measurements are recorded in the local memory of the LCU, and stored to a file on the PRIMA WS upon reception of the STOPENG command. Obviously, the number of samples that can be recorded with this mechanism is limited by the amount of memory of the LCU (typically 256MB). 80 bytes are recorded internally for each sample. For the Phase Meter, this translates to about 4 minutes of measurements if the RT algorithm is executed at 8 kHz. A bar chart displays the current “status” of the engineering file (i.e. the amount of samples recorded with respect to the required amount of samples). ESO PRIMA Metrology Control Software User Manual Doc: Issue: Date: Page: VLT-MAN-ESO-15736-4547 2.0 08/12/2010 15 of 45 Figure 7: Recording of Engineering Files To start recording, specify the number of samples and press the “STRTENG” button. As soon as the requested number of samples has been recorded by the system, the LED “Engineeringbuffer full” will be displayed in GREEN colour. Press the “STOPENG“ button to store the recorded values to the PRIMA WS. Three files are recorded: - Actual Phase Meter measurements DC levels of the 4 Photodiodes Signal levels of the “Fringe Signal Analysis Board” The filenames are generated automatically: <Environment>PhaseMeterYYYY-MM-DDTHH.MM.SS.txt, <Environment>PhotodiodesYYYY-MM-DDTHH.MM.SS.txt and <Environment>FringeYYYY-MMDDTHH.MM.SS.txt. All files can be found in the environment of the corresponding LCU: Phase Meter A-B -B Environment $VLTDATA/ENVIRONMENTS/lprmac $VLTDATA/ENVIRONMENTS/lprma2 Table 3: Engineering File Directories The format of the recorded files is identical to the examples outlined in Table 4: Engineering File Format. For each sample, one line contains a relative timestamp, followed by the actual measurements. Within the header, the keyword “Definition of the columns” defines the order of measurements in the following table. Date/Start time: 2008-04-21T13.33.33 acquisition/loop rate (Hz): 8000.00 Configuration: CHA: UNDEF Ip3 (+38.65 MHz) Ip1 (+38.00 MHz) CHB: FSU B Ip4 (-39.55 MHz) Ip2 (-40.00 MHz) Laser Frequency (nm): 1319.00 Frequency Shift (MHz): 78.00 Index of refraction: n=1 Number of Samples: 2000 Definition of the columns: ESO PRIMA Metrology Control Software User Manual Doc: Issue: Date: Page: VLT-MAN-ESO-15736-4547 2.0 08/12/2010 16 of 45 RelativeTime,Status,DeltaL_PM,Epsilon_FC,DeltaL_REF,FC_sum,FC_comp,numS amples 0.000212,0x0177,-0.1027727725,0.0000008912,0.0000000000,-4148934488.00,3937805.00,25 0.000334,0x0177,-0.1027727746,0.0000008912,0.0000000000,-4148934574.00,3937805.00,25 0.000458,0x0177,-0.1027727771,0.0000008912,0.0000000000,-4148934672.00,3937805.00,25 0.000583,0x0177,-0.1027727788,0.0000008912,0.0000000000,-4148934742.00,3937805.00,25 ... Table 4: Engineering File Format (PhaseMeter) Date/Start time: 2008-04-21T13.33.33 acquisition/loop rate (Hz): 8000.00 Configuration: CHA: UNDEF Ip3 (+38.65 MHz) Ip1 (+38.00 MHz) CHB: FSU B Ip4 (-39.55 MHz) Ip2 (-40.00 MHz) Laser Frequency (nm): 1319.00 Frequency Shift (MHz): 78.00 Index of refraction: n=1 Number of Samples: 2000 Definition of the columns: RelativeTime,Status,DC_REF_650kHz,DC_REF_450kHz,DC_PROBE_650kHz,DC_PROB E_450kHz 0.000212,0x0177,0.644,0.497,0.014,0.140 0.000334,0x0177,0.651,0.504,0.028,0.154 0.000458,0x0177,0.644,0.490,0.014,0.140 0.000583,0x0177,0.637,0.483,0.007,0.133 ... Table 5: Engineering File Format (Photodiodes) % Date/Start time: 2010-12-08T14.30.52.340000 % Sampling frequency in Hz: 1 % Configuration: % CHA: PACMAN % Ip3 (+38.65 MHz) % Ip1 (+38.00 MHz) % CHB: FSU B % Ip4 (-39.55 MHz) % Ip2 (-40.00 MHz) % Laser Frequency (nm): 1319.00 % Frequency Shift (MHz): 78.00 % Index of refraction: n=1 % Number of Samples: 1 % Definition of the columns: RelativeTime,DC_REF_450kHz,RMS_REF_450kHz,V_REF_450kHz,DC_REF_650kHz,RMS_REF_650kHz, V_REF_650kHz,DC_PROBE_450kHz,RMS_PROBE_450kHz,V__PROBE450kHz,DC_PROBE_650kHz, RMS_PROBE_650kHz,V_PROBE_650kHz 1.250000,4.425,7.568,2.419,9.516,9.962,1.48,8.835,6.313,1.011,2.794,1.165,0.5899 ... Table 6: Engineering File Format (Fringe Signal Analysis Board) For a more detailed decription of the engineering files, please refer to [AD 05]. ESO PRIMA Metrology Control Software User Manual Doc: Issue: Date: Page: VLT-MAN-ESO-15736-4547 2.0 08/12/2010 17 of 45 3.4 Fringe Sensor Analysis Board Debug information indicating the quality of the fringes on the Phasemeter, the A-B LCU is equipped with a “Fringe Sensor Analysis Board”, which is used for periodic updates of the OLDB with the following information: - REF 450k OUT DC REF 450k OUT RMS REF 650k OUT DC REF 650k OUT RMS PROBE 450k OUT DC PROBE 450k OUT RMS PROBE 650k OUT DC PROBE 650k OUT RMS A “visibility”attribute shall be derived for each pair of RMS/DC values, to be calculated with the formula: visibility = sqrt(2) * RMS / DC. 3.5 Periodic Healthchecks At a configurable period, PMACQ logs statistical information to the CCS logging system. The rate is user definable via the pmacq_<Environment>.dbcfg file, found in $INTROOT/config: <ATTRIBUTE>: loggingPeriod 30 <TYPE>: Scalar Depending on the PMACQ LCU, different information is logged. Please refer to Table 7: PMACQ Periodic Healthchecks for the keywords generated periodically by PMACQ. Additionally, most commands and their results, as well as “exceptional” events (FC Overflow, PM Overflow) are logged, and can therefore be retrieved at the end of the night via the OPS log database. For a detailed description of ALL PMACQ keywords, please refer to [AD 05]. Keyword DELTALMEAN DELTALSTD DELTALMIN DELTALMAX DCREF650MEAN DCREF450MEAN DCPROBE650MEAN DCPROBE450MEAN DCREF650STD DCREF450STD DCPROBE650STD DCPROBE450STD OPDCHBMEAN OPDCHBSTD Origin lprmac lprmac lprmac lprmac lprmac lprmac lprmac lprmac lprmac lprmac lprmac lprmac lprma2 lprma2 Comment Mean computed over 30sec Standard deviation computed over 30sec Minimum over 30 sec Maximum over 30 sec Mean computed over 30sec Mean computed over 30sec Mean computed over 30sec Mean computed over 30sec Standard deviation computed over 30sec Standard deviation computed over 30sec Standard deviation computed over 30sec Standard deviation computed over 30sec Mean computed over 30sec Standard deviation computed over 30sec ESO PRIMA Metrology Control Software User Manual OPDCHBMIN OPDCHBMAX Doc: Issue: Date: Page: VLT-MAN-ESO-15736-4547 2.0 08/12/2010 18 of 45 lprma2 Minimum over 30 sec lprma2 Maximum over 30 sec Table 7: PMACQ Periodic Healthchecks 3.6 Command Interface For completeness, please find hereafter the full list of commands accepted by PMACQ. The list is taken from [AD 01]. Please check against [AD 01] to verify which command is accepted in which state. Command Parameters Reply Description SETRATE <Rate> (REAL) OK/ERROR The SETRATE command is used to change the data rate of the Phase Meter. Command Parameters Reply Description GETRATE None <Rate> (REAL) The GETRATE command is used to query the data rate of the Phase Meter. Command Parameters REFMET <Reference Mode> (STRING) <Timestamp> (STRING) OK/ERROR The REFMET command is used to perform a software referencing of the PRIMA metrology in one of four different ways. ZERO just sets the currection factor to 0, while AVG sets the correction factor to the arithmetic mean of the last <n> measurements, and CURRENT sets it to the current measurement. Moreover, a timestamp can be supplied with TS. In that case, the correction factor is set to the measurement taken at that specific UTC timestamp. Reply Description Command Parameters Reply Description STRTMET None OK/ERROR The STRTMET command is used to start processing data coming from the Phase Meter, and to deliver the quantity Delta L to the RMN network. Command Parameters Reply Description STOPMET None OK/ERROR The STRTMET command is used to stop processing data coming from the Phase Meter, and to stop delivering the quantity Delta L to the RMN network. Command Parameters Reply Description STRTENG <Number of Samples> (INTEGER) OK/ERROR The STRTENG command is used to start recording data coming from the Phase Meter into engineering files. ESO PRIMA Metrology Control Software User Manual Doc: Issue: Date: Page: VLT-MAN-ESO-15736-4547 2.0 08/12/2010 19 of 45 Command Parameters Reply Description STOPENG None OK/ERROR The STRTENG command is used to stop recording data coming from the Phase Meter into engineering files. Command Parameters Reply Description RESETPM None OK/ERROR The RESETPM command is used to perform a hardware reset of the phase meter. Command Parameters Reply MEASURE None <DeltaL> (STRING) <Timestamp> (STRING) The MEASURE command returns the latest Phase Meter measurement together with a timestamp. Description Command Parameters Reply Description 4 SELINS <Instrument Name> (STRING) OK/ERROR SELINS selects the instrument to be used for the observation. The value must be either FSUA, AMBER or MIDI. LASER STABILIZATION 4.1 Overview The PRIMET “Laser Stabilization” subsystem consists of a laser head together with its frequency stabilization hardware [AD 01]. A model SR844 lock-in amplifier generates the (analog) error signal X, which is read by a analog input board. On a dedicated LCU, a TAC control loop running at 1 kHz calculates two correction signals, which are transmitted to the (analog) frequency tuning inputs of the LightWave model 125 (alternatively InnoLight MIR500NE-FC) microprocessor-based power supply via a analog output board. Note: Originally, the LightWave model 125-1319-200 was foreseen to be used as the PRIMET light source. Due to problems with the manufacturer, it was replaced by a InnoLight model MIR 500NE-FC later. The SW is configurable to use either of them, since the LightWave laser has already been procured and shall be used as a PRIMET spare part. The configuration of the laser model can be done via the file “pmlss.dbcfg”, installed into $INTROOT/config. By default, the InnoLight model MIR 500NE-FC is selected. In case the LightWave model 125 spare part shall be used, please update the OLDB attribute shown in Table 8: PMLSS Laser Configuration to “1”. <ATTRIBUTE>: useLW125Laser 0 <TYPE>: Scalar Table 8: PMLSS Laser Configuration ESO PRIMA Metrology Control Software User Manual Doc: Issue: Date: Page: VLT-MAN-ESO-15736-4547 2.0 08/12/2010 20 of 45 The interface to the Laser Stabilization SW is provided via a VLT standard [AD 06] GUI panel, called pmlssGui. This panel requires one environment variable to be set before being invoked from the shell. Following, please find an example about how to start pmlssGui. wprima primamgr:~ 1009 > export lcuTat=lprmls wprima primamgr:~ 1010 > pmlssGui & For convenience, an alias command has been created: pmlssgui. This command can just be invoked from the shell, without having to set any environment variables in advance. The definition of the alias commands is done in $USER/.pecs/misc-all.ali, which is automatically created when PRIMA is installed via it’s pkgin module. The layout of pmlssGui is outlined in Figure 8: PMLSS GUI. Figure 8: PMLSS GUI ESO PRIMA Metrology Control Software User Manual Doc: Issue: Date: Page: VLT-MAN-ESO-15736-4547 2.0 08/12/2010 21 of 45 The normal operational sequence to go ONLINE with PMLSS is outlined in the following steps: Command INIT - this will initialize the serial communication to the laser assembly devices. Command ONLINE. Switch the laser ON with the “Switch Laser” command. Automatically, the “Laser Power” is set to a predefined value which is user configurable via the file “pmlss.dbcfg”, found in $INTROOT/config. Two different values can be set, one for the InnoLight laser, one different value for the LightWave laser. By default, the InnoLight laser power is set to 300 mW, while the LightWave nominal power is set to 70 mW: <ATTRIBUTE>: LSPNominalIL 300.0 <ATTRIBUTE>: LSPNominalLW 70.0 <TYPE>: Scalar <TYPE>: Scalar Table 9: PMLSS Nominal Laser Power Settings Close the stabilization loop. Verify that the “Laser OK” flag is set. Verify that the “Laser STABLE” flag is set to GREEN after some minutes. CAUTION: The laser radiationis invisible, but can be harmful for the human eye. Please be sure to wear appropriate goggles before sending the command to switch the laser ON! A red flashing message is displayed in the PMLSS GUI in order to warn the user about this situation. 4.2 Troubleshooting 1. Upon INIT, the serial communication to the laser assembly devices is initialized. Most devices require a manual setup of their serial communication parameters, either via HW DIP switches, or via a SW configuration menu. Therefore, in case INIT fails, please check if the following settings have been configured: RS232 connection to the microprocessor based power supply of the LightWave model 125 laser (if configured): Baud Rate: 9600 baud, No Parity, 8 Data Bits, 1 Stop Bit, Full Duplex (via a DIP switch on the back of the power supply). RS485 connection to the NewPort CN77000 temperature controllers for the iodine cell, the EOM driver, and the OVEN: Baud Rate: 9600 baud, No Parity, 8 Data Bits, 1 Stop Bit, Full Duplex (via the SW menu, accessible on the front panel of the CN77000). RS232 connection to the Burleigh WA-1500 WaveMeter: 9600 baud, No Parity, 8 Data Bits, 1 Stop Bit, Full Duplex (DIP switch at the back of the WaveMeter). RS232 connection to the NewPort 2832-C PowerMeter: Baud Rate: 9600 baud, No Parity, 8 Data Bits, 1 Stop Bit, No Flow Control. RS232 connection to the NewPort SR844 lock-in amplifier: Baud Rate: 9600 baud, No Parity, 8 Data Bits, 1 Stop Bit, Full Duplex (via the front panel of the SR844). 2. A digital signal is connected to the “Interlock” input of the laser’s power supply unit. In case of a HW interlock, the “laser OK” flag on the PMLSS panel is set to “FALSE”. Please check the readings on the ESO PRIMA Metrology Control Software User Manual Doc: Issue: Date: Page: VLT-MAN-ESO-15736-4547 2.0 08/12/2010 22 of 45 power supply unit if the interlock condition was cleared successfully. As soon as the interlock condition has been removed, please send the “Switch Laser ON” command to switch on the laser again. 3. RTDScope can be started for the PMLSS LCU by pressing the “RTDSCOPE” button in the PMLSS GUI. Command INIT, ONLINE in the RTDScope GUI to display the data delivered by the RT algorithm. The following information can be displayed in realtime by connecting to the “Scope” block of the TAC RT algorithm: Error signal “X”, delivered by the SR844 Lock-in Amplifier. Piezo command, calculated by TAC. Temperature command, calculated by TAC. PowerMeter analog-out channel #B. Theta signal, delivered by the SR844 Lock-in Amplifier. 4. Proximity switches are periodically read (1 sec interval) by PMLSS to determine the instrument connected to PRIMA. It is not possible to actually “change” the instrument, only the status is determined. In order to change the instrument, the operator must manually change the cabling. Figure 9: PMLSS Proximity Switches shows the display of the proximity switches via the PMLSS GUI. Figure 9: PMLSS Proximity Switches 4.3 Periodic Healthchecks At regular intervals (1 sec), the status of the connected laser is checked. For the LightWave laser, the status can be determined via a separate RS232 connection. For the InnoLight laser, the status is defined via several analog input signals, read by the MEN M36 modules. Different conditions are checked by PMLSS to assure that the laser status is “OK”: Conditions necessary to generate a “laser OK” for the Lightwave laser model 125-1319-200 [AD 05]: Laser Diode On Laser Power 200 mW ± 10% (TBC) Interlock status: no interlock Fault status: No Fault Conditions necessary to generate a “laser OK” for the Innolight laser model MIR 500NE-FC [AD 05]: ESO PRIMA Metrology Control Software User Manual Doc: Issue: Date: Page: VLT-MAN-ESO-15736-4547 2.0 08/12/2010 23 of 45 Diode laser 1 power monitor 1.2 V± 10% (150mW± 10%) TBC Diode laser 2 power monitor 1.2 V± 10% (150mW± 10%) TBC Diode laser 1, Temperature guard (temperature control loop OK) Diode laser 2, Temperature guard (temperature control loop OK) Noise eater monitor ON Interlock status: no interlock At a fixed frequency of 1/30 Hz, PMLSS logs statistical information to the CCS logging system. Please refer to Table 10: PMLSS Periodic Healthchecks for the keywords generated periodically by PMLSS. Additionally, most commands and their results, as well as “exceptional” events (Laser not OK, temperature range exceeded) are logged, and can therefore be retrieved at the end of the night via the OPS log database. For a detailed description of ALL PMLSS keywords, please refer to [AD 05]. Keyword ERRORSIGNALXMAX ERRORSIGNALXMIN ERRORSIGNALXMEAN ERRORSIGNALXSTD Origin lprmls /AI lprmls /AI lprmls /AI lprmls /AI Comment computed over 30sec computed over 30sec computed over 30sec computed over 30sec PHASESIGNALYMAX PHASESIGNALYMIN PHASESIGNALYMEAN PHASESIGNALYSTD lprmls /AI lprmls /AI lprmls /AI lprmls /AI computed over 30sec computed over 30sec computed over 30sec computed over 30sec TEMPCMDMAX TEMPCMDMIN TEMPCMDMEAN TEMPCMDSTD lprmls /AI lprmls /AI lprmls /AI lprmls /AI computed over 30sec computed over 30sec computed over 30sec computed over 30sec PIEZOCMDMAX PIEZOCMDMIN PIEZOCMDMEAN PIEZOCMDSTD lprmls /AI lprmls /AI lprmls /AI lprmls /AI computed over 30sec computed over 30sec computed over 30sec computed over 30sec WAVELENGTH lprmls /ISER12 POWER EOMACTTEMP OVENACTTEMP I2ACTTEMP POWERIRMEAN lprmls /ISER12 lprmls /ISER12 lprmls /ISER12 lprmls /ISER12 Laser output power EOM Actual temperature IR (1319nm) power measured after the doubling crystal ESO PRIMA Metrology Control Software User Manual POWERREDMEAN lprmls /ISER12 Doc: Issue: Date: Page: VLT-MAN-ESO-15736-4547 2.0 08/12/2010 24 of 45 Average over 5 sec Second harmonic (Red ,659nm) power measured before the I2 cell Average over 5 sec Table 10: PMLSS Periodic Healthchecks 4.4 Engineering Files For offline evaluation of the Laser Stabilization results, the user can record “engineering files” via the PMLSS commands STRTENG and STOPENG. In this mode, status information of the TAC RT algorithm is recorded in the local memory of the LCU, and stored to a file on the PRIMA WS upon reception of the STOPENG command. Obviously, the number of samples that can be recorded with this mechanism is limited by the amount of memory of the LCU (typically 256MB). 40 bytes are recorded internally for each sample. For the Phase Meter, this translates to about 30 minutes of measurements if the RT algorithm is executed at 1 kHz. A bar chart displays the current “status” of the engineering file (i.e. the amount of samples recorded with respect to the required amount of samples). Figure 10: Recording of Engineering Files To start recording, specify the number of samples and press the “STRTENG” button. As soon as the requested number of samples has been recorded by the system, the LED “Engineering File Ready” will be displayed in GREEN colour. Press the “STOPENG“ button to store the recorded values to the PRIMA WS. The format of the recorded file is identical to the example outlined in Table 11: Engineering File Format (PMLSS). For each sample, one line contains a relative timestamp, followed by the actual measurements. Within the header, the keyword “Definition of the columns” defines the order of measurements in the following table. Addionally, a snapshot of the current TAC configuration is written to the PRIMA WS. The filenames are generated automatically: MetFreqStabYYY-MM-DDTHH.MM.SS.txt and MetFreqStabYYYY-MM-DDTHH.MM.SS.tac (for the TAC algorithm). The files can be found in the environment of the corresponding LCU: $VLTDATA/ENVIRONMENTS/lprmls. Date/Start time: 1970-01-01T02.23.34 TAC filename: pmlss_IL_SIM.tac Loop status: OPEN Wavelength: 1319.1768 Laser diagnostic: Laser OK DC set. temp: 47.50 DC act. temp: 47.50 EOM set. temp: 30.00 ESO PRIMA Metrology Control Software User Manual Doc: Issue: Date: Page: VLT-MAN-ESO-15736-4547 2.0 08/12/2010 25 of 45 EOM act. temp: 30.00 I2 set. temp: 70.00 I2 act. temp: 70.00 Lock-in ref. detected/frequency: 0.0000013190 Lock-in sensitivity: 100 nVrms / -127 dBm Lock-in filter slope: 6 db/oct Lock-in output Ch1: 0.000000000 Lock-in output Ch2: 0.000000000 Number of Samples: 100 Definition of the columns: RelativeTime,errorSignalX,phaseSignalY,tempCmd,piezoCmd 0.000,0.000000,0.000000,0.000000,0.000000 0.002,0.000000,0.000000,0.000000,0.000000 ... Table 11: Engineering File Format (PMLSS) 4.5 Command Interface For completeness, please find hereafter the full list of commands accepted by PMLSS. The list is taken from [AD 01]. Please check against [AD 01] to verify which command is accepted in which state. Command Parameters Reply Description SETLSP <LSP> (REAL) OK/ERROR The SETLSP command is used to modify laser stabilization parameter that qualifies the laser to be "stabilized". The mean value of the error signal measured by the lock-in amplifier must be below this value. Command Parameters SETTEMP <Device Name> (STRING : « I2 », « EOM » or « OVEN ») <Temperature> (REAL) OK/ERROR The SETTEMP command is used to modify the destination temperature of the CN77000 temperature controller used for either the I2, EOM or OVEN. Reply Description Command Parameters Reply Description GETTEMP <Device Name> (STRING : « I2 », « EOM » or « OVEN ») <Temperature> (REAL) The SETTEMP command is used to read the destination temperature of the CN77000 temperature controller used for either the I2, EOM or OVEN. Command Parameters Reply GETVOLT None <Voltage Piezeo> (REAL) <Voltage Temp.> (REAL) The GETVOLT command is used to read the voltages applied to the FAST FREQUENCY BNC and SLOW FREQUENCY BNC inputs of the laser’s power supply unit done by TAC Description ESO PRIMA Metrology Control Software User Manual Doc: Issue: Date: Page: VLT-MAN-ESO-15736-4547 2.0 08/12/2010 26 of 45 during ONLINE. Command Parameters Reply Description CLSLOOP <On/Off Flag> (STRING) OK/ERROR The CLSLOOP command is used to open or close the light source stabilization control loop. Command Parameters SETCONF <Temperature I2> (REAL) <Temperature DC> (REAL) <Temperature OVEN> (REAL) OK/ERROR The SETCONF command sets the temperature setpoints of the CN77000 temperature controllers user for I2, DC and OVEN. Reply Description Command Parameters Reply Description GETCONF None <Temperature I2> (REAL) <Temperature DC> (REAL) <Temperature OVEN> (REAL) The GETCONF command reads the temperature setpoints of the CN77000 temperature controllers user for I2, DC and OVEN. Command Parameters Reply Description POWER <On/Off Flag> (STRING) OK/ERROR The POWER command is used to switch the laser diode ON or OFF. Please note that the laser diode can only be turned on if the key on the front plate of the LightWave model 125 laser/InnoLight model MIR500 has been turned manually in advance. Command Parameters Reply Description AUTPHAS None OK/ERROR The AUTPHAS command is used to perform a manual autophase function of the SR-844 Lock-In amplifier. Normally this is done automatically when going ONLINE with pmlss. Command Parameters Reply Description STRTENG <Number of Samples> (INTEGER) OK/ERROR The STRTENG command is used to start recording data coming from the stabilization loop into a engineering file. Command Parameters Reply Description STOPENG None OK/ERROR The STRTENG command is used to stop recording data coming from the stabilization loop into a engineering file. ESO PRIMA Metrology Control Software User Manual Doc: Issue: Date: Page: VLT-MAN-ESO-15736-4547 2.0 08/12/2010 27 of 45 Command Parameters Reply Description SETLPWR <Laser Power> (REAL) OK/ERROR The SETLPWR command is used to set the laser power of the Innolight/Lighwave laser in [mW]. Command Parameters SETAOMT <AOM ID> (STRING) <Transmission> (REAL) OK/ERROR The SETAOMT command is used to set the transmission coefficient of one of the four AOMs (in percent). Reply Description Command Parameters Reply Description GETINS None <Instrument Name> (STRING) Returns the name of the instrument configured via the metrology switchyard. The return value is among the values FSUA, AMBER, MIDI, or UNDEF. Command Parameters Reply Description GETFLP <Flip ID> (STRING) <Flip OD Position> (STRING) Returns the position of the FLIP MIRROR device "PRIMETA" or "PRIMETB". Command Parameters SETFLP <Flip ID> (STRING) <In/Out Flag> (STRING> OK/ERROR Sets the position of the FLIP MIRROR device "PRIMETA" or "PRIMETB" to either "IN" or "OUT". Reply Description 5 POSITION SENSOR DETECTION 5.1 Overview The main task of the PMPSD LCU is the computation of the lateral beam displacement of each beam, using PSD (=quadcell) devices. The schematic of one PSD device is outlined in Figure 11: PMPSD PSD Devices. Four active detectors are simultaneously operated. They correspond to the metrology arms monitoring the input channels Ip1 and Ip3 (channel A) and Ip2 and Ip4 (Channel B). The lateral displacements ΔX and ΔY of the sensors coordinate systems are transformed into the necessary corrections in the [U,V,W] coordinates system of the light duct for the two selected star separators, and sent as correction commands during “Pupil Optimization” mode at high frequency (100 Hz t.b.c.) via a dedicated ethernet connection. For a description of the coordinate transformation please refer to [AD 01]. ESO PRIMA Metrology Control Software User Manual Doc: Issue: Date: Page: VLT-MAN-ESO-15736-4547 2.0 08/12/2010 28 of 45 Figure 11: PMPSD PSD Devices The interface to the PRIMET “Position Sensor Detection” SW is provided via a VLT standard [AD 06] GUI panel, called pmpsdGui. This panel requires one environment variable to be set before being invoked from the shell. Following, please find an example about how to start pmpsdGui: wprima primamgr:~ 1009 > export lcuTat=lprmpd wprima primamgr:~ 1010 > pmpsdGui & For convenience, an alias command has been created: pmpsdgui. This command can just be invoked from the shell, without having to set any environment variables in advance. The definition of the alias commands is done in $USER/.pecs/misc-all.ali, which is automatically created when PRIMA is installed via it’s pkgin module. The layout of pmpsdGui is outlined in Figure 12: PMPSD GUI. ESO PRIMA Metrology Control Software User Manual Doc: Issue: Date: Page: VLT-MAN-ESO-15736-4547 2.0 08/12/2010 29 of 45 Figure 12: PMPSD GUI During “Pupil Optimization” (=Guiding) mode, PMPSD sends correction offsets to the VCM LCU’s of the Star Separators involved in the observation. The selection of the two involved STS’s is configured using the SETMCFG command, which defines the two telescopes used for this PRIMA observation. Internally, this command uses a PMPSD internal lookup-table to define the IP addresses and UDP ports that shall be used for the direct socket communication to the STS VCM LCUs. These IP addresses of the STS VCM LCU’s are defined in [AD 03], and have ot be updated in case the VLTI network is changed. All settings can be found within the file $INTROOT/config/pmpsd.dbcfg, and are outlined in Table 12: PMPSD -> STS IP Address Settings. ESO PRIMA Metrology Control Software User Manual Doc: Issue: Date: Page: VLT-MAN-ESO-15736-4547 2.0 08/12/2010 30 of 45 <ATTRIBUTE>: ipAddressSTSAT1 <TYPE>: Scalar "192.168.6.25" <ATTRIBUTE>: ipAddressSTSAT2 <TYPE>: Scalar "192.168.6.35" <ATTRIBUTE>: ipAddressSTSAT3 <TYPE>: Scalar "192.168.6.45" <ATTRIBUTE>: ipAddressSTSAT4 <TYPE>: Scalar "192.168.6.55" <ATTRIBUTE>: ipAddressSTSUT1 <TYPE>: Scalar "xxx.xxx.xxx.xxx" <ATTRIBUTE>: ipAddressSTSUT2 <TYPE>: Scalar "xxx.xxx.xxx.xxx" <ATTRIBUTE>: ipAddressSTSUT3 <TYPE>: Scalar "xxx.xxx.xxx.xxx" <ATTRIBUTE>: ipAddressSTSUT4 <TYPE>: Scalar "xxx.xxx.xxx.xxx" <ATTRIBUTE>: portSTSAT1 <TYPE>: Scalar 3000 <ATTRIBUTE>: portSTSAT2 <TYPE>: Scalar 3000 <ATTRIBUTE>: portSTSAT3 <TYPE>: Scalar 3000 <ATTRIBUTE>: portSTSAT4 <TYPE>: Scalar 3000 <ATTRIBUTE>: portSTSUT1 <TYPE>: Scalar 3000 <ATTRIBUTE>: portSTSUT2 <TYPE>: Scalar 3000 <ATTRIBUTE>: portSTSUT3 <TYPE>: Scalar 3000 <ATTRIBUTE>: portSTSUT4 <TYPE>: Scalar 3000 Table 12: PMPSD -> STS IP Address Settings For the control loop between the PRIMET “Pupil Sensor Detection” subsystem (as the sensor) and the STS VCM LCU (as the actuator), a standard taclib “DigitalTF” block is used, which implements a 2 nd order digital controller with the formula shown in Table 13: 2nd Order Digital Controller. Y 1 A1( Z 1) A2(Z 2) G U 1 B1( Z 1) B2(Z 2) Table 13: 2nd Order Digital Controller For each of the eight installed PSD devices, different parameters for the “DigitalTF” block can be configured. The respective settings are outlined in Table 14: PMPSD Control Loop Parameters. These values shall be optimized for the corresponding STS connection during commissioning by the use of engineering files. <ATTRIBUTE>: Q<x>pmpsdGain <TYPE>: Scalar 0.21351272843237 <ATTRIBUTE>: Q<x>pmpsdA1 <TYPE>: Scalar -1.89038518941956 <ATTRIBUTE>: Q<x>pmpsdB1 <TYPE>: Scalar -1.99905795915703 ESO PRIMA Metrology Control Software User Manual <ATTRIBUTE>: Q<x>pmpsdA2 0.89215003191845 <ATTRIBUTE>: Q<x>pmpsdB2 0.99905795915702 Doc: Issue: Date: Page: VLT-MAN-ESO-15736-4547 2.0 08/12/2010 31 of 45 <TYPE>: Scalar <TYPE>: Scalar Table 14: PMPSD Control Loop Parameters The normal operational sequence to go ONLINE with PFTST is outlined in the following steps: Command INIT. Command SETMCFG – This command selects the telescopes involved in the PRIMA operation, which in turn defines the IP addresses for the dedicated LAN connection to the STS VCM LCU’s. Command SELINS – This command selects the instrument used for the PRIMA observation, which in turn defines the four active PSD devices (out of a total eight). Command ONLINE. Select the PGA and TRA gains for all active quadcells such that the beam does not saturate. This procedure is described in detail in [AD 05]. In case the beam is not detected on one or more of the active PSD devices, start a “beam search” procedure for these devices. If required, additionally command GETBKG and USEBKG to acquire and subtract the “background noise” for the PSD devices. Please note that the beam must be “not detected” in order to measure the background noise! Start “Pupil Optimization” mode via STRTMPO for “ALL” active quadcells. Verify that the “Beam Detected” and “PSD Guiding” flags are displayed in GREEN colour, all 4 PSD devices are set to “ACTIVE”, and the “BKG” is used (=subtracted) from the measurements. The beam must not be saturated, otherwise the PGA/TRA gain settings have to be adjusted manually! Please note that each successful SRCHBM command creates a permanent “backup” of the beam center positions. The following file is created: /vltdata/config/ pmpsdBEAM_lprmpd.dbcfg The format of these files is determined by the LCC dbBackup() utility [AD 07]. Please do not directly modify these files. This configuration will also survive a complete rebuild of the PRIMA WS. 5.2 Calibrating the PSD background noise Calibrating the PSD background noise is an automatic procedure. The GETBKG command shall be sent by the user to measure the average background noise of one specific or all active PSD devices over a predefined (fixed) period. Please note that the beam must be switched OFF, i.e. the “Beam Detected” flag must NOT be on, otherwise the command returns with an error message. The measuring timeframe is user definable via $INTROOT/config/pmpsd.dbcfg: <ATTRIBUTE>: getBkgAvgTime 5 <TYPE>: Scalar ESO PRIMA Metrology Control Software User Manual Doc: Issue: Date: Page: VLT-MAN-ESO-15736-4547 2.0 08/12/2010 32 of 45 By default, the time frame is set to 5 sec. Upon arrival of the GETBKG command, PMPSD uses the internal sampling functionalities which are at the same time used for the engineering files, i.e. the quadcell measurements are stored in the local memory of the LCU at the period of the RT algorithm (1 kHz). At the end of the time frame, the mean value per quadrant for each selected PSD device is calculated and internally stored. A message “PRI MET GETBKG IP<x> Q1,Q2,Q3,Q4” is logged via the CCS logging system to inform the user about the Q1-Q4 noise values found during calibration. The background noise can be used (i.e. subtracted from the actual measurements) by sending the USEBKG command to PMPSD. 5.3 Troubleshooting 1. PMPSD requires a special version of TACLIB which implements VLTSW20070141 to access two VMIVME-3123 analog input boards. Please check the TACLIB version (>1.94.1.1) in case some quadcells are not read correctly. 2. RTDScope can be started for the PMPSD LCU by pressing the “RTDSCOPE” button in the PMPSD GUI. Command INIT, ONLINE in the RTDScope GUI to display the data delivered by the RT algorithm. The following information can be displayed in realtime by connecting to the “Scope” block of the TAC RT algorithm: o o For each active quadcell: R = sqrt(x^2+y^2), R is the "running value". For each active quadcell: Q_SUM. Q_SUM is the “running value”. Thus, in total, 8 values can be displayed in realtime via RTDScope. 3. PMPSD requires a dedicated LAN connection to the VCM LCU’s of the involved STS’s. Motorola MVME-6100 CPU boards offer two separate ethernet ports. The second ethernet port must however be configured manually via the userScript of the corresponding LCU. The port is NOT automatically configured by LCC. IP addresses in the “private subnet” range 192.168.yyy.xxx must be used for the connection. Example: ESO PRIMA Metrology Control Software User Manual Doc: Issue: Date: Page: VLT-MAN-ESO-15736-4547 2.0 08/12/2010 33 of 45 ipAttach 1,"geisc" ifMaskSet "geisc1",0xffffff00 ifAddrSet "geisc1","192.168.0.3" ifShow Table 15: Activation of second ethernet interface 4. The correction messages to the STS VCM LCU’s are sent using UDP sockets. Therefore, PMPSD cannot determine if the messages have reached the destination LCU, or if the STS VCM LCU is actually USING these corrections. Please use the corresponding STS GUI to command the VCM LCU to ONLINE, and verify if the correction commands are received correctly. 5.4 Periodic Healthchecks At a configurable frequency, PMPSD logs statistical information on the CCS logging system. The rate is user definable via the pmpsd.dbcfg file, found in $INTROOT./config: <ATTRIBUTE>: logPeriod 30 <TYPE>: Scalar Please refer to Table 16: PMPSD Periodic Healthchecks for the keywords generated periodically by PMPSD. Additionally, most commands and their results, as well as “exceptional” events (beam detected, beam saturated, beam lost) are logged, and can therefore be retrieved at the end of the night via the OPS log database. For a detailed description of ALL PMACQ keywords, please refer to [AD 08]. Keyword RSTDIP<x> SUMMEANIP<x> SUMSTDIP<x> XMEANIP<x> XSTDIP<x> YMEANIP<x> YSTDIP<x> Origin Comment lprmpd Radial Standard Deviation computed over 1sec Mean Sum computed over 1sec Standard deviation Sum computed over 1sec Mean X deviation computed over 1sec Standard deviation X computed over 1sec Mean Y deviation computed over 1sec Standard deviation Y computed over 1sec Table 16: PMPSD Periodic Healthchecks 5.5 Engineering Files For offline evaluation of the PSD measurements, the user can record “engineering files” via the PMPSD commands STRTENG and STOPENG. In this mode, the quadcell measurements and STS correction commands are recorded in the local memory of the LCU, and stored to a file on the PRIMA WS upon reception of the STOPENG command. Obviously, the number of samples that can be recorded with this mechanism is limited by the amount of memory of the LCU (typically 256MB). 336 bytes are recorded internally for each sample. For the PMPSD application, this translates to about 8 minutes of measurements if the RT algorithm is executed at 1 kHz. ESO PRIMA Metrology Control Software User Manual Doc: Issue: Date: Page: VLT-MAN-ESO-15736-4547 2.0 08/12/2010 34 of 45 A bar chart displays the current “status” of the engineering file (i.e. the amount of samples recorded with respect to the required amount of samples). Figure 13: Recording of Engineering Files To start recording, specify the number of samples and press the “STRTENG” button. As soon as the requested number of samples has been recorded by the system, the LED “Buffer full” will be displayed in GREEN colour. Press the “STOPENG“ button to store the recorded values to the PRIMA WS. Two files are recorded: One for the actual quadcell measurements, one other for the correction commands sent to the STS VCM LCU’s. The filenames are generated automatically: MetQuadCentroidsYYYY-MM-DDTHH.MM.SS.uuuuuu.txt and MetQuadCorrectionsYYYY-MM-DDTHH.MM.SS.uuuuuu.txt. The files can be found in the environment of the corresponding LCU: $VLTDATA/ENVIRONMENTS/lprmpd. The format of the recorded files is identical to the examples outlined in Table 4: Engineering File Format. For each sample, one line gives a relative timestamp, followed by the actual measurements. Within the header, the keyword “Definition of the columns” defines the order of measurements in the following table. % % % % % % % % % % % % % % % % % % % % % % % % % Date/Start time: 1970-01-01T20.41.15.654147 Sampling frequency in Hz: 60 Correction frequency in Hz: 100 Number of Samples: 33 Noise After Quadcell: 0 Configuration: CHA: Instrument=FSUA IP3 Active YES IP3 Serial QCTT0002 IP3 Tel: AT2 IP3 Trans Gain 1 IP3 PGA Gain 1 IP3 Background 0.000 0.000 0.000 0.000 IP1 Active YES IP1 Serial QCTT0001 IP1 Tel: AT1 IP1 Trans Gain 1 IP1 PGA Gain 1 IP1 Background 0.000 0.000 0.000 0.000 CHB: Instrument=FSUB IP4 Active YES IP4 Serial QCTT0004 IP4 Tel: AT2 IP4 Trans Gain 1 IP4 PGA Gain 1 ESO PRIMA Metrology Control Software User Manual Doc: Issue: Date: Page: VLT-MAN-ESO-15736-4547 2.0 08/12/2010 35 of 45 % IP4 Background 0.000 0.000 0.000 0.000 % IP2 Active YES % IP2 Serial QCTT0003 % IP2 Tel: AT1 % IP2 Trans Gain 1 % IP2 PGA Gain 1 % IP2 Background 0.000 0.000 0.000 0.000 % Definition of the columns: RelativeTime,Q1-Ip3,Q2-Ip3,Q3-Ip3,Q4-Ip3,Q1-Ip1,Q2-Ip1,Q3-Ip1,Q4-Ip1, Q1-Ip4,Q2-Ip4,Q3-Ip4,Q4-Ip4,Q1-Ip2,Q2-Ip2,Q3-Ip2,Q4-Ip2 0.000000,0.000,0.000,0.000,0.000,0.000,0.000,0.000,0.000,1.964,3.862,2.091,3.530,0.000,0.000, 0.000,0.000 4294967294.550058,2.092,4.338,1.500,4.069,2.092,4.338,1.500,4.069,2.092,4.338,1.500,4.069,2.092, 4.338,1.500,4.069 4294967294.566724,1.034,3.872,2.012,4.303,1.034,3.872,2.012,4.303,1.034,3.872,2.012,4.303,1.034, 3.872,2.012,4.303 ... Table 17: Engineering File Format (Centroids) % Date/Start time: 1970-01-01T20.41.15.654147 % Sampling frequency in Hz: 60 % Correction frequency in Hz: 100 % Number of Samples: 33 % Noise After Quadcell: 0 % Configuration: % CHA: Instrument=FSUA % IP3 Active YES % IP3 Serial QCTT0002 % IP3 Tel: AT2 % IP3 Trans Gain 1 % IP3 PGA Gain 1 % IP3 Background 0.000 0.000 0.000 0.000 % IP1 Active YES % IP1 Serial QCTT0001 % IP1 Tel: AT1 % IP1 Trans Gain 1 % IP1 PGA Gain 1 % IP1 Background 0.000 0.000 0.000 0.000 % CHB: Instrument=FSUB % IP4 Active YES % IP4 Serial QCTT0004 % IP4 Tel: AT2 % IP4 Trans Gain 1 % IP4 PGA Gain 1 % IP4 Background 0.000 0.000 0.000 0.000 % IP2 Active YES % IP2 Serial QCTT0003 % IP2 Tel: AT1 % IP2 Trans Gain 1 % IP2 PGA Gain 1 % IP2 Background 0.000 0.000 0.000 0.000 % Definition of the columns: RelativeTime,UsrOffsU-Ip3,UsrOffsV-Ip3,UsrOffsW-Ip3,CntrlOffsU-Ip3, CntrlOffsV-Ip3,CntrlOffsW-Ip3,UsrOffsU-Ip1,UsrOffsV-Ip1,UsrOffsW-Ip1,CntrlOffsU-Ip1,CntrlOffsV-Ip1, CntrlOffsW-Ip1,UsrOffsU-Ip4,UsrOffsV-Ip4,UsrOffsW-Ip4,CntrlOffsU-Ip4,CntrlOffsV-Ip4,CntrlOffsW-Ip4, UsrOffsU-Ip2,UsrOffsV-Ip2,UsrOffsW-Ip2,CntrlOffsU-Ip2,CntrlOffsV-Ip2,CntrlOffsW-Ip2 0.000000,0.000,0.000,0.000,0.000,0.000,0.000,0.000,0.000,0.000,0.000,0.000,0.000,0.000,0.000,0.000, 0.005,0.000,-0.015,0.000,0.000,0.000,0.000,0.000,0.000, 4294967294.550058,0.000,0.000,0.000,-0.004,0.000,-0.022,0.000,0.000,0.000,-0.004,0.000,0.022,0.000, ESO PRIMA Metrology Control Software User Manual Doc: Issue: Date: Page: VLT-MAN-ESO-15736-4547 2.0 08/12/2010 36 of 45 0.000,0.000,-0.004,0.000,-0.022,0.000,0.000,0.000,-0.004,0.000,-0.022 ... Table 18: Engineering File Format (Correction Commands) For a more detailed decription of the engineering files, please refer to [AD 08]. 5.6 Command Interface For completeness, please find hereafter the full list of commands accepted by PMPSD. The list is taken from [AD 01]. Please check against [AD 01] to verify which command is accepted in which state. Command Parameters Reply Description Command Parameters Reply Description SETPGN <PSD ID> (INTEGER) <Gain> (REAL) OK/ERROR SETPGN is used to set the PGA gain of quadcell <psdID> to one of the values 1, 10, or 100. SETTGN <PSD ID> (INTEGER) <Gain> (REAL) OK/ERROR SETPGN is used to set the TRANSIMPEDANCE gain of quadcell <psdID> to one of the values 1, 2.22, 5.6, or 10. Command Parameters Reply Description STRTMPO <PSD ID> (INTEGER) OK/ERROR STRTMPO is used to start the pupil optimization loop between PMPSD and the star separators, which is active during the observation. Corrections are sent via socket communication to the process on the star separator LCUs in charge of controlling the variable curvature mirrors. Command Parameters Reply Description STOPMPO <PSD ID> (INTEGER) OK/ERROR STRTPPO is used to stop the pupil optimization loop between PMPSD and the star separators, which is active during the observation. Command Parameters SETMCFG <Telescope #1> (STRING) <Telescope #2> (STRING) OK/ERROR SETCONF is used to define the IDs of the two telescopes that are used for one PRIMA observation. The parameters must be either ATx or UTx. Reply Description ESO Command Parameters Reply Description PRIMA Metrology Control Software User Manual Doc: Issue: Date: Page: VLT-MAN-ESO-15736-4547 2.0 08/12/2010 37 of 45 GETMCFG None <Telescope #1> (STRING) <Telescope #2> (STRING) GETMCFG is used to retrieve the IDs of the two telescopes that are used for one PRIMA observation, and the selected instrument. Command Parameters Reply Description STRTENG <Number of Samples> (INTEGER) OK/ERROR The STRTENG command is used to start recording data read from the quadcells into a engineering file. Command Parameters Reply Description STOPENG None OK/ERROR The STRTENG command is used to stop recording data read from the quadcells into a engineering file. Command Parameters Reply Description SETFREQ <Frequency> (REAL) OK/ERROR SETFREQ is used to set the correction rate of the messages sent to the STS of the telescopes. Command Parameters Reply GETMFLX None <X, Y, Q_SUM, IP1> (REAL) <X, Y, Q_SUM, IP2> (REAL) <X, Y, Q_SUM, IP3> (REAL) < X, Y, Q_SUM, IP4> (REAL) GETMFLX returns the flux (= sum of voltages) read from the 4 active quadcells Ip1, Ip3, Ip2, Ip4. Description Command Parameters Reply Description SELINS <Instrument Name> (STRING) OK/ERROR SELINS selects the instrument to be used for the observation. The value must be either FSUA, AMBER or MIDI. Command Parameters Reply Description SRCHBM <Quadcell ID> (INTEGER) OK/ERROR SRCHBM performs a spiral search, using the VCM of the STS as the actuator, to maximize the flux on the selected quadcell. ESO PRIMA Metrology Control Software User Manual Doc: Issue: Date: Page: VLT-MAN-ESO-15736-4547 2.0 08/12/2010 38 of 45 Command Parameters Reply Description GETBKG <Quadcell ID> (INTEGER) OK/ERROR GETBKG measures the background noise of one specific or all quadcells (i.e. the voltage output with the laser switched off) over a predefined period, calculates the average, and stores these measurements in the OLDB. Command Parameters Reply Description USEBKG <Quadcell ID> (INTEGER) OK/ERROR USEBKG subtracts the background noise measured with GETBKG from the actual measurements of one specific or all quadcells. Command Parameters Reply Description STRTNOI <Quadcell ID> (INTEGER) OK/ERROR Start injecting white noise as the user offsets to the STS VCM. Command Parameters Reply Description STOPNOI <Quadcell ID> (INTEGER) OK/ERROR Stop injecting white noise as the user offsets to the STS VCM. Command Parameters Reply Description CHKLAN None OK/ERROR CHKLAN verifies that the STS VCM LCUs connected via the private LAN are reachable via PING. 6 PRIMET WS CONTROL SW: PMCS 6.1 Overview The functionality of the PRIMA Metrology WS SW is limited to setting up the system, and providing a single interface from PSS to the four PRIMET LCU’s: 1. Configure the telescopes that shall be used for the observation: UTx and UTy or ATx and ATy. 2. Configure the instrument used for the observation: FSU-A, AMBER or MIDI. 3. Provide a state machine which enforces a certain order of commands to be sent until PRIMET is in it’s final state ONLINE_RECORDING. 4. Provide a interface to the PRIMET interlock system (Siemens S7 safety PLC), using the OPC/UA protocol. PRIMA Metrology needs to know the telescope configuration to determine the parameters for the control loop between PMPSD and the VCM LCUs of the two Star Separators involved in the observation. The interface to PMCS is provided via a VLT standard [AD 06] GUI panel, called pmcsGui. The layout of pmcsgui is outlined in Figure 15: PMCS GUI. ESO PRIMA Metrology Control Software User Manual Doc: Issue: Date: Page: VLT-MAN-ESO-15736-4547 2.0 08/12/2010 39 of 45 Note: PMCS is used to control all four PRIMET LCUs: lprmac, lprma2, lprmls, and lprmpd. In case on or more of these LCUs are meant NOT to be used, please use the PRIMA mode-switching GUI “priguiStatus” to ignore these devices: PRIMET Devices Figure 14: PRIMA Mode-Switching GUI 6.2 Interface to the PRIMET interlock PLC The interface to PRIMET interlock PLC is provided via a VLT standard [AD 06] GUI panel, called pmcsILGui. The layout of pmcsgui is outlined in Figure 16: PMCS Interlock GUI. A background task of PMCS with a period of [2 sec] updates the PMCS database with the actual PLC status continuously. The following information is read from the S7 PLC, using the OPC/UA protocol: - Interlock UT1 – UT4 Interlock G2 Interlock IC108 Main Door Interlock IC108 Entrance Door Laser ON Laser OFF System Failure Interlock IC104 Laser Interlocked ESO PRIMA Metrology Control Software User Manual Doc: Issue: Date: Page: A command is available to remotely reset the interlock system (“RESIL”). Figure 15: PMCS GUI VLT-MAN-ESO-15736-4547 2.0 08/12/2010 40 of 45 ESO PRIMA Metrology Control Software User Manual Doc: Issue: Date: Page: VLT-MAN-ESO-15736-4547 2.0 08/12/2010 41 of 45 Figure 16: PMCS Interlock GUI 6.3 Sequence Diagrams for common PMCS Command Scenarios PMCS SELINS Command CAUTION: It is not possible to actually change the PRIMA instrument (AMBER, MIDI, or FSU-A) via PMCS! Proximity switches read on the “Laser Stabilization” LCU allow to read, but not to modify the configured instrument. The SELINS command therefore uses the scenario outlined in Figure 17: PMCS SELINS Command: PMCS shall send GETINS to the “Laser Stabilization” LCU, which returns the instrument currently connected. PMCS compares the returned instrument with the parameter of the SELINS command, and returns ERROR if the two values differ. Otherwise, PMCS forwards the SELINS command to the two “Phase Meter” and the “Pupil Detection” LCUs, which do not know at all the configured instrument. PMCS returns OK to the originator of the SELINS command ESO PRIMA Metrology Control Software User Manual Doc: Issue: Date: Page: VLT-MAN-ESO-15736-4547 2.0 08/12/2010 42 of 45 Figure 17: PMCS SELINS Command 6.4 PMCS Command Interface For completeness, please find hereafter the full list of commands accepted by PFTTP. The list is taken from [AD 01]. Please check against [AD 01] to verify which command is accepted in which state. Command Parameters Reply Description Command Parameters Reply Description REFMET <PMACQ ID> (STRING) <Reference Mode> (STRING) <Timestamp> (STRING) OK/ERROR The REFMET command is used to perform a software referencing of the PRIMA metrology in one of four different ways. ZERO just sets the currection factor to 0, while AVG sets the correction factor to the arithmetic mean of the last <n> measurements, and CURRENT sets it to the current measurement. Moreover, a timestamp can be supplied with TS. In that case, the correction factor is set to the measurement taken at that specific UTC timestamp which follows the mode parameter. pmacqID shall be pmacqABS or pmacqREL. STRTMET None OK/ERROR The STRTMET command is used to start processing data coming from the (two) Phase Meters, and to deliver the quantity Delta L to the RMN network. ESO PRIMA Metrology Control Software User Manual Doc: Issue: Date: Page: VLT-MAN-ESO-15736-4547 2.0 08/12/2010 43 of 45 Command Parameters Reply Description STOPMET None OK/ERROR The STOPMET command is used to stop processing data coming from the (two) Phase Meters, and to deliver the quantity Delta L to the RMN network. Command Parameters Reply Description STRTMFS None OK/ERROR The STRTMFS command is used to close the light source stabilization control loop. Command Parameters Reply Description STOPMFS None OK/ERROR The STRTMFS command is used to open the light source stabilization control loop. Command Parameters Reply Description SET <Accuracy> (REAL) OK/ERROR SET is used by the instrument to set the required laser precision for the light source stabilization loop. Command Parameters Reply Description POWER <On/Off Flag> (STRING) OK/ERROR The POWER command is used to switch the laser diode ON or OFF. Command Parameters Reply Description STRTMPO None OK/ERROR STRTMPO is used to start the pupil optimization loop between PMPSD and the star separators, which is active during the observation. Corrections are sent to the process ID of the process on the star separator LCUs that is in charge of controlling the variable curvature mirrors. Command Parameters Reply Description STOPMPO None OK/ERROR STOPMPO is used to stop the pupil optimization loop between PMPSD and the star separators, which is active during the observation. Command Parameters Reply GETMFLX None <X, Y, Q_SUM, IP1> (REAL) <X, Y, Q_SUM, IP2> (REAL) ESO Description PRIMA Metrology Control Software User Manual Doc: Issue: Date: Page: VLT-MAN-ESO-15736-4547 2.0 08/12/2010 44 of 45 <X, Y, Q_SUM, IP3> (REAL) < X, Y, Q_SUM, IP4> (REAL) GETMFLX returns the total flux of all 4 active quadcells, as well as the X(rms) and Y(rmx) correction positions. Command Parameters Reply Description SELINS <Instrument Name> (STRING) OK/ERROR SELINS is used to verify if the expected instrument is really connected to the PRIMA MET switchyard. This is a manual operation, which however can be verified via proximity switches. Command Parameters Reply GETCONF None <Telescope #1> (STRING) <Telescope #2> (STRING) GETCONF is used to return the IDs of the two telescopes that are used for the PRIMA observation. The parameters must be either two ATx or UTx. Description Command Parameters Reply Description SETCONF <Telescope #1> (STRING) <Telescope #2> (STRING) OK/ERROR GETCONF is used to set the IDs of the two telescopes that are used for the PRIMA observation. The parameters must be either two ATx or UTx. Command Parameters Reply Description SETMSRC <Source> (STRING) OK/ERROR SETMSRC is used to select the source for the current operational mode: MARCEL or SKY. Depending on this command, the flip mirror devices of pmlss are moved IN or OUT of the beam. Command Parameters Reply Description GETMSRC None <Source> (STRING) GETMSRC is used to retrieve the source for the current operational mode: MARCEL or SKY. Depending on this command, the flip mirror devices of pmlss are moved IN or OUT of the beam. Command Parameters Reply Description RESIL None OK/ERROR Remote RESET of the PRIMA interlock system. ESO PRIMA Metrology Control Software User Manual Doc: Issue: Date: Page: ___oOo___ VLT-MAN-ESO-15736-4547 2.0 08/12/2010 45 of 45