1
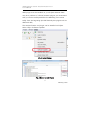
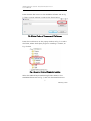
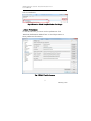
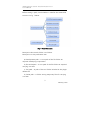
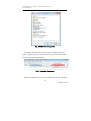
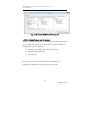
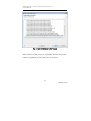
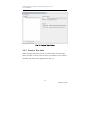
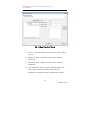
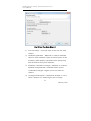
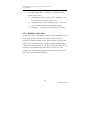
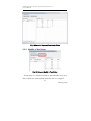
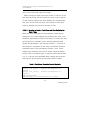
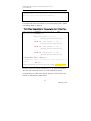
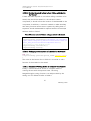
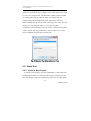
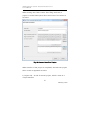
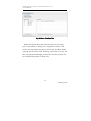
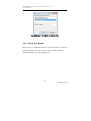
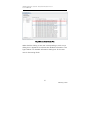
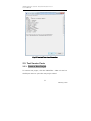
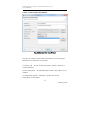
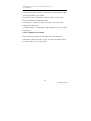
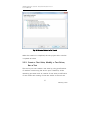
OPRoS
Eclipse-based Test/Verification
Tool
User Manual
OPRoS Eclipse-based Test/Verification Tool
User Manual
Document History
Writer
Contact
February,
Joo
[email protected]
2011
Min-
Date of
Contents
Writing
Drafted
woo
Date of
Reviser
Contact
Revised Contents
Revision
2
February, 2011
OPRoS Eclipse-based Test/Verification Tool
User Manual
Table of Contents
1. OVERVIEW .................................................................................... 5
1.1.
HOW TO USE THIS USER
MANUAL .................................................... 5
1.1.1.
Purpose .... 오류! 책갈피가 정의되어 있지 않습니다.
1.1.2.
How to Use................................................................................. 5
1.1.2.1.
Eclipse's Environment and its Installation ........... 5
1.1.2.2.
Preferences ............................................................................... 8
1.1.2.3.
Default Screen and its Layout...................................12
1.1.3. Appendix ....................................................................................... 13
1.1.4. Useful Information.................................................................... 14
1.1.5. Copyright ...................................................................................... 14
2.
HOW TO USE FOR EACH FUNCTION ................................ 14
2.1.
UNIT TEST .......................................................................................... 14
2.1.1.
Create a Test Project ........................................................... 14
2.1.1.1.
Enter Project Information ............................................ 14
2.1.2.
Select a Target Method ..................................................... 15
2.1.3.
Create a Test Suite ............................................................... 17
2.1.4.
Modify a Test Suite .............................................................. 22
2.1.5.
Modify a Test Driver ............................................................ 23
2.1.5.1.
Routine to Read a Test Case and Cast Suitably
for Each Type .................................................................................................24
2.1.5.2.
Routine Required to Run before Calling a
Method to Be Tested................................................................................26
2.1.5.3.
Setting Input Parameters of a Method to Be
Tested
26
3
February, 2011
OPRoS Eclipse-based Test/Verification Tool
User Manual
2.1.5.4.
Example of Writing Codes to Compare Test
Results
26
2.1.6.
2.2.
Run a Test................................................................................. 27
STATE TEST ......................................................................................... 28
2.2.1.
Create a New Project .......................................................... 28
2.2.2.
Check a Test Suite ................................................................ 30
2.2.3.
Run a Test................................................................................. 30
2.2.4.
Check Test Results ................................................................ 32
2.3.
TEST SERVICE PORTS ........................................................................ 34
2.3.1.
Create a New Project .......................................................... 34
2.3.1.1.
Enter Project Information...................................................35
2.3.1.2.
Method to be Tested ...........................................................36
2.3.2.
Create a Test Suite, Modify a Test Driver, Run a Test
37
APPENDIX 1: DEFINITION OF TERMS ........................................ 38
4
February, 2011
OPRoS Eclipse-based Test/Verification Tool
User Manual
1. Overview
The Eclipse-based test/verification tool is aiming to provide
stepwise test services for discovering faults of robot software
components in advance to produce more reliable components.
At this time, it provides test services in the form of Eclipse plugin to operate locally for helping test work of component
developers.
1.1. How to Use This User Manual
This manual is written easy to follow with the OPRoS job
training, and is a material for the OPRoS beginners.
This user manual describes each item in detail, a figure is added
for each item, and the corresponding item’s page can be found
through the table of contents.
1.1.1. Purpose
This manual is aiming at explaining easy to follow how to install,
use and manage the Eclipse-based test/verification tool.
1.1.2. How to Use
1.1.2.1. Eclipse’s Environment and its Installation
Because the test/verification tool had been developed in the
Eclipse version 3.4, we warn you that it may not work normally
if your system is a version above Ganymede. In addition, the
5
February, 2011
OPRoS Eclipse-based Test/Verification Tool
User Manual
GMF plugin must be installed on your Eclipse. Because there
may be a problem of collision between plugins, we recommend
that you receive an Eclipse IDE as the Modeling Tool version
safely from the beginning (this IDE basically has plugins such as
GMF and GEF.)
The test/verification tool plugin can be installed on Eclipse.
Select ‘Help->Software Updates’.
Fig. 1 Install Plugins
Fig. 2 Button to Add Plugins
6
February, 2011
OPRoS Eclipse-based Test/Verification Tool
User Manual
Press the Add Site button on the Available Software tab as Fig.
2. Then, a popup window is open as the figure below.
Fig. 3 Select Plugins of Uncompressed File Systems
Press the Local button on the popup window as Fig. 3 to select
the folder, where the Eclipse plugin for installing is located, as
Fig. 4 below.
Fig. 4 Select the Folder of Plugins for Installing
Select the OPRoSComponentTerstingToolVer added to the
AvailableSoftware tab as Fig. 5, and click the Install button to
7
February, 2011
OPRoS Eclipse-based Test/Verification Tool
User Manual
start its installation.
Fig. 5 Select the OPRoS Test/Verification Tool Plugin
1.1.2.2. Preferences
To use the test tool, you must set the preferences. Click
‘Windows>Preferences>OPRoS Test’ on the Eclipse menu to
enter preference information.
Fig. 6 OPRoS Test Preferences
8
February, 2011
OPRoS Eclipse-based Test/Verification Tool
User Manual
Before setting a path, check whether it satisfies the hierarchical
structure in Fig. 7 below.
Fig. 7 Folder Structure
Description about each folder is as follows.
Description on the perference item
a) Development-path – A root path of the file folder set
required developing components
b) Test workspace – A root path of the file folder set required
carrying out tests
c) Tool path – A path of the tool folder included in the plugin
release file
d) Cache path – A folder storing temporary files for carrying
out tests
9
February, 2011
OPRoS Eclipse-based Test/Verification Tool
User Manual
e) OPRoS execution engine – A path of the OPRoS execution
engine’s executable files and their file names
f) OPRoS CDL include – A path of header files of the OPRoS
development tool’s libraries
g) OPRoS CDL library – A path of the OPRoS development
tool’s libraries
h) Boost include – A path of header files of the Boost libraries
i) Boost Library – A path of the Boost libraries
* A path of additional header files used by components can
be entered to the Additional include path.
After setting preferences, click ‘Windows > Open perspective’
on the Eclipse menu to open the OPRoS component test tool
perspective as Fig. 8 below, and then select the OPRoS Test.
10
February, 2011
OPRoS Eclipse-based Test/Verification Tool
User Manual
Fig. 8 OPRoS Test Perspective
To display the menu and shortcut icons of OPRoS Test tool,
open a popup menu on the tool bar as Fig. 9 below, and then
click the Customize Perspective.
Fig. 9 Customize Perspective
Select the OPRoS Test on the Commands tab as Fig. 10 below.
11
February, 2011
OPRoS Eclipse-based Test/Verification Tool
User Manual
Fig. 10 Customize OPRoS Test Perspective
1.1.2.3. Default Screen and its Layout
Tests provided by the test tool are divided into three kinds such
as unit, state and service port. Every kind of tests includes the
following process in common.
1) Specify a test target and create a test suite
2) Build and execute a test
3) View results
Fig. 11 below is the default screen of the OPRoS Test
perspective. Description on each view is as follows.
12
February, 2011
OPRoS Eclipse-based Test/Verification Tool
User Manual
Fig. 11 Default Screen of the Test/Verification Tool Perspective
1) Test Project Explorer – Able to explore test projects existed in
the working space by kind.
2) Test Project Editor – A screen to open the created project to
carry out tasks such as setting of projects, creation of test cases,
performing of tests, viewing of results.
1.1.3. Appendix
The appendix simply explains terms confusable in this manual.
13
February, 2011
OPRoS Eclipse-based Test/Verification Tool
User Manual
1.1.4. Useful Information
1.1.5. Copyright
2. How to Use for Each Function
This chapter explains about how to create each test project and
carry out the test. It deals with three kinds of projects such as
‘Unit Test’, ‘State Test’, and ‘Service Port Test’.
2.1. Unit Test
2.1.1. Create a Test Project
To create a test project, click ‘OPRoSTest> New unit test’ on the
Eclipse menu to open the New Project Wizard.
2.1.1.1. Enter Project Information
Enter basic information about the new project to be created on
the first page of the wizard in Fig. 12. Description on each item
is as below. When the setting is completed, press the Next
button to progress to the next step.
14
February, 2011
OPRoS Eclipse-based Test/Verification Tool
User Manual
Fig. 12 Ultrasonic Component Unit Test Wizard
1) Project title = A title of the test project, which is used
as a unique identifier.
2) Test description – A brief description of the project to
be created.
3) Search target method in – Select source files including
the implemented part of functions to be tested.
2.1.2. Select a Target Method
Select a method to be tested as Fig. 13 below, and then press
the Finish button to create the project.
15
February, 2011
OPRoS Eclipse-based Test/Verification Tool
User Manual
Fig. 13 List of Methods to Be Tested
When creation of the project is completed, the new test project
created is appeared on the screen as Fig. 14 below.
16
February, 2011
OPRoS Eclipse-based Test/Verification Tool
User Manual
Fig. 14 Create a Test Project
2.1.3. Create a Test Suite
When clicking the Test suite tab on the bottom of the project
editor window to write a test suite for the method to be tested,
the New test suite tab is appeared as Fig. 15.
17
February, 2011
OPRoS Eclipse-based Test/Verification Tool
User Manual
Fig. 15 New Test Suite Tab
When clicking the New test suite button, the New test suite
wizard window is appeared as Fig. 16 and 17 below. First, enter
specification for a function to be tested. If selecting a function
name and parameter on the left, specification can be entered
for the return value and the corresponding parameter,
respectively. Description about each item of specification is as
follows.
18
February, 2011
OPRoS Eclipse-based Test/Verification Tool
User Manual
Fig. 16 New Test Suite Wizard
1) In-out – If the parameter is pointer-type, select input or
output.
2) Minimum value – Minimum value of the selected
parameter.
3) Maximum value – Maximum value of the selected
parameter.
4) User candidate – Item to add a candidate value that
users want to enter personally other than the
parameter’s candidate values automatically created.
19
February, 2011
OPRoS Eclipse-based Test/Verification Tool
User Manual
Fig. 17 New Test Suite Wizard 2
The next is to set creation of the test suite and driver. For a
figure and description on each item, refer to Fig. 18.
20
February, 2011
OPRoS Eclipse-based Test/Verification Tool
User Manual
Fig. 18 New Test Suite Wizard 3
1) Test suite name – A unique name of the new test suite
created.
2) Candidate generation – Methods to create a candidate
value for each parameter. There are three options of the
boundary value analysis, equivalence class partitioning
and the method using both methods.
3) Parameter combination strength – Methods to combine
between each parameter’s candidate values. As the
combination strength is higher, more test cases are
created.
4) Coverage measurement – Determines whether or not to
insert a detector for measuring the test coverage.
21
February, 2011
OPRoS Eclipse-based Test/Verification Tool
User Manual
5) Test driver generation – Options of creating the test
driver source code.
A.
Generate test driver source code – Whether or not
to create the test driver source code
B.
Compile mode – Set a compile option of the test
driver. There are Debug and Release modes.
C.
Buildtype – Set a type of the builder to be used.
2.1.4. Modify a Test Suite
To use a test suite, the expected result should be defined for an
input value of the function to be tested. If the test suite is
created, a list and contents of test suites created in the current
project can be checked as Fig. 19 below. When double-clicking
a test suite name in the list on the left to open the test suite, its
content can be checked as below. Each row of a test suite
means a test case, and the expected result value for the input
can be put into the Expected value.
22
February, 2011
OPRoS Eclipse-based Test/Verification Tool
User Manual
Fig. 19 Enter the Expected Test Result Value
2.1.5. Modify a Test Driver
Fig. 20 Button to Modify a Test Driver
A test driver is a software module to automatically carry out a
test. It reads test suites, applies each test case to a target to
23
February, 2011
OPRoS Eclipse-based Test/Verification Tool
User Manual
carry out the test, and outputs the result.
When clicking the Open test driver button on the top of the
Test suite tab as Fig. 20, the test driver source code is opened
for the currently opened test suite. Modify the corresponding
test driver source code as below. The location for each item
below is marked with a note in the source code.
2.1.5.1. Routine to Read a Test Case and Cast Suitably for
Each Type
Basic test driver templates are automatically created by the
testing tool. For a user-defined type, however, the driver code
should be additionally written for the tester to convert the data
type properly. For example, such a situation happens when
testing the getValue(int , std::valarray<double> * ) function of
the ultrasonic component. In this case, it should be entered a
parameter value of the std::valarray<double>* form, a userdefined type, however, the test tool cannot create parameter
values of the user-defined type, so that the tester should enter
0, 2, 3, 6 into the user candidate when creating the suite, and
then the test driver should process them. Refer to Table 1.
Table 1 Test Driver Template Created Basically
// Converts each test case suitably for its type.
string *str_index = argList->getArgInfo(0)>value ;
string *str_value = argList->getArgInfo(1)>value ;
int param_index =
OPRoSTestUtil::String2Integer(str_index24
February, 2011
OPRoS Eclipse-based Test/Verification Tool
User Manual
>c_str());
//TODO Convert the test data type that is a userdefined type (std::valarray<double>).
A routine that should be added to the area marked with ‘TODO’
is as below. Refer to Table 2.
Table 2 User Codes Added for Processing the User-defined Type
std::valarray<double> *pParam_value = new
std::valarray<double>();
if (*str_value == "0") {
pParam_value->resize(0);
}
else if (*str_value == "2") {
pParam_value->resize(2);
}
else if (*str_value == "3") {
pParam_value->resize(3);
}
else if (*str_value == "6") {
pParam_value->resize(6);
}
/* Intermediate part is skipped */
// TODO: Set input parameters of the method to be
tested.
int ret =
targetClassObj.getValue(param_index,pParam_value)
;
In other words, the tester converts 0, 2, 3, 6, which are entered
into the user candidate value, to actual parameter values
corresponding to them, and directly inserts in the function call
routine as the pParam_value above.
25
February, 2011
OPRoS Eclipse-based Test/Verification Tool
User Manual
2.1.5.2. Routine Required to Run before Calling a Method to
Be Tested
If there are tasks required to run before calling a method to be
tested, they should be added. For the ultrasonic sensor
component, it should inform the location of HardwareAPI to the
component. In addition, a routine is needed to make initialize()
and start() functions active state to operate by calling them in
sequence. Actual HardwareAPI is replaced with the virtual H/W
API here. Refer to Table 3.
Table 3 Routine executed before calling a method to be tested
//API load
targetClassObj.setProperty("dllName","D:/WorkDeve
loper/OPRoS/Component_SRC/UltraSonicSensor/API/Vi
rtual_API_UltrasonicSensorComponent.dll");
//Activate to the ACTIVE state
targetClassObj.initialize();
targetClassObj.start();
2.1.5.3. Setting Input Parameters of a Method to Be Tested
int ret =
targetClassObj.getValue(param_index,pParam_value)
;
The code on the bottom line in Table 2 is a routine to call a
function of the method to be tested.
2.1.5.4. Example of Writing Codes to Compare Test Results
Finally, a routine should be written to compare results of
running the test with the expected ones. The string
Integer2String(int, string) function is an API provided by the
testing tool for reference. Refer to Table 4.
26
February, 2011
OPRoS Eclipse-based Test/Verification Tool
User Manual
Table 4 Codes to Compare the Test Results with Actual ones
Integer2String(ret, measuredValue);
if (strExpectedValue == NULL) {
cout << "ERROR : ExpectedValue is NULL" << endl;
continue;
}
//Compares whether the expected result variable
is identical to the measured variable value.
if (*strExpectedValue == measuredValue)
PassOrFail = "PASS";
else
PassOrFail = "FAIL";
2.1.6. Run a Test
When clicking the Test run tab on the bottom of the test project
editor, the Test run tab is appeared as Fig. 21 below.
Fig. 21 Test Run Tab
Click the ‘Run test…’ button on the upper of the window to
open the ‘Select test suite’ dialog box as below. Then, a popup
27
February, 2011
OPRoS Eclipse-based Test/Verification Tool
User Manual
window is opened as Fig. 22. Select a test suite, which you want
to carry out, from the list. The ‘Build ID’ means a serial number
of running tests. Except special cases, you should use the
number assigned automatically when selecting a test suite.
When clicking the OK button after selecting a test suite, the test
will be run. The whole process to run a test includes
compilation and building of the test driver, running the test and
output results. The log produced by the process to run a test
can be checked through the console view.
Fig. 22 Select a Test Suite to Execute Test
2.2. State Test
2.2.1. Create a New Project
To create a test project, click the ‘OPRoSTest > New state test’
on the Eclipse menu to open the new project wizard as Fig. 23.
The new project wizard for state test projects has a single page.
28
February, 2011
OPRoS Eclipse-based Test/Verification Tool
User Manual
When clicking the ‘Finish’ button after filling each item, a
project is created. Description about each item of the wizard is
as below.
Fig. 23 Create a State Test Project
When creation of the project is completed, the state test project
editor screen is appeared as below.
1) Project title – A title of the test project, which is used as a
unique identifier.
29
February, 2011
OPRoS Eclipse-based Test/Verification Tool
User Manual
2) Test description – A brief description of the project to be
created.
3) Target component project root – Specifies a root path of the
component project to be tested.
4) Target component profile – Specifies a profile xml file of the
component to be tested.
5) user source code list – Specifies source codes of the
component to be tested. They are source codes implemented
by inheriting the Component class of the OPRoS CDK, and
select “component-name.cpp” and “component-name.h” files in
general.
6) Required DLL – Specifies DLL files required when executing
the component. Generally, they are library files implementing
the OPRoS H/W API.
2.2.2. Check a Test Suite
If clicking the Test suite tab on the bottom of the project editor
as the figure below, you can check the test suite list and its
contents.
2.2.3. Run a Test
When clicking the Test run tab on the bottom of the project
editor, you can see the test run tab as Fig. 24 below.
30
February, 2011
OPRoS Eclipse-based Test/Verification Tool
User Manual
Fig. 24 State Test Run Tab
When clicking the Build and execute button on the upper
part of the window, a dialog box is appeared to select a test
suite to be used when running the test as Fig. 25 below. When
pressing the OK button after selecting a test suite to be run, the
test is progressed. Messages produced by the test process can
be checked through the Console view.
31
February, 2011
OPRoS Eclipse-based Test/Verification Tool
User Manual
Fig. 25 Select a Test Suite to Run the Test
2.2.4. Check Test Results
When a test is completed, the result items are added to the test
result list as Fig. 26 below. The test result can be checked if
double-clicking the corresponding item.
32
February, 2011
OPRoS Eclipse-based Test/Verification Tool
User Manual
Fig. 26 State Test Result Tab
When double-clicking a test case corresponding to each row, a
dialog box is appeared to indicate the detailed information. The
figure below is a detailed information dialog box for the test
case 2 discovering faults.
33
February, 2011
OPRoS Eclipse-based Test/Verification Tool
User Manual
Fig. 27 Detailed Test Case Information
2.3. Test Service Ports
2.3.1. Create a New Project
To create a test project, click the ‘OPRoSTest > New unit test’ on
the Eclipse menu to open the new project wizard.
34
February, 2011
OPRoS Eclipse-based Test/Verification Tool
User Manual
2.3.1.1. Enter Project Information
Fig. 28 Service Port Test Project
Fig. 28 is a screen to enter basic information of a test project.
Description of each item is as below.
1) Project title – A title of the test project, which is used as a
unique identifier.
2) Test description – A brief description about the project to be
created.
3) Component profile – Specifies a profile xml of the
component to be tested.
35
February, 2011
OPRoS Eclipse-based Test/Verification Tool
User Manual
4) Component DLL or SO file – Specifies a compiled library file
of the component to be tested.
5) Compile mode – Specifies a compile mode of test driver.
There are Debug and Release modes.
6) Build type – Specifies a kind of builder to be used when
building the tests driver.
7) Required library – Adds library files required to run the target
component.
2.3.1.2. Method to be Tested
After selecting a method to be tested from the methods
belonged to the service port as Fig. 29, press the Finish button
to close creation of the test project.
36
February, 2011
OPRoS Eclipse-based Test/Verification Tool
User Manual
Fig. 29 Select a Method to Be Tested
When the creation is completed, the test project editor window
is opened as below.
2.3.2. Create a Test Suite, Modify a Test Driver,
Run a Test
The service port test creates a test suite by using specifications
of methods constructing the service ports. Therefore, all the
remaining processes such as creation of test suites, modification
of test drivers and running of tests are similar to the unit test.
37
February, 2011
OPRoS Eclipse-based Test/Verification Tool
User Manual
Appendix 1: Definition of Terms
Boundary Value Analysis: A black box test design technique to
design a test case based on boundary values. In other
words, the boundary value analysis is a technique
that carries out a test by selecting valid values of
equivalently partitioned boundary and invalid values
being the closest to the boundary as test data.
Equivalence Class Partitioning: A black box test design
technique that designs a test case to carry out with
representative values in the area equivalently
partitioned. In principle, the test case is designed to
cover each area at least once.
Pairwise: It makes a table so that each value required for a test
will construct a combination at least once and carries
out the test by using it based on the fact that most
faults are caused by interaction between two
elements as a result of observation.
Test Driver: A software component or test tool that controls a
component or system, or substitutes the calling
component.
Test Case: A set of input values, pre-execution conditions,
expected values and post-execution conditions
developed to test a special target or test situation.
The special target and test situation mean that verify
whether or not to execute a particular program path
or to comply with the specified requirement.
38
February, 2011
OPRoS Eclipse-based Test/Verification Tool
User Manual
39
February, 2011