1
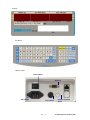
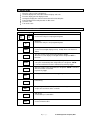
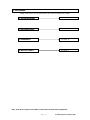
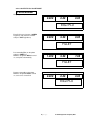
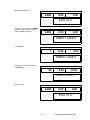
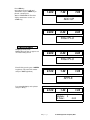
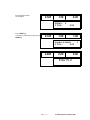
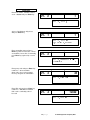
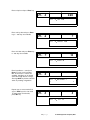
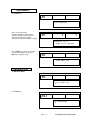
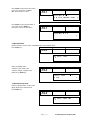
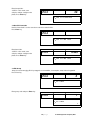
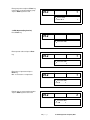
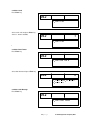
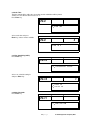
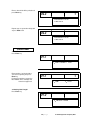
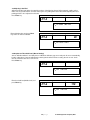
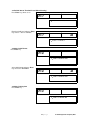
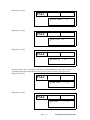
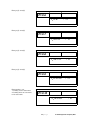
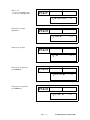
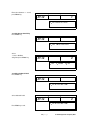
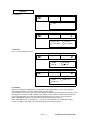
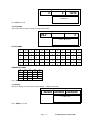
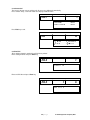
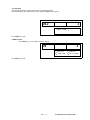
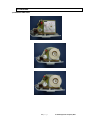
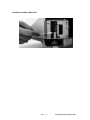
Adam Equipment
NETS ME Price
Computing Scale
Short User
RevB, June 2011
Specifications are subject to change without notice to improve
1|P age
© Adam Equipment Company 2010
Thank you for the choosing our label printing scale NETS, we are always trying
to serve you with better quality as a reliable weighing instrument and enhanced
features supporting various kinds of applications
TABLE OF CONTENTS
1.
2.
3.
4.
5.
6.
7.
8.
9.
10.
11.
SPECIFICATIONS ------------------------------------------------------------------------------- 2
OPTIONS -------------------------------------------------------------------------------------------- 2
PRECAUTIONS --------------------------------------------------------------------------------- 3
OVERVIEWS -------------------------------------------------------------------------------------- 3
INSTALLATION --------------------------------------------------------------------------------- 5
KEYBOARDS AND FUNCTION -------------------------------------------------------------- 5
THE DESIGNATORS ------------------------------------------------------------------------6
7
THE SELLING MODE -----------------------------------------------------------------------THE SET MODE ------------------------------------------------------------------------------- 13
THE OTHERS ---------------------------------------------------------------------------------- 42
SAMPLE LABEL FORMAT ----------------------------------------------------------------- 44
1. SPECIFICATIONS
Model
Maximum capacity
NETS
6 kg / 15 kg
Minimum graduation
2g / 5g
Maximum Tare
Internal resolution
Widths(mm)
Paper / Label / printing
Available Labels(mm)
Label roll size(mm)
Printing Speed(mm)
Speed PLU keys
PLU memory
Full Tare
1 / 60,000
Numeric Displays(digit)
Message Display
Platter size
mm(inch)
Product size mm(inch)
Power source
Power consumption
60 / 58 / 56
35, 40, 60, 80
Max. φ120(1,200 labels at 40mm length)
80 ~ 100
120
Standard Memory(0.5MB) : 1000 labels at 500 characters
Extended Memory (1MB)
LED Price(8) , Weight (5) , Unit price(7)
LCD Graphic 256 x 32 pixels
415(16.3) x 260(10.2)
W460(18.1) x D440(17.3) x H470(18.5)
AC 100 ~ 240 / 50 , 60 Hz (Free Voltage)
Printing : Approx. 100W max.
Stand by : Approx. 40W
2. OPTIONS
Extended PLU memory
Weight conversion
kg ↔ lb conversion
2|P age
© Adam Equipment Company 2010
3. PRECAUTIONS
1.
2.
3.
4.
5.
6.
7.
8.
9.
Place the scale on a flat and rigid desk that is free of vibrations
Place the scale out of direct sunlight
Do not use radio devices which emits strong electromagnetic fields near by
Do not apply sudden impact to the platter
Always level the scale
Do not spill the water to the scale
Do not use cleaners which includes solvent or sinner
Scale should be calibrated by authorized person prior to being to used
Turn on the scale 10 minutes before using
4. OVERVIEWS
Cartridge
3|P age
© Adam Equipment Company 2010
Displays
Key Board
I/O Connections
Power Switch
RS-232C
AC Connect
Fuse- Holder
4|P age
External Keyboard
Option
© Adam Equipment Company 2010
5. INSTALLATION
1. Place the scale on a flat and rigid desk
2. Insert two display wire connectors between displays and scale
3. Erect the display pole into display bracket
4. Arrange the display wire and block the bottom of bracket with plate
5. Fasten display bracket and plate with 4 x M3 screws
6. Level the scale
7. Turn on the scale
6. KEYBOARD AND FUNCTIONS
Name of Key
0
~
C
9
Functions
Numeric keys,
used to enter unit price and programming data
Clear key,
used to clear unit price and programming data
ZERO
Zero key,
used to correct weight display to zero(
drifted
TARE
Tare key, used to set or remove tare(container) weight,
after tare set scale displays net weight and the designator “NET” is
turned on
AUTO
Auto key, used to set scale to automatic printing mode,
scale prints automatically after weight stable, the designator “AUTO”
is turned on while this function is activated, key works by toggle
SAVE
Save key, used to save current PLU, the designator “SAVE” is turned on
while this function is activated,
key works by toggle
0.000) when scale has been
Set key, used to enter to set mode, toggle key
SET
Function key,
FUNC
ESC
Escape key, used to cancel of previous transaction(s),
escape from each menu of the set mode
ADD
Add up key,
used to add up of commodities
PLU
PLU key,
used to call indirect PLU
5|P age
© Adam Equipment Company 2010
Name of Key
X
Functions
Multiple key,
used to printing of same labels
FOR
For key,
used to selling by number
FEED
Feed key,
Used to feeding a label or ticket
PRINT
Print key,
Used to printing label or ticket
7. THE DESIGN ATORS
Designators
ZERO
STABLE
NET
SHIFT
CAPS LOCK
INS
Functions
It indicates scale is on centre of zero
It indicates scale is stable
It indicates tare has been set
It indicates shift function in PLU programming
It indicates function of entering capital letter
It indicates function of insertion
COM
It indicates scale is under communication
AUTO
It indicates automatic printing mode
SAVE
It indicates PLU saving mode
SALE
It indicates sale mode
FUNC
It indicates scale is under function mode
6|P age
© Adam Equipment Company 2010
8. SELLING MODE
Selling mode consists of 4 subsidiary mode, refer to the listed page for the details
1) SELLING BY WEIGHT
See Page 8
2) SELLING BY COUNT
See Page 9
3) PRICE ADD UP
See Page 10
4) MULTIPLE LABELS
See Page 11
Note : Scale dose not print out any label or ticket unless PLU has been programmed,
7|P age
© Adam Equipment Company 2010
refer to the EDIT PLU of the SET MODE
1) SELLING BY WEIGHT
Weighing(normal) mode
0.000
0.00
0.00
Enter PLU
Enter PLU by pressing one of SPEED
key(direct) or by enter PLU number
and press PLU key(indirect)
0.000
5.90
0.00
FILLET
Put commodity(Fillet) on the platter
and press PRINT key
While the designator AUTO is turned
on, scale prints automatically
1.200
5.90
7.08
FILLET
Remove commodity on the platter
While the designator SAVE is turned
on, scale saves current PLU
0.000
0.00
0.00
Enter PLU
8|P age
© Adam Equipment Company 2010
Weighing(normal) mode
0.000
0.00
0.00
Enter PLU
Enter PLU by pressing one of SPEED
key(direct) or by enter PLU number
and press PLU key(indirect)
0.000
0.25
0.00
SWEET CANDY
Press FOR key
1
0.25
0.25
SWEET CANDY
Enter number of commodity(Candy)
and PRINT key
50
0.25
12.50
SWEET CANDY
Weighing mode
0.000
0.00
0.00
Enter PLU
9|P age
© Adam Equipment Company 2010
3) PRICE ADD UP
Weighing(normal) mode
0.000
0.00
0.00
Enter PLU
Enter PLU by pressing one of SPEED
key(direct) or by enter PLU number
and press PLU key(indirect)
0.000
7.99
0.00
TENDERLOIN
Put commodity(Tenderloin) on the
platter and press ADD key
1.000
7.99
7.99
ADD UP
Remove the commodity(Tenderloin)
and enter another PLU
0.000
5.90
0.00
FILLET
Put the commodity(Fillet) on the platter
1.200
5.90
7.08
FILLET
10 | P a g e
© Adam Equipment Company 2010
Press ADD key,
repeat above steps for add up of
commodities or press PRINT key to
print for sum total price
(Notice: PRICE ADD UP Functions
only by manufacturer set the use
of ADD Key.)
1.000
7.99
7.99
ADD UP
0.000
0.00
0.00
Enter PLU
4) MULTIPLE LABELS
Weighing(normal) mode
Multiple labels function is suppressed
on Ticket Printing version
0.000
0.00
0.00
Enter PLU
Enter PLU by pressing one of SPEED
key(direct) or by enter PLU number
and press PLU key(indirect)
0.100
1.99
1.99
APPLE
Put commodity(Apple) on the platter
and press X key
0.100
1.99
Multiply :
X Price :
11 | P a g e
1.99
0
0.00
© Adam Equipment Company 2010
Enter number of labels,
for example 5
0.100
1.99
Multiply :
X Price :
Press PRINT key
scale prints a label when each pressing
PRINT key
0.100
9.95
5
9.95
1.99
7.96
Number of Labels :
X Price :
9.95
0.000
0.00
0.00
Enter PLU
12 | P a g e
4
© Adam Equipment Company 2010
9. SET MODE
Set mode consists of 8 subsidiary mode, in the set mode please take out PLU card in the key board
“∇” key is used to move to next mode, Enter key is used to entering data, ESC key is used to escape
of current using mode and SET key is used to return to the normal mode
Press SET key
Enter
key
See Page 14
1) EDIT PLU
∇
key
Enter
key
See Page 16
2) EDIT SPEED KEY
∇
key
Enter
key
See Page 16
3) EDIT MASTER FILES
∇
key
Enter
key
See Page 21
4) EDIT DATE / TIME
∇
key
Enter
key
See Page 21
5) SELECT FUNCTION
∇
key
Enter
key
See Page 26
6) ACCOUNT
∇
key
Enter
key
See Page 28
7) MODIFY LABEL
∇
key
Enter
key
See Page 37
8) UTILITY
13 | P a g e
© Adam Equipment Company 2010
1) EDIT PLU
Enter PLU number, available numbers
are 0 ~ 999,999 and press Enter key
P1- 0
1
PLU – 0. PLU No.
Select 1. By Weight or 2.By Count
And press Enter Key
P1- 1
1
PLU – 1. PLU Type
1.By Weight 2.By Count
Enter commodity name and press
Enter key, Max. 56 characters x 2 lines
are available, for one line of commodity,
press Enter key again to skip second
line.
P1- 2
PLU – 2. Commodity Name-1
[Tenderloin
]
Enter group code and press Enter key
numbers 0 ~ 99 are available
Group codes are used to grouping
PLUs by categories of commodities
P1- 3
20
PLU – 3. Group Code
Enter UPC code and press Enter key
numbers 0 ~ 999,999 are available
UPC code is commodity code of
bar code
P1- 4
12345
PLU – 4. UPC Code
14 | P a g e
© Adam Equipment Company 2010
Enter unit price and press Enter key
P1- 5
3.95
PLU – 5. Unit Price
Enter cook by date and press Enter
key, 0 ~ 366 days are available,
P1- 6
7
PLU – 6. Cook By Date
Enter shelf date and press Enter key
0 ~ 366 days are available.
P1- 7
14
PLU – 7. Shelf Life
Enter ingredients 0 ~ 9 and press
Enter key at the each ingredient
Max. 56 characters x 10 lines are
available, ingredient can be printed
at the label length 60 mm or longer,
Pressing SAVE key finishes edit PLU
at the any entering of ingredient
Repeat steps to enter another PLU
or press ESC key to the next mode
To return to the normal mode,
press SET key
P1- 9
PLU – 9. Ingredient –1
[
P1- 0
]
2
PLU – 0. PLU NO
15 | P a g e
© Adam Equipment Company 2010
2) EDIT SPEED KEY
Press Enter key
P2
Press Speed Key
Press one of speed keys,
speed key number is shown on the
unit price display and PLU number is
shown on the total price display,
enter PLU number which will be assigned
Press SAVE key to store, repeat steps
to enter other speed keys or press
ESC key to exit(next mode)
P2
1
1
Speed Key No [1]
Assigns PLU No [123456]
P2
Press Speed Key
3) EDIT MASTER FILES
3-1 Edit Store Name
P3
3. Edit Master Files
Press Enter key
P3-1
1. Edit Store name
16 | P a g e
© Adam Equipment Company 2010
Press Enter key and enter store name,
3 lines of store name is available
Max. 56 characters x 3 lines
Press Enter key and enter 2nd line of
store name or press ESC key
nd
rd
to skip 2 , 3 lines of store name
P3-1
Edit Store Name - 1
[The World Shopping Center
]
Edit Store Name – 2
[
]
P3-1
3-2 Non PLU Name
Non PLU Name is used to store commodity name not recorded in PLU.
Press Enter key
P3-2
2. Non PLU Name
Enter commodity name.
<USE> In sales mode, enter
unit price and put a weight on the
platter, Press Enter key
P3-2
Non PLU Name
[APPLE
-1
3-3 Non PLU Group Code
Non PLU Group Code is used to store
Group Code not recorded in PLU.
Press Enter key
P3-3
3. Non PLU Group Code
17 | P a g e
© Adam Equipment Company 2010
]
Enter Group Code.
<USE> In sales mode, enter
unit price and put a weight on the
platter, Press Enter key.
P3-3
20
3. Non PLU Group Code
3-4 Non PLU Item Code
Non PLU Item Code is used to store item code not recorded in PLU.
Press Enter key
P3-4
4. Non PLU Item Code
Enter Item Code.
<USE> In sales mode, enter
unit price and put a weight on the
platter, Press Enter key.
P3-4
12345
4. Non PLU Item Code
3-5 Edit Group
Group is used to managing PLUs by categories of commodities, for examples, meet, fruit and vegetable
Press Enter key
P3-5
0
5. Edit Group
Enter group code and press Enter key
P3-5
1
2. Edit Group
[
18 | P a g e
© Adam Equipment Company 2010
]
Enter group name and press Enter key
repeat steps to entering another group
or press ESC key twice to exit
P3-5
1
2. Edit Group
[ Vegetable
]
3-6 Edit Operator(Registration)
Press Enter key
P3-6
6. Edit Operator
Enter operator code and press Enter
key
P3-6
1
6. Edit Operator
[
]
Enter name of operator and press
Enter key,
Max. 10 characters x 32 operators
P3-6
1
5. Edit Operator
[ Susie
]
Repeat steps to enter another operator
or press ESC key twice to the next
P3-6
2
6. Edit operator
[ Linda
]
19 | P a g e
© Adam Equipment Company 2010
3-7 Edit Sale Message(Registration)
Sale message is an advertising which can be displayed on the message display
Press Enter key
P3-7
7. Edit Sale Message
Enter sale message code and press
Enter key
P3-7
1
7. Edit Sale Message
[
]
Enter sale message and press
Enter key
P3-7
1
7. Edit Sale Message
[ Have a Nice Day
Repeat steps to enter another sale
message, or press ESC key twice
to the next mode
Pressing SET key enables to return
to the normal mode at here
P3-7
]
2
7. Edit Sale Message
[
20 | P a g e
© Adam Equipment Company 2010
]
4) EDIT DATE / TIME
Press Enter key
P4
4. Edit Date / Time
Enter time and press Enter key,
time format should be HH-MM-SS
at this step
P4- 1
123456
xxxxxx
Edit Date/Time - Time
HH-MM-SS
Enter date by format YY-MM-DD
and press Enter key,
formats DD-MM-YY and
MM-DD-YY are available in normal
operation mode
P4- 2
120910
120910
Edit Date/Time - Date
MM-DD-YY
Press ESC key twice to the next
P4- 1
123456
xxxxxx
Edit Date/Time - Time
HH-MM-SS
5) SELECT FUNCTION
5-1 Minimum Weight of Auto Printing
Press Enter key
P5-1
0.100
1. Minimum Weight of
Auto Printing
21 | P a g e
© Adam Equipment Company 2010
Enter motion band of auto printing
and press Enter key,
P5-1
0.200
1. Minimum Weight of
Auto Printing
5-2 Select Group
Press Enter key
P5-2
00
2. Select Group
Select group code and press Enter key
codes 0 ~ 99 are available,
P5-2
1
2. Select Group
5-3 Select Operator
Press Enter key
P5-3
3. Select Operator
Select operator code and press Enter
Key, codes 0 ~ 99 are available,
P5-3
1
3. Select Operator
22 | P a g e
© Adam Equipment Company 2010
5-4 Select Scale
Press Enter key
P5-4
4. Select Scale
Select scale code and press Enter key
codes 0 ~ 99 are available,
P5-4
1
4. Select Scale
`
5-5 Select Date Format
Press Enter key
P5-5
5. Select Date Format
Select date format and press Enter key
P5-5
2
1. YY-MM-DD 2. MM-DD-YY
3. DD-MM-YY
5-6 Select Sale Message
Press Enter key
P5-6
6. Select Sale Message
23 | P a g e
© Adam Equipment Company 2010
Select sale message code and
press Enter key,
codes 0~99 are available
P5-6
1
6. Select Sale Message
5-7 Select EL On And Off
Press Enter key
P5-7
7. EL On And Off
Select 1 or 2, default setting is 2
and press Enter key
P5-7
2
1. Always On
2. PLU Call On
5-8 Select Add Printing
Press Enter key
P5-8
8. Select Add Printing
Select 1 or 2, default setting is 2
and press Enter key
P5-8
2
1. Disable Print
2. Enable Print
24 | P a g e
© Adam Equipment Company 2010
5-9 Scale Time
The time entered will be add to the current time and the added time will be printed.
<Notice> P7-9-15 Current time must be set "Y"
Press Enter key
P5-9
9. Scale Time
Select scale time and press
Enter key, codes 0~24 are available
P5-9
2
Scale Time
5-10 Use Speed Key(120Ea)
Press Enter key
P5-10
10. Use Speed Key (120Ea)
Select 1 or 2, default setting is 1
and press Enter key
P5-10
1
1. Use 60 Ea
2. Use 120 Ea
5-8 Select Bar Code
Press Enter key
P5-11
11. Select BarCode
25 | P a g e
© Adam Equipment Company 2010
Select barcode and press Enter key
P5-11
4
1. UPC-A
2. UPC-B
3. EAN-8 4. EAN-13 5. 2of5
A default format of EAN-A consists of group code DD(2 digit), item code IIIII(5 digit) and price PPPPP(5 digit),
item code can be varied within 6 digit and price can be varied within 7 digit, if price is greater than the digit
of price set then “0” will be printed on the price column
Ex. 1 ; 7 digit price DD III PPPPPPP or D IIII PPPPPPP or IIIII PPPPPPP
Ex. 2 ; 6 digit price DD IIII PPPPPP or D IIIII PPPPPP or IIIIII PPPPPP
Ex. 3 ; Printing weight instead of price on the bar code DD IIIII WWWWW
Enter barcode format and press Enter
key
P5-11
4
Default Barcode Format
[ DDIIIIIPPPPP]
Press ESC key to exit
6) ACCOUNT
6-1 Account Group
Press Enter key
P6-1
1. Account Group
Enter group number and press Enter
key, group total is printed
P6-1
1
Printing Group Total
Accept Group Number
26 | P a g e
© Adam Equipment Company 2010
Repeat steps to print another group
or press ESC key to exit
P6-1
1
Printing Group Total
Accept Group Number
6-2 Account PLU
Press Enter key
P6-2
2. Account PLU
Enter PLU number and press Enter
key, PLU total is printed
P6-2
1
Printing PLU Total
Accept PLU Number
Repeat steps to print another PLU
or press ESC key to exit
P6-2
1
Printing PLU Total
Accept PLU Number
6-3 Account Daily
Press Enter key
P6-3
3. Account Daily
27 | P a g e
© Adam Equipment Company 2010
Enter a date which will be printed and
press Enter key
P6-3
1
Printing Daily Total
Accept Date
Repeat steps to get another daily total
or press ESC to exit
P6-3
Printing Daily Total
Accept Date
7) MODIFY LABEL
7-1 Select Label or Ticket
Press Enter key
P7-1
1. Select Label or Ticket
Enter number 1 for label printing
or 2 for ticket printing and press
Enter key
For the ticket printing, remove the
label bobbin on the cartridge and
fit the ticket paper roll
P7-1
1
1. Label
2. Ticket
7-2 Setting Label Length
Press Enter key
P7-2
2. Set Label Length
28 | P a g e
© Adam Equipment Company 2010
Enter label length and press Enter
key
Available label lengths
30mm, 35mm, 40mm, 60mm,
80mm, 100mm
P7-2
40
2. Set Label Length
7-3 Setting Label Gap
Press Enter key
Label gap is a clearance of labels,
a reference value is 20 for a label gap
2 mm
P7-3
3. Set Label Gap
Enter gap value of labels and press
r key, values 0 ~ 99 are available,
P7-3
20
3. Set Label Gap
7-4 Select Peel Off Sensor
Peel off sensor detects a label peeled or remained on the peel off bar, after enabling, scale dose not print label
to prevent labels jammed
Press Enter key
P7-4
4. Select Peel Off Sensor
Select disable or enable and press
Enter key
P7-4
2
1. Disable
29 | P a g e
2.Enable
© Adam Equipment Company 2010
7-5 Adjusting Label End
Adjustment of label end adjusts the attaching surface of the label on the peel off bar properly, a wide surface
makes not easy to label taken, a lacked surface gives easy falling down of the label, while adjusting label end,
printing position is also adjusted on the label
Press Enter key
P7-5
5. Adjusting Label End
Enter adjusting value and press Enter
key, values 0 ~ 99 are available,
P7-5
20
5. Set Label Adjust
7-6 Gap Sensor Threshold Level (Manual Setting)
Sensor calibration written in 8-7.Utility Sensor calibration calibrates gap sensor and peel off sensor automatically,
but this setting gives a manual calibration by entering threshold level. Prior to setting, the min. & max. levels
must be read in 2-6 Self Test / Sensor Test
Press Enter key
P7-6
6. Gap Threshold
Enter threshold level(middle level) and
press Enter key
P7-6
110
6. Gap Threshold
30 | P a g e
© Adam Equipment Company 2010
7-7 Peel Off Sensor Threshold Level (Manual Setting)
Press Enter key, Same as 7-6
P7-7
7. Peel Off Threshold
Enter threshold level and press Enter
key, levels 0 ~ 255 are available,
P7-7
83
7. Peel Off Threshold
7-8 Select Label Format
Press Enter key
P7-8
8. Select Label Format
Select label format and press Enter
key, refer to the APPENDIX
P7-8
40
8. Select Label Format
7-9 Select Printing Item
Press Enter key
P7-9
9. Select Printing Item
31 | P a g e
© Adam Equipment Company 2010
Enter yes(Y) or no(N)
P7-9-1
1. Pack On Date : [Y]
Enter yes(Y) or no(N)
P7-9-2
2. Shelf Life : [Y]
Enter yes(Y) or no(N)
P7-9-3
3. Plu Number : [Y]
After group code is set to Y each group code of PLU is printed individually, group code is set to N
a common group code is printed which has been set in 5-2 Select Function / Select group code
Enter yes(Y) or no(N)
P7-9-4
4.Group Code
: [N]
5. Barcode
: [Y]
Enter yes(Y) or no(N)
P7-9-5
32 | P a g e
© Adam Equipment Company 2010
Enter yes(Y) or no(N)
P7-9-6
6. Weight
: [Y]
Enter yes(Y) or no(N)
P7-9-7
7. Unit Price
: [Y]
8. Total Price
: [Y]
9. 4 Digit Year
: [Y]
Enter yes(Y) or no(N)
P7-9-8
Enter yes(Y) or no(N)
P7-9-9
Enter number 1 or 2,
1 ; Printing 1 line of store name
2 : Printing 2 lines of store name
0 : No store name
P7-9-10
10. Store Name
33 | P a g e
: [2]
© Adam Equipment Company 2010
Enter 1 or 2
1 : 1 line of commodity name
2 : 2 lines of commodity name
P7-9-11
9. Commodity Name : [1]
Enter yes(Y) or no(N)
Ingredients
P7-9-12
12. Ingredient
: [N]
Enter yes(Y) or no(N)
P7-9-13
Enter yes(Y) or no(N) and
press Enter key
Enter yes(Y) or no(N) and
press Enter key
13. Tare
: [N]
14. Sales Message
: [N]
P7-9-14
P7-9-15
14. Current Time
34 | P a g e
: [N]
© Adam Equipment Company 2010
7-10 Select Printing Speed
Press Enter key
P7-10
10. Select Print Speed
Select printing speed
1 = 60mm/sec, 2 = 80mm/sec
3 = 100 mm/sec and press Enter key
P7-10
1
3
1. Low
2. Medium
3. High
7-11 Set Printing Contrast
Enter value between 0 ~ 400 and press Enter key, bigger? value has a higher contrast, a value 45 is fixed
at high speed
P7-11
200
11. Set Print Brightness
Press ESC key to exit
7-12 Set Number of Label
Press Enter key
P7-12
12. Set Number of Label
35 | P a g e
© Adam Equipment Company 2010
Enter value between 1 ~ 5 and
press Enter key.
P7-12
1
12. Set Number of Label
7-13 Gab Sensor Sensitivity
Press Enter key
P7-13
13. Gab Sensor Sensitivity
Select
1. Low, 2. Medium
3.High and press Enter key
P7-13
2
1.Low
2.Medium 3.High
7-14 Select Subtotal Label
Press Enter key
P7-14
14. Select Subtotal Label
Select Subtotal Label
P7-14
2
14. Select Subtotal Label
Press ESC key to exit
36 | P a g e
© Adam Equipment Company 2010
8) UTILITY
Press Enter key
P8
8. Utility
P8-
x
1. Self Test 2. Print PLU
3. Trans Data 4. Del Account
8-1 Self Test
Press ∆,∇ key to switch the menus
P8
8
1.Analog
3.Display
P8
2.Key board
4.RS-232C
8
5.Printer
6.Sensor Test
7.Sensor Cal
8-1-1 Analog
A/D count is displayed, a calibrated count is displayed on the weight display, a raw count is displayed
on the unit price display, zero value is displayed on the price display
In the Analog test, zero value, span value and stability of the A/D converter are tested, the zero value on the
price display is recommend 7,000 ~ 20,000 counts, higher or lower counts is a mainly load cell defective,
but rarely Analog board on the main board may be affected, when zero count is an out of range of
7,000 ~ 20,000 firstly replace the load cell and then Analog board may be replaced.
And a stable A/D count is recommended + / − 2 count at an indicated value as a stable A/D reading,
if count is unstable or fluctuated, replace the Analog board first and then load cell.
37 | P a g e
© Adam Equipment Company 2010
0
0
13510
Analog test
Press ESC key to exit
8-1-2 Key board
Each code of the key matrix is displayed, refer to below table
P8-2
2
Key Board Test
PLU KEY CODE
31
1
31
2
31
3
31
4
31
5
25
6
26
7
27
8
28
9
30
0
NUMERIC KEY CODE
12
13
7
8
4
5
1
2
0
10
Press “ESC” key to exit
25
7
26
8
27
9
29
0
30
1
14
9
6
3
11
25
8
26
9
28
0
29
1
30
2
19
18
17
16
25
9
27
0
28
1
29
2
30
3
26
0
27
1
28
2
29
3
30
4
26
1
27
2
28
3
29
4
30
5
26
2
27
3
28
4
29
5
30
6
26
3
27
4
28
5
29
6
30
7
26
4
27
5
28
6
29
7
30
8
26
5
27
6
28
7
29
8
30
9
23
22
21
20
15
8-1-3 Display
All numeric displays are checked by counting “00000” ~ “99999” continuously,
000000 0000000 00000000
Display test
Press “ZERO” key to exit
38 | P a g e
© Adam Equipment Company 2010
26
6
27
7
28
8
29
9
31
0
8-1-4 RS-232C
Connect pin 2 & pin 3 of the RS-232C connector located on the power panel, RS-232C interface circuit
of the scale is checked, press “Y” key
P8-4
4
RS-232C Test
Ready?
“Test OK” is displayed when RS-232C works properly otherwise “Connection Error” is displayed when an error
occurred
P8-4
4
RS-232C Test
Test OK
Press ESC key to exit
8-1-5 Printer
Press 1 for a chess printing and 2 for a continuous printing, in continuous printing pressing “C” key
stops
the printing
P8-5
1
1.Print Chess
2.Continuous Printing
Press ESC key to exit.
8-1-6 Sensor Test
The outputs of the sensors are indicated, peel off sensor indicates a high value when a label blocks the sensor,
a low value when no label at the front of the peel off sensor.
Gap sensor indicates a high value when a label with backing paper stand in the gap sensor, a low value is
indicated at gap of a labels( between label and label)
Recommended sensor indications
Peel off sensor ; No label -> more than 200 / With label -> less than 70
Gap sensor ; In gap -> less than 60 / Out of gap -> more than 120
P8-6
Gap Sensor
Peel Off Sensor
: [050]
: [045]
Press ESC key to exit
39 | P a g e
© Adam Equipment Company 2010
8-1-7 Sensor Cal
The levels of the gap sensor and the peel off sensor are calibrated automatically
Press number 3 key, scale feeds labels and displays medium values
P8-7
7
Gap Sensor
Peel Off Sensor
: [xxx]
: [xxx]
Press ESC key to exit
P8
8
1. Analog
2. Key Board
3. Display
4. RS-232C
8-2 Print PLU
PLUs which assigned in starting No to End No are printed
Enter starting PLU No and press Enter key
P8-2
1
Start PLU No
Enter end PLU No and press Enter key
P8-2
1
5
End PLU No
40 | P a g e
© Adam Equipment Company 2010
8-3 Trans data
PLU data of the scale is transfer to the other scale (Scale to Scale)
Connect RS-232C cable between two scales and press Enter key to transfer
P8-3
3
Transmit Data ….
Press ESC key to exit
8-4 Del Account
Press Enter key, account data is deleted / display
P8
9
1. Self Test
3. Trans Data
2. Print PLU
4. Del Account
Press ESC key to exit
41 | P a g e
© Adam Equipment Company 2010
10. THE OTHERS
1) CHANGING LABEL ROLL
42 | P a g e
© Adam Equipment Company 2010
2) CLEANING THERMAL PRINT HEAD
43 | P a g e
© Adam Equipment Company 2010
11. SAMPLE LABEL FORMAT
44 | P a g e
© Adam Equipment Company 2010
WARRANTY INFORMATION
Adam Equipment offers Limited Warranty (Parts and Labour) for the components failed due to def
ects in materials or workmanship. Warranty starts from the date of delivery.
During the warranty period, should any repairs be necessary, the purchaser must inform its s
upplier or Adam Equipment Company. The company or its authorised Technician reserves the
right to repair or replace the components at any of its workshops depending on the severity
of the problems. However, any freight involved in sending the faulty units or parts to the servi
ce centre should be borne by the purchaser.
The warranty will cease to operate if the equipment is not returned in the original packaging
and with correct documentation for a claim to be processed. All claims are at the sole discret
ion of Adam Equipment.
This warranty does not cover equipment where defects or poor performance is due to misuse
, accidental damage, exposure to radioactive or corrosive materials, negligence, faulty installat
ion, unauthorised modifications or attempted repair or failure to observe the requirements and
recommendations as given in this User Manual. Additionally rechargeable batteries (where su
pplied) are not covered under warranty.
Repairs carried out under the warranty does not extend the warranty period. Components re
moved during the warranty repairs become the company property.
The statutory right of the purchaser is not affected by this warranty. The terms of this warrant
y is governed by the UK law. For complete details on Warranty Information, see the terms an
d conditions of sale available on our web-site.
45 | P a g e
© Adam Equipment Company 2010
46 | P a g e
© Adam Equipment Company 2010
Manufacturer’s Declaration of Conformity
This product has been manufactured in accordance with the harmonised European standards,
following the provisions of the below stated directives:
Electro Magnetic Compatibility Directive 2004/108/EC
Low Voltage Directive 2006/95/EC
Adam Equipment Co. Ltd.
Bond Avenue, Denbigh East
Milton Keynes, MK1 1SW
United Kingdom
FCC COMPLIANCE
This equipment has been tested and found to comply with the limits for a Class A digital dev
ice, pursuant to Part 15 of the FCC Rules. These limits are designed to provide reasonable
protection against harmful interference when the equipment is operated in a commercial envi
ronment. The equipment generates, uses, and can radiate radio frequency energy and, if no
t installed and used in accordance with the instruction manual, may cause harmful interferenc
e to radio communications. Operation of this equipment in a residential area is likely to cau
se harmful interference in which case the user will be required to correct the interference at
his own expense.
Shielded interconnect cables must be employed with this equipment to insure compliance wit
h the pertinent RF emission limits governing this device.
Changes or modifications not expressly approved by Adam Equipment could void the user's
authority to operate the equipment.
WEEE COMPLIANCE
Any Electrical or Electronic Equipment (EEE) component or assembly of parts intended to be
incorporated into EEE devices as defined by European Directive 2002/95/EEC must be recy
cled or disposed using techniques that do not introduce hazardous substances harmful to our
health or the environment as listed in Directive 2002/95/EC or amending legislation. Battery
disposal in Landfill Sites is more regulated since July 2002 by regulation 9 of the Landfill (E
ngland and Wales) Regulations 2002 and Hazardous Waste Regulations 2005. Battery recycli
ng has become topical and the Waste Electrical and Electronic Equipment (WEEE) Regulatio
ns are set to impose targets for recycling.
ADAM EQUIPMENT is an ISO 9001:2008 certified global company with more
than 35 years experience in the production and sale of electronic weighing
equipment.
Adam products are predominantly designed for the Laboratory, Educational,
Medical, retail and Industrial Segments. The product range can be described as
follows:
-Analytical and Precision Balances
-Compact and Portable Balances
-High Capacity Balances
-Moisture analysers / balances
-Mechanical Scales
-Counting Scales
-Digital Weighing/Check-weighing Scales
-High performance Platform Scales
-Crane scales
-Medical Scales
-Retail Scales for Price computing
For a complete listing of all Adam products visit our website at
www.adamequipment.com
© Copyright by Adam Equipment Co. Ltd. All rights reserved. No part of this publication may be
reprinted or translated in any form or by any means without the prior permission of Adam Equipment.
Adam Equipment reserves the right to make changes to the technology, features, specifications and
design of the equipment without notice.
All information contained within this publication is to the best of our knowledge timely, complete and
accurate when issued. However, we are not responsible for misinterpretations which may result
from the reading of this material.
The latest version of this publication can be found on our Website.
www.adamequipment.com