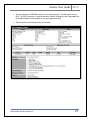
1
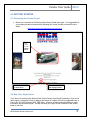
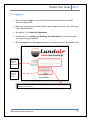
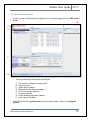
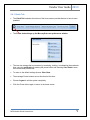
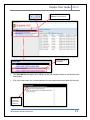
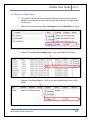
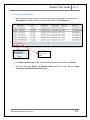
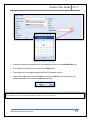
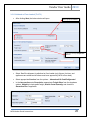
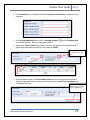
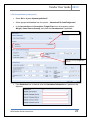
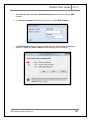
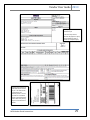
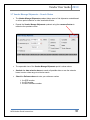
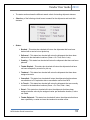
Vendor User Guide 2013 USER GUIDE VENDOR LOGISTICS PORTAL Online Requests for MCX Shipment Validation and Routing February 2013 Powered By: MCX Vendor Portal Instructions 1 Vendor User Guide 2013 Revision Sheet Date Revision Description Release No. Rev. 0 Rev. 1 Rev. 2 10/07/12 10/09/12 12/26/12 Rev. 3 01/14/13 Rev. 4 Rev. 5 1/28/13 2/11/13 User’s Manual for TMS Updated screen images Updated Screen Images and Directions to accommodate new portal design. Updated Screen Images and Directions to accommodate portal modifications. Revised based off of team edits Revised TMS Setup Form MCX Vendor Portal Instructions 2 Vendor User Guide 2013 Table of Contents 1.0 GENERAL INFORMATION .......................................................................................................... 4 1.1 System Overview ............................................................................................................................. 4 1.2 Points of Contact ............................................................................................................................. 4 2.0 GETTING STARTED ..................................................................................................................... 5 2.1 Accessing the Vendor Portal.......................................................................................................... 5 2.2 New User Registration .................................................................................................................... 5 2.3 Logging In ......................................................................................................................................... 7 2.4 Vendor Home Screen ..................................................................................................................... 8 2.4.1 Quick Tab ...................................................................................................................................... 9 2.5 Exiting the System ......................................................................................................................... 10 2.6 Changing or Resetting Your Password ...................................................................................... 10 3.0 USING THE SYSTEM ................................................................................................................. 10 3.1 Vendor News .................................................................................................................................. 10 3.2 Locations – Shipping Points......................................................................................................... 12 3.3 Shipment Routing Request .......................................................................................................... 13 3.4 Searching Open Orders ................................................................................................................ 15 3.4.1 Selecting a Single Order ....................................................................................................... 16 3.4.2 Selecting Multiple Orders ...................................................................................................... 17 3.5 Request Routing ........................................................................................................................ 18 3.5.1 Palletized or Floor Loaded (TL/LTL).................................................................................... 20 3.5.2 Non-palletized (small parcel) ................................................................................................ 22 3.5.3 Multiple PO Entry ................................................................................................................... 24 3.5.4 Summary and SRR Record .................................................................................................. 25 3.6 Freight Routing Notification (FRN) E-Mail ................................................................................. 28 3.7 Vendor Manage Shipments – Search Status ............................................................................ 30 3.8 Edit SRR ......................................................................................................................................... 33 3.9 Re-Print Documents ...................................................................................................................... 33 3.10 OPO, DD, and Procurement Orders ......................................................................................... 34 MCX Vendor Portal Instructions 3 Vendor User Guide 2013 1.0 GENERAL INFORMATION 1.1 System Overview Function The function of this document is to aid the MCX business Partners in navigating the MercuryGate TMS vendor portal effectively and efficiently. Architecture This software is a web based transportation management application customized for third party logistic companies to provide routing and carrier selection. User access mode Graphical User Interface. System Name MercuryGate Transportation Management System. 1.2 Points of Contact Following is the list of the points of organizational contacts that may be needed by the user for informational and troubleshooting purposes. All communications will be returned within one business day. Direct all communications regarding transportation and/or routing to Landair, if no answer is received than contact the Landair Escalation team. Contact the MCX Logistics department if you have any concerns or unresolved communications. Landair Transport, Inc. - General Traffic and Help Desk Landair Traffic E-mail – [email protected] Phone (Direct) – 866-404-8517 Landair Transport, Inc. - Escalation Lyndal Harper, Manager TMS E-mail – [email protected] Phone (Direct) – 423-783-1489 Raj Date, Business Analyst E-mail – [email protected] Phone (Direct) – 423-783-1227 MCX Logistics – General Traffic and Help desk MCX Logistics E-mail – [email protected] Phone (Direct) – 703-784-3805 MCX Vendor Portal Instructions 4 Vendor User Guide 2013 2.0 GETTING STARTED 2.1 Accessing the Vendor Portal Below is a screenshot of the MercuryGate Vendor Portal main page. It is suggested that your shipping locations bookmark the following link in their browser to access the site easily. https://sites.google.com/a/landairtms.com/mcx-log-in/ Click image to enter Vendor Portal Click to view User Guide for Vendor Portal Click to view updated MCX shipping guidelines 2.2 New User Registration If you have not received your MercuryGate Vendor Portal Login ID and Password or if you are a new location, complete the form on page 6 and submit to Landair at E-mail [email protected] or Fax to 423-783-1369 attention MCX TMS Setup. Allow for at least two business days to verify information and process request. Landair will send your Login ID and Password to the emails listed on the form. MCX Vendor Portal Instructions 5 Vendor User Guide 2013 MCX Vendor Portal Instructions 6 Vendor User Guide 2013 2.3 Logging In After clicking the Image to route your PO the user will be directed to the Landair Solutions Login Screen Before you can access the Vendor Portal to enter a shipment you will need your unique Login ID and Password. See section 2.1 for New User Registration See Section 2.5 for Changing or Resetting Your Password if you do not remember your Login ID and/or Password. Enter the Login ID and Password assigned to your location into the TMS Vendor Portal Enter Login ID and Password Click Sign In tab to enter the portal Click Remember Me option box to save login ID and password information to allow for faster access to the Vendor Portal. MCX Vendor Portal Instructions 7 Vendor User Guide 2013 2.4 Vendor Home Screen A similar screen as shown below will appear after successfully logging into the TMS Vendor Portal B. A. D. E. C. G. F. H. These quadrants will automatically be displayed A. B. C. D. E. F. G. H. The Vendor or Shipper’s Location name Logout Function Vendor News quadrant Shipment Routing Request quadrant Re-Print Document quadrant Locations quadrant Vendor Manage Shipments quadrant Quick Launch Tab Menu The functions of all the quadrant items are described in detail in Section 3.0 Using the System MCX Vendor Portal Instructions 8 Vendor User Guide 2013 2.4.1 Quick Tab The Quick Tab located at the bottom of the home screen provides buttons to launch each quadrant. The Power button brings up the MercuryGate user preferences window. The user can arrange the home screen by reordering, resizing, or subtracting the quadrants then using the quick tab and pressing the power button and choosing Save State to save the home screen preferences. To return to the default settings choose Clear State The message Center buttons are not functional at this time. Choose Logout to exit the system completely Click the Power button again to return to the home screen MCX Vendor Portal Instructions 9 Vendor User Guide 2013 2.5 Exiting the System To Exit the system click on the Logout icon in the upper right hand corner. 2.6 Changing or Resetting Your Password Use the Forgot Password link on the login screen to submit a password reset request. You must enter your Login ID and e-mail. If you do not know your Login ID, send an email to [email protected] or call 866-404-8517. 3.0 USING THE SYSTEM 3.1 Vendor News Important alerts concerning system updates, routing/shipping compliance, and MCX supply chain modifications will be posted in the Vendor News quadrant. Each alert will include the date posted to the Vendor News quadrant. All users are required to read the alerts prior to routing and shipping their orders. To view the Vendor News details, click on the blue link of the subject line in the Vendor News quadrant. MCX Vendor Portal Instructions 10 Vendor User Guide 2013 Refresh, Minimize, Maximize and Close command buttons Click the blue link to view details The Selected link will appear as a dialog box with the pertinent details to include document attachments. Click on the document icon to download and view any attachments associated with the alert. Click the icon to download and view the attachment MCX Vendor Portal Instructions 11 Vendor User Guide 2013 3.2 Locations – Shipping Points All of the authorized shipping points for the Vendor will be displayed in the Locations Quadrant The Locations are displayed as a list with the blue links indicating Vendor locations that are active for the user. Click link to view and edit the contact details To modify the shipping location address or to add a new location to the vendor, complete the MCX Trading Partner TMS Setup Form located on page 6 and email or fax to Landair. To modify the contact information for an address select the blue link to that location. An Edit Location Box will open, modify appropriate information and press Save The following fields can be edited by the user: Contact Phone Fax Email (Multiple emails must be separated by a comma , ) Comments EarliestAppointment time Latest Appointment time (Times must be entered as standard time xx:xx am/pm) MCX Vendor Portal Instructions 12 Vendor User Guide 2013 3.3 Shipment Routing Request The Shipment Routing Request quadrant is as displayed below Maximize the quadrant using the command buttons located on the upper right of the quadrant screen. Maximize/Minimize command buttons The first time logging in, the Available to Route report must be selected for open orders attached to the vendor to display. Once the report processes, click on the pin icon to pin the report as the default for subsequent visits. Select Available to Route after logging in the first time MCX Vendor Portal Instructions After processing the report, click on the pin icon to ensure Available to Route as default 13 Vendor User Guide 2013 This quadrant shows all open orders that are authorized to route by the shipper. Any order that is past the PO close date will not populate. You may request routing up to 5 days prior to the PO Start Date PO extension requests must be made to the appropriate MCX buyer. Shipping on a cancelled PO will result in a non-compliance fee. The Shipment Routing Request columns include PO Number – The MCX Purchase Order Number paired with the MCX Site/Store number destination Status – the routing status of the order Pending – no request submitted by the shipper, open order In Process – request for routing submitted by shipper and being processed by the TMS Fulfilled – routing has been completed PO Start Date – authorized start shipping date designated by the MCX buyer PO Close Date – the last date that the PO can be entered for routing approval Dest Code – the MCX site/store number as designated by the order Dest Name – the Destination Location address code Dest City – the city that the shipment will be shipped to Dest State – the State the shipment will be shipped to Ref: Service – the type of shipping service requested by the MCX buyer MCX Vendor Portal Instructions 14 Vendor User Guide 2013 3.4 Searching Open Orders To locate the order(s) that you would like to request routing for use the column headers to sort and filter by your unique criteria, this minimizes your open orders to your query. Example: Filter by selecting category Contains and enter PO Number ex 123456 Example: Filter Dest City to Begins QUA to only show Quantico VA orders Example: Filter Dest Code to = 15020 to only show Kaneohe Bay Store 15020 orders MCX Vendor Portal Instructions 15 Vendor User Guide 2013 3.4.1 Selecting a Single Order After Filtering your open orders to locate the order that you are ready to ship select the PO Number by checking the box on the left hand side of the PO Number. Click Mass Update and then click Route Click Mass Update at the bottom left hand side of the window and then click Route. After the user clicks Route, the Request Route window will open with the Origin Location and Destination Location details. MCX Vendor Portal Instructions 16 Vendor User Guide 2013 3.4.2 Selecting Multiple Orders Multiple orders can be routed together on the same request as long as they meet the following criteria. Dest Name and Ref: Service must be same for multiple orders to route together Select the orders that you are ready to request routing for by checking the selection box next to the PO Number They all must have the same Ref: Service If the Ref: Service is different then you will receive an ERROR They all must have the same Dest Name If the Dest Name is different then you will receive an ERROR Click Mass Update at the bottom left hand side of the window and then click Route MCX Vendor Portal Instructions 17 Vendor User Guide 2013 3.5 Request Routing After the user has selected the PO(s) and has clicked Route, the Request Route window will open with the Origin Location and Destination Location details The Destination Location is automatically populated from the MCX order In the Origin Location section choose your shipping location from the drop down box to populate the Select Location field. All shipping points authorized to ship for the vendor will display, only choose your location, if your location in not listed see Section 2.1 New Vendor Registration MCX Vendor Portal Instructions 18 Vendor User Guide 2013 Choose the date that the shipment will be available for pickup in the Available Date field If the shipment is ready now, then select the Today button The calendar will only populate dates within the PO shipping window In the bottom right hand corner click Next to continue or Cancel to end the request (the routing request will not be saved if Cancel is selected). The example PO has a shipping window of 12/30/2012 to 02/17/13. The Available Date only allows shipping until 02/14/13. Two to four days may be deducted from the ship window due to weekends, holidays, and carrier requirements. MCX Vendor Portal Instructions 19 Vendor User Guide 2013 3.5.1 Palletized or Floor Loaded (TL/LTL) After clicking Next, the below window will open Select appropriate services Drop down arrow for Freight Class selection Select Yes if the shipment is palletized or floor loaded (only fixtures, furniture, and appliances are authorized all others must have approval by MCX to floor load). Select appropriate Services from the options – Hazardous/Lift Gate/Refrigerated In the Item section enter Description, appropriate Freight Class from the dropdown options, Weight to include pallet weight, Actual Carton Quantity, and check the Hazardous box if applicable. MCX Vendor Portal Instructions 20 Vendor User Guide 2013 If the Hazardous box is checked enter the Hazardous Information as it pertains to the shipment. In the Loading Method section click the magnifying glass for available choices. Select the appropriate option. Select either Floor Loaded (only fixtures, furniture, and appliances are authorized all others must have approval by MCX to floor load) or Pallets next to Handling Unit Weight automatically calculated from previous entry Enter the actual number of Total Handling Units and click on the drop down arrow to select the appropriate option then enter the total shipment Cubic Feet Calculation and click Next to continue. Click Next to proceed, Back to return to previous screen or Cancel to quit MCX Vendor Portal Instructions 21 Vendor User Guide 2013 3.5.2 Non-palletized (small parcel) Select No for Is your shipment palletized? Select appropriate Services from the options – Hazardous/Lift Gate/Refrigerated In the Item section enter Description, Freight Class from the dropdown options, Weight , Actual Carton Quantity, and check the Hazardous box if applicable. Select appropriate services Drop down arrow for Freight Class selection If the Hazardous box is checked enter the Hazardous Information as it pertains to the shipment. MCX Vendor Portal Instructions 22 Vendor User Guide 2013 The Loading Method section will expand based on the Actual Carton Quantity entered. Select All Dimensions the Same, Yes or No, and input appropriate dimensions and carton weights and click Next to continue. *Note, cubic feet will automatically be calculated once the dimensions are entered If all dimensions are the same for each carton then you will only enter one set of dimensions If any single carton has a cubic feet greater than 3.0, a warning box will appear when Next is clicked. Sometimes a carton with greater than 3.0 cubic feet is unavoidable. Check the dimensions and if correct select OK. If this is a strapped bundle, the cartons may need to be deconsolodated to avoid oversize fees. Directly below the Actual Carton Quantity field is a Recommended Maximum Bundled Quantity number. This is the MCX recommended number of shippable cartons based on MCX Bundling Guidelines. The shipper is required to bundle to this quantity either by strapping or using a master outer box. If the Actual Carton number exceeds the Recommended number, a warning box will appear when Next is clicked. *If a warning box appears for carton quantity or cubic feet, “OK” must be selected to continue. MCX Vendor Portal Instructions 23 Vendor User Guide 2013 3.5.3 Multiple PO Entry Select appropriate choice for Is your shipment palletized? Select appropriate Services from the options – Hazardous/Lift Gate/Refrigerated In the Item Sections notice that each individual PO has it’s own section. Enter Description, Freight Class from the dropdown options, Weight , Actual Carton Quantity, and check the Hazardous box if applicable per PO. Fill in the Loading Method for the total combined shipment. The Total Shipment Weight will auto-populate based on each Item entry. Select Next to continue. POs with multiple shipping methods i.e. Palletized/Floor Load and non-palletized or refrigerated and non-refrigerated must be entered as two individual shipment requests. The system cannot divide shipment to multiple carriers. MCX Vendor Portal Instructions 24 Vendor User Guide 2013 3.5.4 Summary and SRR Record Once the Shipment Characteristics and the Loading Method has been completed, the below summary screen will appear All information needs to be validated, any Special Comments entered, and the Terms and Conditions statement read and agreed to before the shipment (SRR) can be created If any changes need to be made, click Back to adjust accordingly; otherwise click Save to create the Shipment Routing Request (SRR ) record. Click Save to proceed, Back to return to previous screen or Cancel to quit Terms and Conditions box must be checked to continue MCX Vendor Portal Instructions 25 Vendor User Guide 2013 After Save has been selected a Print Documents window will open with the SRR number. In the Select Document field use the drop down to select SRR Summary. A File Download window will open giving the options to Open, Save or Cancel the document. Open and Print or Save the SRR Summary for your records. MCX Vendor Portal Instructions 26 Vendor User Guide 2013 This an example of a SRR Summary for your routing request. This document is not a BOL. The BOL Document, Carrier information, Service of shipping, and if applicable the small parcel labels will be emailed to you upon approval to ship. This document should be saved for your records. MCX Vendor Portal Instructions 27 Vendor User Guide 2013 3.6 Freight Routing Notification (FRN) E-Mail Once the SRR has been approved and a carrier assigned you will receive a Freight Routing Notification (FRN) E-mail within 4 business days of request and not to surpass the close ship date. The email will include the following information. SRR# Ship Date (must ship on or one business day before or after of this date) MBOL# Carrier SCAC Carrier Name and Service Destination Important Compliance Attachments (Shipment BOL or Small Parcel Labels ) Top example of a LTL FRN with BOL attachment Bottom example of a Small Parcel FRN Email with labels attached MCX Vendor Portal Instructions 28 Vendor User Guide 2013 Example of a BOL that will be emailed to you *You must ship within 1 business day (before or after) the available ship date to avoid non-compliance fees) Example of a Small Parcel label that will be emailed to you – this label can be configured to your thermal printer or can be printed out on standard paper and attached to the carton with clear packing tape or a clear document holder. MCX Vendor Portal Instructions 29 Vendor User Guide 2013 3.7 Vendor Manage Shipments – Search Status The Vendor Manage Shipments quadrant helps users to find shipments created based on a time period selection or other searchable criteria. Expand the Vendor Manage Shipments quadrant using the command button to maximize the quadrant screen. The expanded view of the Vendor Manage Shipments portal is shown above Uncheck the date selection boxes to search all possible dates or use the calendar boxes to enter a date range to minimize search Check the Reference box and enter your reference number the SRR number the PO number the MCX site/store number MCX Vendor Portal Instructions 30 Vendor User Guide 2013 The status section shows the different search criteria for tracking shipment statuses Check any of the following criteria boxes to search for the shipments and track their statuses. Status: Booked – This status box checked will return the shipments that have been booked with a carrier but not picked up Delivered – This status box checked will return the shipments that have been delivered to the destination locations (Green = On Time, Red = Late) Pending – This status box checked will return the shipments that have not been planned Tender Expired – This status box checked will return the shipments that have not been accepted by a carrier for pick up Tendered – This status box checked will return the shipments that have been assigned a carrier Cancelled – This status box checked will return the shipments that have been cancelled due to PO expiration date or cancellation notice from MCX In Transit – This status box checked will return the shipments that are currently in transit to the destination locations (Green = On Time, Red = Late) Rated – This status box checked will return the shipments that have been assigned a dollar value by the assigned carrier per destination location; $ value not visible Tender Rejected – This status box checked will return the shipments that have been rejected by a carrier and must be tendered to another carrier MCX Vendor Portal Instructions 31 Vendor User Guide 2013 User can select multiple search criteria to return shipment tracking results. Click Find to search the specific shipment for details – all orders that meet your criteria will populate. The example above retrieved all SRRs that contained the PO 111213. The Query results provides SRR Number – the Shipment Routing Request Number assigned to the order Status – see page 29 for Status definitions Origin – City and State of pickup Latest Pick-Up – latest ship date obtained from the order minus weekends, holidays and carrier requirement notification days Actual Pick-Up Date – carrier acknowledged date of pickup Destination – City and State for delivery Actual Drop Date – actual delivery date Carrier Name – Carrier/Service assigned to shipment Click on the blue SRR link to get additional information pertaining to the shipment. MCX Vendor Portal Instructions 32 Vendor User Guide 2013 3.8 Edit SRR All requested edits or deletes to an SRR must be done by the Landair Traffic Team. Please email [email protected] or call 866-404-8517 with your SRR#. 3.9 Re-Print Documents The Re-Print Documents quadrant can be used to print the SRR record, the MBL (Master BOL), or the Small Parcel Shipping Labels Expand the Re-Print Documents quadrant using the command button to maximize the portal screen Enter the Reference SRR number and select Shipment then click Find to print the SRR record Click the link to open and print the document screen MCX Vendor Portal Instructions 33 Vendor User Guide 2013 Enter the Reference MBOL number and select Load then click Find to retrieve the MBOL or Small Parcel Shipping Labels. Click the link to open and print the BOL or shipping labels 3.10 OPO, DD, and Procurement Orders Occasionally routing of an OPO (Open Purchase Order), DD (Direct Delivery), or Procurement PO is required. A list of OPO, DD, and Procurement Order numbers by vendor and approved destination ship to will be loaded in TMS for normal routing. The OPO, DD, and Procurement Order numbers will populate in your open orders in the Shipment Routing Request quadrant. If you do not see the OPO, DD, and Procurement Order number you have been required to use, please contact Landair Traffic at [email protected] or 866-404-8517 MCX Vendor Portal Instructions 34