1
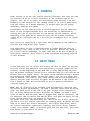
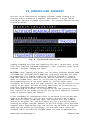
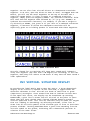
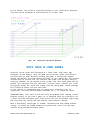
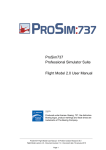
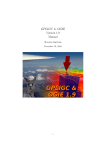
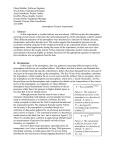
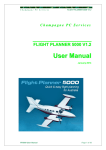
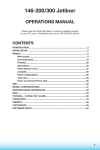
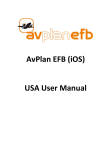
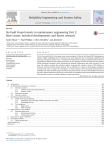
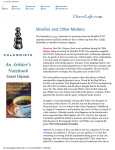
Radar Contact 6.3 User Manual [email protected] RadarContact User Manual Page 1 ©Max Hirn 2015 I GENERAL Radar Contact is an ATC (Air Traffic Control) Simulator that lets you take the position of an air traffic controller in the terminal area of an airport. Your job is to safely and efficiently guide aircraft from the boundary of your airspace to the landing runway or in case of departures, from the airport to a target waypoint. To achieve this you can assign altitudes, headings and speeds. Furthermore you can send aircraft to certain waypoints and let them hold there if your airspace becomes full. The difficulty is controlled by setting the rate of new aircraft in a 10 minutes period. However, at the beginning of the game two or three aircraft will be present instantly (three up to a selected rate of 4 aircraft per 10 minutes and 2 for higher rates). Your success is measured by a score that mainly depends on the number of aircraft that land within your “shift”. This application is more a simulation than an arcade game and aims at replicating a real radar screen as well as possible. Without any advance air traffic control knowledge, it takes some time to be able to handle it efficiently. However, every effort is made to explain everything required in this document. II MAIN MENU In the main menu you can select the airport you want to "work" at and the aircraft arrival and departure rate (expressed in aircraft number per 10 minutes). At the beginning of the game two or three approaching aircraft will be present instantly (three up to a selected rate of 4 aircraft per 10 minutes and 2 for higher rates). The rates can be modified during a session by touching the field "RATES" on menu bar page 2. You can also enter your name if desired. This name is only saved locally and will be displayed as a default the next time you start the game. At the bottom of the screen you find a button to open the instructions as well as general information (version number etc.). Note: Not all airports can be selected from the beginning. Starting from the second airport (Whitehaven), you need a specific total score to unlock them. The total score is the sum of all your session scores achieved so far. To unlock Whitehaven airport 50 points are needed, you need a total score of 300 for Mountainview, 500 for Ragged Peak, 650 for Innsbruck, 750 for Montréal, 850 for Munich and 950 for Nice. This does not apply for the trial version where only one airport is available. The total score will also determine your rank as an air traffic controller. You start as an Air Traffic Controller in Training after 40 points and then move on to Junior Air Traffic Controller, Air Traffic Controller, Senior Air Traffic Controller, Supervisor, Examiner and finally Senior Examiner (total score needed: 1200). To exit the game from the main menu, press the back button on your device as usual. RadarContact User Manual Page 2 ©Max Hirn 2015 III THE RADAR SCREEN After selecting “Start New“ in the main menu, you are presented with the radar screen and the first approaching aircraft (“target“) will be visible at some position near the edges of the screen (for more about targets, see the “Target Symbols“ section). The next aircraft will appear according to the rate you have selected in the main menu. However, at the beginning of the game two or three aircraft will be present instantly (three up to a selected rate of 4 aircraft per 10 minutes and 2 for higher rates). In the trial version, the maximum number of aircraft per session is 15. Fig.1 – The Radar Screen The screen has a black background and consists of several sectors which are divided by lines and have a number displayed somewhere close to their center. These sectors are minimum radar vectoring altitude sectors and define an area where an aircraft has to be above a specific altitude when it is guided by you. This minimum altitude is expressed by the mentioned number and is given in hundreds of feet. For example, the number 86 means that the minimum altitude in this sector is 8600 feet. In practice, this means that you may only assign altitudes from 9000 feet upwards to targets in this sector as you can only assign whole thousands to aircraft. Altitudes that can be assigned are 1000 to 15000 feet in 1000 feet increments. If, by your mistake, an aircraft descends to 400 feet below the respective minimum altitude, its terrain warning system will activate and you will be relieved from your shift (game over). The screen width always corresponds to 80 miles and the height to 50 miles. The landing runways are shown as a small line with the runway designator (e.g. 26R) next to it. The airport elevation is shown in the lower right corner of the radar screen. From the runway(s), a dashed line representing the extended runway RadarContact User Manual Page 3 ©Max Hirn 2015 centreline(s) extends for 20 nautical miles (a bit longer at Munich and Innsbruck). At Innsbruck, this line (and the approach course) is five degrees offset to the runway - this is a peculiarity of the localizer approach there. Additionally, 3 circles are drawn around the landing threshold with radius 5, 10 and 15 nautical miles respectively. The radar screen also shows waypoints as small triangles with their name next to them. 4 waypoints exist at every airport (more at airports with RNAV transitions) and you may clear aircraft to proceed directly to them. If they reach it without a further clearance from you, they will enter a holding pattern there (except at transition waypoints). This is needed if traffic becomes dense. If an aircraft leaves the boundaries of the radar screen because you failed to direct it away from it, it will disappear and the controller of the adjacent sector will have to handle it again (10 points will be deducted of your score). The radar screen is updated only every 3 seconds because the radar antenna has to complete a full rotation before providing new data. The screen can be zoomed to some extent by moving two fingers apart or together as usual on your Android device. At the top of the screen the menu bar is shown. It consists of the following fields and buttons: TIME: The current time in UTC (Universal Time Coordinated) is shown. TRK/DIST: The track and distance from a target to any position on the screen is shown. See section “Controlling Traffic“ for details. H/O REQ: This field shows if there is a new aircraft approaching from the adjacent sector. The target will be yellow and the H/O REQ display will flash yellow as long as you have not accepted the aircraft. See section “Controlling Aircraft“ for details. DEP: Shows the number of pending departures and initiates departure release. See section “Departure Traffic“ for details. SCORE: Shows your current session score. See section „Score“ for details. PG2/PG1: Switches between page 1 and page 2 of the options bar. Fig. 2 – Menu Bar Page 1 Items on page 2 are explained in the following: TIME: Also displayed on page 2. UP WIND: Shows the current average upper wind. Will influence the target's track above ground. TFC/RTS: Opens a dialog where departure and arrival traffic rates can be modified and the vertical speed assignment switched off and on SETUP: Opens the setup menu. See section „Setup Menu“ for details. VERT/S DSP: Opens the vertical situation display. Fig. 3 – Menu Bar Page 2 RadarContact User Manual Page 4 ©Max Hirn 2015 Fig. 4 – Traffic and vertical rates menu (TFC/RTS) In the TFC/RTS menu, you can modify the traffic density by specifying how many aircraft should appear in a 10 minute period (individually for departures and arrivals). Furthermore, the vertical speed assignment dialog can be switched on and off. If this feature is on, you will be asked for a vertical speed assignment after each altitude clearance. You can then either specify a climb/descent rate between 500 and 3000 feet per minute or have the airplane choose its own rate by selecting “free”. There is also an option to switch on turn direction assignments. If on, you will be asked for the desired turn direction. If this feature is switched off, aircraft will always turn in the direction giving the smaller required heading change. RadarContact User Manual Page 5 ©Max Hirn 2015 IV SETUP MENU The setup menu can be opened by touching the respective button on page 2 of the top menu bar. Here you can pause the simulation (the game is stopped except for the UTC time that continues to run), end your shift and close your sector. Pressing the pause button will stop the simulation at once, without clicking the “Done“ button. To resume the simulation, the pause button has to be pressed again. The button “End Shift“ ends the session and takes you back to the main menu. Closing the sector can be useful when traffic gets too much to handle. It causes the controllers of adjacent sectors to prevent aircraft from entering your airspace which gives you some time to handle the traffic you already have. However, the sector may only be closed for 10 minutes of every hour. In the setup menu, you can also select the color in which targets are shown. You can choose between cyan (default), white and orange. Furthermore, the datatag display can be switched between full and reduced mode and the track line display may be turned on or off. Fig. 5 – The Options Menu RadarContact User Manual Page 6 ©Max Hirn 2015 V TARGET SYMBOLS A target (aircraft) is represented by a small square with a text of block of information about it (datatag) and a line connecting both. A full and a reduced datatag mode are available and either can be selected in the options menu. The full datatag shows the following information: First line: Callsign Second line: Current Altitude =/T Cleared Altitude Third line: Type Groundspeed (alternates with target waypoint for departures) For example, the following datatag: AUA123 086T060 320 250 shows an Austrian Airlines Airbus A320, currently at 8600 feet with a cleared altitude of 6000 feet and a groundspeed of 250 knots. The two altitude values are separated by a “T“ if the aircraft is climbing/descending and by a “=” if it maintains its altitude. From the small aircraft symbol (square), a line is extending showing the target's track. It's length corresponds to 5 miles. Additionally, a “trail“ showing the target's last 10 positions is shown behind the aircraft symbol. Fig. 6 – Full Datatag The reduced datatag shows the following information: First line: Callsign Second line: =/C/D Current Altitude*Groundspeed target waypoint for departures) RadarContact User Manual Page 7 (alternates with ©Max Hirn 2015 For example, the following datatag: AUA123 D086*280 shows an aircraft currently at 8600 feet, descending, and a groundspeed of 280 knots. A “D“ before the altitude shows the aircraft is descending, and a “C“ that it is climbing. Fig. 7 – Reduced Datatag Here is a list of airline and aircraft codes with the radio telephony callsign in parentheses: Airlines: DLH AUA BAW AFR IBE BEL KLM UAE RYR TCX AZA SWR ISK AEE BER COA AAL FDX AFL NLY THY QFA SAS Lufthansa (Lufthansa) Austrian Airlines (Austrian) British Airways (Speedbird) Air France (Air France) Iberia (Iberia) Brussels Airlines (Beeline) KLM (KLM) Emirates (Emirates) Ryanair (Ryanair) Thomas Cook (Kestrel) Alitalia (Alitalia) Swiss Airlines (Swiss) Intersky (Intersky) Aegean (Aegean) Air Berlin (Air Berlin) Continental Airlines (Continental) American Airlines (American) Fedex (Fedex) Aeroflot (Aeroflot) FlyNiki (Niki) Turkish Airlines (Turkish) Qantas (Qantas) Scandinavian Airlines (Scandinavian) RadarContact User Manual Page 8 ©Max Hirn 2015 JAI FIN BMA TOM CLX TRA EZY EIN ETD ADR MSR CTN MAH BEE LOT ANA JAL OAL ACA Jet Airways (Jet Airways) Finnair (Finnair) British Midland (Midland) Tomson (Tomson) Cargolux (Cargolux) Transavia (Transavia) Easyjet (Easy) Aer Lingus (Shamrock) Etihad Airways (Etihad) Adria Airways (Adria) Egyptair (Egyptair) Croatia Airlines (Croatia) Malev Hungarian Airlines (Malev) Flybe (Jersey) LOT Polish Airlines (LOT) All Nippon Airways (All Nippon) Japan Airlines (Japan Air) Olympic Air (Olympic) Air Canada (Air Canada) Aircraft (if not labelled Heavy, wake turbulence class is Medium): 736 Boeing 737-600 737 Boeing 737-700 738 Boeing 737-800 753 Boeing 757-300 (Heavy) 744 Boeing 747-400 (Heavy) 748 Boeing 747-800 (Heavy) 763 Boeing 767-300 (Heavy) 773 Boeing 777-300 (Heavy) 318,319,320,321 Airbus A318,A319,A320,A321 332 Airbus A330-200 (Heavy) 333 Airbus A330-300 (Heavy) 343 Airbus A340-300 (Heavy) 344 Airbus A340-400 (Heavy) 380 Airbus A380 (Super) DH8 Dash 8 M82 MD-82 E19 Embraer 190 The datatag can be positioned at any convenient position by drag and drop. Just tap on the datatag, hold it and drag it to the desired position. Just tapping the datatag briefly will open the aircraft control menu (see section “Controlling Aircraft“ for details). The following datatag and target symbol colors exist: Normal (cyan, white or orange depending on your settings), yellow (aircraft not yet accepted or ready to be handed over to tower), green (departures), magenta (Missed approach) and red (conflict alert or emergency). RadarContact User Manual Page 9 ©Max Hirn 2015 VI CONTROLLING AIRCRAFT Aircraft can be controlled by assigning altitude, speed, heading or by clearing them to proceed to a waypoint. Additionally, a target can be cleared for approach or handed off to tower. This section explains how this is done in detail. Fig. 8 – The Aircraft Control Menu Tapping a datatag will open the respective aircraft’s control menu. In the first line (labelled „CALLSIGN TRAJECTORY“), basic trajectory items can be selected - altitude, heading and speed: ALTITUDE: After tapping this button, you can select altitudes between 1000 and 15000 feet. Altitudes above 5000 feet (transition altitude) are shown as flightlevel (for example FL140). The transition altitude is fixed at 5000 feet (which is done for simplicity, but not realistic at Innsbruck where it is 11000 feet). Above it, all aircraft fly with reference to 1013 hPa standard pressure at sea level. Below it, aircraft adjust their altimeters for actual local sea level pressure. For aircraft control in the context of this game, you need not worry about this. It is sufficient to know that flightlevel 080 corresponds to 8000 feet. After selecting an altitude, it is selected for the new clearance. However, this clearance is not issued yet because you may enter additional clearance items (a specific speed, for example). If the assignment of climb/descent rates is activated in the TFC/RTS menu (page 2 of the menu bar), you can also assign a vertical rate of 500 to 3000 feet per minute in 500-feet steps. The airplane will then climb or descent at the given rate, but will reduce the rate a bit shortly before reaching the target altitude. However, if you also assign a very low speed together with a high descent rate, the aircraft may be unable to keep that speed and will inform you accordingly. You must then either reduce the assigned rate or increase the assigned speed. The same is applicable for RadarContact User Manual Page 10 ©Max Hirn 2015 climbs, when it may happen (if the aircraft is very heavy) that an instructed climb rate is too high for the airplane’s performance and will therefore also be refused by the pilots. If you do not want to assign vertical rates at all, switch this feature off in the rates menu on menu bar page 2. This will prevent the vertical speed assignment dialog from appearing and will make altitude assignments quicker. When a descending aircraft is below 6000 feet and high in relation to the distance to the runway, it will expedite its descent to increase the chances of catching the glideslope. HEADING: After selecting this function, you can enter all 3 digits of the heading successively. Headings can be assigned in steps of 5 degrees. (Heading 345 is possible, but not heading 342). For example, to assign heading 340, you press 3, then 4, then 0. Headings must be entered with leading zeros if applicable, e.g. heading 005. Simplified, a heading is the magnetic direction (1-360 degrees, e.g. 090 is east, 270 is west) an aircraft’s nose points to. If there is wind, this is not the same as the direction the aircraft travels in relation the ground. For example, if the aircraft’s nose points exactly to the west but there is strong wind from the south, the track above ground will approximately be west-northwest. Wind is simulated as there is random upper wind generated for each session that influences all aircraft tracks. Its direction and speed can be seen on menu bar page 2. Aircraft will always turn in the direction giving the smaller required heading change unless turn direction assignments are switched on in the TFC/RTS menu. DIRECT: After pressing this button, you will be presented with a selection of waypoints. Selecting a waypoint will have the aircraft proceed to it and if it receives no further clearance, enter a holding pattern there. Aircraft will reduce their speed to 220 knots when approaching the holding pattern. At airports with RNAV transitions, you can also clear aircraft direct to transition waypoints. On the numerical keypad, simply press the last digit of the respective waypoint (for example, to clear a target to waypoint RP605, press 5). The aircraft will then also be cleared for the transition. SPEED: You may select indicated airspeeds from 160 to 250 knots. Aircraft entering your sector will have a standard speed of 270 knots indicated. This is the airspeed as measured by the aircraft’s pitot system. It is (except at sea level in standard conditions) neither the aircraft’s actual speed in relation to the surrounding air nor to the ground. Indicated Airspeed corrected for air density is called True Airspeed. The True Airspeed corrected for wind is called Groundspeed. This is the actual speed of the aircraft in relation to the ground and is displayed in the datatag. Therefore, if you assign an indicated speed to a target, this is not what will be displayed in the datatag (because there groundspeed is shown). As a controller, you have to take the different groundspeeds of aircraft with same indicated airspeed, but different altitudes and wind conditions into account. Speed in a holding pattern will always be 220 knots or less and RadarContact User Manual Page 11 ©Max Hirn 2015 cannot be changed. An aircraft may refuse a speed clearance if you have instructed a high descent rate before and it is unable to fly the requested speed at the given rate. You then have to either increase the cleared speed or assign a lower descent rate. In the second button line of the control menu (labelled “ADDITIONAL“), the following functions can be found: APP CLR: Clears the aircraft for approach. For this to work, it has to be on an intercept heading of less than 55 degrees (45 with parallel runway operations) to the extended runway centerline and at an altitude that allows it to intercept the glidepath. (For example: on runway 26R, the runway direction is 260 degrees and the intercept heading has to be between 215 and 305 degrees. At a distance of 10 miles the aircraft has to be at about 3000 feet above ground (you have to take airport elevation into account) to intercept - roughly distance times 300. This is valid for a standard glidepath angle of three degrees. At Innsbruck, the approach angle is almost four degrees so aircraft have to be higher at a given distance). The approach clearance button will only be active if the aircraft is on a suitable intercept angle and distance from the threshold (less than 30 miles at Innsbruck, 25 at Munich, 20 otherwise). It may also happen that you can select the function but the aircraft is too close to the threshold or too high. In this case the aircraft will not intercept the final track but continue on some heading. In this case, you have to vector it to the final approach course again. The latest allowed approach intercept at all airports except Innsbruck is at 7 miles at 2000 feet, if minimum altitude permits. Aircraft will reduce their speed to 220 knots when cleared for approach and less than 15 miles from the threshold unless they have been cleared slower before and will further reduce their speed to 160 knots when 6 miles from the threshold. At airports with two runways, you will be asked for which runway you want to issue the approach clearance. IMPORTANT: Do not try to align the aircraft with the extended centerline using headings and then clear it for approach. It may continue to fly parallel (even if very close to the centerline) and never intercept. Always have a target intercept the localizer at an angle of about 30 to 45 degrees. Aircraft will report when established on the localizer. After this report, the responsibility for terrain clearance rests on the pilots. To have an aircraft on the localizer discontinue the approach, assign a new higher altitude and when above the sector minimum, a new heading. TOWER: When an aircraft has intercepted the final approach track and is less than 9 miles from the threshold (signified by the target’s color changing to yellow), you can instruct the aircraft to contact the tower. It will then not be controllable anymore. If you fail to hand the aircraft off to tower before it is 5 miles from the threshold, it will contact the tower anyway, but 1 point will be deducted from your score. When on short final, the target will either disappear from the screen or initiate a missed approach. In this case, it will continue to fly straight ahead, climb to the missed approach altitude of 6000 feet and you will have to vector it around again. At Innsbruck, missed approach traffic will turn left to a heading of 060 at 3000 feet and then turn to RTT waypoint at 9500 feet, climbing to 12000 feet. Be sure to use appropriate spacing there as otherwise missed approach aircraft will get too close to approach traffic! It will change its color to magenta as a reminder that it is missed RadarContact User Manual Page 12 ©Max Hirn 2015 approach traffic. Make sure to only assign a new heading when the aircraft is above the minimum altitude for the respective sector. ACCEPT: When a new aircraft arrives, its datatag will be yellow indicating that the controller of the adjacent sector requests a handoff. If sound is on, you will also hear a short beep. By selecting „Accept“, the target will get under your control. You can then immediately issue a clearance. TRK/DIST: After tapping this button, you can tap anywhere on the screen and the track and distance of the respective target to this point will be displayed in the upper menu bar. Below the first two button lines you will find three text lines showing the target’s actual data (altitude, magnetic track and groundspeed), its previous clearance and the now selected clearance. The abbreviation “CA“ means cleared for approach. The new clearance will be transmitted by tapping the button “Transmit“. Selecting “Disregard“ will cancel the transmission. The aircraft will continue according to its previous clearance. Only after tapping the “Transmit“ button, the clearance will be sent (except for “ACCEPT”, which will be immediate). The respective aircraft then sends back its readback, which can be heard when sound is on and which is additionally shown as a text field for a few seconds near the bottom of the screen, if selected in the main menu. IMPORTANT NOTE: During an aircraft’s audio transmission, you cannot use the “Transmit” button on the control menu of any target, except for accepting a handoff. You cannot issue any instructions as long as speech can be heard, but you can prepare them. The transmit button will also be unavailable during the first seconds after a transmission was heard. This simulates the time it would take in real life to speak the instruction you prepared in the control menu. VII DEPARTURE TRAFFIC Departing aircraft will be generated according to the departure rate selected in the main menu. As soon as a new departure is waiting at the runway holding point the DEP field in the menu bar changes its color to yellow and a beep is heard (if sound is on). The number indicates how many aircraft are waiting at the holding point. The maximum is nine, when this number is reached no more aircraft will be cleared for startup and taxi by tower. By tapping the DEP button you can release the next departure. A dialog will open asking you to confirm the release and indicating the waypoint the departure should be guided to. The trajectory control menu of a departure aircraft will show the name of the exit waypoint in the title line. When you confirm the release, the aircraft will get its line up and takeoff clearance by tower. After about one minute it will appear on the screen in about 500 feet on runway heading, a cleared altitude of 5000 feet (12000 feet at Innsbruck) and accelerating to 250 knots. It then has to be accepted just like any other target. It will climb straight ahead to 3000 feet and then turn towards the exit waypoint. The exception to this rule is RadarContact User Manual Page 13 ©Max Hirn 2015 again Innsbruck, where (due to the high terrain) it will initially turn to a track of 320 degrees and then turn to the target waypoint at 11000 feet. As long as it proceeds under own navigation, terrain clearance requirements will be met. You can cancel the standard departure route and guide the aircraft to the specified departure waypoint using vectors or direct-to. CAUTION: Only assign a new heading or direct-to after the target has climbed above minimum altitude! The target will disappear if it passes overhead the target waypoint or climbs above 14500 feet. If it passes the target waypoint you will receive 2, 3 or 4 points depending on how high it is (the higher the better). If the aircraft climbs above 14500 feet you will receive 3 points. It will then be removed from the screen even if not above the target waypoint yet. Fig. 9 – Departure Datatag As a reminder the first three letters of the target waypoint of departure traffic are shown in the datatag, alternating with the groundspeed readout. Departure targets are shown in bright green. Be careful not to release a departure too close to another one as it might cause a conflict alert. To ensure minimum separation, no departure can be released until the previous one has appeared on the screen. The tower controller will make sure there will be no runway conflict between departing and arrival traffic. VIII SOUND When starting the app in version 4.0 or above for the first time, you might be asked by the operating system which text-to-speech engine you would like to use. If this is the case, select “Android Text-To-Speech“. If you have already chosen any other option, saved it and are unable to hear any sound, re-install the app and proceed as stated before. Sound effects featured are a reminder beep when a handoff is waiting or a system message is shown, an alarm when there is a conflict alert, and audio readback of all aircraft using voice synthesis. Voice readback will only work if you have Android voice synthesis installed, which should be the case by default on most RadarContact User Manual Page 14 ©Max Hirn 2015 devices. In the main menu, you can choose between no sound, sound together with text readbacks and audio readback only. IMPORTANT NOTE: During an aircraft’s audio transmission, you cannot use the TRANSMIT button on the control menu of any target, except for accepting a handoff. You cannot issue any instructions as long as speech can be heard, but you can prepare them. The transmit button will also be unavailable during the first seconds after a transmission was heard. This simulates the time it would take in real life to speak the instruction you prepared in the control menu. ALSO IMPORTANT: If the speech output of "non-native-english" airlines like Lufthansa, Alitalia etc. sounds strange, please make sure you have all needed languages (French, German, Italian) installed: Settings -> Language & Input -> Text-to-Speech Output -> Settings -> Install voice data IX AIRCRAFT SEPARATION Aircraft have to be separated from all other aircraft at all times. The minimum separation is 5 miles horizontally or 1000 feet vertically unless one of the targets is established on the approach. When both are on the approach to the same runway, a medium aircraft has to be at least 3 miles behind another medium aircraft and 5 miles behind a heavy aircraft. A heavy aircraft has to be 3 miles behind a medium aircraft or 5 miles behind another heavy one. A distance of less than 2 miles between any two aircraft on approach to the same runway is considered as a severe error and will terminate the session. 10 points will be deducted in this case. At airports with two runways, independent parallel approaches are used – two aircraft established on the approaches to different runways do not need to be separated as explained above. It is advisable to vector aircraft for the primary runway 1000 feet higher or lower to the approach track than aircraft vectored for the secondary runway to maintain separation until both are established. Aircraft with a horizontal or (if not on the approach) vertical distance below the minimum will change their color to red and a red conflict alert warning will be displayed in the upper menu bar. If sound is on, an alarm tone will also be heard. You can then take action to avoid a closer approximation. RadarContact User Manual Page 15 ©Max Hirn 2015 Fig. 10 – Conflict Alert If one aircraft is established on the approach and the distance to another target gets less than 2 miles and the altitude difference less than 1000 feet, the session is over as well and 10 points will be deducted. The conflict alert will be triggered later when one of the two conflicting aircraft is established in the approach (below 1000 feet vertical separation and below 4 miles horizontal distance if the preceding is heavy and below 3 miles if the preceding is light or medium). X WEATHER SIMULATION A weather simulation, which generates thunderstorm cells, can be switched on in the main menu. There are two levels - light and medium - that determine the number of cells that will be generated. The radar detects cells with precipitation and depicts them on the screen in two colors. Dark magenta means light and light magenta heavy precipitation. Generally, aircraft should not get into contact with the storm clouds. It is your job to guide them around the cells, making traffic control more challenging as some parts of the airspace cannot be used. Pilots will also take measures to avoid thunderstorms. If they are on a heading directing them into a cell they will, if you do not issue a heading in time, fly their own avoidance heading. You will be informed about the heading and as long as the aircraft considers the heading as necessary you will not be able to issue any new heading. Therefore it is strongly advisable to vector targets away from clouds early enough. Otherwise, a target may take an avoidance heading putting it into conflict with another aircraft. Targets on their own avoidance heading will inform you when clear of weather (you can then assign a heading again). RadarContact User Manual Page 16 ©Max Hirn 2015 Fig. 11 – Precipitation Area If a target is close to a cell and you issue a heading or direct-to that would take it into the thunderstorm, the pilots will not accept it and continue on their present heading. All storm cells move very slowly across the screen according to the wind direction. When they reach the screen boundary they disappear. After all clouds have disappeared, no more will be generated so after a long session the significant weather will have dissipated. Aircraft established on final approach or in a holding will not turn to avoid a cell. However, one point will be deducted from your score for each radar update the target is inside a cell. Therefore it is advisable to vector aircraft on the instrument landing system so as to avoid as much of the weather as possible (and avoid holding clearances into holdings in bad weather). Departures and missed approaches will also not turn to avoid weather as long as you have not assigned an initial direct-to or heading. In this case, should they fly into a cell, no points will be deducted from your score as there is nothing you can do against it (turning a departure or missed approach too early would have it fly below minimum altitude). If an aircraft is on a weather avoidance heading and descends below minimum safe altitude, the game will continue as long as the target keeps avoiding. You have to use this time frame (1 point is deducted from your score for every radar update) to have the aircraft climb to above the sector minimum, if possible. If it is still below when clear of weather, the game will be over. XI SCORE SYSTEM Your success as an air traffic controller is measured with a score system. For every single session a session score is determined and additionally a total score, which is the sum of all previous session scores, is stored. After each session, the session score is compared to your highscore and you will be informed when you have achieved a new highscore. Additionally, after each session you may compare your score to global highscores. The best 200 scores for each airport are stored on a remote server to enable comparison to other players, if desired. If you choose to compare your RadarContact User Manual Page 17 ©Max Hirn 2015 score, it will be transmitted to the server, where your global rank is determined. No personal data is transmitted to the server but only date/time and your score. A Wi-Fi connection is recommended. IMPORTANT NOTE: Your total score will only be updated after ending a shift without saving. If you save a game, it is expected that you continue it at a later time and therefore your total score will not be updated right away. If you exit the game directly (without visiting the main menu) and do not save, your total score, rank and the available airports will be updated and shown in the main menu the next time you start the app. However, you will not get any information dialog about your achievements (like in the main menu) before exiting. The total score influences which airports are available (full version only) and which rank as an air traffic controller you have. At a total score of 50 points the second airport (Whitehaven), at 300 points the third airport (Mountainview), at 500 points the fourth one (Ragged Peak), at 650 points the fifth one (Innsbruck), at 750 points the sixth one (Montréal) and at 850 points the seventh one (Munich) will be unlocked. Furthermore, from time to time you will receive promotion to a new rank from Air Traffic Controller Trainee in the beginning to Senior Examiner in the end. Here is an overview of all actions influencing your score: Aircraft successfully handed over to tower: +3/4 points depending on weather Departing aircraft reaches target waypoint: +2/3/4 points depending on altitude and waypoint Departing aircraft climbs above 14500 feet: +3 points Aircraft successfully handed over to tower after a previous missed approach: +5 points Emergency Aircraft lands in time: +20 points Aircraft lands without handoff to tower: -1 point Target reaches the screen boundary: - 10 points Emergency aircraft does not land in time: -10 points Aircraft descends more than 400 feet below minimum altitude: -10 points Conflict with less than 3 miles separation: -10 points Please also see the section Score Transfer for information about transferring your total score from the free trial to the full version. RadarContact User Manual Page 18 ©Max Hirn 2015 XII EMERGENCIES From time to time, an aircraft will declare emergency. You will receive a message from it (shown in red) describing the problem, especially the time frame within it has to land. Additionally, the target will change its color to red. Your job then is to bring it to a safe landing within the mentioned time. This may mean moving other traffic out of the way. If you fail to do so, the session will be over and 10 points deducted from your score. If you are successful, you will receive 20 points upon landing. The remaining time to landing is shown in the title line of the emergency aircraft’s trajectory control menu. XIII IMPORTANT FACTS In this section you can find a brief overview of some selected important facts when controlling aircraft. Clearances: To issue a clearance, tap the aircraft’s datatag. A clearance will only be transmitted when tapping the „Transmit“ button (except for handover accepts). A clearance can therefore contain several different items (altitude, speed etc.). Approach: An approach clearance should only be issued when the aircraft’s track is within 55 degrees of the approach course and it is at a suitable altitude. The approach clearance button will only be active if the aircraft is on a suitable intercept angle and its distance to the threshold is 20 miles or less (25 at Munich and 30 at Innsbruck). You can estimate this altitude by multiplying the distance to the threshold by 300. For example, a target 10 miles away should be at around 3000 feet or below (considering minimum vectoring altitude). At Innsbruck, the glidepath angle is steeper so the respective altitude is higher. There is a small tolerance but when an aircraft is unable to intercept the approach, it will continue past the final approach track and you will have to vector it again. If it intercepts, it will start the required descent automatically. Aircraft will reduce their speed to 220 knots when cleared for approach and less than 15 miles from the threshold unless they have been cleared slower before. IMPORTANT: Do not try to align the aircraft with the extended centerline using headings and then clear it for approach. It may continue to fly parallel (even if very close to the centerline) and never intercept. Always have a target intercept the localizer at an angle of 30 to 45 degrees. Tower: You can hand off an aircraft to the tower when it is less than 9 miles from the threshold, approach clearance has been given and it has successfully intercepted the approach (signified by the target’s color changing to yellow). After transfer to tower, the aircraft cannot be controlled anymore. When it is less than 5 miles from the airport it will disappear from the radar screen or (with a small probability) start the missed approach and climb straight ahead to 6000 feet. It will transmit an according message to let you know. You can then take control over it again for a new approach vectoring. At Innsbruck, missed approach traffic will turn to a heading of 060 at 3000 feet and then turn to RTT waypoint at 9500 RadarContact User Manual Page 19 ©Max Hirn 2015 feet. It will change its color to magenta as a reminder. Make sure to only assign a new heading when the aircraft is above the respective minimum altitude. Minimum Altitude: Aircraft have to all times with only one exception: For all other cases, if the target minus 400 feet, you will receive a ends. be above the minimum sector altitude at after intercepting the approach path. descends to less than minimum altitude “game over“ message and the session Screen Boundaries: When an aircraft reaches the edge of the screen, it will disappear and 10 points will be deducted from your score. Direct-To: If you clear an aircraft to proceed direct to a waypoint it will do so until over it, when it will enter the corresponding hold. All holdings have an inbound course of 270 degrees and right turns. For simplicity, targets will only use either a direct or a parallel entry depending on their heading when entering the hold. The aircraft will remain in the hold until you issue a new clearance. Aircraft will automatically reduce their speed to 220 knots when approaching a holding pattern. Aircraft cleared to a numbered transition waypoint will be implicitly cleared for the subsequent transition. Emergencies: An emergency target will change its color to red to easily recognise it. You have to bring such aircraft to a landing within the time indicated or it will be lost and you will be relieved from your shift. The probability that an aircraft experiences an emergency is 0.5 percent. XIV SCORE TRANSFER You can transfer your total score if you upgrade from the free trial to the full version. After transferring your score, your rank will be imported into the full version. Furthermore, all airports requiring fewer points than your transferred score will be unlocked. The score can be synchronized as follows: Press the button SCORE TRANSFER at the bottom of the in-game help screen. In the trial version, you will be presented with a numerical code. Please write it down. In the full version, press the same button. You will be asked for the code. If it is entered correctly, your score will be updated and you will receive a success message. If you get an error message, please check the code again. You can also repeat the process to get a different code. If the error persists, please contact support with the faulty code and your score. IMPORTANT: The app has to be restarted afterwards for the changes to come into effect. RadarContact User Manual Page 20 ©Max Hirn 2015 XV RNAV TRANSITIONS At Ragged Peak airport, so called RNAV (Area Navigation) Transitions can be found. Such transitions are series of waypoints defined by coordinates. These waypoints can be navigated to by the use of RNAV equipment, where the aircraft position is determined by GPS or inertial navigation systems or both. Fig. 12 – RNAV Transition Transitions allow an air traffic controller to assign a predefined arrival route to an aircraft which is then followed without further lateral clearances. Furthermore and equally important, they are used to establish an arrival sequence and ensure separation by the assignment of shortcuts. To get one aircraft ahead of each other, it can be issued a direct clearance to one of the downstream waypoints whereas the other aircraft continues the full transition. In addition to speed assignments, a transition can therefore be an efficient means of traffic control. A transition is shown on the radar screen by its waypoints and lines connecting them (making up the route to be flown) in pink color. Each transition has an initial waypoint from which it has its name. For example, the transition starting at EAGLE point is called EAGLE Transition. The initial waypoints are shown in white but can be recognised as belonging to a transition by a pink line leading to the next waypoint. The transition waypoint names begin with RP60 and end with a single digit number. If you clear an aircraft to a transition start waypoint (the ones with “normal“ names shown in white), you will be asked whether you want to clear the target for the respective transition. If you choose yes, it will follow the route shown in pink until reaching the last waypoint (found on the extended centerline). You should clear the aircraft for a heading before this last waypoint. Otherwise, it will continue its present heading. Approach clearance can only be given as usual with the aircraft being on an intercept heading. If you choose no, the target will enter the hold at the RadarContact User Manual Page 21 ©Max Hirn 2015 waypoint. You can also clear aircraft direct to a downstream transition waypoint. To do this, open the direct-to menu as usual. At Ragged Peak and Munich, you will see the usual waypoints at the top of the menu and a numerical keypad below. To clear a target to a numbered transition waypoint, simply press the waypoint number. The “Previous Clearance“ field will then show the waypoint name followed by “/T“ (e.g. DCT: RP608/T to indicate the transition clearance). For example, if you want a target to fly directly to RP608, just press 8. If you clear to a numbered transition waypoint, a clearance to follow the subsequent transition will be implicitly given as no holding pattern is associated with these waypoints. Fig. 13 – RNAV Transition Menu Aircraft cleared for a transition will keep their speed until inbound a sharp turn waypoint (the ones with a 90 degree turn following) or the last waypoint, when they will reduce to 220 knots if they have not been issued a lower speed before. XVI VERTICAL SITUATION DISPLAY By touching the label VERT/S DSP on menu bar page 2, a three-dimensional display of all traffic is opened. On the left side, a legend shows the different altitudes in feet. Aircraft are shown as small blue or green (departures) rectangles. Lines extend from them to indicate various data. In the upper left corner, the display can be customized. By touching PROJECTION, a pink line is drawn from all aircraft to the point in space where they will have reached their cleared altitude based on present vertical speed and track. This line can therefore only be shown for targets that are climbing or descending. By selecting ALTITUDE, a blue line is drawn from all aircraft symbols to the altitude grid in front to show their present altitude. Touching POSITION shows a green line extending from the aircraft symbol to the ground, indicating the 2-dimensional position in relation to the radar screen. RadarContact User Manual Page 22 ©Max Hirn 2015 At the moment, the vertical situation display is for information purposes only but may be extended in functionality at a later time. Fig. 14 – Vertical Situation Display XVII SAVE & LOAD GAMES Sessions can be saved and continued at a later time, even after app shutdown. At the moment, only one game can be stored. After returning to the main menu or when directly exiting the game, a dialog will appear asking you whether the game should be saved. If you choose yes, all present session data is stored. You can continue this game from the main menu by choosing “Resume” at the bottom of the screen. The last saved game will be opened. All settings from the main menu (traffic rates, weather etc.) will be ignored except for sound and loaded from the saved game. Sound settings will always be taken from the main menu. If the session is terminated due to a game-over situation (loss of separation, aircraft below minimum altitude etc.), it cannot be saved. IMPORTANT NOTE: Your total score will only be updated after ending a shift without saving. If you save a game, it is expected that you continue it at a later time and therefore your total score will not be updated right away, but only when you really end the session (exit without saving). When a previously saved game is loaded, continued and then ended without saving, it cannot be loaded anymore to prevent the score from the same session being awarded multiple times. RadarContact User Manual Page 23 ©Max Hirn 2015