1
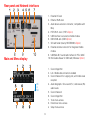
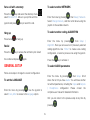
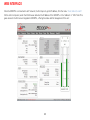
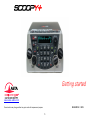
SCOOPY+
Getting started
www.aeta-audio.com
Characteristics may change without any prior notice for improvement purpose
55 000 073-C © 2015
1
Front panel and controls
1
2
3
4
5
6
7
1.
2.
3.
4.
5.
6.
7.
8.
9.
8
9
15
10
16
17
11
18
12
19
13
20
10.
11.
12.
13.
14
21
14.
15.
16.
17.
18.
19.
20.
21.
2
Hang up key: Press the Red phone key to release a
connection
Mic button 3 : To enable/disable microphone input 3
Esc / Power key : Hold it for 3 seconds to start the
ScoopFone Power On/Off and Esc key
OLED display
OK / Menu key : Menu access and validation
Joystick : Menu navigation & Validation
Call key: Use the Green phone key to initiate a call
Headphone 1: Handles the level with the center
knob, handle the balance between send and receive
signal with the external ring
Level control: This potentiometer controls
microphone level 1
Mic button 1 : To enable/disable microphone input 1
Alpha numeric keypad
Mic button 2: To enable/disable microphone input 2
Level control: This potentiometer controls
microphone level 2
Headphone 2: Handles the level with the center
knob, handle the balance between send and receive
signal with the external ring
Function key F1: Marker or Relay
Audio player : Fast Review
Audio player : Play a recording
Audio player : Play and record stop
Record key : Start a new recording
Audio player : Fast Forward
Function key F2 : Marker or Relay
Rear panel and Network interfaces
8
9
Main and Menu display
1. External DC Jack
2. Ethernet RJ45 Jack
3. Audio device extension connector, compatible with
Mixy
4. POTS RJ11 Jack ( POTS Option)
5. USB interface to an external mobile module
6. ISDN RJ45 Jack ( ISDN Option )
7. SD card holder (Use by RECORDING Option)
8. External antenna connector for integrated mobile
module
9. USB (Mini-B) : Sound card interface for PC or MAC
10. Removable drawer for SIM card ( Wireless Option )
10
1. Current Algorithm
2. Link : Mobile data connection enabled
3. Current Network for outgoing call, with mobile level
reception
4. Audio bargraphs : Show send (Tx ) and receive (Rx)
audio levels
5. Current Network
6. Current Algorithm
7. Tools menu access
8. Directories menu access
9. Setup menu access
OK
or
Esc
3
INTRODUCTION
External power supply
We advise you to read this quick guide to start using the
Scoopy+ in a very short time. For more detailed
information on each step, do not hesitate to consult the
full user manual on our web site:
You can use an external power DC. Scoopy+ needs 12V
DC but is able to work with a voltage from 8 to 15V / 2A
minimum.
The external DC supply is also used to charge the
batteries. Only NiMH batteries are supported by the
internal charger.
www.aeta-audio.com
Antenna (Wireless option)
In this guide, we assume most of the main basics are
known and that you already have a microphone and a
headphone connected.
The Scoopy+ has an optimal internal antenna. In place of
the internal antenna, Scoopy+ can use an external
antenna connected on the rear panel [8].
SETTING UP
SIM card (Wireless option)
To establish a mobile communication, you should have a
SIM card from a telecom operator. Scoopy+ supports a
standard size SIM; use a card adaptor to support a micro
SIM Card (Contact your dealer for more details).
Powering
Before switching on the Scoopy+, you need to have 6
C/LR14 batteries inserted in the bottom compartment,
and/or an external DC power connected on the DC jack.
Switch OFF the unit to insert the SIM card in
the unit.
Battery
Scoopy+ works with non rechargeable or
NiMH batteries.
Remove the drawer [7] by pushing its small button,
insert the SIM card inside and put it in place.
Six 4500mAh NiMH batteries provide
autonomy for more than 4 hours.
Info: For a new SIM card, use a mobile phone to activate
your prepaid SIM card; to avoid undesired tones, disable
waiting call tone.
4
Adjust your microphone(s) level
SET A CALL
Turn ON the mute LED indicator with the mute key, i.e.
The Scoopy+ should have been configured before this
step. If it isn’t the case, go to network configuration
chapter:
Ethernet, page 7
ISDN, page 8
POTS, page 8
Mobile, page 8
for microphone 1
Set the Level control ([9] for mic. 1) on middle position,
white dot of the button in topmost position.
Make a test with your microphone.
If the level is too high or too low on the display, adjust
the gain trough the menu Setup / Audio / inputs / Input x
Settings / Gain until you get the right level.
Switching Scoopy+ on/off
Set a call
To switch Scoopy+ on, press
3 seconds.
Press the same key 3 seconds to switch off.
Enter directly from the main screen the number or
address of the destination, using the digital keypad.
Step for wired network
Connect the Scoopy+ to the wall socket through the
right network interface (page 3): Ethernet [2], POTS [4]
or ISDN [6].
Press the 0 key twice to have the international +
symbol.
Press # to switch the keyboard mode between abc,
ABC, 123 (Choice indicated on top right of the display).
Step for mobile network
Push joystick to the LEFT to erase the last digit.
Set up the unit by pressing
/ Setup / Network /
Mobile Parameters / PIN. Enter the PIN code for the
SIM card using the keypad if necessary.
Press the
5
key to launch the call.
Set a call with a memory
Press the
key and select the directory menu
select Remote Prof. Move to your profile with the
joystick and press
To select another NETWORK
,
Enter the menu by pressing
, then Setup / Network.
Select Change Network, and then scroll down using the
joystick to the suitable network.
key to launch the call.
To select another coding ALGORITHM
Hang up
Press twice
to hang up.
Enter the menu by pressing
, then Setup /
Algorithm. Here you can see a list of previously selected
coding algorithms. Use “Other” to create a new coding
configuration, or select a previous one using the joystick.
Redial
Press the
key to access the call history list. Select
the number and press
again.
Press the
GENERAL SETUP
key to activate it.
To select AUDIO parameters
Follow next steps to change the current configuration.
Enter the menu by pressing
, then Setup. Scroll
down the list till you have Audio. You will have another
list with all parameters, including the Inputs and Outputs
/ Headphones configuration. Please consult the
complete user manual for detailed information.
To set the LANGUAGE
Enter the menu by pressing
. Use the joystick to
select Tools, Misc to access to the language option.
Info: you can return to the previous step at any time by
pressing
6
.
How to reset your unit
Change audio quality
In case of trouble, you can reset your current
configuration through menu Tools / Misc / General Reset
/ Reset settings or Factory Reset. With factory reset, all
configurations will be deleted.
To select the coding algorithms: enter in the menu Setup
/ Algorithm / Other then choose your algorithm according
to the network quality and rate.
Note: In case you want to use a SIP proxy server,
please consult the complete and detailed user manual
for SCOOPY+ as you will have to enter other mandatory
information (in the AOIP parameters menu!).
INFO: Your Scoopy+ can receive any incoming
call as soon as it is powered on. Scoopy+ will switch
automatically to the suitable network on an incoming
call.
On the public IP network, or if you don’t use a
SIP server, we highly recommend to use a
STUN server.
ETHERNET IP NETWORK
IMPORTANT
Connect your SCOOPY+ to the Ethernet network via the
Ethernet port.
Set up the unit in IP mode over Ethernet: enter in the
menu Setup / Network / Change Network / Ethernet.
You can check if the Ethernet connection is active if you
can see a light on the RJ 45 connector and if the IP
address is clearly identified. To find the IP address of
your unit on the network, enter the menu / Tools / About
/ Local IP.
Enter the menu by pressing
, then Setup /
Network / AoIP Parameters / STUN Server.
Enter an IP address, for example
stun.aeta-audio.com
by using the front panel keyboard, then press
.
Come back to STUN Mode in the menu and
select On.
7
ISDN NETWORK
MOBILE NETWORK
Connect your unit on the ISDN network, set your unit to
ISDN through Setup / Network / Change Network /
ISDN.
Note: A SIM Card should have been inserted in the
drawer located on the rear panel of Scoopy+
To choose the protocol depending of local country,
please enter the menu ISDN Parameters / Protocol.
Set up the unit by pressing
/ Setup / Network /
Mobile Parameters / PIN. Enter the PIN code for the
SIM card using the keypad if necessary.
To select the coding algorithms: enter in the menu Setup
/ Algorithm / Other then choose your algorithm according
to the network quality and rate.
Data Mode (Broadcast quality)
POTS NETWORK
On the public IP network, or if you don’t use a
SIP server, we highly recommend to use a STUN server.
See grey box on page 7.
Connect your unit to the network via the RJ11connector.
To set up your unit in POTS mode: Setup / Network /
Change Network / POTS.
In the menu Mobile Parameters, select Mode / IP
Mode. Then come back to menu Preferred
Technologies / Auto.
When this is done you can select ‘’encoded’’ (CELP)
mode or Hybrid mode. The encoded mode is compatible
only with AETA POTS codec. The Hybrid mode is
compatible with standard phones.
Then in the menu select Access Point / APN: enter
the APN code for your operator using the keypad,
Adjust the needed parameters (Line level, DTMF, etc.):
see the detailed user manual).
press
8
To select the coding algorithms: enter in the menu Setup
/ Algorithm / Other then choose your algorithm according
to the network quality and rate.
To get HD Voice over mobile (7 KHz bandwidth)
To get a HD Voice connection, some conditions are
required:
Cellphone mode (internal mobile only)
- Both devices in the connection must support HD voice
- Support of HD voice by your mobile operator’s
network
- Very often, only the 3G network supports HD voice.
This depends on the country or area, and the operator.
Set up the unit by pressing / Setup / Network / Mobile
Parameters / PIN. If necessary, enter the PIN code for
the SIM card using the keypad.
In the menu Mobile Parameters, select Mode /
Cellphone.
For this last reason, having a connection on 3G can be a
condition to get HD Voice. In this case, the 3G is a useful
indication that HD Voice is possible.
Come back on Preferred Technologies to set it to
Auto.
In addition, it is possible to force the operation on 3G
mode: / Setup / Network / Mobile Parameters /
Preferred Technologies / Only 3G.
The menu Network Operator enables you to choose
among the available network operators if this is
allowed with your mobile subscription.
INMARSAT BGAN NETWORK (Option)
See the user manual.
9
Also, you enable the coordination return on each
headphone by menu Setup / Audio / Outputs
Headphones / Headphone x.
COORDINATION CHANNEL
- This feature is available only with internal
wireless option.
- You don’t need to set the Mobile Service to
the cell phone mode for having a coordination
line.
- The coordination line is available at all time,
except if you have established a stereo
connection.
- The coordination channel can’t be used if
you already have a cell phone connection as
main channel.
Set a call
To set a call, select / Menu / Setup / Coordination, enter
the phone number to call and press
Set up the unit by pressing / Setup / Network / Mobile
Parameters / PIN. Enter the PIN code for the SIM
card using the keypad if necessary.
Set the audio interface for coordination
The coordination channel can be enabled through Setup /
Audio / Routing for mono. You can choose between two
modes: PGM& Coordination (default) and PGM &
Coordination (auto). In automatic mode, the coordination
line is monitored only when a connection is established.
You can specify which microphone is used for the
coordination channel through the menu Setup / Audio /
Inputs / Input x Settings / Audio routing with
coordination option.
10
RECORDING (optional)
Make a take (Extract a part of a recording)
Recordings are saved on the SD Card mounted in the
rear panel holster [7].
During playback, press
Recording
press
to mark the end cue. Press
to save your
selection into a new Take.
You can transform your Take into a recording file. From
Press twice
to start a new recording. To pause the
recording, simply press the
again, the recording resumes.
the menu
/ Takes, select the take,
Export from the popup menu.
key. By pressing it
and select
Send a file to the studio
Recording stops by pressing the
button. A new
recording file is added to the list with a new index.
Enter in the menu, select
and Records. Make
on the file and select Send from the popup menu to
transfer it through an IP connection (Mobile or Ethernet).
Play back
Press
to mark the beginning and
key, select a file with the joystick. Press
Note for mobile transfers:
If it isn’t the case, set Mobile Service to IP mode and
activate the data connection through menu / Setup /
Network / Mobile parameters / data active. On the
display, an icon shows the data connection (See page 2,
[2]).
again to listen to it or
to access a popup menu.
You can play it back also during a live transmission.
Note: The FTP server should be configured beforehand
in the menu /Tools / Misc / FTP Parameters
11
CONTACTS / RELAYS
You can transmit 2 “contact” states along with the audio
program during an established link. These contacts can
e.g. control relays or lamps on the remote side.
Conversely, 2 “relay” states can be received from the
remote side.
Note: to be effective, this feature should be enabled on
both sides. Some algorithms don’t support it with ISDN.
Enter the menu by pressing
Functions / Relays to ON.
, set Tools / Misc / Aux.
During the connection, with
and
you can
toggle the contact states sent to the remote side. A popup window shows their resulting state. You can recall it
from the main window by pushing the joystick to the
right.
The Info 1 and 2 LEDs show you the state of the
received “relay” states.
These states can actually close relay contacts if you use
the relay extension accessory.
12
WEB INTERFACE
Once the SCOOPY+ is connected on an IP network, the first step is to get its IP address, from the menu: Tools / About / Local IP.
On the control computer, launch the html browser and enter the IP address of the SCOOPY+ in the “address” or “URL” field. This
gives access to the html server integrated in SCOOPY+, offering the status and full management of the unit:
13
ACCESSORIES
NOTE
_____________________________________________
_____________________________________________
_____________________________________________
_____________________________________________
_____________________________________________
_____________________________________________
_____________________________________________
_____________________________________________
_____________________________________________
_____________________________________________
_____________________________________________
_____________________________________________
_____________________________________________
_____________________________________________
_____________________________________________
_____________________________________________
_____________________________________________
_____________________________________________
_____________________________________________
_____________________________________________
_____________________________________________
_____________________________________________
Carrying bag
Car adapter cable
Spare AC/DC adapter
External multiband
antenna
Audio extension: MIXY
Relay extension
14
AUDIO SYNOPTIC
x3
P12v/48v
T12
Off
Mic/Line
Input
Gain
0/16/32/48dB HPF
50Hz
Gain
-20dB
x2
Mute
Tx
Send
Gain
Routing
Balance
Line
Output
x2
Receive
Level on display
6.35mm
Volume
Rx
* : PAD available only on input 3
15
Network
PAD*
Limiter
Routing
Level on display
Mic
power
HOT LINES FOR AETA CODEC TESTS
ISDN: +33 1 41 36 12 68
POTS: +33 1 41 36 12 75
IP: [email protected]
APN Codes (mandatory for wireless IP data)
_____________________________________
_____________________________________
_____________________________________
Your own numbers
_____________________________________
_____________________________________
_____________________________________
_____________________________________
_____________________________________
AETA AUDIO SYSTEMS S.A.S.
IMMEUBLE KEPLER 4 - PARC TECHNOLOGIQUE
18/22 AV. EDOUARD HERRIOT
92350 LE PLESSIS-ROBINSON - FRANCE
TEL. : + 33 141 361 200
FAX : + 33 141 361 269
www.aeta-audio.com
16