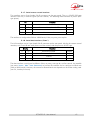
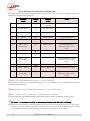
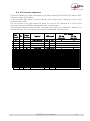
1
Stereo audio codec for real time audio transmission User Manual Table of contents 1. Presentation – Getting started ................................................................ 1 1.1. Install and connect SCOOP 5 IP................................................................................. 3 1.2. Audio settings ........................................................................................................... 3 1.3. Select and set up network to be used........................................................................... 3 2. Functions ............................................................................................ 5 2.1. Transmission interfaces .............................................................................................. 6 2.2. Audio encoding and decoding ................................................................................... 9 2.3. Audio interfaces ...................................................................................................... 12 2.4. Auxiliary functions ................................................................................................... 13 2.5. Supervision and control interface .............................................................................. 15 3. Operation .......................................................................................... 17 3.1. General principles – Control means .......................................................................... 17 3.2. Physical description of the equipment ........................................................................ 18 3.3. Installation and set up ............................................................................................. 22 3.4. Initial setup of the Ethernet interface .......................................................................... 24 3.5. Managing links ....................................................................................................... 27 3.6. First level maintenance ............................................................................................ 31 4. Detailed operating mode – Embedded HTML pages ................................. 34 4.1. Equipment start-up .................................................................................................. 34 4.2. Accessing the SCOOP 5 IP html pages...................................................................... 35 4.3. Principles of operation with html pages ...................................................................... 36 4.4. Detailed presentation of the html pages ..................................................................... 37 4.5. Setting up an IP link ................................................................................................ 54 4.6. Setting up a link over a leased line ............................................................................ 57 4.7. Management of the configuration profiles .................................................................. 58 4.8. Clearing all settings ................................................................................................ 58 5. Technical characteristics ..................................................................... 59 5.1. Characteristics of interfaces...................................................................................... 59 5.2. Audio performance ................................................................................................. 67 5.3. Network protocols and ports .................................................................................... 69 5.4. Power supply .......................................................................................................... 70 5.5. Dimensions and weight............................................................................................ 70 5.6. Environmental characteristics.................................................................................... 70 5.7. Options ................................................................................................................. 70 5.8. Accessories and related products .............................................................................. 70 6. Annexes ............................................................................................ 71 6.1. Additional information on the algorithms and protocols used ....................................... 71 6.2. Overview of the SIP protocol .................................................................................... 72 SCOOP 5 IP - User Manual 6.3. Some methods to deal with NAT routers and firewalls .................................................. 74 6.4. V35 interface adaptation .......................................................................................... 79 6.5. Notice regarding open source code .......................................................................... 80 7. Index ................................................................................................ 81 SCOOP 5 IP - User Manual 1. Presentation – Getting started The SCOOP 5 IP codec allows the bi-directional transmission of one or two audio signals with bit rate reduction, over digital leased lines or IP protocol networks. The codec includes an Ethernet interface for IP transmission, and X24/X21 interfaces for transmission over digital leased lines. The unit can be complemented with options providing additional coding algorithms, or a DC power input... In IP mode, the codec features easy operation thanks to the use of the SIP and SDP protocols. This chapter gives basic instructions for a quick start. It obviously does not provide all the information for full control. For comprehensive information one can refer to the rest of this manual: Chapter 2 describes all the functions and features of the SCOOP 5 IP (but not necessarily with all the operating modes) Chapter 3 gives a physical description of the unit, shows its setting up and operation principles. Chapter 4 details the html server embedded in SCOOP 5 IP and detailed operating modes. Chapter 5 provides all the technical characteristics of the SCOOP 5 IP The annexes bring miscellaneous additional information, including an index you can use to look for a given information topic. The following table shows the main features of the product. Functions marked with in this table are available as options. SCOOP 5 IP - User Manual 1 Characteristics Optional Operation modes Single wide band codec, mono or stereo/2 channel IP transmission interface Ethernet Interface, 10BaseT / 100BaseT; TCP/IP, UDP/IP, RTP protocols Audio transmission in unicast mode: SIP signalling protocol, SDP, RTP streaming Audio transmission in multicast mode: RTP streaming Net bit rate 16 to 256 kbit/s (depending on coding algorithm) Leased line transmission interfaces Two X24/X21/V11/V35 interfaces; 64, 128, 192, 256 or 384 kbit/s over one interface (selectable) Audio coding algorithms (audio modes) G711 (standard telephone) G722 SRT, H221 CELP 7 kHz MPEG Audio Layer II MPEG AAC-LC , HE-AAC, HE-AAC v2 4 sub-band ADPCM (low latency) Mono Mono Mono Mono, Stereo, Double mono, Joint stereo Mono, Stereo Mono, Stereo Audio interfaces Two analog inputs and two analog outputs with adjustable gain Digital input and output, AES/EBU format Level display for encoder inputs and ecoder outputs Auxiliary functions (available depending on transmission interface) Relay transmission: 2 isolated inputs and 2 isolated outputs, 6 non isolated inputs and outputs Data channel with RS232 serial port, 300 to 9600 bauds Audio coordination channel (bandwidth 300-3400 Hz) Control and supervision Status LEDs on front panel Embedded html server Programmable set-up/dial memories Ethernet/IP remote control Remote control serial port Isolated control and status loops Secondary Ethernet interface for remote control Table 1 – Main features of the SCOOP 5 IP 2 SCOOP 5 IP - User Manual 1.1. Install and connect SCOOP 5 IP Plug on a power source: the SCOOP 5 IP automatically starts up. To put it on stand-by or restart it, press the key (top left corner on the front panel) for at least 3 seconds. Connect the necessary audio interfaces (details: page 19) From a computer with network access and capable to communicate with the SCOOP 5 IP, open a web browser and enter the IP address of the SCOOP 5 IP to access its embedded html pages. To change the language if desired, click the appropriate flag on the top right corner! For entering pages other than the home page (which is open access), you must enter the login password. In the “factory setting”, it is blank. Connect SCOOP 5 IP on the transmission network (details: page 19 and following) Connect SCOOP 5 IP to the local Ethernet/IP network (if not already done) and pick its IP address (details in page 24, Initial setup of the Ethernet interface). 1.2. Audio settings With factory settings, the active inputs are the analog ones, and clipping level is set at +16 dBu for both inputs and outputs. In the SCOOP 5 IP html pages, go to the “Audio” tab and configure the interfaces as required for the installation. 1.3. Select and set up network to be used Select network: “NETWORK” tab, then select page “CHANGE NETWORK”. In the proposed choice, select the desired network (Ethernet, LL). Click “Save” to perform the possible change. Select the audio coding: “CODING” tab, make settings and click “Save”. The available choice depends on the transmission network, LL or IP! For more details on coding, see page 9. SCOOP 5 IP - User Manual 3 1.3.1. Set up an IP link Over a public IP network, and especially when no SIP server is used, it is highly recommended to use a STUN server. The address of a STUN server can be set in the html page “AOIP PARAMETER”, via the “NETWORK” tab. In the “STUN Server” field, enter the address of a STUN server (we propose our server stun.aeta-audio.com, look also the support pages on our web site www.aeta-audio.com). Enable or disable STUN with the “STUN Mode” checkbox. More details: see page 75. Go to the “CONNECTIONS” tab. Hang up/release the link using this same button (it becomes “Release” while the link is established). When using a SIP server, some data must be entered beforehand using the “AOIP PARAMETER” page; for more details, refer to page 44. In the “Connection State” area, “Remote Number” field , enter the remote number to call (numeric IP address, or SIP URI if a SIP server is used), then click the “Dial” button. 1.3.2. Set up a leased line (LL) No connection procedure is involved with such link, as it is automatically set (or reset) as soon as the needed connections are done and the settings are correct on both sides of the link. See in this manual on page 45 for configuration details. 4 SCOOP 5 IP - User Manual 2. Functions The following synoptic diagram shows the basic functions of the equipment. Figure 1 – Functional diagram of the equipment The audio signals to be transmitted are converted (when needed) to digital format, then the encoding function reduces the bit rate, using a selectable algorithm; the resulting bit flow is sent to one of the available transmission interfaces: Ethernet interface, permanent link data interfaces (X21/X24/V35)... The transmission interface functional block also extracts compressed data coming from the network and sends them to a decoding block that reproduces uncompressed audio data. Last, the audio signals are output to both digital and analogue outputs. In addition to the main task of transmitting an audio programme, the SCOOP 5 IP can also transmit auxiliary information, usually by embedding them inside the transmitted audio streams. Supervision and controlling the unit is performed using various remote control interfaces. SCOOP 5 IP - User Manual 5 2.1. Transmission interfaces The SCOOP 5 IP features an Ethernet interface for IP protocol networks, and leased line transmission interfaces (X24/V11). 2.1.1. Ethernet/IP interface The IP interface is a 10BaseT/100BaseT Ethernet interface allowing transmission of the audio programmes in a wide range of possible bit rates. The audio stream is always transported under the RTP/UDP protocol. IP unicast mode The most classical transmission mode is unicast: audio connection with one distant device, generally bidirectional. This mode can be used on all types of networks links, LAN or WAN, including links via Internet. The SCOOP 5 IP implements the SIP protocol, which allows it to interoperate with IP phones and other SIP compatible audio codecs, in a way similar to ISDN or POTS connections. Links can be set up in two ways: “Peer to peer” connection between two compatible units Use of a SIP proxy server to set up the link, or a SIP PBX Details about the SIP protocols can be found in the annex (see 6.2, Overview of the SIP protocol). The audio coding algorithm can be selected depending on the required quality and the available network bandwidth. The following algorithms are currently available: Codec Bit rate (coding) Bit rate (total)1 Audio bandwidth Typical use, main features G711 64 kbit/s 86 kbit/s 3 kHz Voice, telephony Compatible with IP phones CELP 24 kbit/s 28,5 kbit/s 7 kHz Suitable for high quality speech; Low network bandwidth consumption G722 64 kbit/s 86 kbit/s 7 kHz High quality speech. Compatible with some IP phones. MPEG Layer II 64 to 256 kbit/s 73 to 275 kbit/s Up to 20 kHz Highest quality, suitable for speech and music MPEG AAC-LC 16 to 256 kbit/s 30 to 277 kbit/s Up to 20 kHz Low bit rate, suitable for speech and music MPEG HE-AAC and HE-AAC v2 16 to 128 kbit/s 23 to 139 kbit/s Up to 20 kHz Very low bit rate, suitable for speech and music 4SB ADPCM 128 or 256 kbit/s 173 or 301 kbit/s 15 kHz Low latency, suitable for speech and music Table 2 – Overview of algorithms available in IP mode 1 Informative value; higher than the “net” encoded audio bit rate because of the protocol overhead 6 SCOOP 5 IP - User Manual IP multicast mode The multicast mode allows an encoder device to transmit an audio programme to several decoders by sending a single encoded stream to a multicast group address. The link is unidirectional by nature. This mode can be used on a local area network, and on larger private networks that can manage the multicast mode. On the other hand, Internet cannot support this routing mode. In this mode, the SCOOP 5 IP uses the RTP protocol to manage the audio stream, like in the unicast mode, but the SIP protocol is not applicable here; instead a proprietary signalling system is used. As the link is unidirectional, the unit has to be set either as a “sender” in order to encode and transmit the audio stream to the selected group address, or as a “receiver” to receive and decode such stream coming from a “sender” device. The audio coding algorithm can be selected with just the same capability as for the unicast mode described above. SIP and SDP protocols The SIP protocol is a signalling protocol, used for IP connections, which allows the SCOOP 5 IP to interoperate with IP phones and other SIP compatible audio codecs, in a way similar to ISDN or POTS connections. Details about the SIP protocols can be found in the annex (refer to 6.2, Overview of the SIP protocol). One significant advantage is the inclusion of SDP, a protocol which allows the connecting devices to automatically negotiate and agree on the coding profile to use. Thanks to this system, it is not necessary to set the units in the same way before setting up a connection. Moreover, the calling party needs not know how the remote unit is configured before initiating a link. Note: the SIP protocol does not mandatorily imply the use of a server. Codecs can set up point-topoint links using this protocol, and benefit from some its advantages. Packet replication SCOOP 5 IP also proposes an RTP transmission mode with enhanced reliability, using packet replication. When enabling this mode, every packet is transmitted twice; with such system a lost packet has no effect since the receiver still gets the other copy of the packet. In this way, stable links can be obtained even with a high packet loss rate. Of course, as a disadvantage the bit rate is double; you must make sure this stays compatible with the transmission medium. Remote control via IP In addition, the Ethernet interface can be used for configuring or remote controlling the unit, with two control methods: SCOOP 5 IP provides html pages which allow to get complete control over the unit using a web browser, via port 80 (default port for http protocol). See in chapter 4 the detailed operating mode. TCP port 6000 can be used for “command line” control, suitable for codec supervision software such as Codec Live, MDC.net, etc. SCOOP 5 IP - User Manual 7 2.1.2. Leased line interfaces For transmission over leased lines, the codec includes two X24/V11 ports which can run at 64 kbit/s, 128 kbit/s, 192 kbit/s, 256 kbit/s and 384 kbit/s bit rates. Only one X24/V11 port is used, selectable among the two physical interfaces. The other, however, send the same data as the active one, and it can be used e.g. for a redundant link. For “leased line” transmission, the codec synchronises on the network clock provided by the X24/V11 interface. If no suitable clock is present, the system folds back to an internal clock. 2.1.3. Managing calls One of the transmission interfaces is selected as the default interface on the SCOOP 5 IP. If this is the LL interface (leased line), this is a permanent connection. Otherwise, for the Ethernet/IP interface, the audio transmission implies a link/session setup phase. Either the link is initiated by the unit itself, or rather the operator of the SCOOP 5 IP: call to a remote destination. Or the link results from a request from a remote unit. Such call can be received and processed as long as the Ethernet interface is connected and is the default interface. 2.1.4. Securing a link with a backup connection When a fixed link (LL) is used, it is possible to use another network access in order to set a temporary backup link in case the nominal LL link fails. The unit will then switch to a backup mode (IP), and provide the audio transmission via the backup network access. More precisely, on one end of the link the codec will switch to the backup mode and “call” its counterpart via the IP network. On the other end the unit will switch to the backup mode when it receives the call on its IP interface. The operating mode and configuration for this backup feature are detailed further in following sections (3.5.4, Setting up a backup link). 8 SCOOP 5 IP - User Manual 2.2. Audio encoding and decoding SCOOP 5 IP features a wide range of coding algorithms. Their availability depends on the transmisison network used. Besides, the MPEG family algorithms feature a large configuration flexibility. The table below synthetically describes the capabilities with the various transmission media: Codec G 711 CE LP G 722 G722-H221 4SB ADP CM 4SB ADP CM MP E G L2 MP E G L2 MP E G L2 MP E G L2 MP E G L2 AAC- LC AAC- LC AAC- LC AAC- LC AAC- LC AAC- LC HE - AAC HE - AAC HE - AAC HE - AAC HE - AAC v 2 HE - AAC v 2 F requency ( kHz) Audio channels 16 24 32 48 Mono Mono Mono Mono Mono Stéréo M / S M / S M / S Stereo Stereo M / S M / S M / S M / S M / S Stereo M / S M / S Stereo Stereo Stereo Stereo Bit rate ( kbit/s) 64 24 64 64 128 256 64 128 192 256 384 16 56 64 96 128 192 256 16 56 64 96 128 16 56 64 N etwork LL E thernet P ossible audio bandwidth: 3 kHz 7 kHz 15 kHz 20 kHz Table 3 – Available coding depending on network The following chapters bring some precisions about the important features of the various algorithms and protocols available. SCOOP 5 IP - User Manual 9 2.2.1. G711 coding Application: telephony, coordination. Low latency. G711 is the standard coding used for voice transmission on public telephone networks, and features 300 to 3400 Hz audio bandwidth. This algorithm is typically used for links over IP networks with IP telephones or VoIP gateways. Via ISDN, G711 is used for links with telephones or hybrid devices. G711 is available only for IP transmission 2.2.2. CELP coding Application: commentaries, coordination. Low capacity transmission channels This algorithm operates in mono for a net nominal bit rate of 24 kbit/s, and provides 7 kHz bandwidth and a quality close to G722 for a much lower bit rate. CELP is available only for IP transmission 2.2.3. G722 coding Application: commentaries, coordination. Low latency. This mono coding algorithm at a 64 kbit/s bit rate is a reference for commentaries, and features a 50-7000 Hz bandwidth. It is available for LL or IP networks. For leased lines, three synchronisation modes are possible: “Statistical recovery” byte synchronisation method (alias SRT); H221 synchronisation; in this case, 1.6 kbit/s from the compressed data are used for this; H221 synchronisation is highly recommended when possible, as it features higher reliability and faster recovery time, while degradation (because of the bit rate used for framing) is minimal. No specific synchronisation is required for the IP mode. 2.2.4. 4SB ADPCM coding Application: commentaries, mono or stereo music. Low latency. 4SB ADPCM operates either in mono at a 128 kbit/s rate, or in stereo at 256 kbit/s, for a 15 kHz bandwidth. It features a very low latency which makes it very interesting for live duplex transmission. It also has the advantage to be very little sensitive to tandem coding. 4SB ADPCM is available for LL or IP. However it is not recommended for low quality IP networks, because it requires a high bit rate and it is highly sensitive to packet losses. 10 SCOOP 5 IP - User Manual 2.2.5. MPEG Audio Layer 2 coding Application: mono or stereo music, high quality. As shown on Table 3, this coding algorithm features a maximum flexibility, with many variations for bit rate, mono or stereo channel mode, sampling rates... The two channel modes exist in three variations: Stereo: coding of each channel stays independent Dual mono: coding is similar to the previous case, but this choice applies to channel with no acoustic relationship, e.g. two languages for commentaries Joint stereo: applies to stereo programme, but here the encoder exploits the interchannel correlation for improved coding. To be used only for a stereo programme The 16 and 24 kHz sampling rates feature a moderate bandwidth (respectively 7 kHz and 10 kHz) and are rather useful for commentaries. The latency is rather high with these sampling rates MPEG L2 is available for LL or IP networks. In leased line mode, an optional protection against transmission errors (FEC) is also available, of Reed-Solomon type. 2.2.6. MPEG AAC algorithms Application: mono or stereo music, Low capacity transmission channels. These (optional) algorithms feature a very high compression ratio, for a given audio quality, compared to Layer 2. They can operate at a sampling rate of 32 or 48 kHz, and several bit rates: 16, 20, 24, 32, 40, 48, 56, 64, 96, 128, 192, 256 kbit/s. Three coding variations are available: MPEG AAC-LC (“Low Complexity”): lower compression than other variations, but lower latency. MPEG HE-AAC (“High Efficiency” AAC): higher compression, and the bit rate is limited to 128 kbit/s for this variation. MPEG HE-AAC v2 (“High Efficiency” AAC version 2): compared to the above, this coding further enhances the performance for a stereo program (not available for mono). The bit rate is limited to 128 kbit/s for this variation. AAC codecs are available as an option, for IP networks only. SCOOP 5 IP - User Manual 11 2.3. Audio interfaces 2.3.1. Analog interfaces The analogue inputs and outputs are balanced, and the input and output gains are adjustable. The input to the encoder is selectable between the digital audio input and the stereo analogue input. The output from the decoder is always provided on the stereo analogue output. The sampling frequency of the analogue digital converters is automatically set depending on the coding algorithm used for transmission. 2.3.2. Digital interfaces The equipment also provides digital audio inputs/outputs in AES/EBU format. The input to the encoder is selectable between the digital audio input and the stereo analogue input. The output from the decoder is always provided both on the digital output and the stereo analogue output. The digital audio interfaces are usually locked to the digital audio input (“genlock” mode), but alternatively they can be synchronised to the internal clock reference of the codec (mode called “Master”). Sampling rate conversion is automatically performed, whenever needed, depending on the coding algorithm used for transmission. As an important consequence, the selection or value of the sampling frequency of the AES/EBU input/output is completely independent of the sampling frequency of the compression algorithm. One should also be aware that the various audio settings have no relationship with those for the other side of the link (the remote codec), whatever they are: selection of analog or digital source, sampling, rate of AES interfaces, etc. This configuration is only relevant for the local installation. 2.3.3. Audio monitoring The audio program level is measured at the audio input (before encoding) and at the audio output (after decoding the received signal). These levels are displayed on some html pages of the unit. Note: as the audio output is monitored immediately after decoding, this monitoring position is not sensitive to the possible activation of the audio test loop (see further the chapter about test loops), contrarily to the physical audio outputs (both analog and digital). 12 SCOOP 5 IP - User Manual 2.4. Auxiliary functions The main function of the SCOOP 5 IP is the transmission of one or two main audio programmes, but it also provides auxiliary functions for transmitting data or additional signals, inside the same stream (or, more generally, the same session). These features are only compatible with AETA products, because they are not inside the scope of independent standards. The availability of these functions depends on the coding algorithms, and on the transmission network. The following tables show these capabilities for the various networks. No auxiliary function is available for mobile voice transmission. Besides, for PSTN/POTS only “relay transmission” (2 loops) is possible. Codec G 711 CELP G 722- SRT G 722- H221 4SB ADP CM MP EG L2 AAC- LC HE- AAC HE- AAC v 2 Relays Isolated G P IO 300 X Data ( bauds) 1200 2400 4800 Coordination 9600 channel X X, Option Option X = exclusiv e ( only one function at a time) Table 4 – Auxiliary functions: over leased lines Codec Relays Isolated G P IO 300 Data ( bauds) 1200 2400 4800 Coordination 9600 channel G 711 CELP G 722 G 722- H221 4SB ADP CM MP EG L2 AAC- LC HE- AAC HE- AAC v 2 Table 5 – Auxiliary functions: over IP networks SCOOP 5 IP - User Manual 13 2.4.1. Transmission of isolated relays When this function is activated, the codec transmits to the remote unit the status of two isolated current loops. The remote unit then opens or closes relay contacts according to the transmitted status. Conversely, as the function is bi-directional, the codec activates its two relays (“dry” isolated contacts) depending on the status of the two current loops on the remote unit. For transmission over IP, this feature is always available whatever the coding algorithm. For the LL mode, availability depends on the algorithm: see above tables. With G722 or 4SB ADPCM, relay transmission cannot be used at the same time as another auxiliary function (see tables). A typical application is the transmission of “on air” signals; a contact closure can be used for instance to light up an indicator or switch on other equipment. 2.4.2. Transmission of GPIO For IP transmission, SCOOP 5 IP also allows, in the same way as the two isolated relays, to transmit 6 additional binary signals, routed to “GPIO” interfaces, which are not isolated. This feature is available whatever the coding algorithm. 2.4.3. Data channel This function is not available in IP transmission mode. In leased line mode, a bi-directional data channel can be transmitted along with the compressed audio signals, by reserving a fraction of the transmitted bit rate. The equipment includes a serial asynchronous port for this purpose. The data are transparently transmitted end-to-end; hardware signalling is not available. Availability depends on the coding algorithm, as well as the max possible baud rate: see above tables. With G722 or 4SB ADPCM, this data channel cannot be used at the same time as another auxiliary function (see tables). A typical application is the transmission of data related to the RDS. 2.4.4. Coordination channel This function is not available in IP transmission mode. This function is available as an option. It enables the transmission of an auxiliary audio channel (or coordination channel), along with the compressed audio, by reserving 8 kbit/s from the transmitted bit rate. This channel uses a compression algorithm of CELP-HLTP type and provides a “voice grade” channel (300-3400 Hz pass-band). This feature is only usable for some algorithms, on leased lines: see above tables. With G722 or ADPCM, the coordination channel cannot be used along with other auxiliary functions (i.e. data channel or relay transmission). On a SCOOP 5 IP with this option, one of the sockets on the rear panel of the device includes one isolated balanced input and one isolated balanced output. An adapter cable, included with the option, provides an easy connection on XLR plugs. 14 SCOOP 5 IP - User Manual 2.5. Supervision and control interface The control and supervision of the equipment (configuration, communication management, status monitoring), is carried out using various remote control interfaces. 2.5.1. Embedded html server: “web pages” SCOOP 5 IP provides html pages that enable full control using a web browser, via port 80 (default port for the HTTP protocol). See on chapter 4 the detailed operation mode. This control mode can be used from any computer regardless of its OS (or a mobile device with a web browser), and the embedded pages are compatible with all current browsers. No software installation is needed on the control device. 2.5.2. Remote control via a serial port or TCP/IP Another remote control mode makes use of a dedicated protocol (AARC), via a TCP/IP connection on TCP port 6000. This “command line” mode is used by codec pool management systems such as Codec Live, MDC.net, etc. This interface can also be operated using AETA’s TeleScoop software. Instead of TCP/IP over the Ethernet interface, it is possible to use the RS-232 serial remote control port available on the unit. 2.5.3. Additional Ethernet/IP interface It is possible to get a second Ethernet/IP interface by plugging a USB/Ethernet adapter1 on the USB socket. This interface can be used as a remote control port (html pages via port 80, or “command line” mode via port 6000), as an alternative to the normal integrated interface. It should not be used for other functions (audio over IP). 2.5.4. Loop control and status In addition, the equipment features a “Loop control” function: call set up and release can be remote controlled with current loops and relays, instead of using for this the html pages. Relay contacts provide a status (idle/on line) of the unit. This is only applicable to transmission over IP, because links in LL mode are permanent. However, the status relays are relevant in all cases. 2.5.5. Alarm contacts Besides configuring the equipment operating mode, this module supervises its status (detection of alarm conditions). On detecting operation or transmission faults, the equipment switches on indicators and relay contacts. Two alarm classes are defined: “Internal” alarm; corresponds to a major fault internal to the equipment; “External” alarm; corresponds to a fault whose origin is deemed external to the equipment (for example, transmission fault); 1 Reference : Logilink UA0144, or other device shown on our web site support pages. SCOOP 5 IP - User Manual 15 2.5.6. Configuration and dialling memories To ease the operation, it is possible to store configuration memories, called “profiles”. These belong to three categories: “Remote profiles”, including the parameters for calling a given destination: dial numbers, coding algorithm, etc. A remote profile is like a directory entry, but can also memorize coding parameters. Recalling such a profile directly reconfigures the codec and/or sets an outgoing call with the parameters that were memorized in this profile. “Local profiles” which memorise the network access characteristics. Recalling a local profile is a quick way to recover the configuration needed for connecting on a given line/network. “Snapshots” which memorise all the settings for the audio interfaces. These various profiles can be used locally and also through the web pages, and they can be imported/exported from/to a computer. 2.5.7. Test functions For maintenance purposes, some test loops can be activated. The following drawing schematically shows these test loops: Figure 2 – Test loops “Audio loop”: uncompressed audio data are looped from the input of the encoder to the input of the output conversion functional block. This loop redirects the audio input to the audio outputs; “Loop 3”, or “Codec” loop: compressed audio data are looped just before the network interface; “Loop 2”, or “Network” loop: this loop sends the received data back to the network; for the remote codec, the effect is the same as a loop 3 when the transmission works correctly; “Audio feedback” loop (audio output to audio input); this allows the codec to send back to the remote codec the signal it receives, after decoding and re-encoding. 16 SCOOP 5 IP - User Manual 3. Operation 3.1. General principles – Control means The equipment control and supervision (configuration, status monitoring) is possible in remote control mode, thanks to an asynchronous serial port or an Ethernet interface. As a general rule, the configuration parameters are saved in non-volatile memory, and restored when the unit is powered on. Remote control operation using a computer and a web browser, thanks to the embedded HTML server, is detailed in chapter 4: Detailed operating mode – . SCOOP 5 IP can also be controlled by the optional TeleScoop software (installed on a Windows PC), which can control the other AETA codecs of the Hifiscoop, Scoop 3, Hifiscoop 3 and SCOOP 4+ ranges. Details about this supervision software can be found in the documentation and user manual of the TeleScoop software. The SCOOP 5 IP can also be remote controlled by third-party codec management software and systems. Please consult us for more information on the available offer in this field. For controlling IP connections, it is also possible to use the “Loop control” function. When this special connection mode is selected, one can trigger a call by activating an input current loop (optically isolated), and release the line by de-activating this loop. In such case, an outgoing connection is established or released only by this way, and no more from the front panel or the remote control interface (however, all other parameters are still controlled from these interfaces as in the normal mode). If “loop control” is not activated, it is always possible to use the loop to release a running connection (a pulse on the loop will release the line). The loop control interfaces are described in 3.5.3 and 5.1.10. Besides, whatever the connection mode (normal or loop control), a “dry loop” is closed when a connection is active. SCOOP 5 IP - User Manual 17 3.2. Physical description of the equipment The SCOOP 5 IP codec is housed in a 19 inches chassis of 1U height (44 mm or 1.75”). It includes a universal mains power supply. There is an option for powering from a 12V DC source (which can be used in parallel with the mains input, with priority to the latter). 3.2.1. Front panel The front panel includes on its left end an on/off button and a few indicators. First, completely on the left is located the on/off key, and just besides the standby indicator (blue LED). When the unit is powered but in standby (blue LED on), keep the key pressed for at least 3 seconds to switch on the unit. When it is operating, keep the key pressed for at least 3 seconds to switch it off. In addition to this manual “on/standby” switching, the unit automatically switches on when power is applied on its mains socket (or its DC input for those units equipped with the DC option). The standby LED next to the power applied. key is off in operation, but lights on when the unit is in standby with Status LED indicators The LEDs have the following meaning: Marking Alarm Color Red Function Shows an alarm (example: link active but no synchronisation) OK Green Green when the link is active/connected and the decoder is synchronised; Off otherwise, or if no link is active/connected Line Green On when the link is active/connected ON Green On when the units is on and operating 18 SCOOP 5 IP - User Manual 3.2.2. Rear panel All connections are done on the rear panel of the codec. The characteristics of the interfaces and layout of the sockets are detailed in chapter 5.1, Characteristics of interfaces. The following elements are available (numbers such as [17] refer to the following Figure 3 – Rear panel): Mains power socket [13] This is an IEC type power socket. The unit starts up as soon as power is applied. See details in 5.1.13 and 5.4 (Power supply). DC 12V power socket [12] This 4 pin male XLR is optional. See details in 5.1.14, DC power supply (option). Audio inputs/outputs Analog inputs/outputs [5]: at the input, plug the audio cables into the female XLR sockets. At the output, plug the audio cables into the male XLR sockets. In mono mode, only “A” channel is used. Digital inputs/outputs [1]: a digital input (mono or stereo) in AES/EBU format (or SPDIF) can be connected on the female XLR socket, and a digital output in AES/EBU format is available on a male XLR socket. It is possible to select which input (analog inputs or digital input) is fed to the encoder for transmission. On the receiving side, the decoded signals are output both on the analog and digital outputs. Ethernet interface [9] This socket is a 100BaseT/10BaseT port, used for audio transmission over IP and/or for remote controlling the unit. This RJ45 socket is devised for a normal “straight” cable to an Ethernet hub or switch. The two integrated LEDs show the presence and activity of the network (green LED) and the interface mode: half-duplex (yellow LED off) or full-duplex (yellow LED on). The configuration of the interface is described in 3.4, Initial setup of the Ethernet interface. Main LL interface (marked “X24/V11/V35”) [6] This socket is used for the connection to data transmission equipment in the “leased line” mode. The connector is 15-point male, Sub-D type. It is possible, if needed, to select the other LL port. Details on this interface: refer to 5.1.4 - Ethernet. Secondary LL interface and alarms (marked “ALARM + X24/V11”) [2] The 15-point male, Sub-D type connector includes two “form C” relays, signalling alarm conditions: “Internal alarm” contact; “External alarm” contact. This port can be used as an alternative interface for connecting the codec to transmission equipment in “leased line” mode. See the wiring in: 5.1.6 - “Alarm + X24/X21” interface. SCOOP 5 IP - User Manual 19 Figure 3 – Rear panel 20 SCOOP 5 IP - User Manual Alarm indicator [7] A red LED indicator also indicates that an alarm relay is activated. In the factory setup, every alarm cause sets the LED on, but by setting jumpers on the motherboard it is possible to program the indicator to react to only one type (internal or external alarm). The pin-out of the socket and the detailed characteristics of the alarm relays can be found in chapter 5.1.6: “Alarm + X24/X21” interface (p. 60). USB socket [3] This “host” socket allows the connection of a peripheral device. As a specific use, a memory stick can be plugged here for the backup reset procedure (see further 3.6.5, Backup reset). As another use, an Ethernet adapter can be plugged for providing a secondary Ethernet/IP remote control interface; see chapter 2.5.3 for this topic. Remote control serial port (Remote) [8] This 9-pin female sub-D socket is an asynchronous serial interface port, usable for remote controlling the equipment thanks to a control and supervision PC. For this capability refer to 2.5.2 Remote control via a serial port or TCP/IP. Auxiliary data serial port (Data) [4] This 9-pin female sub-D socket is an asynchronous serial interface port, usable for transmission of a bi-directional data channel (refer to 2.4.3 above, Data channel). “AUX” socket [11] This 25-pin female sub-D socket groups the interfaces for the relay transmission function (described in 2.4.1) and the (optional) coordination audio channel (optional, cf. 2.4.4). It also includes loop interfaces for the loop control function (cf. 2.5.3), as well as a +5 V power supply that can be used to provide current for the loop and relay interfaces. “Digital I/O” socket [10] This 15-pin male sub-D socket is the interface for the GPIO transmission function (as described in 2.4.2). Its wiring is described in: 5.1.12 - “Digital I/O” interface . SCOOP 5 IP - User Manual 21 3.3. Installation and set up 3.3.1. Mounting and connections Natural convection cools the equipment. Avoid obstructing the openings on the flanges. To operate the codec, the minimum necessary connections to set up are (see details in the rear panel description): Power supply (mains and/or DC); Audio inputs and outputs (XLR sockets); Network interface: depending on the networks used, Ethernet interface, X24/V11/V35 interface. The Ethernet connection is needed at least for the initial set up of the unit. Whenever needed, the “ALARM + X24/V11” socket must be connected to an external supervision system (alarm relay contacts). The pin out of the connectors is indicated in chapter 5.1: Characteristics of interfaces. 3.3.2. Initial set up Before the first use, the Ethernet interface must be configured, and the equipment must be configured according to the desired operation mode: audio input/output format, local conditions (network interface parameters…). Then to set up links you must select the coding type and parameters. A computer with a web browser, linked to the SCOOP 5 IP via the local area network, is required to perform this initial set up. It is also useful to have on this computer the “AetaScan” utility software (see further xxx, xxx). In some cases, this initial setup can be done “off line” before putting the unit into service on its operational location. Configuring the Ethernet interface is described further in 3.4 (Initial setup of the Ethernet interface). For access to the configuration html pages, a login password may have to be entered. After factory setting or after a complete configuration erasure, the password is “blank” (no password) and the access is unrestricted. Afterwards, if needed, a password can be programmed by the user. For more details about the codec configuration, see chapter 4 - Detailed operating mode. 22 SCOOP 5 IP - User Manual 3.3.3. Notes about the use of AES/EBU interfaces When using digital audio interfaces, it must be decided whether the codec is “master” or “slave” regarding audio sampling clock synchronisation. In the first case, the codec derives the sampling clock from the network clock or an internal source, and the device(s) connected to the codec must synchronise to the same clock source. The most common choice is rather the “slave” mode, to be used when it is not possible (or not desired) to synchronise the external equipment onto the clock of the transmission link or the codec. In this case, the AES/EBU interfaces should be set in the so-called “genlock” mode. When in this mode, the codec derives the sampling clock of the digital audio interfaces from its AES input (in other words is “gen-locked” onto the incoming AES signal), and sampling rate conversion (SRC) is used for interfacing to the coding parts. It is mandatory in such situation to provide the codec input with an AES signal featuring the same sampling frequency as the external equipment, even if the codec is used only as a decoder. If this requirement is ignored, the unit will actually fall back to “master” mode. In such situation, clicks in the audio programme might be heard, especially when the resulting sampling rate is very different from that of the external device. If, on the contrary, it is decided to synchronise the external equipment (at 32, 48 or 96 kHz) onto the transmission clock of the network interface, the codec must be configured in “master” mode. In this case, the output is locked onto this clock, and it can be used as a reference to synchronise the equipment connected to the codec output. The digital audio signal at the codec input must then come from a device synchronised by this way. When you do not use the digital audio interfaces, the “master” or “slave” mode has no effect on the actual operation. However, it is recommended in such case to select the “master” mode to avoid undesired alarms. Otherwise, with the “genlock” setting (which is the default factory setting), an alarm is raised because of the lack of a suitable signal on the AES input. In the “master” mode, the device ignores this error condition. SCOOP 5 IP - User Manual 23 3.4. Initial setup of the Ethernet interface The SCOOP 5 IP includes a 100BaseT / 10BaseT Ethernet interface, and the audio transmission can take place over an IP network through this interface. In addition, it is always possible to use the Ethernet interface for accessing the embedded html server or for remote controlling the unit via a TCP/IP connection (TCP port 6000). An initial set up is often needed, and in every case you will need to pick up the unit’s IP address in order to configure and manage it. For setting into operation, first connect the Ethernet interface to the network, using CAT5 wiring. Connection to 10BaseT or 100BaseT interfaces are both suitable, as the SCOOP 5 IP automatically switches to the adequate 10 Mbit/s or 100 Mbit/s mode. “Straightforward” patch cables should be used for a connection to a hub or a switch. Conversely, a “crossed” cable might be needed for special configurations (e.g. a test connection to a PC). The following steps require a computer with a web browser, and depend whether a DHCP server is available or not on the LAN the SCOOP 5 IP is connected to. 3.4.1. DHCP server available This is usually simpler. By default (“factory setting”) SCOOP 5 IP is set as a DHCP client. Thus at start up it is automatically allocated its IP configuration by the DHCP server. The same applies to the computer used for set up. Then you must get the IP address of the SCOOP 5 IP. If you have access to the server’s address lease table, you can get this information there. The other method is to use the “AetaScan” utility on the computer: this tool scans the local area network, detects AETA codecs and displays a list of the devices with their respective IP and MAC addresses. See further (xxx, xxx) how to use this tool. Once you know the unit’s IP address, you can enter it in the address bar of the web browser and access the html pages of the SCOOP 5 IP. If this LAN is the final operational environment, the Ethernet configuration is complete! Conversely, if the final setup has to be “static”, without using a DHCP server, the address parameters must be edited, via the “ETHERNET PARAMETER” of the “NETWORK” tab. See further (in page 42, Ethernet Parameters) how to do that. Warning: this should be done as the last step (after setting the other parameters for the unit) if this would make the unit unreachable from the computer! 24 SCOOP 5 IP - User Manual 3.4.2. No available DHCP server Note: you get the same situation, even if a DHCP server is present, if the current setting in the SCOOP 5 IP is for static addressing and it is incompatible with the current LAN. In such case, the connection between the SCOOP 5 IP and the computer is a priori not possible. First you must get the current IP address of the codec: either this is a previously set static setting, or a “link local” address that SCOOP 5 IP has auto-configured because it found no DHCP server. The “AetaScan” tool will allow you to detect this address, whatever the current settings. If this address is reachable from the computer, you can enter it in the address bar of the web browser and access the html pages of the SCOOP 5 IP. Then you can set up the addressing as required, via the “ETHERNET PARAMETER” of the “NETWORK” tab (see page 42, Ethernet Parameters). Warning: this should be done as the last step (after setting the other parameters for the unit) if this would make the unit unreachable from the computer! If this address is not reachable from the computer (most probable case), you should go through the following steps: Change the computer address (temporarily) so it belongs to the same sub-network as the SCOOP 5 IP. Access the SCOOP 5 IP html pages by entering its IP address in the browser’s address bar. Setup the addressing of the SCOOP 5 IP as required, via the “ETHERNET PARAMETER” of the “NETWORK” tab (see page 42, Ethernet Parameters). This should be done as the last step (after setting the other parameters for the unit) if this would make the unit unreachable from the computer! Setup the computer back to its original addressing. Blocking situation after an invalid setting: it may happen that an incompatible or inconsistent setting completely blocks access to the SCOOP 5 IP (example: unknown login password…). As a last resort solution, you can apply the backup reset procedure as described further (xxx, xxx) and bring the unit back to its default “factory” settings. SCOOP 5 IP - User Manual 25 3.4.3. Using the “AetaScan” tool This software can be downloaded from AETA’s web site www.aeta-audio.com, (see the page dedicated to the SCOOP 5 IP). When launching the tool, the following window is displayed: Click the “Refresh” icon: the tool scans the local network, detects the AETA codecs and lists them with their IP and MAC address: At this stage, you can click/select a codec in the list, and click the “Connect” icon or double-click the codec’s row to open directly the html interface of the selected device (using the computer’s default browser). By default, the tool scans only the LAN. It is possible to search devices on another sub-network (given, of course, that it is reachable through an authorized network path), changing the settings behind the “Settings” icon: (Warning: the result is not guaranteed, because such scan can only work if the involved routers can relay messages to the “broadcast” address of the remote sub-network). 3.4.4. Configuration of the secondary Ethernet interface In case an external USB/Ethernet adapter is used to provide an additional interface (see 2.5.3), an initial setup is also required for this interface. The procedure is similar to that for the main integrated Ethernet interface: First plug the adapter on the USB Interface. Apply the same steps as described above (3.4.1 to 3.4.3), the settings for the secondary Ethernet interface can be found in a dedicated “Ethernet 1” frame on the “ETHERNET PARAMETERS” page (“NETWORK” tab). Connect the Ethernet interface to the network, using CAT5 wiring. Normally the adapter’s LED should blink depending on the network activity. The additional interface is designated “ETHERNET 1” in the unit’s html pages. As soon as you get access to the html pages via an Ethernet interface (either main or secondary), you can set the parameters for both interfaces. 26 SCOOP 5 IP - User Manual 3.5. Managing links 3.5.1. Setting up and releasing links Generally speaking, once the codec is set up and the transmission interface(s) to be used is(are) configured, it is possible to manage audio links with remote devices. In the case of a leased line, the link sets up as soon as the physical connection is made, and all parameters are suitably configured: this is a permanent link. In the case of an IP link, transmission links/sessions have to be set, which can be done in two ways: “Outgoing call” launched towards a remote device: the procedure is to select a transmission interface, a coding configuration, “dial” the destination to call and then set the call to the remote unit. The detailed operating mode is described further, for the various transmission media, in 4.5 (Setting up an IP link). “Incoming call” received from a remote device: on receiving a call on one of the connected and active interfaces, the codec switches to this interface and processes the call. In a similar way, ending/releasing a link is either initiated by the remote unit (remote release), or by the operator of the SCOOP 5 IP (local release). 3.5.2. Auto-redial feature In LL mode, the unit is always supposed to be linked, and it will transmit and look for a reception signal as long as it is on. In contrast, the IP mode is a “dial up mode”, where a link can be set up and released at will. When it is necessary to hold the link on permanently, outgoing calls may be backed up by using the auto-redial function. When it is active and the codec is the initiator of the link, the codec automatically tries to re-set the link in case of an initial failure, or if an established link is dropped for another reason than a local release (i.e. hanging up by the user). The redial capability applies in the following situations: If the initial call fails for any reason (e.g. called party is busy); the codec then redials and retries to establish the link. The codec can also redial if the link is already established and the link is lost, for any reason else than “local release” (e.g. the remote unit mistakenly dropped the line). After a power failure, after rebooting the codec will automatically redial and set-up the link back. Note that, while “auto redial” is active, an established link can be definitively stopped only by releasing the line on the calling codec side. Otherwise, every time the called party will hang up, the calling codec will redial and reset the link. It is possible to program the time period that the unit will wait before redialling after a failed trial, and it is also possible to program the maximum number of times the codec will redial before giving up. The activation of this function and the configuration of its parameters can be done using the “MISC” page. SCOOP 5 IP - User Manual 27 3.5.3. Loop control In normal operation, outgoing calls are sent or released using the menus and/or the remote control interface. When the loop control function is selected, outgoing calls are controlled by activating or not optically isolated input loops. When the input loop is activated (i.e. current is flowing), the corresponding codec establishes a link by calling the last number (IP address, or SIP URI) previously dialled by the unit. When the loop is de-activated, the codec releases the line and stays idle as long as the loop is not active (except if receiving an incoming call). In normal operation, it is nevertheless possible to release a running connection by briefly activating (“pulse”) the control loop. The “auto-redial” feature is implicitly active when loop control is active: the codec tries to keep the link, and automatically recalls the remote unit if the line drops, as long as the input loop is active. The “time before redial” parameter described in the above is also applicable to the loop control mode. On the other hand, the “redial attempts” parameter is not applicable here, because the unit will always try to recover the link, until the loop is left inactive. Note that, as an important consequence, when using loop control, the termination of a link must always be done on the calling party side by de-activating the input loop. Whenever the line is released by the receiving party, the calling unit will redial and re-establish the link. When loop control is active, the input loops are the only means of setting up an outgoing call; setting a call from the menu is not allowed. Hanging up with the keypad is rejected. Remind that the first step is to set-up the link once in normal mode, and later activate the loop control mode; afterwards the input loop is used to trigger a redial to the previous number. The “loop control” input can be used in LL mode for setting up a backup link: see following chapter 3.5.4. 28 SCOOP 5 IP - User Manual 3.5.4. Setting up a backup link The SCOOP 5 IP has the capability for backing up a permanent leased line audio link thanks to a “switched” link (IP). A typical example of this application is shown in the following diagram, where a permanent leased line is used for transmitting a radio programme from a studio to a transmitter. A codec is installed on each side of the link, and each codec is also connected to a “backup” link (IP). In this way, transmission via this line can be used as a temporary back-up in case the normal permanent link fails. Once the problem on the normal line is solved, the backup connection can be released and normal operation in LL mode is resumed. Figure 4 – Backup link The SCOOP 5 IP makes such back-up easy because both transmission interfaces (normal leased line and backup interface) are available in the same unit. Moreover, the SCOOP 5 IP helps to automate the switchover process, especially on the transmitter side, where most often quick human intervention is not possible. The following describes one way of configuring such a system, and details the resulting backup process. Basic principles When a failure of the leased line is detected, one of the two codecs has to switch to “backup” mode, and then call the other unit over the backup network access. On receiving this call, the remote codec will have to switch as well to the backup network interface and accept the call. The audio transmission in then provided over the backup link. Later on, when the leased line comes back to normal, the backup connection can be released and both codecs have to switch back to LL mode and normal operation. We designate as “caller” the codec which switches first and initiates the call over the backup network, and “receiver” the codec which switches on receiving such a backup call. Caller codec: setup and operation For the switch to backup (following a failure on the leased line), two methods can be used: Either the switchover is “manual”: an operator on the studio side can switch the studio codec to backup mode and launch a call to the other site via the backup medium. For this method, no special preliminary setting is needed. The other method is to use the “loop control” feature as described above in section 3.5.3. In this case, the whole switchover sequence can be executed by simply activating the input loop: mode switch for the backup network access, backup call. Conversely, releasing the input loop brings the unit back to normal operation in LL mode. For this latter method, the best situation is when the leased line status is monitored by an alarm contact that closes when the line is down. This alarm can be used for activating the control loop, so that the studio codec quickly and automatically switches over to backup mode (and also comes back to normal when the leased line recovers); no manual intervention is needed in such case. SCOOP 5 IP - User Manual 29 In order to use this operating mode, settings have to be done on the “caller” codec to enable the backup with loop control (“MISC” page, see more details in 4.4.7): select “Backup” for the “Loop Control” parameter. Important notice: when switching to backup mode the number called is the last dialled! For this reason it is important to dial and call the backup destination in the desired mode at least once, before setting the unit in its normal LL mode. Receiver codec: setup and operation The setup is easy on the “receive” side of the backup link, as it is somewhat “passive”. The “backup receive” mode must be activated, using the “MISC” page (see 4.4.7). Once this is done, when the codec is operating in LL mode, on receiving a call on the backup interface, the codec switches to the IP network mode, answers the call and the connection is established with the remote codec. Later, when the temporary connection is released (by the calling party), the “receiver” codec automatically switches back to LL mode, and normal operation is resumed. Reminder: in LL mode the codec accepts no incoming call whatever the network interface, unless this backup receive mode is active. Thanks to the automatic coding algorithm detection (SIP/SDP in IP mode), the coding setup is not critical on this “receiver” side. Notes regarding the automatic switchover Note that, when switching from LL to backup mode, a separate set of parameters is recalled. As a consequence, the coding configuration can be made, if desired, totally different in the back-up mode. Of course, both units should be configured in an adequate configuration for each transmission mode, and then each codec can be set in the LL mode to start the normal operation. 30 SCOOP 5 IP - User Manual 3.6. First level maintenance 3.6.1. Internal configuration All the configuration is done in the factory, and/or it can be changed by means of the control interface (html pages), without having to open the unit. However, a few settings can be done internally by setting jumpers: It is possible to prevent one alarm type to light on the red alarm LED on the back of the equipment. It is possible to disable the standby mode (in which case the device is always in operation as long as the mains power is present). Please consult us for such operation! We remind that unduly opening the unit can void the warranty. In any case, opening the unit may expose live parts and is hazardous. Never open or maintain the internal parts without first disconnecting the AC supply. 3.6.2. Analysis of malfunctions The following table indicates the detected alarm conditions and their classification: Alarm condition Internal Power or fuse fault X Bad start-up of a microprocessor, or interface fault detected on start-up X External Overload on an audio input Minor1 X Fault on AES/EBU audio input X Decoder synchronisation error X Network clock fault2 X Table 6 - List and classification of alarm conditions Excluding the case when an internal failure disables the management micro-controller or the Ethernet interface, alarm indicators describe the anomaly on the “ALARM” html page. 1 Minor alarms are readable on the display, but do not trigger alarms (contacts and LEDs) 2 Fault of the network clock source currently used for synchronisation (X21/X24 main port or secondary port) SCOOP 5 IP - User Manual 31 3.6.3. Using the test loops The test loops (accessible from the “MAINTENANCE TAB”, “TESTS” page can help in the analysis of a problem: In order to check if the audio part functions correctly, use the “Audio” loop and check if the audio is OK at the output. To check if the coding part functions correctly, activate “Loop 3” 1 and check if the alarm disappears (and the decoding indicators come back to normal), and if the audio is present at the output. “Loop 2”2 sends back to the remote codec the compressed data received from the network (see the description of test loops in 2.5.7, Test functions). In this way, it is possible to test the integrity of the transmitted data and/or check that the remote codec works properly. The decoder out to encoder in loop (“Audio feedback” loop) can be used for overall functional check, and also for aligning the overall chain. Note: not all test loops are available for all the network interfaces. 3.6.4. External alarms In leased line mode, a clock fault is one typical cause of an external alarm. This can be due to: complete loss of the X24/V11 interface, due to a failure of the transmission line; lack of signal received from the X24/V11 interface, due to a failure of the transmission device connected to the codec, or a transmission failure in the network; a fault in the remote codec, or else the remote codec has an incompatible configuration; a failure of the transmission device connected to the codec; an incorrect clock frequency (i.e. incompatible with the codec configuration). On the other hand, in case of a decoder alarm with no clock error, possible causes are: transmission errors causing erratic alarms. Errors such as “AES error” and “AES sync loss” can frequently be seen, even when the unit is configured to use the analog inputs. This is because the AES output is always active, and by default “genlocked” to the AES input. To avoid such undesired alarms: When not using digital audio interfaces, set the digital audio sync in “Master” mode (“AUDIO” page, “AES Synchro” parameter). 1 Note: this loop is only available for LL transmission 2 This loop is not only available for LL transmission 32 SCOOP 5 IP - User Manual 3.6.5. Backup reset This procedure should be applied to recover control over the unit if it is in a blocked status, in which it is impossible to access the html page which is normally used to perform the configuration reset. After this reset, the SCOOP 5 IP will be brought back to its “factory” configuration with all parameters in their default value, especially: blank password, Ethernet interface set for auto link mode, DHCP client enabled. Go through the following steps: Get the reset_scoop.bin file (to be downloaded from our www.aeta-audio.com web site, a link can be found on the page dedicated to SCOOP 5 IP). Copy this file without changing its name on a USB memory stick. Plug this stick into the USB socket on the rear panel of the unit (while it is off). Power on the SCOOP 5 IP. After the initialization phase, SCOOP 5 IP will go back to its “factory” settings. Remove the USB stick (no matter with or without power on), before restarting the SCOOP 5 IP, otherwise all your possible new settings will be deleted again. Note: existing profiles are not deleted by this procedure. SCOOP 5 IP - User Manual 33 4. Detailed operating mode – Embedded HTML pages The embedded html server in SCOOP 5 IP provides a comfortable and efficient means to control and monitor the unit. It just needs the SCOOP 5 IP to be connected to an IP network and to be reachable from a computer, or another device with an html browser: tablet, smartphone… In the most common case, the two devices are connected on the same local network (LAN). But it is also possible to control the SCOOP 5 IP by remote, provided that the control device can reach it (TCP/IP port 80, HTTP protocol). If you also have a secondary Ethernet interface (using a USB/Ethernet adapter), each of the two interfaces can be used for this remote control access. This control mode is usable regardless of the OS of the control unit, and the embedded pages are compatible with all common browsers. No software installation is needed on the control position. 4.1. Equipment start-up When the unit is powered but in standby (blue LED on), press the key for at least 3 seconds to start up the unit. The initialisation phase lasts around 30 seconds, and afterwards the unit can be controlled and receive IP calls. Reminder: if the unit is connected to a power source (mains or DC), it starts automatically whenever the source is switched on, without having to use the on/off button. 34 SCOOP 5 IP - User Manual 4.2. Accessing the SCOOP 5 IP html pages Once the SCOOP 5 IP is connected on an IP network, the first step is to get its IP address, following the procedure described above in 3.4, Initial setup of the Ethernet interface. Then, on the control device, launch the html browser and enter the IP address of the SCOOP 5 IP in the “address” or “URL” field. This gives access to the html server integrated in SCOOP 5 IP. The page which is displayed is similar to the following picture: If needed, select another language by clicking the appropriate flag. The home page displayed above is the “STATUS” page, which provides an overview of the unit status, but allows no action on it. This is the only “free access” page, with no limitation or access control. To access the other pages, you must “log in”, and get for the control device an exclusive access. Any connection request from another device will remove this access. To log in, enter the password and click the connection button. The initial password is blank: click directly on the button. To set the password and enable protection, go to the “MAINTENANCE” page (cf. further). To release control, click on “Logout” (also in the connection area). You are also logged out automatically after a long period of time with no action on the pages. If you have lost the login password, you should apply the backup reset procedure (as described in 3.6.5, Backup reset) and bring the unit back to its default “factory” settings, including a blank password. SCOOP 5 IP - User Manual 35 4.3. Principles of operation with html pages The picture below shows a typical page. On top you find a bar of tabs corresponding to the various categories of functions and parameters for the SCOOP 5 IP. Clicking a tab you access either a page, or a drop-down list for selecting a secondary page. These tabs and pages are detailed in the following chapters. Under the bar can be found the information and adjustable parameters, with various selection or entry modes for these parameters, grouped in blocks (each surrounded with a frame). On the right side, a text area provides additional help and hints. As a general rule, the displayed parameters are read when accessing the page, and are not refreshed automatically1. To force a refresh, click the refreshed. icon: the data in the area or frame are read and Exception: some data on some pages is however periodically and automatically refreshed. This makes a modest bit rate, but you should exit the html pages if you want no traffic at all on the path between SCOOP 5 IP and the control device. Two tabs have a specific behavior: “STATUS” is accessible without a login and some data are updated automatically. “ALARMS” is also updated automatically, and switches to red when an alarm triggers, showing the number of issues detected. You can then check for details by clicking the tab. Access to the tabs (other than “STATUS”) requires logging in beforehand. If you click a tab without being logged in, the login dialog box opens to allow you to enter the connection password. If it is blank, just click the “Login” button. 1 This is on purpose, in order to avoid a permanent high rate of queries to the unit, which may be questionable in some situations. 36 SCOOP 5 IP - User Manual 4.4. Detailed presentation of the html pages 4.4.1. “Status” tab This tab leads to the “STATUS” page, which is also the home page. It provides an overview of the essential settings and parameters, sufficient for basic monitoring. This page is accessible without a log in, and without a password. The link status is monitored dynamically; e.g. you can see call reception and releasing. It is also possible to monitor calls that an operator is managing using the front panel. The page displays the audio level of the two transmitted signals (encoder) and the two received signals (decoder), shown as bargraphs with a 0 dB reference. Refer to chapter 4.4.5 (“Audio” ) for more details on the setting for this reference. The “Headroom” setting is adjustable using the “Audio” tab. Note: the goal of these bargraphs is to provide an indication on the presence and level of the audio modulation. The measurement has a good precision for stationary signals (1 dB accuracy and resolution), but the update rate is rather slow. As a consequence these bargraphs are not appropriate for precisely monitoring a dynamic program, and they should not be considered an alternative to real program meters! SCOOP 5 IP - User Manual 37 4.4.2. “Connections” tab This tab leads to the “CONNECTIONS” tab, allowing to remote control the links: monitoring, outgoing call set up and call releasing. The “Connection State” block allows to monitor and/or manage links. For direct dialing: the codec has to be set beforehand for the right interface (see “NETWORK” tab), and the suitable coding configuration (“CODING” tab). Enter the number (or numbers, or SIP URI…), then click “Dial”. You can also use one of the last called numbers: click the arrow on the right of the “Number” field and pick a number in the dropdown list. For using a remote profile: select the profile in the list on the left, and click the “Dial” button. Alternatively, you can click “Load”. The codec loads the profile settings but does not dial: this is useful for quickly setting the coding parameters. Indicators show the status of the relays when the “Relay transmission” feature is active. For auxiliary functions, see the “CODING” tab. 38 SCOOP 5 IP - User Manual 4.4.3. “Profiles” tab “Profiles” are configuration memories that can be recorded and later recalled at will (see their description in 2.5.6 above, and more details further in xxx, “xxx”). This “Profile” tab proposes one page for each profile category, with a list of the profiles already recorded in the SCOOP 5 IP memory, each with its index and name. The page allows you to manage these profiles, with following capabilities: Create a New profile, which will memorize all the current network settings, and assign name. For a remote profile, you can beforehand edit the settings (shown in “PARAMETERS” frame). This is useful for instance if you want to create a profile that will affect the coding setup, or conversely add an address or SIP URI to be recalled with profile. Delete a profile previously recorded. Load a profile or snapshot: the codec then restores the settings included in the profile. (except for a remote profile: loading these is possible from the “CONNECTIONS” tab) Update a profile previously recorded, either for renaming it or change its content. (not proposed for a snapshot). “Remote profiles” page Parameters that are not relevant in a given context are shaded and inactive. SCOOP 5 IP - User Manual 39 it a the not this “Local profiles” page Snapshots Snapshots are in fact managed on the “Audio” page, and this “Snapshots” choice on the “Profiles” tab just redirects to the “Audio” page. See further the description of the audio page. 40 SCOOP 5 IP - User Manual 4.4.4. “Network” tab This tab leads to several pages, which correspond to the network interfaces. “Change Network” page: default interface selection This page is used for selecting the default interface: LL or IP. Besides, the settings done in the “CODING” page are applicable to this interface1. Select the desired interface and click “Save”. “LL Parameter” page You can select here the X24/V11 interface used for transmission; the default interface is LL1. Remember to save the changes, clicking the “Save” button! 1 Remind that the algorithm settings are memorized separately for each network interface. When switching the default interface, the codec settings for this interface are recalled. SCOOP 5 IP - User Manual 41 Ethernet Parameters This page is for configuring the Ethernet interface and IP addressing, and shows up as follows: The main setting is the “Mode”: with DHCP, most of the other settings are automatically provided to the unit by the DHCP server. When there is no such server, you have to enter the settings manually: select “Manual” for the “Mode”. The IP address must be “available”, i.e. not already assigned to other equipment. Ask support from the network administrator(s) as needed. Afterwards, enter the following parameters: Parameter Notes Local IP Must be unique on the network Subnet Mask A typical value is 255.255.255.0 Gateway DNS Server 1 Domain Name Server (main) DNS Server 2 Domain Name Server (secondary) All addresses are in “dot-decimal” format, such as e.g.: 192.168.0.12, 10.0.54.123. Note: in contrast to the configuration with DHCP, the “static” setting has to be reviewed each time you move the unit to a new physical site/network, as the previous IP addressing is probably not valid for the new location. 42 SCOOP 5 IP - User Manual You can also configure the “Link Mode”: in its factory settings, the Ethernet interface is set for an auto negotiation of the ”link” mode: speed (10 or 100 Mbit/s) and half-duplex or full-duplex. This setting is suitable for almost all situations and usually you don’t need to change it. However, in the rare cases where this is needed, it is possible to set the desired mode manually. The available choices are: Auto-negotiation (standard setting) 100BaseT, full-duplex 100BaseT, half-duplex 10BaseT, full-duplex 10BaseT, half-duplex “Network Quality”: select here the expected quality of the transmission via the Ethernet interface. The unit switches to internal settings suitable for this quality level. For instance, if you select “Low”, the codec sets a large size for the reception buffer, in order to stand a higher jitter. As a counterpart, the latency will be higher as well. Conversely, if you select “High”, the buffer is smaller and the latency is lower, but the system is more vulnerable to possible jitter (fluctuations of the network transmission latency). Remember to save the changes, clicking the “Save” button! Settings regarding the Ethernet interface and IP addressing are especially critical, because this is just the interface you are controlling SCOOP 5 IP through. You can lose control because of a mistake in the settings; it might even be the normal expected consequence for a configuration change. So be very careful with the settings on this page! In case control is lost after an error, you must perform the initial Ethernet setup as described in 3.4, Initial setup of the Ethernet interface. Note: if a secondary Ethernet interface is available, it is also shown in this page, in an “Ethernet 1” frame. This frame is organized in the same way as for the main interface. SCOOP 5 IP - User Manual 43 “AoIP Parameter” page This page groups the settings related to the Audio over IP (AoIP) transmission. It is relevant for the Ethernet interface. The main setting is the transmission mode: SIP (unicast) or multicast. For SIP, the settings are as follows: Notes: STUN Mode: enable or disable STUN. In this way you can disable STUN without erasing the STUN server address. STUN Server: enter the address of the STUN server, either in numeric form or with a symbolic name. This kind of server allows SCOOP 5 IP to discover its public IP address when it accesses the Internet through a router with NAT. You can use AETA’s server: stun.aetaaudio.com. STUN Interval: interval between two queries to the server; usually you can keep the default setting of 15 s. SIP Registration: enable or disable the registration on a SIP server. The following menus SIP xxx are used to enter the parameters of the account on this server, when using such service. These parameters should be provided by the administrator of the SIP server. The SIP User field usually corresponds to a number that a remote party can call to initiate a link with the codec when it is registered on the server. With this SIP Registration parameter, you can disable the registration and hence stop using a SIP server, without having to erase account parameters; they stay ready for later use. Keepalive Interval: sets the interval between two re-registrations on the SIP server. This setting can be used to make the registration renewal more frequent, but the server always imposes a maximal period; for this reason the default setting “Server Preset” is recommended except for specific cases. SIP Port: the default port for SIP signalling is 5060 (UDP), you can enter a different value here. RTP Port: the default port for RTP/SIP audio streams is 5004 (UDP), but you can enter a custom value here if desired. RTP TOS: if the transmission network supports DiffServ to manage the media priority, you can set here the type of service which is assigned to the stream transmitted by the codec. 44 SCOOP 5 IP - User Manual Packet Replication: (see also 2.1.1 and page 7 regarding this feature) you can select here the setting for packet replication: 0 => standard mode without replication (default setting) 1 => packet replication without interleaving 2 => packet replication with interleaving: the second packet is delayed; robustness is improved but latency is increased. If you select (in the “AOIP MODE” frame) the multicast mode (see above in 2.1.1, IP multicast mode), the page is different: NOTES: Multicast Mode: if the selected mode is Multicast, the transmission is unidirectional. Select with this menu if the codec must be sender of a multicast stream, or rather receiver of such stream. Multicast Control Port: this port number (UDP) is used for sending control packets accompanying the multicast stream. Default value is 6000. Multicast Audio Port: this port number (UDP) is used for transporting the multicast audio stream. Default value is 6001. Note: this setting is not related to the RTP Port setting valid for RTP/SIP. Multicast TTL: TTL value applicable to the RTP multicast audio stream. Default: 254. Remember to save the changes, clicking the “Save” button! SCOOP 5 IP - User Manual 45 4.4.5. “Audio” tab Like the “STATUS” page, this page shows the audio level transmitted/received to/from the network. Notes on these parameters: Input Level and Output Level: gain setting for (respectively) the inputs and the outputs. The parameter is the maximum level (absolute level expressed in dBu) of the interface. For an input this is the clipping level, which when applied at the input produces a transmitted signal at 0 dBFS. For an output this is the maximum output level, produced when receiving a signal at maximum level, i.e. 0 dBFS. Input Impedance: configuration of the analog inputs, by default high impedance. You can switch to 600 Ohm input impedance instead. Input Source: select the audio source to be used by the encoder: either the analog inputs, or the AES input. Even if you use the analog inputs, the AES input can still be connected in order to synchronize the AES output. AES Synchro: the default choice is “Genlock”: digital interfaces (input and output) locked onto the digital audio input. This choice is suitable for most cases, when the codec should slave to the system clock. However, it is possible, if required, to rather synchronize these input/output from the internal clock of the codec: so-called “Master” mode (see also in 3.3.3 about the installation). AES Sampling Rate: sampling rate to be used in the “Master” mode. In the Genlock mode, this setting has no direct influence because the codec “follows” whatever sampling frequency is set by the AES input. 46 SCOOP 5 IP - User Manual Headroom: this setting defines the reference level for the program level display. This display is relative to a “0 dBr” reference which can be set here. The “Headroom” parameter is the available headroom for a signal displayed as 0 dBr, i.e. the difference between the reference and the 0 dBFS maximum level. For instance, a headroom of 10 dB means that the reference is set at -10 dBFS. On the display, the “OVL” clipping indicator shows that the absolute maximum level is reached (0 dBFS), regardless of this headroom setting. This is not necessarily the top of the bargraph scale, which is +6 dBr (relative), and whose absolute level depends on the “Headroom” setting. Example, if the headroom is set at 10 dB: then the reference is -10 dBFS. The bargraph can go up to +6 dBr, which is -4 dBFS. At this stage the “OVL” indicator does not yet trigger, as it reacts at 0 dBFS. Beware of the differences between the three level measurements! Absolute digital levels in dBFS for the AES input and output, internally (encoder/decoder) and for transmission. Displayed levels in dBr, relative to an adjustable 0 reference. The relationship between the display and the dBFS level is controlled by the “Headroom” setting. Absolute analog levels in dBu for the analog inputs and outputs. The relationship between the absolute analog and digital levels is controlled by the “Input Level” and “Output Level” settings. After changes on the audio parameters, make sure to save the changes, clicking the “Save” button. This page includes the management of snapshots, memorizing the parameters controlled in this page. To create a snapshot based on the current settings, click the “Create new” button, and enter a name for the snapshot. The other buttons can be used after selecting an existing snapshot. Click a snapshot: its parameters are recalled in the fields of the page, but yet no change is done (the “Save” buttons warn of this). Then you can: Click the “Cancel” button to simply come back to the previous situation (also possible using the icons, but one frame at a time). Click the “Load” button and directly apply the snapshot (also possible using the “Save” buttons, but one frame at a time). Click “Delete” to remove the selected snapshot from the list of snapshots. SCOOP 5 IP - User Manual 47 4.4.6. “Coding” tab This page allows to select the desired configuration for the LL link or an outgoing IP call, depending on the current transmission interface. The “Coding” tab groups the selection of the algorithm and its parameters, as well as the auxiliary functions. The available coding algorithms depend on the current network interface and the installed options, such as e.g. the AAC codecs. The coding parameters depend on the algorithm and the network interface. This is also true for the auxiliary functions. After selecting the coding algorithm, for some of these you must select additional parameters, such as: channel mode (for stereo-capable coding), sampling frequency and bit rate (for MPEG L2 and AAC coding), protection mode (only for MPEG L2 in LL mode) Remember to save the changes, clicking the “Save” button! 48 SCOOP 5 IP - User Manual 4.4.7. “Misc” tab This “MISC” tab groups several settings: auto redialing configuration and activation, loop control activation… Notes for the parameters on this page: Auto Redial: this sub-menu deals with the auto redial feature, whose operation is described in 3.5.2 above. Redial Attempts: you can adjust from 1 to 20 the number of attempts to reset the link in case of a drop, or even “Infinite” for redialing indefinitely. Time before dial: (in seconds) adjust between 1 and 30 seconds, after a link loss, the waiting time before redialing. It is often worth leaving such a pause, so that the cause of the link loss is possibly cured, or the remote unit gets back to its normal state, etc. Loop Control: for activating the loop control feature (cf 2.5.3, Loop control and status). Warning: this feature is incompatible with controlling links using the “CONNECTIONS” embedded html pages! Select “Backup” for the codec that will be “Caller” on a backed up LL link (see above 3.5.4, Setting up a backup link). LL Backup: in this section you can enable “Backup receive” for the codec that will be “Receiver” on a backed up LL link (see above 3.5.4, Setting up a backup link). It is also possible to configure an NTP server: this kind of server provides a time reference (from the Internet or a server on the local network), useful and recommended for the absolute time stamping of the events in the log (see further 4.4.8, “Event log” page). If such a server is available and accessible via the Ethernet interface, enter its address in the “NTP Server” field. A few public servers are also proposed in the dropdown list1. A reboot is needed for this setting to become effective! Remember to save the changes, clicking the “Save” button! 1 Note: to be able to use these servers 1) access to the Internet from the codec must not be restricted, 2) a DNS must be set so the symbolic names can be resolved. SCOOP 5 IP - User Manual 49 4.4.8. “Maintenance” tab This tab leads to a selection between several pages dedicated to maintenance aspects. “Login data” page This page is for setting the password for logging in the html pages. In a classic way, to set up a password you must first enter the current one, and then enter the new one and confirm it. Remember to save the change, clicking the “Save” button! “Tests” page This page allows to activate the various test loops (as described in 2.5.7, Test functions). Do not forget to disable the test loops (setting “None”) to come back to normal operation! “System update” page This page allows to upload a system update file into the unit and update the unit’s firmware. For an update, the file must be provided to you by AETA (or possibly your distributor/dealer). The procedure is rather simple: From this page, click “Browse…”, find and select the update file. Wait for the completion of the update. The process takes a few minutes. Normally the unit should reboot by itself at the end of the process. Once the unit has restarted, perform a complete “Factory reset”. Click the “Update” button. The process begins, and a warning message is also displayed on the SCOOP 5 IP front panel. This procedure requires maximum care, because such update always implies some risk. Please note these additional recommendations: Beforehand backup/export the recorded profiles and snapshots, if you would like to use them again afterwards. Make sure the link between the control computer and the SCOOP 5 IP is stable (no undesirable interruption during the process). Make sure the SCOOP 5 IP is not powered off and its Ethernet interface is not disconnected during the process. Re-import your profiles and snapshots after the update. But be aware that, although we always try to keep a maximum upward compatibility, AETA cannot guarantee the re-usability and consistency of these memories after a firmware update. 50 SCOOP 5 IP - User Manual “Reset” page This page provides two functions: clearing the settings and/or memories/profiles recorded in the unit, and rebooting the unit. You can reset the unit completely or only clear a category of data; the available options are: “Factory reset”: all parameters are brought back to their default setting, and all memories (profiles, snapshots) are deleted. “Reset settings”: all parameters are brought back to their default setting, but all memories are kept: profiles and snapshots. “Reset snapshots”: all snapshots are cleared form the memory. “Reset profiles”: all profiles (remote and local) are cleared form the memory. After selecting an option, click the “Reset” button. Warning: this cannot be cancelled! If you have lost the login password, of course this page cannot be reached… You should in such case apply the backup reset procedure (as described in 3.6.5, Backup reset) and bring the unit back to its default “factory” settings, including a blank password. The page also allows you to reboot the unit by remote, clicking the “Reboot” button. The device is actually reboot when you confirm by clicking “OK” in the dialog box which then shows up1. This is equivalent for SCOOP 5 IP to an off/on power cycle. Of course, you must wait for the return to the normal operative state before regaining control via the html pages. “Event log” page This page displays a history if the system events, which can be useful for operational records, or for investigating operation issues, etc. Events are logged by the codec in its internal memory card; they are recorded in plain text (unformatted ASCII), and the web page displays the 200 last lines of this log (with a scroll bar). You can select the detail level for this history, depending on the target application: “Coarse”: only essential events are logged, such as reboots, link set up, alarms… This type of history can be useful as a link record, and gives a very synthetic overview. “Normal”: gives more details, and this is the default setting, suitable for most operation needs. “Debug”: absolutely all events are logged; this makes a very “verbose” and technical history, reserved for testing and fixing issues. SCOOP 5 IP can also send event messages to a SYSLOG server is such server is available on the network: enter the address or name of this server and click the “Apply” button. From then on, SCOOP 5 IP sends the designated server all events, regardless of the detail level selected as described above. The two “histories” run in parallel: on one hand messages to the SYSLOG server, on the other hand the “filtered” events (depending on the detail level selected) recorded in the SCOOP 5 IP log file. 1 If you mistakenly clicked the “Reboot” button, it is still possible to cancel this: close the page without clicking “OK” (do not hit the computer’s Esc key neither). SCOOP 5 IP - User Manual 51 Events are time-stamped (date, hour, minute, second) from the internal clock of the unit. This clock is not backed (no battery inside the unit), but the unit can synchronize at boot time using the NTP protocol. The address of such server must be set in the “Misc” page (see 4.4.7 above). Important notice: time stamps are universal time (UTC), hence they take no account of geographical location, neither any DST (daylight saving time). Remember to add the appropriate time difference when analyzing the logs. Under the log window you can find some control buttons: “Hold”: normally the event window scrolls at any time while new events occur. Click this button to stop this and freeze the display. The button becomes “Continue”. The events are still logged, only the page update is interrupted. “Continue”: resumes the automatic updating of the event display. “Save logfile as”: allows you to download on the control computer the history file. This takes place as a typical download. Depending on the browser and its settings, you can possibly select the file destination, name… “Refresh”: click this button to update the display and show the most recent events. This button is relevant if the display has been frozen (with “Hold”), in order to refresh the event display on demand. “Setup Transfer” page This page provides a means to backup all the settings of the unit into a file, and reciprocally to restore a complete configuration from a file previously saved in this way. Partial exports are also possible, selecting the items you wish to include: remote profiles, local profiles, snapshots, settings… The left part of the page is dedicated to “exporting” the device configuration: the configuration is then saved in a file, downloaded in the control computer. Before doing the export you can select which type of data is to be included in this backup/export: check the desired categories (multiple choice allowed), and click “Export”. The rest is carried out like a typical download. Depending on the browser and its settings, you can possibly select the file destination, name… 52 SCOOP 5 IP - User Manual The right side is for “importing” the device configuration: click “Browse…” to select the file to be imported, and launch the process by clicking “Update”. The file must be a file previously exported from a SCOOP 5 IP (same unit, or another). The settings or memories included in the file are respectively applied to the codec, or recorded in its memory of profiles/snapshots. Warning: the export files can be imported into a device with the same firmware version, but there is no guarantee of “portability” of the configuration files from one firmware version to another. In other terms, the outcome is not guaranteed when importing into a unit files which were exported from a unit with a different firmware version. We recommend to carefully check the settings in such case, after importing the file. 4.4.9. “Alarm” tab The “Alarm” tab switches to red as soon as at least one anomaly is detected. In addition the number of abnormal conditions is shown, like in the example below with two alarm conditions detected: Clicking the tab, you reach this “Alarm” page showing all the alarm conditions. All possible issues are listed, but only those actually detected are highlighted with the The issues are grouped in three areas: icon. Alarms related to “Transmission”: essentially issues related to the decoder synchronization. In addition, for ISDN links, there may be encoder or decoder fallback cases (“fallback” is the situation when the encoder or decoder configuration actually set on the link differs from the one which was initially programmed or expected). Alarms related to the audio interfaces: audio clipping (minor alarm), AES input errors. Hardware alarms (internal alarms): excess temperature, power failure. SCOOP 5 IP - User Manual 53 4.5. Setting up an IP link The transmission in « leased line » mode is permanent, and is set up as soon as the physical connections are done and all parameters are configured adequately. For an IP link, a link/session must be set. 4.5.1. Preliminary settings If a SIP server is used, the SCOOP 5 IP must be registered on this server. Use the “Network” tab, “AOIP PARAMETER” page (see above on page 44) for entering the SIP account data and activate the SIP registration. Check that the codec is successfully registered, thanks to the “STATUS” page: “AOIP” frame, “SIP Status” field. Besides, for links over the Internet, most often the link passes through a NAT router which “hides” to the codec the characteristics of the public access: public IP address and RTP ports actually used. This can make the SIP transactions fail, or get a non-optimal route through the network. To avoid this a STUN server is often used; the corresponding settings are also found in the “AOIP PARAMETER” page. Check that the public address discovery has succeeded: “ETHERNET” frame, “Public IP” information (its mere presence shows the discovery has succeeded). You can find in annex 6.3 (Some methods to deal with NAT routers and firewalls) some additional information on the use of STUN. 4.5.2. Directly call an IP address This is the most basic way of setting the link. It is suitable only if: The other unit is “directly” reachable, i.e. there is no NAT Router or firewall blocking the connectivity. The simplest case is when both units are on the same LAN or private network. The IP address of the other unit is known! To set the link, first set the unit in IP mode (“Network” tab, “CHANGE NETWORK” page, select “Ethernet”), and set the desired encoding format (“CODING” tab). Go to the “CONNECTIONS” tab, and in the “Number” field enter the IP address to call. Click the “Call” button. You can monitor the link status in the “LINK STATUS” frame, either in the “CONNECTIONS” page or the “STATUS” page. When operating in this way, it is recommended to disable the SIP registration (“SIP Registration” parameter in the “AOIP PARAMETER” page, see on page 44). 54 SCOOP 5 IP - User Manual 4.5.3. Calling via a SIP server This is the technique when both units are registered on a SIP proxy server. In this case, each unit is identified by its SIP URI, in the form username@sipservername, like an email address. There is no need to know any IP address (and hence there is no problem if the IP address of a unit changes for whatever reason). To set the link, first set the unit in IP mode (“Network” tab, “CHANGE NETWORK” page, select “Ethernet”), and set the desired encoding format (“CODING” tab). Go to the “CONNECTIONS” tab, and in the “Number” field enter the SIP URI of the device to call. Click the “Call” button. It is often possible to dial the short form username (omitting the @sipservername) when the device is itself registered onto the same “sipservername” server. You can monitor the link status in the “LINK STATUS” frame, either in the “CONNECTIONS” page or the “STATUS” page. 4.5.4. Receiving calls This is very simple, in both cases (direct peer to peer link or SIP server). There is nothing to do… When a call is received, the units negotiate automatically a commonly acceptable coding algorithm, and set the link automatically. On the receiving side, SCOOP 5 IP will “follow” the calling unit. The receiving and processing of an incoming call is visible in the “LINK STATUS” frame, either in the “CONNECTIONS” page or the “STATUS” page. Important notice: the unit can receive and accept incoming IP calls only if it is running in LL mode, except if the ”Backup receive” mode is active (for details see above 3.5.4, Setting up a backup link). 4.5.5. “Network quality” setting Depending on the quality of service provided on the network, especially its jitter performance, it is possible to change the stability/latency compromise used by the SCOOP 5 IP. For this purpose, a setting is available in the “ETHERNET PARAMETER” of the “NETWORK” tab. Three choices are proposed: “High”: suitable for a good quality and low jitter network; latency is minimal, but the codec will have little tolerance to possible jitter “Middle”: intermediate (and default) setting, suitable for a moderate transmission jitter “Low”: to be preferred when the network has low QoS, especially for residential ADSL lines. This setting ensures a safer operation, at the cost of a high latency. On a LAN and/or private network with a controlled quality, the “HIGH” quality setting is recommended, as it yields minimum latency. On the contrary, it should be avoided for a link via the Internet, as it can only tolerate a low jitter. One solution can be to start with a “Middle” setting, and switch to the “Low” setting if too much audio disturbance is heard. 4.5.6. Quick redialing Once a remote device has already been called, it is easy to recall it: click the icon at the right of the “Number” field: a drop-down list shows the last called numbers/addresses. Select the desired number, and click the “Call” button. SCOOP 5 IP - User Manual 55 4.5.7. Releasing/Hanging up To stop a link, on the “CONNECTIONS” page click the “Release” button. 4.5.8. Links with IP phones SCOOP 5 IP is compatible with IP phones that use the SIP protocol (many on the market do). The algorithm used in this case is commonly G711, but a few IP phones also accept G722. Note that “IP phones” include software SIP phones implemented on computers (also called “softphones”) or smartphones. 4.5.9. Multicast mode transmission On a network that can support it1, the multicast mode can optimise the resource usage when an audio stream has to be distributed simultaneously to several destinations. Contrary to the normal bidirectional unicast mode, this mode is unidirectional: one sender encoder sends a stream towards a multicast group address, and one or several decoders receiving the stream pick up the packets sent to this group address and decode the audio stream. On the SCOOP 5 IP the operating mode stays quite similar to the “normal” mode, with mainly two differences in the multicast mode: A codec must be set as sender or receiver device Set the codec in “multicast send” mode. To do this, refer to the “AOIP PARAMETER” page, (see page 44). SIP is not used and hence the SIP configuration is not relevant For the operation it is assumed the network “statically” supports UDP multicast, i.e. routers of the network recognise and deal with routing the packets with multicast group addresses. For obvious reasons the coding setup is entirely decided at the source. On the codec on the audio source side (hence sender of the encoded stream), the procedure for setting up a multicast stream is the following: Select on this codec the desired audio coding parameters; Start the streaming as for setting up a call in normal mode (“CONNECTIONS” tab): enter as “Number” the IP group address, then click the “Call” button. Note that the codec decodes its own stream on its audio output; this can be useful for audio monitoring. For each codec that has to decode the stream, the procedure is simple: Set the codec in “multicast receive” mode. To do this, refer to the “AOIP PARAMETER” page, (see page 44). Start the streaming as for setting up a call in normal mode (“CONNECTIONS” tab): enter as “Number” the IP group address, then click the “Call” button. You can monitor the link status in the “LINK STATUS” frame, either in the “CONNECTIONS” page or the “STATUS” page. 1 This does not include the Internet; multicast cannot be used over the Internet. 56 SCOOP 5 IP - User Manual 4.6. Setting up a link over a leased line There is no specific procedure for establishing or interrupting such link: once the physical connections and the coding configuration are done, set the unit in LL mode (“NETWORK” tab, “CHANGE NETWORK” page, select LL), and configure the desired coding setup: “CODING” tab.). The link is immediately started: the encoder transmits the encoded stream, and the decoder looks for synchronisation on the received stream. In case the link is broken, the decoder restarts looking for synchronisation and restarts as soon as the stream comes back, without any action needed from an operator. This is also true when restarting after a power cycle. SCOOP 5 IP - User Manual 57 4.7. Management of the configuration profiles The configuration profiles ease configuration changes and the setting up of routine links. There are three types of profiles: “Remote profiles”, which include call parameters for a given destination (number(s), coding, etc.). Such a profile is similar to a directory entry, but in addition it can memorize the coding parameters. “Local profiles” memorize the network access parameters. These are the settings found in the “NETWORK” tab. Recalling a local profile is a quick way to restore the configuration needed for a given line or network. “Snapshots” memorize the settings for the audio interfaces. These are settings found in the “AUDIO” page. These various memories are usable through the embedded html pages, and also using these pages they can be imported/exported from/to a computer. Each remote profile includes the following elements: Name assigned to the profile Number(s): number or SIP URI, IP address. Coding configuration associated with the profile A remote profile may have no number included; in such case it is used for quick and safe recall of a given coding configuration. Conversely a remote profile may have no associated coding configuration included; in such case it is just like a directory entry, used for instant dialling a known destination. The profiles are managed and used via the “PROFILES” tab (see 4.4.3, “Profiles” tab). Besides, remote profiles can be used directly from the “CONNECTIONS” page, where they ease up the link management. 4.8. Clearing all settings In some cases, it can be necessary to come back to the “factory” configuration. To clear the whole configuration and come back to the factory settings, normally you should go to the “MAINTENANCE” tab, “RESET” page, and select “Factory Reset”, or “Reset Settings” (the latter does not delete the memorized profiles and snapshots). Warning: this cannot be cancelled! If you have lost the login password, of course this page cannot be reached… You should in such case apply the backup reset procedure (as described in 3.6.5, Backup reset) and bring the unit back to its default “factory” settings, including a blank password. 58 SCOOP 5 IP - User Manual 5. Technical characteristics 5.1. Characteristics of interfaces 5.1.1. Analogue audio inputs Audio characteristics are measured over a 20 to 20 000 Hz bandwidth except when differently stated. The inputs are balanced type, using 3-pin female XLR sockets. Maximum input level: adjustable from 0 to +22 dBu ± 0.3 dB Nominal input impedance: 600 or 10 k (setting: “AUDIO” page) 5.1.2. Analogue audio outputs Audio characteristics are measured over a 20 to 20 000 Hz bandwidth except when differently stated. The outputs are balanced type, using 3-pin male XLR sockets. Maximum output level: adjustable from 0 to +22 dBu ± 0.3 dB Nominal load impedance: 600 or 10 k Output impedance: <50 Symmetry: > 40 dB (ZL = 150 ) 5.1.3. Digital audio input and output These interfaces comply with recommendations: AES3-1992 EBU Tech. 3250-E CCIR Rec. 647 They support (in genlock mode) a sampling rate from 28 to 96 kHz. In master mode, the unit can be set in one the following sampling rates: 32, 48 and 96 kHz. 5.1.4. Ethernet Interface This RJ45 socket has standard Ethernet pinout (for use of a normal “straight” cable to an Ethernet hub or switch). The interface normally operates in 100BaseT full-duplex mode, with auto negotiation, but it is possible to force other configurations. The installation and operation of this function is detailed in 3.4, Initial setup of the Ethernet interface. SCOOP 5 IP - User Manual 59 5.1.5. Main X24/X21/V11/V35 interface The X24/V11 interface uses a 15-pin male Sub-D connector. The following table shows the pinout. Signal Pin Frame ground Transmitted data Ta Received data Indication Received clock Ra Ia Sa Electrical ground 1 2 3 4 5 6 7 8 Signal 9 10 11 12 13 14 15 Tb Transmitted data Rb Ib Sb Received data Indication Received clock The codec does not transmit a C signal, and the I signal has no effect. The codec can also be connected to a V35 interface; a specific adaptation cable is needed in such case. The connection is described in Annex (6.4, V35 interface adaptation). 5.1.6. “Alarm + X24/X21” interface This interface uses a 15-pin male Sub-D connector. The following table shows the pinout. Signal Internal alarm - Common Transmitted data Internal alarm - NC Received data Indication Received clock External alarm - NO Electrical ground Pin IA-Com Ta IA-C Ra Ia Sa EA-O 1 2 3 4 5 6 7 8 Signal 9 10 11 12 13 14 15 Tb IA-O Rb Ib Sb EA-C EA-Com Transmitted data Internal alarm - NO Received data Indication Received clock External alarm - NC External alarm - Common The bold text refers to the alarm contacts. Both are form-C type. The “NO” terminal is open when the alarm is set, otherwise it is connected to the “Common” terminal. The “NC” terminal is connected to the “Common” terminal when the alarm is set, otherwise it is open. The current and voltage handling capabilities of the relays (static type) are: Maximum output current: 120 mA Maximum output voltage: 350 V peak Resistance of output loop: < 35 Isolation > 1500 VRMS The codec does not transmit a C signal and the I signal has no effect. The codec can also be connected to a V35 interface; a specific adaptation cable is needed in such case. The connection is described in Annex (6.4, V35 interface adaptation). 60 SCOOP 5 IP - User Manual 5.1.7. Serial remote control interface This interface uses a 9-pin female Sub-D connector on the rear panel. This is a V24/RS-232 type interface with only Tx and Rx signals (no flow control). The following table indicates its pinout (DCE type pinout). Pin Function 2 Rx V24 data to the PC Output 3 Tx V24 control data, from the PC Input 5 Ground Other Not connected The interface is configured as follows: 4800 bauds, 8 bits, no parity, one stop bit. 5.1.8. Serial data interface (“Data”) This V24 interface uses a 9-pin female Sub-D connector on the rear panel. Like for the remote control interface, only Tx and Rx are used, there is no flow control, and the pinout is of DCE type. Broche Fonction 2 Rx Received V24 data Output 3 Tx Transmitted V24 data Input 5 Ground Other Not connected The data interface is configured as follows: 8 bits, no parity, one stop bit, no flow control. It is possible (see menu TOOLS / MISC / AUX. FUNCTIONS) to activate the interface and to configure its baud rate (300 to 9600 bauds). However, the maximum allowed baud rate depends on the audio coding used (see 2.4, Auxiliary functions). SCOOP 5 IP - User Manual 61 5.1.9. Relay transmission interface (“AUX” socket) The relay transmission interface (refer to 2.4.1, Transmission of isolated relays) is available on the 25 pin female sub-D “AUX” Socket. It includes two isolated current loop inputs and two dry contact outputs. The following table shows the pinout of the socket for this function: Pin Function 13 Output loop n°2 (b) 25 Output loop n°2 (a) 12 Output loop n°1 (b) 24 Output loop n°1 (a) 11 Input loop n°1 (b) 23 Input loop n°1 (a) 10 Input loop n°2 (b) 22 9 Input loop n°2 (a) +5V of internally supplied power supply 21 0V of power supply All loops are isolated and bi-directional (free polarity). The characteristics of the input loops are: Input loop control current: 6 mA Resistance of input loop: 560 Input loop isolation: > 1500 VRMS (max. 100 mA) (current limiting series resistor) A +5V to +12V source may be connected directly on an input loop, because the internal series resistor is dimensioned for this purpose. For a higher voltage source, it may be necessary to limit the input current. The characteristics of the output loops are: Maximum switching voltage: 350 V peak Maximum switching current: 120 mA Resistance of output loop: < 35 Output loop isolation: > 1500 VRMS The 5V power supply is available from the unit to power a low-consumption device (maximum 300 mA current consumption), e.g. to power the input loops or LED indicators connected to the output loops. 62 SCOOP 5 IP - User Manual 5.1.10. Loop control interface (“AUX” socket) The 25 pin female sub-D “Aux.” socket includes isolated current loop inputs and dry contact outputs, that can be used to remotely control the calls and indicate the link status: The input loops have an effect only if the “loop control” function is enabled (see 3.5.3, Loop control). The output loops are always operative. Activating the input loop #1 triggers an IP call on the codec; de-activating the loop releases the line. Output loop #1 is closed while the codec is connected and synchronized. The following table shows the wiring of the socket for this function: Pin Function 17 Input loop n°2 (a) 5 Input loop n°2 (b) 18 Input loop n°1 (a) 6 Input loop n°1 (b) 19 Output loop n°2 (a) 7 Output loop n°2 (b) 20 Output loop n°1 (a) 8 Output loop n°1 (b) 21 9 0V of power supply +5V of internally supplied power supply All loops are isolated and bi-directional (free polarity). The characteristics of the input loops are: Input loop control current: 6 mA (max. 100 mA) Resistance of input loop: 560 Input loop isolation: > 1500 VRMS (current limiting series resistor) A +5V to +12V source may be connected directly on an input loop, because the internal series resistor is dimensioned for this purpose. For a higher voltage source, it may be necessary to limit the input current. The characteristics of the output loops are: Maximum switching voltage: 350 V peak Maximum switching current: 120 mA Resistance of output loop: < 35 Output loop isolation: > 1500 VRMS The 5V power supply is available from the unit to power a low-consumption device (maximum 300 mA current consumption), e.g. to power the input loops or LED indicators connected to the output loops. SCOOP 5 IP - User Manual 63 5.1.11. Coordination channel interface (“AUX” socket) In addition to the loop control and relay transmission interfaces, the (optional) coordination channel input and output are available on the 25-pin female sub-D connector (“AUX” Socket on the rear panel), with pinout as indicated hereunder. The input and output are balanced floating signals, transformer isolated. Maximum level: 9 dBm Impedance: 600 Nominal bandwidth: 300 – 3400 Hz 64 Pin Function 1 Coordination channel output (-) 14 Coordination channel output (+) 2 Frame ground 15 Coordination channel input (+) 3 Coordination channel input (-) 16 Frame ground SCOOP 5 IP - User Manual 5.1.12. “Digital I/O” interface This 15 pin female sub-D socket provides the GPIO signals described in 2.4.2, Transmission of GPIO. The pinout is shown in the following table: Pin Function Signal and power ground 1 9 2 GPI 3 10 GPO 3 3 GPI 4 11 GPO 4 4 GPI 5 12 GPO 5 5 GPI 6 13 GPO 6 6 GPI 7 14 GPO 7 7 GPI 8 15 GPO 8 8 +5V of internally supplied power supply Note: the GPIO index starts at 3 because indexes 1 and 2 are allocated to the relays (see above in 0). The GPIO signals do not have galvanic isolation as the relays. They feature the following characteristics: Characteristics GPI: voltage (low level, active) Min Nominal Max -0.5 V 0V 1V GPI: current (@ 0 V) Notes 110 µA GPI: voltage (high level, inactive) 3V 5V 7V GPO: voltage (low level, active) 0V 0V 0.55 V GPO: current (low level, active) [1] 32 mA GPO: voltage (high level, inactive) 5V 6.5 V [2] [1] An input pull-up ensures a high level if the GPI are “open” (not connected). [2] The GPO are “open drain”, and must be “pulled up” (to 5 V nominal) for the high level, but an internal pull-up ensures a 5 v voltage when they are inactive, even with no external polarization. SCOOP 5 IP - User Manual 65 5.1.13. AC power supply The unit is connected to mains via an IEC 3 pin socket, and accepts a 85-263Vac, 47-63 Hz AC source. Protection is provided by a resettable fuse. 5.1.14. DC power supply (option) When the 12V DC option is installed, the unit features, in addition to the mains socket, a 4 pin male XLR socket for connecting a 12 V DC supply (non isolated). The unit includes overvoltage and overcurrent protection (resettable fuse on the DC input). The DC supply is redundant with mains power, with priority to mains whenever it is present [1]. Characteristics Min Nominal Max Notes Supply voltage 10 V 12 V 17 V [1] Supply current 0.5 A 2A [2] [1]: Beyond 15 V the DC supply takes precedence, and provides power to the unit even if AC power is available. [2]: The power consumption may vary in a wide range depending on the input voltage, the installed options, and the operating mode. Connections on the XLR socket: Ground is connected on pin 1, and pin 4 must provide the +12 V voltage. 66 SCOOP 5 IP - User Manual 5.2. Audio performance The audio performance in this part applies to the system without coding/decoding, and excluding the coordination channel. The additional effect of the audio encoding and decoding on audio performance depends on the coding algorithm used and its parameters. Except when differently stated, the following measurements are done at a +6 dBu input level and on the AD/DA path, with maximum input and output level set at +16 dBu. 5.2.1. Transmission gain The drift in time of the gain from the input to the output of the codec is less than 0.3 dB. 5.2.2. Amplitude-frequency response All measurements are done with a +6 dBu input signal, and a reference frequency of 1020 Hz. The measurements are done with a loopback before coding/decoding, so the possible effect of compression has no influence. For a 48 kHz sampling rate: Frequency range Tolerance 0 Hz 20 Hz - 0 dB 20 Hz 40 Hz -0.2 dB 0.1 dB 40 Hz 20 000 Hz -0.1 dB 0.1 dB For a 32 kHz sampling rate: Frequency range Tolerance 0 Hz 20 Hz - 0 dB 20 Hz 40 Hz -0.2 dB 0.1 dB 40 Hz 15 000 Hz -0.1 dB 0.1 dB 5.2.3. Group delay distortion Taking the minimum group delay as reference, the group delay distortion on the AD/DA path is always less than 1 ms. 5.2.4. Idle channel noise Background noise is measured with no audio modulation (idle channel), with maximum input and output level set at +16 dBu, through the whole encoder-decoder chain (wide band coding, with 48 or 32 kHz coding frequency). Maximum noise level1: - 56 dBm (quasi-peak detection, CCIR weighting) (or - 62 dBq0ps) This result in a signal to noise ratio (SNR) of more than 72 dB. When the maximum input and output level is set at another level, both the signal and noise levels are shifted but the SNR remains in the same range. 1 Worst case for all types of algorithms; MPEG performs better than the others SCOOP 5 IP - User Manual 67 5.2.5. Total distortion vs frequency and level Total distortion relative to maximum level (or THD + N) is less than –82 dB over the whole audio bandwidth (20 – 20 000 Hz). This performance holds for audio signals from –80 dB to –1 dB relative to the maximum level (+16 dBu). 5.2.6. Crosstalk Crosstalk is less than -80 dB over the whole bandwidth. 5.2.7. Gain and phase difference between channels The gain difference between channels is less than 0.3 dB over the whole bandwidth, for any sampling frequency. The phase difference between channels is less than 3 degrees over the whole bandwidth, for any sampling frequency. 68 SCOOP 5 IP - User Manual 5.3. Network protocols and ports The SCOOP 5 IP implements or complies with the following protocols (non exhaustive list): Physical and link layers: Ethernet, 100BaseT, 10BaseT Network/Transport layers (IPv4): TCP/IP, UDP/IP, RTP/IP Application: HTTP, Telnet, DHCP, STUN, NTP, SYSLOG Audio transmission: SIP signalling, SDP, RTP, RTCP, RFC3550/3551, RFC3640 Compliant with EBU recommendation Tech 3326 (interoperability of audio codecs for contribution) The ports used by the device are the following: Type TCP UDP Port Designation Dir Notes 80 HTTP Embedded html server 6000 Control Remote control (“command line” mode); used by Scoop4Man and TeleScoop 123 NTP For querying an NTP server 514 SYSLOG For sending messages to a SYSLOG server 3478 STUN For querying a STUN server 5004 RTP For audio streaming 5005 RTCP For audio streaming 5060 SIP SIP signalling 6000 Multicast/description Multicast stream description channel 6001 Multicast/audio Multicast stream transmission channel Ports shown in bold can be changed from the default values shown in the table. SCOOP 5 IP - User Manual 69 5.4. Power supply The codec operates from mains 85-263Vac, 47-63 Hz. As an option the product can also be powered from 12V DC source. The maximum power consumption is 15 W (depending on version and installed options). 5.5. Dimensions and weight The unit is a 19 inches frame of 1U height (44 mm or 1.75”) and 265 mm overall depth (12.5”). Its maximum weight is about 3.3 kg (depends on installed options). 5.6. Environmental characteristics The equipment operates over a 0°C to 45°C ambient temperature range (32°F to 113°F), and a 5% to 90% humidity ratio range. The SCOOP 5 IP complies with “CE” directives regarding safety and EMC. Safety: compliance with EN60950 EMI: radiated emissions complying with EN55103-1 Susceptibility: compliance with EN55103-2 5.7. Options The SCOOP 5 IP includes digital leased line interfaces (X24/V11/V35) and an Ethernet interface for IP transmission. Options can be added to complement the capabilities of the SCOOP 5 IP. Ordering code Option Description 80 00 192 51 AAC Addition of AAC coding algorithms: AACLC, HE-AAC and HE-AAC v2 80 00 194 01 12V DC power Additional 12V DC power supply input 80 00 196 01 Coordination channel Auxiliary coordination channel 5.8. Accessories and related products The SCOOP 5 IPis delivered with a mains cord and a CAT5 Ethernet cable. Along with the coordination channel option, a specific cable is delivered, which provides XLR plugs for the coordination channel input and output (input on a female plug, output on a male plug). For remote controlling SCOOP 5 IP units from a PC, the TeleScoop configuration and supervision software is available (for a Windows computer). The TeleScoop software also allows to control the other rackmount codecs of the Hifiscoop, Scoop 3, Hifiscoop 3 and Scoop 4+ ranges. SCOOP 5 IP can also be controlled by several third-party software tools such as Codec Live, MDC.Net... It is possible to get an additional Ethernet interface that can be used for remote control from a separate sub-network, by connecting on the USB socket a USB/Ethernet adapter, such as the LogiLink UA0144. Other compatible devices may be available later, in which case you can find them on our web pages; consult our site www.aeta-audio.com . 70 SCOOP 5 IP - User Manual 6. Annexes 6.1. Additional information on the algorithms and protocols used 6.1.1. Auxiliary data in the MPEG frames The auxiliary data are used for the following purposes: Reed-Solomon error detection and correction (J52 standard) Data channel Other auxiliary information: relay transmission, and/or auxiliary audio channel. The insertion of this auxiliary information is an extension (AETA proprietary format) to MPEG. However, the frame structure remains compliant. 6.1.2. Reed-Solomon encoding In order to cope with possible transmission errors in the network, Reed-Solomon error correction coding can be added, compliant with J52 recommendation. Four correction modes are available in the SCOOP 5 IP: Mode 0: no error correction, Reed-Solomon coding disabled Mode 2: protection of the whole frame, moderate (2.5 %) redundancy Mode 1: protection of only the control information and scale factors in the MPEG frame, low redundancy Mode 3: protection of the whole frame, high (10 %) redundancy Higher redundancy increases the protection against errors, but slightly degrades the audio quality, as redundancy takes up part of the bit rate that could be allocated to audio coding. Most often, for a normal quality transmission link, mode 1 is sufficient and it consumes little bit rate from the compressed data, so it hardly impacts the audio quality. Although J52 does not apply to leased line connections, this error protection technique is also implemented in the SCOOP 5 IP in leased line mode. 6.1.3. H221 framing H221 defines a framing structure that allows byte synchronisation recovery in leased lines, and the transmission of control data along with the main data. SCOOP 5 IP - User Manual 71 6.2. Overview of the SIP protocol 6.2.1. What is SIP? SIP is for Session Initiation Protocol, a protocol specified by the IETF for establishing media transmission sessions. SIP is considered the communication protocol of the future by most vendors, and as such it has deep influence on the VoIP applications. As a signalling protocol, SIP brings methods and techniques to solve the issues related to the establishing of an audio link. Almost as important, it is a recognised standard, implemented on many network devices and systems. Using SIP helps you build modular and really evolutive systems, not being tied to a single vendor. The SIP protocol is an essential requirement in the EBU Tech 3326 recommendation (a.k.a. “N/ACIP” recommendation, from the name of the EBU workgroup who elaborated it). 6.2.2. Setting a link with SIP Let us look at an example (diagram below): a reporter on the move with a Scoopy+1 wants to make a call to a SIP compliant codec located in the main station. The reporter may be at home, or at another location, not necessarily known in advance. Once the Scoopy+ is on and connected to the network, it will register itself to a SIP “registrar”. This registrar can be located on the LAN of the radio house, but it may as well be elsewhere in the network. Then the registrar “knows” where the Scoopy+ is, what its IP address is. On the radio house side, a similar process takes place . To call the codec of the radio house (e.g. a SCOOP 5 IP), the reporter just needs to know its SIP address, which can be like [email protected] (indeed very similar to an e-mail address). To call the unit, the reporter has to select the preferred audio coding mode on the Scoopy+ (e.g. mono G722), then call the remote unit, simply using this SIP address (SIP URI). IP telephone SIP proxy server Gateway 4 IP network 2 3 1 Gateway Gateway SIP registrar Scoop 5 5 Scoopy+ Figure 5 – Setting up an SIP session with server(s) 1 Scoopy+ is a portable audio codec from AETA; the description here applies to both Scoopy+ and the SCOOP 5 IP, as they are both SIP compliant and mutually compatible 72 SCOOP 5 IP - User Manual What happens then on the network: the Scoopy+ sends the request (INVITE in SIP protocol) to a proxy server (often the same device is also the registrar). To make things simple, this proxy then relays and routes the request to its destination. Resolving the SIP URI to a physical network and address uses mechanisms similar to those used for resolving URLs. Several proxys may be involved in cascade to finally reach the desired destination, but this does not have to be known or dealt with by the end devices. The following is like the initiation of a phone call: the IP codec “rings”; if it accepts the call, this is notified to the Scoopy+. At this stage, the proxy (s) provide the Scoopy+ and the IP codec with all the address data they need for the link, then the actual audio streams can be exchanged between both units. As a very important feature, the end devices now can exchange data directly; the proxies do not have to be on the path, they are only involved in the setting (and later the ending!) of the session. The codecs will automatically exchange their coding capabilities, and agree on a coding mode, with no further user intervention. Alternatively, the call can be done from the station to the reporter, in a way very similar to the above. In contrast with ISDN links, the operators at the station do not even need to know where the reporter is located! This is because the registrar deals with this issue. Note that it is also possible to set a link with a SIP-compliant VoIP phone instead of another codec. This is one of the numerous advantages of using a standard. 6.2.3. Setting a link without a SIP server Contrary to a commonplace but wrong idea, the SIP protocol does not impose using a SIP server. The SIP protocol can be used without a SIP server, i.e. it is possible to set “peer to peer” links without involving one or more SIP registrars or proxies. In such a case the process is more direct, and the codec contacts the remote destination with no intermediate entity. However, there are some drawbacks with such type of session: Without a registrar, the identification of the destination is its IP address; this is not as “stable” as a SIP URI, as it may change depending on the location, or time (with dynamic addressing). The two codecs must have open access to the Internet, or otherwise the link must be made possible by unlocking if necessary the appropriate routes and ports (conversely, when using a proxy, such allowances can be restricted to the server connection, for a better control on the access security). Most often the gateways perform address translation (NAT), which is an a priori issue for UDP protocols such as implemented for real time audio links. Proxies can help dealing with this issue, but without such servers it may be rather difficult to work around such obstacle. The following chapter provides some recommendations about this. SCOOP 5 IP - User Manual 73 6.3. Some methods to deal with NAT routers and firewalls Problems arise when the desired connection has to go through a NAT router, and/or a firewall, that blocks a direct IP communication. This is a very common issue, especially if one needs to set up a transfer via the Internet. It is impossible here to describe in details the possible ways to deal with this problem, but the following just shortly discusses some typical solutions. Most probably, a network administrator should be consulted for support, and for granting adequate network authorisations and/or privileges. The most classical issues are related to: The presence of a NAT router on the network path between the codecs. The presence of a firewall on this path. It is always important to have available the information regarding the network organization and to be allowed to access the devices which need to be configured. Hence we highly recommend to involve the persons empowered for such tasks. 6.3.1. Links via a private network No special problem should be met within a LAN. The operation is also possible with codecs from other manufacturers, provided that they comply with the Tech3326 EBU recommendation (also known as “N/ACIP” recommendation). However you should check for specific settings or preparation possibly needed on such devices. A wide area network covers a wider geographic range, and the network topology most probably includes routers on the path between the codecs to be linked. However, usually there is not much difference with a local area network. Note: using a VPN leads to just the same case; the operation is identical as far as the codecs are concerned. 6.3.2. Links through a public network (Internet) If each of the units has got a “direct” access to Internet with a public address, we are in the same situation as the previous one, functionally speaking (private WAN). The addressing scheme is normally static, as DHCP can rarely be used on a public access. In fact, this situation is very seldom met in the field! First, the Internet access is usually protected by a firewall which will, as a principle, block a priori the desired connection. In such case exceptions (to the firewall security rules) must be created, that will allow this connection; this has to be done by the person in charge of the network management. Most often, on one access if not both, the codec accesses the Internet via a NAT router. This router shares Internet access, with one or a few public addresses, among the equipment on the LAN. On this LAN the devices get local private addresses, and the router carries out an IP address translation. Note that: As an example, a consumer ADSL modem-router is almost always a NAT router, sharing a single public IP address between the devices connected to the router. It is just the same on a 3G/3G+ mobile IP access; the terminals (phones or computers) access the Internet via NAT routing. NAT routing is often included in the firewall features; in fact NAT routing somewhat participates to the protection against direct attacks from the outside. 74 SCOOP 5 IP - User Manual NAT routing is an obstacle to transmission with UDP, mainly for two reasons: It does not allow unsolicited data to come in from the outside network. In other words, data input is accepted on a port as an answer to a request from the local network, but an external agent cannot directly initiate the transmission of a packet. The terminal units on the LAN only know their private local address. On the other hand, agents implementing the SIP protocol have to communicate to each other the addresses and ports to be used for the media exchanges. Because of the NAT routing, agents do not get the real public addresses, which leads to failure of the session setup attempts. We are now looking at various methods used to overcome these obstacles. NAT and use of a STUN server The STUN protocol is a method which is often successful1 in helping the agents to discover their public address even when they are “hidden” behind a NAT router. Here is the operation principle: A STUN server is used, which is accessible over the Internet; The address of this server is programmed into the agent (i.e. the audio codec in our topic); The agent queries the server and discovers its public IP address and port number, as seen from outside of the NAT router and LAN; This addressing information is then used by the agent for negotiating and setting up a media session. The STUN server address is programmable in the menu or the html pages of a SCOOP 5 IP or Scoopy+. Besides, there is also in the menu (keypad and display on the front of the unit) an enable/disable (on/off) selection, without having to clear the server address. There are many public STUN servers available on the Internet; here are a few examples, valid at the time of writing: Domain name Numeric address stun.aeta-audio.com 85.214.134.163 stun.ekiga.net 77.72.174.163 stun.sipgate.net 217.10.68.152 Examples of STUN servers It is recommended to check that the server is operative. Moreover, numeric addresses may change, even if the domain name stays the same. A list of servers can also be found on the support page of our web site http://www.aeta-audio.com. 1 Although not with so called “symmetric” NAT routers SCOOP 5 IP - User Manual 75 Standard NAT router Situation: codec A behind a NAT router with no specific programming (a codec accessing Internet via a mobile network is almost always in such situation). Besides, we assume that the other codec (B) is accessible with a public address. Once codec A is configured for using a STUN server: codec A can initiate a connection to (call) codec B codec B cannot call codec A Advantages Drawbacks Configuration is relatively simple B cannot call A No change is needed on the router Several codecs can be set behind the NAT router Method suitable for mobile network access1 NAT router with DMZ Situation: codec A behind a NAT router and placed in « DMZ ». We also assume that the other codec (B) is accessible with a public address. Once codec A is configured for using a STUN server: codec A can initiate a connection to (call) codec B codec B can call codec A, using the public address of the NAT router Advantages Drawbacks Each codec can set up a session Need to configure the router A is nearly equivalent to a codec with a Only one codec can be set up in this way on a LAN direct public access A is exposed to external attacks The DMZ may be already reserved for other network equipment Method not possible for a mobile network access NAT router with port forwarding Situation: codec A behind a NAT router and configuration of the router to forward to A the necessary ports. We also assume that the other codec (B) is accessible with a public address. Port forwarding to be set on the router2: UDP 5060 (= SIP port) UDP 5004 (RTP port) and 5005 (RTCP port) 1 Except with symmetric NAT, which is often met for mobile network access 2 If needed you can change these numbers on the SCOOP 5 IP 76 SCOOP 5 IP - User Manual Once codec A is configured for using a STUN server: codec A can initiate a connection to (call) codec B codec B can call codec A, using the public address of the NAT router Advantages Drawbacks Each codec can set up a session Need to configure the router A is nearly equivalent to a codec with a direct Only one codec can be set up in this public access way on a LAN Method not possible for a mobile network access Use of a SIP server In addition to the numerous features it brings along, using a SIP proxy server is a very powerful method to solve the issues related to NAT routers, because most SIP proxies are capable to detect the presence of NAT routers and/or deal appropriately with their traversal. If a SIP server is available, and once the codecs are registered on this server: Any registered codec can call another registered1 codec, regardless whether there is or not a NAT router on the path. The identifier (SIP URI) is stable and does not depend on the location of the called agent (“mobility” feature). It is possible either to use a public server on the Internet, or to install a private server accessible via the Internet. Advantages Drawbacks Each codec can initiate Each codec can receive calls a session Installation may not be easy (private server) Identification is simple and location/time-wise stable Reliability of server questionable (public server) Security: a private proxy can be linked with a firewall Also works with symmetric NAT routers Interoperation with telephony over IP Method suitable for mobile network access For a fast implementation, you can use SIP accounts on AETA’s SIP server sip.aeta-audio.com. This server is dedicated to a professional broadcast usage, and housed in a safe site, available 24/7. Contact AETA for subscribing SIP accounts. 1 Depending on the access control policy, a server may accept « outgoing » calls to third party domains, or accept « incoming » calls from non registered agents. SCOOP 5 IP - User Manual 77 6.3.3. Summary and reminder of essential rules The table below sums up the situations where a link can be set up (not using a SIP proxy server) and reminds the needed specific settings: Codec A access Possible calls Codec B access Notes 1 LAN LAN (same) 2 Private WAN Private WAN 3 Internet direct Internet direct 4 NAT Internet direct STUN needed for A 5 NAT + DMZ Internet direct STUN needed for A 6 NAT + port forwarding Internet direct STUN needed for A UDP ports 5004, 5005, 5060 7 NAT NAT + DMZ STUN needed for A and B 8 NAT + DMZ NAT + DMZ STUN needed for A and B 9 NAT + port forwarding NAT + DMZ STUN needed for A and B UDP ports 5004, 5005, 5060 10 NAT NAT + forwarding STUN needed for A and B 11 NAT + DMZ NAT + forwarding STUN needed for A and B 12 NAT + port forwarding NAT + forwarding STUN needed for A and B UDP ports 5004, 5005, 5060 Basic rule: Codec behind a NAT router => use a STUN server. This allows the codec to set up outgoing calls. This is not sufficient to be accessible to connection requests from the outside. Mobile network access without SIP server or VPN => use a STUN server NAT + DMZ or NAT + forwarding => incoming calls are possible. Incoming calls are not possible behind a NAT router without either such change or a SIP proxy. SIP server => maximum versatility, at the expense of some initial effort (for installation) Reminder: the SIP protocol (always used by AETA codecs) does not impose the use of a SIP server. Codecs can set up point-to-point links using this protocol in the above described conditions. When no SIP registrar is involved, the identifiers are simply the IP addresses of the codecs. 78 SCOOP 5 IP - User Manual 6.4. V35 interface adaptation This annex indicates the proper connections to use when interfacing the SCOOP 5 IP codec to DCE equipment using a V35 interface. In the connection table below, the three leftmost columns show the pin allocation on the 15-pin connector of the codec. The two columns on the right indicate the pinout on a 34-pin V35 connector or a 37-pin sub-D connector. Consult the DCE documentation for other connector types. Only the bold indicated signals need be connected; leave other pins unconnected. However, the frame ground (pin 1) may be used for connecting the shield of the connection cord. X24 Signals G Pin 8 15 7 14 Sa Sb Ia Ib Ra Rb 6 13 5 12 4 11 3 10 Ta Tb 2 9 1 Signal direction Function V35 signal Pin number 34-pin 37-pin connector connector B 19 Signal ground 102 SG Data clock Data clock 115a 115b RETA RETB V X 8 26 Received data Received data 104a 104b RDA RDB R T 6 24 Transmitted data 103a Transmitted data 103b Frame ground TDA TDB FG P S A 4 22 1 SCOOP 5 IP - User Manual 79 6.5. Notice regarding open source code The software of this product includes programs and libraries that are covered by the GNU General Public License (or "GPL"), available for example at following address: http://www.gnu.org/licenses/gpl.txt . Under this license, the source code for concerned elements is available on our Internet site ("Download" page); otherwise it can be obtained on request by e-mailing AETA AUDIO SYSTEMS ([email protected]). The software also includes the sipX stack covered by the LGPL license. 80 SCOOP 5 IP - User Manual 7. Index 4 L 4SB, ADPCM ............................................. 10, 14 Loop Loop control ................. 15, 17, 21, 28, 49, 63 Test loop .................................................... 16 A AAC ......................................................... 11, 70 ADPCM .................................................... 10, 14 AES .............................................. 12, 19, 23, 59 Alarm ......................... 15, 18, 19, 21, 31, 32, 60 Auto redial ...................................................... 49 Auxiliary functions ............................................ 48 M Master (AES interface mode)............................. 59 MPEG AAC............................................... 11, 70 MPEG Audio Layer 2 ....................................... 11 Multicast ............................................... 7, 45, 56 B N Backup ............................................................. 8 NAT ......................................................... 44, 74 C P CELP .............................................................. 14 Clock.......................................................... 8, 12 Consumption (power) ................................. 66, 70 Coordination channel .............. 14, 21, 48, 64, 70 Crosstalk ......................................................... 68 Packet replication ........................................ 7, 45 Password .................................................. 22, 58 Port (forwarding) ............................................. 76 Port(s) (TCP/UDP) ...................................... 44, 69 Power supply................................................... 21 Profile ................................................ 16, 39, 58 Protocol.......................................................... 69 Proxy .............................................................. 73 D Data channel ................................ 14, 21, 61, 71 DC power ................................................. 66, 70 DCE, DTE ................................................. 61, 79 Dimensions ..................................................... 70 Distortion ........................................................ 68 E EMC, EMI ....................................................... 70 Environment .................................................... 70 F Factory settings .......................................... 22, 58 Firewall ........................................................... 74 G G711 ............................................................. 10 G722 ................................................. 10, 14, 72 Genlock ........................................ 12, 23, 46, 59 GPIO ....................................................... 14, 65 GPL, LGPL ...................................................... 80 Group address ............................................ 7, 56 H H221 ....................................................... 10, 71 HTML server .................................................... 35 I Impedance ...................................................... 59 J R Redial (auto) ............................................. 27, 49 Relays transmission .............................. 14, 21, 62, 71 Remote control .................... 7, 17, 21, 24, 61, 70 Replication (packet) ..................................... 7, 45 S SDP.................................................................. 7 Server ............................................................. 77 SIP protocol.............................................. 6, 7, 72 registration.................................................. 72 server ......................................................... 73 URI....................................................... 55, 72 SNR (Signal to Noise Ratio) .............................. 67 SRT ................................................................ 10 Standby .............................................. 18, 31, 34 STUN ................................................. 44, 69, 75 Supervision ......................................... 15, 17, 21 Synchronisation ............................................... 23 T Tech 3326 (N/ACIP) .................................. 69, 72 TeleScoop ................................................ 17, 70 Temperature ................................................... 70 Test loop ........................................................ 32 THD, THD+N ................................................. 68 J52................................................................. 71 SCOOP 5 IP - User Manual 81 U VPN ............................................................... 74 Unicast ............................................................. 6 USB ................................................................ 21 W V VoIP ............................................................... 72 Weight ........................................................... 70 X X21, X24 .................................................... 8, 60 NOTES 82 SCOOP 5 IP - User Manual AETA AUDIO SYSTEMS S.A.S. IMMEUBLE KEPLER 4 – PARC TECHNOLOGIQUE 18-22, AVENUE EDOUARD HERRIOT 92350 LE PLESSIS ROBINSON – FRANCE TÉL. + 33 1 41 36 12 00 – FAX + 33 1 41 36 12 69 http://www.aeta-audio.com Specifications subject to change – All rights reserved by AETA AUDIO SYSTEMS 55 000 079 - A February 2013