1
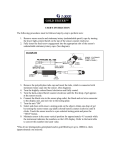
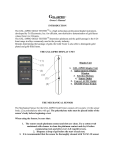
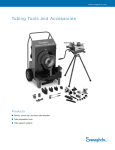
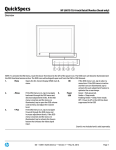
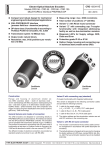
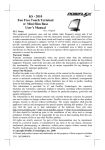
GXL-18
Owner's Manual
INTRODUCTION
The G-XL-18TM Gold Tester is a digital computerized, portative instrument, developed
for efficient and quick determination of gold karat values from 6k to 18k. It can also
distinguish between gold plated and solid gold items.
There are four types of gold (yellow, white, red (pink) and green.
Diagram 1
Display Unit
1.
2.
3.
4.
5.
6.
7.
Electronic unit
Alpha-numeric Display Window
Low Battery Indicators
Gold Selection Buttons
Sensor Outlet
Optional Converter (Connection)
ON-OFF Power Switch
Note: When using the optional converter, the power switch must be in the "OFF" position.
THE MECHANICAL SENSOR
The Mechanical Sensor for the G-XL-18 TM Gold Tester consists of the sensor body and a polyethylene tube
with gel. The polyethylene tube must be placed inside of the sensor's body before beginning a test.
Diagram 2 shows each part of the mechanical sensor.
Diagram 2
Sensor
Diagram 3 shows the cross section of the polyethylene tube.
1. Tube Cap
4. Feed Screw
7.Feed Screw
2. Tube Nozzle
5. Piston
Engagement
3. Tube Body
6. Bottom Plug
Diagram 3
Polyethylene Tube
When using the Sensor, be sure that:
1. The sensor nozzle is clean. Use the plastic cleaner (supplied) to clean the opening.
2. When testing, dispense THEN dispose of the drop of gel following each test. For
best result, use every other gel drop for testing.
LOADING/CHANGING THE POLYETHYLENE GEL TUBE
1. Take off the nozzle cap (Diagram 2).
2. Remove the Stationary Cap by turning the light colored barrel (Diagram 2) counter
clockwise. Please remember that the Stationary Cap and the Rotary Cap are
undetachable. (Diagram 2).
3. Insert the Feed Screw Engagement (Diagram 3, #7) into the appropriate slot of the
Rotary Cap. Be sure that the Feed Screw is fully engaged.
4. Take off tube Cap (Diagram 3, #1)
5. Insert the polyethylene gel tube, which is fully lodged in the Stationary/Rotary Cap,
into the sensor and turn the bright colored barrel (Diagram 2) clockwise until fully
seated. Do not turn the dark colored top barrel (Diagram 2, # 7) clockwise or it will
damage the mechanism.
6. Turn the Rotary Cap counter clockwise several times until the first drop of gel
appears at the sensor nozzle.
OPERATION PROCEDURE
1. Load the polyethylene gel tube.
2. Connect the black wire to the sensor's plug outlet, the black and red wire
connector to the display unit and the red wire to the testing plate.
3. Turn the unit "ON". (See Diagram 1, #7 for switch). The unit should display:
display: "G-XL-18 READY TO TEST…"
4. Select a testing point on the object close to, BUT NOT TOUCHING, the alligator
clip.
5. Holding the sensor in the vertical position with the nozzle down, twist the Rotary
Cap counter clockwise, a click at a time, until a drop of gel appears on the tip. Wipe
this first drop of gel on the towel and turn (usually one or two clicks) until a small
gel sample appears. Immediately touch the sensor to pre-selected cleaned point on
the test object.
DO NOT LET GEL OR SENSOR NOZZLE TOUCH THE ALLIGATOR CLIP!
6. Press one of the following buttons: Y-Yellow, W-White, R-Red, or G-Green
depending on the color of the gold (See Diagram 1, #4 for button location).
7. Maintain the sensor in the vertical position for approximately 5 seconds while the
instruments calibrates the gold value.
SERVICE
If there are any problems regarding the GXL-18, please contact us:
TRI Electronics Inc.
9570 Ridgehaven Court SUITE "A"
San Diego, CA 92123
Attn. Service Dept.
Phone 858) 571-4881
FAX (858) 571-5404
E-mail: [email protected]