1
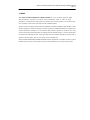
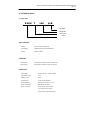
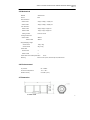
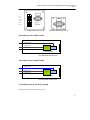
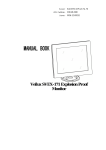
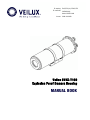
1.4
Ex marking: ExdⅡCT6 (H2) / EExdⅡCT6
Ex certificate: CNEx05.0222
Nemko 05ATEX1209
License: XK06-123-00251
Veilux SVEX-T100
Explosion Proof Camera Housing
MANUAL BOOK
SVEX-T100 EXPLOSION PROOF CAMERA HOUSING MANUAL BOOK
VER 1.4
1. Please carefully read the Manual Book before your operation.
2. Please shut off before maintenance and repair.
3. Do not open camera body under too much humidity, otherwise the humid air getting into
camera inside cannot easily vaporize because of good sealing of camera flameproof, and this
humidity may damage camera spare parts and damage picture quality of camera.
4. Please connect cables correctly according to the Manual Book.
5. Pay attention to protect the flameproof surface of camera while install or un-install camera.
6. Please do not break up or reconstruct the product.
2
SVEX-T100 EXPLOSION PROOF CAMERA HOUSING MANUAL BOOK
VER 1.4
C O N TEN T
1. BRIEF ........................................................................................................................4
2. TECHNICAL DATA..................................................................................................5
2.1 Type Code .......................................................................................................................... 5
2.2 Certificate ........................................................................................................................... 5
2.3 Model ................................................................................................................................. 5
2.4 Electric Data ...................................................................................................................... . 5
2.5 Mechanical ........................................................................................................................ . 6
2.6 Environmental ................................................................................................................... . 6
2.7 Dimension ............................................................................................................... ........... 6
2.8 Installation Size .................................................................................................................. 7
3. INSTALLATION........................................................................................................8
3.1 Installation of camera and lens ........................................................................................... 8
3.2 Cable Working ...................................................................................... ............................. 9
3.3 Camera housing installation ............................................................................................. 10
3.4 Terminal housing.............................................................................................................. 10
3.5 Inside structure: SVEX-T100A ......................................................................................... 11
3.6 Inside structure: SVEX-T100B .......................................................................................... 11
3.7 Install housing to electronic pan/tilt ................................................................................ . 11
3.8 Install housing to fixed bracket ........................................................................................ 12
3.9 Notes for installation ..................................................................................................... ... 12
4. FLAMEPROOF STRUCTURE .............................................................................13
5. TROUBLE SHOOTING .........................................................................................14
6. SHIPPING AND STORAGE .................................................................................15
7. ACCESSORIES INSTALLATION ........................................................................16
8. QUALITY GUARANTEE .......................................................................................17
9. COMPANY COMITTMENT ..................................................................................18
3
SVEX-T100 EXPLOSION PROOF CAMERA HOUSING MANUAL BOOK
VER 1.4
1. BRIEF
This SVEX-T100 EXPLOSIONPROOF CAMERA HOUSING as a new monitoring equipment adopts
advanced production techniques and matured quality management system to make its quality,
performance and appearance a leading position in explosion proof monitoring products. This camera housing
owns advantage of small volume, light weight and easy installation features.
Strictly according to European Directive EC/94/9 and EN50014, Standards of GB3836.1-2000 GB3836.1—2000
Electrical apparatus for explosive atmosphere: General requirements, GB3836.2-2000 Electrical apparatus for
explosive atmosphere: Flameproof „d‟ and GB12476.1-2000 Electrical apparatus for explosive dust: Using
enclosure and limiting surface temperature for protecting electrical apparatus Chapter 1: Technical requirements,
this camera owns advantage of small volume, light weight and easy installation features and could be used in
petroleum, chemical industry, jetty, port, mine, space, army and foodstuff area.
SVEX-T100 EXPLOSIONPROOF CAMERA HOUSING has two specifications: the standard one which could be
installed zoom lens camera, and the smaller one which could be installed focus lens camera or PTZ camera.
SVEX-T100 EXPLOSION PROOF CAMERA HOUSING MANUAL BOOK
VER 1.4
Ver: 1.4
2. TECHNICAL DATA
2.1 Type Code
SVEX T
100
A/B
Figuration
Design No.
Cam Code
Veilux
2.2 Certificate
Ex Mark
ExdⅡCT6 (H2) / EExdⅡCT6
Ex Certificate
CNEX05.0222 / Nemko 05ATEX1209
License
XK06-123-00251
2.3 Model
SVEX-T100A
Explosionproof camera housing, standard size
SVEX-T100B
Explosionproof camera housing, smaller size
2.4 Electric
Input voltage
220VAC / 24VAC / 12VDC, 50/60Hz
Input voltage range
±10%
Working current
≤0.5A
Camera power
12VDC or 220VAC/50Hz
Heater (Optional)
Work while it is under -10℃±5℃
Power consumption
≤20W (Heater included)
Electric connection
2-core cable for camera power
4-core cable for lens control
Video cable for video signal output
SVEX-T100 EXPLOSION PROOF CAMERA HOUSING MANUAL BOOK
VER 1.4
Ver: 1.4
2.5 Mechanical
Material
Stainless 304
IP level
IP68
Outer dimension
SVEX-T100A
520(L) x 180(H) x 170(W) mm
SVEX-T100B
360(L) x 160(H) x 150(W) mm
Inner dimension
SVEX-T100A
260(L) x 90(H) x 70(W) mm
SVEX-T100B
190(L) x 70(H) x 50(W) mm
Viewing window
Thickness 10mm
Viewing window area
SVEX-T100B
SVEX-T100B
Φ66mm
Φ60mm
Weight/Shipping weight
SVEX-T100A
12Kg / 14Kg
SVEX-T100B
8Kg / 10Kg
Cable outlet
SVEX-T100A
3
SVEX-T100B
2
Cable outlet screw thread specification
Mounting
G-3/4”
Electro motion pan tilt, half-fixed pan tilt, fixed bracket
2.6 Environmental
Air pressure
86~106KPa
Environment temperature
-25℃~+60℃
Relative humidity
U95%RH (+25℃)
2.7 Dimension
P1. SVEX-T100A
6
SVEX-T100 EXPLOSION PROOF CAMERA HOUSING MANUAL BOOK
VER 1.4
Ver: 1.4
P2. SVEXT100B
2.8 Installation Size
P3. Camera bottom fixing holes
7
SVEX-T100 EXPLOSION PROOF CAMERA HOUSING MANUAL BOOK
VER 1.4
Ver: 1.4
3. INSTALLATION
3.1 Installation of camera and lens
Before installation, please read the manual book carefully, to see if the CCD specification is accorded with the
connection format;1/3 inch CCD camera could install 1/3 inch or 1/2 inch lens,1/2 inch CCD camera could only
install 1/2 inch lens, if not, there will be dark corner at the edge of picture.
Screw down
after
installation
P4. Lens installation
After installation of lens and camera, adjust the back focus of camera; observe the definition of test card on the
monitor.
Install the lens and camera on the drawer board of the camera housing, adjust its position .to ensure there is no
dark corner on the edge of picture when it is put into the housing.
Adjust the camera
location forwards
and backwards
Adjust the camera
location forwards
and backwards
Fix it with screw
P5. Install camera and focus lens on the drawer board
Fix it with screw
P6. Install camera and zoom lens on the
drawer board
SVEX-T100 EXPLOSION PROOF CAMERA HOUSING MANUAL BOOK
VER 1.4
Ver: 1.4
3.2 Cable Working
3.2.1 Use Ex-proof Flexibility Tube
a. As Picture 7, put on the Ex-proof flexibility part to cable, remove the Tighten Nut, keep the original gasket and
rubber loop (or use the spare parts).
Ex-proof
Flexible Tube
Gasket
Screw Joint
Cable Outlet
Rubber Loop
Cable
PICTURE 7.
b. As Picture 8, firstly turn tight the screw connection head and then tight the Ex-proof Flexibility Tube.
Ex-proof
Flexible Tube
Cable Outlet
PICTURE 8.
3.2.2 Use Armored Cable
a. As Picture 9, remove proper length cable protection cover and cut off not used part.
Ex-proof Gland Parts
Armored cable
Protection Cover
Cable inner layer
Steel belt
Cable core wire
Rubber
Sealing Loop
Nut
Bushing
Gasket
Bushing
Connection
Joint
Taper Volt
PICTURE 9.
b. As Picture 10, install Ex-proof Gland to Armored Cable, as the method please refer to Document for
Installation of Ex-proof Gland.
Armored cable Out Cover
Finished Gland
Cable Inner Layer
Screw Thread
9
SVEX-T100 EXPLOSION PROOF CAMERA HOUSING MANUAL BOOK
VER 1.4
Ver: 1.4
PICTURE 10.
c. Armored cable with ex-proof Gland could connect with any ex-proof equipment directly
3.3 Camera housing installation
Due to the high ex-proof level, the explosion proof surface of housing should be rather rigor, when installed,
pay special attention to the protection of ex-proof surface; As P9, back cover and back housing are all ex-proof
surface. Do not nick when installed.
Ex-proof surface
Force equally
Fix back cover
with bolt
P11. Install the back cover carefully
There is insulated shim between the drawer board and back cover, if you need to take down, be carefully of
its insulated performance; after finishing installation, and test the insulated resistance, which must be higher than
100 MΩ. At the center of back cover, it is outside earthling bolt, which should be connected reliably with earth.
Insulated floor
P12. Be careful of the insulated floor between back cover and drawer board
3.4 Terminal housing
See picture:
10
SVEX-T100 EXPLOSION PROOF CAMERA HOUSING MANUAL BOOK
VER 1.4
Ver: 1.4
Power in
iris+
iris—
zoom+
zoom—
focus+
focus—
Power
Power
Power in
P13. SVEX-T100A terminal housing
P14. SVEX-T100B terminal housing
3.5 Inside structure: SVEX-T100A
Control inout
Power input
Zoom lens
Camera
Video output
Ex Proof cavity
P15. SVEX-T100A inside structure
3.6 Inside structure: SVEX-T100B
Control inout
Power input
Focus lens
Camera
Video output
Ex Proof cavity
P16. SVEX-T100B inside structure
3.7 Install housing to electronic pan/tilt
Please refer to the manual book of electronic pan/tilt
11
SVEX-T100 EXPLOSION PROOF CAMERA HOUSING MANUAL BOOK
VER 1.4
Ver: 1.4
3.8 Install housing to fixed bracket
Fixed bolt
Camera
housing
Bracket
Half fixed pan/tilt
Leading-in cable
P17. SVEX-T100 bracket installation
3.9 Notes for installation
„
Please carefully check before installation. Stop immediately while there is any unconformity
a. If there is ex-marking license
b. The ex-marking satisfy environment use
c. All ex-proof and flameproof parts are complete enough for structure
„
Choose the right cable, the diameter of leading-in cable matches with aperture of airproof glue loop.
Choose the minimum cable outer diameter according to the airproof glue loop surface mark. Make sure
that after tight the tighten nut, the gap between airproof glue loop and cable as well as the gap between
airproof glue loop and leading-in settings meet the explosion proof requirements.
„
Setup the nameplate and warning mark “Do not open while energized” on the obvious place of the product
surface.
„
When installing the connection, choose the airproof loop with inner holeΦ8.surface casting ≥Φ7.5.When
selecting the outer diameter of cable, it is required to match with the inner hole diameter of airproof loop. As
p 18:
≥Φ7.5
P18. Airproof ring
12
SVEX-T100 EXPLOSION PROOF CAMERA HOUSING MANUAL BOOK
VER 1.4
4. FLAMEPROOF STRUCTURE
„
Completely consider every special circs, when the explosive air getting into ex-proof structure, which may
lead to explosion because of some reason and to confirm and ensure camera housing performance based
on its structure gap, length and max temperature it will get to.
„
Enclosure shall burden water pressure testing for 1.5Mpa for 10~12 seconds without leakage as pass,
which is ordered in GB3836.2-2000.
„
Camera surface temperature max shall not over +80℃ while it is working.
„
The introduce setting of camera is tighten nut.
„
Window glass adopts steel glass to burden Impact and Heat change testing.
5. TROUBLE SHOOTING
Problems
Reason
Method
Change the fuse
Power off
Check the connection
No image
Signal off
Check the connection
Camera error
Change the camera
Lens error
Change the lens
Note
Eliminate by
yourself
Eliminate by
yourself
Eliminate by
yourself
Contact with
manufacturer
Contact with
manufacturer
6. SHIPPING AND STORAGE
After package, without rain or snow fall directly to product, shipment could do by air or sea and store for one year
under the environment of 0℃~+40℃, humidity < 90%.
7. ACCESSORIES INSTALLATION
When leaving factory, 8mm airproof rubber loops are installed inside of every camera outlet. 8mm bushing and
tighten nut installed in the cable entry without cable. Provide airproof rubber loop with 10mm,12mm each and one
drier. Additionally with copper made screw of 1/4‟‟ 6mm, 12mm each as accessories.
Other accessories:
(Please purchase in addition)
SVEX-M1-1side view
SVEX-M1-1top view
SVEX-M1-1face view
SVEX-T100 EXPLOSION PROOF CAMERA HOUSING MANUAL BOOK
VER 1.4
Ver: 1.4
8. QUALITY GUARANTEE
For any camera produced by Veilux, we promise a one year to repair warranty. During Guarantee period,
we supply free service except following situations:
„ User does not operate as manual book requires
„ User un-install the whole product by themselves
„ Lightning or Act of God
If there are additional agreements between Veilux and buyer, then agreements shall be strictly done
9. COMPANY COMITTMENT
„
Veilux owns the final design changing and final specification rights and no responsibility to inform
user.
„
This manual book belongs to Veilux rights, without permits or any book inform, any company or
private copy of whole or part of the book shall be prohibited.
802 GREENVIEW DR STE 200 GRAND
PRAIRIE, TX. 75050 Website:
www.veilux.net
E-mail: [email protected]
Phone # 1-800-510-6528