1
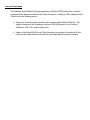
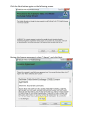
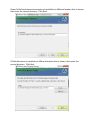
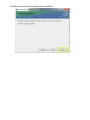
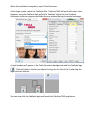
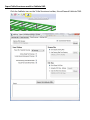
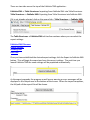
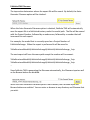
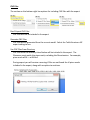
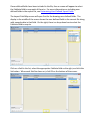
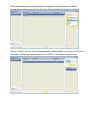
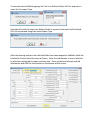
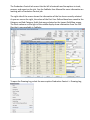
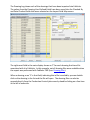
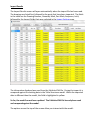
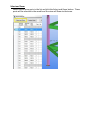
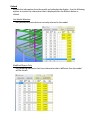
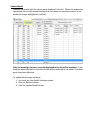
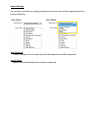
FabSuite TME (Tekla Model Exchange) v1.0 General Description Installation Export Tekla Structures model to FabSuite XML FabSuite XML Filename Export Settings Drawing Files CNC Files FabSuite XML Import Export Status from FabSuite to XML Import FabSuite XML into Tekla Structures FabSuite XML Filename Import Settings Display Settings General Description The FabSuite/Tekla Model Exchange application (FabSuite TME) allows for seamless communication between FabSuite and Tekla Structures. FabSuite TME integrates with Tekla Structures allowing you to: 1. Export the Tekla Structures model into a compressed FabSuite XML file. This single file contains the Drawings, Revisions, Bill of Materials, User-Defined Attributes, CNC Files, and Drawing Files. 2. Import a FabSuite XML file into Tekla Structures to update the model with the current status information and colorize the model based on those statuses. Installation Before installing FabSuite TME you must first have Tekla Structures installed. To install FabSuite TME: Click on the link below and follow the instructions on the web page to download the correct version of the installation package: https://www.fabsuite.com/en/fabsuite-tme After the download has completed, double-click on the installation file. Click the Next button to begin the installation. Click the Next button again on the following screen. Review the license agreement, select “I Agree”, and click Next. If your Tekla Structures environments are installed in a different location than is shown, then enter the correct directory. Click Next. If Tekla Structures is installed in a different location than is shown, then enter the correct directory. Click Next. Click Next one last time to perform the installation. When the installation completes, open Tekla Structures. At the login screen, select the FabSuite Role. FabSuite TME will work with other roles. However, using the FabSuite Role will add a ‘FabSuite’ tab to the User-Defined Attributes screen to organize the fields that are updated during the model exchange. A small window will appear in the Tekla Structures background with the FabSuite logo ( ). Click and hold on the bar just above the logo (to the left of the X) and drag the logo up to the title bar. You can now click the FabSuite logo and launch the FabSuite TME application. Export Tekla Structures model to FabSuite XML Click the FabSuite icon on the Tekla Structures toolbar, this will launch FabSuite TME. There are two tabs across the top of the FabSuite TME application: FabSuite XML -> Tekla Structures: Importing from FabSuite XML into Tekla Structures. Tekla Structures -> FabSuite XML: Exporting from Tekla Structures into FabSuite XML. If it is not already selected, click on the second tab – Tekla Structures -> FabSuite XML. The Tekla Structures -> FabSuite XML tab has four sections where you can select the export settings: FabSuite XML Filename Export Settings Drawing Files CNC Files Once you have established the desired export settings, click the Export to FabSuite XML button. This will begin the export and save the current settings. The next time you launch FabSuite TME the same settings will be populated automatically. As the export proceeds, the progress as well as any warning or error messages will be displayed in the Output area at the bottom of the screen. When the import completes, the full path of the export file will be shown. FabSuite XML Filename The top section determines where the export file will be saved. By default, the AutoGenerate Filename option will be checked. When the Auto-Generate Filename option is checked, FabSuite TME will automatically save the export file in a FabSuite directory under the model path. The file will be named with the Project Number, followed by an underscore, followed by a number that will increment for each export. For example, the model that is currently open has a Project Number of FabSuiteExchange. When the export is performed it will be saved to: TeklaStructuresModels\FabSuiteExchange\FabSuite\FabSuiteExchange_1.zip The next export will have the same path except the number will increment: TeklaStructuresModels\FabSuiteExchange\FabSuite\FabSuiteExchange_2.zip TeklaStructuresModels\FabSuiteExchange\FabSuite\FabSuiteExchange_3.zip … Since FabSuite TME is generating the filename automatically, the Filename input as well as the Browse button are disabled. When the Auto-Generate Filename option is not checked, the Filename input and Browse button are enabled. You can enter or browse to any directory and filename that you wish. Export Settings The section on the left has options to determine the data that will be exported from the model. Export All or Selected Drawings All Drawings – Export all drawings from the model. Selected Drawings – Export only the drawings currently selected in the Drawing List. FabSuite TME will check each drawing included in the export to ensure that it is Up to Date. If any drawings are not Up to Date, you will receive a warning message and an option to continue with the export. Include Single Part Drawings Include the single part drawings information and files (if drawing files are included in the export). Include General Arrangement Drawings Include the general arrangement drawing information and files (if drawing files are included in the export). Include Drawing User-Defined Fields Include User-Defined fields for the drawings. By default, these fields include: Drawn By, Checked By, and Checked Date. For information on how to customize the UserDefined fields that are included, see Customizing User-Defined Export Fields. Include Part User-Defined Fields Include User-Defined fields for the parts. By default, these fields include: User Field 1, User Field 2, User Field 3, User Field 4, and Comment. For information on how to customize the User-Defined fields that are included, see Customizing User-Defined Export Fields. Drawing Files The section on the top-right has options for including the drawing files with the export. Don’t Export Drawing Files Drawing files will not be included in the export. Use Drawing Files From Directory Drawing files from the directory listed below will be included in the export. The filenames must match the drawing #, excluding the file extension. For example, drawing # 200 -> 200.pdf During export you will receive a warning if files are not found for all drawings included in the export, along with an option to continue. CNC Files The section on the bottom-right has options for including CNC files with the export. Don’t Export CNC Files CNC files will not be included in the export. Generate CNC Files CNC files will be generated from the current model. Select the Tekla Structures NC export setting to use. Use CNC Files From Directory CNC files from the directory listed below will be included in the export. The filenames must match the piece mark, excluding the file extension. For example, piece mark w104 -> w104.nc1 During export you will receive a warning if files are not found for all piece marks included in the export, along with an option to continue. FabSuite XML Import To import the XML file into FabSuite, first open the FabSuite application and log in. Select the menu option File -> Import. On the Import screen, select the Production Control (XML) import option. On the topright of the screen browse to the file that was exported using the FabSuite TME program. Click the Import button to begin. If user-defined fields have been included in the file, then a screen will appear to select the FabSuite field to map each of them to. For more information on including userdefined fields in the export file, see Customizing User-Defined Export Fields. The Import Field Map screen will open first for the drawing user-defined fields. The display in the middle of the screen shows the user-defined fields in the current file along with example data in that field. On the right, there is a drop-down box to select the FabSuite Field to map to. Click on a field in the list, select the appropriate FabSuite field on the right, and click the Set button. When each field has been set, click OK on the bottom of the screen. User-Defined fields with no data (all blank values) are ignored by the import and will not appear on the Import Field Map screen. FabSuite has the ability to save the field mappings as a new Import Type. During an import the list of user-defined fields is compared against a previously saved Import Type. If a match is found you can proceed using that Import Type without re-entering the field mappings. If you wish to save these settings for future use, click Yes. When prompted enter a name to describe the Import Type. If another file with the same user-defined fields is imported, the match will be found. Click Yes to proceed using that saved Import Type. After the Drawing User-Defined fields are mapped to FabSuite fields, you will be prompted to do the same with the Part User-Defined fields (if included in the file). Click on a field in the list, select the appropriate FabSuite field on the right, and click the Set button. When each field has been set, click OK on the bottom of the screen. To save the selected field mappings for Part User-Defined fields, click Yes and enter a name for the Import Type. If another file with the same user-defined fields is imported, the match will be found. Click Yes to proceed using that saved Import Type. After the drawing and part user-defined fields have been mapped to FabSuite fields the Production Control Job Edit screen will open. Enter the Job Number to use in FabSuite or select an existing job to import revisions into. Enter any desired settings and job information and click the Save button on the bottom of the screen. If the job does not already exist in FabSuite then you will be prompted to add a Project Management job, click Yes. The import will now proceed to validate and save the job into FabSuite. If CNC and/or Drawing Files were included in the file then they will automatically be added to FabSuite. To view the bill of materials, click the Production Control button on the title bar of the FabSuite application. Select the job that was just imported and click the Open button on the bottom of the screen. The Production Control Job screen lists the bill of materials and has options to track, process, and report on the job. See the FabSuite User Manual for more information on working with a Production Control job. The right side of the screen shows the information of the line item currently selected. As you can see on the right, the values of the Part User-Defined have been saved to the Category and Sub-Category fields that were selected on the Import Field Map screen. The three columns on the right of the middle display show information from the CNC files that is now available in FabSuite. To open the Drawing Log, select the menu option Production Control -> Drawing Log. The Drawing Log shows each of the drawings that have been imported into FabSuite. The values from the Drawing User-Defined fields have been saved into the Checked By and Date Checked fields that were selected on the Import Field Map screen. The right-most field in the main display shows an ‘F’ for each drawing that has a file associated with it in FabSuite. In this example, not all drawing files were available when the export was performed with FabSuite TME (see: Drawing Files). When a drawing as an ‘F’ in that field, indicating that a file is available, you can doubleclick on the drawing in the list and the file will open. The drawing files can also be opened directly from the Production Control job screen by double-clicking on a line item in the bill of materials. Export Status from FabSuite to XML To open the job, click the Production Control button on the title bar of the FabSuite application. Select the job that you would like to export and click the Open button on the bottom of the screen. To export the job, select the menu option Production Control -> Export -> Export Production Status to XML. The status can also be exported from the Project Management module. Click the Project Management button on the title bar of the FabSuite application. Select the job that you would like to export and click the Open button on the bottom of the screen. To export the job, select the menu option Project Management -> Data Exchange -> Export Production Status to XML. Import FabSuite XML into Tekla Structures Click the FabSuite icon on the Tekla Structures toolbar, this will launch FabSuite TME. There are two tabs across the top of the FabSuite TME application: FabSuite XML -> Tekla Structures: Importing from FabSuite XML into Tekla Structures. Tekla Structures -> FabSuite XML: Exporting from Tekla Structures into FabSuite XML. If it is not already selected, click on the first tab – FabSuite XML -> Tekla Structures. The FabSuite XML -> Tekla Structures tab has three sections where you can select the import settings: FabSuite XML Filename Import Settings Display Settings Once you have established the desired import settings, click the Import from FabSuite XML button. This will begin the import and save the current settings. The next time you launch FabSuite TME the same settings will be populated automatically. As the import proceeds, the progress as well as any warning or error messages will be displayed in the Output area at the bottom of the screen. When the import completes, the Import Results screen will appear. Import Results The Import Results screen will open automatically when the import file has been read. The drawings are listed first, followed by the parts that have been imported. The fields in the table are the Drawing Number, Assembly Mark, Part Mark, Sequence, Lot #, followed by the Import Fields that were selected in the Import Settings area. The information displayed was read from the FabSuite XML file. During the import it is compared against the existing data in the Tekla Structures model. When the imported data is different than the model, the field is highlighted in yellow. So far, the model has not been updated. The FabSuite XML file has only been read and compared against the model. The options across the top of the screen allow you interact with the model: Select and Zoom Select one or more parts in the list and click the Select and Zoom button. Those parts will be selected in the model and the view will Zoom to that area. Refresh Reloads the information from the model and refreshes the display. Use the following options to restrict the information that is displayed after the Refresh button is clicked. Use Model Selection Only display the parts that are currently selected in the model. Modified Objects Only Only drawings and parts that have information that is different than the model will be shown. Update Model Updates the model with the information displayed in the list. When the update has completed, the list will reload showing that the values are now the same as in the model (no longer highlighted in yellow). Only the drawings and parts currently displayed in the list will be updated. In the example above the data is restricted to the objects selected in the model. No other parts have been affected. To update all drawings and parts: 1. Un-check the Use Model Selection option. 2. Click the Refresh button. 3. Click the Update Model button. Object Representation This option allows you to apply a representation to the model, colorizing the parts by status. To add additional representations to the drop-down, enter them in the Display Settings area of the import tab. To apply a representation to the model, select it in the drop-down and click the Set button. The image above shows that several columns on the upper level have been shipped, while the lower columns are still in fabrication. For more information, select those columns in the model. On the Import Result screen in FabSuite TME, select the Use Model Selection option and click Refresh. FabSuite XML Filename Enter or browse to the FabSuite XML file to import. The file could have the extension .XML or .ZIP if it is compressed. Import Settings The section on the left has settings to determine the data that will be imported from the FabSuite XML file. Read Status of Choose the option for the types of parts/drawings that should be imported. Import Fields Select the individual fields that should be imported. Display Settings The section on the right allows you to enter the Object Representations that will be available on the Import Results screen. The representations must exist in Tekla Structures. To add a new representation, click on the blank item at the end of the list and type the name of the Object Representation from Tekla Structures. To rename a representation, click on the item in the list and type in the new name. Customizing User-Defined Export Fields The User-Defined export fields come from two Tekla reports that are installed by FabSuite TME: FabSuite_Drawing_UserDefined_v1.rpt FabSuite_Part_UserDefined_v1.rpt Do not customize any of the other reports installed by FabSuite TME. These reports, along with several others, are installed in: environments\common\system\ environments\usimp\us_common\system environments\usmet\us_common\system TS 17.0 only TS 17.0 only Both the Drawing and Part UserDefined reports produce a tab-delimited text file. These reports can be customized to retrieve different information from the Tekla model, subject to the following restrictions: The report fields must be separated by a tab character. The report must have a single header line containing the name of each field. These names will be included in the export file. During the FabSuite import, the names will be displayed for the user to decide which FabSuite field to bring the data into. The field names cannot be duplicated. Part UserDefined report – The first field must be the part GUID. The name in the report header of the first field must be: GUID Drawing UserDefined report – The first field must be the drawing ID. The name in the report header of the first field must be: ID The report header must be a single line. Each record in the report must be a single line. After customizing a report, copy it into the environments\common\system\ directory and overwrite the existing file. For Tekla Structures 17.0 installations, copy the file into the usimp and usmet paths listed above. Important: Keep extra copies of the customized reports in a directory other than the ones listed above. If you install a FabSuite TME upgrade in the future your reports will be overwritten. You will need extra copies to re-install.