1
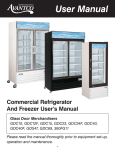
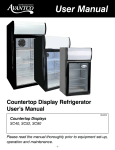
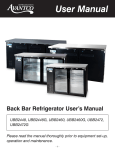
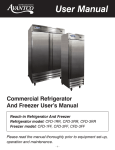
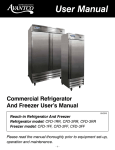
User Manual
Commercial Bottle Cooler
User’s Manual
Commercial Beer Bottle Coolers:
JBC-25, JBC-50, JBC-50S, JBC-65, JBC-65S,
JBC-95B, JBC-95S
05/2015
Please read the manual thoroughly prior to equipment set-up,
operation and maintenance.
-1-
User Manual
Installation
Please read this manual thoroughly prior to equipment set-up, operation and maintenance.
Important!!! Please Read Before Installation
• If the unit has recently been transported on its side, please let the unit stand upright for a
minimum of 24 hours before plugging it in.
• Make sure the unit has reached the desired temperature before loading the unit with products.
• Make sure all accessories are installed (shelves, shelf clips, etc…) before plugging in the unit.
• Do not attempt to remove or repair any component of the unit. Consult an authorized service
technician for servicing / repair.
• Do not hang on doors or stand inside the unit.
• Please read through this manual in its entirety.
Cabinet Location Guides
• Install the unit on a strong and leveled surface.
- If the surface is uneven, the unit may be noisy.
- The unit may malfunction if the surface is uneven.
• Install the unit in an indoor, well ventilated area.
- For best performance, maintain 6” of clearance on both sides and the back of the unit at all times.
- Outdoor use may cause decreased efficiency and damage to the unit.
- Avoid direct sunlight.
• Avoid installation in a high humidity and / or dusty area.
- High humidity can cause the unit to rust and may decrease efficiency.
- Dust collected on the condenser coil may cause unit to malfunction.
- Malfunction due to high ambient temperatures, humidity, or improperly maintained
condenser coil will void the warranty.
• Select a location away from heat and moisture-generating equipment.
- High ambient temperatures may cause the compressor to malfunction.
- Malfunction due to high ambient temperatures and humidity will void the warranty.
-2-
User Manual
Electrical
• Please ensure that the required voltage is being supplied at all times.
• The unit should be plugged into a grounded and properly-sized electrical outlet with appropriate
over-current protection. Please refer to the electrical requirements on the unit’s nameplate.
• The unit should have its own dedicated outlet.
• Do not use extension cords.
• Ensure the unit is not resting on or against the electrical cord.
• If the unit is not in use for a long period of time, please unplug the unit from the outlet.
• To avoid shock and fire hazards, do not plug in or unplug the unit with wet hands.
• After unplugging the unit, wait at least 10 minutes before plugging it back in. Failure to do so could
cause damage to the compressor.
Temperature Controls
The temperature controls are preset at the factory to maintain an average temperature of 38OF in
refrigerators. To maintain a different temperature, simply adjust the control knob located inside the
unit. Temperature ranges from 7 (coldest) to 1 (warmest). Setting the temperature control to the
coldest setting may cause the evaporator coil to freeze and ice up. This will eventually make the
cabinet warm, which is not recommended.
Defrost System
Refrigerator coils are kept below the freezing point (32 degrees Fahrenheit). During compressor
down-time, the evaporator fan continues to circulate air through the evaporator coil. This air
circulation raises the coil temperature above the freezing point, melting any accumulated frost.
Run-off water is drained into the evaporator pan and evaporated. Freezer coils are defrosted
electrically. Automatic defrost timers automatically initiate at pre-set intervals and for a predetermined duration.
-3-
User Manual
Loading Product
The dividers have already been installed at the factory. Please feel free to reposition the dividers as
per your need. To remove the dividers, simply push the divider towards the back wall until the front of
the divider is removed from the fixing holes. When repositioning the dividers, please make sure that
the pressure spring is installed properly.
Operation/Maintenance
NOTE: We strongly recommend that any servicing be performed by an authorized service technician.
Cleaning the Condenser Coil
• For efficient operation, keep the condenser surface free of dust, dirt, and lint.
• We recommend cleaning the condenser coil at least once per month.
• Clean the condenser with a commercial condenser coil cleaner, available from any kitchen
equipment retailer.
Cleaning the Fan Blades and Motor
• If necessary, clean the fan blades and motor with a soft cloth.
• If it is necessary to wash the fan blades, cover the fan motor to prevent moisture damage.
Cleaning the Interior of Unit
• When cleaning the cabinet interior, use a solvent of warm water and mild soap.
• Do not use steel wool, caustic soap, abrasive cleaners, or bleach that may damage the interior finish.
• Wash door gaskets on a regular basis, preferably weekly. Simply remove the door gasket from the
frame of the door, soak it in warm water and soap for thirty (30) minutes, then dry with soft cloth
and replace.
• Check door gaskets for proper seal after they are replaced.
• Periodically remove the shelves and shelf brackets from the unit, and clean them with a mild soap
and warm water.
-4-
User Manual
Troubleshooting
Compressor is Not Running
Fuse blown or circuit breaker tripped.
Power cord unplugged.
Thermostat set too high.
Cabinet in defrost cycle.
Replace fuse or reset circuit breaker.
Plug in power cord
Set thermostat to lower temperature.
Wait for defrost cycle to finish.
Cabinet Temperature is too Warm
Thermostat is set too high.
Airflow is blocked.
Low refrigerant levels.
Door is slightly ajar.
Set thermostat to lower temperature.
Re-arrange products to allow for proper air flow.
Make sure there is at least four inches of clearance
from the fan.
Contact a service technician to chek refrigerant levels.
Make sure door is completely closed.
Warranty Information
Units in this manual are backed by a 1 year parts and labor warranty, with a 5 year warranty on the
compressor. For warranty inquiries or service, first locate:
• The model number and cabinet serial number (located on the front of the unit, or inside the
door jamb).
• The bold number on the service plate (located on the front of the unit).
Next, call 1-800-678-5517. Be sure to have the model number, cabinet serial number, and service
plate number available when contacting service technicians.
This warranty does not apply to, and Avantco is not responsible for, any warranty claims made on
products sold or used outside of the United States.
RESIDENTIAL USERS: Avantco assumes no liability for parts or labor coverage for component
failure or other damages resulting from installation in non-commercial or residential applications.
-5-