1
Product Installation Manual
Oracle Financial Services Hedge Management and
IFRS Valuations
Version 6.1.0.0.0
March 2015
Document Control
Author: Niraj Ranjan Biswal
Created on : 08-Feb-12
Updated by : Arpana Danayak
Updated on : March-15
Group: OFSAA
Revision No : 1.1
Installation Manual
Table of Contents
About this Manual ........................................................................................................................ 1
Audience ...................................................................................................................................... 1
Scope ........................................................................................................................................... 1
Organization of the Manual ......................................................................................................... 1
Conventions Used in this Manual ................................................................................................ 1
Pre-Requisites ............................................................................................................................. 3
Environment................................................................................................................................. 3
Front-End Access ........................................................................................................................ 4
Installing Oracle Financial Services Hedge management and IFRS Valuations v6.1 (6.1.0.0.0)
Product ........................................................................................................................................ 5
Pre-Installation Activities ............................................................................................................. 5
Pre-Upgrade Activities ................................................................................................................. 6
Oracle Financial Services Hedge management and IFRS Valuations v6.1 (6.1.0.0.0) Product
Installation .................................................................................................................................. 10
Machine A – Product App Layer ................................................................................................ 11
Machine B – Product Database Layer ....................................................................................... 23
Machine C – Product Web Layer.............................................................................................. 30
Silent Installation........................................................................................................................ 36
ADCo –Deployment of ADCo libraries on OFSAAI ................................................................... 40
Post Installation Activities .......................................................................................................... 41
About this Manual
Oracle Hedge Management (hereinafter referred to as “Oracle HM”) product enables financial
institutions to manage their hedges and to define new hedge relationships and monitor them
from time to time in a process-oriented manner. Traditionally, financial institutions manage it
through a process which demands a lot of manual intervention. This poses challenges to
meet the regulatory demand of documentation and maintenance.
Oracle HM addresses this need by storing hedge relationships at desired levels and
computing hedge effectiveness using industry-standard valuation techniques. It allows users
to classify a financial instrument into any one of the prescribed categories and to reclassify it
as another in the future. It then computes fair value of all the financial instruments and profit/
loss on such valuation. It enables banks to manage fair valuation and hedge relationships and
their effectiveness at a central place in a process-driven manner.
Audience
This Manual is meant for use by the Oracle Financial Services Analytical Applications
Infrastructure System Administrator. It provides step-by-step instructions necessary for
installing the Oracle Financial Services Hedge Management and IFRS Valuations v6.1
(6.1.0.0.0) Product.
Scope
This manual provides a step-wise instruction to install the Oracle Financial Services Hedge
Management and IFRS Valuations Product in an existing Oracle Financial Services Analytical
Applications Infrastructure hosted in OEL/RHEL 5.3 / 5.5, Solaris 5.10 and AIX 5.3 (ML12) /
AIX 6.1 (ML07), 64bit - Oracle 11g R2 (11.2.0.2.0) environment. The supported web-servers
are Tomcat 7.0.19, Websphere 7.0.0.17 and Web logic 10.3.5.0.
Note: Linux 6 is not supported for HM v6.1 even though AAI supports it. HM v6.1 is not
qualified on Solaris 5.11.
Organization of the Manual
The Installation Manual is organized into the following chapters.
Pre Requisites section identifies the hardware and base software environment that is
required for a successful installation & functioning of the Oracle Financial Services Analytical
Applications Infrastructure Solution.
Installing Oracle Financial Services Hedge Management and IFRS Valuations v6.1
(6.1.0.0.0) Product section details the pre-installation activities followed by a step-by-step
instruction on the various installation options.
Post installation Activities section details the steps that are required to be performed after a
successful installation of the Oracle Financial Services Analytical Applications Infrastructure
Solution.
Conventions Used in this Manual
References to sections or chapters in the manual are displayed in Italics.
Screen names are displayed in the following manner:
Introduction screen
Options and buttons are displayed in Bold.
1
Notes are displayed as follows:
Note:
o
It is important that the password should be 6 characters long. If you do not
adhere to this pre-requisite, you will see a system message that reads Password
must be at least 6 characters long.
2
Pre-Requisites
The installation process requires certain environmental variables to be set prior to starting the
installation. You must ensure that these requirements are met before starting the installation.
You are requested to refer to the Release Notes for the latest updates on hardware or
software requirements and the OFSAAI Installation Manual for the environment variables.
Environment
Installation of Oracle Financial Services Hedge Management and IFRS Valuations v6.1
(6.1.0.0.0) Product requires the OEL/RHEL 5.3 / 5.5, Solaris 5.10 and AIX 5.3 (ML12) / AIX
6.1 (ML07), 64 bit - Oracle 11g R2 (RAC) (11.2.0.2.0) – OBIEE (11.1.1.6.1) of Oracle
Financial Services Analytical Applications Infrastructure 7.3.2.0.0 or 7.3.3.0.0 for
OEL/RHEL 5.3 / 5.5, Solaris 5.10 and AIX 5.3 (ML12) / AIX 6.1 (ML07), 64 bit, to be
installed in either a single-tier or multi-tier environment. It is implicit that all base software
versions and patch levels required by the OEL/RHEL 5.3 / 5.5, Solaris 5.10 and AIX 5.3
(ML12) / AIX 6.1 (ML07), 64 bit version of Oracle Financial Services Analytical Applications
Infrastructure 7.3.2.0.0 or 7.3.3.0.0 is available and adhered to. The supported web-servers
are Tomcat 7.0.19, Websphere 7.0.0.17 and Web logic 10.3.5.0.
Note
o
Linux 6 is not supported for HM v6.1 even though AAI supports it. HM v6.1 is not
qualified on Solaris 5.11.
o
The Oracle Financial Services Hedge Management and IFRS Valuations v6.1
(6.1.0.0.0) installer download contains only the ERwin XML file that is required for
uploading the model. This file is sufficient to install the v6.1 (6.1.0.0.0) product.
However, this XML file cannot be opened in the ERwin Data modeler tool and
hence cannot be used for any data model customization. ERwin file is delivered
as a patch and need to be downloaded separately. This ERwin file should be
used for any customization of the data model. Reference bug / patch where
ERwin file can be downloaded is Bug 16182943 - IFRS/HM 6.1 (6.1.0.0.0)
DATA MODEL.
The OEL/RHEL 5.3 / 5.5, Solaris 5.10 and AIX 5.3 (ML12) / AIX 6.1 (ML07), 64 bit - Oracle
11g R2 (RAC) (11.2.0.2.0) version of Oracle Financial Services Analytical Applications
Infrastructure 7.3.2.0.0 or 7.3.3.0.0, once installed must be configured. Please apply following
one-off patches before proceeding for ALM v6.1 (6.1.0.0.0) installation.
Refer to OFSAAI Administration guide, if you want to execute the MLS Utility where the
application is being installed on top of AAI 7.3.3.
Note: These one-offs are only required when installing v6.1 on Infrastructure 7.3.2.0.0 or
7.3.3.0.0; higher versions of Infrastructure will incorporate the fixes represented by these oneoffs.
•
Bug 14766836 - BREADCRUMB IS SHOWING 'LIMITS SUMMARY$' INSTEAD OF
'LIMITS SUMMARY'.
One-Off Patch : - 14766836_GENERIC.zip
ML version - 7.3.2.0.10
3
•
Bug 14359454 - NEW COLUMN UDP FOR IDENTIFYING ECONOMIC VALUE
RELATED COLUMNS
One-Off Patch : - 14359454_GENERIC.zip
ML version - 7.3.2.0.11
•
Bug 14676961 - ERROR WHILE OPENING MEMBER SCREEN UNDER
DIMENSION MANAGEMENT
One-Off Patch : - 14676961_GENERIC.zip
ML version - 7.3.2.0.12
•
Bug 16066102 - OBJECT MIGRATION EDIT: TP/ALM SHARED OBJECTS
DISPLAYED IN DUPLICATE, CANNOT SAVE
One-Off Patch : - 16066102_GENERIC.zip
ML version - 7.3.2.0.20
Note: Above mentioned patches are not required if platform 7.3.2.1 has been already
applied.
Front-End Access
•
Internet Explorer 8.0/9.0
•
Java Plug-in 1.6.0_21
•
Acrobat Reader 8.0
•
The screen resolutions supported are 1024*768 and 1280*1024
Note
Ensure that Java Plug-in is enabled in the browser settings.
4
Installing
Oracle
Financial
Services
Hedge
Management and IFRS Valuations v6.1 (6.1.0.0.0)
Product
Note: If you want to create ETL Application and source for this product, then the jdbc url
should be in following format. Other formats are not supported in this version.
jdbc:oracle:thin:@<HOST_NAME>:<PORT_NO>:<ORACLE_SID>
Pre-Installation Activities
The following is the Pre Installation checklist to ensure the readiness to start installing Oracle
Financial Services Hedge Management and IFRS Valuations Product:
•
Oracle Financial Services Analytical Applications Infrastructure 7.3.2.0.0 or 7.3.3.0.0
must be successfully installed on OEL/RHEL 5.3 / 5.5, Solaris 5.10 and AIX 5.3 (ML12)
/ AIX 6.1 (ML07), 64 bit - Oracle 11gR2 (RAC) (11.2.0.2.0).
•
If Infrastructure installation is on multitier environment, Execute the following
commands in the DB Layer terminal
chmod -R 777 < ftpshare folder >
•
Navigate to ftpshare folder and set the umask shown as below, this will make sure all
the new files created will have 666 file permission.
cd < ftpshare folder >
umask 0000
•
The config and atomic schema should be two distinct oracle database users.
•
Please execute the following grants in
<ORACLE_USER> with atomic schema user.
config
schema.
Please
replace
grant select on REVELEUS_MASTER to <ORACLE_USER>
grant select on REV_MAST_MAP_ITEMS to <ORACLE_USER>
grant select on METADATA_LOCALE_MASTER to <ORACLE_USER>
•
Please execute “privileges_atomic_user.sql” from DBA user. This will provide required
privileges for atomic schema.
•
Execute the below scripts in the config schema.
o
insert_cssms_model.sql
•
Please copy the entire HM v6.1 (6.1.0.0.0) installer download directory to the server
location (Including the DataModel directory). Please give read, write and execute
permission to all the files present in this directory.
•
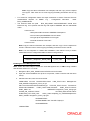
Please specify the log file path and name in the log4j.xml. Please update the “value”
attribute marked in the following picture
Figure 1: Log4j.xml file configuration
5
•
Please make sure the path given in the log4j.xml file has read/write/execute permission.
•
Please execute the “config_table_privileges_for_atomic_user.sql” script in config
schema. This file will be present inside $FIC_HOME directory.
•
Please make sure FICServer is up and running before proceeding for installation.
Pre-Upgrade Activities
This section is applicable only for customers upgrading from earlier version.
Back-up of Database schema and Files
•
Back-up existing config and atomic schema of the information domain that is
being upgraded. This can be used to restore back the application, in case of
any failures during upgrade.
•
Back-up FTPSHARE and $FIC_HOME folders of your existing environment.
This section is applicable only for customers upgrading from v6.0/6.0.1/6.0.2/6.0.3 to 6.1.0.0.0
Batch changes
The batches do not allow a special character in the task description, and hence the existing
batches that violate this rule have to be identified and the task description has to be changed.
Following special characters are allowed in batches:
Batch Name: Alpha Numeric with Underscore (_) only.
Batch Description: Alpha Numeric with Underscore (_), Hyphen (-), colon (:), Dot (.), and
space ( ).
The same is applicable for task name and task description.
The query below, gives the list of tasks that violates the rule. The description of these tasks
has to be changed manually before the upgrade, in order to avoid errors.
SELECT t1.v_batch_id,
t1.v_task_description
FROM
batch_task_master T1
WHERE Replace(Translate(Nvl(T1.v_task_description, ' '),
'`~!@#$%^&*()+=[]{}\\|;"<>?,/','#'), '#', '') <>
Nvl(T1.v_task_description, ' ');
T2T changes
The existing T2T's will be replaced during upgrade installation. Hence, take a backup of
existing T2T's.
New T2T Definitions in 6.1(6.1.0.0.0)::
T2T_EMBEDDED_OPTIONS_LOAN_CONTRACTS
T2T_EMBEDDED_OPTIONS_INVESTMENTS
T2T_EMBEDDED_OPTIONS_BORROWINGS
T2T_EMBEDDED_OPTIONS_SCH
6
Modified T2Ts:
T2T_ANNUITY_CONTRACTS
T2T_BORROWINGS
T2T_BROKEN_ACCOUNT_LOANS_FP
T2T_BROKEN_ACCOUNT_LOANS_R
T2T_BROKEN_ACCOUNT_TD_FP
T2T_BROKEN_ACCOUNT_TD_R
T2T_CASA
T2T_CREDIT_CARDS
T2T_FRA_PAY
T2T_FRA_RCV
T2T_FUTURE_CONTRACTS
T2T_FX_CONTRACTS_PAY
T2T_FX_CONTRACTS_RCV
T2T_GUARANTEES
T2T_INVESTMENTS
T2T_LEASES_CONTRACTS
T2T_LOAN_COMMITMENTS
T2T_LOAN_CONTRACTS
T2T_LOAN_CONTRACT_TXNS_SUMMARY
T2T_LOAN_PAR_RESTRUCTURED
T2T_MERCHANT_CARDS
T2T_MM_CONTRACTS
T2T_MORTGAGES
T2T_MORTGAGES_PAR_RESTRUCTURED
T2T_OD_ACCOUNTS
T2T_OPTIONS_CAPFLOOR
T2T_OPTION_COLLAR_PAY
T2T_OPTION_COLLAR_RCV
T2T_OTHER_SERVICES
T2T_PAYMENT_SCHEDULE
T2T_RETIREMENT_ACCOUNTS
T2T_STG_CARDS_TXNS_SUMMARY
T2T_STG_CASA_TXNS_SUMMARY
T2T_STG_LC_GUARANTEES
T2T_STG_MERCHANT_CARD_TXNS_SUMMARY
T2T_STG_MUTUAL_FUNDS
T2T_STG_OTHER_SERVICE_TXNS_SUMMARY
T2T_STG_TERMDEPOSITS_TXNS_SUMMARY
T2T_STG_TRUSTS_TXNS_SUMMARY
T2T_SWAPS_CONTRACTS_PAY
T2T_SWAPS_CONTRACTS_RCV
T2T_TD_PAR_RESTRUCTURED
T2T_TERM_DEPOSITS
T2T_TRUSTS
Note:
7
The existing T2T's will be replaced during upgrade installation. The T2T files are
present in FTPSHARE folder and hence no separate back ups are required. It is
assumed that the FTPSHARE is backed up as mentioned earlier in this document.
T2T definitions are present in the following folders:
<FTPSHARE_PATH>/STAGE
<FTPSHARE_PATH>/<INFODOM>/erwin/sources
If the user has done any customizations on the above T2T's, then they need to be done again
on these T2T definitions.
Datamodel changes
If data model is customized:
1.) Open both the models using ERwin Data Modeler tool.
2.) Go to "Tools" and Select "Complete Compare"
3.) In the Compare window select your existing HM_Data_Model on Left
Model.
4.) Select extracted HM_Datamodel on Right Model
5.) In "Type Selection" check "Subject Area"
6.) In "Advanced" option un-check ALL except "Auto Close Database/Script
Models"
7.) Click "Compare"
8.) Resolve Differences Screen by applying all the changes mentioned in the
HM Datamodel Changes 6.0-6.1.xls file for 6.0 to 6.1(6.1.0.0.0)upgrade.
The HM Datamodel Changes 6.0-6.1.xls file contains the following
sheets
a. New Table
b. New Columns
c. Data Type Changes
These are the changes from 6.0 to 6.1upgrade.
Click "Finish" and Close
9.) Save the file as XML in "AllFusion Repository Format" ex:HM_Datamodel.xml
10.) Copy the modified existing into the location
"ftpshare/*INFODOM*/erwin/erwinXML". (Replace *INFODOM* with the
name of the information domain)
11.) Upgrade from HM v 6.0 to 6.1
Execute the below script mentioned in atomic schema.
dm_pre_common_ddl_6_1.sql
12.) Perform Incremental/Sliced Model Upload in the information domain where
HM application is installed.
13.) Incremental/Sliced model upload might give errors in case there are NOT
NULL columns that are being added to a table that already has rows or if
the columns that are being dropped have values. Check the data model
changes excel file for any such cases. In such a case, take a backup of the
8
table and truncate the table. Insert records back into the table with a default
value for the NOT NULL column.
Note:
Follow the instructions mentioned in the “Merging Data Model Changes into Existing
Model.doc” for merging the existing data model with 6.0 HM data model.
If data model is not customized:
1
2
Execute the below script mentioned in atomic schema.
dm_pre_common_ddl_6_1.sql
Perform Incremental/Sliced Model Upload in the information domain where
HM application is installed.
Note:
The Following tables will be backed up FSI_IRC_RATE_HIST, FSI_BILLING_METHOD_MLS
, FSI_BILLING_METHOD_CD, FSI_M_PROD_CHARACTERISTICS and
FSI_IRC_VOLATILITY_RATE_HIST during the execution of the file
dm_pre_common_ddl_6_1.sql.
9
Oracle Financial Services Hedge Management
and IFRS Valuations v6.1 (6.1.0.0.0) Product
Installation
The Oracle Financial Services Analytical Applications Infrastructure Product comprises of
components that are installed in Web, Application & Database layer. Hence if you have
installed Oracle Financial Services Analytical Applications Infrastructure 7.3.2.0.0 or 7.3.3.0.0
in a multi-tier architecture, the Oracle Financial Services Hedge Management and IFRS
Valuations Product installer must be invoked on each of the machines that host the Oracle
Financial Services Analytical Applications Infrastructure tier.
For a Single-tier installation, the installer is required to be invoked only once on the machine
that hosts all the Oracle Financial Services Analytical Applications Infrastructure tiers.
This section describes the installation process where the Three Product setup components
are installed on separate machines in with the Product installation on separate machines.
Machine A will be used to install Product Application Layer components, Machine B will be
used to install Product Database Layer components and Machine C will be used to install
Product Web Layer components.
Note
o
This section holds applicable if Oracle Financial Services Analytical Applications
Infrastructure 7.3.2.0.0 or 7.3.3.0.0 is installed on OEL/RHEL 5.3 / 5.5, Solaris
5.10 and AIX 5.3 (ML12) / AIX 6.1 (ML07), 64 bit - Oracle 11g (RAC) on
separate machines A, B and C respectively.
o
Refer to section on “Silent Installation”, if a silent installation is required
10
Machine A – Product App Layer
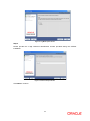
Step 1
To begin Oracle Financial Services Hedge Management product installation, execute
Setup.sh.
Figure 2: Installation Splash Screen
Step 2
Figure 3: Introduction Screen
Upon invoking the installer, the Introduction screen will display the pre-requisites for
installation. Ensure that the pre-requisites are satisfied before you proceed.
Step 3
Please choose the log mode for this installer. In case, if Debug is selected, the Passwords will
be printed in the Log File.
11
Figure 4: Log Mode Option Screen
Step 4
Please provide the 9 digit Customer Identification number provided during the OFSAAI
installation.
Figure 5: Customer ID Input Screen
Click Next to continue.
12
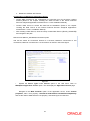
Step 5
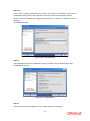
The Pre Setup Information screen requests for setup information.
Select the appropriate Oracle Financial Services Analytical Applications Infrastructure layer
that has been installed on the machine.
Example AppLayer
Figure 6: Pre Setup Information Screen – Choose Layer to Install
Along with appropriate Oracle Financial Services Analytical Applications Infrastructure layer
choose Administrative Reports to configure the Administrative Reports application.
NOTE
o
For a single-tier Oracle Financial Services Analytical Applications Infrastructure
installation, you must select App Layer, DB Layer and Web layer. For a multi-tier
Oracle Financial Services Analytical Applications Infrastructure installation, select
the corresponding layer installed on the machine.
o
In case Admin BI is already configured through the previous product installation;
the subsequent product installation without Admin BI option may alter the existing
Admin BI configuration settings.
13
Step 6
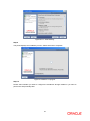
This panel seeks infromation on whether a new infodom has to be created or the existing
infodom to be used for apps installtion. Please choose the desired option.
Figure 7: Pre Setup Information Screen – Infodom type
Click Next to continue.
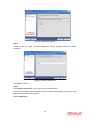
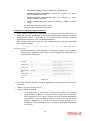
Step 7-i
If the option “New Infodom” was chosen in the previous panel then the following panel will be
next displayed which will seek information of the following details to create infodom.
Please specify a DB name for the new infodom. Please make a TNS entry with the DB name
specified in the tnsname.ora file in the oracle server.
Please enter the newly created atomic schema user name, password, jdbc url in relevant
fields.
Click Next to continue
Figure 8: Database details for the new Infodom
14
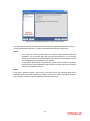
Step 7-ii
If the option “New Infodom” was chosen in the previous panel then the following panel will be
displayed following the panel 7-i which will seek further information of the following details to
create infodom.
Please specify the name and description for the new infodom to be created.
Please specify a segment name to be created.
Note: Here, recommended Infodom Name limit is max 10 characters, and Segment
name should not exceed 10 characters.
Also specify the Application server and database server log path for infodom maintenance (to
be created)
Figure 9: Infodom details for creation of new Infodom
Click Next to continue.
Step 7-iii
If the option “New Infodom” was chosen in the previous panel then the following panel will be
displayed following the panel 7-ii which will display the pre-infodom creation details. Please
check and verify all the details before proceeding to the next step.
Click Next to continue. A new information domain will be created on clicking Next.
15
Figure 10: Pre Infodom Creation Summary
Step 7-iv
If the option “Existing Infodom” was chosen in the Step 6 then the following panel will be
displayed which will prompt to select the infodom from list of infodoms present in the setup,
enter segment code and enter the application schema’s TNS name.
Figure 11: Installation in Progress
Step 8
HM v6.1 (6.1.0.0.0) data model is packaged as part of HM v6.1 (6.1.0.0.0) product installer
and will be installed as part of the upcoming steps, if required.
Clicking ‘No’ implies that HM v6.1 (6.1.0.0.0) model has been uploaded into information
domain prior to this installation.
Clicking ‘Yes’ will proceed with the HM v6.1 (6.1.0.0.0) model upload process as part of the
installation.
If the user selects “Yes”, Step 9 and 10 will be performed. will appear.
Upon selecting “No..”, Step 9 to 10 will be skipped.
16
Click Next to proceed.
Figure 12: Pre-Setup Information
Step 9
The following panel prompts the user to choose whether the released version of Datamodel or
the customized datamodel to be uploaded.
On selecting ‘Released Data Model’ option, installer uploads the HM v6.1 (6.1.0.0.0) data
model that is packaged as part of the HM v6.1 (6.1.0.0.0) product.
On selecting ‘Customized Data Model’ option, installer allows the user to select the data
model.Please choose desired option.
Click Next to proceed.
Figure 13: Pre – Setup information
Step 10
If the option “Customized Data Model” was chosen then the following panel will be displayed
prompting user to select the customized data model located in the machine.
Please choose the customized datamodel file from the server.
Note:
17
•
The data model xml file should be available in the server.
•
In case the installation is being performed on an existing information domain,
the data model that is planned to be selected in this panel should be merged
with the data model that was previously uploaded in the information domain.
In case the installation is being performed on a new information domain, data model that is
either customized or merged with other data models can be selected in this panel.
Figure 14: Pre – Setup information
Step 11
The following panel displays pre-model upload details.
Please verify the details before proceeding to the next step.
Click Next to proceed for model upload.
Figure 15: Pre – Model Upload Summary
Clicking on ‘Next’ will start the model upload process. This process will take some time
depending on the size of the data model and available physical memory in the environment.
User will not be able to take any further action on the screen, until the model upload process
is complete. Also, this step cannot be rolled back.
18
If the model upload fails, then a pop-up message with relevant error and the log file path will
be displayed.
Review errors and take relevant action. Continue with this step until the model upload is
successful and the installer takes the user to next step.
Note:
Some of the common errors during model upload are
•
Insufficient heap memory on the client machine
Possible reason/resolution: The java memory settings in “reveleusstartup.sh”
located in $FIC_APP_HOME/common/FICServer/bin directory should be
increased.
•
Error while getting the Erwin File path
Possible reason/resolution: Restart the FICServer.
•
Error in Upload Operation :
“FAILED WHILE SUPER CATEGORY - SUB CATEGORY RELATIONS
HANDLINGDELETING”
Possible
reason/resolution:
Incorrect
Erwin.xsl
$FIC_APP_HOME/common/FICServer/conf directory.
•
file
version
in
Incremental/Sliced model upload might give errors in case there are NOT
NULL columns that are being added to a table that already has rows or if the
columns that are being dropped have values. Check the data model changes
excel file for any such cases. In such a case, take a backup of the table and
truncate the table. Insert records back into the table with a default value for
the NOT NULL column.
Navigate to the previous screen and proceed with the steps mentioned above.
Step 12
The following panel seeks input from the user on whether to create new ETL
application/source pair or use an existing one.
In case of upgrade, if customer selects an existing application/source pair, then existing ETL
definitions under the source will be over-written with the packaged definitions. Customer can
also choose to create a new application / source pair and then merge the changes between
the packaged definition and their existing definitions offline.
Please choose a desired option.
Click Next to continue
19
Figure 16: Pre – Setup Information
Step 13-i
If the option ”New application/source pair” was chosen then the following panel will displayed
seeking the application and source name for creation of the same.
Please specify all the details required for application and source creation.
Click Next to proceed.
Clicking ‘Next’ will create application and source within OFSAAI. Source model will also be
generated. This process will take some time depending on the number of entities / attributes
in the atomic schema. This step cannot be rolled back.
Figure 17: Pre – Setup Information
Note:
ETL Source will be created pointing to the information domain (atomic schema) that is
specified during the installation.
20
Step 13-ii
If the option “Existing application/sourrce pair” was chosen the following panel willl be
displayed prompting user to select app/source pair from the list of pairs already present.
Please choose the desired ETL application/source pair into which ETL definitions will be
deployed.
Click Next to proceed
Figure 18: Pre – Setup Information
Step 14
This panel displays all the pre-installation summary. Please verify all details and proceed.
Click Install to proceed.
Figure 19: Pre – Install Summary
Step 15
This panel displays the installation process. Please wait until it completes.
21
Figure 20: Installation is in progress
Step 16
The following screen displays the completion of installation of the Oracle Financial Services
Hedge Management Product Setup.
Click Done to exit.
Figure 21: Installation Complete
22
Machine B – Product Database Layer
Step 1
To begin Oracle Financial Services Hedge Management product installation, execute
Setup.sh.
Figure 22: Installation Splash Screen
Step 2
Figure 23: Introduction Screen
Upon invoking the installer, the Introduction screen will display the pre-requisites for
installation. Ensure that the pre-requisites are satisfied before you proceed.
Step 3
Please choose the log mode for this installer. In case, if Debug is selected, the Passwords will
be printed in the Log File.
Click Next to proceed.
23
Figure 24: Log Mode Option Screen
Step 4
Please provide the 9 digit Customer Identification number provided during the OFSAAI
installation.
Figure 25: Customer ID Input Screen
Click Next to continue.
24
Step 5
The Pre Setup Information screen requests for setup information.
Select the appropriate Oracle Financial Services Analytical Applications Infrastructure layer
that has been installed on the machine.
Example Database Layer
Figure 26: Pre Setup Information Screen – Choose Layer to Install
Along with appropriate Oracle Financial Services Analytical Applications Infrastructure layer
choose Administrative Reports to configure the Administrative Reports application.
NOTE
o
For a single-tier Oracle Financial Services Analytical Applications Infrastructure
installation, you must select App Layer, DB Layer and Web layer. For a multi-tier
Oracle Financial Services Analytical Applications Infrastructure installation, select
the corresponding layer installed on the machine.
o
In case Admin BI is already configured through the previous product installation;
the subsequent product installation without Admin BI option may alter the existing
Admin BI configuration settings.
Step 6
If the option “Existing Infodom” was chosen in the Step 6 then the following panel will be
displayed which will prompt to select the infodom from list of infodoms present in the setup,
enter segment code and enter the application schema’s TNS name.
25
Figure 27: Pre Setup Information Screen
Step 7
Please specify the Tablespace name(Infodom database).
Click Next to proceed.
Figure 28: Pre Setup Information Screen
Step 8
This panel displays all the pre-installation summary. Please verify all details and proceed.
Click Install to proceed.
26
Figure 29: Pre – Install Summary
Step 9
This panel displays the installation process. Please wait until it completes.
Figure 30: Installation is in progress
Step 10
Please select whether you want to configure the sandboxes through installer or you want to
perform this step manually later.
27
Figure 26: Post-Install Configuration
Selecting “Yes , Please configure the sandboxes” option will take you to the next step.
If you select “No, I will perform this manually” it will take you directly to the Step 14
NOTE
o
For performing sandbox creation manually please refer to the following document.
OFSAAI Modeling Framework User Manual.pdf
Click Next continue.
Step 11
The following screen request for selecting different three different information domains for
three separate sandboxes. Please select a different information domain for each sandbox
from the list of dropdown menu for each sandbox.
Figure 27: Selection of information domains for sandboxes
28
Click Next continue.
Step 13
The following screen displays the completion of installation of the Oracle Financial Services
Hedge Management Product Setup.
Click Done to exit.
Figure 31: Installation Complete
29
Machine C – Product Web Layer
Step 1
To begin Oracle Financial Services Hedge Management product installation, execute
Setup.sh.
Figure 32: Installation Splash Screen
Step 2
Figure 33: Introduction Screen
Upon invoking the installer, the Introduction screen will display the pre-requisites for
installation. Ensure that the pre-requisites are satisfied before you proceed.
Step 3
Please choose the log mode for this installer. In case, if Debug is selected, the Passwords will
be printed in the Log File.
Click Next to proceed.
30
Figure 34: Log Mode Option Screen
Step 4
Please provide the 9 digit Customer Identification number provided during the OFSAAI
installation.
Figure 35: Customer ID Input Screen
Click Next to continue.
Step 5
The Pre Setup Information screen requests for setup information.
Select the appropriate Oracle Financial Services Analytical Applications Infrastructure layer
that has been installed on the machine.
Example Web Layer
31
Figure 36: Pre Setup Information Screen – Choose Layer to Install
Along with appropriate Oracle Financial Services Analytical Applications Infrastructure layer
choose Administrative Reports to configure the Administrative Reports application.
NOTE
o
For a single-tier Oracle Financial Services Analytical Applications Infrastructure
installation, you must select App Layer, DB Layer and Web layer. For a multi-tier
Oracle Financial Services Analytical Applications Infrastructure installation, select
the corresponding layer installed on the machine.
o
In case Admin BI is already configured through the previous product installation;
the subsequent product installation without Admin BI option may alter the existing
Admin BI configuration settings.
Step 6
If the option “Existing Infodom” was chosen in the Step 6 then the following panel will be
displayed which will prompt to select the infodom from list of infodoms present in the setup,
enter segment code and enter the application schema’s TNS name.
32
Figure 37: Pre Setup Information Screen
Step 7
The Pre Setup Information screen requests for the Oracle Business Intelligence installed host
machine IP, port-number and context name.
Click Next to continue.
Figure 38: Pre Setup Information Screen
33
Step 8
This panel displays all the pre-installation summary. Please verify all details and proceed.
Click Install to proceed.
Figure 39: Pre – Install Summary
Step 9
This panel displays the installation process. Please wait until it completes.
Figure 40: Installation is in progress
Step 10
The following screen displays the completion of installation of the Oracle Financial Services
Hedge Management Product Setup.
Click Done to exit.
34
Figure 41: Installation Complete
35
Silent Installation
Silent installation is achieved via a properties file [Silent.props] that must be updated with
proper values, before attempting to install using the silent mode.
The following table lists all the properties that need to be specified
Property Name
Description of Property
Permissible
values
Comments
LOG_MODE
Mode for logging
0
=
Debug
1= General
Optional;
Default : 0
CUSTOMER_ID
Customer id specified while
installing OFSAAI
Not Applicable
MANDATORY
INSTALL_WEB
Install web-tier components
0
=
1 = Yes
No
Default : 0
INSTALL_DB
Install
components
database-tier
0
=
1 = Yes
No
Default : 0
INSTALL_APP
Install
Application-tier
components be installed
0
=
1 = Yes
No
Default : 0
INSTALL_ADMIN_BI
Install admin-BI components
0
=
1 = Yes
No
Default : 0
Applicable
only
INSTALL_WEB=1
INSTALL_DB=1
INFODOM_NAME
Information Domain(infodom)
Not Applicable
MANDATORY
SEGMENT_CODE
Segment Code
Not Applicable
MANDATORY
if
OR
Segment Code should
not exceed 10 characters
TABLESPACE
Tablespace name
INFODOM_TYPE
New Infodom
Infodom
or
36
Existing
Not Applicable
MANDATORY
0
=
New
1 = Existing
# Specify Infodom Type
Mandatory if this an App
Layer Installation and
option
selected
for
INSTALL_APP=1
APPL_TNS
TNS Name of the Infodom
database
Not Applicable
MANDATORY
APPL_USER
User-id of the Database
Schema for new Infodom
Not Applicable
# Mandatory if this an
App Layer Installation
and want to create a new
infodom
# Option selected for
INSTALL_APP=1
and
INFODOM_TYPE=0
APPL_PWD
Password of the Database
Schema for new Infodom
Not Applicable
# Mandatory if this an
App Layer Installation
and want to create a new
infodom
# Option selected for
INSTALL_APP=1
and
INFODOM_TYPE=0
APPL_URL
JDBC Connection String of the
Database Schema for new
Infodom
Not Applicable
# Mandatory if this an
App Layer Installation
and want to create a new
infodom
# Option selected for
INSTALL_APP=1
and
INFODOM_TYPE=0
RAC_STATUS
whether the Database Schema
for new Infodom is a RAC
database
Not Applicable
# Mandatory if this an
App Layer Installation
and want to create a new
infodom
# Option selected for
INSTALL_APP=1
and
INFODOM_TYPE=0
INFODOM_DESC
Description for the Database
Schema for new Infodom
Not Applicable
# Mandatory if this an
App Layer Installation
and want to create a new
infodom
# Option selected for
INSTALL_APP=1
and
INFODOM_TYPE=0
APHM P_LOG_PATH=
Infodom
Maintenance
log
path(to be created) for the new
Infodom for applayer
37
Not Applicable
# Mandatory if this an
App Layer Installation
and want to create a new
infodom
# Option selected for
INSTALL_APP=1
and
INFODOM_TYPE=0
DBFTP_LOG_PATH
Infodom
Maintenance
log
path(to be created) for the new
Infodom for DBLayer
Not Applicable
# Mandatory if this an
App Layer Installation
and want to create a new
infodom
# Option selected for
INSTALL_APP=1
and
INFODOM_TYPE=0
OBI_HOST
Host Name of the OBIEE
Server
Not Applicable
Applicable
if
INSTALL_ADMIN_BI=1
OBI_PORT
Port Number of the OBIEE
Server
Not Applicable
Applicable
if
INSTALL_ADMIN_BI=1
OBI_CONTEXT
Context Name of the OBIEE
Server
Not Applicable
Applicable
if
INSTALL_ADMIN_BI=1
UPLOAD_MODEL
wheter you want to perform
Model Upload
0
=
1 = yes
No
Mandatory
INSTALL_APP=1
if
MODEL_TYPE
released
datamodel
customized datamodel
0 = released
1 = customized
Mandatory
INSTALL_APP=1
if
DATAMODEL
the path for the cutomized
datamodel
Not Applicable
# Mandatory only in the
case of uploading the
customized datamodel
or
# Option selected for
MODEL_TYPE=1
DM_DIRECTORY
the file name for the cutomized
datamodel
Not Applicable
# Mandatory only in the
case of uploading the
customized datamodel
# Option selected for
MODEL_TYPE=1
ETL_APP_NAME
The ETL application name
Not Applicable
# Mandatory if this an
App Layer installation
# Option selected for
INSTALL_APP=1
ETL_SRC_NAME
The ETL Source into which the
Table-2-Table ETL definitions
on staging tables will be
38
Not Applicable
This Source must be
mapped to the above
ETL Application
deployed
ETL_APPSRC_TYPE
create new ETL App/Src pair
or use an existing one
0
=
New
1 = Existing
# Mandatory if this an
App Layer installation
# Option selected for
INSTALL_APP=1
# 0 = If you want to
create a new ETL
app/src pair
# 1 = If you want to use
an existing pair
ETL_APP_DESC
Please give description for the
ETL App
Not Applicable
# Mandatory if you want
to create new ETL
app/src pair
# Option selected for
ETL_APPSRC_TYPE=0
ETL_SRC_DESC
Please give description for the
ETL Src
Not Applicable
# Mandatory if you want
to create new ETL
app/src pair
# Option selected for
ETL_APPSRC_TYPE=0
How to install in Silent Mode
-
The installer folder contains a template file “Silent.template”
Create a copy of this file and rename the copy as “Silent.props”
Edit the file “Silent.props” and specify the parameters as per the requirements
On the UNIX Command prompt, execute the following command
o “Setup.sh SILENT”
-
Refer to the console log [or the file preinstall.log] for any error messages.
39
ADCo –Deployment of ADCo libraries on OFSAAI
Pre-requisites:
-
ALM 6.1 / Hedge Management 6.1
ADCo v1.9 libraries for Loan-Dynamic-Model, for your operating system / version
o Note: ADCo is not available on IBM AIX operating systems
Steps:
-
Preparation
o
o
o
o
o
o
-
Deployment
o
o
o
-
Login to the UNIX Profile where OFSAAI database-tier is installed
Create a folder called “adco”; create 3 sub-folders under “adco”: “io”, ”data”,
“lib”
Edit the .profile script and set the following environment variables
ADCO_IO_DIR: set it to the absolute path of the “io” sub-folder
created above
DATAFILEDIR: set it to the absolute path of the “data” sub-folder
created above
LD_LIBRARY_PATH: update this environment variable to include the
absolute-path of the “lib” sub-folder created above
Stop all OFSAAI services
Log-out of the UNIX Session and log back in to UNIX. Verify that the 3
environment variables created above are set properly
Start all OFSAAI Services
Download the v1.9 ADCo libraries and place the file “'libadppmdl.so” into the
“adco/lib” sub-folder
Place the monthly license-key & historical-rate files into the “adco/data” subfolder
If you have been provided the following 2 files by ADCo, place both of these
files in the “adco/io” sub-folder
ADCO_DefaultValues_INACTIVE.txt
ADCO_XMLSettings_INACTIVE.txt
Enable ADCo functionality in ALM / HM
o
o
o
o
o
Login to OFSAAI
Under the OFSAAI Home Page, go to Administration -> Security
Management
Expand System Administrator and click “Function – Role Map”
Associate the SMS-Function “ADCO Prepayments for ALM” with the required
roles
Associate the SMS-Function “ADCO Prepayments for Hedge Management”
with the required roles
40
Post Installation Activities
Oracle Financial Services Analytical Applications Infrastructure Server Memory
Configuration
The Oracle Financial Services Analytical Applications Infrastructure Application Server is
started using reveleusstartup.sh. Please raise an SR in support.oracle.com if you have any
queries related to EPM applications.
Once the installation of Oracle Financial Services Hedge Management and IFRS Valuations
Product is completed, you must perform the following steps.
o
Check the Log file (The path and file name specified in the log4j.xml).
o
Ignore the following errors in the log file:
o
•
Error: ORA-02260: table can have only one primary key.
•
Error: ORA-00955: name is already used by an existing object.
•
Error: ORA-00001: unique constraint (<<UNIQUE KEY NAME>>)
violated.
•
Error: ORA-02275: such a referential constraint already exists in the
table.
•
Error: ORA-01430: column being added already exists in table.
•
Error: ORA-02303: cannot drop or replace a type with type or table
dependents.
Ignore following errors if the setup is upgraded from 6.0.1/6.0.2/6.0.3 or if
Funds transfer Pricing v6.1.0.0.0 and Hedge Management solution v6.1.0.0.0
and Asset Liability Management v6.1.0.0.0 and Pricing Management
v6.1.0.0.0 is/are installed in the same infodom.
•
Error:ORA-01442: column to be modified to NOT NULL is already
NOT NULL
•
Error:ORA-01451: column to be modified to NULL cannot be
modified to NULL
Ignore these errors for FSI_M_PROD_CHARACTERISTICS
-
Error:ORA-00904:
identifier
"RATE_PRICING_OPTION_P":
invalid
-
Error:ORA-00904:
identifier
"BOUGHT_SOLD_FLG_P":
invalid
-
Error:ORA-00904: "RATE_FLOOR_LIFE_P": invalid identifier
-
Error:ORA-00904: "NET_MARGIN_P": invalid identifier
-
Error:ORA-00904: "GROSS_MARGIN_P": invalid identifier
-
Error:ORA-00904: "ACCR_BASIS_P": invalid identifier
-
Error:ORA-00904: "ADJ_TYPE_P": invalid identifier
-
Error:ORA-00904: "COMP_BASIS_P": invalid identifier
-
Error:ORA-00904:
identifier
"MIN_RATE_CHANGE_P":
invalid
-
Error:ORA-00904:
identifier
"BINARY_RANGE_CAP_P":
invalid
41
o
-
Error:ORA-00904:
identifier
"BINARY_RANGE_FLOOR_P":
invalid
-
Error:ORA-00904:
identifier
"RATE_PRICING_OPTION_R":
invalid
-
Error:ORA-00904:
identifier
"BOUGHT_SOLD_FLG_R":
invalid
-
Error:ORA-00904: "RATE_CAP_LIFE_R": invalid identifier
-
Error:ORA-00904: "NET_MARGIN_R": invalid identifier
-
Error:ORA-00904: "GROSS_MARGIN_R": invalid identifier
-
Error:ORA-00904: "ACCR_BASIS_R": invalid identifier
-
Error:ORA-00904: "ADJ_TYPE_R": invalid identifier
-
Error:ORA-00904: "COMP_BASIS_R": invalid identifier
-
Error:ORA-00904:
identifier
"MIN_RATE_CHANGE_R":
invalid
-
Error:ORA-00904:
identifier
"BINARY_RANGE_CAP_R":
invalid
-
Error:ORA-00904:
identifier
"BINARY_RANGE_FLOOR_R":
invalid
Restore data from backup table for the below listed tables
i. FCT_ACCOUNT_FAIR_VALUE
ii. FCT_HEDGE_EFFECTIVENESS
iii. DIM_INSTRUMENT_TYPE
iv. DIM_RUN
v. DIM_RESULT_BUCKET
o
•
For
upgrade
from
5.6
or
“$FIC_APP_HOME/common/FICServer/bin”
“./UpgradeConfig.sh”.
below,
and
navigate
to
Execute
Apply the following one-off patch post successful installation.
Bug 15956177 -- "ALPHANUMERIC CODE IS NOT POPULATED IN 7.3.2 FOR
NUMERIC COLUMN CREATED FROM UI"
ML Version - 7.3.2.0.7
Note: Above mentioned patch is not required if platform 7.3.2.1 has been already
applied.
•
Add the below mentioned entries in excludeURLList.cfg file located in the path
$FIC_WEB_HOME/webroot/conf/. These entries are required for Asset and Liability
Management, Funds Transfer pricing, Profitability Management and Hedge
Management / IFRS:
o
/fsapps/common/batchCreate.action
o
/fsapps/common/batchEdit.action
42
Note: Copy the above information into notepad, and then copy it from notepad
into cfg file. Take extra care to avoid copying formatting characters into the cfg
file.
•
For Admin BI configuration follow the steps mentioned in Oracle Financial Services
Administrative Reports on OBIEE 11g - Configuration Note.docx
under
$FIC_HOME/adminbi
•
The web.xml under the path
$FIC_WB_HOME \webroot\WEB-INF\ should have
Resource tag, if not present add the tag and replace ORDEMO with the INFODOM
name.
<resource-ref>
<description>DB Connection ORDEMO</description>
<res-ref-name>jdbc/ORDEMO</res-ref-name>
<res-type>javax.sql.DataSource</res-type>
<res-auth>Container</res-auth>
</resource-ref>
Note: Copy the above information into notepad, and then copy it from notepad into
xml file. Take extra care to avoid copying formatting characters into the xml file.
Note: If a new segment is created after installation, then add the entry in below
mentioned format in configuration table located in Config schema.
Paramname
Paramvalue
Description
<Infodom>_<Segment>_ROLE_HIER
V_role_code
Role code
Enabling the Limit Management Link:
Note: Follow the below steps to enable the Limit Management link, if HM is being installed
and OFSAAI version is 7.3.2.1.0 ML.
1. Navigate to $FIC_APP_HOME/common/FICServer/conf location.
2. Open the CustomLHSMenu.xml (If file is not present, create a new file with the same
name).
3. Add the below text, save and close the file.
<MENUITEM ID="LM" PROTECTED="false" LINK_TEXT="Limit Management"
LINK_IMAGE="images/tree_icons_ror.gif"
URL="formsFramework/menu/LMindex.jsp" TOOLTIP_TEXT="Forms Framework"
FGCOLOR="#000000"
FONT_FACE="Arial,Helvetica"
FONT_STYLE="normal"
FONT_SIZE="12"
BGIMAGE="images/rev_menu_orange.gif"
CLOSE_ON_LOGOUT="false"
ALLOWS_DUPLICATE="false"
FUNCTION_LIST="SCR_LIM"
HELP_LINK="help/help_en_US/ROR/helpfile.htm"
HELP_IMAGE="images/rev_menu_help.gif">
<PARAMETERS>
<PARAM NAME="dsn" VALUE="%{dsn}"/>
</PARAMETERS>
</MENUITEM>
43
4. Restart the OFSAAI APP Service.
Configuration in Websphere Application Server
o
Create JDBC Provider for the configuration of connection pool for the above created
Infodom (Refer to: the chapter Creating the JDBC Provider of the Oracle Financial
Services Analytical Applications Infrastructure 7.3.3.0.0 Installation Manual).
o
Create a data source to access the data from the database. (Refer to: the chapter
Creating the Data Source of the Oracle Financial Services Analytical Applications
Infrastructure 7.3.3.0.0 Installation Manual)
o
After creating a Data Source, Click the newly created Data Source ($DATA_SOURCE$)
and navigate to the path
Data sources>$DATA_SOURCE$>Connection pools
And set the values for Connection timeout to 0 seconds, Maximum connections to 100
connections, Minimum connections to 10 connections as shown in the below figure.
Figure 42:
•
Expand the Server Types under Servers option in the LHS menu. Click on
WebSphere application servers option. This will display the Application Servers page.
Navigate to the Web Container option of the application server, under Custom
properties, add a new property com.ibm.ws.webcontainer.invokefilterscompatibility
and set the value to true Save the new property. Use below figure for reference
44
Figure 43:
Configuration in Tomcat Application Server
o
Copy $ORACLE_HOME/jdbc/lib/ojdbc6.jar to the path
$TOMCAT_DIRECTORY/common/lib/
o
Edit the server.xml present under the path $TOMCAT_DIRECTORY\conf\ with the
below changes, which is required for connection pooling.
Note: Copy the following information into notepad, and then copy it from notepad into xml
file. Take extra care to avoid copying formatting characters into the xml file.
<Context path="/ $CONTEXTNAME$" docBase=" $APP_DEPLOYED_PATH$ "
debug="0" reloadable="true" crossContext="true">
<Resource auth="Container"
name="jdbc/ $INFODOM_NAME$"
type="javax.sql.DataSource"
driverClassName="oracle.jdbc.driver.OracleDriver"
username=" $ATOMICSCHEMA_USERNAME$"
password="$ATOMICSCHEMA_PASSWORD$"
url="$JDBC_CONNECTION_URL"
maxActive="100"
maxIdle="30"
maxWait="10000"
removeAbandoned="true" removeAbandonedTimeout="60"
logAbandoned="true"/>
</Context>
NOTE:
o
$TOMCAT_DIRECTORY$ should be replaced by Tomcat application
installed path
o
$CONTEXTNAME$ should be replaced by Oracle Financial Services
Analytical Applications Infrastructure context name
o
$APP_DEPLOYED_PATH$ should be replaced by the Oracle Financial
Services Analytical Applications Infrastructure application deployed path
45
o
$INFODOM_NAME$ should be replaced by Infodom Name
o
$ATOMICSCHEMA_USERNAME$
schema database user name
o
$ATOMICSCHEMA_PASSWORD$ should be replaced by Atomic
schema database password
o
$JDBC_CONNECTION_URL should be replaced by JDBC connection
string
should
be
replaced
by
Atomic
Ex: jdbc:Oracle:thin:<IP>:<PORT>:<SID>
jdbc:oracle:thin 10.80.50.53:1521:soluint
Configuration in Weblogic Application Server
•
Create JDBC Provider for the configuration of connection pool and a data source to
access the data from the database for the above created Infodom (Refer to: the chapter
Creating data Source – WebLogic of the Oracle Financial Services Analytical
Applications Infrastructure 7.3.3.0.0 Installation Manual).
•
After creating a Data Source, Click the newly created Data Source ($DATA_SOURCE$)
and navigate to the path
Home >Summary of Services: JDBC >Summary of JDBC Data Sources >JDBC Data Source<INFODDOM_NAME>
And set the values for Initial Capacity to 10, Maximum capacity to 100 ,Capacity
Increment by 1, Statement Cache Type to LRU and Statement Cache size to 10
as shown in the below figure.
Figure : 44
•
All Oracle Financial Services Analytical Applications Infrastructure Servers must be
shut down.
•
Oracle 11g service must be running.
•
Deploy the EAR or WAR file
o
If the Web-Server is Tomcat then re-create and re-deploy the WAR file
(OFSAAI war file). (Refer to: Tomcat WAR Files Creation and Tomcat WAR
Files Deployment of the Oracle Financial Services Analytical Applications
Infrastructure 7.3.3.0.0 Installation Manual). Ensure that the previously
deployed applications in Tomcat are removed before starting the redeployment. Start all OFSAAI servers. All servers should be directly started
in the server.
46
•
o
If the Web-Server is Websphere re-create and re-deploy the WAR file
(OFSAAI war file). (Refer to: Websphere WAR Files Creation and Websphere
WAR Files Deployment of the Oracle Financial Services Analytical
Applications Infrastructure 7.3.3.0.0 Installation Manual). Ensure that the
previously deployed applications in Websphere are removed before starting
the re-deployment. Start all OFSAAI servers. All servers should be directly
started in the server.
o
If the Web-Server is Weblogic re-create and re-deploy the WAR file (OFSAAI
war file). (Refer to: Weblogic WAR Files Creation and Weblogic WAR Files
Deployment of the Oracle Financial Services Analytical Applications
Infrastructure 7.3.3.0.0 Installation Manual). Ensure that the previously
deployed applications in Weblogic are removed before starting the redeployment. Start all OFSAAI servers. All servers should be directly started
in the server.
Start all Oracle Financial Services Analytical Applications Infrastructure Servers.
NOTE
•
If you need assistance in starting the servers, then refer to Starting OFSAAI FICServers
in the Installation Guide Oracle Financial Services Analytical Applications Infrastructure
7.3.3.0.0. .profile should be executed before starting any activity from the console.
47
Installation Manual
March 2015
Oracle Financial Services Hedge Management and IFRS Valuations v6.1 (6.1.0.0.0) Product
Oracle Corporation
World Headquarters
500 Oracle Parkway
Redwood Shores, CA 94065
U.S.A.
Worldwide Inquiries:
Phone: +1.650.506.7000
Fax: +1.650.506.7200
Oracle and Java are registered trademarks of Oracle and/or its affiliates. Other names may be trademarks of their respective owners.
Intel and Intel Xeon are trademarks or registered trademarks of Intel Corporation. All SPARC trademarks are used under license and are trademarks or
registered trademarks of SPARC International, Inc. AMD, Opteron, the AMD logo, and the AMD Opteron logo are trademarks or registered trademarks of
Advanced Micro Devices. UNIX is a registered trademark of The Open Group.
This software and related documentation are provided under a license agreement containing restrictions on use and disclosure and are protected by
intellectual property laws. Except as expressly permitted in your license agreement or allowed by law, you may not use, copy, reproduce, translate,
broadcast, modify, license, transmit, distribute, exhibit, perform, publish, or display any part, in any form, or by any means. Reverse engineering,
disassembly, or decompilation of this software, unless required by law for interoperability, is prohibited.
The information contained herein is subject to change without notice and is not warranted to be error-free. If you find any errors, please report them to us in
writing.
If this is software or related documentation that is delivered to the U.S. Government or anyone licensing it on behalf of the U.S. Government, the following
notice is applicable:
U.S. GOVERNMENT END USERS: Oracle programs, including any operating system, integrated software, any programs installed on the hardware, and/or
documentation, delivered to U.S. Government end users are "commercial computer software" pursuant to the applicable Federal Acquisition Regulation and
agency-specific supplemental regulations. As such, use, duplication, disclosure, modification, and adaptation of the programs, including any operating
system, integrated software, any programs installed on the hardware, and/or documentation, shall be subject to license terms and license restrictions
applicable to the programs. No other rights are granted to the U.S. Government.
This software or hardware is developed for general use in a variety of information management applications. It is not developed or intended for use in any
inherently dangerous applications, including applications that may create a risk of personal injury. If you use this software or hardware in dangerous
applications, then you shall be responsible to take all appropriate fail-safe, backup, redundancy, and other measures to ensure its safe use. Oracle
Corporation and its affiliates disclaim any liability for any damages caused by use of this software or hardware in dangerous applications.
This software or hardware and documentation may provide access to or information on content, products, and services from third parties. Oracle
Corporation and its affiliates are not responsible for and expressly disclaim all warranties of any kind with respect to third-party content, products, and
services. Oracle Corporation and its affiliates will not be responsible for any loss, costs, or damages incurred due to your access to or use of third-party
content, products, or services.