1
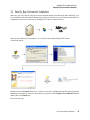
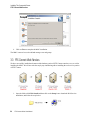
User Manual
March 24, 2006
ISO 9001 Certified
Quality Management System
P/N 8100078 Rev. A
SECURE COLLABORATION
FOR YOUR BUSINESS COMMUNITY ™
© Copyright 2006 by Psion Teklogix Inc., Mississauga, Ontario - Canada
This document and the information it contains is the property of Psion Teklogix Inc., is issued in strict confidence, and is not to be reproduced or copied, in whole or in part, except for the sole purpose of promoting the
sale of Psion Teklogix manufactured goods and services. Furthermore, this document is not to be used as a
basis for design, manufacture, or sub-contract, or in any manner detrimental to the interests of Psion
Teklogix Inc.
© Copyright 2006 by Coversant Inc., Sacramento, California - USA
Coversant and Soapbox Server is the sole property of Coversant Inc. Soapbox server may not be altered or
re-engineered in any way without the express written permission granted by Coversant Inc.
© Copyright 1996-200_ RADVISION Ltd.
Portions of this software are © 1996-200_ RADVISION Ltd. All intellectual property rights in such portions
of the Software and documentation are owned by RADVISION and are protected by United States copyright
laws, other applicable copyright laws and international treaty provisions. RADVISION and its suppliers
retain all rights not expressly granted.
All trademarks are the property of their respective holders.
Return-To-Factory Warranty
Psion Teklogix Inc. provides a return to factory warranty on this product for a period of twelve (12) months in
accordance with the Statement of Limited Warranty and Limitation of Liability provided at www.psionteklogix.com/warranty. (If you are not already a member of Teknet and you attempt to view this warranty, you
will be asked to register. As a member of Teknet, you’ll have access to helpful information about your Psion
Teklogix products at no charge to you.) In some regions, this warranty may exceed this period. Please contact
your local Psion Teklogix office for details. For a list of offices, see Appendix A: “Support Services And
Worldwide Offices” . The warranty on Psion Teklogix manufactured equipment does not extend to any product that has been tampered with, altered, or repaired by any person other than an employee of an authorized
Psion Teklogix service organization. See Psion Teklogix terms and conditions of sale for full details.
Important:
To ensure prompt warranty service in North America, please register the serial number of
this device to activate its warranty coverage by contacting Psion Teklogix at 1-800-8355644 ext. 209, or via web-link [email protected]. Failure to do so could
affect Psion Teklogix’ ability to effectively service, repair, or support this device.
Service
Psion Teklogix provides a complete range of product support services to its customers. For detailed information, please refer to Appendix A: “Support Services And Worldwide Offices”. This section also provides
information about accessing support services through the Psion Teklogix web site.
Disclaimer
Every effort has been made to make this material complete, accurate, and up-to-date. In addition, changes are
periodically added to the information herein; these changes will be incorporated into new editions of the publication.
Psion Teklogix Inc. reserves the right to make improvements and/or changes in the product(s) and/or the program(s) described in this document without notice, and shall not be responsible for any damages, including
but not limited to consequential damages, caused by reliance on the material presented, including but not limited to typographical errors.
TABLE OF CONTENTS
Chapter 1: Introduction And Overview
1.1 About This Manual . . . . . . . . . . .
1.2 Text Conventions . . . . . . . . . . . .
1.3 PTX Connect Overview . . . . . . . . .
1.3.1 Enterprise Installation Prerequisites .
1.3.1.1 MS SQL Installation . . . . . . .
1.3.2 Commercial Installation Prerequisites
.
.
.
.
.
.
.
.
.
.
.
.
.
.
.
.
.
.
.
.
.
.
.
.
.
.
.
.
.
.
.
.
.
.
.
.
.
.
.
.
.
.
.
.
.
.
.
.
.
.
.
.
.
.
.
.
.
.
.
.
.
.
.
.
.
.
.
.
.
.
.
.
.
.
.
.
.
.
.
.
.
.
.
.
.
.
.
.
.
.
.
.
.
.
.
.
.
.
.
.
.
.
.
.
.
.
.
.
.
.
.
.
.
.
.
.
.
.
.
.
.
.
.
.
.
.
.
.
.
.
.
.
.
.
.
.
.
.
.
.
.
.
.
.
.
.
.
.
.
.
.
.
.
.
.
.
.
.
.
.
.
.
.
.
.
.
.
.
.
.
.
.
.
.
.
.
.
.
.
.
.
.
.
.
.
.
.3
.3
.4
.5
.5
.6
.
.
.
.
.
.
.
.
.
.
.
.
.
.
.
.
.
.
.
.
.
.
.
.
.
.
.
.
.
.
.
.
.
.
.
.
.
.
.
.
.
.
.
.
.
.
.
.
.
.
.
.
.
.
.
.
.
.
.
.
.
.
.
.
.
.
.
.
.
.
.
.
.
.
.
.
.
.
.
.
.
.
.
.
.
.
.
.
.
.
.
.
.
.
.
.
.
.
.
.
.
.
.
.
.
.
.
.
.
.
.
.
.
.
.
.
.
.
.
.
.
.
.
.
.
.
.
.
.
.
.
.
.
.
.
.
.
.
.
.
.
.
.
.
.
.
.
.
.
.
.
.
.
.
.
.
.
.
.
.
.
.
.
.
.
.
.
.
.
.
.
.
.
.
.
.
.
.
.
.
.
.
.
.
.
.
.
.
.
.
.
.
.
.
.
.
.
.
.
.
.
.
.
.
.
.
.
.
.
.
.
.
.
.
.
.
.
.
.
.
.
.
.
.
.
.
.
.
.
.
.
.
.
.
.
.
.
.
.
.
.
.
.
.
.
.
.
.
.
.
.
.
.
.
.
.
.
.
.
.
.
.
.
.
.
.
.
.
.
.
.
.
.
.
.
.
.
.
.
.
.
.
.
.
.
.
.
.
.
.
.
.
.
.
.
.
.
.
.
.
.
.
.
.
.
.
.
.
.
.
.
.
.
.
.
.
.
.
.
.
.
.
.
.
.
.
.
.
.
.
.
.
.
.
.
.
.
.
.
.
.
.
.
.
.
.
.
.
.
.
.
.
.
.
.
.
.
.
.
.
.
.
.
.
.
.
.
.
.
.
.
.
.
.
.
.
.
.
.
.
.
.
.
.
.
.
.
.
.
.
.
.
.
.
.
.
.
.
.
.
.
.
.
.
.
.
.
.
.
.
.
.
.
.
.
.
.
.
.
.
.
.
.
.
.
.
.
.
.
.
.
.
.
.
.
.9
11
12
13
14
15
16
17
18
19
19
22
25
26
29
.
.
.
.
.
.
.
.
.
.
.
.
.
.
.
.
.
.
.
.
.
.
.
.
.
.
.
.
.
.
.
.
.
.
.
.
.
.
.
.
.
.
.
.
.
.
.
.
.
.
.
.
.
.
.
.
.
.
.
.
.
.
.
.
.
.
.
.
.
.
.
.
.
.
.
.
.
.
.
.
.
.
.
.
.
.
.
.
.
.
.
.
.
.
.
.
.
.
.
.
.
.
.
.
.
.
.
.
.
.
.
.
.
.
.
.
.
.
.
.
.
.
.
.
.
.
.
.
.
.
.
.
.
.
.
.
.
.
.
.
.
.
.
.
.
.
.
.
.
.
.
.
.
.
.
.
.
.
.
.
.
.
.
.
.
.
.
.
.
.
.
.
.
.
.
.
.
.
.
.
.
.
.
.
.
.
.
.
.
.
.
.
.
.
.
.
.
.
.
.
.
.
.
.
.
.
.
.
.
.
.
.
.
.
.
.
.
.
.
.
.
.
.
.
.
.
.
.
.
.
.
.
.
.
.
.
.
.
.
.
.
.
.
.
.
.
.
.
.
.
.
.
.
.
.
.
.
.
.
.
.
.
.
.
.
.
.
.
.
.
.
.
.
.
.
.
.
.
.
.
35
37
38
39
40
41
43
47
47
50
Chapter 2: Installing The Enterprise Server
2.1 Step By Step Enterprise Installation . .
2.1.1 Server Information . . . . . . . . .
2.1.2 Installation Path. . . . . . . . . . .
2.1.3 Database Installation . . . . . . . .
2.1.4 Database Name . . . . . . . . . . .
2.1.5 Database Authentication . . . . . .
2.1.6 Database Path . . . . . . . . . . . .
2.1.7 Database Configuration. . . . . . .
2.1.8 Domain Name And User Manager .
2.1.9 Administrator Password . . . . . .
2.1.10 Database Options . . . . . . . . . .
2.1.11 License Registration . . . . . . . .
2.1.12 Enterprise Installation Complete . .
2.2 Installing The MMC . . . . . . . . . .
2.3 Installing PTX Connect Web Services.
.
.
.
.
.
.
.
.
.
.
.
.
.
.
.
.
.
.
.
.
.
.
.
.
.
.
.
.
.
.
.
.
.
.
.
.
.
.
.
.
.
.
.
.
.
Chapter 3: Installing The Commercial Server
3.1 Step By Step Commercial Installation .
3.1.1 Server Information . . . . . . . . .
3.1.2 Installation Path. . . . . . . . . . .
3.1.3 Domain Name And User Manager .
3.1.4 Administrator Password . . . . . .
3.1.5 Database Options . . . . . . . . . .
3.1.6 License Registration . . . . . . . .
3.1.7 Commercial Installation Complete .
3.2 Installing The MMC . . . . . . . . . .
3.3 PTX Connect Web Services . . . . . .
.
.
.
.
.
.
.
.
.
.
.
.
.
.
.
.
.
.
.
.
.
.
.
.
.
.
.
.
.
.
.
.
.
.
.
.
.
.
.
.
PTX Connect Client User Manual
i
Contents
Chapter 4: Configuring PTX Connect
4.1
4.2
4.3
4.4
Configuring PTX Connect (Enterprise And Commercial).
Administration Of PTX Connect. . . . . . . . . . . . . .
Adding Users. . . . . . . . . . . . . . . . . . . . . . . .
Users And Groups . . . . . . . . . . . . . . . . . . . . .
.
.
.
.
.
.
.
.
.
.
.
.
.
.
.
.
.
.
.
.
.
.
.
.
.
.
.
.
.
.
.
.
.
.
.
.
.
.
.
.
.
.
.
.
.
.
.
.
.
.
.
.
.
.
.
.
.
.
.
.
.
.
.
.
.
.
.
.
.
.
.
.
.
.
.
.
.
.
.
.
.
.
.
.
.
.
.
.
57
57
60
61
Chapter 5: Configuring PTX Connect Client On A Windows Mobile Device
5.1
5.2
5.3
5.4
Configuring The Windows Mobile Menu Buttons
Configuring Scancode Remapping Keys . . . . .
Installing PTX Connect On Windows Mobile . . .
Configuring PTX Connect On Windows Mobile .
.
.
.
.
.
.
.
.
.
.
.
.
.
.
.
.
.
.
.
.
.
.
.
.
.
.
.
.
.
.
.
.
.
.
.
.
.
.
.
.
.
.
.
.
.
.
.
.
.
.
.
.
.
.
.
.
.
.
.
.
.
.
.
.
.
.
.
.
.
.
.
.
.
.
.
.
.
.
.
.
.
.
.
.
.
.
.
.
.
.
.
.
.
.
.
.
.
.
.
.
.
.
.
.
67
68
70
74
.
.
.
.
.
.
.
.
.
.
.
.
.
.
.
.
.
.
.
.
.
.
.
.
.
.
.
.
.
.
.
.
.
.
.
.
.
.
.
.
.
.
.
.
.
.
.
.
77
78
79
80
Chapter 6: Configuring PTX Connect Client On A Windows CE Device
6.1
6.2
6.3
6.4
Installing PTX Connect On Windows CE .
Configuring The Input Panel. . . . . . . .
Configuring The Keyboard . . . . . . . .
Configuring Scancode Remapping Keys .
.
.
.
.
.
.
.
.
.
.
.
.
.
.
.
.
.
.
.
.
.
.
.
.
.
.
.
.
.
.
.
.
.
.
.
.
.
.
.
.
.
.
.
.
.
.
.
.
.
.
.
.
.
.
.
.
.
.
.
.
.
.
.
.
.
.
.
.
.
.
.
.
Chapter 7: Configuring The XML File
7.1
7.2
Configuring On Windows Mobile And Windows CE . . . . . . . . . . . . . . . . . . . . . . . . . 85
Configuring PTX Connect On Windows Mobile . . . . . . . . . . . . . . . . . . . . . . . . . . . 86
Chapter 8: Uninstalling PTX Connect
8.1
8.2
Uninstalling The Enterprise Server . . . . . . . . . . . . . . . . . . . . . . . . . . . . . . . . . . 91
Uninstalling The Commercial Server . . . . . . . . . . . . . . . . . . . . . . . . . . . . . . . . . 99
Chapter 9: License Management
9.1
9.2
Adding A License Key. . . . . . . . . . . . . . . . . . . . . . . . . . . . . . . . . . . . . . . . .109
Removing A License Key . . . . . . . . . . . . . . . . . . . . . . . . . . . . . . . . . . . . . . .112
Appendix A: Support Services And Worldwide Offices
A.1 Technical Support . . . . . . . . . . . . . . . . . . . . . . . . . . . . . . . . . . . . . . . . . . A-1
A.2 Product Repairs. . . . . . . . . . . . . . . . . . . . . . . . . . . . . . . . . . . . . . . . . . . . A-1
A.3 Worldwide Offices . . . . . . . . . . . . . . . . . . . . . . . . . . . . . . . . . . . . . . . . . . A-2
ii
PTX Connect Client User Manual
1
INTRODUCTION AND OVERVIEW
1.1 About This Manual . . . . . . . . . . . . . . . .
1.2 Text Conventions . . . . . . . . . . . . . . . . .
1.3 PTX Connect Overview . . . . . . . . . . . . . .
1.3.1 Enterprise Installation Prerequisites .
1.3.1.1 MS SQL Installation . . . . . .
1.3.2 Commercial Installation Prerequisites
.
.
.
.
.
.
.
.
.
.
.
.
.
.
.
.
.
.
.
.
.
.
.
.
.
.
.
.
.
.
.
.
.
.
.
.
. . . . . . . . . . . . . . . . . . . .
. . . . . . . . . . . . . . . . . . . .
. . . . . . . . . . . . . . . . . . . .
. . . . . . . . . . . . . . . . . . .
. . . . . . . . . . . . . . . . . . .
. . . . . . . . . . . . . . . . . . .
3
3
4
5
5
6
PTX Connect Client User Manual
1
2
PTX Connect Client User Manual
Introduction And Overview
About This Manual
1.1 About This Manual
This manual describes the installation and configuration of PTX Connect Server software for hand-held
computers, which is managed by SoapBox Server 2005. For detailed information on the administrative tools
available with the SoapBox Server, please refer to the PTX Connect Server Administrative Manual.
Chapter 1: Introduction
provides an overview of this manual and the PTX Connect prerequisites for installation.
Chapter 2: Installing The Enterprise Server
is a step-by-step guide for the installation and configuration of the Enterprise Server.
Chapter 3: Installing The Commercial Server
is a step-by-step guide for the installation and configuration of the Commercial Server.
Chapter 4: Configuring PTX Connect
details configuring PTX Connect for Enterprise and Commercial servers, and creating users and groups.
Chapter 5: Configuring PTX Connect Client On A Windows Mobile Device
is a step-by-step guide for the installation and configuration of Windows Mobile®.
Chapter 6: Configuring PTX Connect Client On A Windows CE Device
is a step-by-step guide for the installation and configuration of Windows® CE.
Chapter 7: Configuring The XML File
is a step-by-step guide for the configuration of XML.
Chapter 8: Uninstalling PTX Connect
is a guide for uninstalling PTX Connect.
Chapter 9: License Management
details the addition and removal of license keys.
Appendix A: Support Services And Worldwide Offices
presents information for technical support, contacts, and the Psion Teklogix worldwide web address.
1.2 Text Conventions
Note:
Notes highlight additional helpful information.
Important:
These statements provide particularly important instructions or
additional information that is critical to the operation of the
computer and other equipment.
Warning:
These statements provide important information that may prevent injury, damage to the
equipment, or loss of data.
PTX Connect Client User Manual
3
Introduction And Overview
PTX Connect Overview
1.3 PTX Connect Overview
Before we begin installing the PTX Connect Server and hand-held components, you must make sure you have
the following prerequisites installed on your Windows® 2003 or higher server.
If you have MS SQL installed, and you are using PTX Connect with ten or more users, follow the diagram
below headed “Enterprise Installation” (shaded in Orange). For further details, please see “Enterprise
Installation Prerequisites” on page 5.
Important:
If you are using PTX Connect with more than 10 users it is highly recommended that you
have MS SQL installed on your server. It is also recommended to use PTX Connect on an
independent Windows 2003 server with MS SQL.
If you do not have MS SQL and you are using PTX Connect with fewer than 10 users, you will be following
the “Commercial Installation” (shaded in Blue). See Chapter 3: “Installing The Commercial Server”. For
more information on IIS requirements as a prerequisite, please see the PTX Connect Release Notes.
4
PTX Connect Client User Manual
Introduction And Overview
Enterprise Installation Prerequisites
1.3.1 Enterprise Installation Prerequisites
Make sure your server has all of the latest security and patch updates from Microsoft®. More than likely, your
server should have IIS and ASP.NET installed on your system. If it does not, you will need to install these two
components onto the server, followed by the installation of MS SQL Server 2000.
1.3.1.1
MS SQL Installation
There are three ways to install MS SQL Server, all of which will be compatible with PTX Connect.
1. SQL Authentication.
2. Windows Authentication.
3. Mixed Mode.
When you install the server component of PTX Connect, you will need to know the SQL Server name (more
than likely called ‘local’), User Name, and Password in order to connect to the server. If you are connecting to
an SQL Server that is not on your local machine, you will need to know the location of the server.
The beauty of PTX Connect is that the SQL Server does not need to reside on the PTX Connect Server. It is
recommended that you keep all of the contents on the same machine, but it is not mandatory.
NAME OF SQL SERVER:
USER NAME:
PASSWORD:
LOCATION OF
SQL SERVER:
(if the server is not on the local machine)
Important:
Make sure you have at least one SQL authenticated user.
For installation and configuration details for PTX Connect Enterprise, please go to Chapter 2: “Installing The
Enterprise Server”.
PTX Connect Client User Manual
5
Introduction And Overview
Commercial Installation Prerequisites
1.3.2 Commercial Installation Prerequisites
Make sure your server has all of the latest security and patch updates from Microsoft®. More than likely, your
server should have IIS and ASP.NET installed on your system. If it does not, you will need to install these two
components onto the server. (MS SQL Server 2000 is not required for Commercial Installation.)
6
PTX Connect Client User Manual
INSTALLING THE ENTERPRISE SERVER
2.1 Step By Step Enterprise Installation. . . . . .
2.1.1 Server Information . . . . . . . .
2.1.2 Installation Path . . . . . . . . . .
2.1.3 Database Installation . . . . . . .
2.1.4 Database Name . . . . . . . . . .
2.1.5 Database Authentication . . . . .
2.1.6 Database Path . . . . . . . . . . .
2.1.7 Database Configuration . . . . . .
2.1.8 Domain Name And User Manager
2.1.9 Administrator Password. . . . . .
2.1.10 Database Options . . . . . . . .
2.1.11 License Registration . . . . . . .
2.1.12 Enterprise Installation Complete.
2.2 Installing The MMC. . . . . . . . . . . . . .
2.3 Installing PTX Connect Web Services . . . .
.
.
.
.
.
.
.
.
.
.
.
.
.
.
.
.
.
.
.
.
.
.
.
.
.
.
.
.
.
.
.
.
.
.
.
.
.
.
.
.
.
.
.
.
.
.
.
.
.
.
.
.
.
.
.
.
.
.
.
.
.
.
.
.
.
.
.
.
.
.
.
.
.
.
.
.
.
.
.
.
.
.
.
.
.
.
.
.
.
.
.
.
.
.
.
.
.
.
.
.
.
.
.
.
.
.
.
.
.
.
.
.
.
.
.
.
.
.
.
.
2
. . . . . . . . . . . . . . . . . . . . 9
. . . . . . . . . . . . . . . . . . . 11
. . . . . . . . . . . . . . . . . . .12
. . . . . . . . . . . . . . . . . . .13
. . . . . . . . . . . . . . . . . . .14
. . . . . . . . . . . . . . . . . . .15
. . . . . . . . . . . . . . . . . . .16
. . . . . . . . . . . . . . . . . . .17
. . . . . . . . . . . . . . . . . . .18
. . . . . . . . . . . . . . . . . . .19
. . . . . . . . . . . . . . . . . . .19
. . . . . . . . . . . . . . . . . . .22
. . . . . . . . . . . . . . . . . . .25
. . . . . . . . . . . . . . . . . . . 26
. . . . . . . . . . . . . . . . . . . 29
PTX Connect Client User Manual
7
8
PTX Connect Client User Manual
Installing The Enterprise Server
Step By Step Enterprise Installation
2.1 Step By Step Enterprise Installation
After you have installed your prerequisites (see “PTX Connect Overview” on page 4), we will walk you
through installing PTX Connect Enterprise. If you are installing PTX Connect Commercial, please proceed to
Chapter 3: “Installing The Commercial Server”.
Double-click on the Soapbox Server icon—make sure you click on Cancel when the Microsoft Component
Installation screen pops up. After you cancel that screen, open the folder SoapBox Server 2005 SR2 and then
double-click on the Setup icon.
Proceed to the next page.
PTX Connect Client User Manual
9
Installing The Enterprise Server
Step By Step Enterprise Installation
1. Select the SoapBox Server 2005 SR2 Option.
2. After accepting the END-USER LICENSE AGREEMENT, click on Next.
10
PTX Connect Client User Manual
Installing The Enterprise Server
Server Information
2.1.1 Server Information
1. Enter Name and Organization.
2. Enter Server Name and Description. (Keep defaults for ease of configuration and installation.)
PTX Connect Client User Manual
11
Installing The Enterprise Server
Installation Path
2.1.2 Installation Path
1. Select the Everyone radial button.
2. Click on Next to install the SoapBox components on your server.
12
PTX Connect Client User Manual
Installing The Enterprise Server
Database Installation
2.1.3 Database Installation
1. Gather the SQL information outlined in “MS SQL Installation” on page 5 to configure
PTX Connect.
2. Select the Microsoft SQL option. (PTX Connect does not currently support Oracle.)
PTX Connect Client User Manual
13
Installing The Enterprise Server
Database Name
2.1.4 Database Name
1. Select the Install a new SoapBox Server database option.
2. If your SQL Server is installed on the same machine as PTX Connect, accept the default settings.
If the SQL Server is not installed on the same machine, make the appropriate changes to specify
the machine name on which the SQL Server is running, and provide an Instance Name if you
have more than one instance of SQL Server running on that machine.
14
PTX Connect Client User Manual
Installing The Enterprise Server
Database Authentication
2.1.5 Database Authentication
1. Select the Use a specific SQL... option and enter the MS SQL User Name and Password as
noted in “MS SQL Installation” on page 5.
2. Enter “ptxconnect” as your Database Name. You can enter any name but, for ease of installation
and configuration, use these recommended settings.
PTX Connect Client User Manual
15
Installing The Enterprise Server
Database Path
2.1.6 Database Path
1. Select the Use a specific SQL... option and enter the MS SQL User Name and Password as noted
in “Database Authentication,” Step 1 on page 15, and in “MS SQL Installation” on page 5.
2. Keep the default paths. You may change the path if necessary.
16
PTX Connect Client User Manual
Installing The Enterprise Server
Database Configuration
2.1.7 Database Configuration
1. Select Finish. You will get a message that says “Database is Being Created”. It may take some
time for your database to be created. Please wait until prompted to continue.
2. Select Local System.
PTX Connect Client User Manual
17
Installing The Enterprise Server
Domain Name And User Manager
2.1.8 Domain Name And User Manager
1. Enter the domain name “ptxconnect.com”. You may name it anything you wish, but it is
recommended that you keep the factory defaults for ease of installation and configuration. Make
sure you keep a note of this if you change it. You will need the domain later to configure your
PTX Connect hand-held software's XML File.
Important:
Please refer to the PTX Connect Server Installation Manual for information on DNS
configuration for this domain.
2. Select SoapBox Database. For other settings, please refer to page 29 of the PTX Connect Server
Installation Manual.
18
PTX Connect Client User Manual
Installing The Enterprise Server
Administrator Password
2.1.9 Administrator Password
1. Enter a Password for the SoapBox Administrator Console. Remember this password since you
will need it again when you try to configure your server.
2.1.10 Database Options
1. Make sure the example matches your installation settings.
PTX Connect Client User Manual
19
Installing The Enterprise Server
Database Options
2. Make sure the example settings match your installation settings. These are the defaults.
3. Make sure the example settings match your installation settings. These are the defaults.
20
PTX Connect Client User Manual
Installing The Enterprise Server
Database Options
4. Make sure the example settings match your installation settings. These are the defaults.
5. Make sure the example settings match your installation settings. These are the defaults.
PTX Connect Client User Manual
21
Installing The Enterprise Server
License Registration
2.1.11 License Registration
1. Make sure the example settings match your installation settings.
2. Select Yes to enter the license keys.
22
PTX Connect Client User Manual
Installing The Enterprise Server
License Registration
3. Keep the Username as the default (SoapBoxAdmin), but enter the Password you selected in
Section 2.1.9 on page 19 when you set up an Administrator password.
4. Click on Add License, then follow the next Step.
PTX Connect Client User Manual
23
Installing The Enterprise Server
License Registration
5. Enter the following base license key: 4ff74f72-aa63-4c17-adec-807ece914bcc.
6. After accepting the END-USER LICENSE AGREEMENT, click on Done.
24
PTX Connect Client User Manual
Installing The Enterprise Server
Enterprise Installation Complete
2.1.12 Enterprise Installation Complete
1. After you have entered your base server key, click on Done. Proceed to completing the
Enterprise Installation, and refer to Chapter 9: “License Management” for further information.
2. Click on Close to complete the installation of PTX Connect Enterprise Server.
PTX Connect Client User Manual
25
Installing The Enterprise Server
Installing The MMC
2.2 Installing The MMC
The SoapBox Microsoft Management Console (MMC) is the central location where most administrative tasks
are performed (for detailed information, please refer to the PTX Connect Server Administrative Manual). The
MMC allows the administrator to manage users and groups within the SoapBox console. Follow the steps to
install MMC for PTX Connect.
1. Select the MMC installer.
2. Click on Next to begin installing the MMC.
26
PTX Connect Client User Manual
Installing The Enterprise Server
Installing The MMC
3. Once you have read the END-USER LICENSE AGREEMENT, select I Agree and click
on Next.
4. Select Everyone and click on Next.
PTX Connect Client User Manual
27
Installing The Enterprise Server
Installing The MMC
5. Click on Next to start the installation.
6. Click on Close to complete the MMC installation.
We will be using the MMC to add and manage users and groups in Chapter 3: “Installing The Commercial
Server”.
28
PTX Connect Client User Manual
Installing The Enterprise Server
Installing PTX Connect Web Services
2.3 Installing PTX Connect Web Services
We have successfully installed and connected the database portion of PTX Connect onto the server. We will
now take a step by step installation guide to installing the web services portion of PTX Connect.
1. Open the folder called Web Install and then click on the Setup icon to launch the Web Services
installation. Then follow the steps below.
2. Click on Next to proceed with the Web Services Installation for Enterprise Server.
PTX Connect Client User Manual
29
Installing The Enterprise Server
Installing PTX Connect Web Services
3. Upon accepting the END-USER LICENSE AGREEMENT, click on Next.
4. Select a Virtual Directory to install into. (Accept defaults.) Click on Next. If you change your
Virtual Directory to something other than “PTX Connect”, you will need to keep a note of it and
use it when configuring your XML files in Chapter 7: “Configuring The XML File”.
30
PTX Connect Client User Manual
Installing The Enterprise Server
Installing PTX Connect Web Services
5. Click on Next to continue.
6. Enter the appropriate information as shown for SQL Server Authentication. For SQL Server with
Windows Authentication, refer to “PTX Connect Web Services”, Step 5 on page 53.
PTX Connect Client User Manual
31
Installing The Enterprise Server
Installing PTX Connect Web Services
7. Enter a Username and Password for an account that has ADMINISTRATIVE rights in Windows.
The Logon Domain will be pre-populated with the domain of your current logged-in user. You
may need to change your domain as well, but it is not likely (if you are not sure, contact your
System Administrator).
8. Click on Close to complete installation, and then Restart your computer.
32
PTX Connect Client User Manual
INSTALLING THE COMMERCIAL SERVER
3.1 Step By Step Commercial Installation . . . .
3.1.1 Server Information . . . . . . . .
3.1.2 Installation Path . . . . . . . . . .
3.1.3 Domain Name And User Manager
3.1.4 Administrator Password. . . . . .
3.1.5 Database Options . . . . . . . . .
3.1.6 License Registration. . . . . . . .
3.1.7 Commercial Installation Complete
3.2 Installing The MMC. . . . . . . . . . . . . .
3.3 PTX Connect Web Services . . . . . . . . . .
.
.
.
.
.
.
.
.
.
.
.
.
.
.
.
.
.
.
.
.
.
.
.
.
.
.
.
.
.
.
.
.
.
.
.
.
.
.
.
.
.
.
.
.
.
.
.
.
.
.
.
.
.
.
.
.
.
.
.
.
.
.
.
.
.
.
.
.
.
.
.
.
.
.
.
.
.
.
.
.
3
. . . . . . . . . . . . . . . . . . . 35
. . . . . . . . . . . . . . . . . . . 37
. . . . . . . . . . . . . . . . . . . 38
. . . . . . . . . . . . . . . . . . . 39
. . . . . . . . . . . . . . . . . . . 40
. . . . . . . . . . . . . . . . . . . 41
. . . . . . . . . . . . . . . . . . . 43
. . . . . . . . . . . . . . . . . . . 47
. . . . . . . . . . . . . . . . . . . 47
. . . . . . . . . . . . . . . . . . . 50
PTX Connect Client User Manual
33
34
PTX Connect Client User Manual
Installing The Commercial Server
Step By Step Commercial Installation
3.1 Step By Step Commercial Installation
Make sure your server has all of the latest security and patch updates from Microsoft. More than likely, your
server should have IIS and ASP.NET installed on your system. If it does not, you will need to install these two
components onto the server, followed by installing PTX Connect Commercial Server.
After you have installed your prerequisites, we will walk you through installing PTX Connect
Commercial edition.
Double-click on the Soapbox Server icon—make sure you click on Cancel when the Microsoft Component
Installation screen pops up. After you cancel that screen, open the folder SoapBox Server 2005 SR2 and then
double-click on the Setup icon.
Proceed to next page.
PTX Connect Client User Manual
35
Installing The Commercial Server
Step By Step Commercial Installation
1. Click on SoapBox Server 2005 SR2 Standalone to install PTX Connect without connecting to
MS SQL. MS SQL light (aka MSDE) will be installed in place of MS SQL. This is ONLY
recommended for fewer than 10 users using PTX Connect.
2. After accepting the END-USER LICENSE AGREEMENT, click on Next.
36
PTX Connect Client User Manual
Installing The Commercial Server
Server Information
3.1.1 Server Information
1. Enter Name and Organization.
2. Enter Server Name and Description. (Keep defaults for ease of configuration and installation.)
PTX Connect Client User Manual
37
Installing The Commercial Server
Installation Path
3.1.2 Installation Path
1. Select the Everyone radial button.
2. Click on Next to install the SoapBox components on your server.
38
PTX Connect Client User Manual
Installing The Commercial Server
Domain Name And User Manager
3. MSDE is being installed. Click on Next when prompted to do so.
3.1.3 Domain Name And User Manager
1. Enter the Domain Name of PTX Connect. You may name it anything you wish, but is
recommended that you keep the factory defaults for ease of installation and configuration.
Important:
Please refer to the PTX Connect Server Installation Manual for information on DNS
configuration for this domain.
PTX Connect Client User Manual
39
Installing The Commercial Server
Administrator Password
2. Select SoapBox Database.
3.1.4 Administrator Password
1. Enter a Password for the SoapBox Administrator Console.
40
PTX Connect Client User Manual
Installing The Commercial Server
Database Options
3.1.5 Database Options
1. Make sure the example matches your installation settings.
2. Make sure the example settings match your installation settings. These are the defaults.
PTX Connect Client User Manual
41
Installing The Commercial Server
Database Options
3. Make sure the example settings match your installation settings. These are the defaults.
4. Make sure the example settings match your installation settings. These are the defaults.
42
PTX Connect Client User Manual
Installing The Commercial Server
License Registration
5. Make sure the example settings match your installation setting. These are the defaults.
3.1.6 License Registration
1. Make sure the example settings match your installation setting.
PTX Connect Client User Manual
43
Installing The Commercial Server
License Registration
2. Select Yes to enter the license keys.
3. Keep the Username as the default (SoapBoxAdmin), but enter the Password you selected in
Section 3.1.4 on page 40 when you set up an Administrator password.
44
PTX Connect Client User Manual
Installing The Commercial Server
License Registration
4. Click on Add License, then follow the next Step.
5. Enter the following base license key: 4ff74f72-aa63-4c17-adec-807ece914bcc.
PTX Connect Client User Manual
45
Installing The Commercial Server
License Registration
6. After accepting the END-USER LICENSE AGREEMENT, click on Done.
7. After you have entered your base server key, click on Done. Proceed to completing the
Commercial Installation and refer to Chapter 9: “License Management” for more information.
46
PTX Connect Client User Manual
Installing The Commercial Server
Commercial Installation Complete
3.1.7 Commercial Installation Complete
1. Click on Close to complete the installation of PTX Connect Commercial Server.
3.2 Installing The MMC
The SoapBox Microsoft Management Console (MMC) is the central location where most administrative
tasks are performed (for detailed information, please refer to the PTX Connect Server Administrative
Manual). The MMC allows the administrator to manage users and groups within the SoapBox console.
Follow the steps to install MMC for PTX Connect.
1. Select the MMC installer.
PTX Connect Client User Manual
47
Installing The Commercial Server
Installing The MMC
2. Click on Next to begin installing the MMC.
3. Once you have read the END-USER LICENSE AGREEMENT, select I Agree and click on
Next.
48
PTX Connect Client User Manual
Installing The Commercial Server
Installing The MMC
4. Select Everyone and click on Next.
5. Click on Next to start the installation.
PTX Connect Client User Manual
49
Installing The Commercial Server
PTX Connect Web Services
6. Click on Close to complete the MMC installation.
The MMC can now be used to add and manage users and groups.
3.3 PTX Connect Web Services
We have successfully installed and connected the database portion of PTX Connect onto the server, as well as
installing the MMC. We will now take the step by step installation guide to installing the web services portion
of PTX Connect.
1. Open the folder called Web Install and then click on the Setup icon to launch the Web Services
installation, and follow the steps below.
50
PTX Connect Client User Manual
Installing The Commercial Server
PTX Connect Web Services
2. Click on Next to proceed with the Web Services installation for the Commercial Server.
3. Upon accepting the END-USER LICENSE AGREEMENT, click on Next.
PTX Connect Client User Manual
51
Installing The Commercial Server
PTX Connect Web Services
4. Select a Virtual Directory to install into. (Accept defaults.) Click on Next. If you change your
Virtual Directory to something other than “PTX Connect”, you will need to keep a note of it and
use it when configuring your XML files in Chapter 7: “Configuring The XML File”.
5. Click on Next to continue.
52
PTX Connect Client User Manual
Installing The Commercial Server
PTX Connect Web Services
6. For PTX Commercial using MSDE or SQL with Windows Authentication, enter the parameters
as shown here.
7. Enter a username and password for an account that has ADMINISTRATIVE rights in Windows.
The Logon Domain will be pre-populated with the domain of your current logged-in user. You
may need to change your domain as well, but it is not likely (if you are not sure, contact your
System Administrator).
PTX Connect Client User Manual
53
Installing The Commercial Server
PTX Connect Web Services
8. Click on Close to complete the installation, and then Restart your computer.
54
PTX Connect Client User Manual
4
CONFIGURING PTX CONNECT
4.1
4.2
4.3
4.4
Configuring PTX Connect (Enterprise And Commercial)
Administration Of PTX Connect . . . . . . . . . . . . .
Adding Users . . . . . . . . . . . . . . . . . . . . . . .
Users And Groups. . . . . . . . . . . . . . . . . . . . .
.
.
.
.
.
.
.
.
.
.
.
.
.
.
.
.
.
.
.
.
.
.
.
.
.
.
.
.
.
.
.
.
.
.
.
.
.
.
.
.
.
.
.
.
.
.
.
.
.
.
.
.
.
.
.
.
.
.
.
.
.
.
.
.
.
.
.
.
.
.
.
.
.
.
.
.
PTX Connect Client User Manual
.
.
.
.
.
.
.
.
57
57
60
61
55
56
PTX Connect Client User Manual
Configuring PTX Connect
Configuring PTX Connect (Enterprise And Commercial)
4.1 Configuring PTX Connect (Enterprise And Commercial)
Now that PTX Connect Enterprise Server has been successfully installed, we will need to add users as well as
configure the XML file (see Chapter 7: “Configuring The XML File”) so that you may successfully deploy
PTX Connect on Windows Mobile® and/or Windows® CE.
4.2 Administration Of PTX Connect
1. Click on Start > Programs > Coversant > SoapBox Server 2005 Administration > SoapBox
Server Manager.
PTX Connect Client User Manual
57
Configuring PTX Connect
Administration Of PTX Connect
2. Make sure all of the values are the same as shown here. However, if you did not accept the
defaults when you installed PTX Connect, some of your values may have changed. You will need
to specify the password you selected as an Administrator Password in Section 2.1.9 on page 19
or Section 3.1.4 on page 40. You may have also selected a different Domain Name in sections
Section 2.1.8 on page 18 or Section 3.1.3 on page 39.
3. Expand the SoapBox Servers tree node. Then expand the ptxconnect.com node. (This may take
a while.) Right click on the ptxconnect.com node and select Properties. If you entered a
different domain name, expand the node associated with that domain.
58
PTX Connect Client User Manual
Configuring PTX Connect
Administration Of PTX Connect
4. Check Log Messages and click on Apply, then OK.
PTX Connect Client User Manual
59
Configuring PTX Connect
Adding Users
4.3 Adding Users
1. Click on the Users tree node. Then click on the Add User link on the right.
2. Type the User Name and Password for the user. Repeat steps as necessary for all users. When
complete, go to the next step.
60
PTX Connect Client User Manual
Configuring PTX Connect
Users And Groups
4.4 Users And Groups
1. Click on the Managed Roster Groups tree node on the left side. Right click on the empty pane
on the right and select New Managed Roster groups.
2. Type a name for your group and click on OK. Repeat Steps 1 and 2 for all the groups you want
to create.
PTX Connect Client User Manual
61
Configuring PTX Connect
Users And Groups
3. Double click on one of your groups in the left pane, and then double-click on the Owners folder.
4. Click on Add User(s) and select all the users (except for the “soapboxadmin” user) to indicate
that all users can communicate with users in this group. Select users with [SHIFT] or [CTRL]
and the mouse left-click. Then click on Add. Click on OK when done.
62
PTX Connect Client User Manual
Configuring PTX Connect
Users And Groups
5. Click on Members on the left pane under one of the groups you created.
6. Click on Add User(s) and add users to this group just as you did in Step 4. The users you add
here belong to this group and will be seen under that group in the directory when clients
are online.
PTX Connect Client User Manual
63
Configuring PTX Connect
Users And Groups
7. Once done editing all your groups, click on File > Save.
8. After saving, click on File > Exit.
64
PTX Connect Client User Manual
5
CONFIGURING PTX CONNECT CLIENT ON A WINDOWS MOBILE DEVICE
5.1
5.2
5.3
5.4
Configuring The Windows Mobile Menu Buttons
Configuring Scancode Remapping Keys . . . . .
Installing PTX Connect On Windows Mobile . .
Configuring PTX Connect On Windows Mobile .
.
.
.
.
.
.
.
.
.
.
.
.
.
.
.
.
.
.
.
.
.
.
.
.
.
.
.
.
.
.
.
.
.
.
.
.
.
.
.
.
.
.
.
.
.
.
.
.
.
.
.
.
.
.
.
.
.
.
.
.
.
.
.
.
.
.
.
.
.
.
.
.
.
.
.
.
.
.
.
.
.
.
.
.
.
.
.
.
.
.
.
.
PTX Connect Client User Manual
.
.
.
.
.
.
.
.
67
68
70
74
65
66
PTX Connect Client User Manual
Configuring PTX Connect Client On A Windows Mobile Device
Configuring The Windows Mobile Menu Buttons
5.1 Configuring The Windows Mobile Menu Buttons
1. Click on Start > Settings.
2. Click on Menus.
3. UNCHECK a program from the list that is unnecessary for your use. (This function does not
delete the program, it just removed it from the Start Menu.) Then click on OK. This will allow
the PTX Connect icon to appear on the Start Menu once it is installed on your device. Windows
Mobile allows a total of seven programs in your Start Menu shortcuts.
PTX Connect Client User Manual
67
Configuring PTX Connect Client On A Windows Mobile Device
Configuring Scancode Remapping Keys
5.2 Configuring Scancode Remapping Keys
1. Click on the Buttons icon to
configure your Push To Talk
and Scanner Functions.
2. Click on the Right arrow button
until you reach the Scancode
Remapping tab. Click on Add.
WORKABOUT S
WORKABOUT C
3. WORKABOUT S Units: Click on the Label 4. WORKABOUT C Units: Click on the Label
down arrow and scroll until you see the
down arrow and scroll until you see the
ScannerOn that represents Scancode 003E.
ScannerOn that represents Scancode 0006. This
This maps the soft yellow key on the left
maps the hard yellow key on the left side of the
side of the terminal as your function key.
terminal as your function key.
68
PTX Connect Client User Manual
Configuring PTX Connect Client On A Windows Mobile Device
Configuring Scancode Remapping Keys
5. Click on OK once you have
selected the appropriate Scancode
for your unit.
6. Verify that you have mapped the Scancode
by viewing the information screen. Click
on OK to complete Scancode remapping.
7. Click on the X button to exit the Settings menu.
PTX Connect Client User Manual
69
Configuring PTX Connect Client On A Windows Mobile Device
Installing PTX Connect On Windows Mobile
5.3 Installing PTX Connect On Windows Mobile
1. Dock your Windows Mobile device (you can setup a Guest partnership if you like), and then
click on the Explore icon.
2. Drag and drop the two files for your Windows Mobile into the Business folder:
1) 1050722a.cab, and
2) 1050721a.cab.
You will need to do Steps 3 and 4 below for each of the files.
70
PTX Connect Client User Manual
Configuring PTX Connect Client On A Windows Mobile Device
Installing PTX Connect On Windows Mobile
3. Click on OK to proceed with transferring the PTX Connect files over to your Windows Mobile device.
4. The files will transfer into your Windows Mobile unit.
PTX Connect Client User Manual
71
Configuring PTX Connect Client On A Windows Mobile Device
Installing PTX Connect On Windows Mobile
72
5. Click on Start > File Explorer.
6. Click on My Device to make sure you go
to the root directory.
7. Click on My Documents.
8. Click on Business (where the files were
transferred in Step 2, page 70).
PTX Connect Client User Manual
Configuring PTX Connect Client On A Windows Mobile Device
Installing PTX Connect On Windows Mobile
9. Click to launch the 1050722a.cab file.
10. The file will automatically install and go
back to the next screen.
11. Click to launch the 1050721a.cab file.
12. PTX Connect will automatically install
onto the device.
PTX Connect Client User Manual
73
Configuring PTX Connect Client On A Windows Mobile Device
Configuring PTX Connect On Windows Mobile
5.4 Configuring PTX Connect On Windows Mobile
You can now launch PTX Connect and you will see the following screen. Before logging in however, please
make sure your configuration XML file is set correctly (see Chapter 7: “Configuring The XML File”).
74
PTX Connect Client User Manual
6
CONFIGURING PTX CONNECT CLIENT ON A WINDOWS CE DEVICE
6.1
6.2
6.3
6.4
Installing PTX Connect On Windows CE.
Configuring The Input Panel . . . . . . .
Configuring The Keyboard . . . . . . . .
Configuring Scancode Remapping Keys .
.
.
.
.
.
.
.
.
.
.
.
.
.
.
.
.
.
.
.
.
.
.
.
.
.
.
.
.
.
.
.
.
.
.
.
.
.
.
.
.
.
.
.
.
.
.
.
.
.
.
.
.
.
.
.
.
.
.
.
.
.
.
.
.
.
.
.
.
.
.
.
.
.
.
.
.
.
.
.
.
.
.
.
.
.
.
.
.
.
.
.
.
.
.
.
.
.
.
.
.
.
.
.
.
.
.
.
.
PTX Connect Client User Manual
.
.
.
.
.
.
.
.
77
78
79
80
75
76
PTX Connect Client User Manual
Configuring PTX Connect Client On A Windows CE Device
Installing PTX Connect On Windows CE
6.1 Installing PTX Connect On Windows CE
Before installing the 1050720a.cab file (below), you will need to copy the cab file into the device, just as you
did in Windows Mobile (see page 70), but instead of placing the cab file in the Business folder, place it in the
root folder, as there is no Business folder in Windows CE.
1. Install the 1050720a.cab file.
2. Click on OK to select the default installation.
3. PTX Connect will install and add components into your device.
PTX Connect Client User Manual
77
Configuring PTX Connect Client On A Windows CE Device
Configuring The Input Panel
6.2 Configuring The Input Panel
1. Click on the Windows Start Button >
Settings > Control Panel > Input Panel.
3. Make sure the checkbox IS
CHECKED. Click on OK to save
the changes.
78
PTX Connect Client User Manual
2. Go to the Input Panel.
4. You must Warm Reset the device to
continue. You may get the message: “ALL
UNSAVED DATA WILL BE LOST”. Just
click on OK to warm reset the device.
Configuring PTX Connect Client On A Windows CE Device
Configuring The Keyboard
6.3 Configuring The Keyboard
1. We will need to go back to the
Control Panel again.
3. Make sure the checkbox is NOT CHECKED.
2. Select the Keyboard option.
4. Click on the right arrow until you come to
the Scancode Remapping tab. Click on Add.
PTX Connect Client User Manual
79
Configuring PTX Connect Client On A Windows CE Device
Configuring Scancode Remapping Keys
6.4 Configuring Scancode Remapping Keys
WORKABOUT S
1. After clicking on the Add button
you will see this screen.
80
PTX Connect Client User Manual
2. WORKABOUT S Units: Click on the Label down
arrow and scroll until you see the ScannerOn that
represents Scancode 003E. This will map the soft
yellow key on the left of your terminal as your “Push
to Talk and Imager” key.
Configuring PTX Connect Client On A Windows CE Device
Configuring Scancode Remapping Keys
WORKABOUT C
3. WORKABOUT C Units: Click on the
Label down arrow and scroll until you
see the ScannerOn that represents
Scancode 0006. This will map the hard
yellow key on the left of your terminal as
your “Push to Talk and Imager” key.
5. Click on OK again and close the
Control Panel.
4. Click on OK to accept the Scancode and
Character Repeat settings for either the C
or S unit.
6. Go to the Taskbar.
PTX Connect Client User Manual
81
Configuring PTX Connect Client On A Windows CE Device
Configuring Scancode Remapping Keys
7. Make sure the Show Input Panel button is
CHECKED and click on OK. Then close the
Control Panel.
82
PTX Connect Client User Manual
CONFIGURING THE XML FILE
7
7.1 Configuring On Windows Mobile And Windows CE . . . . . . . . . . . . . . . . . . . . . . . 85
7.2 Configuring PTX Connect On Windows Mobile . . . . . . . . . . . . . . . . . . . . . . . . . . 86
PTX Connect Client User Manual
83
84
PTX Connect Client User Manual
Configuring The XML File
Configuring On Windows Mobile And Windows CE
7.1 Configuring On Windows Mobile And Windows CE
1. Windows Mobile — Dock your unit to your cradle and then click on Explore > My Windows
Mobile > Program Files > PTX Connect.
2. Windows CE — Dock your unit to your cradle and then click on Explore > Program Files >
PTX Connect.
PTX Connect Client User Manual
85
Configuring The XML File
Configuring PTX Connect On Windows Mobile
7.2 Configuring PTX Connect On Windows Mobile
1. On your computer desktop, right-click on the config.xml file and click on Open With >
Notepad.
86
PTX Connect Client User Manual
Configuring The XML File
Configuring PTX Connect On Windows Mobile
2. You will only need to update four settings in the XML file. Once you do, save a copy and re-flash
it into other units.
For the Server value, enter the IP Address of the server on which you installed the SoapBox
Server 2005.
For the XmppDomain, enter “ptxconnect.com”. But, if you selected a different domain name
during your SoapBox Server installation, enter that name instead.
The value for WebServer should be the same IP Address as that for the SERVER.
For your VirtualDirectory, enter “PTX Connect” only if you accepted the defaults and
recommendations when installing your Web Services. If you changed the Virtual Directory
name, enter that name here.
PTX Connect Client User Manual
87
Configuring The XML File
Configuring PTX Connect On Windows Mobile
3. Once you have updated the four variables, use ActiveSync® to save it back into the PTX
Connect folder.
4. Launch PTX Connect by clicking on
the Start button.
88
PTX Connect Client User Manual
5. You can launch PTX Connect by going to the
Programs directory.
UNINSTALLING PTX CONNECT
8
8.1 Uninstalling The Enterprise Server . . . . . . . . . . . . . . . . . . . . . . . . . . . . . . . . . 91
8.2 Uninstalling The Commercial Server . . . . . . . . . . . . . . . . . . . . . . . . . . . . . . . . 99
PTX Connect Client User Manual
89
90
PTX Connect Client User Manual
Uninstalling PTX Connect
Uninstalling The Enterprise Server
8.1 Uninstalling The Enterprise Server
1. Before proceeding to uninstall PTX Connect, you must back up your messages and data to a
secure location. All messages and data stored on the PTX Connect server can be found in the
folder: ...\Inetpub\wwwroot\PTX Connect.
Important:
All messages and data stored in the folder ...\Inetpub\wwwroot\PTX Connect will be
deleted entirely as part of the uninstall.
2. Go to Control Panel > Add/Remove Programs and find the PTX Connect program to
uninstall it. Click on Remove.
PTX Connect Client User Manual
91
Uninstalling PTX Connect
Uninstalling The Enterprise Server
3. Click on Yes.
4. Find the SoapBox Server 2005 MMC program to uninstall it. Click on Remove.
92
PTX Connect Client User Manual
Uninstalling PTX Connect
Uninstalling The Enterprise Server
5. Click on Yes.
6. Find the SoapBox Server 2005 program to uninstall it. Click on Remove.
PTX Connect Client User Manual
93
Uninstalling PTX Connect
Uninstalling The Enterprise Server
7. Click on Yes.
8. Go to Start > All Programs > Microsoft SQL server > Enterprise Manager.
94
PTX Connect Client User Manual
Uninstalling PTX Connect
Uninstalling The Enterprise Server
9. Expand the tree on the left side of the Enterprise Manager. You will need to find your database
server (in our case it was “(local)”, but this might not always be the case).
Expand the Databases node and find the ptxconnect database.
Right-click on it and go to All Tasks > Detach Database... Click on it.
PTX Connect Client User Manual
95
Uninstalling PTX Connect
Uninstalling The Enterprise Server
10. Keep the defaults and click on OK.
11. Click on OK when the detach is complete.
96
PTX Connect Client User Manual
Uninstalling PTX Connect
Uninstalling The Enterprise Server
12. Go to My Computer.
13. Navigate to your Program Files directory and locate the Coversant directory. Select the
directory and then press [SHIFT] + [DELETE]. Click on YES to confirm.
Note:
If you did not install the database into the default location as recommended in the installation
procedures, then you will have to find the database files and delete them manually.
PTX Connect Client User Manual
97
Uninstalling PTX Connect
Uninstalling The Enterprise Server
14. Navigate to your Inetpub\wwwroot directory and locate the PTX Connect directory. Select the
directory and then press [SHIFT] + [DELETE]. Click on YES to confirm. You have completed
uninstalling the PTX Enterprise Server.
Note:
If you installed PTX Connect into a different Virtual Directory, delete the directory with that name.
(When you installed PTX Connect Web Services, it asked for a Virtual Directory. The default is
“PTX Connect”, but you had the option to change that. Sometimes when you uninstall PTX
Connect Web Services the Virtual Directory may be automatically deleted (depending on your IIS
settings), but if it is not, then you should make sure you delete it now.)
98
PTX Connect Client User Manual
Uninstalling PTX Connect
Uninstalling The Commercial Server
8.2 Uninstalling The Commercial Server
1. Before proceeding to uninstall PTX Connect, you must back up your messages and data to a
secure location. All messages and data stored on the PTX Connect server can be found in the
folder: ...\Inetpub\wwwroot\PTX Connect.
Important:
All messages and data stored in the folder ...\Inetpub\wwwroot\PTX Connect will be
deleted entirely as part of the uninstall.
2. Go to Control Panel > Add/Remove Programs and find the SoapBox Server 2005 MMC
program to uninstall it. Click on Remove.
PTX Connect Client User Manual
99
Uninstalling PTX Connect
Uninstalling The Commercial Server
3. Click on Yes.
4. Find the SoapBox Server 2005 program to uninstall it. Click on Remove.
100
PTX Connect Client User Manual
Uninstalling PTX Connect
Uninstalling The Commercial Server
5. Click on Yes.
6. Find the PTX Connect program to uninstall it. Click on Remove.
PTX Connect Client User Manual
101
Uninstalling PTX Connect
Uninstalling The Commercial Server
7. Click on Yes.
8. Find the Microsoft SQL Server Desktop Engine (SOAPBOX) program to uninstall it. Click
on Remove.
102
PTX Connect Client User Manual
Uninstalling PTX Connect
Uninstalling The Commercial Server
9. Click on Yes.
10. Go to My Computer and navigate to your Program Files directory. Click on the Coversant
directory. Click on [SHIFT] + [DELETE].
PTX Connect Client User Manual
103
Uninstalling PTX Connect
Uninstalling The Commercial Server
11. Click on Yes.
12. Navigate to your Inetpub\wwwroot directory and locate the PTX Connect directory. Select the
directory and then press [SHIFT] + [DELETE].
104
PTX Connect Client User Manual
Uninstalling PTX Connect
Uninstalling The Commercial Server
Note:
If you installed PTX Connect into a different Virtual Directory, delete the directory with that
name.
(When you installed PTX Connect Web Services, it asked for a Virtual Directory. The default is “PTX
Connect”, but you had the option to change that. Sometimes when you uninstall PTX
Connect Web Services the Virtual Directory may be automatically deleted (depending on your IIS settings), but if it is not, then you should make sure you delete it now.)
13. Click on Yes to confirm. You have finished uninstalling the PTX Commercial Server.
PTX Connect Client User Manual
105
LICENSE MANAGEMENT
9
9.1 Adding A License Key . . . . . . . . . . . . . . . . . . . . . . . . . . . . . . . . . . . . . . . 109
9.2 Removing A License Key. . . . . . . . . . . . . . . . . . . . . . . . . . . . . . . . . . . . . . 112
PTX Connect Client User Manual
107
108
PTX Connect Client User Manual
License Management
Adding A License Key
9.1 Adding A License Key
1. Double-click on the PTX Connect License Manager icon on your desktop.
2. Click on Add License from the main screen.
PTX Connect Client User Manual
109
License Management
Adding A License Key
3. This screen will pop up. Enter the serial number provided to you by Psion Teklogix.
Click on Activate.
110
PTX Connect Client User Manual
License Management
Adding A License Key
4. You will return to the main screen, but notice that your license key has been registered. You will
also see the number of users allowed by this license. Click on Close when finished.
Note:
You can augment licenses. If you already have 1000 licenses and add a new key with 500 licenses,
you will see a total of 1500 licenses
PTX Connect Client User Manual
111
License Management
Removing A License Key
9.2 Removing A License Key
1. Double-click on the PTX Connect License Manager icon on your desktop.
2. You will notice that all your licenses are listed. Select the license you want to delete by clicking
on the left of the license you want to delete. The license key and number of users will turn blue to
indicate the row is selected.
112
PTX Connect Client User Manual
License Management
Removing A License Key
3. Click on Remove License. You will get a confirmation dialog asking if you are sure you want to
delete the specified license key. Click on Yes.
4. You will return to the main screen. Note that your license key has been deleted.
Click on Close when finished.
PTX Connect Client User Manual
113
APPENDIX
A
SUPPORT SERVICES AND WORLDWIDE OFFICES
Psion Teklogix provides a complete range of product support services to its customers worldwide. These
services include technical support and product repairs.
A.1 Technical Support
Technical Support for Mobile Computing Products is provided via e-mail through the Partner Program
website. To reach the website, go to www.psionteklogix.com and click on the Partner Program link, which
takes you to the Partner Program page. Then click on the Log-in button or the Register button, depending on
whether you have previously registered for Teknet or the Partner Program. (Your UserID and password are
the same for TekNet and the Partner Program.) Once you have logged in, search for the “Support Request
Form”.
A.2 Product Repairs
International
For product repairs, please contact your local Psion Teklogix office listed on our worldwide website:
http://www.psionteklogix.com
Click on the heading labelled “Contacts” to choose a Psion Teklogix technical support representative closest
to you.
Canada/U.S.A
Canadian and U.S. customers can receive access to repair services by calling the toll-free number below, or
via our secure website (see Technical Support, above).
Note:
Customers calling the toll-free number should have their Psion Teklogix customer number or
trouble ticket number available.
Voice:
1 800 387-8898 (press option “2”)
Fax:1 905 812-6304
Web Site:
http://service.psionteklogix.com
PTX Connect Client User Manual
A-1
Worldwide Offices
A.3 Worldwide Offices
COMPANY HEADQUARTERS AND CANADIAN SERVICE CENTRE
Psion Teklogix Inc.
2100 Meadowvale Blvd.
Mississauga, Ontario
Canada L5N 7J9
Tel:
+1 905 813 9900
Fax:
+1 905 812 6300
E-mail: [email protected]
NORTH AMERICAN HEADQUARTERS AND U.S. SERVICE CENTRE
Psion Teklogix Corp.
1810 Airport Exchange Boulevard
Suite 500
Erlanger, Kentucky
USA 41018
Tel:
+1 859 371 6006
Fax:
+1 859 371 6422
E-mail: [email protected]
INTERNATIONAL SUBSIDIARIES
Psion Teklogix S.A.
La Duranne
135 Rue Rene Descartes
BP 421000
13591 Aix-En-Provence
Cedex 3; France
Tel:
+33 4 42 90 88 09
Fax:
+33 4 42 90 88 88
E-mail: [email protected]
For a complete listing of international offices, please refer to: www.psionteklogix.com
A-2
PTX Connect Client User Manual