1
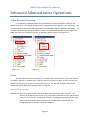
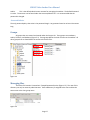
SNDLC Video Locker User Manual SNDLC Video Locker User Manual Page 1 SNDLC Video Locker User Manual Table of Contents Getting Started. . . . . . . . . . . . . . . . . . . . . . . . . . . . . . . . . . . . . . . . . . . . . . . . . . . . . . . . . . . . . . . . . . . . . . . 4 Overview . . . . . . . . . . . . . . . . . . . . . . . . . . . . . . . . . . . . . . . . . . . . . . . . . . . . . . . . . . . . . . . . . . . . . . 4 Navigation. . . . . . . . . . . . . . . . . . . . . . . . . . . . . . . . . . . . . . . . . . . . . . . . . . . . . . . . . . . . . . . . . . . . . 4 Student Operations . . . . . . . . . . . . . . . . . . . . . . . . . . . . . . . . . . . . . . . . . . . . . . . . . . . . . . . . . . . . . . . . . . 5 Logging in . . . . . . . . . . . . . . . . . . . . . . . . . . . . . . . . . . . . . . . . . . . . . . . . . . . . . . . . . . . . . . . . . . . . . 5 Downloading Files . . . . . . . . . . . . . . . . . . . . . . . . . . . . . . . . . . . . . . . . . . . . . . . . . . . . . . . . . . . . . . . 6 Logging out. . . . . . . . . . . . . . .. . . . . . . . . . . . . . . . . . . . . . . . . . . . . . . . . . . . . . . . . . . . . . . . . . . . . . 7 Teacher Operations . . . . . . . . . . . . . . . . . . . . . . . . . . . . . . . . . . . . . . . . . . . . . . . . . . . . . . . . . . . . . . . . . . 8 Logging in. . . . . . . . . . . . . . . . . . . . . . . . . . . . . . . . . . . . . . . . . . . . . . . . . . . . . . . . . . . . . . . . . . . . . . 8 Downloading files . . . . . . . . . . . . . . . . . . . . . . . . . . . . . . . . . . . . . . . . . . . . . . . . . . . . . . . . . . . . . . . 9 Uploading Files . . . . . . . . . . . . . . . . . . . . . . . . . . . . . . . . . . . . . . . . . . . . . . . . . . . . . . . . . . . . . . . . . 10 Creating directories. . . . . . . . . . . . . . . . . . . . . . . . . . . . . . . . . . . . . . . . . . . . . . . . . . . . . . . . . . . . . . 11 Deleting Files. . . . . . . . . . . . . . . . . . . . . . . . . . . . . . . . . . . . . . . . . . . . . . . . . . . . . . . . . . . . . . . . . . . 12 Deleting Directories . . . . . . . . . . . . . . . . . . . . . . . . . . . . . . . . . . . . . . . . . . . . . . . . . . . . . . . . . . . . . 12 Logging out . . . . . . . . . . . . . . . . . . . . . . . . . . . . . . . . . . . . . . . . . . . . . . . . . . . . . . . . . . . . . . . . . . . . 12 Administrator Operations . . . . . . . . . . . . . . . . . . . . . . . . . . . . . . . . . . . . . . . . . . . . . . . . . . . . . . . . . . . . 13 Logging in . . . . . . . . . . . . . . . . . . . . . . . . . . . . . . . . . . . . . . . . . . . . . . . . . . . . . . . . . . . . . . . . . . . . . 13 Changing the Welcome Message . . . . . . . . . . . . . . . . . . . . . . . . . . . . . . . . . . . . . . . . . . . . . . . . . . 14 Creating Accounts . . . . . . . . . . . . . . . . . . . . . . . . . . . . . . . . . . . . . . . . . . . . . . . . . . . . . . . . . . . . . . . 15 Deleting Accounts . . . . . . . . . . . . . . . . . . . . . . . . . . . . . . . . . . . . . . . . . . . . . . . . . . . . . . . . . . . . . . 17 Changing Passwords . . . . . . . . . . . . . . . . . . . . . . . . . . . . . . . . . . . . . . . . . . . . . . . . . . . . . . . . . . . . 18 Changing groups. . . . . . . . . . . . . . . . . . . . . . . . . . . . . . . . . . . . . . . . . . . . . . . . . . . . . . . . . . . . . . . . 19 Removing Users from Groups . . . . . . . . . . . . . . . . . . . . . . . . . . . . . . . . . . . . . . . . . . . . . . . . . . . . . 20 Page 2 SNDLC Video Locker User Manual Administrator Operations (cont.) Deleting groups. . . . . . . . . . . . . . . . . . . . . . . . . . . . . . . . . . . . . . . . . . . . . . . . . . . . . . . . . . . . . . . . . 20 Downloading Files . . . . . . . . . . . . . . . . . . . . . . . . . . . . . . . . . . . . . . . . . . . . . . . . . . . . . . . . . . . . . . 21 Uploading Files . . . . . . . . . . . . . . . . . . . . . . . . . . . . . . . . . . . . . . . . . . . . . . . . . . . . . . . . . . . . . . . . . 22 Creating Directories . . . . . . . . . . . . . . . . . . . . . . . . . . . . . . . . . . . . . . . . . . . . . . . . . . . . . . . . . . . . . 24 Deleting Files. . . . . . . . . . . . . . . . . . . . . . . . . . . . . . . . . . . . . . . . . . . . . . . . . . . . . . . . . . . . . . . . . . . 24 Deleting Directories . . . . . . . . . . . . . . . . . . . . . . . . . . . . . . . . . . . . . . . . . . . . . . . . . . . . . . . . . . . . . 24 Logging out . . . . . . . . . . . . . . . . . . . . . . . . . . . . . . . . . . . . . . . . . . . . . . . . . . . . . . . . . . . . . . . . . . . . 25 Advanced Administrative Operations . . . . . . . . . . . . . . . . . . . . . . . . . . . . . . . . . . . . . . . . . . . . . . . . . 26 Active Directory Overview . . . . . . . . . . . . . . . . . . . . . . . . . . . . . . . . . . . . . . . . . . . . . . . . . . . . . . . . 26 Users . . . . . . . . . . . . . . . . . . . . . . . . . . . . . . . . . . . . . . . . . . . . . . . . . . . . . . . . . . . . . . . . . . . . . . . . . 26 Groups. . . . . . . . . . . . . . . . . . . . . . . . . . . . . . . . . . . . . . . . . . . . . . . . . . . . . . . . . . . . . . . . . . . . . . . . 27 Managing files . . . . . . . . . . . . . . . . . . . . . . . . . . . . . . . . . . . . . . . . . . . . . . . . . . . . . . . . . . . . . . . . . 27 Manually Creating Accounts . . . . . . . . . . . . . . . . . . . . . . . . . . . . . . . . . . . . . . . . . . . . . . . . . . . . . 28 Changing the Service Account Password . . . . . . . . . . . . . . . . . . . . . . . . . . . . . . . . . . . . . . . . . . . 29 List of Figures. . . . . . . . . . . . . . . . . . . . . . . . . . . . . . . . . . . . . . . . . . . . . . . . . . . . . . . . . . . . . . . . . . . . . . . 30 Page 3 SNDLC Video Locker User Manual Getting Started Overview The SNDLC Video Locker is a centralized website where teachers can upload various files to share with the entire class. This website functions as an online file sharing portal which restricts access based on the type of user. This site uses active directory based user management and internet information services (IIS) version seven to provide content to the end users. Students require no extra software to use the website but Teachers and Administrators must use Silverlight to upload files to the locker. Silverlight can be downloaded at http://www.microsoft.com/silverlight/get‐ started/install/default.aspx. There are no browser requirements to view this site. This site is owned and maintained by Educational Service Unit #5 (ESU5) located in Beatrice Nebraska. Navigation Navigation of the SNDLC Video locker has been simplified to suit the needs for users of all ages. There are four main sections to the site; the header, footer, logon controls and content. See figure 1 for the breakdown of the site content. Figure 1 Page 4 SNDLC Video Locker User Manual Student Operations Users that log on with student accounts have the least amount of access to the site. Students only have access to the home page and locker, and can only perform the following actions: Log into the site Log out of the site Download files their teacher has uploaded. Logging in Logging into the website can only be done on the home page. The username and password will be issued to the student by their teacher. The teacher receives the logon information from a site administrator. Figure 2.1 shows the default page and figure 2.2 shows the logon control where the student will enter the username and password. Figure 2.1 Figure 2.2 To log into the website, enter the provided username in the username textbox, and enter the provided password in the password textbox. Figure 2.3 shows the proper placement of the username and password. NOTE: Usernames are not case sensitive. Passwords are case sensitive. Figure 2.3 Page 5 SNDLC Video Locker User Manual Downloading Files Once a student is logged on to the website, he or she will be redirected to their respective area of the locker. Figure 2.4 shows what the locker looks like. Figure 2.4 NOTE: Students will only have access to files uploaded by their teacher. There are two types of items that can appear in the locker. These items can be Folders (Figure 2.5) or Files (Figure 2.6). If a student clicks on a file a window will appear asking the student to open or save the file (Figure 2.7). If a student clicks on a directory, the locker will display all files and folders within that directory (Figure 2.8). Notice when you are in a directory, a directory with the name of ‘..’ appears (figure 2.9). By clicking this directory, it will take you to the parent path. Figure 2.5 Figure 2.6 Figure 2.7 Figure 2.8 Page 6 Figure 2.9 SNDLC Video Locker User Manual Logging out When a student is finished downloading files from the locker, the student can terminate his or her session with the server by clicking “log out”. The log out link can be found on the right hand side of the screen as seen in figure 2.10. Once the logout link is clicked (figure 2.10), the student is logged out and redirected to the log in page. Figure 2.10 Page 7 SNDLC Video Locker User Manual Teacher Operations Users that are declared as teachers have the restricted access to the site. Teachers only have access to the home page and the locker, and can only perform the following actions: Log into the site Log out of the site Download files. Delete files Delete Directories Upload files. Create directories. Logging in Logging into the website can only be done on the home page. The username and password will be issued to the teacher by a system administrator. Teachers can contact Education Service Unit #5 (ESU5) for more information on obtaining credentials to utilize the site. Figure 3.1 shows the default page and figure 3.2 shows the logon control where the teacher will enter the username and password. Figure 3.1 Figure 3.2 To log into the website, enter the username in the textbox next to username, and enter the assigned password in the textbox next to password. Figure 3.3 shows the proper placement of the username and password. Once logged into the SNDLC Video Locker, Teachers can perform the following actions; Upload files, Download Files, Create Directories, and Delete Files. NOTE: Usernames are not case sensitive. Passwords are case sensitive. Figure 3.3 Page 8 SNDLC Video Locker User Manual Downloading files Once a teacher is logged on to the website, they will be redirected to their respective area of the locker. Figure 3.4 shows what the locker looks like. Figure 3.4 NOTE: Teachers will only have access to files and directories they have uploaded. There are two types of items that can appear in the locker. These items can be Folders (Figure 3.5) or Files (Figure 3.6). If a teacher clicks on a file a window will appear asking the teacher to open or save the file (Figure 3.7). If a student clicks on a directory, the locker will display all files and folders within that directory (Figure 3.8). Notice when you are in a directory, a directory with the name of ‘..’ appears (Figure 3.9). By clicking this directory, it will take you to the parent path. Figure 3.5 Figure 3.6 Figure 3.7 Figure 3.8 Page 9 Figure 3.9 SNDLC Video Locker User Manual Uploading Files To upload new files into the locker, the teacher must use the file upload control (Figure 3.10). Figure 3.10 Any files can be uploaded to the locker but cannot exceed a file size of 4GB. To upload files, follow the following procedure: 1. Click on “Select Files” (Figure 3.11) 2. Find and click on the file(s) you want to upload (Figure 3.12) 3. Click Open NOTE: All files show as a pending status. This means the files have not yet been uploaded to the server. NOTE: If a file appears in the list that you do not wish to be uploaded, simply click the trash can icon (Figure 3.13). This will not delete the file from your computer but it will remove it from the list of files to be uploaded to the Locker. Figure 3.11 Figure 3.12 Figure 3.13 4. Click Upload (figure 3.14) Figure 3.14 Page 10 SNDLC Video Locker User Manual NOTE: When files are uploading to the server, you can see the progress for the file (Figure 3.15) and the total progress for all files (Figure 3.16) Figure 3.15 Figure 3.16 The files will be uploaded into the directory and will appear when the upload is complete. In the event that they do not appear, click the refresh link (Figure 3.17) to refresh the items in the directory. Figure 3.17 Creating directories To help organize files that are uploaded, Teachers can create directories. To make new directories, teachers must use the Make new directory control (Figure 3.18). To create a directory, type in a directory name and click the create button. The directory will appear in the list of items. Figure 3.18 Page 11 SNDLC Video Locker User Manual Deleting Files If a file or directory is no longer needed on the server, Teachers have the option to delete the files and directories. To delete files, check the checkbox next to the file (Figure 3.19) and click the “Delete Selected” Button (Figure 3.20). Figure 3.19 Figure 3.20 Deleting Directories To delete a directory select the checkbox by the directory (Figure 3.21) and then click the “Deleted Selected” button (Figure 3.22). Figure 3.21 Figure 3.22 WARNING: When you delete a directory all files in the directory will also be deleted. To delete all files and directories click the select all checkbox (Figure 3.23) and the click the “Delete Selected” Button (Figure 3.24). Figure 3.23 Figure 3.24 Logging out When a teacher is finished downloading files from the locker, the teacher can terminate his or her session with the server by clicking “log out”. The log out link can be found on the right hand side of the screen as seen in figure 3.25. Once the logout button is clicked, the teacher is logged out and redirected to the log in page. Figure 3.25 Page 12 SNDLC Video Locker User Manual Administrator Operations Users that are declared as administrators have the unrestricted access to the site and can the following actions: Log into the site Log out of the site Download files Delete files Delete directories Upload files Create accounts Delete accounts Change passwords Remove users from groups Delete groups Change the welcome message Logging in Logging into the website can only be done on the home page. The username and password will be issued with server. The default username is admin and the default password is Locker. Figure 4.1 shows the default page and figure 4.2 shows the logon control where the administrator will enter the username and password. Figure 4.1 Figure 4.2 To log into the website, enter the provided username in the username textbox, and enter the provided password in the password textbox. Figure 4.3 shows the proper placement of the username and password. NOTE: Usernames are not case sensitive. Passwords are case sensitive. Figure 4.3 Page 13 SNDLC Video Locker User Manual Changing Welcome Message From the administrator’s home page click on “change welcome message” (Figure 4.4). This will bring up the text editor page where you can change the welcome message (Figure 4.5). The text editor works similar to Microsoft word. Simply change and format the message that fits your needs and click save (Figure 4.6). Figure 4.4 Figure 4.5 Figure 4.6 Page 14 SNDLC Video Locker User Manual Creating Accounts From the home page click on create accounts (Figure 4.7). This will bring up the page to allow you to create accounts. The following types of accounts can be created: Students Teachers Admins Figure 4.7 You can select you account type by selecting the options at the bottom (Figure 4.8). To create an account, fill in the username and password information then click Create User (Figure 4.9). A message will appear indicating if the user has been created (figure 4.10) Figure 4.8 Figure 4.9 Figure 4.10 Page 15 SNDLC Video Locker User Manual NOTE: To setup a new class, it is easiest to create the student and teacher accounts at the same time. The can be accomplished by selecting Student and Teacher in the options (Figure 4.11). Figure 4.11 When creating accounts, the following rules must be followed: All Usernames must be unique Class Names must be unique. Passwords must be at least four letters long. The password must match the confirm password for the user. Page 16 SNDLC Video Locker User Manual Deleting Accounts To delete a user select manage user from the home page (Figure 4.12). This will list all the users that have access to the Digital Locker (Figure 4.13). To delete an account, locate the username in the list and click the “Delete” button on the far right (Figure 4.14). Figure 4.12 Figure 4.13 Figure 4.14 Page 17 SNDLC Video Locker User Manual Changing Passwords To delete a user select manage user from the home page (Figure 4.15). This will list all the users that have access to the Digital Locker (Figure 4.16). To change a user’s password locate the user you wish to change and click the change “Change Password” button (Figure 4.17). This will display a change password field (Figure 4.18). Enter the new password in the password and confirm password text boxes and click the “Change” button (Figure 4.19). Figure 4.15 Figure 4.16 Figure 4.17 Figure 4.18 Figure 4.19 Page 18 SNDLC Video Locker User Manual Changing groups To change group membership or remove groups, click on Manage Groups from the home page (Figure 4.20). This will display the group manager (Figure 4.21). The group manager list the groups and classes associated with the Digital Locker. The group manager will only allow you to remove users from groups and delete groups. Figure 4.20 Figure 4.21 Page 19 SNDLC Video Locker User Manual Removing Users from Groups To remove a user from a group, locate the user that is in the group and click the remove button next to the name of the user you wish to remove (Figure 4.22). Figure 4.22 Deleting groups To remove a group, locate the group name and click the “Delete Group” button on the far right to remove the group (Figure 4.23). Figure 4.23 NOTE: removing groups does not delete the users in a group. Page 20 SNDLC Video Locker User Manual Downloading files To download files that have been uploaded into the Digital Locker, Select Manage Files from the home page (Figure4.24). This will display the File management tool (figure 4.25). Figure 4.24 Figure 4.25 Page 21 SNDLC Video Locker User Manual There are two types of items that can appear in the locker. These items can be Folders (Figure 4.26) or Files (Figure 4.27). If an administrator clicks on a file a window will appear asking the administrator to open or save the file (Figure 4.28). If a student clicks on a directory, the locker will display all files and folders within that directory (Figure 4.29). Notice when you are in a directory, a directory with the name of ‘..’ appears (figure 4.30). By clicking this directory, it will take you to the parent path. Figure 4.26 Figure 4.27 Figure 4.28 Figure 4.29 Figure 4.30 Uploading Files To upload new files into the locker, the teacher must use the file upload control (Figure 4.31). Figure 4.31 Any files can be uploaded to the locker but cannot exceed a file size of 4GB. To upload files, follow the following procedure: 1. Click on “Select Files” (Figure 4.32) Page 22 Figure 4.32 SNDLC Video Locker User Manual 2. Find and click on the file(s) you want to upload (Figure 4.33) 3. Click Open NOTE: All files show as a pending status. This means the files have not yet been uploaded to the server. NOTE: If a file appears in the list that you do not wish to be uploaded, simply click the trash can icon Figure 4.34). This will not delete the file from your computer but it will remove it from the list of files to be uploaded to the Locker. Figure 4.33 Figure 4.34 4. Click Upload (Figure 4.35) Figure 4.35 NOTE: When files are uploading to the server, you can see the progress for the file (Figure 4.36) and the total progress for all files (Figure 4.37) Figure 4.36 Figure 4.37 The files will be uploaded into the directory and will appear when the upload is complete. In the event that they do not appear, click the refresh link (Figure 4.38) to refresh the items in the directory. Figure 4.38 Page 23 SNDLC Video Locker User Manual Creating directories To help organize files that are uploaded, Administrators can create directories. To make new directories, administrators must use the Make new directory control (Figure 4.39). To create a directory, type in a directory name and click the create button. The directory will appear in the list of items. Figure 4.39 Deleting Files If a file or directory is no longer needed on the server, Administrators have the option to delete the files and directories. To delete files, check the checkbox next to the file (Figure 4.40) and click the “Delete Selected” Button (Figure 4.41). Figure 4.40 Figure 4.41 Deleting Directories To delete a directory select the checkbox by the directory (Figure 4.42) and then click the “Deleted Selected” button (Figure 4.43). Figure 4.42 Figure 4.43 WARNING: When you delete a directory all files in the directory will also be deleted. To delete all files and directories click the select all checkbox (Figure 4.44) and the click the “Delete Selected” Button (Figure 4.45). Figure 4.44 Figure 4.45 Page 24 SNDLC Video Locker User Manual Logging out When an administrator is finished downloading files from the locker, the administrator can terminate his or her session with the server by clicking “log out”. The log out link can be found on the right hand side of the screen as seen in Figure 4.46. Once the logout button is clicked, the administrator is logged out and redirected to the log in page. Figure 4.46 Page 25 SNDLC Video Locker User Manual Advanced Administrative Operations Active Directory Overview It is important to understand how the active directory must be maintained in order for the website to function. The website searches specific organizational units (OUs) for users and groups. This not only helps with the speed of the website but also encourages a logical organization of the data. It is a requirement that at the root of the domain structure an Accounts and Groups OU exists (Figure 5.1). Under the Locker OU an Admins, Teachers, and Students OUs must also exist (Figure 5.2). Figure 5.1 Figure 5.2 Users All users that have access to the locker are located under the Accounts OU, and can be found in the Admins, Teachers, or Student OUs. Creating a new User in these OUs does not allow access to the website, but allows for the website to authenticate the user. For manually configure access to the website see Section Manually Creating Accounts on Page 28. Important user accounts: DSConnector: This is the service account that the website uses to access the active directory. This account can be found under the Users OU. The account password should not be changed under any circumstances. Deleting this account or changing the password will cause the site to stop working until advanced web server configurations are performed. See Changing the Service Account Password on Page 29. Page 26 SNDLC Video Locker User Manual Admin: This is the default administrator account for managing the website. The default Password is Locker. The account can be found under the Accounts/Admins OU. It is recommended that the password is changed. Password Policies: The only password policy that exists is the password length. Any password must be at least 4 characters long. Groups All groups that are created are located under the Groups OU. Three groups are mandatory Admin, Teachers, and Students (Figure 5.3). These groups define the level of access to the website. All other groups that are listed define the access to the locker files. Figure 5.3 Managing files The Locker file location is located at C:\inetpub\wwwroot\Locker (Figure 5.5). The root of this directory can only be access by administrators. Each subdirectory is assigned to the class and has the same name as the class group name. Figure 5.4 Page 27 SNDLC Video Locker User Manual Manually Creating Accounts In the event that the accounts cannot be created on the web page, or an administrator desires to create accounts through Active Directories Users and Computers, the following Steps must be performed: 1. Create the group a. Open Active Directory Users and Computers b. Locate the Groups OU c. Right Click on the Groups OU and select New ‐> Group d. Enter the Class Name and select OK 2. Create the Teacher Account a. Open Active Directory Users and Computers b. Locate the Teachers OU under the Accounts OU c. Right Click on the Teacher OU and select New ‐> User d. Enter the Name of the Teacher In the Full Name e. Enter the logon Name Under User Logon Name f. Click Next g. Enter the Password under the Password and Confirm Password Boxes h. Uncheck the User must change Password at next logon checkbox i. Click Next j. Click Finish 3. Create the Student Account a. Open Active Directory Users and Computers b. Locate the Students OU under the Accounts OU c. Right Click on the Students OU and select New ‐> User d. Enter the Name of the Student In the Full Name e. Enter the logon Name Under User Logon Name f. Click Next g. Enter the Password under the Password and Confirm Password Boxes h. Uncheck the User must change Password at next logon checkbox i. Click Next j. Click Finish 4. Create the Locker Directory a. Open My Computer b. Navigate to the C:\inetpub\wwwroot\Locker directory c. Click on File ‐> New –> Folder d. Enter the Group Name that was created in step 1 for the name of the folder. e. Press Enter The Teacher and Student now have access to the Locker. Page 28 SNDLC Video Locker User Manual Changing the Service Account Password To change the service account password Perform the following steps 1. Change the account Password a. Open Active Directory Users and Computers b. Navigate to the User OU c. Right Click on the DS Connector User and select reset Password d. Insert the new password in the Password and Confirm Password Boxes e. Select OK 2. Change the Web Configuration Password a. Open the Internet Information Services Manager (IIS) b. Navigate to SNDLC‐Locker ‐> Sites ‐> SNDLC‐Locker c. Double Click on Application Settings d. Double Click on Password e. Change the Value to the new password f. Click OK 3. Change the Impersonation Password a. Open My Computer b. Navigate to C:\inetpub\wwwroot\ c. Double click on the web.config file d. Locate the following line: <identity impersonate="true" userName="LOCKER\DSConnector" password="P^1c3(EsS>" /> e. Change the password to the new password f. Save and close the file The Service account password has now been saved. Page 29 SNDLC Video Locker User Manual List of Figures Figure 1: Shows the website layout 4 Figure2.1: Shows the home page 5 Figure2.2: Shows the logon control on the home page 5 Figure2.3: Shows the proper placement of the username and password in the logon control 5 Figure2.4: Shows the student locker 6 Figure2.5: Shows what directories looks like in the locker 6 Figure2.6: Shows what files looks like in the locker 6 Figure2.7: Shows the download box 6 Figure2.8: Shows what the locker looks like when in a sub directory 6 Figure2.9: Shows the directory that will take you to the parent directory 6 Figure2.10: Shows the logout control. The circled link is where to click to log out 7 Figure 3.1: Shows the home page 8 Figure 3.2: Shows the logon control on the home page 8 Figure 3.3: Shows the proper placement of the username and password in the logon control 8 Figure 3.4: Shows the teacher locker 9 Figure 3.5: Shows what folders look like in the locker 9 Figure 3.6: Shows what files looks like in the locker 9 Figure 3.7: Shows the download box 9 Figure 3.8: Shows what the locker looks like when in a sub directory 9 Figure 3.9: Shows the directory that will take you to the parent directory 9 Figure 3.10: Shows the Upload File control 10 Figure 3.11: Shows the location on the file upload control to select files 10 Figure 3.12: Shows the file select windows to select files that need to be uploaded 10 Page 30 SNDLC Video Locker User Manual Figure 3.13: Shows the list of files pending uploads 10 Figure 3.14: Shows the upload button on the file upload control 10 Figure 3.15: Shows the progress for individual files being uploaded 11 Figure 3.16: Shows the total progress for all files being uploaded 11 Figure 3.17: Shows the refresh button to refresh the locker files 11 Figure 3.18: Shows the create directory control 11 Figure 3.19: Shows the checkbox to select files to delete 12 Figure 3.20: Shows the delete selected button to delete selected files 12 Figure 3.21: Shows the checkbox to select directories to delete 12 Figure 3.22: Shows the delete selected button to delete selected directories 12 Figure 3.23: Shows the select all checkbox to select all files and directories 12 Figure 3.24: Shows the delete selected button to delete all selected items 12 Figure 3.25: Shows the logout control. The circled link is where to click to log out 12 Figure 4.1: Shows the home page 13 Figure 4.2: Shows the logon control on the home page 13 Figure 4.3: Shows the proper placement of the username and password in the logon control 13 Figure 4.4: Shows the administrator home page. The circled items are where to click to change the welcome message 14 Figure 4.5: Shows the welcome message text editor 14 Figure 4.6: Shows the save button to save the welcome message 14 Figure 4.7: Shows the administrator home page. The circled items are where to click to create new users. 15 Figure 4.8: Shows the account type selector 15 Figure 4.9: Shows where to click to create a new user 15 Figure 4.10: Shows the account create successful message 15 Figure 4.11: Shows the option to select to create a student and teacher account at the same time 16 Page 31 SNDLC Video Locker User Manual Figure 4.12: Shows the administrator home page. The circled items are where to click to manage existing users 17 Figure 4.13: Shows the Manage users control 17 Figure 4.14: Shows where to click to delete a user 17 Figure 4.15: Shows the administrator home page. The circled items are where to click to manage existing users 18 Figure 4.16: Shows the Manage users control 18 Figure 4.17: Shows where to click to change a user’s password 18 Figure 4.18: Shows the change user’s password control 18 Figure 4.19: Shows where to click to change the user password 18 Figure 4.20: Shows the administrator home page. The circled items are where to click to manage existing groups 19 Figure 4.21: Shows the group manager 19 Figure 4.22: Shows the “Remove User from group” button 20 Figure 4.23: Shows the Delete Group Button 20 Figure 4.24: Shows the administrator home page. The circled items are where to click to manage Files. 21 Figure 4.25: Shows the Administrator locker 21 Figure 4.26: Shows what folders look like in the locker 22 Figure 4.27: Shows what files looks like in the locker 22 Figure 4.28: Shows the download box 22 Figure 4.29: Shows what the locker looks like when in a sub directory 22 Figure 4.30: Shows the directory that will take you to the parent directory 22 Figure 4.31: Shows the Upload File control 22 Figure 4.32: Shows the location on the file upload control to select files 22 Figure 4.33: Shows the file select windows to select files that need to be uploaded 23 Figure 4.34: Shows the list of files pending uploads 23 Page 32 SNDLC Video Locker User Manual Figure 4.35: Shows the upload button on the file upload control 23 Figure 4.36: Shows the progress for individual files being uploaded 23 Figure 4.37: Shows the total progress for all files being uploaded 23 Figure 4.38: Shows the refresh button to refresh the locker files 23 Figure 4.39: Shows the create directory control 24 Figure 4.40: Shows the checkbox to select files to delete 24 Figure 4.41: Shows the delete selected button to delete selected files 24 Figure 4.42: Shows the checkbox to select directories to delete 24 Figure 4.43: Shows the delete selected button to delete selected directories 24 Figure 4.44: Shows the select all checkbox to select all files and directories 24 Figure 4.45: Shows the delete selected button to delete all selected items 24 Figure 4.46: Shows the logout control. The circled link is where to click to log out 25 Figure 5.1: Shows the Active directory Users and computers. The items in the red square are mandatory for the Locker to function. 26 Shows the OUs under the Accounts. The items that are in the red square are mandatory for the Locker to function 26 Shows the items in the Group OU. The Items in the red square are mandatory for the locker to function 27 Shows the location and files that are in the locker 27 Figure 5.2: Figure 5.3: Figure 5.4: Page 33