1
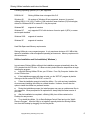
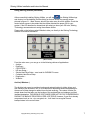
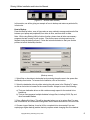
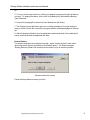
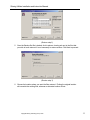
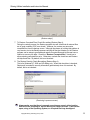
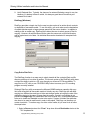
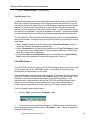
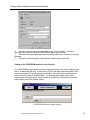
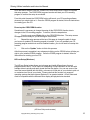
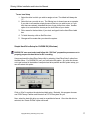
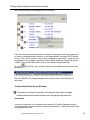
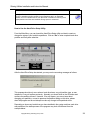
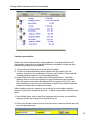
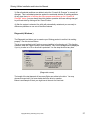
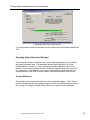
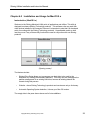
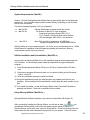
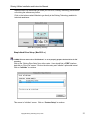
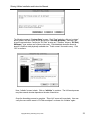
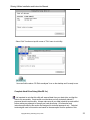
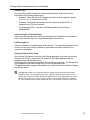
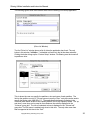
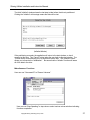
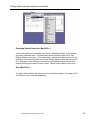
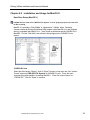
Shining Utility Suite (Windows and MacOS)
Installation and User’s Manual v3.2
Revision History
Version
Reason for Change
Date Released
1.0
1.1
1.2
1.3
2.0
3.0
3.1
3.2
Initial release
Added blue from Michael, working on Archiving
HD Doc split out, more changes.
Merge in MacOS portion
Release 2.0
Release 3.0
Release 3.1
Release 3.2
11/25/2001
11/27/2001
11/30/2001
01/16/2002
02/20/2002
01/17/2003
01/27/2003
02/12/2003
Copyright Shining Technology’s 2001, 2002, 2003
Shining Utilities Installation and Instruction Manual
Table of Contents
Chapter 1.0
Forward – license, copyright agreements & trademarks ............................ 3
Chapter 2.0
About Shining Technology............................................................................... 4
Chapter 3.0
Installation and Usage for Windows ............................................................... 5
Introduction( Windows ) ............................................................................................................5
System Requirements( Windows )..........................................................................................5
Hard Disk Space and Memory requirements ...............................................................................6
Utilities Installation and Un-Installation( Windows ) .............................................................6
Using Shining Utilities( Windows ) ..........................................................................................7
Simple Hard Drive Setup for CitiDISK DV( Windows ) ..................................................... 17
Complete Hard Drive Setup( Windows ) ............................................................................. 19
Diagnostic( Windows ) ........................................................................................................... 27
Operating System Detection( Windows )............................................................................ 28
Cancel( Windows ).................................................................................................................. 28
Chapter 4.0
Installation and Usage for MacOS 9.x .........................................................29
Instroduction ( MacOS 9.x ) .................................................................................................. 29
System Requirements ( MacOS ) ........................................................................................ 30
Utilities Installation and Un-installation ( MacOS 9.x )...................................................... 30
Using Shining Utilities ( MacOS 9.x )................................................................................... 30
Simple Hard Drive Setup ( MacOS 9.x ) ............................................................................. 31
Complete Hard Drive Setup( MacOS 9 .x ).......................................................................... 33
Operating System Detection ( MacOS 9.x ) ....................................................................... 38
Quit ( MacOS 9.x ).................................................................................................................. 38
Chapter 5.0
Installation and Usage for MacOS X ............................................................39
Hard Drive Setup( MacOS X ) .............................................................................................. 39
Ejecting the Drive Icon in MacOS X ..................................................................................... 41
Chapter 6.0
Customer Supports .........................................................................................41
Copyright Shining Technology 2001, 2002 ?
2
Shining Utilities Installation and Instruction Manual
Chapter 1.0 Forward – license, copyright agreements & trademarks
Except as stated in the License Agreement, this product, “Shining Utilities”, is provided as-is without warranty or
support of any kind, either expressed or implied. The software described in this document is furnished under a license
agreement and may be used or copied only in accordance with the terms of the license agreement. This licensee
may make one copy of the software for backup purposes.
PRODUCT LICENSE INFORMATION
NOTICE TO USERS: CAREFULLY READ THE FOLLOWING LEGAL AGREEMENT. USE OF THE SOFTWARE PROVIDED
WITH THIS AGREEMENT (THE "SOFTWARE") CONSTITUTES YOUR ACCEPTANCE OF THESE TERMS. IF YOU DO NOT
AGREE TO THE TERMS OF THIS AGREEMENT, DO NOT INSTALL AND/OR USE THIS SOFTWARE. USE OF THIS
SOFTWARE IS UPON CONDITION OF COMPLIANCE BY USER WITH THE TERMS OF THIS AGREEMENT.
1. LICENSE GRANT. Shining Technology grants you a license to use one copy of the version of this SOFTWARE on any
one system for as many licenses as you purchase. "You" means the company, entity or individual whose funds are used
to pay the license fee. "Use" means storing, loading, installing, executing or displaying the SOFTWARE. You will be
granted an evaluation period of not more than 30 days, after which time you must pay for the SOFTWARE according to the
terms and prices discussed in the Software’s documentation, or you must remove the SOFTWARE from your system. This
license is not transferable to any other system, or to another organization or individual. You are expected to use the
SOFTWARE on your system and to thoroughly evaluate its usefulness and functionality before making a purchase. This
"try before you buy" approach is the ultimate guarantee that the SOFTWARE will perform to your satisfaction; therefore,
you understand and agree that there is no refund policy for any purchase of the SOFTWARE.
2. OWNERSHIP. The SOFTWARE is owned and copyrighted by Shining Technology. Your license confers no title or
ownership in the SOFTWARE and should not be construed as a sale of any right in the SOFTWARE.
3. COPYRIGHT. The SOFTWARE is protected by United States copyright law and international treaty provisions. You
acknowledge that full ownership rights to the SOFTWARE will remain the exclusive property of Shining Technology, and
that no title to the intellectual property in the SOFTWARE is transferred to you. You agree that any copies of the
SOFTWARE will contain the same proprietary notices, which appear on and in the SOFTWARE.
4. REVERSE ENGINEERING. You agree that you will not attempt to reverse compile, modify, translate, or disassemble the
SOFTWARE in whole or in part. Shining Technology disclaims all warranties of any kind if the software was altered in any
way by anyone other than Shining Technology.
5. NO OTHER WARRANTIES. Shining Technology DOES NOT WARRANT THAT THE SOFTWARE IS ERROR FREE. Shining
Technology disclaims all other warranties with respect to the SOFTWARE, expressed or implied, including but not limited
to implied warranties of merchantability for a particular purpose and non-infringement of third party rights. Some
jurisdictions do not allow the exclusion of implied warranties or limitations on how long an implied warranty may last, or
the exclusion or limitation of incidental or consequential damages, so the above limitations or exclusions may not apply to
you.
6. SEVERABILITY. In the event of invalidity of any provision of this license, the parties agree that such invalidity shall not
affect the validity of the remaining portions of this license.
7. NO LIABILITY FOR CONSEQUENTIAL DAMAGES. IN NO EVENT SHALL Shining Technology OR ITS SUPPLIERS BE
LIABLE TO YOU FOR ANY CONSEQUENTIAL, SPECIAL, INCIDENTAL OR INDIRECT DAMAGES OF ANY KIND ARISING
OUT OF THE DELIVERY, PERFORMANCE OR USE OF THE SOFTWARE, EVEN IF Shining Technology HAS BEEN ADVISED
OF THE POSSIBILITY OF SUCH DAMAGES.
8. GOVERNING LAW. This license will be governed by the laws of the State of South Carolina as they are applied to
agreements between South Carolina residents entered into and to be performed entirely within South Carolina. The United
Nations Convention on Contracts for the International Sale of Goods is specifically disclaimed.
9. ENTIRE AGREEMENT. This is the entire agreement between you and Shining Technology, which supersedes any prior
agreement or understanding, whether written or oral, relating to the subject matter of this license.
10. TRADE MARK. All of the company, product names mentioned in the manual is the registered trade marks of their
own.
Copyright Shining Technology 2001, 2002 ?
3
Shining Utilities Installation and Instruction Manual
Chapter 2.0 About Shining Technology
Shining Technology is an U.S. Company, founded in 1992 with headquarters in Cypress,
California. In addition to designing and manufacturing I/O devices and products utilizing
PCMCIA, CardBus, USB (1.1 & 2.0), Firewire( A & B ) and DV technologies, Shining
Technology is also one of the major suppliers of the product in the PC and MAC computer
market.
This manual is designed to provide detailed information on the bundled software suite,
Shining Utilities. Shining Utilities was developed and offered to Shining Technology’s
customers for the purpose of further enhancing the functionality of our products. This
utility program is applicable for the entire Shining adapter, kits or total solution products.
Chapter 3 explains how to use the “Shining Utilities Suite” for PC/Windows environments.
Chapter 4 explains how to use it under Apple/MacOS9.x environment. Utilities Suite
Macintosh version is also available from Shining Technology at Mac Volume of this CD.
Chapter 5 explains how to utilize MacOS X provided utility to perform the tasks.
CitiDISK DV user must read and follow instructions of section “Simple Hard Drive Setup
for CitiDISK DV User” in each above different OS’s.
Shining Technology’s WEB site, www.shining.com, contains detailed information for the
following subjects:
o
o
o
o
o
Contact information
Product Information
Where and how to buy products
Support and software download information
New product and special event announcements
Copyright Shining Technology 2001, 2002 ?
4
Shining Utilities Installation and Instruction Manual
Chapter 3.0 Installation and Usage for Windows
Introduction( Windows )
Welcome to the Shining Utilities suite of applications and functions. This utility suite is
designed to enhance Shining Technology products. This software suite may work with
other devices installed in the computer; however it is important to note that it is developed
solely for working with the Shining Technology product. Un-predicable results or data loss
may occur if any of these utility functions are used in conjunction with non-Shining
products.
(Opening screen)
•
•
•
•
•
The features include:
“Install/Uninstall Drivers” let user install necessary driver for the hardware.
“Install Utilities” let user install the utility functions such as “Hard Drive Setup”, “HD Icon
Setup”, “Diagnostic” and etc.
“Install Firmware Uploader” let user install the unit specific firmware( the CPU’s software
running inside the unit ) uploader so as to upgrade the unit functionalities.
“View Readme File” let user browse through information about the product.
“Visit Shining Technology on the Web”.
System Requirements( Windows )
Version 7.x of Shining Utilities is designed for supporting PC platform only. For
Mac support, please contact Shining Technology or visit the Web site for more
information. Shining Utilities has been tested under all current CPUs and clock
speed (MHz) of systems that are available on the market.
Copyright Shining Technology 2001, 2002 ?
5
Shining Utilities Installation and Instruction Manual
Following Operating Systems (O.S.) are supported:
DOS/Win3X
Shining Utilities does not support this O.S.
Windows 9X
All versions of Windows 9X are supported, however, for product
utilizing USB (V1.1 & V2.0), FireWire (1394) and other newer interface (I/O) technologies,
drivers for Windows 98 SE or newer O.S. may be required.
Windows ME
supports all versions
Windows NT
only supports NT4.0 with minimum of service pack 4 (SP-4) or newer
service pack installed.
Windows 2000
supports all versions
Windows XP
supports all versions
Hard Disk Space and Memory requirements
Shining Utilities is a very compact program. It only requires a minimum of 2.5 MB of disk
space for installation under all supported operating environments. Memory requirement is
also at minimum.
Utilities Installation and Un-Installation( Windows )
In most cases, Shining Utilities will begin the installation program automatically when the
CD is inserted into the CD drive. If it does not start, please follow the steps below to begin
installing the program:
Insert the Shining Utilities CD into your CD drive. From “My Computer “double click
on the CD drive icon.
1)
If the installation program still does not start, run the “SETUP” program by double
clicking on the file named “SETUP.EXE” on the CD.
2)
Follow the installation prompt to install the utilities. For quick and easy installation,
we recommend installing the utilities to a default location. However, there is also the
option to install the utilities to a preferred location.
3)
During the installation process, the install program may copy or update some files to
your computer. When prompted for file replacement, always keep the latest version of
your files.
4)
After the installation is completed, a Shining Utility Icon will be created on the
Desktop for easy access.
5)
To un-install the utilities. Go to Start>Settings>Control Panel and run the “Add &
Remove Program”. After the Utility is un-installed, manually delete the Shining Utilities
Icon from the Desktop by dragging it to the Recycle Bin.
6)
Copyright Shining Technology 2001, 2002 ?
6
Shining Utilities Installation and Instruction Manual
Using Shining Utilities( Windows )
After successfully installing Shining Utilities, you will see
, the Shining Utilities logo
and shortcut, on the desktop. Double clicking on that will launch the opening screen
pictured in figure 6.1 – Main Screen, which is the main menu for all the utilities. Check the
center bottom square to be certain that the utilities detected the proper OS for your
system. If the OS described is mismatched with what you know your OS to be, Shining
Technology recommends not running the software further.
Please click on the button marked Website to take you directly to the Shining Technology
website for technical assistance.
(Main Screen)
From the main menu, you can go on to the following choices of applications:
•
•
•
•
•
•
•
•
Archive –
DiskCopy –
CDR/CDRW –
HD Icon Setup –
Simple Hard Drive Setup - must read for CitiDISK DV users.
Complete Hard Drive Setup
Diagnostics –
Website –
Archive( Windows )
The Archive tool serves to provide a backup and restore function for disks, drives, and
files. Backups can be done in full, or in incremental or differential amounts depending on
the amount of data changed or added since the last archiving. The restore function is a
simple wizard tool that asks you the location of the archived files and catalogs, and their
intended destination. THIS BACKUP SOFTWARE DOES NOT DO FILE COMPRESSION
DURING THE BACKUP PROCESS AS PER A ZIP DRIVE. However, if your file is already
compressed such as .tar, .zip, encrypted, etc., it will treat it as a regular file and
backup/restore in the current state.
Copyright Shining Technology 2001, 2002 ?
7
Shining Utilities Installation and Instruction Manual
(Figure 7.1 – Archive main screen)
In this section, we will be giving an example of how to backup and restore a particular file,
in that order.
How to Backup
Press the Backup button, seen in figure also an easy method to arrange and transfer files
between your laptop and peripherals, from drive to drive, and from drive to disks.
Note: While using Shining Utility’s Archive function, please close all other unnecessary
programs that are running in your system. Files that are open or being used may be
skipped during the backup process. Follow the instructions below to start your archive
process to launch the backup function.
(Backup screen)
1. Select files or directories to be backed up by entering the path name in the space after
the Backup from button. To browse for the selection, click on the button.
2. Select the destination drive by either entering the path name in the “Backup To” space,
or click on the button to browse for the correct location. Always be sure of the following:
a) That your destination drives or disk contains enough space for the material to be
backed up.
b) That you have prepared multiple diskettes for large files, including LS120, Zip, and
other removable Medias.
3. Enter a BackupSet Name. This will be important when you go to restore files. For ease
and convenience, we recommend writing down the set name somewhere it will not be lost.
4. Choose a type of backup; it can be full for a complete list or incremental if you are
employing a regular backup practice that only requires certain changing files to be backed
Copyright Shining Technology 2001, 2002 ?
8
Shining Utilities Installation and Instruction Manual
up.
5. You can use the verify function to confirm your backup in progress, though it is faster to
not use it. To employ this feature, click on the Verify Backup box just below the Backup
Type Selections.
6. Current file (changing file names in list) and backup size (file sizes).
7. The Progress bars at the bottom give you a running description of how the backup is
doing, in terms of which file is currently in progress and the overall percentage for the total
job.
8. After the backup is finished, go to the destination location and check for the backup file
names, and that the files are populated with data.
How to Restore
To restore a backup set is a relatively easy task. Again, from the Archive’s main menu,
launch the restore function by clicking on the Restore button. The Restore program
“Shining Recovery Wizard” will come up and be ready for you to restore a process.
(Restore wizard first screen)
Follow the Steps below to restore your files.
Copyright Shining Technology 2001, 2002 ?
9
Shining Utilities Installation and Instruction Manual
(Restore wizard step 1)
1. You can also input that to the program and it will locate and report what backup set is
available for restoring. If you do not yet have a catalog for your backup sets, then
check the “Check Box” and click “Next” to continue.
2. If you enter the name of the backup that you wish to restore and if you have Catalogs
of backup sets and have checked the “Catalogs” check box, the following screen will
pop up and allow you to create a new catalog for your backup set files.
(Recreation of backup catalog)
3. Fill in the required information. It is recommended that you recreate the catalogs in
the same location as the backup.
4. Click the Recreate button, and it will take you to the next step in the restore process.
Copyright Shining Technology 2001, 2002 ?
10
Shining Utilities Installation and Instruction Manual
(Restore step 2)
5. Once the Backup Set file is loaded, click to place a check mark next to the files that
you wish to have restored. It is not necessary to restore all files. Click Next to proceed.
(Restore step 3)
6. Choose the location where you want the files restored. Picking the original location
will overwrite the existing files; whereas an alternate location will not.
Copyright Shining Technology 2001, 2002 ?
11
Shining Utilities Installation and Instruction Manual
(Restore step 4)
7. To Restore Corrupted Files, Check Box setting (Restore Step 4).
During the restore process. the Restore program also will check that all restored files
are in good condition (CRC error check). However, the restore may encounter
corrupted files from the backup source. Although the chance of running this problem is
very remote, due to the Backup process verifying all files that it backs up, the Restore
program can be setup to go ahead and restore corrupted files and let the user have a
chance to recovery the data. Check the “Restore Corrupted files” check box to
allow restoring corrupted files as is. Otherwise, uncheck the check box and Restore
will skip these files. By default, this is not checked.
8. The Restore Security Check Box setting (Restore Step 4)
This is for Windows NT, 2000 and XP setting only. When this check box is checked,
Restore will recreate file security information (permissions) when it is restored. By
default, this is not checked.
(Restoring in process screen)
Always make sure that there is enough room (storage space) at the location
where files are restoring to, before starting the restore process. Files that are
open, using of the Operating System, or corrupted files may be skipped.
Copyright Shining Technology 2001, 2002 ?
12
Shining Utilities Installation and Instruction Manual
9. Verify Restored files. Typically. the chance of a restored file being corrupt is very low.
However, if a backup is done to a disk, it is always a good idea to check that your
restored file is intact.
DiskCopy( Windows )
DiskCopy provides a simple tool for the user to make copies of an entire drive’s contents
or duplicates of removable media. To use this utility, you must make sure the destination
of copied data has equal or larger storage space than the source location. In addition to
making a disk or media copy, DiskCopy also allows the user to select groups of files for
copying. However, all selected files must be under the same root or top-level directory
and be copied as a set of data. No individual files can be deselected or exempted from
copying.
(DiskCopy main screen)
Copy Entire Disk Drive
The DiskCopy function is an easy way to simply transfer all the contents (files) and file
directory structure of one drive to another. The current version of the DiskCopy utility does
not have the ability to write to a CD, even though you will see a CD Drive available. To
copy files to a CD, click on our CD/CDRW Utility button to access your CD recording
program currently installed.
Shining’s DiskCopy utility overcomes the Microsoft 32MB maximum capacity disk copy
limit, and will support all removable media of virtually any size. DiskCopy also will allow
copying to a different size and type of drive and storage media, as long as the size of the
destination device is the same or larger than the source. Currently, our utilities do not
provide true image copy of a media other than on a file level only. All files attributed have
to be set to visible and readable in order to be copied. System or hidden files attributes
also have to be reset to read format in order to be copied. DiskCopy can therefore not
create a boot disk. To make a copy of a drive or disc media, all you need to do is follow
the steps below.
1. Select a Source device at the “From” drop down list and Destination device at the
“To” dropdown list.
Copyright Shining Technology 2001, 2002 ?
13
Shining Utilities Installation and Instruction Manual
2. Click “Copy Drive Now” to start the copy.
Copy Directory Tree
In addition to copying an entire drive and storage media at once, as above, this utility will
allow you to select a single directory tree for movement within the same drive or to copy
onto another drive. It is a simpler way to do small backups or copying of collective files as
needed. You can only select one directory in a drive at a time, but every file within that
directory, with the exception of hidden files, will be included. If a file is open and in use by
the system or an application, it may not be available to be copied. To avoid this possibility,
it is recommended that you terminate all unnecessary programs before using this utility.
The Copy Directory Tree Now button will remain grayed out until a source and destination
directory are inputted. To make a copy of a drive or disc media, all you need to do is follow
steps below.
1. Select a Source directory by single clicking on the “Copy From Directory” button. A
file selection window will appear for selection files.
2. Select a Destination for the files by single clicking on the “Copy To Directory” button.
If you only want to copy selected files to a drive or storage media, all you need to do is
select the root directory for that device.
3. Once both the Source and Destination inputs are completed, the “Copy Directory
Now” button will be available for starting the copy process. Click on it.
CD/CDRW( Windows )
The CDR/CDRW function is a short cut to the CD recording program of your choice. With
only one simple click on the CDR/CDRW button, you are ready to transfer and copy
selected files (and directories) to a CD media.
Shining Utilities does not bundle a CD writing program. A third party CD writing software,
such as CD Creator, must be installed and in operation prior to using this function. Try to
remember or record the installed location (path) of the CD writing program. This
information will be required when setting up the CD/CDRW recording program launch
function. If you do not know or have forgotten where your CD recording program is
located, below are instructions to find out where your CD writing program resides:
From your taskbar follow the steps below:
1.
Click on “Start” and select the “Programs” folder.
2.
From the popup menu locate and highlight your CDRW program then right click to
get the program’s properties and launch the “Properties” menu. Here is an example by
using the WinZip program.
Copyright Shining Technology 2001, 2002 ?
14
Shining Utilities Installation and Instruction Manual
3.
Record or make a copy of the information in the “Target” window. This is the
information you’ll need to setup the CDR/CDRW program launcher later.
4.
Exit from the program properties menu by simply pressing the “Cancel key from you
keyboard.
5.
Continue to the next section of this manual to finish setting up the utility.
Setting up the CDR/CDRW function for the first time
The CDR/CDRW program launch function will prompt the user to set up the program path
when it is started the first time. A setup menu (Fig.9.2) will appear and allow user to enter
where the installed CD recording program is located. You can directly enter the path or
use the “Browse” button to select the path. If you already have made a copy of the
program path information earlier, all you have to do is paste the information into the data
entry window next to the “Browse” button.
( CD/CDRW first time or setup screen)
Copyright Shining Technology 2001, 2002 ?
15
Shining Utilities Installation and Instruction Manual
Once the data is entered, click the “Continue to CDR/CDRW Writer” button to complete
this setup process. The CDR/CDRW program launcher will start your CD recording
program to confirm the setup is successful.
From this point forward the CDR/CDRW button will launch your CD recording software
whenever you single click on it. Once the CDRW program is started, follow its instructions
for creating your own CD
Re-set up the CDR/CDRW function
Sometimes it is necessary to change the setup of this CDR/CDRW function due to
changes in the CD recording program. To do this, follow the steps below:
1.
From the main menu Right click on the CDR/CDRW button. The setup screen
will appear and be ready for you to reconfigure this function.
2.
Repeat the setup process at the top of this page to change the path of where
you’re new or updated CD recording program is located. If you only updated your CD
recording program and did not move its installed location, you do not need to re-setup this
function.
3.
Click on the “Update” button to finish this process.
After this process is completed, any subsequent clicking on the CDRW button will take you
right to your installed CDRW program. Once the CDRW program is started, follow its
instructions for creating your own CD.
HD Icon Setup( Windows )
The HD Icon Setup button allows you to browse and install different icons for each
peripheral and or drive. This is useful for establishing a unique identifier for the user with
multiple drives to quickly and easily locate the files they desire. You can use some of the
icons that come installed with this utility, or browse to a Web site of your choice to pick out
or customize icon files of your choice. Please note that this function only supports
operating systems that have Internet Explorer 5.0 or greater installed. All icon files used
must be compatible with the Microsoft icon display and physical size standard.
(HD Icon Setup main screen)
Copyright Shining Technology 2001, 2002 ?
16
Shining Utilities Installation and Instruction Manual
To use Icon Setup
1. Select the drive in which you wish to assign an icon. The default will always be
“C:”.
2. Select the icon you wish to use. The Shining icon is shown here as an example.
If you wish to use another, simply browse to the icon you wish to use, or if you
don’t have one already, download the icon of your choice from online. Another
option is to customize the icon as per the Icon Editor of your choice.
3. Pick a name for the hard drive, if you wish, and type it into the Hard Drive Label
box.
4. To finish the setup, click on Set Drive Icon.
5. Changes will be made after you reboot the system.
Simple Hard Drive Setup for CitiDISK DV( Windows )
CitiDISK DV user must select and follow this “DV Disk” preparation process so as to
properly prepare the hard drive for DV recording.
Users can launch the Hard Drive Setup utility by selecting “Hard Drive Setup” option from
the Main Menu. For CitiDISK DV user, you must select this option. Any user can choose
not to get involved in the details of computer hard drive partition and file system setup; you
can also select this option.
Click on “Yes” to continue the simple hard disk setup. Basically, this program chooses
one DOS-Primary Partition and formats it as FAT32 file system for you.
Now, select the hard disk drive you want to re-partition/re-format. Once the disk drive is
selected, the “Create DVDisk” option will reveal.
Copyright Shining Technology 2001, 2002 ?
17
Shining Utilities Installation and Instruction Manual
Click on “Create DVDisk” to continue. A message screen shall pop up indicating the
“Assigning Drive Letter”, “Partitioning and formatting” is started.
Next message screen is informational only indicating above process is still undergoing.
The whole process may takes up to 30 minutes for large size hard disk drive.
Copyright Shining Technology 2001, 2002 ?
18
Shining Utilities Installation and Instruction Manual
Now, the partitioning and formatting process is complete
If the drive selected is partitioned and/or is formatted, the program shall erase it clean and
re-create a new partition and re-format it as one single partition, one single FAT32 volume
for you. Click “OK” to continue. Click “Cancel” to go back to main menu. A drive icon will
be displayed in “My Computer” and “Movie” folder, “Media” folder and “Project” file are now
created. The hard disk drive is now ready to use a regular Firewire Hard Disk.
Or, click
, “Plug-N-Play” icon, at bottom right corner on desktop and eject the drive by
selecting it.
Now the CitiDISK DV is properly prepared and is ready to record video directly from
camcorder.
Complete Hard Drive Setup( Windows )
This section is created for advanced, technical user who wants to prepare
multiple partitions and multiple volumes from a single physical hard drive.
Introduction
In order for a hard drive to be recognized and used by a PC and the Operation system, it
must be prepared in certain ways prior to becoming operational. There are two main steps
to preparing a hard drive:
Copyright Shining Technology 2001, 2002 ?
19
Shining Utilities Installation and Instruction Manual
1) Create a partition.
2) Format the partition and place a file system on it.
Shining’s Hard Drive Setup utility is designed for simple hard drive partitioning operation
only. This utility does not support resizing, merging or converting partitions from one type
to other. This utility also will not repair any damaged partition. If a more sophisticated
portioning operation is required, please use another hard drive partition product that is
available in the market.
Since the inception of the PC, many partition types, partitioning rules, and file systems
have come into use. Some of these partition settings and file systems are not compatible
with the currently available Windows OS and vice versa. Information provided in this
section is for reference only. Users of this Hard Drive Setup utility are fully responsible of
making the proper decision on how to setup their hard drives.
Partition Basics
There are many types of partitions used by PC systems. Shining’s Hard Drive Setup utility
only supports the hard disks that are partitioned and formatted under Microsoft operating
environments, such as DOS6.0 and newer, Windows 95, Windows 98, Windows ME,
Windows NT and Windows 2000, XP.
In order for a hard disk drive to function in a PC, it has to have at least one partition setup.
Normally this is also the bootable partition if this is the only drive installed in the system.
Removable hard disk (SyQuest and Iomega/Jazz) could be setup to have 1 partition or no
partition just like a giant floppy (LS120, ZIP). For super capacity floppy devices, such as
ZIP and LS120, there is no need to partition because these are not supported as a Hard
Drive.
There are a few deviations of partition types that have evolved through the continued
development of the Microsoft Operating Systems and the need of supporting increased
size of hard disk. Please note that only Win95 version B and newer OS can support a
very large hard disk. Large drive support also can be limited by the system’s BIOS. To
install a large hard drive (over 8 GBytes), a newer BIOS that supports LBA (Logical Blcok
Addressing) mode and extended INT13 operation is required.
Partition Schema
Shining’s utility supports the follow partition format:
•
16 bit FAT
Maximum size for a single partition allowed is 2047 MBytes
•
32 bit FAT
Maximum size for a single partition allowed is 2047 GBytes
•
NTFS
Windows NT, 2000 and XP
•
NTFS5
Encrypting file and Windows 2000, XP only
For much older operating systems, such as DOS 6.22 and older that use a 12 bit based
partition schema, (12 bit FAT), the maximum size for a single partition is limited to 33
MBytes. Since Shining’s Hard Drive Utility does not support this partition type, backward
compatibility issues must be taken into consideration. Please cross check with the
compatibility table below for more information on selecting what type of partition you are
going to create.
Table 1 - Compatibility Table
Copyright Shining Technology 2001, 2002 ?
20
Shining Utilities Installation and Instruction Manual
OS \ File
Systems
Windows 95
Version a and
older
Windows 95(
OSR2 )
Version b and
newer
Windows 98
All versions
Window ME
All versions
16bit FAT
32 bit FAT
NTFS
NTFS5
Supported
Supported
Supported
Supported
Supported
Supported
Supported
NT All versions
Supported
Supported
Win 2000 All
versions
Supported
Supported
Supported
Supported
Windows XP
Supported
Supported
Supported
Supported
FAT12 is supported by all of the operating system described above but not Shining’s HDD
Setup Utility.
NTFS5 is supported by Win200, XP, and it’s implicitly imposed by them.
Partition Type
Once the proper partition scheme is determined and selected, a hard disk can be
partitioned to the following partition types:
•
Primary, bootable or not
•
Extended
•
Logical
Primary
If a hard disk is intended to boot the system, it must have a Primary partition and be
set as active (bootable). If booting is not required, different combinations of primary,
extended and logical driver partitions can be created according to the basic rules
defined by the Microsoft Operating System requirements.
Extended
A hard disk can also be set up to have only extended partitions. Please note that an
extended partition can never be used as a boot partition.
Logical
Normally, a Logical partition is automatically assigned to the Extended partitions by
the OS, if the user is intended to use the whole Extended partition as one drive.
However, if the user would like to further divide an Extended partition into smaller
portions, Logical partitions can be further created within an Extended partition. After
Logical partitions were defined under an extended partition, the OS will
automatically assign drive letters to each of these sub-partitions.
Copyright Shining Technology 2001, 2002 ?
21
Shining Utilities Installation and Instruction Manual
Limit on Number of Total Drive Letters Available
Please note that a maximum of 26 drive letters can be used under all Microsoft Operating
Systems. Caution must be taken while planning for the total number of partitions,
regardless of the combinations of types a system could have. Don’t forget these 26 drive
letters also will be used for network drive mapping and added external storage devices.
Partitioning Rules
In general, all hard disks operating under Microsoft operating systems must follow
partitioning rules:
1) Maximum of four partitions can be supported. This can be in combinations of
Primary and Extended partitions. Only one Primary partition of one physical
drive can be set to be active (bootable) at any give time. If there are more than
one physical drives installed, only one of the Primary partitions of one of the
installed drives can be set to active (bootable).
2) Logical partitions are further sub-divisions of the Extended partition. Technically
speaking, there is no limit on how many Logical partitions (sub-extended
partitions) can be created in a system, provided that the total numbers of the
drive letters used in a system does not exceed 26 (Drive letter A to Z). With the
exception of using the entire Extended partition as one drive, an Extended
partition itself that contains more than one Logical partition, will not be assigned a
drive letter.
If FAT16 partitions are preferred, be aware of 2047 Mbytes per partition limitation.
Example for a Typical Partition Setup & Drive Letter Assignment
A simple diagram is presented here to further illustrate what a typical hard disk partition
may look like.
Table –1 Example for partitioning an 8 GB hard disk and Drive Letter Assignment
Primary/Boot
0G
B
Extended
1.5 GB
3.5 GB
Drive Letter C
Drive Letter D
Extended
1GB
Logical
Drive E
1GB
Logical
Drive F
1GB
Logical
Drive G
8
Drive Letter Assigment
In comparing with the example above, the drive letter assigment may be different in your
system. Under the Windows operating system, you can always change the Drive Letter
assignment with exception to the boot drive or partition. All drive letters are initially
assigned by the system. The OS does follow a unique scheme for this process. The
basic rule is as follows:
Copyright Shining Technology 2001, 2002 ?
22
Shining Utilities Installation and Instruction Manual
1) The first partition of the first physical drive always being assigned to letter “C”.
2) The first partition of Subsequence installed hard drives always being assigned to the
next available drive letter.
3) After all the first partitions of each physically installed drive were assigned a drive letter,
the system will start from the first physical drive again and assign an additional drive letter
to each of the extended or logical partitions respectivly and according to the description in
this manual. This process will continue for the next installed physical drive until all
available drive letters are exhaulted. Any left over drive letters will be used for supporting
additional network drives and any other storage devices that may be added to the system
(e.g. an external storage device).
File systems
After partitioning is completed, each partition must be formatted before it is useable by the
operating system. During the formatting process, the operation system will create a file
system according to the partition type that is setup on the drive. Each partition shall carry
the file system of its own type. For example, if the physical drive is divided into three
partitions in combination of FAT16, FAT32 and NTFS, each logical drive letters shall carry
individual file system tables after formatting process are completed.
Microsoft NT operating system does not recognize FAT32 partition/file system;
a third party file system translator would be required.
Running under Windows 98, ME, 2000 and XP operating systems
Throughout this program there are six different icons being used to represent different
drives and their partition settings (Fig. 11.5.1-1)
1) Physical drive
Indicates the installed physical drive
2} Free physical drive space available
Represents the total drive space available for partitioning
3) Primary Partition and the space it uses
Represents the drive space being used by a Primary Partition.
The description next to the icon also will report the file system type. If there is
“Active” labeled after the size information, it means this is a boot partition.
4) Extended Partition
Indicates that this is an Extended Partition and no Logical Partition is defined as
of yet. A Logical Partition unused space icon (icon #6) with equal size to this
Extended Partition will appear under this icon. This indicates this Extended
Partition is ready to be further divided into Logical Partitions or used as the
whole space for a FAT16 or FAT32 type partition.
5) Logical partition and space it used
Indicates a Logical Partition is defined and the space is allocated
Copyright Shining Technology 2001, 2002 ?
23
Shining Utilities Installation and Instruction Manual
6) Logical Partition with unused space
Since it is possible to define multiple Logical Partitions with in an Extended
Partition, this icon indicates the let over space that is available for defining more
logical partitions until the total available storage space is exhausted.
How to Use the Hard Drive Setup Utility
From the Main Menu, you can launch the Hard Drive Setup utility and start to create or
change the setup of your hard drive partitions. Click on “No” to enter complete hard drive
partition and file system selection.
After the Hard Drive Setup has started, you may receive a warning message as follows.
This message should only occur when a hard drive has a very old partition type, or was
installed in a very old system previously. Normally you should click on the OK button and
continue the partition process. However, if for any reason, you are not sure about
changing your partitions, or want to preserve the partition setting on this drive, please
abort the program and do not attempt to make any change to this particular drive.
Depending on how many hard drives you have installed in the system and how each drive
was partitioned, the startup screen of the program may look a bit different from the
example below.
Copyright Shining Technology 2001, 2002 ?
24
Shining Utilities Installation and Instruction Manual
Creating a new partition
Simple rules must be followed when creating partitions. According to Microsoft OS
requirements, a hard drive can be partitioned with any combination of types and sizes,
provided the following rules are observed:
1) Only one Primary Partition can be set as active (bootable).
2) A total of four physical partitions can be created under the support of the OS.
However, they can be any combinations of Primary and Extended. Please note that
Extended Partitions cannot be used as bootable partitions.
3) Logical Partitions can only be created within an Extended Partition. Technically
speaking, there is no limit on the number of Logical Partitions that can be created.
Since the maximum drive letters that Microsoft OS can support is 26 (A to Z), drive
letter availability must be taken into consideration in relation to the number of potential
network and external drives added to the system.
When installing a new drive, make sure you do not see any drive letters or partition
indicators (Icon) next to the physical drive Icon. To define a new partition, follow the steps
below:
1) From the Main Menu, click on Hard Drive Setup and select the drive you would like to
change its partition by clicking on the Physical Drive icon.
2) Click on the “Allocate” button at the top of the main menu to enter the partition size, and
type of configuration menu.
Copyright Shining Technology 2001, 2002 ?
25
Shining Utilities Installation and Instruction Manual
3) From the Allocate menu, define the type and size of the partition that is required.
Please note that if the Length (MB) data entry box of the “Allocate” menu is left blank, it
means that you are going to allocate the maximum space for this partition.
4) To complete the allocation setting, single click the “Create” button. You should see a
newly defined partition appear at the utility startup screen. This confirms that you have
inputted all the necessary data for this new partition.
5) To further define more partitions, simply select any of the icons, which have the label
“Free” and repeat steps 2 to 4 in this section.
6) After all desired partitions are defined, click on the “Commit All Change” button to
commit all changes and create the partitions. Reboot.
7) After the system is rebooted, all the new partitions will be ready to format and be used
by the OS.
At any given time prior to finishing the setup process by clicking on the “Commit All
Changes” button, you can abort the partition operation and have no change to your
hard drive by clicking on the “Cancel” button.
8) After the system is rebooted, the Hard Drive Setup utility will automatically re-start.
From the Main Menu, select each of the newly created partitions and format each of
them.
9) Follow the on screen prompt to format each partition. After the formatting is completed
exit the utility. The new drive is ready to be used by the Operating System.
Deleting and Redefining Partitions
When using the Hard Drive Setup utility, existing partitions of a hard drive must be
deleted (all data on the drive will be erased) prior to re-defining the new setting. User
must back up all data in advance if you would like to preserve it for future restoration.
Your only other option is to use another partition utility application available in the market
(e.g. Partition Magic).
Using Shining’s Hard Drive Setup utility to delete partitions from a hard drive is very
simple, managed by an easy to understand graphical interface. One rule always applies
while trying to delete partitions: You must delete the Logical Partitions prior to deleting the
any Extended Partitions. Follow the steps below to delete Logical Partitions:
1) From the Main Menu, single click on Hard Drive Setup and select the partition that
needs to be deleted.
2) Click the Delete button to delete. When prompted for confirmation, select “Yes” to
continue.
Copyright Shining Technology 2001, 2002 ?
26
Shining Utilities Installation and Instruction Manual
3) After all selected partitions are deleted, select the “Commit All Changes” to commit all
changes. This is an added protection against the accidental deletion of working partitions.
At any given time prior to finishing the setup process and clicking on the “Commit All
Changes” button, you can always abort the partition operation and have nothing changed
to your hard drive by clicking on the “Cancel” button.
4) After the system is rebooted, the utility will automatically restart and you are ready to
define new partitions or use one of the other features.
Diagnostic( Windows )
The Diagnostic tool allows you to examine your Shining product to confirm it is working
properly. Run this test as follows:
This is an easy method to tell if a drive you are installing is functioning well. This function
creates a small file, reads it backs in, and deletes it. Any error messages will be displayed
if you try to write to a CD or drive that is protected. You can stop the test at any time.
(Diagnostic screen)
The length of the test depends of how many Bytes are written to the drive. You may
choose a longer test if you have doubts about the drive in question.
Below is an example of what you might see at the end of a short test:
Copyright Shining Technology 2001, 2002 ?
27
Shining Utilities Installation and Instruction Manual
(Diagnostic Short Test result screen)
If you have chosen a long test and wish to end it sooner, click on the button marked Stop
Test.
Operating System Detection( Windows )
At the lower middle part of the Main menu, there is Operating System (O.S.) detection
and report information area. This information should confirm the type of O.S. that
Shining Utilities is running on. This is important to confirm matches to the O.S. you
believe you are running, because some of the Shining Utilities functions are very much
O.S. dependent. If the detection is not correct, some utilities functions may not work
properly and may even result in a loss of data. Caution must be taken if this occurs.
Cancel( Windows )
The Cancel button located in the main menu is for exiting the program. Other “Cancel”
buttons found through out of the program are for exit from the particular function that you
are running. The usages of these “Cancel” Button are very much self-explanatory.
Copyright Shining Technology 2001, 2002 ?
28
Shining Utilities Installation and Instruction Manual
Chapter 4.0 Installation and Usage for MacOS 9.x
Instroduction ( MacOS 9.x )
Welcome to the Shining Macintosh Utility suite of applications and utilities. This utility is
designed to enhance Shining Technology products. This software suite may work with
other devices installed in the computer; however it is important to note that it is developed
solely for working with the Shining Technology products. Unpredictable results or data
loss may occur if any of these utility functions are used in conjunction with non-Shining
products.
(Opening screen)
The features include:
•
Shining Drive Setup allows you to prepare a new hard drive to be used by the
Macintosh, by creating the necessary partitions. This utility can also reconfigure the
partition arrangement of an existing hard drive; however all existing data will be
erased during this process.
•
Website - where Shining Technology’s products and services are only a click away.
•
Automatic Operating System detection, it shows your Mac OS version.
The empty slots in the pane shown above are for future additions .
Copyright Shining Technology 2001, 2002 ?
29
Shining Utilities Installation and Instruction Manual
System Requirements ( MacOS )
Version 1.X of the Shining Macintosh Utilities does not have all the tools for the Macintosh
platform yet. For more Mac support please contact Shining Technology or visit the Web
site for more information.
The follow Operating Systems (O.S.) are supported:
?? Mac OS 8.6
?? Mac OS 9.x
Shining Utilities was not tested under this version.
All versions of Mac OS 9.X are supported;
however for products utilizing USB (V1.2 &
V2.0), Firewire (1394) and other newer interface
(I/O) technologies, Mac OS 9.2.1 are preferred.
??
Mac OS X has built-in supports for all USB Mass
Storage Compliant devices, Firewire and PCMCIA.
Mac OS X
Shining Utilities is a very compact program. As of now, it only requires less than of 1.0 MB
of disk space for installation under all supported operating environments. Memory
requirements are also kept to a minimum.
Utilities Installation and Un-installation ( MacOS 9.x )
In most case, the Shining Utilities will run the installation program automatically when the
CD is inserted. If it did not start, please follow the steps below to begin installing the
program:
1) Insert Shining Macintosh Utilities CD into your CD drive. Double-click the CD drive
icon.
2) If the start up program still does not start, run it by double clicking on the file named
“Setup” on the CD.
3) Follow any installation prompts to install the utilities.
4) During the installation process, the install program may update some files on your
computer. When prompted for file replacement, always keep the latest version of your
files.
5) To un-install the utilities. Locate the Shining Utilities folder (Commad-R the alias on
desktop) and delete it. There are no preference files to delete.
Using Shining Utilities ( MacOS 9.x )
Shining Macintosh Utilities will perform only under the classic Mac OS (System 9).
After successfully installing the Shining Utilities, you will see an alias,
,on
the desktop. Double clicking it will launch the opening screen shown in figure 19.1 –
Opening Screen, which is the main menu for all the utilities. Check the center bottom slot
to be certain that the utilities detected the proper OS for your system. If the OS version
Copyright Shining Technology 2001, 2002 ?
30
Shining Utilities Installation and Instruction Manual
displayed does not match what you know your OS to be, Shining Technology recommends
not running the software any further.
Click on the button marked Website to go directly to the Shining Technology website for
technical assistance.
(Main Menu (Opening Screen))
Simple Hard Drive Setup ( MacOS 9.x )
CitiDISK DV user must select “DV Windows” so as to properly prepare the hard drive for DV
recording.
Click on the “Shining Drive Setup” box at the center. User should find a “FIRE” interface
hard disk on “Drive List” screen. Click on the drive entry and “Initialize” option shall reveal.
Click on “Initialize” to continue.
This screen is “Initialize” screen. Click on “Custom Setup” to continue.
Copyright Shining Technology 2001, 2002 ?
31
Shining Utilities Installation and Instruction Manual
The following screen is “Custom Setup” screen. Find “Type” selection, click on “up-down”
arrow symbol, hold the mouse button and scroll to “DV Disk( Windows )” selection, and
let go the mouse button. Confirm the “DV Disk” is setup as “1 Partition” scheme, “DV Disk(
Windows )” type, and as one full size volume only. Calculated data size after format is
about 8% less than total physically available size. That’s normal. No need to worry. Click
“OK” to continue.
Now, “Initialize” screen is back. Click on “Initialize” to continue. The full format process
may take several minutes depends on the size of hard drive.
Once the formatting process is complete. “Drive List” screen will come back. User can
verify the new volume name is “DV Disk mmddyear” or choose it to “initialize” again.
Copyright Shining Technology 2001, 2002 ?
32
Shining Utilities Installation and Instruction Manual
Select “Quit” function on top left corner of “File” menu to exit utility.
User can find the above “DV Disk mmddyear” icon on the desktop and it’s ready to use.
Complete Hard Drive Setup( MacOS 9.x )
It is important to note that this utility will erase all data from your hard drive, and that the
data is not recoverable. Great caution must be taken and only technically trained IT
personnel should use this utility. Always make sure all your data is backed up and verified
before making any attempts to change your hard drive setup. All information and
instructions provided in this section are designed for technical personnel only. Technical
terminologies used in this section are based on the assumption that the operator of this
Copyright Shining Technology 2001, 2002 ?
33
Shining Utilities Installation and Instruction Manual
utility has a clear understanding of their meanings and implications. No further
explanations of these technical terminologies are included in this document.
Introduction
In order for a hard drive to be recognized and used by the operating system, it must be
prepared in certain ways prior to its being operational. There are two main steps in
preparing a hard drive:
1) Create a partition.
2) Format the partition and place a file system on it.
Shining’s Hard Drive Setup utility is designed for simple hard drive partitioning only. This
utility does not support resizing, merging or converting partitions from one type to another.
This utility also will not repair any damaged partition. If a more sophisticated portioning
scheme is required, please use another hard drive partition product that is available on the
market.
Information provided in this section is for reference only. Users of this Hard Drive Setup
utility are fully responsible for making the proper decision on how to setup their hard
drives.
Partition Basics
Shining’s Hard Drive Setup utility only supports the Apple classic operating environments,
such as Mac OS 9.0.4 and newer.
In order for a hard disk drive (hard drive) to function in a Mac, it has to have at least one
partition. Normally this is also the bootable partition if this is the only drive installed in the
system. Removable hard drive (SyQuest and Iomega/Jazz) could be setup to have 1
partition or no partition just like a giant floppy (LS120, ZIP).
Since the inception of Mac OS, the partitioning rules are very much unchanged. However,
there are a few deviations of partition types that have evolved through the continued
development of the Mac OS and the capability of supporting increasing sizes of hard drive.
Please note that only Mac OS version 8.1 and newer OS can support a very large hard
drive.
Partition Schema
Shining’s utility supports the follow partition file systems:
•
Apple File Exchange partition (need PC Exchange - DOS format)
•
Standard
HFS (Hierarchical File System)
•
Extended
HFS+ ((Hierarchical File System Plus)
•
File Exchange( DOS ) MS-DOS File System like FAT16, FAT32, no NTFS.
When DOS partitions or volumes are preferred, make sure “File Exchange” application is
enabled. User can invoke “Extension Manager” inside “Control Panel” and make certain the
“File Exchange” box is crosschecked.
Copyright Shining Technology 2001, 2002 ?
34
Shining Utilities Installation and Instruction Manual
Partition Type
Once the proper partition schema is determined and selected, a hard drive can be
partitioned to the following partition types:
•
Standard –This is the old 16 bit that was used with low drive capacity for system
from 6 to 7.6.1. It is also known as HFS.
•
Extended–The Extended File system was first introduced in Mac OS 8.1. It
addresses the HFS size limitations.
•
File Exchange( DOS ) – Windows compatible partitions from Windows
95/98/2000/XP.
Limit on Number of Total Partitions
Please note that this application allows only a maximum of 8 partitions to be created in a
drive. It was done this way to be compatible with Apple’s Drive set-up.
Partitioning Rules
There is no maximum of partitions that we are aware of. The partitioning application sets
the limit. We don’t know of any limitation by Apple about how many volumes can be
mounted on the desktop.
Using the Shining Drive Setup
Since all Mac OS systems come with a Drive Setup application, why does one need the
Shining Drive Setup? In classic Mac OS (System 9), the Apple application does not
support external and third party drives.
The Shining Drive Setup lets you partition drives in Shining enclosures. The Shining Drive
Setup application works like the Apple one, so it can be used right away.
This application doesn’t support boot partitions yet, and it has only been tested with Apple
and Shining drivers.
This application relies on the respective drivers to support certain services that have been
defined by Apple. Since partitioning was never a big issue because Apple offered it for the
internal drive, many driver writers ignored this support and hence this application may not be
able to work on all drives. Shining, however, tries to support all the calls for their products.
So, if the application fails to format a third party drive, you will have to format it in the Finder.
Copyright Shining Technology 2001, 2002 ?
35
Shining Utilities Installation and Instruction Manual
The following figures show three screen shots from the Shining Drive Setup application.
(Drive List Window)
The first “Drive List” window shows a list of drives the application has found. The only
button in this window, “Initialize...” is disabled until a drive in the list has been selected.
Clicking the button brings up the “Custom Setup” window. File Sharing must be turned off
to partition a drive.
This is where the user can specify the partitions, size and name of each partition. The
limit on the partition count is 8. The pop-up menu near the “Size:” entry box can be used to
specify the display units; MB, GB or %. The application first attempts to display in the
units that make sense as MB for low capacity and as GB for high capacity media. The “up
and down” arrow keys can be used to move between the volumes displayed in the
“Volumes” group box. The info of a selected volume is displayed in the “Volume Info”
group box. The Edit menu is enabled only when in this view. The only other menu item
that is supported at this time is the “Quit.”
Copyright Shining Technology 2001, 2002 ?
36
Shining Utilities Installation and Instruction Manual
The third “Initialize” window shows the last step to take before the drive is partitioned.
Clicking the “Initialize” at this stage means the data will be lost.
(Initialize Window)
If the partitioning succeeds, the application will return to the start window, or else it
remains in this view. The “Cancel” button takes the user back to the start window. The
“Custom Setup” button allows you to re-size each volume size. The “Initialize” button
allows you to execute the “initialization”. Be aware that the “initialize” function will erase
all of the data in the drive.
Miscellaneous Functions
User can use “Command-R” to “Rescan Volumes”.
User can use “Stop Speaking” to stop voice or select various voices selection indicating
functions completion.
Copyright Shining Technology 2001, 2002 ?
37
Shining Utilities Installation and Instruction Manual
Operating System Detection ( MacOS 9.x )
At the lower middle part of the Main menu, there is Operating System (O.S.) detection
and report information area. This information should confirm the type of O.S. that
Shining Utilities is running on. This is important to confirm that it matches the O.S. you
believe you are running, because some of the Shining Utilities functions are very much
O.S. dependent. If the detection is not correct, some utilities function may not work
properly and may even result in a loss of data. Caution must be taken if this occurs.
Quit ( MacOS 9.x )
The Quit button located in the main menu is for exiting the program. The usage of this
“Quit” Button is very much self-explanatory.
Copyright Shining Technology 2001, 2002 ?
38
Shining Utilities Installation and Instruction Manual
Chapter 5.0 Installation and Usage for MacOS X
Hard Drive Setup( MacOS X )
CitiDISK DV user must select “MS-DOS File System” so as to properly prepare the hard drive
for DV recording.
MacOS 10.x provides a “Disk Utilities” in “Applications”, “Utilities” folder. Partitions,
volumes created by Shining DriveSetup Utility program under MacOS 9.2.x and Windows
are fully compatible with MacOS 10.x. Here is how to partition/format the CitiDISK DV in
MacOSX. Find the “Disk Utility” and activate it after plugging in the CitiDISK DV into
system.
CitiDISK DV user
Select the drive saying “Shining”, click on “Erase” function on top menu bar, find “Volume
Format” and select “MS-DOS File System” for CitiDISK DV user. This is the most
important thing while partition / formatting MacOS X. Enter the volume “Name” as
“CitiDISK DV”. Click on “Erase” to continue.
Copyright Shining Technology 2001, 2002 ?
39
Shining Utilities Installation and Instruction Manual
Follow the message prompted by MacOS X and click on “OK” to continue. While the
process is ongoing, system will prompt “Un-mounting old volume,” “Erasing data,” and
other messages indicating the process is in progress. Click “OK” to acknowledge the
process once it’s done.
CitiDISK DV is partitioned as one single FAT32 volume, not a partition, which is not cross-platform
compatible with Windows systems even though it is an actual FAT32 file system.
HFSPlus is not supported at the time of this manual release; so, user has to select “MS-DOS File
System” in “Volume Format” selection.
Non CitiDISK DV user
Select the drive saying “Shining”, click on “Erase” function on top menu bar, find “Volume
Format. Several different types of partition and file systems are available to use. Native
file system for MacOS is “Mac OS Extended.” Select one from the list. Click on “Erase” to
continue.
Copyright Shining Technology 2001, 2002 ?
40
Shining Utilities Installation and Instruction Manual
Follow the message prompted by MacOS X and click on “OK” to continue. While the
process is ongoing, system will prompt “Un-mounting old volume”, “Erasing data” and other
messages indicating the process is in progress. Click “OK” to acknowledge the process
once it’s done. After the hard drive formatting process is completed, a
will be displayed on desktop and it’s ready to use.
drive icon
Ejecting the Drive Icon in MacOS X
Drag the “CitiDISK DV” drive icon into “Trash” can before unplugging the cable.
Chapter 6.0 Customer Supports
Shining Technology provides many easy ways to report the problem via:
Website Tech support:
Access “http://www.shining.com” website, select “Download and Support”
page and look for “Utility” category for latest Utilities suite updates. Select
“Contact Tech Support” is recommended by us by providing detail and
organized information to us.
Copyright Shining Technology 2001, 2002 ?
41