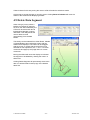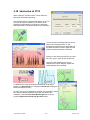
1
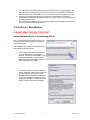
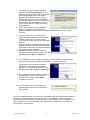
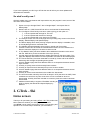
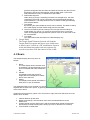
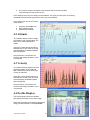
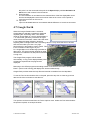
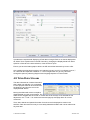
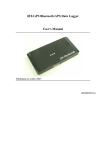
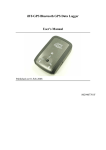
User Manual
Version 2.3
© GTrek Ltd. 2008
-1-
Version 2.4
User Manual...............................................................................................................1
1. Welcome ....................................................................................................................3
1.1 Notes and Warnings.............................................................................................4
1.2 Software Installation ............................................................................................5
1.3 How to use your GTrek........................................................................................8
1.4 What's New ..........................................................................................................8
2. GTrek - Ski ................................................................................................................9
2.1 File Splitter.........................................................................................................11
2.2 Manual Connect .................................................................................................12
2.3 Quick Statistics ..................................................................................................12
2.4 Configure GTrek................................................................................................13
2.5 Download...........................................................................................................14
2.6 Clear GTrek .......................................................................................................15
3. Position ....................................................................................................................15
4. Analyze ....................................................................................................................16
4.1 Route ..................................................................................................................20
4.2 Altitude ..............................................................................................................21
4.3 Velocity..............................................................................................................21
4.4 Profile Display ...................................................................................................21
4.5 Rotate Displayed Route .....................................................................................22
4.6 Route Summary .................................................................................................22
4.7 Google Earth ......................................................................................................23
4.8 Trim Data Stream...............................................................................................24
4.9 Delete Data Segment..........................................................................................25
4.10 Animation & POI.............................................................................................26
4.11 Trip Details ......................................................................................................27
5. Support.....................................................................................................................27
Appendix......................................................................................................................28
Appendix A – Specifications ...................................................................................28
Appendix B – Certification......................................................................................30
Appendix C – Warranty Information.......................................................................32
© GTrek Ltd. 2008
-2-
Version 2.4
1. Welcome
Getting acquainted with your GTrek
Your GTrek comes to you ready to use but before you do it
is advisable to read the following.
Your GTrek is simple to use but there are a few minor points
which you should be aware of when using it to ensure
accurate data is available for maps and routes to be
produced.
1. Your GTrek data logger receives data from orbiting
satellites and converts the meaningless data
streams into useful information. It then saves this
data until it is transferred from the device into the GTrek program where meaningful
information is produced.
2. On the left hand side there is a three position switch, the functions are as follows:1. OFF - In this position the unit is in the off position, no data will be collected in
this state.
2. NAV - In this position the blue Bluetooth light will illuminate and an
attempt will be made to communicate and connect with another Bluetooth
device. If such a device is found and can be paired with GTrek it will assume
the roll of a slave device supplying data, the Bluetooth light will also flash. In
this position GTrek can be used as a data source for third party programs
such as TomTom and can function as a GPS receiver for a satellite
navigation system. If after about 60 seconds GTrek is not paired with another
device then the Bluetooth communications will be shut down to conserve
battery power. Data logging will also cease, the Bluetooth light will start to
flash very slowly.
3. LOG - When switched to this position the data log will automatically start
recording data at the preset rate until switched off. Bluetooth communications
will not function in this position.
3. On the top surface of the device you will find three lights and a push button
1. The satellite fix light is multi-function and multi-colour
1. An amber light on - satellite fix not obtained and reliable data is
not being collected
2. An amber light flashing - satellite fix obtained and useful data is being
collected.
3. A blue and amber light on - data not being collected, internal memory
is full and needs to be downloaded and then cleared.
4. A blue light off - normal operation condition.
5. A blue light flashing - internal memory is more than 90% full and
needs to be downloaded as soon as possible.
6. A blue light on - see 3 above.
7. When data is being downloaded the yellow satellite light with flash
rapidly.
2. The green power light
1. A green light flashing - this is a charging indication
2. A green light on - the unit is fully charged
© GTrek Ltd. 2008
-3-
Version 2.4
3. A red light on if the battery power level is very low. In this situation
the battery should be recharged without delay.
3. The blue Bluetooth light
1. A blue light off - Bluetooth is disabled
2. A blue light on - GTrek has not yet paired with a Bluetooth
device
3. A blue light flashing - GTrek is connected and ready to transfer data
4. A blue light flashing slowly - No Bluetooth connection, GTrek has
entered a low power sleep mode.
4. The push button
1. This button when pushed will log additional data points and the blue
Satellite light will flash three times. Routes when viewed by the data
analyzer will add small blue circles indicating where on the route the
button was pressed. Routes viewed in Google Earth will have
location markers positioned at locations where the button was
pressed along with additional information. This button can be used as
often as required
4. On the right is a mini USB socket used for transferring data and for charging the
battery.
Note
When your GTrek is first switched on it will need to establish its bearings and calculate its
location. If the location is close to where it was when it was switch off then a warm start up
sequence will be initiated.
If the new location is some distance from the last one then a cold start is initiated as any
information it has acquired will not match data it is receiving now. This requires more data to
be downloaded and can take a little longer to obtain a 3D fix. During this time your GTrek may
not communicate with the GTrek program. If this is the case position your GTrek where it can
be seen by the satellites and try again after a couple of minutes. If the satellite light starts to
flash then a satellite fix has been obtained.
If a pass key is requested when pairing your GTrek with a Bluetooth device use 0000 (4
zeros).
1.1 Notes and Warnings
1. GTrek uses a Lithium-ion battery. If your GTrek is used in temperatures lower than 10ºC or higher than 60ºC its battery charge capability will decrease. A pocket is a
good place as body heat will maintain temperature. Please keep your GTrek data
logger away from particularly low or high temperature environments. In addition, do
not expose your GTrek data logger to temperatures higher than 140ºF/60ºC. If you do
not follow these rules the battery inside your GTrek may overheat, explode or ignite,
and this will lead to serious damage. The Lithium-ion battery inside the GTrek should
be recycled in a proper way and should never be thrown into normal refuse or
disposed of in an incinerator.
2. Your GTrek should not be used in prohibited locations such as on-board airplanes
and in hospitals so turning off your GTrek is recommended. Wireless GPS receivers
may interfere with sensitive equipment which use radio frequency.
3. If your GTrek data logger is not to be used for long periods it is recommended that the
battery be removed and stored separately in a dry and cool place. Re-charging
periodically is also recommended (by periodically we mean recharge your battery
every two to three months).
4. For safety keep your GTrek and all accessories out of children's reach. The GTrek
system is a useful tool and is not a toy, though we do hope you have a lot of fun with
it.
© GTrek Ltd. 2008
-4-
Version 2.4
5. The manufacturer of GTrek and related products assumes no responsibility for any
damage or loss resulting from the use of this manual, or from deletion of data as a
result of malfunction, dead battery, or from misuse or use of the product in any way.
6. Use only the supplied and approved accessories. Unauthorized accessories,
modifications or attachments could damage your GTrek and may violate regulations
governing radio devices.
7. None of the above detract from your statutory rights under European law, however if
you have a problem please call us first.
1.2 Software Installation
PLEASE READ THIS SECTION FIRST
Install Software Prior to Connecting GTrek
Prior to connecting your GTrek to your PC you
are required to install the application software
and device drivers.
The installation is a simple automated process
and should proceed as follows.
1. After inserting the installation disk into
your CD-ROM drive the installation
program should run automatically. If not,
open "My Computer" and double click
startUp.exe on the installation CD. The
will be displayed, Click next .
2. The GTrek program requires a Microsoft
system extension called ".Net Framework
2.0" and needs to be installed. Click
Accept and the installation will proceed.
”.Net” may already be installed, if so this
step will be skipped. If required this may
take a couple of minutes to complete.
© GTrek Ltd. 2008
-5-
Version 2.4
3. The Welcome Screen is now displayed. Click Next to
continue.
4. The GTrek End User License Agreement is displayed
next and the user needs to click I Agree and Next to continue.
You should actually read it, but we can't make you.
5. GTrek is normally installed in the default folder. It
can be changed if necessary, although the default
folder is recommended.
Microsoft Windows XP and Vista provide support
for more than one user; this program can be
installed for a single user (default) or can be
accessed by all users. This selection can also be
made here. Click Next to continue.
6. Confirm installation, Click Next to continue. The
installation stage takes less than a minute.
© GTrek Ltd. 2008
-6-
Version 2.4
7. If the Windows Logo Testing message is
displayed click Continue Anyway. This is a
Windows security message and is not always
automatically displayed. It is not always
displayed above all other items currently
being displayed and hence the installation
process may appear to hang. At no time during
the installation process should there be any
length of time where no update process is
being displayed.
8. GTrek will now commence the installation.
When the installation has finished click
Close to complete the task. That concludes the installation and the CD can be
removed.
9. Insert the battery into Your GTrek data
logger aligning the battery terminals with the
contacts, replace the cover and connect
your GTrek to the PC with the mini USB cable
supplied.
A message will be displayed stating that New
Hardware has been detected and the Hardware
Wizard will be launched. The driver installation is
a two stage process as follows:
10. A Dialog box will be displayed requesting
directions to install the new hardware, click Yes,
this time only and Next and Next again.
11. The installation process will start by searching for the information required. When
found the drivers will be installed. Click Finish to complete the process.
At this stage a second Hardware Wizard
Dialog Box may be displayed requesting
directions to install the new hardware. Click
Yes, this time only and Next and Next again.
12. The installation process will start to search for
the information required. When found the
drivers will be installed. Click Finish to
complete the process.
13. An information balloon will be displayed
indicating that the process has completed
without errors.
It is recommended that prior to first use your GTrek data logger be configured and initialized.
Switch on your GTrek and allow it to synchronize with the satellites. Launch the GTrek
application by double clicking the icon that is now on your desktop. From the Settings menu
select Configure GTrek and click Save. Your GTrek will be configured for use and the onboard memory will be cleared.
© GTrek Ltd. 2008
-7-
Version 2.4
The battery should be fully charged before use. The green flashing light indicates the
charging process is complete. Your GTrek is now ready to go. Use your GTrek and get
familiar with it before you get to the slopes.
Don't forget to register your GTrek system, if you do we will notify you when there are updates
available.
1.3 How to use your GTrek
You GTrek has been designed to provide ease of use from the start to getting the results.
However some simple preparation is always of use and some simple tips are included here
1. Charge your battery. Your GTrek data logger can be charged in any one of three
2.
3.
4.
ways as follows:1. From the mains supply with the supplied charger. Your charger is dual
voltage, 50 or 60hz and will work anywhere with a suitable adaptor. Do not
use a charger from another device as this may damage your GTrek. Inspect
the charger before use and do not use it if it looks damaged. Replacements
can be obtained from the web site www.gtrek.co.uk.
2. Your GTrek can be charged by plugging it into a car cigarette lighter socket
with the supplied charging cable, again use nothing other than the
supplied charger as damage may result.
3. Through a connection to a laptop or desktop PC by USB cable. Your GTrek is
supplied with a standard mini-USB cable which is used to transfer data
between your GTrek and a computer. It also re-charges the battery when
connected to the PC.
At the start of your day's activities switch your GTrek on. If it's not switched on it won't
record anything, however it's never too late. On the side of your GTrek there is a
three position switch labeled OFF-NAV-LOG, be sure to switch it to the LOG position.
From cold it can take from a few tens of seconds to a few minutes to get a satellite fix,
it depends on the number of satellites in view. If you are inside a car or bus it may
never get a fix at all, moving at high speed also does not help. A fix is indicated by the
satellite light (yellow) blinking. Once a fix is obtained it's a lot easier to maintain
synchronization. Place your GTrek in a pocket or pack where it can get a good
unimpeded view of the sky. Covering it with a tin box for instance is not a good idea.
When your days activities finish switch your GTrek data logger off otherwise you will
collect unwanted data and waste battery energy.
On return to your residence download the data and save it and/or e-mail it to yourself
at home and analyze the results.
Clear down the memory ready for the next day (don't forget item 1 above)!
5.
6. Once data has been downloaded the Analysis screen is automatically loaded.
View your route, distances and speeds, view the profile and load Google Earth
and view your route in 3D.
1.4 What's New
If you are installing this new version as an upgrade you may have noticed a subtle name
change. Although your Ski-Log device is still the same we have changed the name. Thus the
Ski-Log and GTrek names can be used synonymously.
Ski-Log was originally designed as a device for skiers and boarders alike but we can see
applications for other sporting and outdoor leisure activities and we're going to end up with a
number of slightly different devices with different names. So GTrek has been created, this
allows us to create GTrek - Ski, GTrek - Bike and other applications we are working on.
Watch the website for new products.
© GTrek Ltd. 2008
-8-
Version 2.4
If you have registered your Ski-Log or GTrek then we will inform you when updates and
downloads are available.
So what's really new ?
We have added many new features and improved the way the program is used, some of the
new items are as follows:-
1. Export not only to Google Earth™ but to Google Maps™ and export files for
MemoryMap.
2. Double click on a .GBF file and GTrek will run and load the file automatically
3. The "Configure GTrek" facility now has 3 options giving you the option of :1. 1 second update with storage for 16 hours
2. 4 second update with 60 hours of storage
3. 6 second update with over 100 hours of storage
4. The Analysis screen now has a tab page format providing easy access to the Route
Display, Altitude Display and Speed Display.
5. The Route display has a North pointing compass and the display is rotatable, it has
an overlayable grid with a measured scale
6. The Altitude and Speed displays have height or speed and Time scales
7. All three screens can have Point Of Interest labels inserted. A POI inserted on the
Route screen also displays on the other screens as well.
8. A "Trip Details" facility has been added to allow additional information to be saved
with the .GBF file to provide a reminder of the trip or journey.
9. A profile page has been added showing height and speed on the same graph. This
page also displays data entered on the Trip Details. POI data can also be displayed.
10. The "Route Summary" has been extended to include Up, Down and Level distance
data along with average ski (traveling down) speed.
11. A Quick Statistics page has been added to allow for a comparison between several
days activities.
12. A facility to quickly remove POI's and My Place markers
13. A facility to import Points Of Interest (POI’s) into a file from another
14. A Quick Statistics page has been added to allow for a comparison between several
days activities.
15. A facility to remove erroneous data in the middle of a data stream.
16. The time information stored by the GTrek is always in UTC (the same as GMT). Data
recorded can come from any time zone which can be corrected for when it's
downloaded. A facility has been included to correct any time errors after it has been
downloaded.
17. Additional functionality to support GTrek-Bike including an
ability to display the Altitude and Speed displays by
distance.
2. GTrek - Ski
Home screen
Thank you for purchasing and using GTrek - Ski. This product has
been created to enhance your skiing experience. In fact
your GTrek can be used to record any journey, not just skiing and
reproduce an accurate map of wherever you have taken it.
© GTrek Ltd. 2008
-9-
Version 2.4
This software has been produced to be as simple and intuitive as possible. If you find any part
confusing or would like a feature that is not available then let us know, we might think it's a
good idea too. We endeavor to improve on the product to meet with your requirements.
From connecting the device only two clicks are required to get all the basic information.
A third click will download all necessary data to Google Earth™ and enable you to get a 3D
visualization of your trip.
The GTrek program will automatically open the connection to your GTrek data logger, all you
have to do is plug it in and switch it on. The Download and Data Manager button will become
active when a connection has been confirmed.
Menu items are as follows:1. File menu options
1. Open.
The open option allows you to open presaved routes. When selected the
default GTrek folder is displayed. Select the
file required and it will automatically be
loaded and displayed.
2. File Splitter
The File Splitter utility takes a downloaded
route file *.GBF that spans more that a single
day and splits it into separate files
each associated with a complete day.
3. File Merge
The File Merge utility will take two or more .GBF files and merge them into a
single file. This can be useful, for instance, if you have a days journey that
naturally splits into two parts with some unwanted data in the middle. Save a
copy of the original with only the one part visible and then save a second file
with only the second part visible. Then merge the two parts into a single file.
All non-visible data is discarded and you only get the useful stuff.
4. Manual connection
The Manual option provides the option to manually connect to GTrek data
logger if the automatic process fails. If for example the connection is via
Bluetooth then GTrek cannot automatically detect the connection.
5. Exit
The Exit option will terminate the program. If there is new unsaved data then
a message will be displayed and request whether or not that data should be
changed.
A message box will be displayed requiring confirmation that the program
should terminate.
2. View menu options
1. Position
Selecting Position will take you to the
satellite data utility where detailed live
information can be viewed.
2. Analyze
Selecting Analyze will take you to the
data analysis page, from where saved
routes can be accessed and Google
Earth™ can be accessed.
3. Quick Statistics
Selecting Quick Statistics will open a dialog where you can open several
previously saved routes and it will create a table with statistics taken from
each file. The fastest, longest etc. are also highlighted.
3. Settings menu options
© GTrek Ltd. 2008
- 10 -
Version 2.4
1. Configure GTrek
Your GTrek data logger can be configured in
one of two ways; either for use as a day-today collection system or for a week-to-week
collection system.
4. Help menu options
1. Contents
Selecting the contents option will open the
help system with the Contents tab selected.
2. Index
Selecting the Index option will open the
help system with the Index tab selected.
3. Search
Selecting the Search option will open the
help system with the Search tab selected.
4. About
Selecting the About option will display relevant data about the GTrek
program.
The Searching Status box provides connection status information on whether GTrek data
logger is connected and switched on. There only 3
states as follows:1. Waiting for GTrek connection.
In this condition the program is waiting
for GTrek to be connected. If the device driver
has not been installed correctly this message will be displayed even if GTrek is
connected. If this is the case check for red (fault) or yellow (warnings) in Device
Manager .
2. Waiting for GTrek to power up.
When your GTrek is connected to your computer it will be detected by Microsoft
Windows™ and reported to the program. If this message is displayed then switch
your GTrek onto the LOG position or if connected via Bluetooth set to the NAV
position.
3. Found GTrek on COM4:
If this message is displayed you are ready to go. The actual COM port to which
your GTrek is connected to is displayed, it may not be COM4:
2.1 File Splitter
Your GTrek is capable of collecting data over
long periods particularly if set to the Longest
Storage Capability mode. This will create a
single file that may span many days.
The File Splitter utility will take this file and
split it into several files which correspond to
the individual dates found in that file.
If the Auto-Save is ticked (default) then the
names of the files created will be formatted
as dd-mm-yyyy.gbf and saved in the default
folder "MyDocuments\ski-log data files". If the
Auto-Save is un-checked then the user will be given the opportunity to select the file name
and storage location for each file.
© GTrek Ltd. 2008
- 11 -
Version 2.4
The original file will be renamed by adding "-split-" to the file name to prevent it from being
overwritten. If a file to be saved already exists the user will be prompted to overwrite the file. If
the file is overwritten then old file will be backed up first by renaming it *.bak.
After the source file has been scanned a
message is displayed indicating how many
days worth of data the file contains. This may
be more than expected. When connecting
your GTrek to a PC to download the collected
information additional entries may be added.
These may have later dates than the main body of information.
When the process is complete a list
of the files created is displayed
For this utility to function correctly it
is important that when downloading
data from your GTrek the correct Time Zone has been selected so that the data is saved with
local time stamps.
2.2 Manual Connect
Your GTrek data logger automatically connects
to your GTrek program without any intervention
from the user. The Operating System
(Windows™) is notified when any new USB
devices are attached to the PC.
If for any reason the operating system is not
notified then the GTrek program cannot detect
the device automatically and the manual facility can be utilized to scan for a device. If the
Comm Port number is known then double clicking on the Comm Port Number box will allow
the number to be entered.
Clicking the Scan button will instruct GTrek to scan for a device. This option can take some
time to check the ports registered in your PC. If a device is located then scanning will stop
with the Port number displayed.
Clicking Connect will open the port and close the window.
2.3 Quick Statistics
The Quick Statistics page provides a convenient way of comparing the activity of several days
or trips.
Select Add New Data from the file menu and select as many Route Files as required.
Additional Route Files can then be added later to the current list
© GTrek Ltd. 2008
- 12 -
Version 2.4
Some of the data displayed, Name and Resort are taken from data entered in the Trip Details.
The remaining data is taken from the Route Summary
information.
From the file menu several option are available
1. Add New Data
Add new data from pre-saved Route Files
2. Open
Open a previously saved Quick Statistics
compilation
3. Save
Save the current Quick Statistics compilation
4. Print
Print the displayed screen
5. Print Preview
Show a preview of the screen before it is printed.
From the settings menu, clicking Options will provide a dialog
box allowing the user to select which columns are visible.
Clicking Show Totals will enable or disable the totals data
displayable at the bottom of the table.
The order of the columns can be altered by clicking and dragging
the column header to the desired position.
The column widths can be changed by clicking and dragging the
column header border.
Clicking in a column header box will re-sort the columns in ascending
or descending order.
Rows can be deleted by right clicking the row to be removed and
selecting Delete.
2.4 Configure GTrek
Your GTrek can be set up to provide a large range of information
only some of which is applicable for this application. The
optimize option is deigned to ensure that your GTrek is set up
correctly.
© GTrek Ltd. 2008
- 13 -
Version 2.4
There are two options here as follows:-
1. GTrek Best Resolution
This option configures your GTrek for one second updates. With this setting up to 16
hours of continuous data can be collected for later analysis, more than enough for a
day's activities.
2. GTrek Longer Storage Capability
This mode is designed to collect data at
a slower rate of four seconds providing
enough storage capability for 66 hours
of continuous data or 11 hours a day for
6 days. Don't forget to switch your
GTrek off at the end of your day's
activities.
3. GTrek Longest Storage Capability
This mode is designed to collect data at an even slower rate of six seconds providing
enough storage capability for over 100 hours of continuous data, enought for a 14
day holiday. Don't forget to switch your GTrek off at the end of your day's activities.
Select the option required and click Save. A box will be displayed requiring the user to accept
or reject the request. Selecting OK will set the option required whereupon the GTrek memory
will be initialized ready for the new selection. Any data will be lost. The dialog box will
automatically close. Selecting close or Cancel will exit with no changes made.
2.5 Download
The Download screen shows the record
count and the memory used. The
Start/Stop Logging button will either
start GTrek collecting data or will stop the
logger from recording more data while it
is switched on. Turning the power off and
back on again will automatically restart the
logger so there is no requirement to
manually restart it. This button doubles as
the Start and Stop Logging function.
The Erase Logger button when pressed
will erase the data logger memory ready for a new session. A warning message is displayed
requiring the user to confirm the request. This operation can take upto 26 seconds to
complete.
Your GTrek records location information and real time of day and date. This time is UTC time
and is the same the world over. UTC is the
same as GMT or British Winter time.
To correct for any time difference between
the local time and UTC where the data
was collected, select the time zone
correction in the Set Time Zone drop
down box. For example if data is collected
in the UK during the summer months then
set the time zone to GMT + 1 hour.
Data then collected will be altered to
reflect the local time zone.
© GTrek Ltd. 2008
- 14 -
Version 2.4
The Start Download button will initiate the download sequence. Additional information will be
displayed indicating the progress on the data transfer and elapsed time. When the process
has completed the Download box is removed and replaced by the data Analysis display. The
user will be given the opportunity to initialize the GTrek
memory.
2.6 Clear GTrek
Either from the completion of the data Download sequence
or when selected from the Download dialog the user is
given the option to erase the data stored on GTrek data
logger.
Selecting Cancel will leave the data intact and any
additional data will be added until the memory is full at
which point logging will cease.
Selecting OK will start the memory initialization sequence.
This process can take upto 26 seconds.
An elapsed timer is displayed indicating process
time. When the process completes the dialog box will be
deleted automatically.
After initialization the data logging function is stopped. It
can either be restarted manually or automatically when
your GTrek is next switched on.
3. Position
GPS status and positional data is shown here. Latitude and longitude are shown in degrees
and minutes to four decimal places.
Universal Co-ordinate Time (UTC) is equivalent to GMT or BST -1 hour. Speed is in km/h and
course is degrees from true North. Altitude is in meters above mean sea level.
The satellite data received
provides information from which
position can be calculated. Three
good signals are required for a 2D
Fix and four are required for a 3D
fix. PDOP, HDOP and VDOP are
indications of the Dilution of
Positional information
representing probable errors in
the data.
The image in the centre is a
representation of the visible sky
from horizon to horizon and indicates the position of all visible satellites and their allocated
numbers. Blue circles indicate satellites which are providing reliable data.
Reset GTrek, for GPS to work the receiver needs to have to hand detailed information on
each satellite in view, this data is stored on your GTrek and updated during the normal course
© GTrek Ltd. 2008
- 15 -
Version 2.4
of operation. If your GTrek is switch on some distance away (over a 100 miles) from where it
was switched off then this data can be inaccurate or in error. The information will eventually
be updated and corrected but may result in incorrect GPS data being recorded.
The three buttons here have the following effect:-
1. Hot, this button if pressed will instruct your GTrek to perform a hot restart using all
current data available as if it had been woken up from a sleep condition
2. Warm, this button if pressed will instruct your
GTrek to perform a warm restart as if it had just
been switch on.
3. Cold, this button if pressed will instruct your
GTrek to perform a cold restart, in this
condition all stored data is deleted and no
GPS data is stored until fresh data can be
downloaded.
4. Analyze
The Analysis screen automatically shows downloaded
routes colour coded black for up, red for down and blue
for flat. Routes can be saved for access later or saved
routes can be re-opened.
The Analysis screen is dynamically re-sizeable. Click and drag the right or bottom sides to
expand or click and drag the bottom right-hand corner to expand or retract in both axis.
If the route has been saved or a previous route opened then the filename for this route will be
displayed. The total distance traveled is also displayed.
The Analysis view is tabb'ed and clicking on the Route, Altitude or Speed buttons will change
the display accordingly.
A displayed route can be exported to Google Earth ™ simply by clicking the Google Earth™
icon.
There are a number of options that can be accessed from either the Route, Altitude or Speed
screens, these are detailed below:-
1. Right click menu
Right clicking on any of the analysis screen will bring
up a floating menu
1. Show Grids
When this item is selected a grid is
displayed. On the Route view a distance
scale is also displayed.
2. Show POI
Points Of Interest can be added to the route
see entering POI data here.
3. List POI's
This option provides an easy way to remove
any unwanted Points of Interest markers. A
list is prepared, setting the checkbox will
temporarily remove the POI. Clicking
© GTrek Ltd. 2008
- 16 -
Version 2.4
Confirm Deletion will remove the selected POI's
4. List My Places.
When your GTrek is gathering data and if the button is pressed a My Place
marker is placed on that record. When the data is downloaded and displayed
on the Route view the My Place markers are shown as small blue circles.
Selecting this item will create a list of the My Place markers which can be
hidden or un-hidden by checking the check box.
5. Rotate
The Route display can be rotated with this option
6. Zoom In and Zoom Out
The Analysis view can be zoomed in or out via a number of different options:1. By the options in the right click menu
2. By the commands in the View menu item
3. Via the keyboard "+" and "-" keys
4. Via the wheel on a suitable mouse
7. Distance in Km
Selecting this option will alter the display to show information in metric,
clicking again will revert back to Imperial.
8. Route Summary
The Route Summary by default is displayed, clicking this option will turn if off
and back on again. The route Summary can also be moved about the screen
to aid viability. This is achieved by clicking and dragging. If the Analysis
screen is printed and the Route Summary is being displayed then the viable
box will snap to the nearest corner of the printed page.
9. Filter
This is only applicable to the Altitude and Speed displays, it is used to filter
out positional noise on the recorded data. The default setting is off.
10. Interpolation
Data is normally gathered as a continuous stream however if data is missing
then this continuous line will be broken. Imagine taking some data in a
location. About 2 miles, switching your GTrek off and then moving to another
location some 20 miles away and switching your GTrek back on again and
gathering another 2 miles of data. The resulting information will show total
distance of 24 miles with Interpolation switch on but only 4 miles with it switch
off. Interpolation is switched on by default.
11. X Axis selection.
This is only applicable to the Altitude and Speed displays. It switches the X
axis scale between time at which the data was gathered, data record number
and total distance (only in GTrek-.
2. File Options
1. Open
Selecting Open gives access to pre-saved routes. The default location is
MyDocuments/Ski-Log Data Files. Select the route required and it will be
displayed.
2. Save
Any route displayed can be saved as a .GBF file for later access.
3. Export
The export option allows the displayed route to be saved in other formats.
Four options are available:
1. As a Google Earth™ file
Accessing Google
Earth™ via the icon
button will create a
temporary file which is
subsequently deleted.
Saving a Google
Earth™ file through the
© GTrek Ltd. 2008
- 17 -
Version 2.4
4.
5.
6.
7.
8.
export utility will allow the user to view routes in Google Earth™
without first loading the GTrek program.
2. As a Memory Map™ File
Memory Map compatible files can be saved using this utility.
3. To Google Earth™
This option will create a temporary GE compatible file and export it to
Google Earth.
4. To Google Maps™
For journeys that involve roads exporting the data to Google Maps
may be a better option. The file produced is transferred as a KML file
to the GTrek web server. Google maps is then loaded and preconfigured with the ULR of the saved file. A connection to the internet
is required before carrying out the procedure and may take a few
seconds to load the file over an ADSL connection. It may take many
minutes over a dial-up connection. The URL shown on the Google
Maps screen can then be e_mailed to friends for then to load into
GM.
Import
The Import option allows additional data to be
imported. One function is available as
follows:1. Import POI's.
Points Of Interest created on other
Route files can be imported into the
currently displayed Route file. Selecting
this option you will be prompted to select the file from which POI's are
to be imported from. After the POI's have been imported the number
of items is displayed. Click OK to close this box.
For a POI to be imported the map location on the new file needs to
be within 20m of the map location from where the POI to be imported
is located.
Page setup
Allows access to the printer page setup utility
Print Preview
Allows the user to view printer page before printing
Print
Selecting this option will print the current Analysis view on the selected or
default printer
Exit
This will close the Analysis view. If a
new route has been loaded or an
existing route changed then a
message will be displayed requesting
that the file be saved.
3. View Options
1. Profile
Selecting this option will open the
Profile display page, this displays
speed and altitude on the save graph.
2. Animation & POI.
When looking at a skied route it can be
difficult to establish the actual route
taken. This utility will show your actual
location at any time during your trip
either manually or as an animated
process. Access to setting and
deleting Points of Interest are also
accessible through this feature.
© GTrek Ltd. 2008
- 18 -
Version 2.4
3. Zoom In
See 1.3 above.
4. Zoom Out
See 1.3 above.
5. Distance in km
Selecting this option will alter the display to show information in metric,
clicking again will revert back to Imperial.
6. Route Summary
The Route Summary by default is displayed, clicking this option will turn if off
and back on again. The route Summary can also be moved about the screen
to aid viability. This is achieved by clicking and dragging. If the Analysis
screen is printed and the Route Summary is being displayed then the viable
box will snap to the nearest corner of the printed page.
7. Show Position / Show Height / Show Speed
If this option is selected then cursor located information will be displayed. The
actual information displayed is dependent on the Analysis screen data
currently being viewed.
8. Show Date/Time
This option only applicable in the Altitude and Speed views and will show
the Date and Time at the cursor location.
9. Filtered Data
The data displayed is by default not filtered. However it can be switched on or
off by selecting this option to remove noise from the downloaded data. This
option also has a keyboard shortcut Ctrl+F.
10. Show 2D data
All data is gathered at all times when your GTrek is switched on. It takes time
for your GTrek to get a proper fix on its location and incorrect data can, and
will be, stored in this situation. Proper synchronization can also be lost if for
instance you are traveling through a tunnel or in a steel fabricated building.
Only data correctly synchronized is normally displayed. We say that this data
has a 3Dfix, data that is not fully synchronized is called either NoFix or 2Dfix.
The possibly inaccurate 2Dfix data can be viewed by selecting this option.
Data stored and identified as NoFix is not available for display.
11. Interpolation
Data is normally gathered as a continuous stream however if data is missing
then this continuous line will be broken. Imagine taking some data in a
location, about 2 miles, switching your GTrek off and then moving to another
location some 20 miles away and switching your GTrek back on again and
gathering another 2 miles of data. The resulting information will show total
distance of 24 miles with Interpolation switch on but only 4 miles with it switch
off. Interpolation is switched on by default.
12. X Axis selection.
This is only applicable to the Altitude and Speed displays. It switches the X
axis scale between time at which the data was gathered, data record number
and total distance (only in GTrek-Bike).
4. Settings Option
1. Trim Data Stream
The data gathered may contain
correct 3D data either at the
beginning or at the end that is
not relevant to the trip. For
example your GTrek is switched
on when you leave your place of
residence and then you travel
by bus to the first ski lift or after
the last ski run there is bus ride back. Selecting this utility will allow you to
trim off data both at the beginning and end. Alternatively the data stream
contains two segments that are of separate interest. Simply trim the end to
© GTrek Ltd. 2008
- 19 -
Version 2.4
2.
3.
4.
5.
get the first segment and save then wind back the end trim and trim from the
beginning to get the second segment, save the data under a new name.
Data trimmed in this way is not deleted it's just hidden.
Delete Data Segment
Often during a journey if a building is entered, for example lunch, the data
collected by the GTrek can be a bit erratic due to limited signal strength or
signal reflections. This utility allows the user to delete records (permanently)
from the data stream.
Trip Details
By selecting this option details of the trip can be entered. This data is used by
the Profile display and then saved along with the route data.
The time recorded by GTrek is always UTC time (the same as GMT) no
matter where you may be. To correct for the local time zone a correction
value can be applied during download. However if this is not done then it can
be corrected here.
Line Width
This option affects the line width on the Route display only.
5. Google Earth
The Google Earth™ button if pressed will load the
Google Earth™ program and export your visible route
so that it can be viewed on a 3D visualization. Zoom in
on the individual runs and use the tour option to fly
over the route taken. POI data entered is also viable.
4.1 Route
The analysis display has many forms as
follows:-
1. Route.
The route display shows the total route
as recorded. It is topographically correct
and is orientated with north towards the
top.
2. Altitude.
This display shows the vertical or
height path and is displayed in meters
above mean sea level.
3. Speed.
This display shows speed information in
either km/h or mph as selected.
The displayed image can be zoomed in or out as
required with the View menu option, by pressing the "+" or "-" keys on the keyboard or by use
of the mouse wheel.
Clicking the Route Summary option in the view menu or right click menu will show the route
details, which include:1. Vertical distance up and down
2. Distance traveled up, level and down from which the skied distance can be
determined.
3. Average speed over the while journey and the average down speed (it's assumed
that all skiing is skied traveling down. Skiing up hill or on the flat is not counted).
4. Total duration of visible data
© GTrek Ltd. 2008
- 20 -
Version 2.4
5. The number of laps or lifts taken. Note however that if two lifts are taken
consecutively then this counts as one.
In the Settings menu the Trim facility can be selected. This gives you the option of removing
extra data before and after the period in which you are interested.
In the View menu can be found other
useful options:1. Access to the Profile view
2. Show additional data
3. Filtered Data selection
4.2 Altitude
The Altitude display will show height
information of the collected data. The
data here is always displayed in
meters.
If the View->Show Height property is
selected then as the cursor is moved
over the display the detailed Altitude
data is displayed.
Using the Zoom In and Zoom Out
functions will display the data in more
or less detail.
4.3 Velocity
The Speed Analysis display will show
speed information of the collected
data. Scaled data can be either mph
or km/h as selected.
If the view->Show Speed property is
selected then as the cursor is moved
over the display the detailed speed
data is displayed.
Using the Zoom In and Zoom Out
functions will display the data in more
or less detail.
4.4 Profile Display
The Profile Display shows the Altitude
and Speed information on the same graph.
Useful and informative information is displayed
along with data entered on the Trip Details
© GTrek Ltd. 2008
- 21 -
Version 2.4
section. The background picture can also be changed on the Trip Details to one of your own.
Print, Print preview and Exit are accessible through the file menu.
4.5 Rotate Displayed Route
The Route display can be rotated by selecting the Rotate option from the right click menu.
Either use the slider to rotate the display or enter the required angle in the test box and click
Apply. North is assumed to be 0 degrees and the map rotates clockwise through 360
degrees.
If the Route Rotation angle is saved in the .GBF route file, if the angle is changed then the
route file will expect to be updated and you will be prompted to do so when the Analysis
screen in closed.
4.6 Route Summary
The Route Summary function is normally enabled and can be
disabled if required. The Route Summary box can be moved to
other parts of the screen if it is found to be covering important
detail by clicking and dragging the box to another location.
The display can be changed to Km by selecting "Display in Km"
from the View Menu.
The information displayed:
1. Vertical Ascent
Vertical ascent is the distance traveled vertically up.
2. Vertical Descent.
Vertical descent is the distance traveled vertically down.
3. Up Distance.
4.
5.
6.
7.
8.
The up distance is the calculated distance traveling in the up direction, lifts etc. An
average gradient greater than 1:20 is used for the calculation. The actual distance is
calculated from the horizontal plain and corrected for the angle of ascent.
Down Distance.
The down distance is the calculated distance traveling in the down direction, skiing
(probably). An average gradient greater than 1:20 is used for the calculation. The
actual distance is calculated from the horizontal plain and corrected for the angle of
descent.
Level Distance.
The level distance is where movement is detected but no apparent change in altitude
can be observed.
Average Speed.
The average speed is calculated from the total distance covered over the total period.
Average Down Speed.
The Average down speed is calculated from the Down Distance (4 above) and the
total time traveling down. All lifts are removed along with and movement deemed as
level or not moving at all.
Maximum Speed
The maximum speed detected over the period is recorded here. To find exactly where
© GTrek Ltd. 2008
- 22 -
Version 2.4
this point is on the route select the point in the Speed display with the Animation &
POI function and create a Point Of Interest.
9. Event Duration
The event duration is recorded from the date and time of the first displayable record
and the last displayable record and is shown here as hh:mm:ss or if the period is
more than 24 hours as d.hh:mm:ss.
10. Lap Count
Laps are calculated based on a measured altitude difference of more than 50 meters.
4.7 Google Earth
When the Google Earth® button is clicked or
Google Maps is selected a message is displayed
requesting the "smoothing value". The default
value for Google Earth is 4 and for Google Maps is
1. It controls the granularity of the data. A higher
value will result in less data, a lower value will result
in more data with better resolution. However
exporting data to Google Earth with a smoothing value of 1 may cause the tours to be less
than smooth unless you have a very high
performance PC and graphics card to match. This
is not a limitation of Ski-Log but of your
PC. Google Maps can't handle large quantities of
data points. The actual number depends on what
other data is included but 30,000 points should be
a rough rule.
The Google Earth program will be started
automatically. A copy of the displayed data points
will then be exported into the program and
displayed.
Returning to the GTrek program and loading another route which is then sent to Google
Earth™ (which is still running) will display both tracks simultaneously.
Google Earth provides extensive help files and tutorials accessible form the Help Menu.
To use the Tour function double click on the path, press the stop icon to clear any previous
data and click the run button to start the tour.
Tour options can be accessed from the Tools->options menu. Select the Tour tab and select
the options required, an example is below.
© GTrek Ltd. 2008
- 23 -
Version 2.4
If problems are experienced displaying GTrek data in Google Earth or no data is displayed at
all, Select Tools->Options and in the 3D View tab try changing the Display Mode from either
OpenGL or DirectX to the other selection, close GE and re-open.
Ensure you have the latest graphics drivers as GE uses all the features they have to offer.
One condition that has been brought to our attention is that if your PC is configure to use a ","
for a decimal data separator instead of a "." then Google Earth can get very confused.
Change the option by selecting Regional and Language Options in Control Panel.
4.8 Trim Data Stream
The data collected can include information
that is either not relevant or is not desired.
For this purpose data can be trimmed from
the beginning and from the end of the
displayed data stream.
Moving the sliders will remove or replace
displayed data from the current image. The
slider can be dragged with the cursor or moved with the arrow keys once selected for fine
adjustment, the "+" and "-" for small movement and page-up and page-down for course
movement.
Time, date, altitude and speed information from the record is displayed to assist in the
selection. Data trimmed in this way is not actually deleted but hidden and can be retrieved at
any time later.
© GTrek Ltd. 2008
- 24 -
Version 2.4
If data is altered in this way saving the route to a file will retain the selections made.
Click accept to accept changes or cancel to reject. Clicking Reset to Defaults will move the
sliders to the extreme ends displaying all data.
4.9 Delete Data Segment
Often during a journey where a
building is entered, for example
for lunch, the data collected by the
GTrek can be a bit erratic due to
limited signal strength or signal
reflections. This utility allows the
user to delete records
(permanently) from the data
stream.
This facility can be selected from either Route, Altitude
or Speed displays and a selection screen with two
sliders will be displayed. The slider can be dragged
with the cursor or moved with the arrow keys once
selected for fine adjustment, the "+" and "-" for small
movement and page-up and page-down for course
movement.
Moving the sliders will cause the display to indicated
the segment to be deleted by drawing the route in a
thicker line.
Clicking Delete Segment will permanently remove the
data. It is advised that a backup copy of the data be
taken first.
© GTrek Ltd. 2008
- 25 -
Version 2.4
4.10 Animation & POI
When viewing a complex route it can be difficult to
determine the actual route taken.
This animate feature if selected will display an icon on
the route at any time selected or the route can be
played out automatically by clicking Run Animation.
The Speed slider controls the speed on the animation.
To save a Point Of Interest (POI) move the
slider to the required position, in this
example the speed screen is displayed and
the slider has been moved to point at which
maximum speed have been measured
Clicking on the Save POI will bring up a text
entry box, type in here the text for the POI
The POI is then displayed and can be
viewed on the Route, Altitude, Speed and
Profile displays when enabled.
To delete a POI move the Animation slider back to the same
position, the Save POI button changes to Delete POI, clicking this
button will delete the entry.
As many POI's can be entered as required. The information shown
here was provided by Matthew and is also provided in this
installation, open file 28-02-2007 Whistler.gbf which can be
located in MyDocuments/ski-log data files/ folder.
© GTrek Ltd. 2008
- 26 -
Version 2.4
4.11 Trip Details
The Trip Details facility allows the user
to enter personal data regarding the
Route data. The information entered is
displayed on the Profile Display page
and on the Quick Statistics page.
The Profile Picture entry allows the user
to select the background picture used
on the Profile.
The File Name and Duration data are
entered automatically, the
latter is taken is taken from the Route
Summary data.
5. Support
Your GTrek GPS data logger and the GTrek program have
been rigorously tested by system designers and users alike
and all known bugs and problems have been dealt with.
However in the unlikely event of you finding a problem we
would, in the first instance, request that you check out the
FAQ page on the website www.gtrek.co.uk . Secondly send
an e-mail to [email protected] describing the
problem, including the following information
1. Operating System (XP, Win200, Vista etc) (see
General tab in System Properties)
2. Computer type, speed and memory
3. Video card type
4. When your GTrek is connected to your PC can you see an
entry in Ports (COM & LPT) section of the Device Manager
? (see picture)
5. Is your problem with the GTrek installation or the GTrek
program or your GTrek device?
We are always striving to improve the GTrek product. If you find
any aspect difficult to understand or there is a feature you consider would be useful then
please let us know. Send an e-mail to [email protected] and we will give all comments
serious consideration
Register your GTrek via
www.gtrek.co.uk and we will
keep you informed of program
updates or just check the
update page periodically.
© GTrek Ltd. 2008
- 27 -
Version 2.4
Appendix
Appendix A – Specifications
General
Frequency
C/A Code
Datum
L1,1575.42MHZ
1.023MHZ
WGS84
Performance Characteristics
Position Accuracy
Velocity Accuracy
Acceleration
Timing Accuracy
Re-acquisition Time
Hot start
Warm start
Cold start
Sensitivity
Update
Without aid: 3.0m 2D-RMS
<3m CEP(50%) without SA(horizontal)
DGPS (WAAS,EGNOS,MSAS,RTCM):2.5m
Without aid: 0.1m/s
DGPS (WAAS,EGNOS,MSAS,RTCM):0.05m/s
Without aid:<4g
DGPS (WAAS,EGNOS,MSAS,RTCM):<4g
50ns RMS
<1s
1s (Typical)
33s (min)
36s (min)
Acquisition:-144dbm
Tracking:-158dbm
1Hz
Dynamic
Altitude
Velocity
Acceleration
Maximum 18,000m
Maximum 515m/s
Maximum 4g
Power
Input Voltage
Power Consumption
Battery
Vin : 5.0V±10%
40mA
Built-in rechargeable 1000mAH Li-ion battery
I/O
Available Baud Rates
Protocols
115,200 bps
NMEA 0183 v3.01
Environment
Operating Temp.
Storage Temperature
Charging
-10 ~ 60˚C
-20 ~ 60˚C
0 ~ 45˚C
Bluetooth
Standard
Output Power
Range
Bluetooth Profile
Frequency
Security
Fully compliant with Bluetooth V1.2
0dbm (Typical),Class II
Up to 15 meters
Serial Port Profile (SPP)
2.4G ~ 2.4835GHz ISM Band
Yes
USB Bridge
Standard
Full - speed
Fully compliant with USB 2.0
12Mbps
Dimension
GTrek
Weight
© GTrek Ltd. 2008
46.5 x72.2 x20 mm
60g (including battery)
- 28 -
Version 2.4
Data Log
16Mb serial Flash ROM
Up to 100,000 way points (typically 70,000)
Log GPS data by time interval/ distance/ speed limit.
Log GPS data by button push.
User can configure settings by using utility.
© GTrek Ltd. 2008
- 29 -
Version 2.4
Appendix B – Certification
FCC Notices
This device complies with part 15 of the FCC rules. Operation is subject
to the following two conditions:
1. This device may not cause harmful interface, and
2. This device must accept any interference received, including
interference that may cause undesired operation.
FCC RF Exposure requirements:
This device and its antenna(s) must not be co-located or operated in
conjunction with any other antenna or transmitter.
NOTE: THE MANUFACTURER IS NOT RESPONSIBLE FOR ANY
RADIO OR TV INTERFERENCE CAUSED BY UNAUTHOURIZED
MODIFICATION TO THIS EQUIPMENT. SUCH MODIFICATIONS
COULD VOID THE USER’S AUTHORITY TO OPERATE THE
EQUIPMENT.
Industry Canada Caution
The installer of this radio equipment must ensure that the antenna is
located or pointed such that it does not emit RF field in excess of Health
Canada limits for the general population; consult Safety Code 6,
obtainable from Health Canada's website.
"www.hc-sc.gc.ca/rab"
© GTrek Ltd. 2008
- 30 -
Version 2.4
CE Notices
Is herewith confirmed to comply with the requirements set out in the
Council Directive on the Approximation of the Laws of the Member
States relating to Electromagnetic Compatibility (89/336/EEC),
Low-voltage Directive (73/23/EEC) and the Amendment Directive
(93/68/EEC), the procedures given in European Council Directive
99/5/EC and 89/3360EEC.
The equipment was passed. The test was performed according to the
following European standards:
- EN 300 328-2 V.1.2.1 (2001-08)
- EN 301 489-1 V.1.4.1 (2002-04) / EN 301 489-17 V.1.2.1 (2002-04)
- EN 50371: 2002
- EN 60950: 2000
© GTrek Ltd. 2008
- 31 -
Version 2.4
Appendix C – Warranty Information
Thank you for purchasing the GTrek product.
The company warrants this product to be free from defects in materials
and workmanship for one year from the date of purchase. The warranty
for accessories is also 12 months. The stamp of distributor or a copy of
the original sales receipt is required as the proof of purchase for warranty
repairs. The company will, as its sole option, repair or replace any
components, which fail in normal use. Such repair or replacement will be
made at no charge to the customer for parts or labor. The customer is,
however, responsible for any transportation costs.
This warranty does not cover failures due to abuse, misuse, accident or
unauthorized alteration of repairs. The company assumes no
responsibility for special, incidental punitive or consequential damages,
or loss of use.
© GTrek Ltd. 2008
- 32 -
Version 2.4