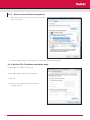
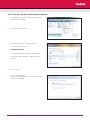
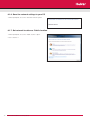
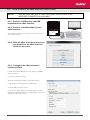
1
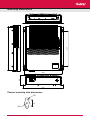
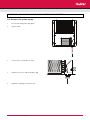
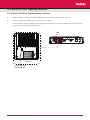
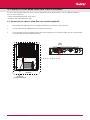
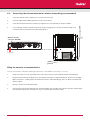
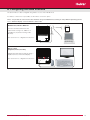
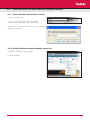
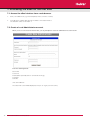
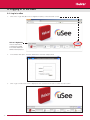
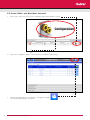
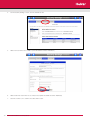
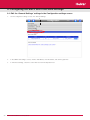
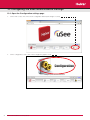
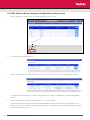
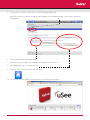
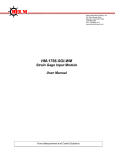
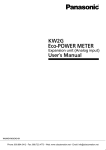
uSee Interface
Installation and Set-Up Guide
Introduction
The Helvar uSee Interface enables you to use a web browser to access and control a Helvar Router lighting control system.
It is a hardware and software platform that, used in conjunction with a Helvar Router system, allows the user to view the system,
select scenes, programme new scene levels, apply alternate scene and group names, and monitor energy use.
The uSee interface provides both wired and wireless connectivity to all popular web browsing devices, such as an iPad, and
provides an easy to use, intuitive graphical means of control of the lighting system.
1: Mount to wall
Mounting, Environmental and Clearance Requirements
Mounting
•
•
•
•
Mount the unit on a flat surface.
Use No.8 or No. 10 screws with a head diameter between 6 mm and 9 mm.
Use wall plugs if necessary.
Refer to the ’Mounting Dimensions’ diagram on the next page.
Environment
•
•
•
•
The ambient temperature must be between 0ºC and 40ºC.
Air humidity must be between 0% and 90% (non-condensing).
The area must be adequately ventilated.
Do NOT install this product in a damp location.
Clearance
• Leave sufficient clearance (at least 100 mm) to allow cables to be connected.
2
Helvar uSee Installation and Set-Up Guide
217
279
Mounting dimensions
59
219
234
Chassis mounting hole dimensions
R3
14
R4.5
3
Helvar uSee Installation and Set-Up Guide
2: Electrical installation
WARNING: BEFORE COMMENCING ANY ELECTRICAL WORK, ISOLATE THE
ELECTRICITY SUPPLY AT THE MAIN DISTRIBUTION BOARD.
2.1: Remove the cover
1.
Remove the two screws securing the cover.
2.
Tilt the cover and slide it backwards
2.2: Attach the cable gland
1.
4
Attach the (supplied) cable gland for the mains cable.
Helvar uSee Installation and Set-Up Guide
WARNING:
THE SUPPLY INPUT EARTH MUST BE CONNECTED.
2.3: Connect the mains supply
1.
Pass the wire through the cable gland
2.
Strip the cable
3.
Connect the L, N and Earth as shown
E
N
L
3.
Pull back any excess cable through the grip
4.
Tighten the cable grip to retain the wire
Helvar uSee Installation and Set-Up Guide
5
3: Connect to the Lighting Network
3.1: Connect the Helvar ‘Lighting Router’ network
1.
Plug the Ethernet cable from the Helvar ‘Lighting Router’ network into ‘Port 1’ on the uSee unit
2.
Push the cable into the rubber grommet as it exits the enclosure
3.
Leave sufficient clearance around the uSee unit to give enough space to ensure the cables are not crushed or bent
in a manner that may affect their performance.
LAN
port 1
Rubber
grommet
To Helvar Lighting
Network Router
Helvar uSee Installation and Set-Up Guide
6
4: Connect to the uSee Interface from a browser
To access and control the uSee unit, connect using a web browser on an external device, such as a laptop or tablet PC.
You can connect either via:
- a direct wired Ethernet network connection or
- a wireless LAN connection (802.11b/g)
4.1: Connecting to a direct wired Ethernet network (optional)
1.
Plug the Ethernet cable from the local computer network in to ‘LAN Port 2’ on the uSee unit.
2.
Push the cable into the rubber grommet as it exits the enclosure.
3.
Leave sufficient clearance around the uSee unit to give enough space to ensure the cables are not crushed or bent
in a manner that may affect their performance.
LAN
port 2
Rubber
grommet
To Local
Computer Network
7
Helvar uSee Installation and Set-Up Guide
4.2:
Connecting the external antenna for wireless networking (recommended)
1.
Screw the external antenna cable in to the socket of the uSee unit
2.
Push the cable into the rubber grommet as it exits the enclosure
3.
Screw the antenna into the base. The base is magnetic for secure mounting on ferrous materials
4.
Leave sufficient clearance around the uSee unit to give enough space to ensure the antenna cable is not
crushed or bent in a manner that may affect performance.
Wireless antenna
connector, RP-SMA
Rubber
grommet
Siting the antenna: recommendations
These recommendations will help in optimizing the performance and reliability of the wireless connection:
8
1.
Set up your router as close as possible to the centre of the area you want to provide wireless networking for.
2.
Keep the antenna away from objects that cause wireless interference. Large metal objects, fluorescent or halogen
lights, microwaves, cordless phones and their base stations, and wall ducting or vents can block or interfere with
wireless signals.
3.
Place the antenna in an elevated location.
4.
Point the top of the antenna upwards if it is positioned below the coverage area. Point the top of the antenna down
if it is positioned above the coverage area, e.g., if it is wall-mounted near the ceiling.
Helvar uSee Installation and Set-Up Guide
5: Replace cover and power uSee Interface on
5.1:
Replace the cover
1.
Tilt the cover so the front pegs locate in to the slots
and slide it forwards.
2.
Push the bottom of the cover downwards and secure
it with the two retaining screws.
5.2:
Switch on mains power supply and check operation
1.
Switch on the mains power supply.
2.
Check that 12 V power is being supplied: the PWR and HDD LEDs at the top of the unit should be on (PWR) and
flashing (HDD).
Diagram: HDD and PWR indicators
With the unit powered on, you can now configure the uSee Interface: see the next section for details.
Helvar uSee Installation and Set-Up Guide
9
6: Configuring the uSee Interface
The uSee Interface is best configured using wireless access and a web browser.
If a wireless connection is not possible, use the ‘Direct connection’ option.
Note 1: It is possible to connect to the uSee Interface using a standard browser, running on many different operating systems.
Note 2: Minimum display screen resolution is 1024 x 768.
Web browser, wireless Ethernet
Connect via wireless Ethernet to the
uSee Interface using a PC, tablet PC or
smartphone (any device running a web
browser).
See section 6.1 for configuration instructions.
Direct control
(keyboard, mouse, monitor)
Operate the uSee Interface directly, using a
keyboard, mouse and monitor/display.
See section 6.2 for configuration instructions.
Helvar uSee Installation and Set-Up Guide
10
6.1: Initial access to the uSee Interface: Wireless Ethernet
6.1.1. Open ‘Network Connections’ window
1. Click the Windows logo.
2. Access ‘ncpa.cpl’ from the Windows Search box.
(On Windows XP, use the Start > Run... dialogue box)
The Network connections window can also be accessed via the
Windows Control Panel.
6.1.2. Access Wireless Network Adapter properties
1. Right-click the wireless network adapter
2. Select ‘Properties’
11
Helvar uSee Installation and Set-Up Guide
6.1.3. Access Internet Protocol properties
1.
Select the ‘Internet Protocol item. If more than one is listed,
select the IPv4 item.
2.
Click the ‘Properties’ button: the ‘Internet Protocol (TCP/IP) Properties window opens.
6.1.4. Set the PC’s IP address and subnet mask
1. Click ‘Obtain an IP address automatically’
2. Click ‘Obtain DNS server address automatically’
3. Click ‘OK’
4. Click ‘Close’ in the ‘Wireless Network Connections
Properties’ window
12
Helvar uSee Installation and Set-Up Guide
6.1.5. Connect the PC to the wireless network
13
1.
In the ‘Network Connections’ window, right-click the
wireless network adapter.
2.
Select ‘Connect/Disconnect’
3.
Select the uSee Interface’s wireless network.
The network SSID will be :
HELVARuSeeXXXXX
where XXXXX is the uSee Interface’s serial number,
The serial number is printed on a label on the uSee
Interface.
4.
Click ‘Connect’
5.
Click ‘Connect Anyway’
(when warned that information on this network may be
visible to other people)
Helvar uSee Installation and Set-Up Guide
6.1.6. Save the network settings to your PC
1. When prompted, choose the ‘Save this network’ option
6.1.7. Set network location as ‘Public location’
1. When prompted, choose the ‘Public location’ option.
2. Go to Section 7
14
Helvar uSee Installation and Set-Up Guide
6.2: Initial access to the uSee Interface: Direct Control
NOTE:
THIS ACCESS METHOD IS ONLY REQUIRED WHEN THERE IS NO
WIRELESS CONNECTION AVAILABLE.
6.2.1. Connect a USB mouse and USB
keyboard to the uSee Interface
6.2.2. Connect a monitor/display to the
uSee Interface.
The uSee Interface video port is VGA: you may need to use a
DVI to VGA converter.
6.2.3. With the uSee Interface powered on,
you should see the uSee Interface
initail set-up screen
6.2.4. Configure the uSee Interface’s
network settings
Consult the network administrator for IP settings compatible
with your network.
1a. Click on ‘Network Settings’
1b. Enter the required IP address of the uSee Interface.
1c. Enter subnet mask, Gateway, and DNS values.
1d. Click ‘Apply’, and then ‘Close’
Discovery of a workgroup and any further setup of the uSee
Interface should be managed via the Configuration section of its
web interface (see next section)
15
Helvar uSee Installation and Set-Up Guide
7: Accessing the uSee for the first time
7.1: Access the uSee Interface from a web browser
1.
Start your web browser (e.g. Internet Explorer, Firefox, Chrome or Safari)
2.
In the browser’s address bar, type the IP address of the uSee Interface.
The default IP adress is 192.168.1.1.
7.2: Create a Local Administrator account
When you access the uSee for the first time, you are prompted to create an administrator account for unit.
Enter the following details:
User name
Password
Email address (Used by uSee to send results and logs)
Forename
Surname
16
and click ‘Add User’
The uSee main screen will be displayed, and you can log in (see next section)
Helvar uSee Installation and Set-Up Guide
8: Logging in to the uSee
8.1: Log in to uSee
1.
Click on the ‘Login’ link (above the ‘Configuration’ button) on the uSee main screen.
Helvar’s Nightclub
‘Helvar’s Nightclub’ is
a workgroup included
in the uSee module for
demonstration purposes.
17
2.
In the window that opens, enter the administrator username and password
3.
Click ‘Log In’ and the main screen is displayed. Now create two more user accounts: see next section.
Helvar uSee Installation and Set-Up Guide
8.2: Create ‘Editor’ and ‘BasicUser’ Accounts
18
1.
On the main screen, click on the small ‘Configuration’ button (bottom right of screen)
2.
Click on the Configuration graphic or text to open the Configuration options page
3.
Click the ‘Security Settings’ icon (top right of ‘Configurations page).
The Security Settings page screen opens.
Helvar uSee Installation and Set-Up Guide
19
4.
On the Security Settings screen, click the ‘Add User’ tab:
5.
Add a new user in the role of ‘Editor’ (enter the details and click ‘Add User’)
6.
Add another new user in the role of a ‘Basic’ User (enter the details and click ‘Add User’)
7.
Click the ‘Home’ icon to return to the uSee main screen.
Helvar uSee Installation and Set-Up Guide
9: Configuring the SMTP and Time Zone Settings
9.1: Edit the ‘General Settings’ settings in the Configuration settings screen
20
1.
On the Configuration settings screen, click ‘General Settings’
2.
In the ‘SMTP mail settings’ section, click the ‘Edit’ button, enter the details, and click the green tick.
3.
In Time Zone Settings, select the correct time zone from the drop-down list.
Helvar uSee Installation and Set-Up Guide
10: Configuring the uSee Wired Network Settings
10.1: Open the Configuration settings page
21
1.
On the main screen, click on the small ‘Configuration’ button (bottom right of screen)
2.
On the configuration screen, click on the Configuration graphic or text
Helvar uSee Installation and Set-Up Guide
10.2: Edit ‘Network Setup’ settings in Configuration settings screen
22
1.
On the Configuration settings screen, click ‘Network Setup’ (bottom of screen)
2.
The network settings will be displayed
3.
Click the ‘Edit’ button for the Router Network Connection (connection from uSee unit to the lighting router system).
Consult the network administrator or commissioning engineer for IP settings compatible with your LIGHTING ROUTER
network.
4.
Edit the network settings , and click the green ‘tick’ icon, to save the settings.
Having changed network settings for the Router Network Adapter it may take several minutes for Workgroups on that
Ethernet network to be seen by the uSee unit. Refresh this page on a regular basis until the expected Workgroups appear
in the Workgroup Settings section.
Helvar uSee Installation and Set-Up Guide
5.
Check that the connection has been made: click the ‘Workgroup Settings’ bar.
When the connection is made, the workgroup name will appear in the ‘Workgroup Settings’ section of the Configuration
Settings page.
6.
Click the drop-down list of workgroups.
7.
When the connection is made, the workgroup name will appear in the list: select it.
8.
Click ‘Minimal Discover’ or ‘Complete Discovery’
9.
Click the ‘Home’ icon to return to the uSee main screen.
10. You can now control the lighting system using uSee: see the user manual for details.
23
Helvar uSee Installation and Set-Up Guide
Technical Data
Power
Mains supply voltage: 88 - 264 VAC; 47 - 63 Hz
Power consumption:
14 W
Protection:
Max. 6 A MCB
Supply current:
0.55 A / 230 V
Cable Requirements
Gland cable range:
Diameter: 5 - 10 mm
Mechanical Data
Dimensions (L x W x H): See diagrams on page 10.
Weight:
2.5 kg
IP rating:
IP20
Installation
Mounting:
Wall mounted. Refer to mounting dimensions and clearance diagrams
Operating and Storage Conditions
Ambient Temperature:
0ºC to 40ºC
Storage Temperature:
-10°C to 70°C
Relative Humidity:
Max 90%, non-condensing
Conformity and Standards
EMC
Emission:
EN 55022
Immunity: EN 61000
Safety:
EN 60950
Isolation:
3 kV
Environmental:
Complies with WEEE and RoHS directives
Class A product:
This is a Class A product. In a domestic environment this product may cause radio interference in
which case the user may be required to take adequate measures.
www.helvar.com
18:05:2012
Helvar uSee Installation and Set-Up Guide
Doc. 7860285, issue 01
Data subject to change without notice