1
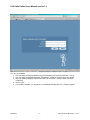
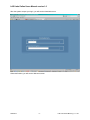
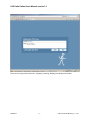
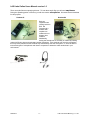
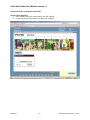
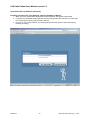
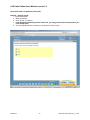
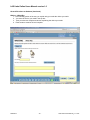
LAS Links Online User’s Manual 2011
LAS Links Online Users Manual version 1.0
To Log in as a student:
1. Use your teacher-assigned Student Login ID (something like Phil-Hue-θ1θ1[zero 1 zero 1]
2. Use your teacher-assigned password (6 characters - usually a word and some number[s])
3. Use your teacher-assigned Test Access Code (10 characters - usually a word and some
number[s])
4. Click “Log In”
5. If you make a mistake, you will get an error message indicating the error. Please try again.
4/26/2013
-2-
LAS Links User's Manual_v 1 1.doc
LAS Links Online Users Manual version 1.0
After the system accepts your login, you will see the download screen.
When this finishes, you will see the Welcome screen.
4/26/2013
-3-
LAS Links User's Manual_v 1 1.doc
LAS Links Online Users Manual version 1.0
There are four (4) sections of the test – Speaking, Listening, Reading and Writing in that order.
4/26/2013
-4-
LAS Links User's Manual_v 1 1.doc
LAS Links Online Users Manual version 1.0
There are audio files accompanying this test. To hear these audio files you will need earphones.
During the Speaking portion of the test, you will also need a microphone. We tested several headsets
for this purpose.
Headset #1
Headset #2
Both are
GigaWare sets
costing less than
$20. We
recommend a
headset with
earphone so
students do not
distract other
students.
Additionally,
having the microphone too far away or muffled by clothing
makes it difficult to hear and understand spoken responses. If the students can mute the microphone,
this may cause problems as the students may inadvertently mute the microphone. It would be wise to
test several types of microphones and listen to responses to determine which works best in your
environment.
4/26/2013
-5-
LAS Links User's Manual_v 1 1.doc
LAS Links Online Users Manual version 1.0
Instructions for the Proctor
General Directions:
1. Use the Go on to move to the next item
2. The arrows at the bottom of the screen are for reference and not navigation
3. The boxes with the lines are sample items.
4. The individual numbers refer to questions and are for reference only.
5. Become familiar with the test by reviewing a few items
6. Ensure the microphone is plugged in and the system received the signal of the recording (you
may want to test this ahead of time).
7. The test has no time limit, but make sure students understand they should not linger in one
question for a long time, as this may not be the way they wish to invest their time.
4/26/2013
-6-
LAS Links User's Manual_v 1 1.doc
LAS Links Online Users Manual version 1.0
Instructions for the Student
General Directions:
1. Caution: Make sure you listen to each direction entirely
2. Think carefully about your response
3. Click the red button to record your response.
4. You may repeat the directions by clicking the “Repeat” button
5. If you wish to re-record your response, you may click the “STOP” button (with the black square).
Then click the “Start Over” indicator (large black oblong) and your new response will overwrite
your previous response
6. “Start Over” only works after the “STOP” button is clicked
7. Repeatedly re-recording will probably not help very much and may frustrate you in the process
8. Once you are done, click Go On to do the next question
9. You cannot go back to the questions once you click Go On.
10. Start recording only when the directions are complete. Otherwise, the directions and your
response may overlap.
11. Make sure you speak clearly and directly into the microphone
12. Time indicator in the Sound Recorder box shows how much time is remaining to capture your
response
4/26/2013
-7-
LAS Links User's Manual_v 1 1.doc
LAS Links Online Users Manual version 1.0
General Directions to Students (Continued):
1. You will see a blue ball above each box at the bottom of the screen as you progress. This
indicates your progress and is for reference only
2. The red ball and the “RECORDING” indicator show the test is capturing your response
3. When you plug in the microphone, the computer recognizes this. The computer also knows when
you click the “Record” button. If you inadvertently mute the microphone, the computer cannot
recognize this and you may give a brilliant response that goes unrecorded. Therefore, be wary
of the mute potential of the microphone.
4/26/2013
-8-
LAS Links User's Manual_v 1 1.doc
LAS Links Online Users Manual version 1.0
General Directions to Students (Continued):
On screen indicators:
1. By hovering the mouse over the buttons, the button’s name appears (see “Record” below)
2. The “STOP” button’s name in show on the following page
3. Additionally, there may be indicators in the graphic as shown with the arrow below.
4/26/2013
-9-
LAS Links User's Manual_v 1 1.doc
LAS Links Online Users Manual version 1.0
General Directions to Students (Continued):
On screen indicators:
1. The “STOP” button name is shown below
4/26/2013
- 10 -
LAS Links User's Manual_v 1 1.doc
LAS Links Online Users Manual version 1.0
General Directions to Students (Continued):
Not Answering a Question
1. If you intentionally want to skip a question, you may click the “Go On” without answering.
2. The screen below appears, to ensure you realize you have not yet answered the question.
3. At this point, you may answer or you may chose not to answer
4. In this test, it is better to guess an answer rather than not answer because you may guess
correctly.
4/26/2013
- 11 -
LAS Links User's Manual_v 1 1.doc
LAS Links Online Users Manual version 1.0
General Directions to Students (Continued):
Telling a Story Question:
1. Think carefully about your answer before you click “Record”
2. You will only have 120 seconds to complete your response
4/26/2013
- 12 -
LAS Links User's Manual_v 1 1.doc
LAS Links Online Users Manual version 1.0
General Directions to Students (Continued):
Finishing a Section of the Test (Speaking, Listening, Reading or Writing):
1. When you have answered the last question in the section you will get the screen below
2. If you have not answered the last question (only the last) question in the section, you may return
to it at this point by clicking “No, go back to the test”
3. If you click, “Yes, I have finished”, you will be guided to the next portion of the test (Listening,
Reading or Writing)
4/26/2013
- 13 -
LAS Links User's Manual_v 1 1.doc
LAS Links Online Users Manual version 1.0
General Directions to Students (Continued):
Listening:
1. Directions are automatic for the sample items in a group.
2. When the directions are complete, the “STOP” button will become a “Listen” button.
3. Clicking the “Listen” button will give the background and the question
4. For the sample questions only, the “More Instruction” button will indicate the correct response
5. Click “Go On” to hear the next question.
6. Always click “Listen” for the background and the question
4/26/2013
- 14 -
LAS Links User's Manual_v 1 1.doc
LAS Links Online Users Manual version 1.0
General Directions to Students (Continued):
Listen in the Classroom:
1. The directions are given automatically with the sample questions
2. Click the “Story” button to hear the story for the next few questions. You will hear the story only
once.
3. After the story, click the “Listen” button to hear the question. Choose your answer
4. In the sample questions, the “More Instruction” button will indicate the correct answer
4/26/2013
- 15 -
LAS Links User's Manual_v 1 1.doc
LAS Links Online Users Manual version 1.0
General Directions to Students (Continued):
Reading – Analyze words:
1. The directions are given automatically for the sample questions
2. The “Repeat” button is originally a “STOP” button to stop the directions
3. Read the instructions and choose your answer.
4. In the sample questions, the “More Instruction” button will indicate the correct answer
4/26/2013
- 16 -
LAS Links User's Manual_v 1 1.doc
LAS Links Online Users Manual version 1.0
General Directions to Students (Continued):
Reading – Analyze words:
1. Read the question
2. Mark you answer
3. Click “Go On” to continue.
4. In the Reading and Writing portions of the test, you may go back and review questions you
have already seen.
5. You may skip ahead and come back to questions for further review.
4/26/2013
- 17 -
LAS Links User's Manual_v 1 1.doc
LAS Links Online Users Manual version 1.0
General Directions to Students (Continued)
Writing:
1. In the Writing portion of the test, you will have a chance to write an answer to questions
2. Always write in the space provided. The space will expand to allow you to write as much as you
want.
3. Always write in full, complete sentences.
4. The directions are given automatically for the sample questions
5. The “STOP” button becomes a “Repeat” button once the directions have finished
6. Read the instructions and choose your answer.
7. In the sample questions, the “More Instruction” button will indicate the correct answer
8. The keyboard is a standard computer keyboard. It will not accommodate accent marks or special
characters.
4/26/2013
- 18 -
LAS Links User's Manual_v 1 1.doc
LAS Links Online Users Manual version 1.0
General Directions to Students (Continued)
Writing – Write Why:
1. In this Writing portion of the test, you explain why you made the choice you made.
2. You enter the choice you made in the top box
3. Then you write two complete sentences explaining the choice you made.
4. Each sentence must be full and complete
4/26/2013
- 19 -
LAS Links User's Manual_v 1 1.doc
LAS Links Online Users Manual version 1.0
Instructions for the Administrator
General Directions:
The Network Utility is a suite of tools for confirming that:
1. Student workstations are properly connected and configured to connect to the CTB
servers.
2. Your network has the capacity to support all workstations scheduled to be used for
testing at the same time.
3. Workstations to be used for students with "read aloud" testing accommodations can
successfully convert text to speech.
The utility can be run by anyone, requires no network knowledge, and takes just a couple of
minutes to complete. It lets you test your system for the number of workstations you plan to use
and save the results from each test for troubleshooting the system if necessary.
You do not need to install the software on all workstations at your site before you run the
Network Utility. It can be installed on a single workstation to give you useful information on
connectivity and bandwidth.
There are three tabs in the Network Utility, each with a separate testing purpose:
1. The Network Connectivity Test confirms that the workstation can connect to the CTB
servers to conduct online testing.
2. The Bandwidth Simulation confirms that your internet capacity is big enough for the
number of test workstations you plan to use simultaneously. This test simulates the
bandwidth used by your workstations and indicates the likelihood of interruption-free
service.
3. The Text to Speech Test confirms that the workstation can run a complete conversion
session with the CTB text-to-speech (TTS) server, for those students with "Read Aloud"
testing accommodations.
When to run the tests
First, be sure you have configured your network settings and your student workstation according to the
current configuration checklists provided by CTB and that your network is up and functioning normally.
While running tests with this tool ahead of time cannot predict your network traffic at the time of testing,
running this utility does help assure that the workstation is properly configured to connect with the CTB
application servers.
Testing times: Run the Network Utility at those times when students would be taking the online test.
Internet traffic: Run the Network Utility during those periods that your internet experiences its heaviest
load. If you don't know when those periods are, run the Network Utility at various times during the day and
compare results. The bandwidth test takes less than a minute to run.
Accessing the Network Utility
4/26/2013
- 20 -
LAS Links User's Manual_v 1 1.doc
LAS Links Online Users Manual version 1.0
When you install the Online Assessment software on the student workstation, the Network Utility is placed
in the Online Assessment folder. You can then access the utility from your menu:
On a PC, select Start > All Programs > CTB > Online Assessment > Network Utility.
On a Mac, select the Finder > Applications > Online Assessment > Network Utility.
On Linux, navigate to the folder in which you installed the Online Assessment software and
select /Online Assessment/Network Utility.
4/26/2013
- 21 -
LAS Links User's Manual_v 1 1.doc
LAS Links Online Users Manual version 1.0
Test Administration Features
General Directions:
1. To create a Test Session:
a. Click on Schedule Test Session in the Left Menu Bar
b. When the screen appears, choose LAS Links Form A or B
c. By default all grade levels appear. Choose the grade span that you wish to test.
d. One you choose a grade span, some other questions appear.
4/26/2013
- 22 -
LAS Links User's Manual_v 1 1.doc
LAS Links Online Users Manual version 1.0
Test Administration Features
General Directions:
1. To finish creating a Test Session: Test Security
a. For test Security, you may create your own test access code or use the computer
generated one. Either is fine.
b. Then you can decide if you want to test all four subtests (Speaking, Listening, Reading
and Writing) or fewer.
c. If you decide to test fewer than all subtests, you may choose the subtests to include.
4/26/2013
- 23 -
LAS Links User's Manual_v 1 1.doc
LAS Links Online Users Manual version 1.0
Test Administration Features
General Directions:
1. To finish creating a Test Session: Add Time, Date and Location
a. Click Next button at the bottom
b. The screen below will appear
c. You may indicate the date, time and location for the test session
4/26/2013
- 24 -
LAS Links User's Manual_v 1 1.doc
LAS Links Online Users Manual version 1.0
Test Administration Features
General Directions:
1. To finish create a Test Session: Add Students
a. You may add Students to the test session
b. Click on Add Student button
c. Follow directions on the following page
4/26/2013
- 25 -
LAS Links User's Manual_v 1 1.doc
LAS Links Online Users Manual version 1.0
Test Administration Features
General Directions:
1. To Add a Student to a Test Session
a. Click on Add Student in the left-hand menu bar
b. The screen below will appear
c. Enter the Student Name, Date of Birth, Grade and Gender in the form below. Middle
Name, Student ID, Student ID2, Purpose of Test are optional.
d. To choose an organization, the organization must already be entered into the System.
e. Click on the Name of the Test on the right
4/26/2013
- 26 -
LAS Links User's Manual_v 1 1.doc
LAS Links Online Users Manual version 1.0
Test Administration Features
General Directions:
1. To Add a Student to a Test Session (Continued)
a. The School name will appear (must already be in the system)
b. Click on the School Name (not in the check box)
4/26/2013
- 27 -
LAS Links User's Manual_v 1 1.doc
LAS Links Online Users Manual version 1.0
Test Administration Features
General Directions:
1. To Add a Student to a Test Session (Continued)
a. The Class Name will appear (must already have been added)
b. Click in the check box
4/26/2013
- 28 -
LAS Links User's Manual_v 1 1.doc
LAS Links Online Users Manual version 1.0
Test Administration Features
General Directions:
1. Print test tickets for students participating
2. Depending on level of security desired, you may print Individual Tickets, Group Tickets or
Summary Ticket
4/26/2013
- 29 -
LAS Links User's Manual_v 1 1.doc
LAS Links Online Users Manual version 1.0
Test Administration Features
General Directions:
1. Speaking Scoring
a. The proctor will score the Speaking and Writing portions of the test
b. Choose “Student Scoring” from the left-hand menu bar
c. You will see the screen below
d. You may enter the Student’s Name and click “Search”
e. Or you may do a broader search
4/26/2013
- 30 -
LAS Links User's Manual_v 1 1.doc
LAS Links Online Users Manual version 1.0
Test Administration Features
General Directions:
1. Speaking Scoring (Continued)
a. You may enter the Grade and search all the Students who sat for the test in that grade
b. You may find the Test name and search through everyone who took the test
c. Once you find the appropriate student, click on his/her Login ID
4/26/2013
- 31 -
LAS Links User's Manual_v 1 1.doc
LAS Links Online Users Manual version 1.0
Test Administration Features
General Directions:
1. Speaking Scoring (Continued)
a. Once you find the appropriate student
b. His/Her results appear. The Item number is in the left column, the Rubric for that item is
in the next column. The subtest is the next column, followed by “View Question”.
Clicking here allows the proctor to see the Question. The next column contains the
Student response.
c. To access the response, you must click on “Audio Response. You will be able to heat=r
the response either through the computer speakers or earphones.
Hand-entering scores
This feature is currently available only to LAS Links customers with Constructed Response and
listening/speaking questions in their test.
There are several approaches to hand-entering scores, depending on the situation. You can
elect to score responses for individual students whose scoring needs to be completed or
modified by clicking the Student Scoring link on the main menu. Alternatively, you can score by
test session and then elect to score all of each student's responses for the entire test session,
one student at a time, or to score one item for all students before scoring the next item.
4/26/2013
- 32 -
LAS Links User's Manual_v 1 1.doc
LAS Links Online Users Manual version 1.0
Once scoring has been completed, you can Export Data Reports for the test session.
Scoring one student at a time
1. From the Score menu, click Student Scoring.
2. Find a student whose results you want to score:
-To find a list of all students, select the test name and click Search.
-To find a specific student or a list of students with similar criteria (all students with the
last name "Smith" or all students with Incomplete scores, for example) select or enter the
criteria on which to search and click Search.
3. From the list of students returned, click the Login ID of he student to score. This opens
the Individual Student Scoring page. The student's test status for the test session must
be Completed in order to enter scores for the student.
4. Click Audio Response to score a question with an audio (recorded) response, or click
Text Response to score the text of a written response.
For each test question, you can click a link to view the rubric, view the question, and
view the response to score. If a response has already been scored, you can rescore the
response if needed..
5. A separate scoring window opens in front of the list of item. Read or listen to the
response, select a score from the list, and click Save.
6. When you have finished scoring or changing scores for a student, click Back to return to
the list of students to select another and continue scoring.
Scoring the test session by student or by item
1. From the Test menu, click Find Test Session.
2. Select the test session to score and click either Score by Student or Score by Item.
3. If you select to Score by Student, a Find Student page displays a list of all students
assigned to the test session whose test status is Completed.
Follow the steps above for Scoring one student at a time, beginning with step 3, until all
student scoring is finished for the test session.
4. If you select to Score by Item, a List of Items page opens. It lists all items by Item
Number, Subtest Name, Item Type, and Maximum Score possible.
5.
6.
7.
8.
9.
Click an Item No. link to open a new page that summarizes the test session and item
information at the top, and lists all students in the test session whose test status is
Completed. There are links at the top that allow you to View Item and View Rubric for
the item.
Click a Student ID to open a scoring window in front of the list. Read or listen to the
response, select a score from the list, and click Save.
Continue selecting students by Student ID from the list until all student responses for
the item have been scored.
Click Back to return to the List of Items page.
Click another Item No. to score by student. Repeat from step 4 until all items have been
scored for all students.
When scoring has been completed for the test session, click Home or select another
task from the menu.
4/26/2013
- 33 -
LAS Links User's Manual_v 1 1.doc
LAS Links Online Users Manual version 1.0
Test Administration Features
General Directions:
1. Speaking Scoring (Continued)
a. After choosing response to hear, you will see the screen below
b. Click on the Orange Triangle to play the response.
4/26/2013
- 34 -
LAS Links User's Manual_v 1 1.doc
LAS Links Online Users Manual version 1.0
Test Administration Features
General Directions:
1. Speaking Scoring (Continued)
a. Choose the appropriate score from the drop-down box. (You may refer to the rubrics at
the same time.)
b. Click Save
c. Click the red X in the upper right-hand corner of the Audio window to close this item.
4/26/2013
- 35 -
LAS Links User's Manual_v 1 1.doc
LAS Links Online Users Manual version 1.0
Test Administration Features
General Directions:
1. Speaking Scoring (Continued)
a. An example of displaying the rubric while listening to the response
b. The Rubric also presents sample responses
4/26/2013
- 36 -
LAS Links User's Manual_v 1 1.doc
LAS Links Online Users Manual version 1.0
Test Administration Features
General Directions:
2. Speaking Scoring (Continued)
a. An example of viewing the question while scoring
Talk about view question
4/26/2013
- 37 -
LAS Links User's Manual_v 1 1.doc
LAS Links Online Users Manual version 1.0
Test Administration Features
General Directions:
2. Writing Scoring (Continued)
a. Writing follows the Speaking portion of the test
b. To access the response, you must click on “Response. You will be able to see the
response the student entered
c. You may score the response in a manner similar to the Speaking subtest
d. Be sure to Save the scores
4/26/2013
- 38 -
LAS Links User's Manual_v 1 1.doc
LAS Links Online Users Manual version 1.0
Test Administration Features
General Directions:
3. Exporting Scores
4/26/2013
- 39 -
LAS Links User's Manual_v 1 1.doc