1
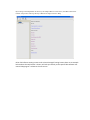
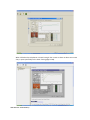
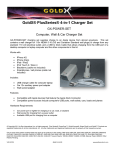
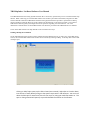
TBS Help Index / On Board Software User Manual
The TBS 2000 Functional Testing Systems Software has a convenient, quick and easy access on board software help
manual. While a hard copy of on board TBS software user manual is provided in this manual, integration of TBS
software manual contained in TBS 2000 Functional Testing Systems Software provides a quick reference during
testing if needed or when the hard copy of the software user manual may not be easily accessible. The on board
TBS software manual guides you through and answers questions regarding use of the software. All of the
information contained in the on board TBS software user manual is provided in this TBS Software User Manual.
The on board TBS software user help manual can be accessed several ways.
Clicking On Help In Commands
On the TBS 2000 Functional Testing Systems software Program Manager Screen, as well as any of the TBS testing
screens, the on board TBS software user manual can be accessed by Clicking on Help. In the drop down menu Click
on Help Topics.
Clicking on Help Topics opens up the TBS on board user manual / Help Index. It is broken down into sections to easily identify and go to the specific topics with in TBS software. You can scroll down the TBS topics or areas listed, then Click on topic or listing you need information on. The topic or listing selected will open up to provide detailed information on the software. Clicking On Help In Test Screen Boxes
In some of the TBS test screens, there is a Help Button located within the TBS test screen box. As an example
below in Hand Tests , the Help Button is located in the bottom right corner of the Hand Test screen box.
By Clicking on the Help Button as shown by the sample TBS test screen above, the TBS on board user
manual / help section comes up directly to Hand Tests Pages section in Help.
Other TBS software testing screens such as Static Strength Testing Screen shown as an example below where the Help button is shown, will take you directly to the specific TBS software user manual help page as it relates to the test screen. When Clicked on the Help button in Static Strength Test screen as shown in above test screen shot, it opens specifically to the Static Testing page in Help. TBS Shortcut / Function Keys
Following is a quick reference guide for global or module specific shortcut keys. These shortcut keys will assist in
being more efficient in operating TBS 2000 Functional Testing software. The shortcut/function keys eliminates
unnecessary extra key strokes that help to get through your tests quicker. Following are shortcut keys:
Module Specific Shortcut Function Keys: F2: This shortcut function key is used if testing with a hardware device. Selecting F2 is used if testing with a hardware device to initialize gauge and start test. F6: This shortcut function key is used to enlarge the thumbnail photo of the testing position to full size to view. To revert back to the test screen, you can hit F6 again, hit Esc (Escape) or click on the full size test picture. F7: This shortcut function key is used to bring up the graph dialog, or you can click on the graph button. Use this dialog to view the forces at particular times in the lift. You use the left and right arrow keys to move the cursor across the graph while this dialog is up. To revert back to the test screen you can hit F7 again, or hit Esc (Escape). F8: This shortcut key will open the “Options Dialog” Box for Sound and Gauge type selection. F9 This shortcut key will open up the “Select Curve Dialog” box. Global Shortcut Function Keys: F1: This global shortcut function key will take you directly to the online or onboard software help section. It will bring up information and instructions specific to the current test screen open for using TBS and various types of reference information. Ctrl+1: Shortcut key to validity Ctrl+2: Shortcut key to Percentile Profile Ctrl+3: Shortcut key to Pain Profile and Heart Rate Ctrl+4: Shortcut key to explain Validity, Percentile, Pain and Heart Rate Setup with USB to Serial Cable / GoldX Cable* (or other usb to serial adapter) If the computer the TBS 2000 Functional Testing Systems software was installed on does not have a Serial connection, a USB to Serial adapter cable is needed. From testing several brands of USB to Serial adapter cables, the GoldX brand has been found to best USB to Serial adapter cable to work most optimally with Blankenship computerized testing gauges and Interfaces. If you purchased any Blankenship computerized testing hardware to use with TBS software, a GoldX USB to Serial adapter cable is included as part of your order. To connect any of TBS computerized testing gauges or interfaces with a USB to Serial adapter cable to use with TBS software: 1. Connect the Serial end of the GoldX cable to one of the following based on TBS hardware purchased: - Adapter box for single computerized testing gauges. - Serial connection on back of Interface box for System Interface, MyoRom Interface or UE Interface. - Serial end connection of Omni Force Gauge Computer Interface cable for Omni 500, 300 or 200. 2. Connect the GoldX USB end into a selected USB port on your computer. 3. After connecting the GoldX USB to Serial adapter cable to the computer, a message will appear on your screen that it has located new hardware. The message will prompt you to install the GoldX USB to Serial adapter cable Driver disk or CD. 4. Insert the GoldX Driver Installation Disk that was included with the GoldX cable. The Driver should Auto Install. If it does not Auto Install, do the following: A. Click on Start at bottom left corner of computer screen. B. The Start menu Popup appears. Click on Run. C. The Run Window should appear. D. Click on the Browse button. E. The Browse window will appear. Select the CD Drive. You may have to Click on the Arrow icon next to the Look In box. F. After selecting CD Drive, Click on Setup.exe. G. The computer will walk you through the GoldX Driver installation. H. Click Finish to complete GoldX Driver installation. I. Connect the Serial cable for any of the TBS computerized testing gauges, Interfaces or Force Gauges to the GoldX USB to Serial adapter cable (serial end of GoldX cable). J. NOTE: REMEMBER after initial installation of Gold X cable and installing the driver, always use the same USB port when unhooking and hooking back up the USB to Serial adapter cable. *NOTE: Or other compatible serial to usb adaptor brands. NOTE: WHEN USING A UBS TO SERIAL ADAPTOR, YOU MUST MAKE SURE
THAT THE USB TO SERIAL ADAPTOR IS PLUGGED INTO YOUR COMPUTER
PRIOR TO STARTING THE TBS FUNCTIONAL TESTING SYSTEMS SOFTWARE.
Changing Com Ports **
1.
2.
3.
4.
5.
6.
7.
Go to Start at bottom left of screen and Click on Start.
In the Start menu popup, Click on Control Panel.
Go to System Icon and Double-Click on System Icon.
In System Properties Popup screen Click on Hardware tab.
In Hardware tab, Click on the Device Manager button.
In Device Manager Popup screen Click on the Plus + sign next to Ports.
Select and Double Click on Com Ports or USB to Serial Port (USB to Serial Port if using
a USB to Serial Cable to connect computerized testing gauge or interface to computer
when serial port is not available).
8. For Com Port or USB to Serial Port selected, right click on it. The drop down menu will
display Properties. Click on Properties.
9. In the Port Properties Popup screen Click on Port Settings Tab.
10. Click on the Advanced button.
11. In the Advanced Popup screen, by the Com Port Box Click on the drop down arrow.
12. Of the Com Ports shown, select a Com Port (1-4) that is not in use. (Note: TBS 2000
Functional Testing Systems is set up to select from Com Port settings 1-4 only).
13. Click OK.
14. Exit out of Popup screens.
15. Go back to TBS 2000 Functional Testing Systems software.
16. Go back into Utilities, Setup in TBS software screen.
17. In TBS Setup dialog box, for Com Port Click on the down arrow and select the correct
Com Port you changed your settings to.
18. Click OK to save new Com Port setting and any other changes made also to TBS Setup
dialog box.
**Depending on version of Windows you are using, there may be some slight variations on navigating to “Control Panel”