1
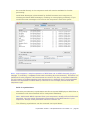
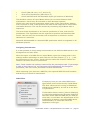
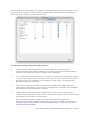
Welcome! Liquid Notes is a highly intelligent composition assistant for your music productions. Take your arrangement to perfection from within! Music theory, harmony, chords, and melodies: have your composition analyzed in musical depth and alter your entire arrangement on a professional level with only a few mouse clicks. Liquid Notes helps you optimize the impact of your music by comprehensive variation while not interfering with your very own musical style. Tools for your support User Manual (in English and German) for the standalone version of Liquid Notes (1.5) and Liquid Notes for Live (1.0), the Max MIDI effect (plug-in) for Ableton Live. Yellow indicates features which are only supported by the standalone version. The blue section describes features which are only supported by Liquid Notes for Live. To take the first steps with the software, please refer to the Quick Guide which can be accessed either from the Help menu or the welcome screen of the software. Go to our YouTube channel for Videos on how to get started easily with Liquid Notes and for practical cases of application: www.youtube.com/liquidnotesofficial For a deeper understanding about the function and nature of the software, please read the following FAQ Entries on pages 25 and 26 in this user manual: What does Liquid Notes do? and What can't Liquid Notes do? Our Customer Support can be accessed here: www.re-compose.desk.com Email: [email protected] We are always there for help when you need us. Liquid Notes Version 1.5 & Liquid Notes for Live Version 1.0 – page 1 Contents 4 Part 1 Features, System Requirements, and Installation 4 4 4 4 5 5 5 Features System requirements Installation Installing and updating to a higher version in Mac OS X Installing and updating to a higher version in Windows Activating product Transferring product 6 Part 2 Workspace and Functions 6 9 9 10 10 11 11 Workspace Reharmonizing the music track Chord substitution and chord progression Chord tension (degree of dissonance) Chord function LN Live (improvising and creating melodies) Playing via the computer keyboard 12 Part 3 Use of Liquid Notes with Own Projects 12 12 12 12 13 13 14 14 14 15 15 15 17 17 17 17 17 Workflow Exporting a MIDI file Exporting a multi-track MIDI arrangement from Live Altering the MIDI file in Liquid Notes Using pre-arranged music templates (Style Templates) Further use of harmonic changes in the sequencer Routing between Liquid Notes and the sequencer Routing in Mac OS X Routing in Windows (except for Cubase) Routing for Cubase in Windows Liquid Notes for Live Setting up Liquid Notes for Live Enhancing the analysis quality Creating a "clean arrangement" Correct naming of percussion tracks Creating a chord track Later correction of melody notes 18 Part 4 Settings 18 18 General Connecting to the Internet Liquid Notes Version 1.5 & Liquid Notes for Live Version 1.0 – page 2 18 19 19 19 19 19 19 19 20 21 21 22 22 22 Limit available chords MIDI Clock synchronisation between Liquid Notes and the sequencer Limit zoom level Settings for LN Live Source scale Automatic correction of sustaining notes Routing Overview Built-in synthesizers Assigning instruments MIDI filter Routing for LN Live Routing for the acoustic chord preview ReHarmonize settings 24 Part 5 Harmonic Analysis 25 Part 6 Frequently Asked Questions 25 26 26 28 What does Liquid Notes do? What can't Liquid Notes do? What can I do when the processing of a chord resulted in an undesirable change of an instrument? Why do I get different results by substituting the same chord twice? Why did a change in the ReHarmonize settings not produce changes in my composition? Why do I see more tracks in the Routing table and in the ReHarmonize table than in the sequencer? What am I doing wrong if I receive the error message No chords detected in MIDI file? The harmonic analysis is obviously wrong. What is the problem? As a result of the harmonic analysis I get a lot of short chords. What is the problem? The segmentation of the chord regions is not optimal. Why are the chord regions sometimes too narrow and sometimes too wide? Why does adding tension produce no results? 29 Contact 26 26 26 27 27 27 27 Liquid Notes Version 1.5 & Liquid Notes for Live Version 1.0 – page 3 Part 1 Features, System Requirements, and Installation Features Standalone software or MIDI effect for Ableton Live for assistance in composing, harmonic analysis, and reharmonization: manipulation of chord functions, substitutions (exchanges), tensions (degree of dissonance), and cadences (progressions) Live improvisation and melody creation: corrects incorrect notes as you are playing them Import your own compositions for harmonic alteration and "effect optimization" Selection of style templates (pre-arranged music sequences): MIDI arrangements in various styles for harmonic alteration to get fresh musical ideas and to use further as sequences for larger compositions/productions Multi-track MIDI routing to software sequencers such as Logic, Cubase, Live, Pro Tools, Sonar, and many more, to control software instruments: no connection via VST, AU, or RTAS necessary Built-in synthesizers for independent use from sequencers System requirements Liquid Notes is implemented entirely in Java, which allows system-independent use in Windows and Mac OS X. The recommended version of Java is 1.6.0_25+. Windows. Windows XP, Vista, and Windows 7 & 8, 32/64 bit are supported. Mac OS X. Due to certain restrictions with the Apple MIDI loopback driver, IAC bus use is recommended only from Java 1.6.0_25. Liquid Notes works with Mac OS X 10.6 or higher. Note: Since Liquid Notes works on operating system level and is listed to the outside as a MIDI device via virtual busses, it should operate flawlessly with any commercially available sequencers. This compatibility was so far tested with Cubase (Windows versions 5, 6, and 7) and Logic (versions 8 and 9), Live, Sonar X1, and Pro Tools (from version 8). Further tests are planned with more sequencers. See special instructions for MIDI export from Live on page 12. Installation After purchasing the software or ordering the trial version, you will receive an email with download links. If you purchased the product, the email will contain a software license number. Click on the link for your operating system to start the download. Installing and updating to a higher version in Mac OS X 1. Install Liquid Notes by opening the installer package. As part of the installation Liquid Notes and Licensing Daemon are installed, which ensures the legitimate use of the software. 2. Complete the installation by restarting your computer (not necessary for updates). Liquid Notes Version 1.5 & Liquid Notes for Live Version 1.0 – page 4 3. Before starting Liquid Notes, open Programs ➞ Utilities ➞ Audio MIDI Setup ➞ Window ➞ Show MIDI window. Double-click IAC Driver and make sure that Device ready is checked. Create at least one port in the lower left table. Installing and updating to a higher version in Windows Install Liquid Notes by starting the setup program. The following programs are installed: Liquid Notes Licensing Daemon: ensures the legitimate use of Liquid Notes (not for updates) LoopBe30: Virtual MIDI cable to connect Liquid Notes with your sequencer (not for updates) Complete the installation by restarting your computer (not necessary for updates). Activating product If you are in possession of a license number, open Help ➞ Start License Manager. Enter the license number on the page Product Activation and click on Activate. The product is now activated. The license number is tied to your computer. Transferring Product If you want to use Liquid Notes on different computers, you can reset the license key at any time after activation and tie it to a different computer. Open Help ➞ Start License Manager. In the upper pane, click on Internet De-Activate. Enter your license number and click on De-Activate. You have reset your license number. Now you can tie Liquid Notes to any other computer. Liquid Notes Version 1.5 & Liquid Notes for Live Version 1.0 – page 5 Part 2 Workspace and functions Workspace The user interface of Liquid Notes is now shown. The most important elements in Liquid Notes are the chord regions. Their width corresponds to the duration of the respective harmony (chord plus scale). Chord regions show two rotary knobs (CHORD and TENSION) and one slider. These elements control different attributes of the chord. Rotating the upper knob substitutes the chord (see page 9, Chord substitution and chord progression), the second lower knob changes the chord's tension (see page 10, Chord tension). To turn the knobs you can either click on them and move the mouse cursor up and down. Or you can click on the little arrows below the respective knob for forward or backward movement. Colored rings on the rotary elements ranging from green to red indicate the “conventionality” of the respective chord. The slider snaps to three different positions for the three basic chord functions indicated on the interface with I (TONIC), IV (SUBDOMINANT), and V (DOMINANT). The top area of the chord region shows the full chord symbol, a color code indicating the “average conventionality of the chord” (average value of CHORD and TENSION), a reset button, and the ReCalc button. The reset button allows you to restore the original chord after a series of changes. The CHORD knob will not necessarily turn back to its original position but stay in relation to its predecessor. Obtain more information on this topic on page 9, Chord substitution and chord progression. Clicking on the chord symbol opens dropdown windows for immediate access to all possible chords at that position in the song. Clicking on either of the rotary knobs once causes a short playback of the chord, while double-clicking on them or clicking on the ReCalc button recalculates the chord region (chord information and additional instrumental voices). This applies after you have made manual changes in the ReHarmonize settings which are accessible through the Settings menu. See also page 22, ReHarmonize settings. Liquid Notes Version 1.5 & Liquid Notes for Live Version 1.0 – page 6 The global chord view shows all chords of the entire piece. The track view shows all MIDI tracks indicating the activity of individual instruments. Additionally, you see the position of the cursor in the piece. The blue navigation window represents the area of selected chord regions. Dragging its left and right ends zooms into and out of this area. The entire work area can be repositioned by clicking on the navigation window and shifting it, or by clicking on any position in the track view (lower area). Click on any position in the chord view (upper area) to move the cursor there. Clicking on the upper tabs switches between the track view and a piano roll which is optimized for displaying single MIDI events of different instrumental tracks in Liquid Notes. Depending on the predefined size of the piano roll, this may cause the chord regions to change in height. In contrast to the usual separation between single tracks, Liquid Notes represents the MIDI events of all instruments overlaid across the same visual range. Instruments can be differentiated by color. The descending order of the overlay is determined by the order of the instruments in the corresponding MIDI file. After the import of the MIDI file, the piano roll shows the MIDI events exactly as they are stored in that MIDI file. The harmonic analysis leaves the data untouched. However, when chords are changed in Liquid Notes, the respective MIDI events will change, as well. Note: In case the display panel of the piano roll is too small to show the complete tonal range of the instruments, enlarging the entire Liquid Notes window and dragging the lower slide bar of the piano roll may help to adjust its size according to desire. Liquid Notes Version 1.5 & Liquid Notes for Live Version 1.0 – page 7 Clicking on the settings button placed on the upper right corner of the piano roll opens a settings window (see previous page) where you can hide and unhide instruments by activating and deactivating the respective boxes. Clicking on any of the colors opens the color picker allowing you to edit instrument colors. The scale of the current harmonic segment is shown in the bottom right corner. It is the target scale of LN Live, the integrated improvisation instrument of Liquid Notes (see page 11, LN Live). Note In indicates if LN Live receives a MIDI event. Bypass enables all notes to pass unfiltered. The length of a chord progression loop can be defined by horizontal dragging of the left and right ends of the loop bar and results in a continuous repetition of the selected region. By directly clicking on the bar, the repetition is activated or deactivated. This can also be accomplished by clicking on the loop symbol in the transport panel (see below). The transport panel controls the internal sequencer: The functions jump to start, stop, play/pause, loop enable/disable and follow to the cursor when playing enable a fast navigation. The tempo adjustment function allows you to define the tempo of the song by beats per minute (BPM). Time code shows the duration of the track from the beginning to the selected end point in seconds, the beat display (bar) located below indicates the corresponding beat Liquid Notes Version 1.5 & Liquid Notes for Live Version 1.0 – page 8 progression. Loop start and loop end specify the number of beats that determine the beginning and the end of the loop region on the loop bar. With the scroll bar, you select the visible time range (by sliding it left and right) and to act as a zoom tool (by extending or shrinking it). A horizontal pull of the left and right ends of the bar causes an increase or decrease in the visible range. For zoom settings see page 19, Limit zoom level. On the upper left corner of the interface, three menu buttons can be found: for file operations, settings, and help. Two more buttons give you quick access to instruments and their routing settings (second from right), as well as a button for reharmonization settings. Reharmonizing the music track Chord substitution and chord progression A substitution of the chord occurs by turning the knob marked CHORD from left to right. Such a substitution refers to all tracks except "locked tracks". Such tracks have no meaning for the formation of chords, such as rhythm tracks. The substitution will affect melody and chord tracks as well as bass ranges. The relative position at which the grey dot on the knob is placed and the color of its ring are a function of the "conventionality" (probability of expectation) of the sound of its chord and its predecessor. If the colors of knobs of a composition are more in the greenish range (i.e. the dot is on the left side), then this is an indication for a rather conventional chord progression. Should you wish to make your composition more interesting or unconventional, move the respective controllers into the yellow to red range. If the knob is turned far to the right side, a very unusual musical jump between chords may occur. Turning the knobs of the following chords to the left creates a more suitable harmonic context for the progression. The position of a knob does not have to be dependent on a previous chord. If the scale changes at a certain point in the composition, the relative position of the knob might refer to the new scale instead. Liquid Notes Version 1.5 & Liquid Notes for Live Version 1.0 – page 9 Note: Liquid Notes ranks its suggestions in accordance to music theory, and terms such as "conventional" or "usual" are solely based on this theory. However, we acknowledge that music is perceived subjectively. Therefore, every harmonic change of a piece you know well may strike you as "unconventional". By default, the chord selection is limited to ensure better results. Under Settings ➞ General ➞ Limit available chords you can deselect this limitation by one click. This could lead to very unusual results and should be used with caution. Chord tension (degree of dissonance) You can add additional tension notes to a chord by turning the knob marked TENSION. This changes the chord's degree of dissonance but will affect only polyphonic parts of a composition. You can recognize the strength of the tension by the position of the little gray dot and the color of the knob's ring. The color shifts from green to red as the dissonance (or "sound color") of the chord intensifies. Tensions in Liquid Notes are produced in various ways: by adding new sounds, or by displacing existing ones. The progressive sequence of the tensions results from a compromise between these two possibilities. Attention: Normally, it is useful to activate Add Tension only for one track of a song (see page 22, ReHarmonize settings). The tension of a chord area displayed immediately after creation of a project may be the result of a combination of chord information from multiple tracks. The change of tension, however, refers to the newly allocated tension tracks by Liquid Notes. If a chord with initially very high tension is reharmonized on the same chord again (e.g. by double-clicking on the knob or clicking on ReCalc), this will add the respective tension sounds to the tension track even if they are not part of the track. For this reason it is recommended to reduce the tension of chord areas that have a very high initial tension, i.e. to keep more in the green area. Chord function The chord function can be chosen by moving the slider up and down to the respective function position or by directly clicking on such a position. Changing the function results in an entirely new set of possible chord substitutions. I stands for TONIC (first scale degree), IV for SUBDOMINANT (fourth scale degree), and V for DOMINANT (fifth scale degree), the prime steps of a basic cadence. So the chord substitution sequences change from tonic: C...Am... to subdominant: F...Dm... and dominant: G...Em... Liquid Notes Version 1.5 & Liquid Notes for Live Version 1.0 – page 10 Altering its function will in most instances cause a distinct change in the perceived impact of a harmonic progression. Functions influence the "deep nature" of chord progressions. LN Live (improvising and creating melodies) LN Live is an additional tool that allows you to improvise error-free via a QWERTY computer keyboard or a MIDI input device (e.g. keyboard). For routing instructions please refer to page 19, Settings for LN Live. The benefit of LN Live is simple to understand: only correct notes can be played (wrong notes will be mapped to the right ones). While the song is playing, LN Live automatically selects the correct scale for chord regions. For MIDI devices, manual selection of the source scale is possible under Settings ➞ LN Live ➞ Scale and ➞ Keynote. The default scale is C major. This means that the notes of the target scale are mapped to the white keys on the keyboard. To set up a MIDI instrument for LN Live please refer to page 22, Routing for LN Live. Playing via the computer keyboard The three rows of letters on the computer keyboard allow you to play three octaves. Since the number of buttons per row exceeds the number of notes of a scale, you can play the next octave on the last 3-4 keys of each row. These notes are therefore represented twice. Overview of the keyboard layout for LN Live: First octave: Z to / Second octave: A to ” Third octave: Q to ] All one octave up: Shift keys Velocity: numbers 1 to 7 See also page 19, Settings for LN Live Liquid Notes Version 1.5 & Liquid Notes for Live Version 1.0 – page 11 Part 3 Use of Liquid Notes with Own Projects Workflow Liquid Notes can be used at any time during your production. From idea generation to final mastering, Liquid Notes supports your project’s progress. Below are the steps that allow the program to seamlessly integrate into the production workflow: Note: Liquid Notes only uses MIDI. Exporting a MIDI file 1. Start the sequencer (Cubase, Logic, Live, Pro Tools, etc.) 2. Create a music composition minding the instructions in the manual on page 17, Enhancing the analysis quality. 3. Export the music composition as a MIDI file. Attention: Separate MIDI regions in a MIDI track might be exported as separate tracks, and therefore appear in Liquid Notes as multiple tracks with the same name. If you combine these separate MIDI regions, you prevent splitting the track. Exporting a multi-track MIDI arrangement from Live Since Live does not support the export of a multi-track MIDI file, Liquid Notes contains a function to glue together single-track clips exportet from Live. 1. In Live, right-click on all MIDI clips you want to export. Choose “Export MIDI Clip” and save them to your preferred destination on your computer. 2. Locate the exported clips on your computer, select them all at once, and drag all of them into Liquid Notes. 3. Liquid Notes will ask you if you want to combine the clips into a multi-track one. Accept and proceed with further instructions. Altering the MIDI file in Liquid Notes 1. Start Liquid Notes. 2. Select Open File or drag it onto the Liquid Notes window (Mac OS only) and open the MIDI file previously exported. 3. Follow the instructions of the wizard. 4. Modify chords, chord functions, tension, and chord progressions. Liquid Notes Version 1.5 & Liquid Notes for Live Version 1.0 – page 12 5. Use LN Live to create one or more new melody tracks in the sequencer. To save them they must be recorded in the sequencer. 6. Save the modified version of the piece as a MIDI file or record the routed MIDI data live in the sequencer. Using pre-arranged music templates (Style Templates) Directly in Liquid Notes, you may choose music templates from a list of various styles (i.e. chord progressions, arpeggios, or a variety of simple to elaborate arrangements). They will allow you to create harmonic ideas and compose more complex harmonic progressions for further use in larger compositions/ productions. We will keep extending this list of templates continually. Select your style template from File Menu ➞ Load Template and choose a keynote (if applicable). By default, template arrangements are played by one of the built-in synthesizers and have been optimized for them. Find more information on page 20, Built-in synthesizers. If you would like to use the templates with sequencers, check the routing settings so the notes are directed to the correct bus. The routing is different for each system, therefore there is no preset available. Further use of harmonic changes in the sequencer If the project was saved as a MIDI file, it must be mapped to the right tracks in the sequencer. Live recording of tracks in the sequencer allows for immediate processing. Note: Liquid Notes can be seen as a very effective mastering tool. It masters the structure of your composition instead of your signal outputs. In almost all compositions you will find the following scheme: a musical theme is introduced and varied over the course of the piece. Such changes, whether small or large, make a composition interesting and the listening experience entertaining. Liquid Notes Version 1.5 & Liquid Notes for Live Version 1.0 – page 13 Routing between Liquid Notes and the sequencer If you would like to listen to your song with the sound of your preferred software instruments while altering the song in Liquid Notes, you can route the instrumental tracks from Liquid Notes through your sequencer to the respective software instruments. The best way to guarantee an exact correlation between MIDI tracks in Liquid Notes and the respective instruments in the sequencer is to export a MIDI file of the song session from your sequencer and import it into Liquid Notes. Upon importing a MIDI file into Liquid Notes a routing wizard will open automatically and guide you through the routing procedure. The following steps are to be taken only in exceptional cases: In general, Liquid Notes selects the correct settings automatically. However, the sequencer must be configured manually. To receive all relevant information select Next in the wizard until the entire routing process is complete. Routing in Mac OS X. In Mac OS X a separate MIDI interface, the IAC bus (Inter Application Communication Bus), is included: 1. Open the utility Audio MIDI Setup (if necessary search with Spotlight). 2. Select Window ➞ Show MIDI window. 3. Double-click on IAC driver. For the routing to Logic at least one bus should be created. For routing to Cubase one bus for each instrument is recommended. 4. Activate Device is online. 5. Restart Liquid Notes. The IAC bus should now be selectable in the routing table. 6. Follow the instructions of the wizard to complete the configuration. 7. Set all tracks to record mode. Note: This functionality is only available starting from OS X 10.5 and Java 1.6.0_25. Start the operating system's internal software update function to make sure you have installed the latest version of Java. Routing in Windows (except for Cubase). The program LoopBe30 is installed via the Liquid Notes installer and started afterwards. This program offers the possibility to create up to 30 MIDI busses which route MIDI data between applications. 1. Start Liquid Notes and the sequencer. 2. By default, Liquid Notes routes the MIDI data to the first bus of LoopBe30. Choose the same bus as the input in your sequencer. Align the channels of the matching tracks between Liquid Notes and the sequencer. You will find the channel mapping in the Routing table (second tab of the Settings menu). 3. In the sequencer, set all tracks to "record". Liquid Notes Version 1.5 & Liquid Notes for Live Version 1.0 – page 14 Routing for Cubase in Windows. The program LoopBe30 is installed via the Liquid Notes installer and started afterwards. This program offers the possibility to create up to 30 MIDI busses which route MIDI data between applications. 1. Double-click the LoopBe30 icon in the right bottom of the task bar. 2. Create the same number of ports as there will be expected tracks. 3. Restart the computer. 4. Start Liquid Notes and the sequencer. 5. Select an output bus for each track in the routing table. Choose the respective input bus for the corresponding track. 6. In the sequencer, set all tracks to "record". Liquid Notes for Live Liquid Notes for Live is a Max MIDI effect for Ableton Live which behaves like a plug-in. You need to have Max for Live installed to be able to run it. Setting up Liquid Notes for Live Follow these steps to set up Liquid Notes for Live: 1. Open an Ableton Live set of your choice. We have included a demo set which is already set up for use with Liquid Notes for Live. If you use the demo, please continue with step 6. If you use your own set, continue with step 2. 2. In your Ableton Live set, create an empty MIDI track. 3. In the window Categories (located on the left in Ableton Live), navigate to Max for Live → Max MIDI Effect 4. Drag LN_Bridge_Global.amxd on the empty MIDI track you created in step 2. Liquid Notes Version 1.5 & Liquid Notes for Live Version 1.0 – page 15 5. Drag LN_Bridge_Track.amxd on each track you want to manipulate with Liquid Notes for Live. 6. Make sure that the Scene containing all clips you want to work on is selected in Live before import. 7. In Liquid Notes for Live, click on Get Clips on the start screen. Or select File → Get Clips… from the menu. 8. A Wizard pops up by which you can check the automatic classification of the types of your instrumental tracks (e.g. melody, chords, bass) and adjust them if necessary. 9. That’s it. Your Liquid Notes project is all set and you are ready to go. You can now manipulate your Ableton Live tracks via the Liquid Notes editing functions. 10. You can export your results from Liquid Notes by choosing File → Export MIDI File… and import it into Ableton Live by dragging the saved file onto Ableton Live. If you click on Play in Liquid Notes, it plays all the imported data. Notes are transmitted to Live and Live sounds them. However, Live will not start its own playback function. So you cannot hear any clips in Live which have not been imported to Liquid Notes. If you click on Play in Live, Liquid Notes and Live will start playback simultaneously. You will hear every clip in Live. Note: The LN Bridge has been designed for Live's Session View. To transfer an arrangement from Arrangement View to Session View select your preferred clips or region and from the menu, choose Create → Consolidate Time to New Scene. This will create clips for Session View which will work smoothly with Liquid Notes for Live. Liquid Notes Version 1.5 & Liquid Notes for Live Version 1.0 – page 16 Enhancing the analysis quality A composition can be prepared in advance to prevent or minimize analysis errors in Liquid Notes. Creating a "clean arrangement" 1. Set every instrument on a separate instrument track. 2. Notes or regions with different channel numbers within a track should be avoided. 3. If an instrument has different functions within a music composition (e.g. strings, which play full chords, and sometimes also take on a melody function), dividing this track into one track per function helps. Correct naming of percussion tracks For the automatic classification of a track, the corresponding naming of the percussion tracks will be used. "Percussion", "perc", "drums" or "HiHat" are just some of the names that indicate a percussion track. Such indications are deliberately not considered in the harmonic analysis because they do not contain chord information. This trick can be used for all tracks whose notes do not agree with the perceived pitch (e.g. tracks with MIDI triggers of arpeggios, noise sounds, and others). Creating a chord track When there is a clear chord track, Liquid Notes carries out the analysis most effectively. In a chord track at least three notes must be struck simultaneously to build an explicit chord. Additional notes, which are not necessary for the design of the chords, should be avoided. If such an explicit chord track is not found in a composition, it is recommended to create one for the transmission of MIDI files to Liquid Notes. When this new track in Liquid Notes is muted, only the original composition is heard. Consequently, the chord track is only there to help optimizing the harmonic analysis. Attention: Be cautious of MIDI downloads from the Internet. Problems may arise since these MIDI downloads are often arranged inaccurately. Later correction of melody notes An incorrect, false, or unsatisfactory melody can be excluded from the harmonic analysis by selecting the percussion marker in the wizard. 1. Deselect the checkbox Drums/Static in the options for ReHarmonize. 2. Then double-click on any of the two knobs or click on the ReCalc button within a chord region to correct the melody in this segment and adjust the chord. Liquid Notes Version 1.5 & Liquid Notes for Live Version 1.0 – page 17 Part 4 Settings General Connecting to the Internet In the settings menu, you can adjust the program's online behavior: if you would like to be informed if an update is available and if you would allow your usage data to be analyzed for further improvements of the software. This data is anonymized and is exclusively for internal use. Limit available chords It is recommended to leave this option enabled. However, for musically savvy users, for certain genres (like jazz), and for further musical experiments, it may be useful to extend the selection of available chords by switching off this option. Attention: This option has no influence on the result of the harmonic analysis. Chords that were already present in the music composition are automatically part of the subset described above, even when the chord limitation is switched on. Liquid Notes Version 1.5 & Liquid Notes for Live Version 1.0 – page 18 MIDI Clock synchronisation between Liquid Notes and the sequencer Time synchronisation for recording and playback between Liquid Notes and the sequencer ensures both applications to synchronize their cursor position and movement. Check Listen to MIDI clock to activate time sync and enable MIDI clock sending for your sequencer. The transmission must be sent to the IAC driver bus. Limit zoom level Zooming in and out causes chord regions to fade into lines when their control elements cannot be displayed completely any more. From time to time, songs are made up from chords of drastically varying length. Some might be displayed as very wide in relation to others, and this can make it difficult to zoom into and out of the song without constantly causing narrow chord regions to fade into lines. With Limit zoom activated, chord regions are prevented from fading out. By default, the zoom level is limited and chord regions cannot fade out. Settings for LN Live Source scale. If LN Live is connected to an external MIDI device, a source scale can be selected. For example, for a MIDI keyboard the default value in C Major means that all the white keys are available for improvisation, which are then linked automatically to the correct target scale. For other MIDI devices, such as MIDI guitars, it might be advantageous to choose a different source scale. Many guitarists, for example, are well versed in improvisations in the E Minor scale and thus should make this their choice. Automatic correction of sustaining notes. If a note is sustaining during a scale change, it could possibly no longer fit the new scale. If the automatic correction is turned on, Liquid Notes terminates the respective note automatically and shifts it to the proper pitch. Attention: For instruments whose attack differs significantly from the sound of the sustain (held note, e.g. for guitar or piano), the automatic correction of sustaining notes could lead to unwanted sound effects. In these cases disabling the automatic correction should lead to better results. In all other cases, for example when working with strings, organs, and similar "stable sounding instruments", this option should remain activated. Routing Overview Just as you can assign each track to an instrument in the sequencer, each track in Liquid Notes can be assigned a MIDI bus and a MIDI channel. In the sequencer, each track must be connected with the desired MIDI bus and MIDI channel (MIDI input). All known sequencers act as a synthesizer and therefore it is recommended to use the sequencer which was used to create the composition as the synthesizer. Consequently, you can use all your previously set tracks from the sequencer in Liquid Notes. In addition, changes created through Liquid Notes can Liquid Notes Version 1.5 & Liquid Notes for Live Version 1.0 – page 19 be recorded directly in the sequencer and will remain available for further processing. Send Meta Messages is deactivated by default because some sequencers misinterpret these MIDI messages, resulting in notes playing endlessly. If you would like meta messages to be sent to the sequencer check this option. Note: Logic supports a simple separation of MIDI data via its MIDI channels (project settings ➞ recording ➞ separate multi-track recording by event channel). Therefore it is sufficient for this program if all instruments are sent to one bus, on separate channels. For the routing to Cubase sending each instrument to a different bus is recommended because the separation of MIDI data by channels is not a simple process with that sequencer type. Built-in synthesizers With this port selected, Liquid Notes acts like a General MIDI player. MIDI files in accordance with this standard will be interpreted flawlessly. Note: Multi-track MIDIs exported from your sequencer usually will not follow this standard. You can assign appropriate instruments to the MIDI tracks in your sequencer. Always route percussion tracks to channel 10. The following synthesizers can be accessed via Liquid Notes: Liquid Notes Version 1.5 & Liquid Notes for Live Version 1.0 – page 20 Gervill (Mac OS 10.6, 10.7, and 10.8) Java Sound Synthesizer (Mac OS 10.5) Gervill and Microsoft GS Wavetable Synth (all versions of Windows) The Windows version of Liquid Notes allows you to choose between both synthesizers. Gervill may be excluded in older Windows systems. Gervill is an open source synthesizer which is part of the Java Library starting from version 6 of Java. It will produce the best sound output but it could cause noticeable latencies. This can be avoided by connecting Liquid Notes with a sequencer. The Java Sound Synthesizer is an internal synthesizer of Java, and Gervill's predecessor. This synthesizer can be expected to produce less latencies than Gervill. Here as well, the connection with a sequencer is advised to reduce latencies to a minimum. Microsoft GS Wavetable is a General MIDI synthesizer which is integrated in all Windows systems. Assigning instruments It is also possible to freely assign instruments to the different MIDI tracks in the arrangement and save them. After the import of a MIDI file into Liquid Notes, open the routing panel in the settings window and assign to each track its own Out Channel (1, 2, 3, …) and the instrument of your choice. Tracks with the same Out Channel number are linked to the same choice of instrument. Note: Track number 10 is always reserved for the percussion track. If you assign a track to Out Channel 10, its instrument will automatically be changed to percussion, and vice versa: percussion to tonal instruments. When exporting your piece as a MIDI file, the exported MIDI file itself contains and saves your choice of instruments. MIDI filter If required, here you can select MIDI event types which must not be sent by Liquid Notes. This filter influences the routing to additional software and hardware, as well as to the builtin synthesizers. If information about volume (Control Changes) or instrument assignments (Program Changes) has been saved with the MIDI file you want to work with, it could alter the adjustments of the synthesizer of another connected MIDI device unintentionally. To avoid this check the respective event type. Liquid Notes Version 1.5 & Liquid Notes for Live Version 1.0 – page 21 Routing for LN Live Here you can adjust the input and output routing for LN Live. If you would like to play with the computer keyboard, select QWERTY Keyboard as the input. If a MIDI device is connected to your computer (such as a MIDI keyboard), you can select it here. The output routing works the same way as the routing of the Routing table from the Help menu. You may send the MIDI data to any track in your sequencer. Take the following steps to set up your MIDI instrument for LN Live: 1. Connect your MIDI instrument to the computer before starting Liquid Notes. 2. From the Settings Menu, open Routing Settings. 3. At Routing for LN Live, choose your instrument from In port. Choose the output instrument from Out port. You should now be able to hear your instrument. 4. You may now change the input scale as described on page 11, LN Live. Note: When a keyboard is connected to the computer, Logic starts receiving data from it. This leads to both Liquid Notes and Logic receiving and processing the same data stream. To avoid this, insert a track before all other tracks in your sequencer arrangement (at position one), mute it, and ensure that recording is enabled. This will block unwanted sound outputs by the sequencer and is a known issue with Logic only. Routing for the acoustic chord preview In this line, the output routing for the acoustic chord preview can be set. It is recommended that you route to the instrument which takes over the harmonic function (e.g. the tension track of the arrangement). ReHarmonize settings In the ReHarmonize table, one or more of the following options can be enabled for each track: Drums/Static, Fit to Scale, Fit to Chord, and Add Tension. For correct settings, it is imperative to understand the process of reharmonizing. If there were no checkboxes selected in the ReHarmonize settings, Liquid Notes would proceed as follows (simplified representation): 1. Melody, chord, and percussion tracks are treated equally. (Note that percussion tracks are usually protected from changing by Drums/Static.) 2. The notes of polyphonic passages are moved to their nearest chord note. 3. The notes of monophonic sequences are corrected if they do not fit into the new scale, or if a certain note is not allowed in the context of the new chord (avoid note). Liquid Notes Version 1.5 & Liquid Notes for Live Version 1.0 – page 22 4. The notes of the bass tracks are shifted so that their distance to the root note of the new chord is the same as before reharmonization. Next, the track will be treated the same way as a melody or a chord track would. The following settings change this basic behavior: Tracks marked with Drums/Static are not considered in the process of reharmonization and remain unaffected. This way percussion tracks and tracks that are not subject to any tonal change can be protected. Fit to Scale means that the notes of a polyphonic area are not necessarily moved to chord notes. They will be corrected only if they do not fit into the new scale or the new chord. This correction is not based on chord notes. The logic behind Bass/Root applies accordingly. Fit to Chord means that notes of monophonic passages are always shifted to chord notes. This feature can be used for arpeggios, for example. Such passages would otherwise be treated like a melody. Tracks marked with Add Tension will add new tension notes to the chords if needed, with 80 percent velocity of the average chord notes. This function should be activated for at least one chord track. Note: By default, melody tracks are set to Fit to Chord to produce the harmonically clearest possible results. If a melody line is rather vivid (running through a lot of notes outside of chord spanning notes), choose Fit to Scale, or maybe even Drums/Static. Liquid Notes Version 1.5 & Liquid Notes for Live Version 1.0 – page 23 Part 5 Harmonic Analysis Liquid Notes executes a very extensive analysis of the composition when creating a new project. Such an analysis involves several consecutive steps, each considering different attributes of the composition. Despite the robust design of these methods, errors in the analysis might occur. This can lead to unpleasant musical effects when reharmonizing chords. An important step is to adjust the types of tracks in the wizard. In principle, Liquid Notes recognizes the correct track types automatically. In rare cases, problems might occur. 1. Melody tracks that are partially polyphonic could be detected as chord tracks. 2. Since priority is given to chord tracks, a melody allocation should be preferred to a chord allocation. Only well-defined chord tracks should be used in the analysis. 3. Another important type of track is percussion. Percussion tracks are excluded from the analysis because they do not include relevant harmonic information. Therefore, always check whether a percussion track was properly recognized and correct the type assignment if necessary. 4. The correct type assignment of a bass track is part of the analysis and important for reharmonization. Liquid Notes Version 1.5 & Liquid Notes for Live Version 1.0 – page 24 Part 6 Frequently Asked Questions (For more FAQs please also refer to www.re-compose.desk.com.) What does Liquid Notes do? 1. Liquid Notes changes chords and harmonic progression. This simple process can actually lead to an unimaginable variety of results. 2. Liquid Notes delivers ideas. Looking for an interesting chord progression for your composition? Simply create some chords in your sequencer to specify the rhythmic structure. In Liquid Notes, you can then play around with different variants and continue using the result that you like. This step can be repeated at any time of the composition process. It makes no difference whether the composition contains one, sixteen, or even more tracks. 3. Liquid Notes refines your composition. Have you created an interesting arrangement? You have certainly aspired to vary the composition permanently by adding new instruments or breaks and by changing the rhythm or the motif of a melody. But have you thought about the chords yet? Very small changes such as enhancing the tension of chords or a subtle substitution of a chord are perhaps barely perceptible, but increase the listening experience. Liquid Notes will help you to do just that. Like the "mastering of sound" this is just like a "mastering of a composition". 4. Liquid Notes corrects and optimizes melodies. You have doubts whether you have always played the correct scale notes during your composition. Have you thought of all scale changes? Was a sound for one particular chord eventually not so suitable? No problem. As a precaution, set this track in the wizard to percussion so that it cannot affect the harmonic analysis. After the analysis is finished, uncheck Drums/Static and double-click on any of the two knobs or click the ReCalc button within the chord regions for which you want to correct the melody. This results in a recalculation of these areas, making the melody optimally fit within the context of the surrounding chords and scales. This procedure treats chords in the same way. 5. Liquid Notes is a recommendation tool for chords and harmonic progression. You wrote a song using your guitar? C, F, G, C? Why not? Many pop songs follow this pattern. But your song ought to be something special. Set these chords in a sequencer and use Liquid Notes to come up with some new ideas. Liquid Notes Version 1.5 & Liquid Notes for Live Version 1.0 – page 25 6. Liquid Notes is an intelligent instrument. You only play correct notes. Simply use the computer keyboard or a connected MIDI instrument and improvise to your composition. Do you want to record your project? Your sequencer generates sounds via software instruments. Just click on "record". What can’t Liquid Notes do? 1. Liquid Notes cannot change the rhythmic nature of your composition. The software shifts or creates notes and also cuts notes at chord boundaries. 2. Liquid Notes was not made with an emphasis on handling very complex music such as classical pieces. Naturally, the best results are obtained for arrangements that can be clearly classified into chord, melody, and bass tracks. This is the case for most modern music genres. What can I do when the processing of a chord resulted in an undesirable change of an instrument? This problem can probably be fixed by changing the ReHarmonize settings from the Settings menu. See also page 22, ReHarmonize settings. Why do I get different results by substituting the same chord twice? This is by design. For melodies especially, there are often several ways to adapt to a chord or scale change. Whether you wish to correct a note one seminote up or down, is not known to Liquid Notes. In this case, Liquid Notes offers different possibilities. Usually, the most probable possibility is suggested first. Therefore, if you get an unsatisfactory result, simply doubleclick on any of the two knobs or clicking on the ReCalc button within that chord region and you will be offered a different solution. Why did a change in the ReHarmonize settings not produce changes in my composition? The ReHarmonize settings apply only to future reharmonizations. If they are changed, the relevant chord areas will be recalculated by double-clicking on any one of the two knobs or clicking on the ReCalc button within the respective chord region. Why do I see more tracks in the Routing table and in the ReHarmonize table than in the sequencer? The rows of these tables do not correspond to tracks, but rather to regions. In most sequencers a track can include more than one region. The notes of these regions are then grouped when saving a MIDI file, while track allocations in MIDI files are not Liquid Notes Version 1.5 & Liquid Notes for Live Version 1.0 – page 26 foreseen. A theoretical solution would be grouping regions of the same name to one track. Try using the function merge regions which can be found on any sequencer to make sure every track of your arrangement contains only one region. What am I doing wrong if I receive the error message No chords detected in MIDI file? Check the result of the automatic classification (track type detection) in the wizard. This problem is an indication that all tracks were detected as percussion. Moreover, Liquid Notes requires a certain amount of harmonic information in the music composition. Even a single melody track with very few notes can cause such a problem. The harmonic analysis is obviously wrong. What is the problem? During the analysis, Liquid Notes processes the composition if it detects at least one clear and plain chord track. Such a track should cover the entire duration of the composition and include chords with at least three notes. However, if there are no chord tracks, Liquid Notes will utilize melody and bass tracks, which can also lead to correct results. In any case, a chord track gives the best support to the analysis process. If you specifically create a chord track to support the analysis, it can be muted in the Routing table. Also check the results of the classification in the wizard. If more than one chord track is showing there, choose the one which contains the most consistent succession of chords. As a result of the harmonic analysis I get a lot of short chords. What is the problem? Such a result suggests that only melody and bass tracks were available for the analysis. Identical neighboring chords are usually combined into one chord. If an analysis is done using melody and bass tracks which have a very vivid tonal course, same chords with different tensions may be detected. If there is a chord track, please check whether there are at least three simultaneously playing melody lines in the respective area. To prevent Liquid Notes from producing a succession of identical chord regions, select Merge identical chords in the wizard. The segmentation of the chord regions is not optimal. Why are the chord regions sometimes too narrow and other times too wide? Check the result of the track classification in the wizard. If more than one chord track has been detected, choose the one which contains the most consistent succession of chords. Liquid Notes Version 1.5 & Liquid Notes for Live Version 1.0 – page 27 Try to fine-tune the attributes and to experiment a little. Also note the two previous entries in regard to chord tracks with a clear succession of chords and merging identical chords. Why does adding tension produce no results? Please note the following preconditions: Tensions are only added to tracks for which Add Tension is enabled. This can be done in the ReHarmonize table from the Settings menu. Tensions are only added to already existing polyphonies. This also includes passages of two simultaneously playing melody lines. Adding tension does not have any effect on single playing notes. Liquid Notes Version 1.5 & Liquid Notes for Live Version 1.0 – page 28 Contact For problems that were obviously caused by a bug, please click on Help ➞ Contact ReCompose and share with us how the problem has occurred and if so, what steps have led to this problem. You can also contact us via the support section of the Liquid Notes website, or send us an e-mail: Online Support: E-Mail Support: http://www.re-compose.desk.com [email protected] We thank you for having purchased Liquid Notes and wish you many hours of fun and musical success! Re-Compose Team Liquid Notes Version 1.5 & Liquid Notes for Live Version 1.0 – page 29