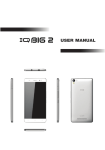
1
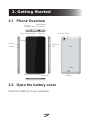
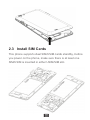
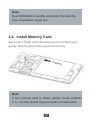
USER MANUAL Welcome Thank you for purchasing this product. For your cellular phone works properly, please follow the instructions in this manual. To prevent any possible incidents or malfunctions, please follow all safety warnings. Screen displays and illustrations in this user’s manual are designed to help you operate this phone to its optimum performance Contents 1. Points of attention on safety 1.1 Safety Alert and Cautions Note driving safety It is strongly recommended that you do not use a mobile phone when driving. Please use the personal hand free package when a call is inevitable. Please put your mobile phone in the mobile phone holder safely, and don’t put it at a passenger’s seat or any other place that may risk a drop of your mobile phone in the case of collision or emergency brake. Switch off your mobile phone on the airplane Interference caused by mobile phones affects aviation safety, and thus it is illegal to use it on the airplane. Please make sure your mobile phone is switched off when you are on a plane. Switch off your mobile phone in blasting operation area You should strictly obey relevant laws and regulations and switch off your mobile phone in or near blasting operation area. 1 Switch off your mobile phone near dangerous area Your cell phone is not allowed to switch on when the refueling and chemical substance area is nearby. In a hospital When using it in a hospital, you should be subject to the relevant rules specified by the hospital. Make sure your mobile phone is switched off when medical equipment is nearby. Any wireless transmission equipment, mobile phones included, will affect its performance. Other electronic equipment may be affected as well. If you have any question in this regard, please consult relevant doctor or equipment supplier directly. Interference Any interference caused by wireless equipment can do damage to its performance. Qualified services Only qualified services are allowed to install or repair mobile phones. If you install or repair it by yourself, you may break the guarantee rules. Accessories and batteries Only manufacturer recognized accessories and batteries 2 can be used. Reasonable use It should be used normally. It is absolutely forbidden to put it on the condition that with an extremely high temperature (over 60 Celsius degrees), for example, do not put it under the window where it can be exposed to the sunshine directly. Remember to use wet or antistatic cloth, instead of using any cloth with static electricity to clean it. Emergency call Make sure your mobile phone is powered on and is in the service, if you would like to make an emergency call number such as 911, pressing the dial key and confirm your location, simply explain what has happened, and don’t terminate the call without any permission. Note: Like any mobile phone, it may not be supported due to the network coverage and wireless signal transmission. What’s more, some networks even don’t support the 112 emergency call services. Therefore, the communication under emergent situations (such as first aid) should not be completely depended on mobile phones. You can consult and check with you local network suppliers. 3 Note: All screen shots in this guide are simulated, Actual displays may vary. Instructions to perform tasks in this guide may change depending on the software version on your phone. Unless specified otherwise, all instructions to perform tasks in this guide assume that you are starting from the home screen. 1.2 Protecting Your Battery Warn reminders about battery: Please don’t store your mobile phone battery at an extremely high or low temperature, for it will affect the service life of the battery, and shorten the standby time. The service life of the mobile phone battery is subject to a certain limit. It is recommended that you would better change a battery from the original supplier if the performance of the battery has declined after using it for a period of time. Points of attention on use of battery: Be sure to switch off the mobile phone before you remove the battery. 4 Please use it carefully. A short circuit will occur if the positive pole (+) and the negative pole (-) of the battery is connected with a metal object (for example, a coin or clip), it may do damage to both the battery and the metal object. Make sure that no metal object will be connected simultaneously with the positive pole and the negative pole of the battery after it is removed and put in a bag. Don’t throw the battery into the fire, or use it under an extremely high temperature condition. Don’t dismantle or modify the battery. Don’t put battery in an occasion with strong mechanical impact, or use a hard object to penetrate the battery. Battery should be put in a cool and dry place to avoid direct sunlight. It should not be placed with a high temperature (over 60 Celsius degrees) environment. If battery gives out any peculiar smell or getting overheated, you should stop using it. If the battery is found to have any crack, deformation, damage of other type, or electrolyte leakage, it should be stopped using immediately. Please clean your skin or clothes immediately with soap and clear water if they contact leaking electrolyte, and wash your eyes completely with clear water if any 5 electrolyte splashes into. In case of any injury caused by incorrect charge, only original battery is allowed to be charged. Don’t use the li-ion battery when the temperature is extremely low, for the maximum standby/call time is not available at a low temperature. Don’t clean the battery with water or organic solvent, or immerse the battery in water. Make sure the battery is fully charged if it has been out of use for a long period. It is recommended that the rejected battery be returned to the mobile phone manufacturer or placed in a designated public area for rejected battery recycling. Don’t mix it with other garbage or throw it freely. 1.3 Cleaning and Maintenance Please don’t leave the phone, the battery and the charger in the bathroom and other high humidity places, and prevent them from rain. Please clean the phone, the battery and the charger using soft and dry cloth. Please don’t wipe the phone using alcohol, thinner or benzene and other chemical reagents. The socket with dirt may cause poor contact and power-off. Please clean it regularly. 6 2. Getting Started 2.1 Phone Overview USB/Charger 3.5 mm Headset Jack Connection Camera Flash Front camera Sensor Receiver Volume + Volume – Screen Power on /off Menu Key Home Key Back Key 2.2 Open the battery cover Push the battery cover upwards. 7 Speaker 2.3 Install SIM Cards GS M This phone supports dual SIM/USIM cards standby, before you power on the phone, make sure there is at least one SIM/USIM is inserted in either USIM/SIM slot. A DM M C +W GS 8 Note: Dual SIM/USIM in standby will shorten the standby time compared to single sim. 2.4 Install Memory Card Aim at the T-Flash card slot and push the T-Flash card gently, and the card will be inserted correctly. T-Flash Note: If the memory card is failed, please check whether it is correctly placed at good contact of metal point. 9 2.5 Power on/off In power off status, long press the power key for about 2 seconds to power on your phone. In power on status, long press power key for about 2 seconds to power off your phone. 2.6 Battery Charging You can charge the battery by connecting the phone either to a pc USB port or to the provided standard charger use the provided standard usb cable. Note: In order to ensure normal operation of the phone, please make sure to use the designated charger. 2.7 Security A series of passwords have been set in your mobile phone and SIM card, for they can prevent any unauthorized use of your mobile phone and SIM card. The Pin Code of the Sim Card: The PIN code (personal identification number, 4~8 digits) is used to prevent unauthorized use of your SIM card. If 10 the PIN verification function is activated, the PIN code will be required to start the mobile phone each time. If you have entered the PIN code incorrectly for three times, the SIM card will be locked. The following instructions indicate you how to unlock the card: 1> Enter the correct PUK code in line with the prompt on the screen to unlock the SIM card. 2> Then enter a new PIN code and tap the Enter key. 3> When you are prompted to reenter the new PIN code, reenter the new PIN code and tap the Enter key. 4> If the PUK code is correct, the SIM card will be unlocked, and thePIN code is reset. Warnings: If you have entered the PIN code incorrectly for three times, the SIM card will be locked automatically, in that case you need to use the PUK code to unlock the card. The PUK code is generally kept by the network operator. PUK code: The PUK code (the PIN unlocking password, 8 digits) is used to unlock the locked PIN code.The PUK code is provided by the manufacturer together with the SIM card. 11 If you have entered the PUK code incorrectly for ten times, the SIM card will be invalidated. You need to ask your network supplier for a new card. PIN2 code: The PIN2 code (4~8 digits) is provided together with the SIM card, which is used to set the fixed dial and other functions. Please contact your network operator to check if your SIM card supports such functions. If you have entered the PIN2 code incorrectly for three times, the PIN2 code will be locked. The PIN2 code will be unlocked only by entering the correct PUK2 code. The operations are as follows: 1>Enter the correct PUK2 code in line with the prompt on the screen to unlock the PIN2 code. 2>Then enter a new PIN2 code and tap the Enter key 3>When you are prompted to reenter the new PIN2 code, reenter the new PIN2 code and tap the Enter key PUK2 code: The PUK2 code (the PIN2 unlocking password, 8 digits) is used to unlock the locked PIN2 code. The PUK2 code is provided by the manufacturer together with the SIM card. If the PUK2 code has not been provided, please contact 12 your network operator. If you have entered the PUK2 code incorrectly for ten times, you will be unable to use the functions of the PUK2 code. If you want to use these functions, please contact your network operator to change a new card. 2.8 Factory data reset Thinking carefully before you reset the factory data because all the data on the phone will be erased. You can follow the following steps to reset the factory data: 1. Select Settings -> Backup & reset -> Factory data reset. 2. Input password 0000 on the pop-up window. 3. Click OK, and then operate according to the system prompt. 13 3. Basic operation & knowledge 3.1 Using Touch Screen Tap To act on items on the screen, such as application, settings icons and options, to type letters and symbols using the onscreen keyboard, or to press onscreen buttons, you simply touch down your finger on them and then lift your finger without change the touch down position in a short time. Tap & hold Touch down your finger on the screen without lifting up or moving for about 2 seconds. This action will pop-up an special options list or active some special actions. Drag Touch down your finger on screen and move without lifting up to scroll options, switch screens and other contents displayed on screen. Flick Drag quickly and release, To scroll through a list or move quickly, flick across the touch screen, When you flick a long list, tap the screen to stop it from scrolling. Pinch In some applications (such as Maps, Browser, and Gallery), you can zoom in and out by placing two fingers on the screen at once and pinching them together (to zoom out) or spreading 14 3.2 Using Keys Power key: Press and hold Power key to open the power key menu, where you can power off, restart, set airplane mode, switch silent mode, vibration mode and standard mode. Volume key: Press the volume keys to change the ring volume (on the home screen) or the earpiece volume (during a call). Press the volume button will cancel ringtones when incoming calls. Menu key: Opens a menu with items that affect the current screen or application. When you want to exit from an application or do other operations, if there is no option button displayed on screen, try this menu key. Home key: Press Home to close any menu or app and return to the home screen. On the home screen, press and hold Home to show the last few apps you used, then tap an app to open it. Back key: Opens the previous screen you were working in. If the onscreen keyboard is open, closes the keyboard. 3.3 Home & Main menu screen When you sign in, the Home screen opens. It is your starting point to access all the features on your phone, 15 displays application icons, widgets,shortcuts, and other features. You can customize the Home screen with different wallpaper and display the items you want. In Home screen, tap the menu button to enter the Main menu screen where displays all the apps have been installed in your phone. 3.4 Screen Lock & Display off You can customize the phone’s display off time in menu Settings -> Display -> Sleep, without any operation to the phone in the set time, the LCD display will go off, short press any of Power key will wake up the display from off mode. If you wake up the display in more than 5 seconds after the LCD auto go off, it will be in the screen lock screen, there are 5 (Slide, Face Unlock, Pattern, PIN, Password) different ways to unlock the screen according to your settings under menu Settings -> Security ->Screen lock, by default Slide option is activated, with this option. 3.5 Using the on Screen Keyboard You enter text using the onscreen keyboard. Some applications open the keyboard automatically. In others, you touch a text field where you want to enter text to open 16 the keyboard. If you have installed the third party input method application, before you apply this input method, you should firstly enable it under menu Settings -> Language & input. 3.6 Status bar The Status bar appears at the top of every screen. It displays icons indicating that you’ve received notifications (on the left), icons indicating the phone’s status (on the right), and programs run in background, along with the current time. Notification Icons Status Icons Notification icons Battery is full Battery is partially drained Battery is low Battery is very low 17 Battery is charging No signal Signal strength 3G in use EDGE in use Connected to network Vibrate mode Ringer is silenced Speaker phone is on Phone microphone is mute Airplane mode Alarm is set Received notification icons New text or multimedia message New gmail message Missed call Call in progress 18 Call on hold Call forwarding is on Hangout is on Screenshot Captured FM is on Upcoming event GPS is on Song is Playing USB Debug is on Phone is connected via USB Uploading data Downloading data New e-mail Headset is plugged in The applications you installed in your phone may use their own notification icons while running in background. To open the Notifications panel: Drag the Status bar down from the top of the screen. 19 3.7 Using sensors Proximity Sensor detects how close an object is to the surface of the screen. This is typically used to detect when your face is pressed up against the screen, such as during a phone call. (While talking on the phone, the sensor detects talk activity and locks the keypad to prevent accidental key presses). Light Sensor lets you use the ambient light level to adjust the screen brightness/contrast. Gravity sensor detects your phone’s acceleration direction and takes responding actions according to the running application. Rotate the screen display when you rotate the device while using some features. To set the interface to keep the orientation when you rotate the device, select Settings -> Display -> Auto-rotate screen. Take actions according to the gravity’s real time orientation angle, typically used in games. Responding to your actions such swing the device in some applications. 3.8 Connectivity PC connections: 20 You can connect your device to a PC using a USB data cable. When you connect the device to a PC, you can synchronize data with an Android synchronization tool running at PC side, which you can download from google play store, and transfer data to and from your device directly. You can connect your phone to a computer with a USB cable, to transfer music, pictures, and other files between your phone’s SD card and the computer. To use this feature, you should follow the 4 steps below: 1. Use the USB cable that came with your phone to connect the phone to a USB port on your computer (you will receive a notification that the USB is connected). 2. Open the Notifications panel and tap USB Connected 3. Tap Turn on USB storage, then you can transfer files between PC and SD card. Bluetooth: Bluetooth technology allows you to connect your phone, using radio waves, to a compatible Bluetooth device within 10 meters (32 feet). With this feature on your device you can: 21 Transfer files to or from other Bluetooth available devices. Share multimedia files with other Bluetooth available devices. Remote control another Bluetooth available devices. Connect to computers and access the Internet. Before using the Bluetooth, you should first turn it on by selecting Settings -> WIRELESS & NETWORKS, and then tap the button next to Bluetooth to turn Bluetooth on, and You may also have to pair your phone with other Bluetooth devices by steps Settings -> WIRELESS & NETWORKS -> Bluetooth, your phone will searching for the devices automatically, and then select the device you want to connect to. Wi-Fi: Using Wi-Fi™ you can access the Internet wirelessly with your phone. You can browse the Internet at home (personal networks) or in public access zones (hot spots): Personal networks – usually protected. A pass phrase or a key is required from the owner. Hot spots – usually non-protected but often requires you to log on to the operator’s service before you get Internet access. 22 Follow the following steps to use your Wi-Fi: 1. Select Settings -> Wireless & networks -> Wi-Fi to turn it on. (The phone scans for available Wi-Fi networks and displays the names of those it finds. Secured networks are indicated with a Lock icon.If the phone finds a network that you connected to previously, it connects to it.) 2. If you want to connect to a newly found Wi-Fi network, tap on the network name under Settings -> Wireless & networks -> Wi-Fi . 3.9 Storage There are 2 kinds of user storage memory with your phone, phone built-in storage and SD card storage. The phone built-in storage is mainly used for installing application space (see install applications section) and other information data, user data can store in external MMC. Application programs and other data you downloaded from internet or transferred from other devices, camera captured photos, recorded videos or recording are all stored in external MMC, some files to be accessed by applications such as music, images, videos etc. must be stored in SD card memory or external MMC, you can also make your application installed in SD card (see install applications 23 section). 3.10 Contact Contacts gives you quick and easy access to the people you want to reach. When you first turn on your phone and sign into your Google Account, any existing Google contacts are downloaded to your phone. After that, your contacts are synchronized: any changes you make to your contacts on the phone or the web are made in both places, the next time you sync. Contacts from Exchange ActiveSync accounts are also synced in this way. Information about your contacts is shared with other applications, such as Gmail, Messaging, and so on. If you have more than one account with contact information, Contacts joins duplicates into a single entry. You can also manage that process manually 3.11 Call Make a call: Tap on dial button on Home screen or on menu screen to enter dial board screen, enter the phone number and tap send out button to make a call. 24 In contact list, tap & hold on a contact and select Call contact option, or tap the contact and then tap on button after entering another screen. In other applications such as message, call log, there are also options for make a call. Answer/Reject a call: When a call incomes in, drag to the right until it reaches the green dot to answer a call, drag to the left until it reaches the red dot to reject an incoming call. During a call conversation, press the side volume key to adjust volume, tap at bottom to open dial pad, tap to open the loudspeaker, etc. 3.12 Messaging You can use Messaging to exchange text messages (SMS) and multimedia messages (MMS) with your friends on their mobile phones. You can send text (SMS) messages of up to 160 characters to another mobile phone. If you keep typing after the limit, exchange to two message automatically. Multimedia (MMS) messages can contain text and a picture, a recorded voice, an audio file, a video, or a picture slideshow. 25 Messaging automatically converts a message into a multimedia message if you send it to an email address instead of a phone number, add a subject, or attach a media file. Press on Main menu screen to access message. When new message received, the message notification icon will be shown on the notification bar, drag down the bar and tap on the message to read. 3.13 Multimedia Camera is a combination camera and camcorder that you use to shoot and share pictures and videos. Pictures and videos are stored on the phone’s SD card or phone. Gallery is used to view pictures and play videos that you’ve taken with Camera, downloaded, or copied onto your SD card or phone. You can perform basic editing tasks on pictures and set them as your wallpaper or contact picture. Music collects all audio files from your SD card or phone to play. Videos collects all video files from your SD card or phone to play. 3.14 Applications Based on the Android platform, your device’s functionality 26 can be extended by installing additional applications, These applications can be downloaded from internet such as Android Market. Three ways to install applications in your phone: Directly down load from internet, when the downloading task is completed, select the application in your download list to install. Note: How to install may depend on the browser you use. Download applications to your PC local disk, and install from PC by running phone suite. If have a file manager installed in you phone, you can transfer or download applications to your SD card, find out the application you want to install under path ./sdcard/.. and tap on it. Note: To install applications downloaded from websites other than Android Market, you must select Settings ->Security -> Unknown sources. 27 Warning: Applications downloaded from internet can be from unknown sources. To protect your phone and personal data, download applications only from trusted sources such as Android Market. To manage applications: Enter Settings -> Apps -> ALL, you can access all the applications. Tap on an application under each tag list, it will enter the Application info screen, along with manage buttons. Force stop to close a running application, it is stopped without confirmation. Uninstall to uninstall applications that you don’t want to use any more, and free the storage space that they occupied. Clear data to delete user data about an application such as accounts, databases, settings and so on. Move to SD card/phone to move applications installed in phone/SD card to SD card/phone memory. Clear cache to delete temporary data for this application stored in phone. 3.15 GPS 28 With the global positioning system (GPS) receiver in your phone, you can find your location with in a accuracy about 50 meters. To use this facility, you should install applications to support, such as google map. 3.16 SWYPE keyboard Swype is a fast way to enter text. It lets you enter a word by drawing through letters. Put your finger on the first letter of the word and draw a path from letter to letter, lifting up after the last letter. Swype will insert spaces where necessary. The Swype key The Swype key is the key with the Swype logo on it. Press and hold the Swype key to access Swype Settings. The Swype key is also used to initiate many of the Swype gestures. Swype Gestures Swype Gestures are shortcuts on the keyboard to quickly accomplish common tasks Getting to the edit keyboard To get to the Edit keyboard, Swype from the to the Symbols key (+!=) on the keyboard. Getting to the number keyboard To quickly get to the 29 Number keyboard, Swype from the to the number 5. Hiding the keyboard To easily hide the keyboard, just Swype from the Swype key to the Backspace key. Turn off automatic spacing Suppress automatic spacing before the next word by Swyping from the Space key to the Backspace key. Editing the case of a word Change the case of a word after you enter it by tapping the word and then swyping from the to the Shift key . A Word Choice List with capitalization options will display, allowing you to choose lower case, Capitalized, or ALL CAPS. Punctuation A simple way to enter punctuation is to Swype from the question mark, comma, period, or other punctuation to the Space key instead of tapping it. Select All, Cut, Copy and Paste Select All: Swype from the to the 'a' Cut: Swype from the to the 'x' Copy: Swype from the to the 'c' Paste: Swype from the to the 'v' Application shortcutsGoogle Maps: Swype from the to the 'g', then 'm' Switching to the last language usedWhen using multiple languages, a fast way to switch back to the previous language is to Swype from the to the 30 Entering double letters To improve accuracy when entering double letters, scribble slightly or make a loop on the letter. For example, to get the "ll" in "hello", scribble on the "l" key. Choosing a word To accept the suggested default word in the Word Choice List, just keep Swyping. Otherwise, scroll through the list by dragging your finger, and select the word you want. Capitalizing words Capitalize a word by Swyping your finger from the first letter up past the top of the keyboard and, without lifting, gliding your finger back down to the next letter of the word. Change the case of a word after you enter it by tapping the word and then swyping from the to the Shift key Swype can also guess your word when you tap only a few letters. Languages To switch languages from the keyboard: Press and hold the space bar. Select your desired language from the A Word Choice List with capitalization options will display, allowing you to choose lower case, Capitalized, or ALL CAPS. 31 To enter CAPS Lock mode, just double-tap on the Shift key . Automatic spacing Swype automatically inserts a space between words when you Swype the next word in the sentence. You can turn the auto-spacing feature on or off in Swype Settings. Auto-spacing can be turned off for one word by Swyping from the Space key to the Backspace key. Replacing a word Replace a word by tapping on it, then select the word you want from the Word Choice List, or simply highlight the word and Swype a new word. The new word will replace the incorrect one. A word can be highlighted by tapping the word and hitting the or double tapping the word. Bouncing between letters Sometimes avoiding letters when Swyping ensures you get the word you want the first time. For example, "tip" and "top" could be drawn with the same path - but notice, you don’t have to move from letter to letter in a straight line. Avoiding the "o" when swyping your finger to the "p" ensures that the word "tip" is first in the Word Choice List. Alternate characters 32 Press and hold on a key to bring up a list of alternative characters for that key, such as accented letters like é and ñ, symbols like @ and %, and numbers. Tap the Symbols key (+!=) to be taken to the Symbols keyboard. Note that ALL of the characters are Swype-able from the main keyboard (whether you can see them or not). You can Swype using this view of the keyboard, but you will only get words that have at least one number or symbol. Adding and deleting words Swype intelligently adds any new words you use to your Personal Dictionary. You can also add a word by highlighting it and tapping the . Tap the prompt that appears to add the word. To delete a word, press and hold the word in the Word Choice List, and then tap OK in the confirmation dialog. Personalization Swype can quickly add words to your dictionary from Facebook, Twitter, and Gmail. To personalize Swype: 1. Press and hold the . 2. From the Swype Settings menu, select Personalization. 3. Select from the personalization options and enter your credentials if prompted. 4. You can personalize Swype from one or all sources 33 Speak You can speak to enter text content for everything from text and email messages to Facebook and Twitter updates. Punctuation No need to manually add punctuation. Just say the punctuation you want and continue. Try this: 1. Press the voice key and start speaking. 2. What you say: Dinner was delicious exclamation point 3. What you get: Dinner was delicious! Voice input is not available on some keyboards Write You can use your finger to draw letters and words and Swype will turn it into text. You can draw letters from left-to-right or on top of each other. Press the ABC / 123 to toggle between letter and symbol mode. Enable handwriting 1. Press and hold the Swype key to open Swype Settings 2. Select Preferences and check the "Enable Handwriting" option 3. Return to the Swype keyboard and press the handwriting key. 34 4. Draw letters with your finger on the handwriting area. 5. Tap the space bar in between each word Multi-Touch Gesture The multi-touch gesture allows you to complete simple tasks, such as capitalizing words or letters. 1. Draw some lowercase letters on the drawing pad 2. After entering the characters, slide two fingers upwards on the writing area 3. The handwriting feature will recognize the multi-touch gesture and capitalize the letters 4 Handwriting is not available on some keyboards. Tap Traditional form of manual keyboard input. Tap input on the Swype keyboard is made easier and more efficient by some helpful features: Sloppy Typing Correction You don’t have to tap each letter perfectly. Just try your best and Swype will intelligently provide word suggestions. Word Completion Swype can also guess your word when you tap only a few letters Languages 35 To switch languages from the keyboard: Press and hold the space bar. Select your desired language from the popup menu. Change your active languages To change which languages are available from the space bar: 1. Press and hold the . 2. From the Swype Settings menu, select Language Options 3. Check or un-check your desired set of languages Swype Connect Swype Connect allows us to deliver updates and powerful functionality right to your device! While Swype Connect will work over 3G, we always recommend finding a WiFi connection. Language downloads Adding additional languages to Swype is easy: 1. Press and hold the and select Language Options. 2. From the Language Options menu, select Download languages. 3. Click on a language and your download will start automatically. 4. Swype Connect is not available on all keyboards. 36 More help For more help with using Swype, view a Swype User Manual and Swype Tips and Videos at www.swype.com, or check out the Swype Forum online at forum.swype.com. 37 4. Safety Information and Notices Using the Mobile Phone and Charger Danger: Only use authorized battery and charger. Using other brands may cause battery leakage, overheating, explosion or even fire. Caution: Keep the phone away from dust, water and damp areas. Dust, water or other liquids may cause overheating, electrical leakage, and/or phone failure. The phone, battery, charger and AC adapter are not waterproof. Keep them away from rain and liquid. Warning: Do not bump, shake or tamper with the phone or charger. This may cause battery leakage, overheating, explosion or even fire. Do not place the battery, phone or charger near a microwave or high-voltage device. This may cause battery leakage, overheating, explosion or even fire; also prevent the phone and AC adapter from overheating, smoking or short circuiting. Do not use the phone around volatile oil. This may cause 38 fire, breakdown or damage. To avoid any damage or breakdown, do not disassemble the phone, battery, charger or internal components by yourself. Using the Mobile Phone Warning: Do not use the phone while you are driving. Pull over and stop your automobile to dial or listen to a phone call. Usage of mobile phones in aircrafts or hospitals is prohibited. Switch the phone off to prevent interference with electronic medical devices. Follow any rules or regulations in such places. Do not use the phone at a gas station, near fuel or near chemicals. Do not use the phone near electronic medical devices such as hearing aids, pacemakers and auto-control devices such as fire detectors and automatic doors. If you have to use your mobile phone near an electronic medical device such as a pacemaker, please contact your manufacturer or dealer for information about preventing interference. Caution: Electronic systems in automobiles such as anti-lock 39 brakes, speed control, or fuel spraying systems, are usually not influenced by wireless devices. Manufacturers of these systems will tell you whether they are provided with good screening functions. If you suspect that an automobile failure is caused by a wireless wave, please contact your automobile dealer. Avoid using your phone in crowded places. Do not store your mobile phone near or with a credit card, disk or other magnetic materials. This may effect information stored on your phone. Keep your phone away from pins. Pins can be absorbed by the phone’s receiver magnet, which may cause harm. If you intend not to use your mobile phone for a long period of time, please remove the battery from the phone. Leaving the battery inside the mobile phone for a long period of time may cause moisture to the battery, and it can damage the mobile phone or the battery. Using the Battery Danger: Do not dispose of the battery into a fire. Doing so may cause battery explosion or even fire. If you have difficulties installing the battery, do not force the installation. This may cause battery leakage, overheating, explosion or even fire. 40 Keep metal objects away so they do not come in contact with the battery or its connectors as it may cause the battery to short circuit, overheat or explode. Do not weld the polarities of the battery directly together. This may cause battery leakage, overheating, explosion or even fire. Battery liquid is severely harmful for your eyes. If battery liquid gets in your eyes, do not rub them. Instead, wash your eyes with water first and then go directly to a doctor for help. Do not use or store your phone in high temperature areas. This may cause battery leakage, overheating, explosion or even fire. Warning: Replace the battery when the normal usage time begins to decrease or if you notice the battery is overheated or has changed shape or color. If battery liquid leaks onto your skin or clothes, immediately wash the affected parts with water. If the battery begins to leak or emits a strange odor, properly dispose of the battery according to local regulations. Do not throw it into a fire. Caution: Do not leave the product or its battery inside a vehicle. This 41 may damage the product, overheat the battery, or pose a risk to the vehicle. Using the Charger Danger: Only use the charger that came with the phone. Using a different charger may cause the phone to breakdown or explode. If the charger short circuits, a fire may occur. Do not use a damaged, worn or broken charger. This may cause a fire. Clean dust away from the power socket to avoid the possibility of a fire. Do not store the charger near any liquids. If liquids spill onto the charger it may cause it to overheat or breakdown. If liquid does spill onto the charger, immediately unplug the power cable to prevent overheating, fire or another type of breakdown. Do not use the charger in places with high humidity like a bathroom. This may cause a fire or other breakdown. Do not touch the charger, power cable or socket with wet hands. This may cause an electric shock. Requirements for Mobile Phone 42 Avoid using your mobile phone in extremely high or low temperatures. It is recommended that you do not use your mobile phone near a telephone, TV set, radio or other radio frequency sensitive devices. Requirements for the Battery When not in use, store the battery in a cool, well-ventilated place with sunshine. If you will not be using the mobile phone for an extended period of time, charge the battery on a regular basis to avoid battery breakdown. The phone battery wears out fast. If charging the battery does not improve its performance, it is time to replace the battery. Properly dispose of the battery according to local regulations. Do not throw it into a fire. Caution: Risk of explosion if battery is replaced by an incorrect type. Dispose of used batteries according to the instructions. Requirements for the Charger and AC Adapter Please confirm if the environment temperature is within the range of 0ºC ~40ºC while charging. Cleaning and Maintenance 43 The mobile phone, the battery and the charger are not waterproof. Do not use them in places with high humidity like a bathroom and also avoid spilling any liquids on them. Use a soft cloth to clean the mobile phone, the battery and the charger. Do not use alcohol, diluted liquid or benzene to clean the mobile phone. If dust gets in the sockets the phone can be damaged, short-circuit or even the lose the ability to be re-charged. Be sure to clean the socket regularly. 44 5. Specific Absorption Rate (SAR) information Your phone has been designed to comply with applicable safety requirements for exposure to radio waves. These requirements are based on scientific organizations through periodic and thorough evaluation of scientific studies. These guidelines include safety margins designed to assure the safety of all persons, regardless of age and health. • The radio wave exposure guidelines employ a unit of measurement known as the Specific Absorption Rate, or SAR. Tests for SAR are conducted by using standardized method with the phone transmitting at its highest certified power level in all used frequency • • bands. This phone is designed to meet the relevant guidelines for exposure to radio waves. The SAR limit recommended by the international Commission on Non-Ionizing Radiation Protection (ICNIRP), which is 2 W/kg averaged over ten (10) • grams of tissue. The SAR for this model is as following: 45 Band Position SAR 10g(W/kg) GSM900 Head 0.62 GSM1800 Head 0.66 SAR data information for residents in countries/ regions that have adopted the SAR limit recommended by the Institute of Electrical and Electronics Engineers (IEEE), which is 1.6 W/kg averaged over one (1) gram of tissue. 46 6. Battery Informations Type Li-polymer Capacity 1780 mAh • The battery life depends on many factors, including • • • • the SIM card, network conditions, settings, usage and enviorenment. Making calls, turning on the backlight and music player will consume more battery power. The standby time is shorter when the network is not available than in the standard status. For power saving, the backlight turns off automatically if your phone stands idle for an assigned time. The performance of battery varies with the charging status, temperature, local radio wave and backlight status. 47 7. Condition Of Waranty 1. Mobile phone device, portable charger, charger, wireless headset are in-warranty of 12 months after the date of purchase. 2. Battery, headset, memory card, USB data connector are in-warranty of 6 months after the date of purchase. 3. This warranty shall apply to mobile phone and accessory under “i-mobile” brands that are purchased from Shop namely, I-mobile by Samart and Authorized Distributor or Authorized Service Center as appointed in Thailand only. 4. The condition of the warranty for mobile phone and accessory that are purchased in other countries, except Thailand. It shall be applied in accordance with the applicable law. For Thailand, the purchaser acknowledges the end of warranty period as stated in the warranty sticker or purchase's record of i-mobile system. 5. Within the warranty period, maintenance or parts replacement is free of charge. Should be noted that i-mobile reserves the rights no return the damaged part. 6. i-mobile provides warranty for mobile phone and accessory with the terms and conditions that are stated 48 in the law excluding the commerce, product satisfaction, lost of benefit or expected profit, loss or damages from the violation of personal rights in conversation, and working discontinuance or loss of information arising of the use or inability to use. 7. In cellular network / signal and sounds that are used with mobile phone and accessory is the service of independent operators, not i-mobile. Therefore, 8. i-mobile will not be responsible for the working process, the readiness of the service, and the area covered. Any mobile phone and accessories that are already repaired or had parts replacement, the warranty period will continue from the remaining warranty onward or 60 days from the repaired date whichever is longer. 9. Customer has to pay for the repair cost and cost of replacement parts provided that the said repair are not in the warranty conditions. 10. The warranty sticker on the mobile phone must not be torn, tattered, scraped or crossed out. 49 THIS WARRANTY IS VOID UNDER THE FOLLOWING CONDITIONS 1. Mobile phone and accessory are damaged due to the abnormal use, improper use, being stored in the damped or overheated area, or other inappropriate environment, the interference that can cause damage, including unforeseeable accident, spill with liquid or food, or any actions that cause damages to mobile phone and accessories. 2. Mobile phone and accessory are damaged due to the natural disaster. 3. Mobile phone and accessory are repaired, changed parts, adjusted, modified, connected, customized without any authorization by i-mobile. 4. Using of mobile phone and accessory together with, or connect with the mobile phone or accessory that are neither provided nor certified by i-mobile including any accessory are inappropriate to use together with mobile phone and accessory. 5. Small alteration in the brightness and color on the screen might occur in each mobile phone and accessory, might results in bright or dark dots on the screen. This is called as pixel defect. It can occur when these pixels are malfunction and cannot be modified. 50 The Pixel defect of 2 pixels is considered acceptable. Small alteration in a picture taken by a camera might occur in each mobile phone and accessory is considered normal and it is not the camera module to be deemed as malfunction. 6. Editing, scarping, crossing over the IMEI number of the mobile phone or accessory, including the warranty number will be deemed as the termination of the warranty. 7. Damaging of the label, warranty sticker on the mobile will be deemed as termination of the warranty. 8. i-Mobile will not assure provided that the software from i-mobile will be up to your wishes or the working process of the software will not be discontinued or flawless. i-mobile will not assured provided that the additional software to download or install by you for the purpose of work or entertainment will be up to your wishes without mistakes and flaw that is out of control of i-mobile. 9. The warranty and responsibilities of i-mobile are not covered the malfunction of any software or access of information from virus, or unauthorized access, which cause the damage in the banking transaction, E-banking, or any important information, or using the mobile phone illegally. 51 10. The warranty and responsibilities of i-mobile are not covered the malfunction of any software or access of information from virus, or unauthorized access, which cause the damage in the banking transaction, E-banking, or any important information, or using the mobile phone illegally. 11. The warranty will not cover the loss of personal information during the use or during the installation, software remove, including applications, songs, videos, and any memberships that Customer has already purchased. 12. The warranty will not cover the responsibility of the loss of any personal information during the repair at Authorized Service center of i-mobile, including the applications, songs, videos, and any memberships that Customer has already purchased. 13. The warranty will not cover the damage that occurs from the use of any device under “i-mobile brand” with other products which are not the product of i-mobile. 14. The warranty will not cover any expenses in the co-ordination with i-mobile for solving the problem and the process of delivering for examination and repair service. 52 8. SW upgrade (OTA) Notice: Before testing, please make sure: 1. WIFI is available. 2. Battery power is more than 40%. Check the firmware: Check the firmware version before the System Software Update. Settings -> About phone -> Build number Pic. 1 53 Android Mode: 1. Click the icon “System Software Update” in Application Manager(Pic.2) System Software Update initializing interface will pop up (Pic.3) Pic. 2 Pic. 3 2. Pic.3->Press Yes, will try to connect to server, 3 cases will happen: 54 Case 1: Connect to server successfully, a new firmware is found on server. Pic.4->Pic.5, will show you the information and description of the new firmware package. Pic. 4 Pic. 5 Case 2:There is no new firmware available on server. It will pop up” The current system is up-to-date”, if you press ”OK”, the application will exit. (Pic.6) 55 Pic. 6 Case 3:Fail to connect to server. It will pop up "Error occurred" , then if you press ”OK”, the application will exit. (Pic.7) Pic. 7 56 3. Pic.5->Press Yes, will show up the downloading interface, or if you press ”Cancel”, the application will exit. Pic. 8 4. Updating interface: 4.1 Update Now->Update confirmation interface. If you press ”Yes”, the phone will reboot, enter the Recovery Mode.(Pic.9->Pic.10->Pic.11) 57 Pic. 10 Pic. 9 Pic. 11 58 4.2 Update later: Will exit the application. When you enter the application next time, will show you Step 4 directly. Recovery Mode: Some codes and a progress bar will show in phone screen. Phone will reboot after the recovery is finished. Then the phone will enter the Android mode again. Android Mode: Report server update statues: System software has been successfully updated. Pic. 12 59 Check the firmware again: Check the firmware version again after the System Software Update. Settings -> About phone -> Build number Pic. 13 60